Mar 8, 2016 | Cards, Club, Occasions |
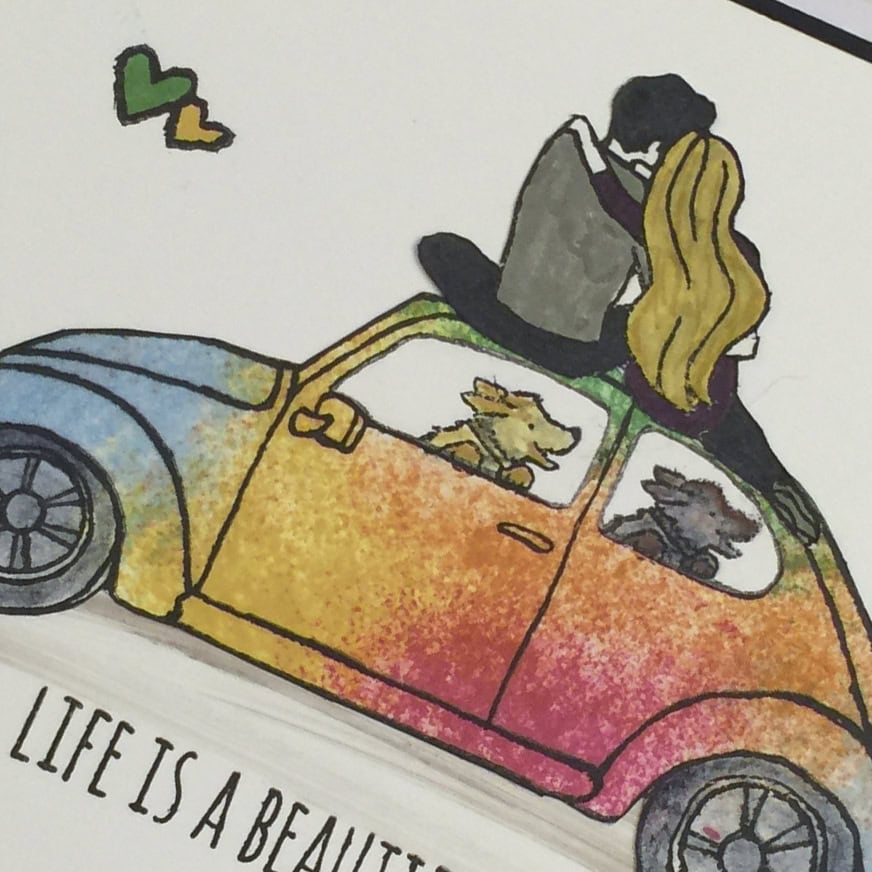
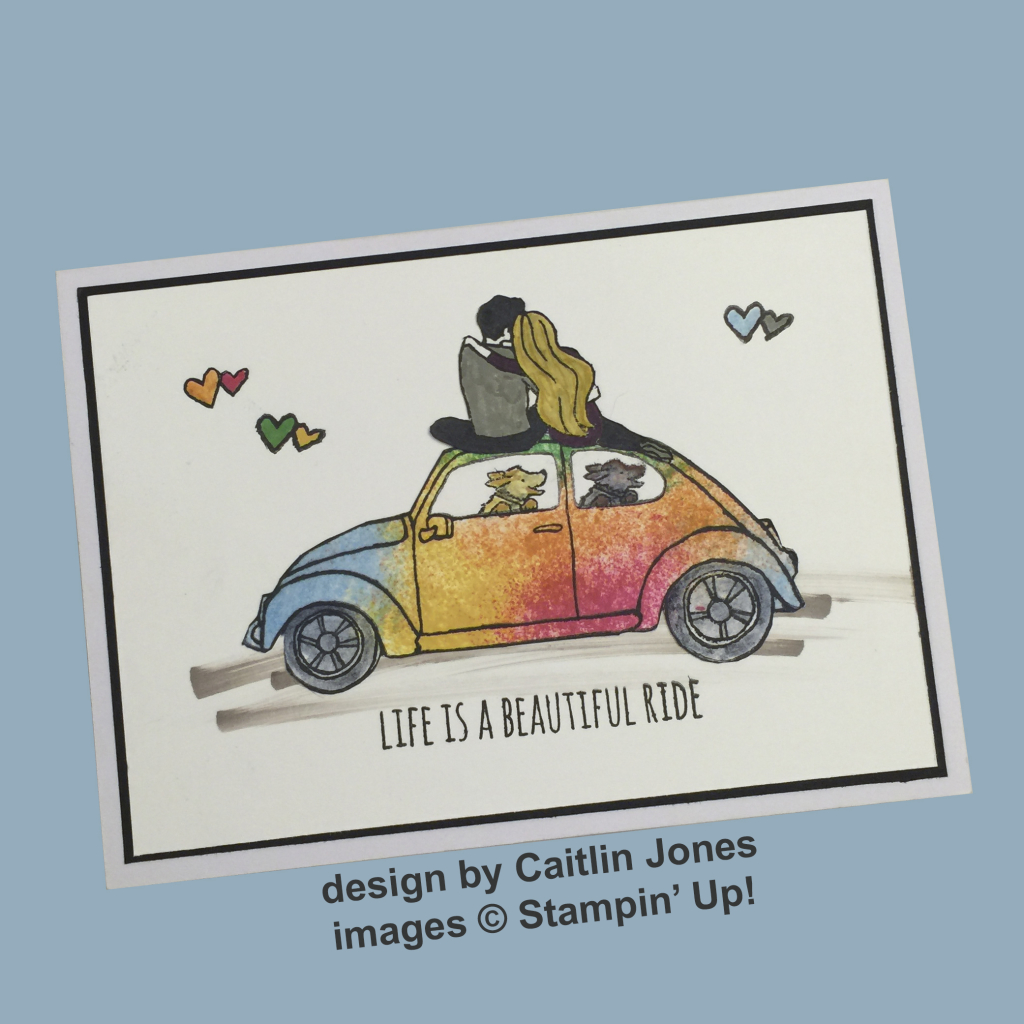
Today I am excited to share with you a card made by one of my Stamp Club members, Caitlin Jones. She is extremely talented in the design of, and skilled in the execution of, handmade cards. She brought this card to show us at our last meeting, and I just had to show it off.
She used a mostly-dry wet wipe to tie-dye the car image from the Beautiful Ride stamp set, then fussy cut it and the people. Didn’t she do an outstanding job?
Caitlin is a delight and I’m thrilled to have her in my club. I hope she’ll sign up one day and share her talents with more people!
Thanks for stopping by today, and Sweet Stamping!

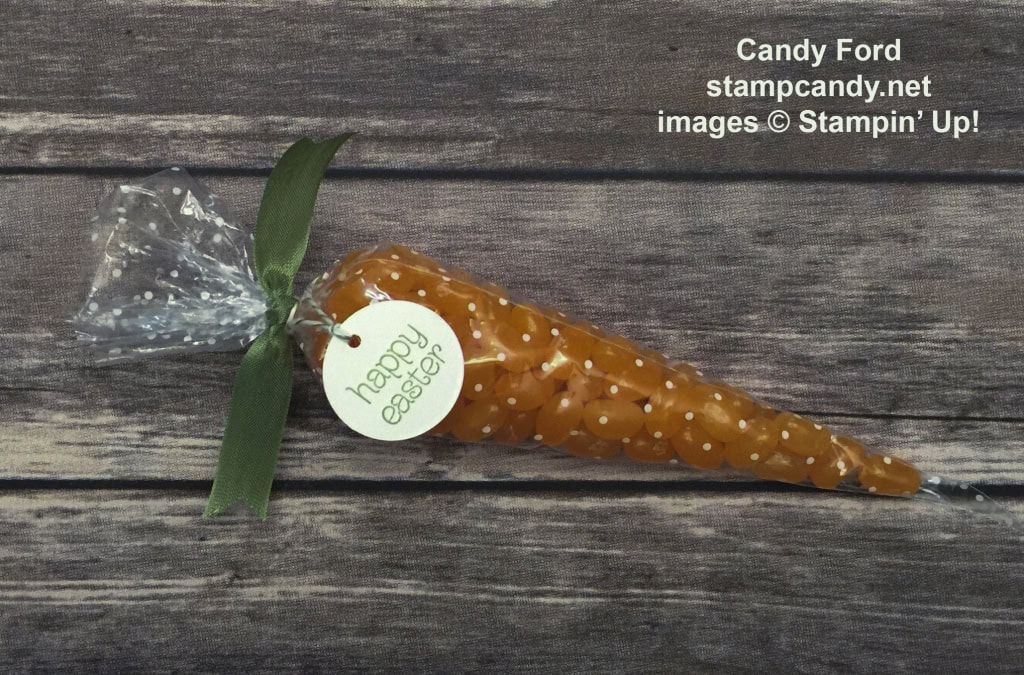
Mar 7, 2016 | Bags, Club, Food, Gifts, Occasions, Tags |
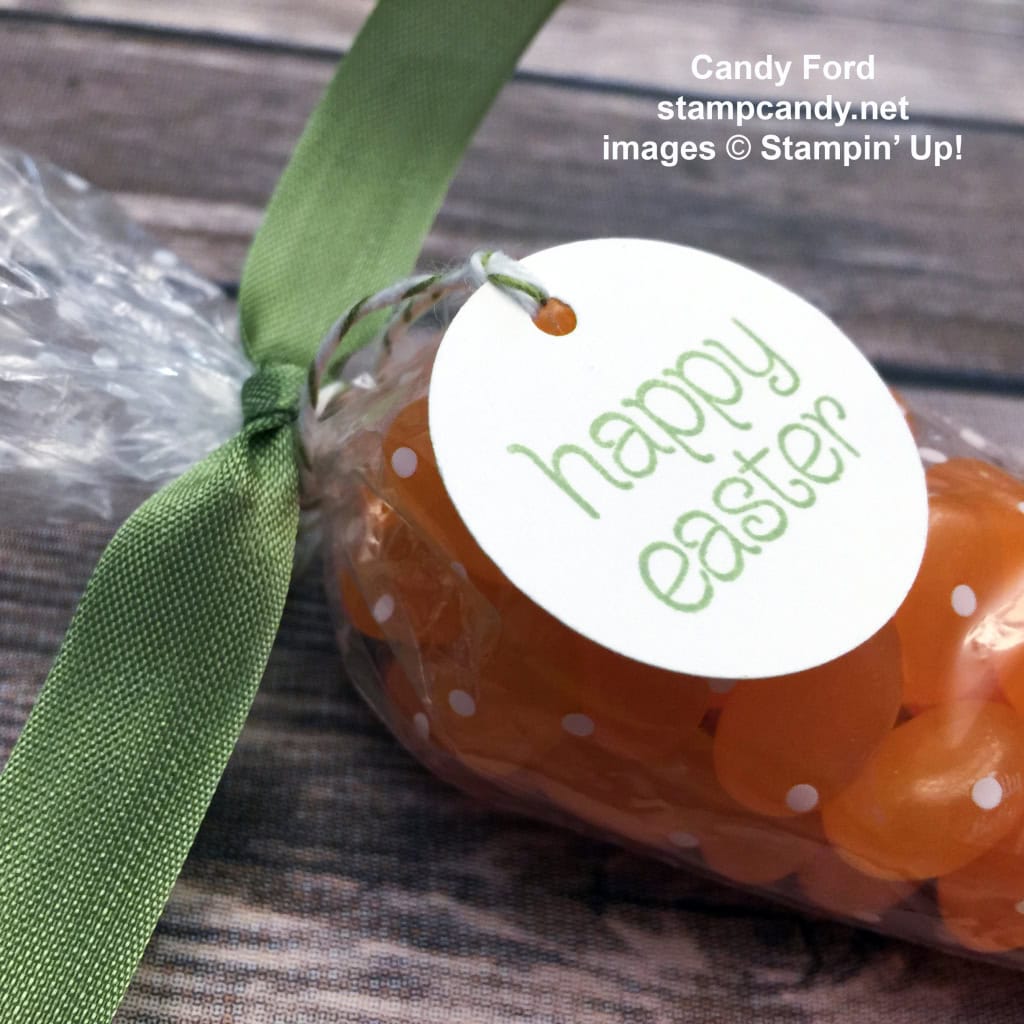
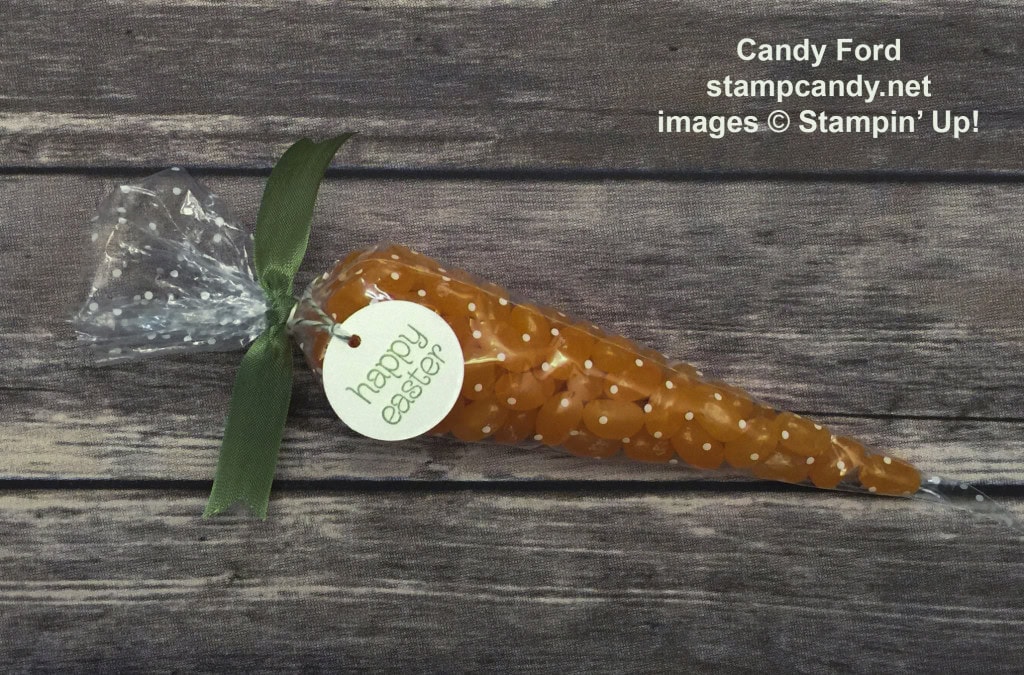
No, it isn’t an exotic dish you’d see on one of those cooking challenge shows. It’s much simpler. It’s a Polka Dot Cone Bag filled with Tangerine flavored jelly beans, and tied with Wild Wasabi Seam Binding and Old Olive Baker’s Twine, to look like a carrot.
This is the third and final Easter project from the March Stamp Club gathering. To see the previous two, click here and here.
This is just about as quick and easy as they come. Put a level 1/3 cup of jelly beans, or other small treats, into the bag. Twist the top to close, and tie with a piece of Wild Wasabi Seam Binding Ribbon.
Stamp the sentiment (we used this one from the Circle of Spring stamp set) on a piece of Whisper White card stock and cut it with the 1-1/4″ Circle Punch. Punch a small hole with the 1/8″ Circle Punch to make a tag. Use Old Olive Baker’s Twine to tie the tag onto the bag.
And that’s it! These provide a lot of bang for the buck. They’re super quick and easy, and make wonderful favors.
Here’s what we used:
Thanks for stopping by today, and Sweet Stamping!
Mar 5, 2016 | Boxes, Club, Gift Wrap, Gifts |
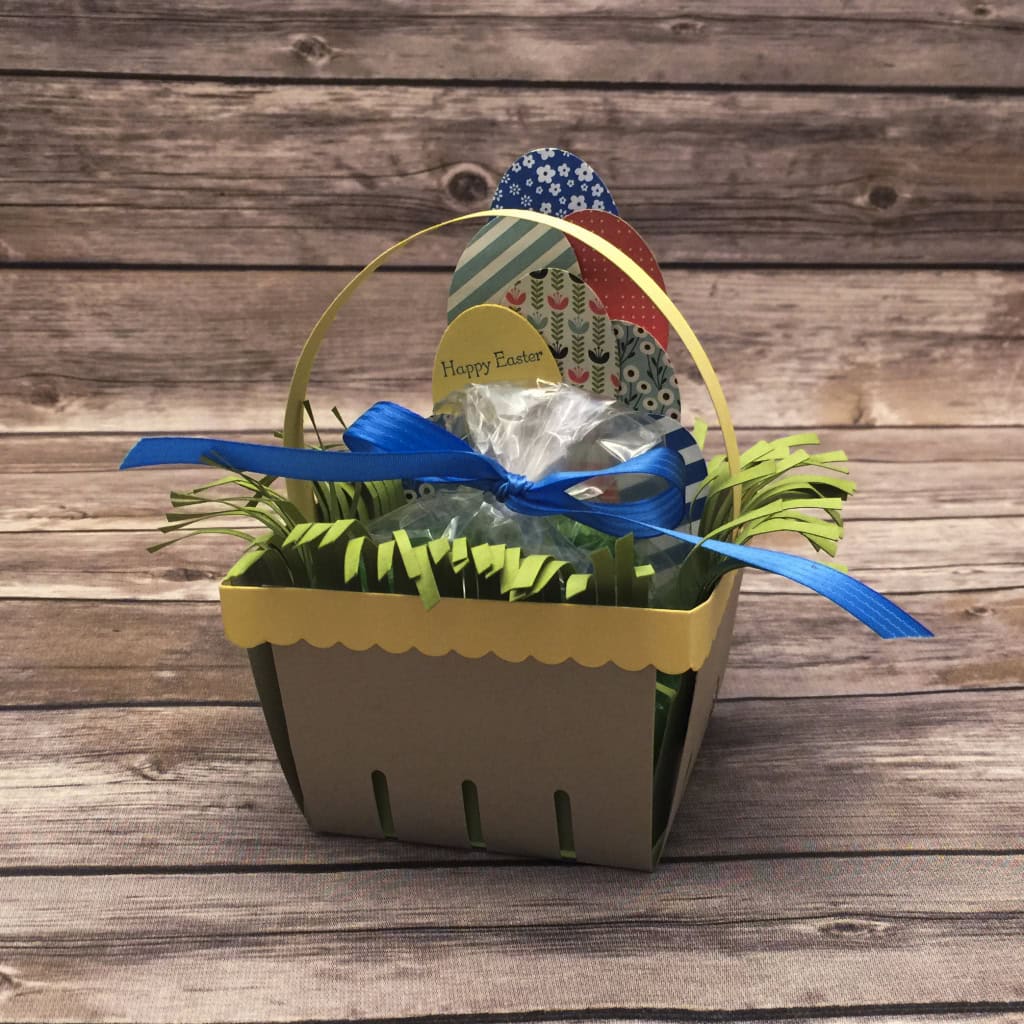
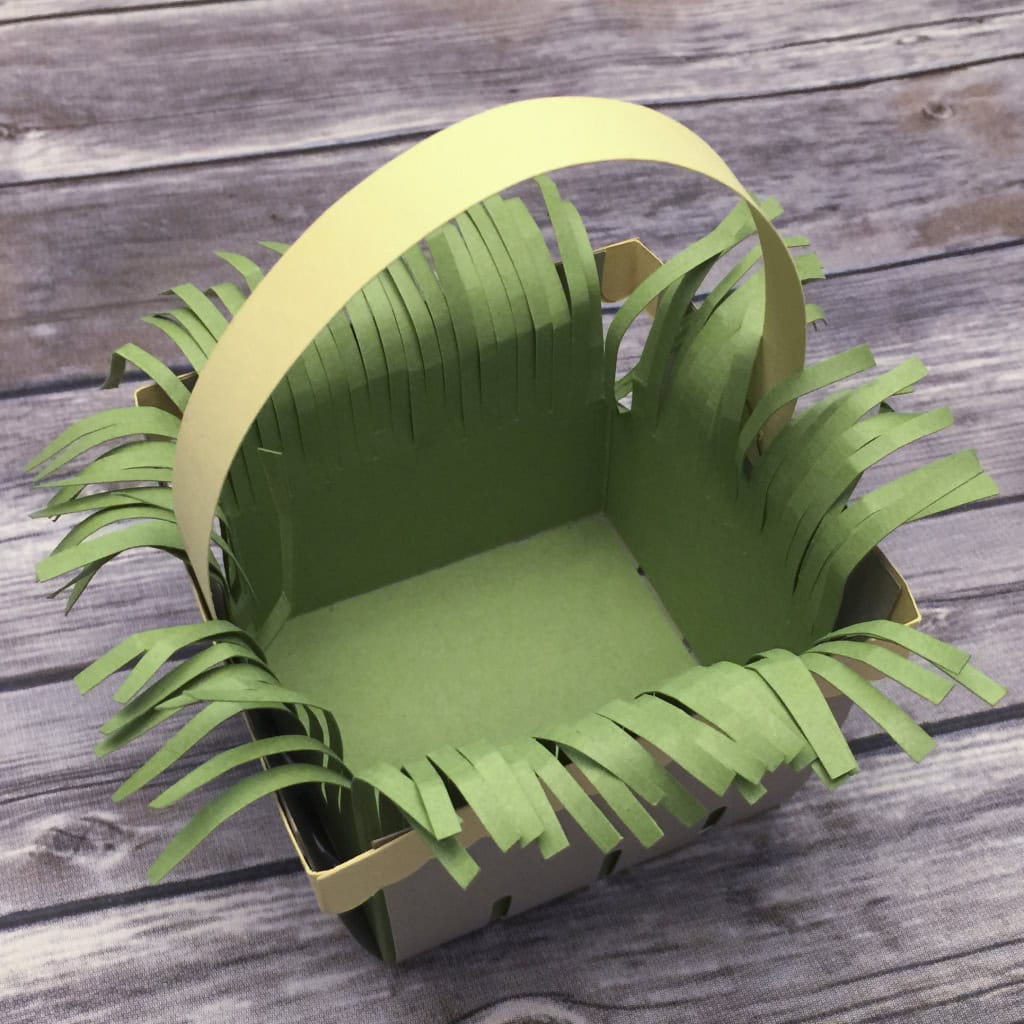
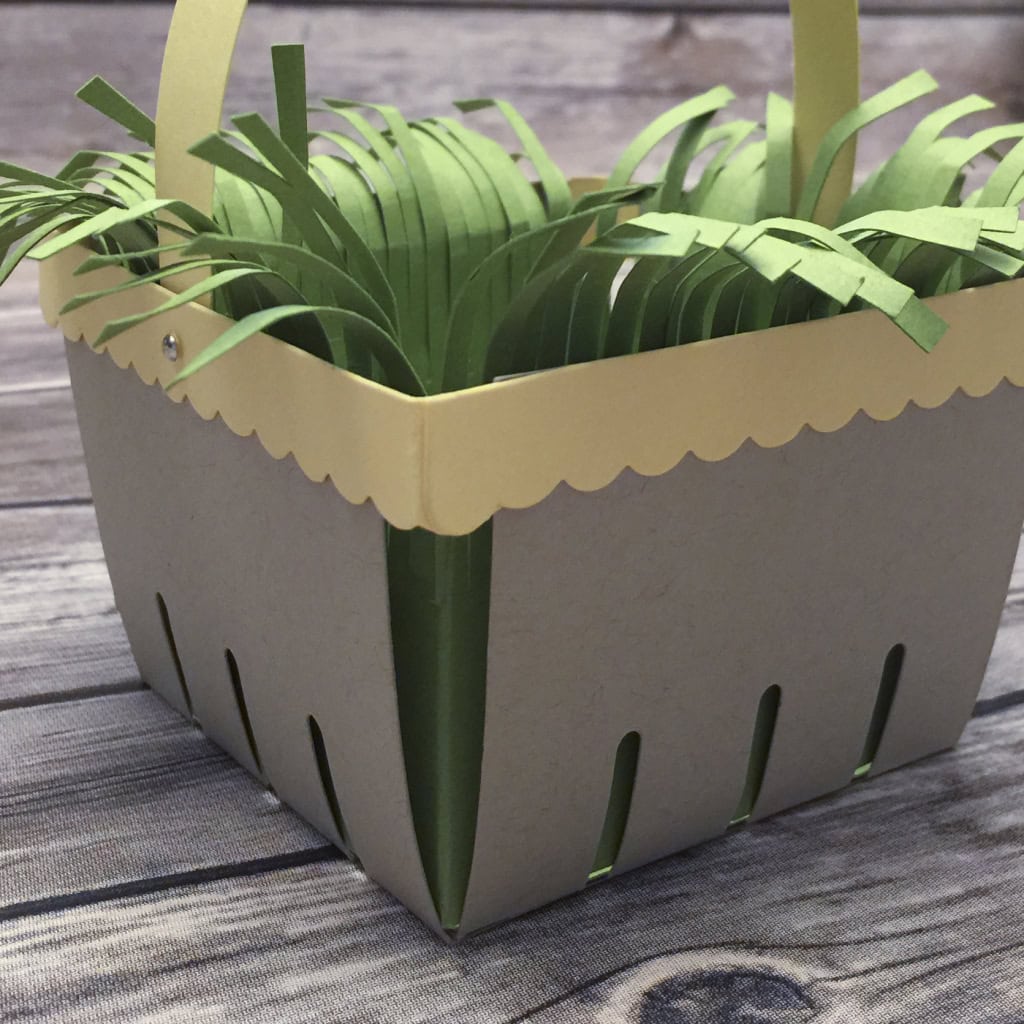
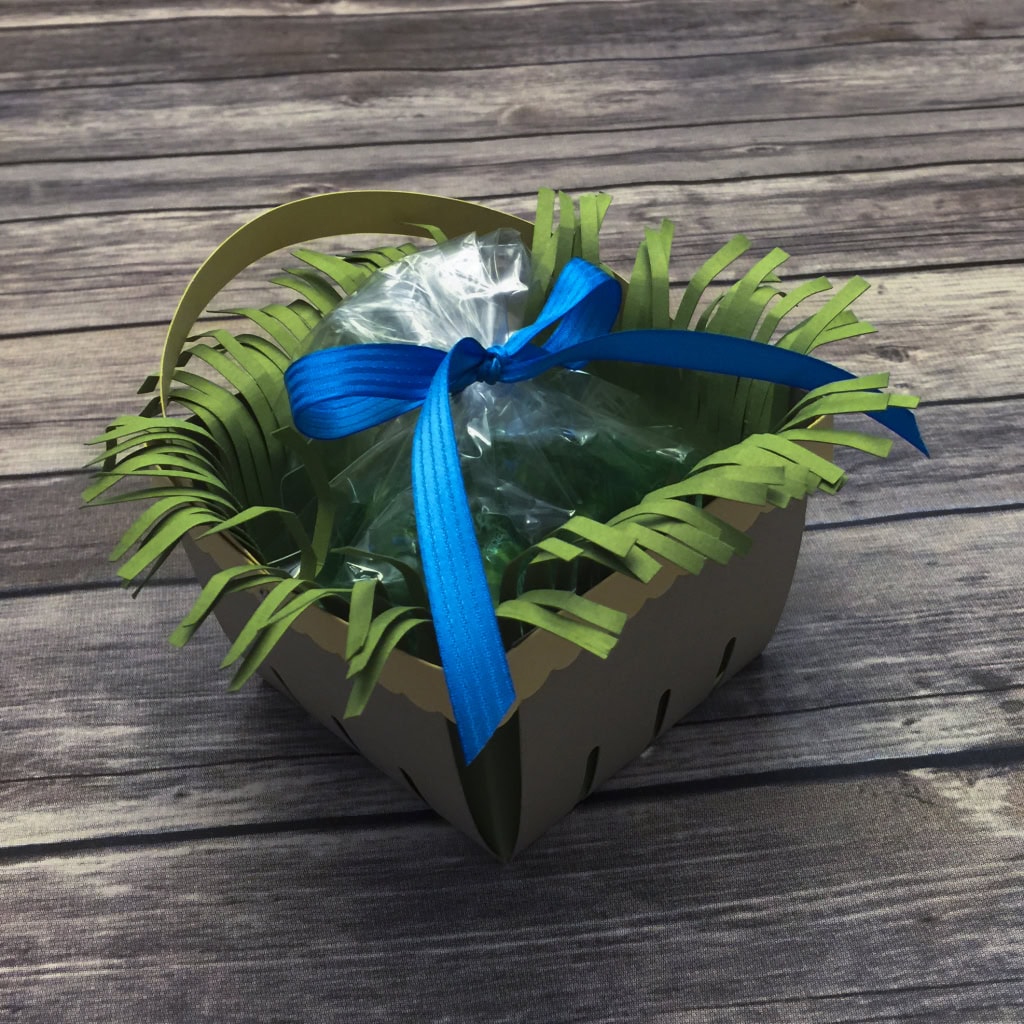
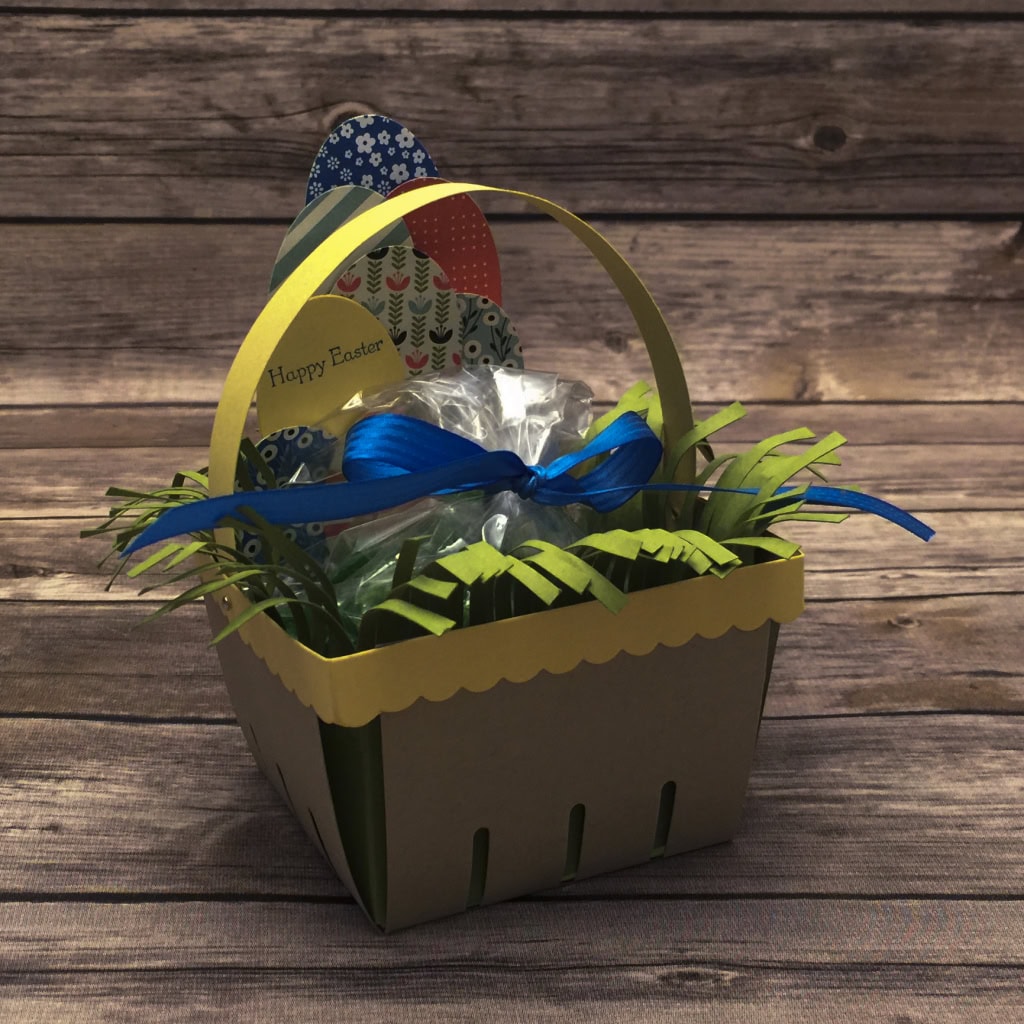
Today I’m sharing with you another project we made during our March Stamp Club gathering. You can see the first project here. This Easter Basket made with the Berry Basket Bigz Die is much easier than it might look.
First we assembled the basket using Crumb Cake card stock for the body and So Saffron CS for the handle and trim. We attached the handle with Tiny Brads, so it can be rotated out of the way to fill the basket. The Piercing Tool and Stampin’ Pierce Mat are perfect for creating the tiny holes.
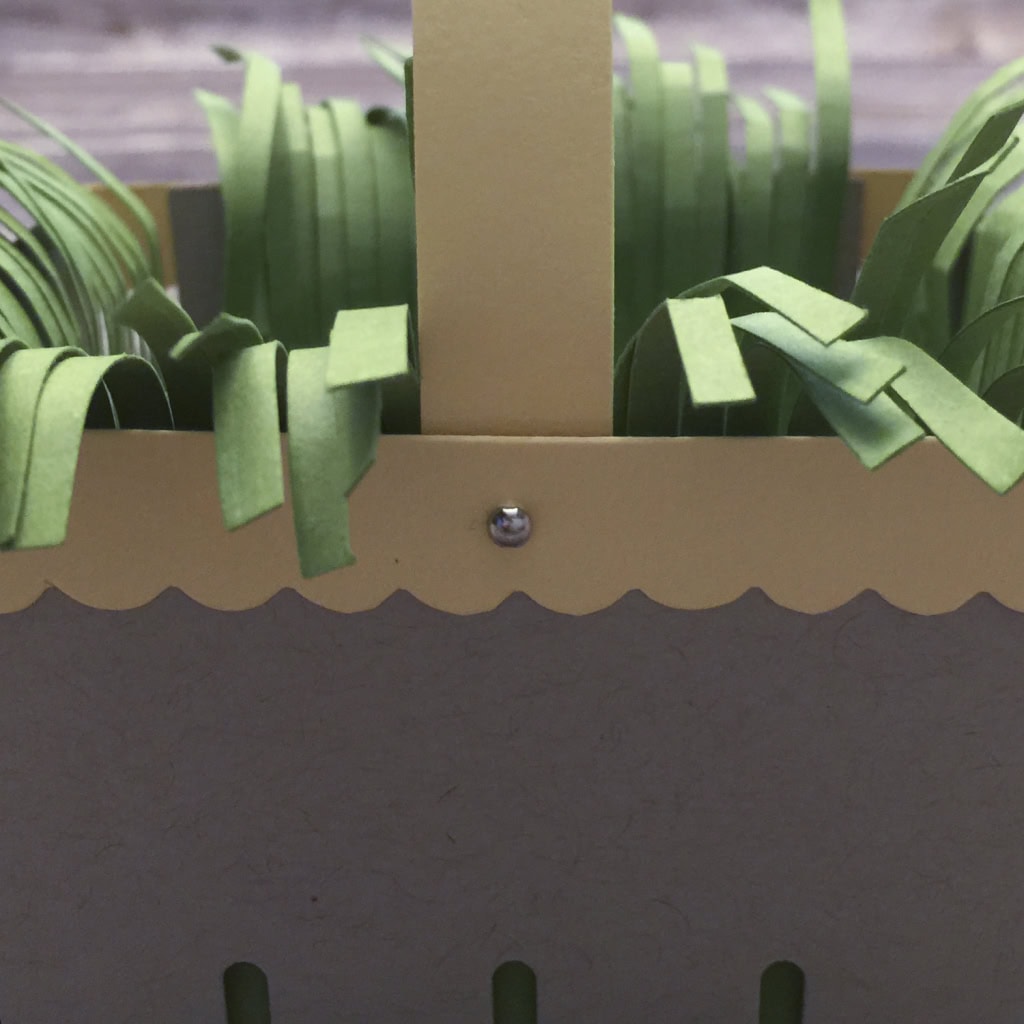
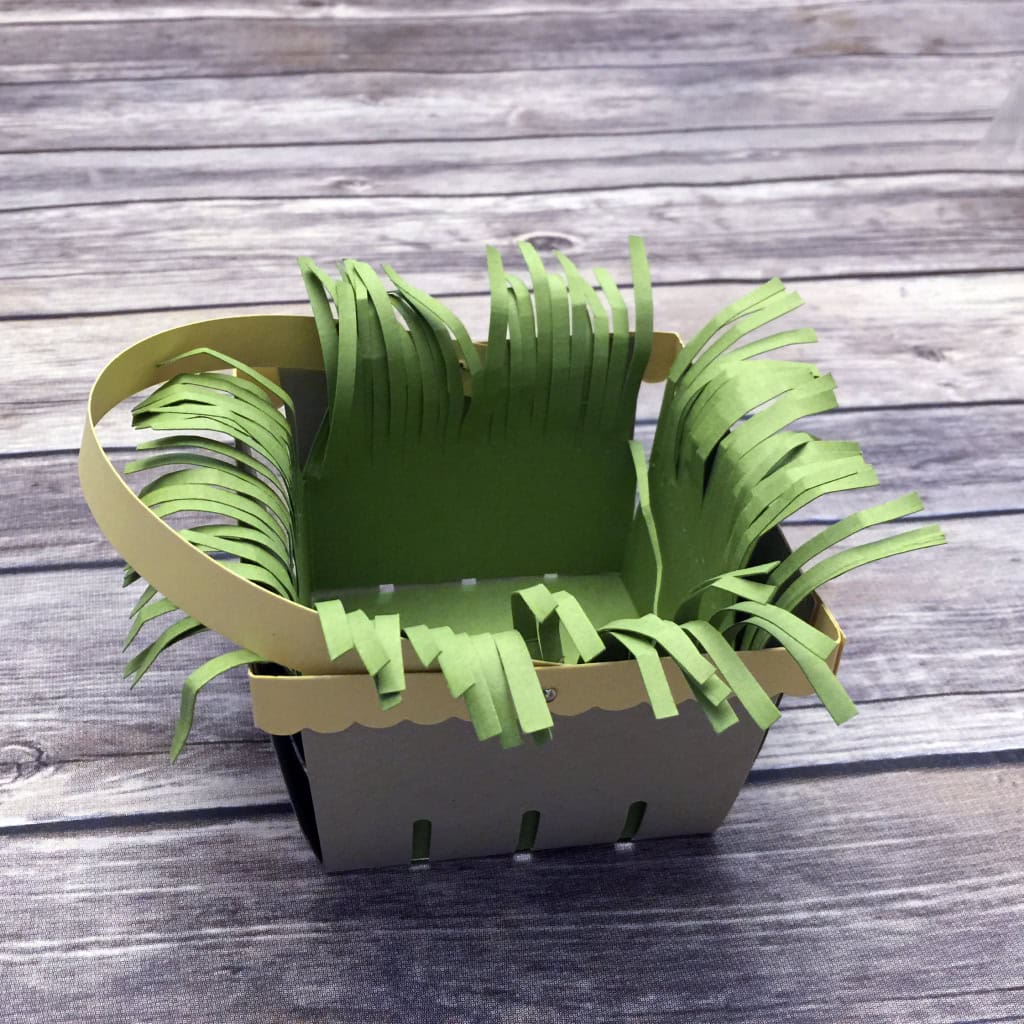
We scored a 4″ x 12″ piece of Old Olive CS along the long side at 3″, 6″, and 9″. Then we cut along the long side with Fringe Scissors, cutting with the full length of the blades to make long blades of grass. We taped the two ends together to make a square, then inserted it into the basket. We curled and scrunched the blades of grass to hang over the basket’s edges.
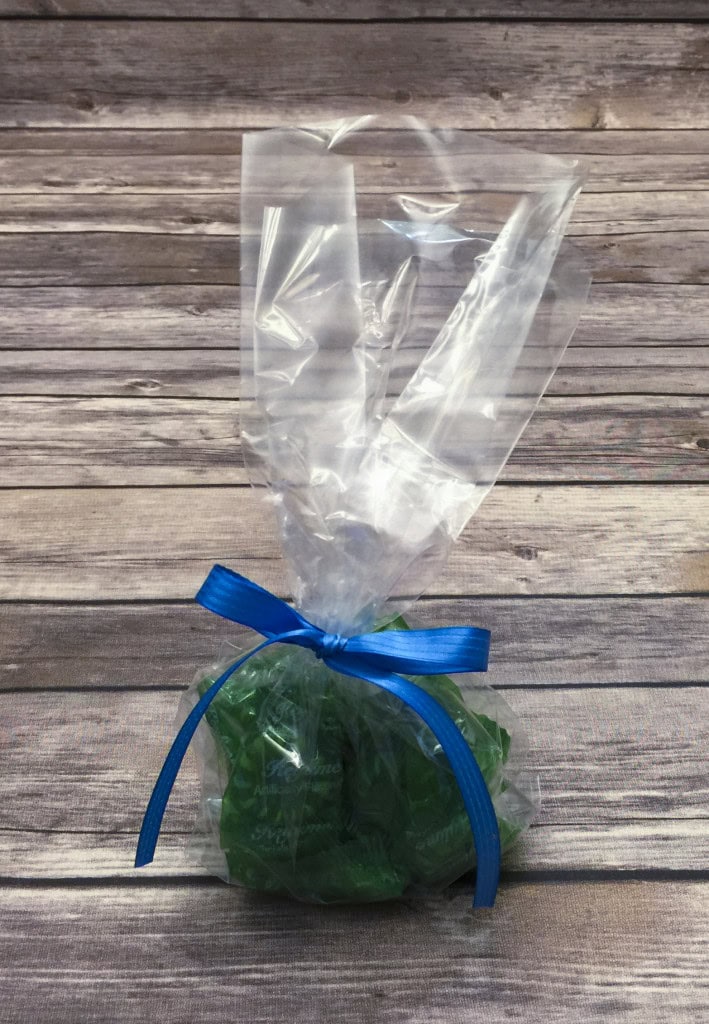
We used a Gusseted Cellophane Bag to hold treats and tied it with a piece of Pacific Point Stitched Satin Ribbon. Since the bag is very tall, we tucked the top of it down behind the bag. You could also cut the top of the bag, but we opted to tuck it so the eggs would be more visible.
We cut eggs from the Pretty Petals Designer Series Paper Stack and from So Saffron CS using the Extra Large Oval Punch. We stamped the sentiment from the Teeny Tiny Wishes stamp set in Pacific Point on the So Saffron egg. We glued the eggs to a piece of Old Olive CS cut to fit into the basket and tapered to create a stacked shape.
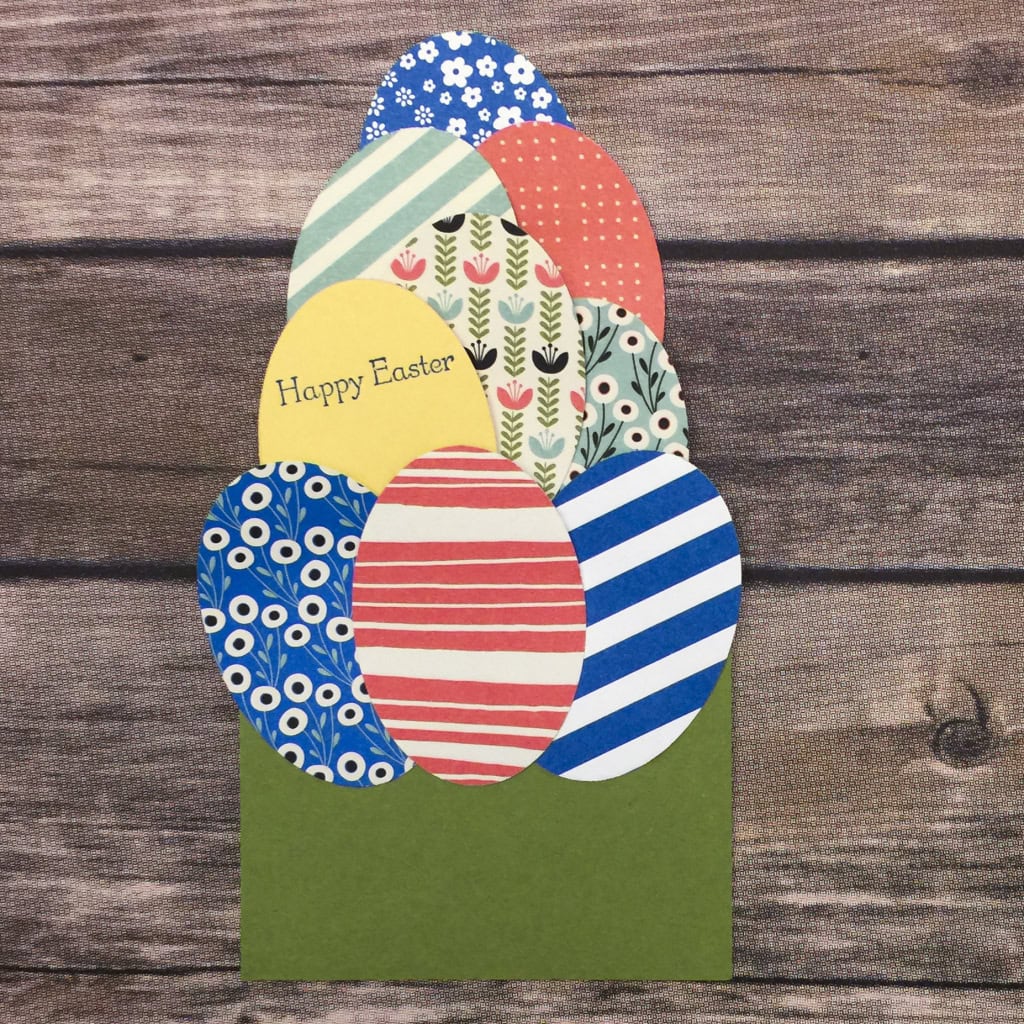
Note: this sample also has a couple of Pacific Point/Whisper White eggs (top and bottom right) cut from the Brights Designer Series Paper Stack.
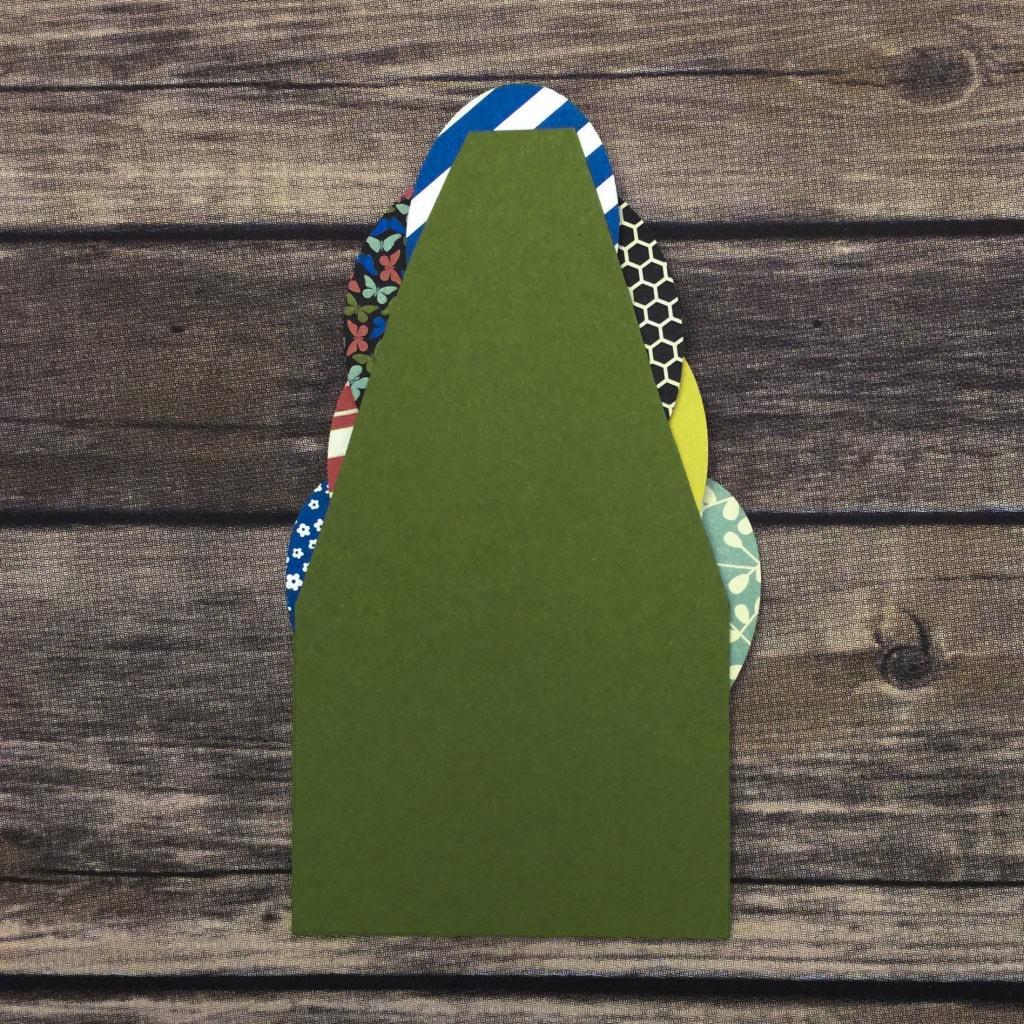
We tucked the egg stack into the back of the basket, and voila, an Easter Basket! Wouldn’t your loved ones enjoy receiving their Easter goodies in this?
Check back for another project from our March Stamp Club gathering!
Here’s what we used:
Thanks for stopping by today, and Sweet Stamping!
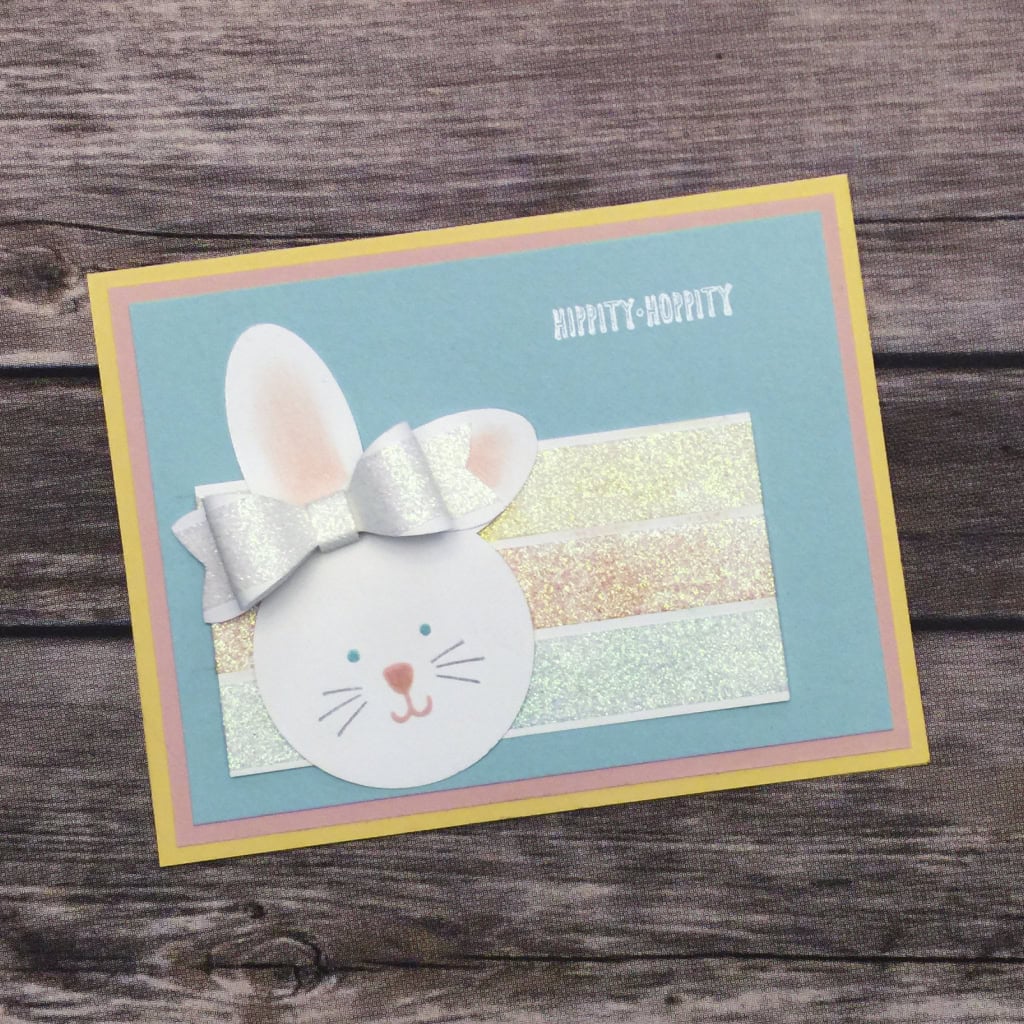
Mar 4, 2016 | Boxes, Cards, Club, Occasions, Sale-A-Bration |
Easter is on its way! At this month’s Stamp Club, we made three adorable Easter projects. I’m sharing one of them with you today.
I got so excited when I learned you can color the new Glitter Tape to match any of your Stampin’ Up! supplies. I was inspired by this photo from the newest Sale-a-bration brochure:
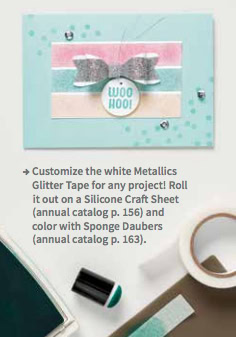
You can get the Metallics Glitter Tape FREE! Add Item # 141020 to any order of $50 or more by March 31, when Sale-a-bration ends.
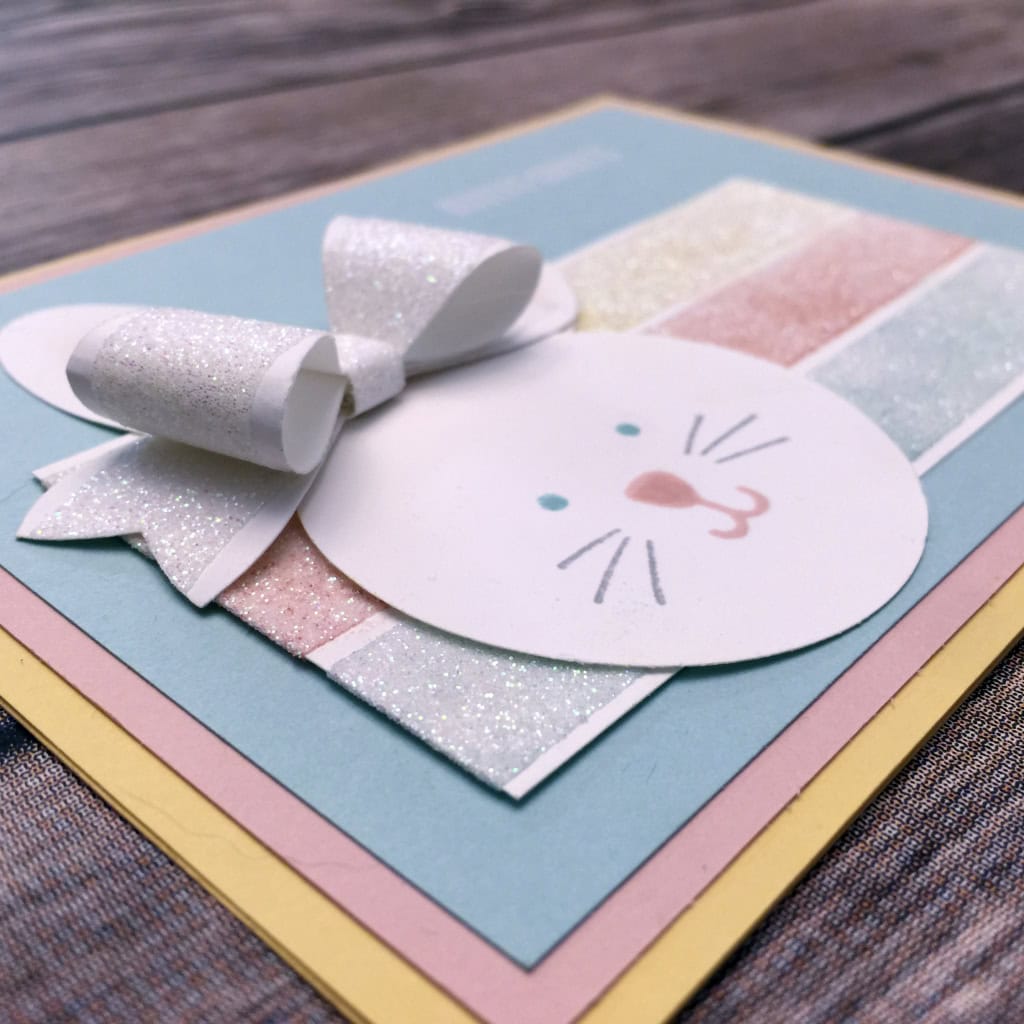
This is the first project we began, and the last project we finished, at Stamp Club. We put three strips of the white Glitter Tape on a Silicone Craft Sheet. We used Sponge Daubers to color the pieces of white Glitter Tape in Blushing Bride, So Saffron, and Pool Party, then set them aside to dry.
After completing the other projects, we used the dry tape to finish this card.
The card base is So Saffron card stock, with layers in Blushing Bride and Pool party.
We heat embossed the sentiment from the And Many More stamp set in white on the Pool Party layer.
We put the three pieces of tape on a piece of Whisper White CS and adhered it to the card front.
We punched the bunny out of Whisper White CS with the 2″ Circle Punch and the Large Oval Punch. We stamped the face in Blushing Bride, Pool Party, and Smoky Slate with the Playful Pals stamp set. We used a sponge dauber to add Blushing Bride to the oval pieces, then adhered them to the back of the head. Then we adhered the bunny to the card
We put white Glitter Tape on Whisper White CS, then cut it with the Bow Builder Punch. We used Glue Dots to build the bow and to adhere it to the card.
I’m sorry the color on the Glitter Tape doesn’t show up very well in this photo. I just couldn’t seem to get the lighting right.
Check back for more Stamp Club projects!
Here’s what we used:
A Nice Cuppa Bundle Class
Tuesday is the deadline to prepay for my March 22 Bundle Class. We’ll create some great projects using the A Nice Cuppa stamp set and coordinating Cups & Kettle Framelits Dies. Only $50 and you get to keep the projects, the stamp set, and the dies! This is a prepaid class. I must receive payment by Tuesday, March 8, so I’ll have time to order your supplies. Click here for more information and to sign up now!
Thanks for stopping by today, and Sweet Stamping!
Stamp Candy
Atlanta, GA
84 Paper Crafters
I’m an Independent Stampin’ Up Demonstrator and I love to share my passion for paper crafting. I offer classes and parties to teach about products and techniques. Whether you’…
Check out this Meetup Group →
Feb 20, 2016 | Cards, Club, Occasions |
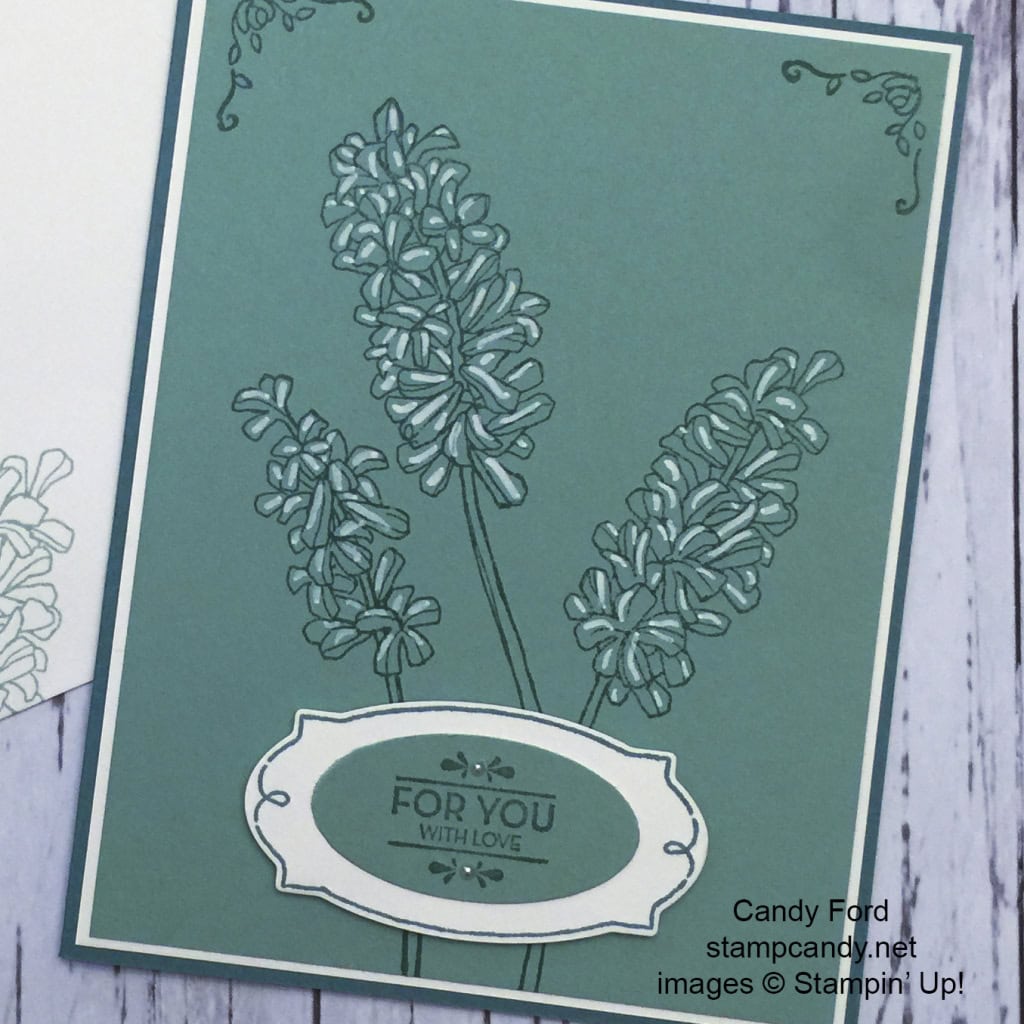
Today I’m sharing with you one of the projects I designed for our February Stamp Club meeting.
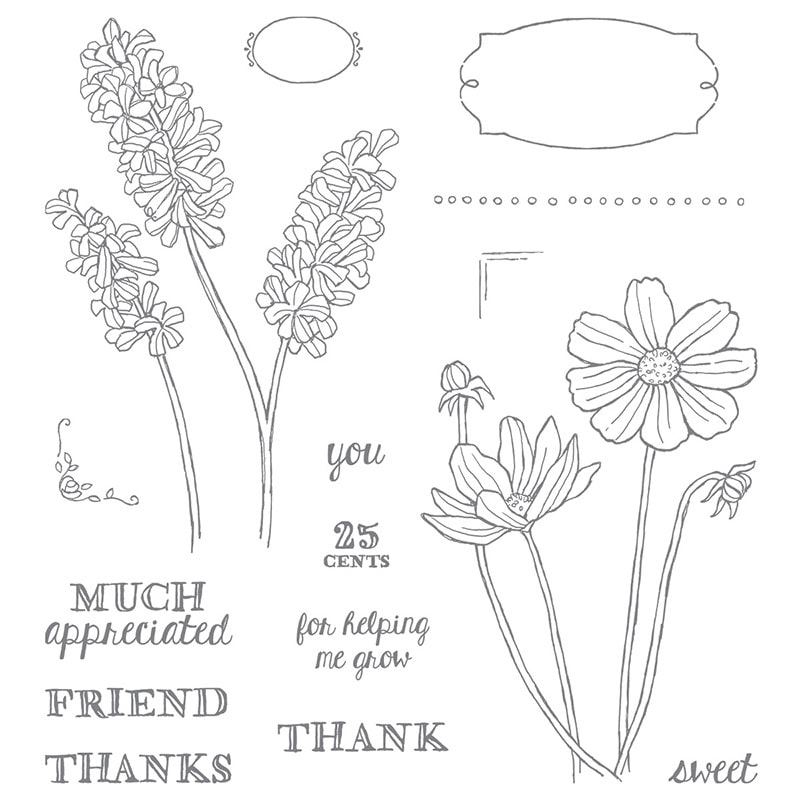
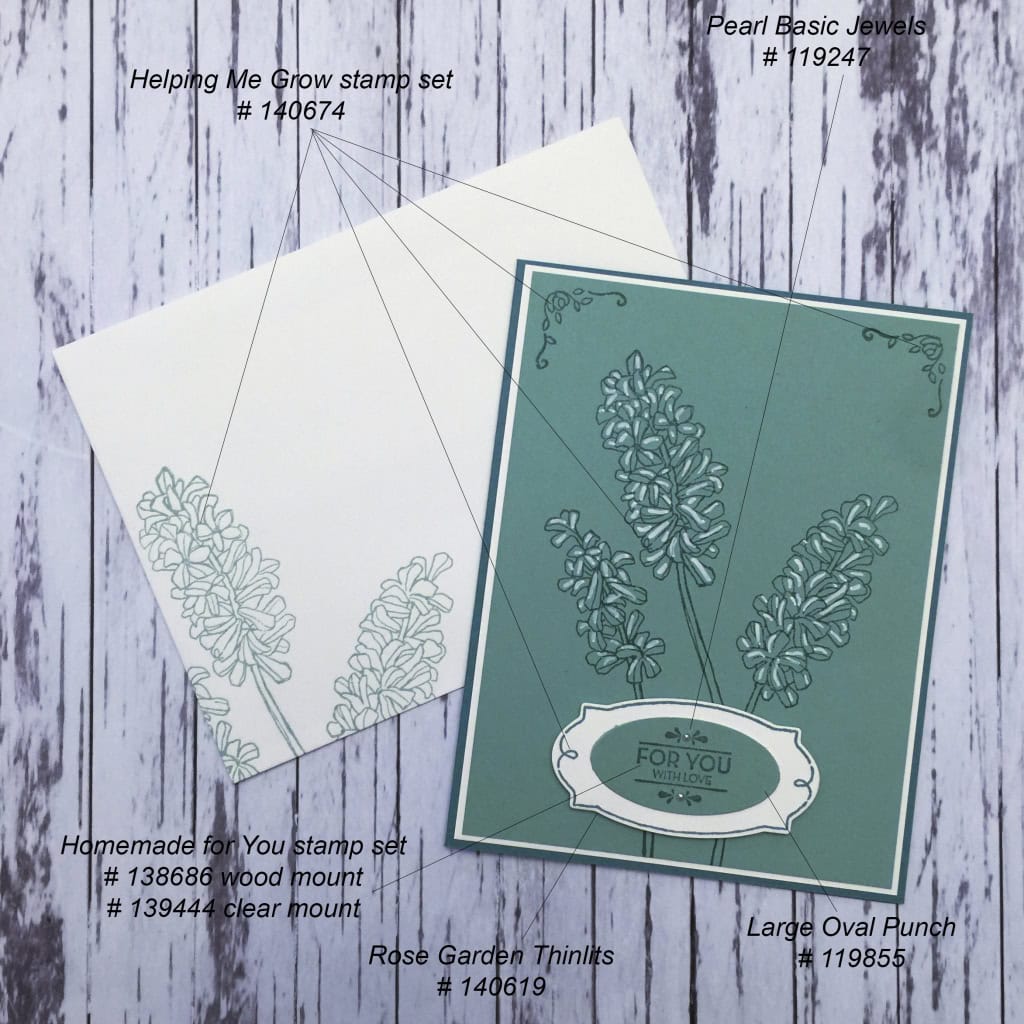
I think this was the first time I had used the Helping Me Grow stamp set from the 2016 Occasions catalog, which is a shame because it’s a beautiful set.
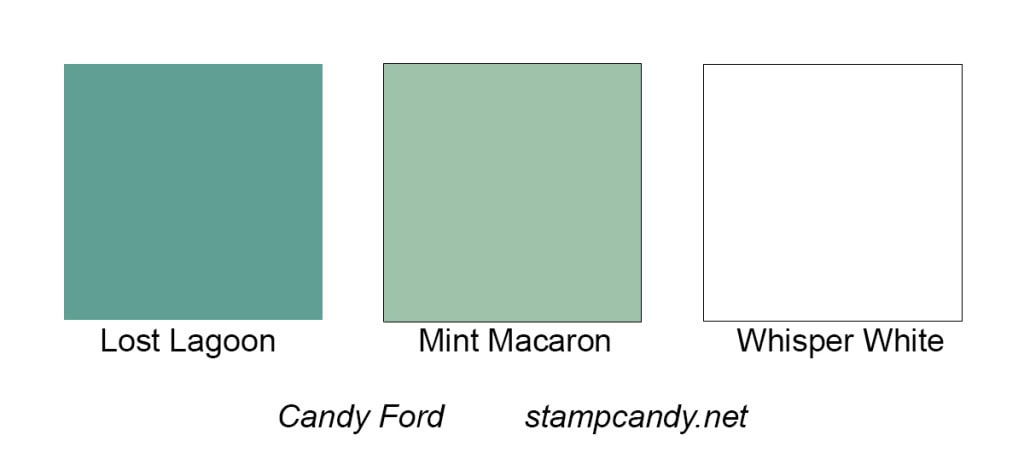
The card base is Lost Lagoon card stock, and the middle layer is Whisper White CS. The card front is Mint Macaron CS stamped with Lost Lagoon ink. I used a White Stampin’ Chalk Marker to add highlights to the petals.
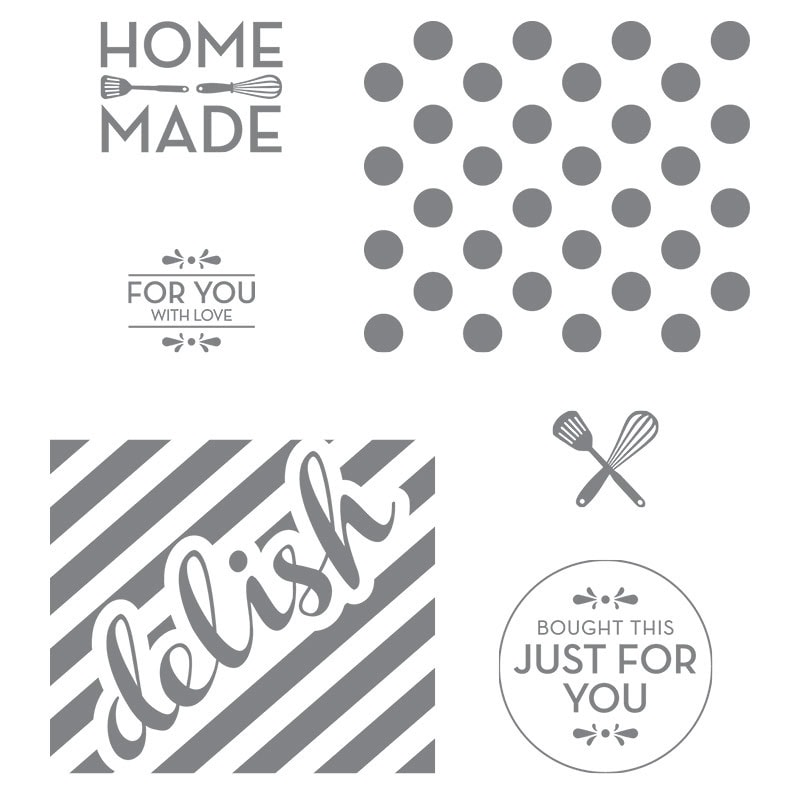
There are some lovely sentiments in the Helping Me Grow stamp set, but I opted for a sentiment from the Homemade For You stamp set from the Annual catalog.
I stamped it in Lost Lagoon on Mint Macaron CS, then cut it with the Large Oval Punch. I added two tiny Pearl Basic Jewels to the design. I glued that on top of a piece of Whisper White CS that I had stamped in Lost Lagoon and cut with the coordinating die from the Rose Garden Thinlits Dies. I attached this to the card front with Stampin’ Dimensionals.
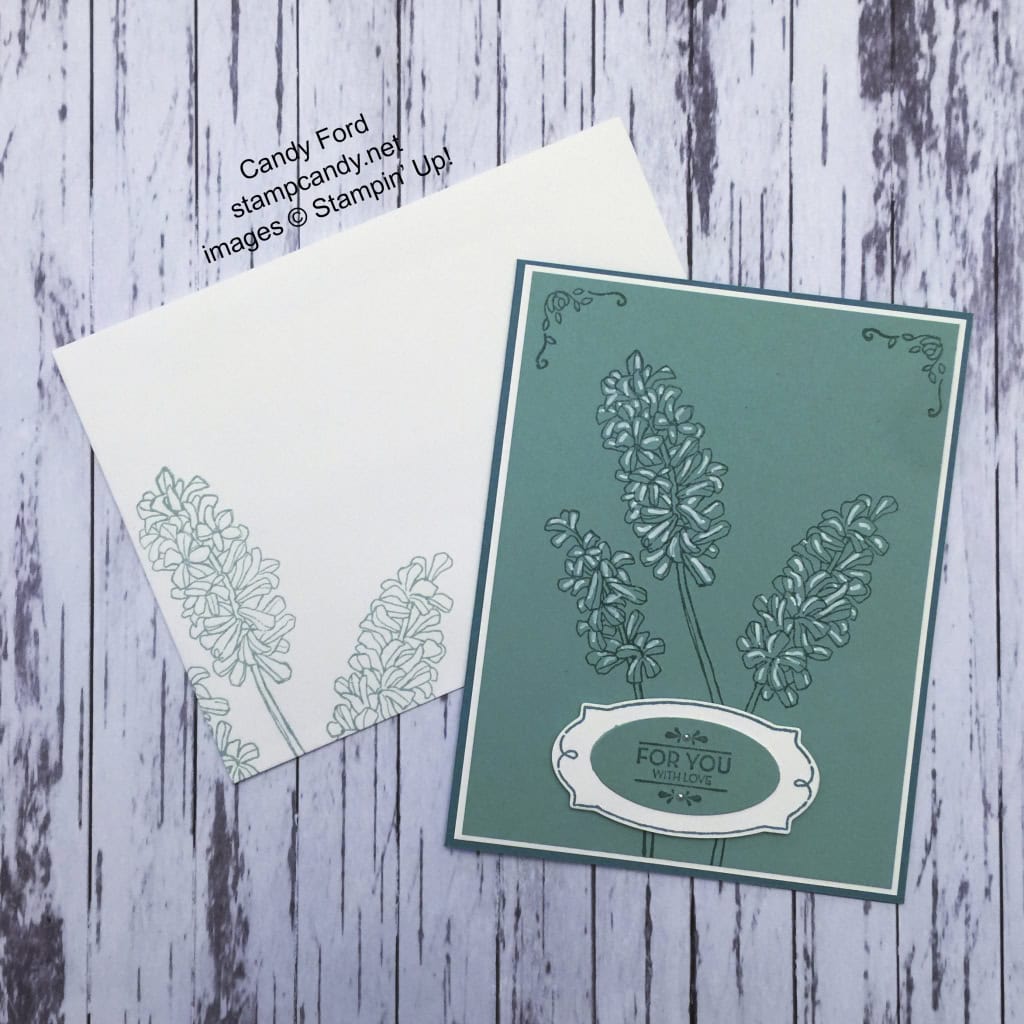
I wanted to keep using this flower stamp, because it’s just so pretty, so I stamped the envelope with it in Mint Macaron ink. There’s still plenty of room for the addresses and postage.
About the colors: Some people store their Stampin’ Up! products alphabetically by name, and some by color family (Brights, Regals, et.c) I store mine by color because that’s just what makes sense to my brain. I have all the pinks together, then the reds, oranges, yellows, greens, etc. In this organization, Mint Macaron is next to Lost Lagoon. To me they seem like different shades of about the same dusty blue-green. As I was looking at my card stock for inspiration, I thought these two would look nice together, especially with some crisp Whisper White to break them up. If you like this color combo, feel free to copy this for future reference:
Here’s what I used:
And here’s where to get your:
Thanks for stopping by today, and Sweet Stamping!
Jan 19, 2016 | Blog Hop, Cards, Club, Events, New Products, Occasions |

Welcome to InKing Royalty’s January Blog Hop! Today’s So In Love Blog Hop is filled with inspiring projects that share ideas for Valentine’s Day or new products we love. We are excited to share what we’ve made and hope you’ll find great inspiration from our talented team members in this hop. After you read my post, I hope you’ll hop over to the next person on the list at the base of this post.
This is one of the three projects we made at January’s Stamp Club meeting, and I thought it would be perfect for today’s blog hop. It’s a Valentine AND it’s made with new products that I love, including the Bloomin’ Love Bundle and the Love Blossoms Embellishment Kit!


The card is 4″ x 4″. The card base is Whisper White Thick card stock, with a Crumb Cake CS layer, then the Blushing Bride CS top layer.
We cut the heart from a Silver Foil Sheet with the new Bloomin’ Hearts Thinlits Dies. The Precision Cutting Plate and the new Big Shot Die Brush make intricate dies like this a breeze to work with. The Precision Cutting Plate gives you a nice, clean cut; and the Die Brush makes it super easy to get the die cut – and all the extra little bits of paper – out of the die. No more poking and poking through all those little holes.
After gluing the heart to the front layer, we adhered a piece of ribbon from the Love Blossoms Embellishment Kit using a dry adhesive, such as Fast Fuse or Snail. A dry adhesive won’t bleed through the ribbon like a wet glue can. We wrapped the ribbon to the back of the Crumb Cake layer before gluing it onto the card base.
We stamped the banner in Blushing Bride, and the sentiment in Crumb Cake – so easy to line up with the see through photopolymer stamps! – then cut it using the Large Numbers Framelits Dies. This die set has a banner that coordinates with several of the new stamp sets.
We then glued the banner on top of the ribbon. Then we glued on some scattered sequins in Blushing Bride, White, and Silver. The Silver ones are from the Metallics Sequin Assortment, and the rest are from the Love Blossoms Embellishment Kit. The kit includes gold sequins, but I was in more of a silver mood when I designed this card. I’m sure it would be just as lovely with a heart cut from a Gold Foil sheet and gold sequins.

We used the Envelope Punch Board to make the envelope from Whisper White Envelope Paper, then stamped the floral design on the flap in Crumb Cake.
I hope you’ll hop along to the next stop on the blog hop, Becky Volpp at Ink Blossom with Becky. There’s lots of inspiration to be found in this group – and you don’t want to miss it!