May 13, 2018 | Gallery, Gifts, Parties, Retiring Products |
Today I’m sharing a party favor or activity for a child’s birthday party. It’s a coloring book and watercolor pencils in a decorated stamp case. I used the Picture Perfect Party and Just Add Color Designer Series Papers (DSP) and the Crafting Forever stamp set to create this fun gift. All the colors I used were inspired by the Picture Perfect Party DSP.
Here’s what I made:


Here’s what I did:
Cut and scored with my Stampin’ Trimmer:
- Bermuda Bay card stock (CS) cut to 7-1/4″ x 4-1/4″, then scored at 1″ and 1-1/8″ from the left side, for the coloring book cover
- Peekaboo Peach CS cut to 6-1/8″ x 4-1/4″, then scored 1″ from the left side
- Berry Burst CS cut to 4-7/8″ x 4″
- Lemon Lime Twist CS cut to 11″ x 7″, for the stamp case cover insert
- Berry Burst CS cut to 5″ x 6-1/4″
- Whisper White CS cut to 3-7/8″ x 3″
- Picture Perfect Party Designer Series Paper (DSP) cut to 4-3/4″ x 6″
- Just Add Color DSP cut to 6″ x 4″ (6 different pieces)
Stamped with the Crafting Forever stamp set:
- jar of brushes in black ink onto the Whisper White CS layer
- creative sentiment in Bermuda Bay ink onto a scrap of Whisper White CS
Stamped with the Birthday Delivery stamp set:
- birthday sentiment in Bermuda Bay ink onto the Picture Perfect Party DSP
Die cut using the Stitched Shapes Framelits:
- creative sentiment with circle die
Die cut using the Layering Circles Framelits:
- a scrap of Lemon Lime Twist CS with a scalloped circle die
Assembled the project:
- Picture Perfect Party DSP layer glued onto the larger Berry Burst CS layer
- Berry Burst CS layer glued onto the Lemon Lime Twist CS case insert
- stamp case cover insert inserted into the stamp case cover (That looks odd but I’m not sure how else to say it.)
- Just Add Color DSP pieces stapled together at the left end
- burnished the folds in the Bermuda Bay CS book cover using a Bone Folder
- back piece of Just Add Color DSP glued onto the Bermuda Bay CS cover
- Peekaboo Peach CS glued to the underside of the front of the Bermuda Bay CS cover
- smaller Berry Burst CS layer glued onto the Peekaboo Peach CS
- Whisper White CS layer glued onto the Berry Burst CS layer
- creative sentiment glued onto the Lemon Lime Twist CS die cut circle, then glued onto the Whisper White CS layer
- Lemon Lime Twist ribbon tied around the left end of the book
- Watercolor Pencils and coloring book put inside the case
Here are today’s colors:
You can click on each one to see all the products that come in that color!
Here’s what I used:
Click on these images for more details and to purchase.
Here’s some stuff you should know:
Thanks for stopping by today, and Sweet Stamping!
May 7, 2018 | Decor, Food, Gallery, Gifts, Occasions, Parties, Retiring Products |
Today I’m sharing a super easy way to decorate a container for a party. I used the Picture Perfect Party Designer Series Paper, Bermuda Bay card stock, and Lemon Lime Twist ribbon. The colors in the paper look great with the multicolor gumballs in the jar.
I’ve had this jar for years, and I decorate it in different ways for different events. This is perfect for a fun birthday party, maybe for a child. I think I bought the jar at Target, or maybe T.J.Maxx or Home Goods.
I recommend using a small plastic scoop, so there aren’t a bunch of sticky little hands all over the gumballs. Don’t ask me how I learned that lesson.
Here’s what I made:


Here’s what I did:
Cut and scored with my Stampin’ Trimmer:
- Bermuda Bay card stock (CS) cut to 12″ x 4″ (2 pieces)
- Picture Perfect Party Designer Series Paper (DSP) cut to 6″ x 3-1/2″ (4 pieces)
- NOTE: I cut the top and bottom off the DSP pieces to have as much of the candles as possible.
Assembled the project:
- Bermuda Bay CS pieces wrapped around the jar and adhered with Tear & Tape, to each other and to the jar
- DSP pieces glued onto the CS, all the way around the jar
- tied a piece of Lemon Lime Twist Finely Woven Ribbon around the lid handle and tied it in a bow
Here are today’s main colors:
You can click on each one to see all the products that come in that color!
Here’s what I used:
Click on these images for more details and to purchase.
Here’s some stuff you should check out:
Thanks for stopping by today, and Sweet Stamping!
May 3, 2018 | Bags, Blog Hop, Boxes, Cards, Gallery, Gift Wrap, Gifts, Paper Pumpkin |

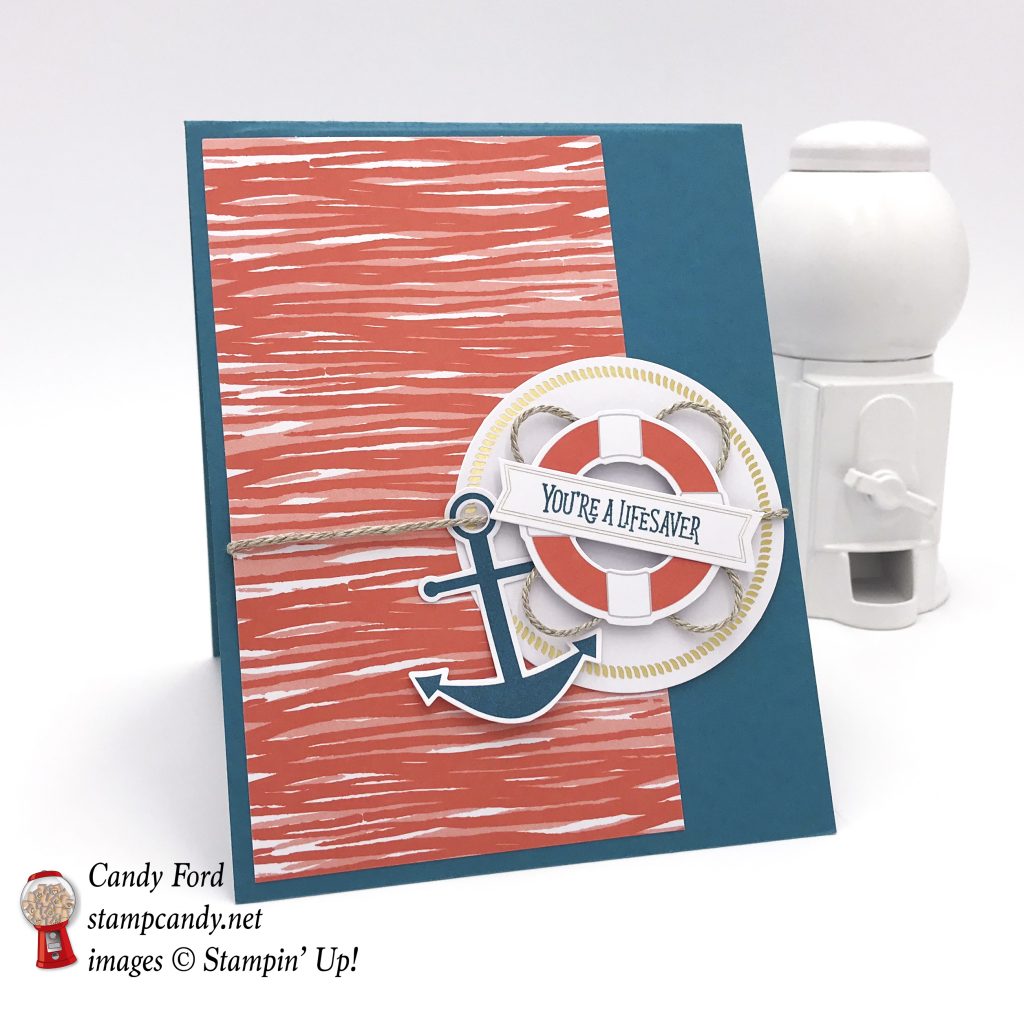
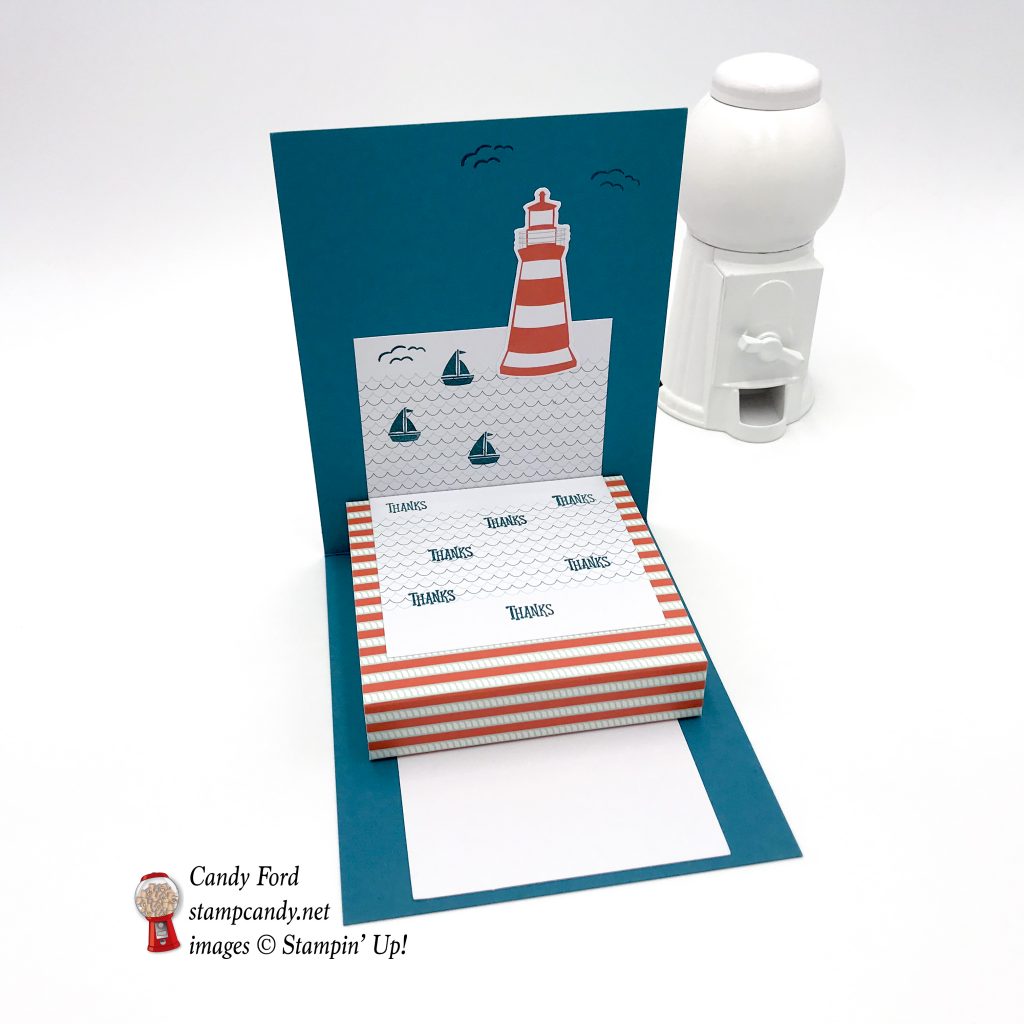
It’s time for the A Paper Pumpkin Thing Blog Hop for the April kit, You Are My Anchor. This is such a fun kit! The colors are great; the images are great; really everything about it is awesome. I’ve had a lot of fun playing with it. I hope you enjoy the alternative projects I’ve made with it. After reading my post, be sure to check out the rest of the stops on the hop. I can’t wait to see what everyone else has made.

Here’s what I made:
Three different items: a bag, a pop up card, and a treat box.

I used one of the matchbox covers from the kit to create this pop-up card.


I made this box from some of the note cards in the kit.

Aren’t candies with sea salt appropriate for the theme?
When I saw the gold and white note cards in the kit, I knew I had to pair it with one of Stampin’ Up!’s Striped Treat Bags.


Here’s what I did:
Cut and scored with my Stampin’ Trimmer:
- Island Indigo card stock (CS) cut to 4-1/4″ x 11″, then scored in half at 5-1/2″, for the card base
- 2 Island Indigo striped note cards scored 1/2″ from each end, and 1/4″ from the bottom edge
- 1 Island Indigo striped note card cut to 2-7/8″ x 2-7/8″
- 1 Island Indigo anchor note card cut to 3″ x 3″, then scored 1/4″ from all four edges
- a Calypso Coral note card cut to 3″ x 5-1/4″
- 1 wave note card cut in half
- 1 note card cut in half (doesn’t matter which design because I used the solid white side)
Stamped with the You Are My Anchor stamp set:
- anchor, starfish, and “For You” in Island Indigo ink onto one of the small die cut round tags
- “You’re a lifesaver” in Island Indigo ink onto one of the small die cut banners
- birds in Island Indigo ink onto the inside top of the Island Indigo CS card base
- birds and boats in Island Indigo ink onto one of the wave not card halves
- “Thanks” in Island Indigo ink onto the other wave note card halves
- “Adventure awaits” in Island Indigo ink onto one of the small die cut banners
- anchor, wheel, boat, and starfish in Island Indigo ink onto the white stripes of the treat bag – I lined up the four stamps on one acrylic block and stamped them as one long stamp
Colored using an Island Indigo Stampin’ Write Marker:
- 8″ piece of Whisper White 1/8″ Sheer Ribbon – color on both sides
Assembled the card, front:
- fold in the Island Indigo CS card base burnished with a Bone Folder
- a large round die cut glued onto the side of the 3″ x 5-1/4″ Calypso Coral note card piece
- rope twine run through an Island Indigo anchor die cut, then wrapped around the front of the Calypso Coral note card piece and large round die cut, securing ends on the back using Glue Dots
- NOTE: I covered the score line in the note card piece with the rope twine
- Calypso Coral note card piece and large round die cut glued to the front of the Island Indigo CS card base
- rope twine adhered to the back of a lifesaver die cut using Glue Dots, then the lifesaver adhered to the large round die cut using Stampin’ Dimensionals
- “You’re a lifesaver” sentiment glued onto the front of the lifesaver die cut
Assembled the card, inside:
- wave note card half with boats glued onto the back side of a matchbox cover
- wave note card half with “Thanks” glued onto the top of the matchbox cover
- 3″ x 3″ note card piece glued to the inside of the Island Indigo CS card base, 1/8″ from the bottom edge, with the solid white side showing
- bottom of matchbox cover and back of wave note card half glued onto the inside of the card base, as shown in photos
- lighthouse die cut glued to the inside top of the card base
Assembled the box:
- the two Island Indigo striped note cards glued together at the ends – at both intersections, one flap will be on the outside of the adjacent side, and the other flap will be on the inside of its adjacent side
- using Paper Snips, cut along the score lines up the four corners only up to the horizontal score line
- folded all four flaps toward the inside and glued them to the inside of the 2-7/8″ x 2-7/8″ piece, which will form the bottom of the box
- cut along one score line at each corner of the 3″ x 3″ Island Indigo anchor note card piece
- glued the resulting flaps to the inside of the adjacent sides
- filled the box with goodies and put on the lid
- 2 small die cut banners glued to the back of the small round die cut tag as shown
- tied a piece of the rope twine around the box, through the tag, and tied in a box
Assembled the treat bag:
- “Adventure awaits” banner and an Island Indigo die cut anchor glued to the front of a gold and white note card
- top of treat bag folded over
- note card, Island Indigo colored ribbon, and some rope twine clipped to the top of the treat bag using a Gold Library Clip
Note: I used glue on these projects, but you can certainly use the Glue Dots that come with the kit. I just really like the glue.
Here’s the hop:
Use this list in case you get lost, or click on the Next button to go to Sara Levin of

Here are today’s colors:
You can click on each one to see all the products that come in that color!
Here’s what I used other than what came in the kit:
Click on these images for more details and to purchase.
Here’s some stuff you should know:
Thanks for stopping by today, and Sweet Stamping!

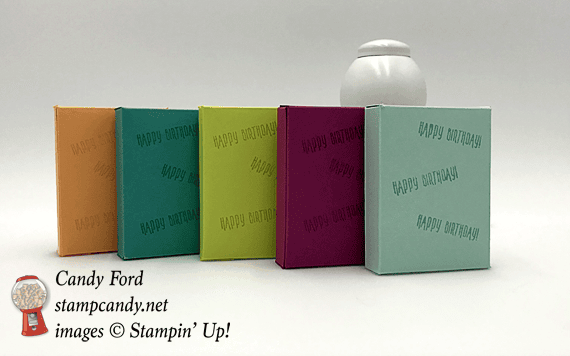
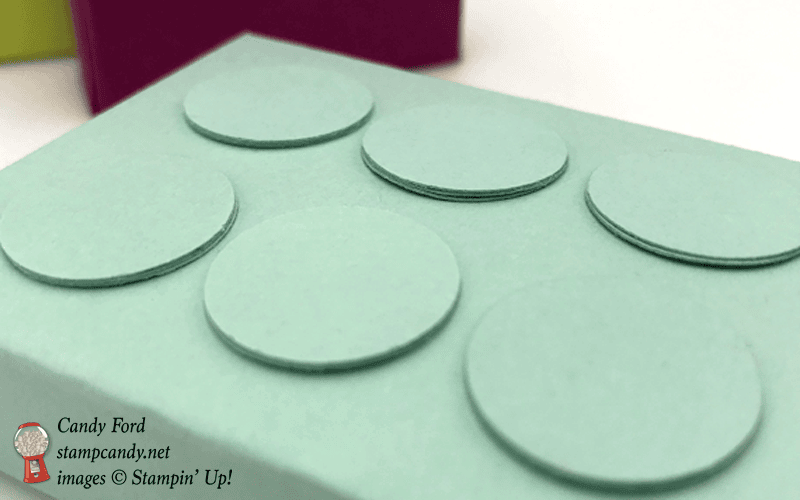
Apr 27, 2018 | Boxes, Food, Gallery, Gifts, Parties |
These cute little party favors for a child’s birthday party are really easy to make. It’s a simple box with some punched circles glued onto the front to resemble Lego blocks. The colors are from the Picture Perfect Party Designer Series Paper: Berry Burst, Lemon Lime Twist, Peekaboo Peach, Bermuda Bay, and Pool Party. I made them to coordinate with some other things I made for a presentation of projects for a child’s birthday party.
Here’s what I made:


Here’s what I did:
Cut and scored with my Stampin’ Trimmer:
- card stock (CS) cut to 6-3/8″ x 4-3/4″, then scored according to the diagram below
- along the 6-3/8″ side, scored at 5/8″, 2-7/8″ 3-1/2″, 5-3/4″, and 6-3/8″
- along the 4-3/4″ side, scored at 1/2″, 1-1/8″, and 4-1/8″
Cut using Paper Snips:
- the cardstock according to the diagram below (after burnishing all the score lines with a Bone Folder)
- cut away the green areas
- cut solid lines

Stamped with the Picture Perfect Birthday stamp set:
- Happy Birthday onto the back of the boxes in the same color ink
Cut using the 3/4″ Circle Punch:
- 18 circles from the same color CS for each box
Assembled the boxes:
- burnished the folds in the card stock with a Bone Folder, before cutting with Paper Snips
- 3 punched circles glued together – make 6 of these
- box glued together up one side (flap at far right glued to the inside of the flap at far left)
- bottom flaps of box glued together
- 6 circle stacks glued onto the front of the box
- inserted raisins and closed box
Here are today’s colors:
You can click on each one to see all the products that come in that color!
Here’s what I used:
Click on these images for more details and to purchase.
Here’s some stuff you should know:
Thanks for stopping by today, and Sweet Stamping!
Apr 24, 2018 | Gifts, Retiring Products |
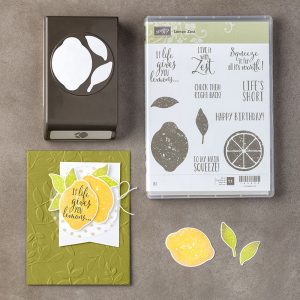
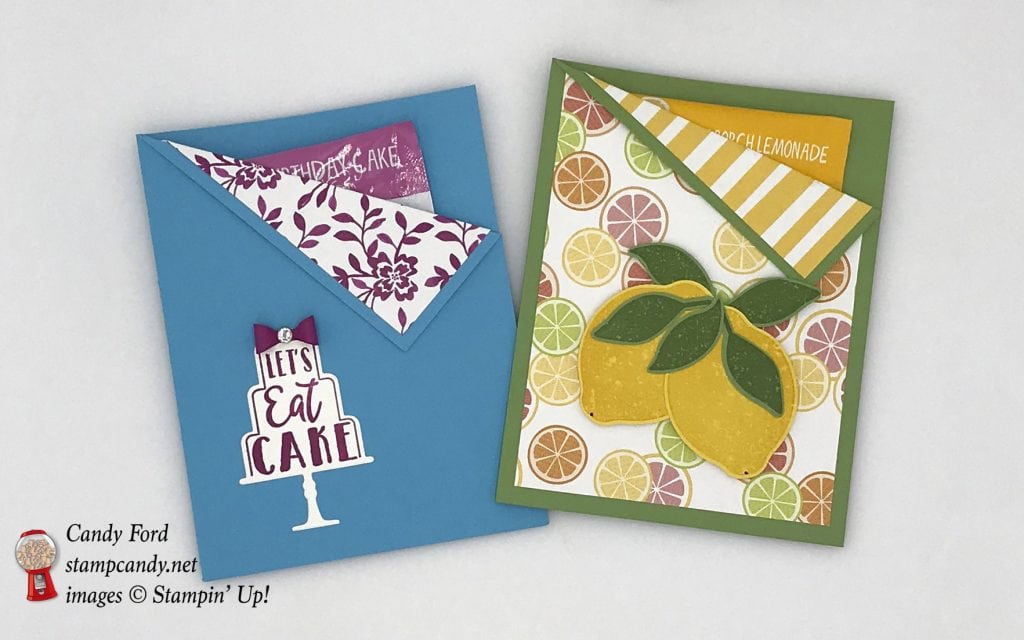
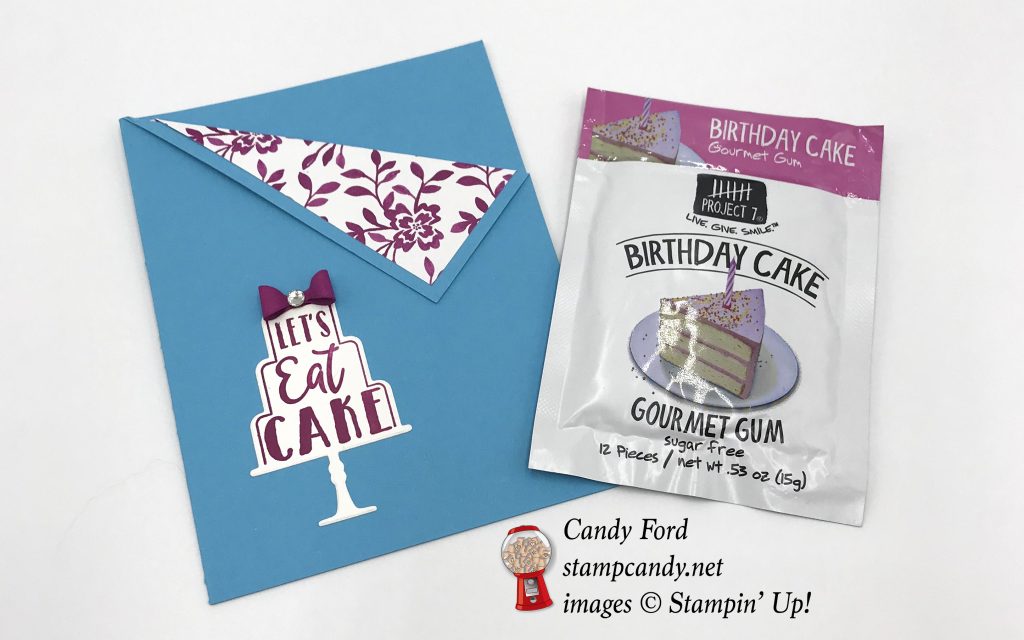
Today’s project is a two-fer. I found these cute little packs of “gourmet gum” at Fresh Market and thought they would make great little gifts. I haven’t tasted them yet, but I’m thinking they might be pretty tasty. I mean, birthday cake and front porch lemonade? Yum! I made these gum holders for them: one using the Celebration Time Bundle and Fresh Florals Designer Series Paper (DSP,) and the other using the Lemon Zest Bundle and Tutti-frutti DSP.

Celebration Time Bundle © Stampin’ Up!
Lemon Zest Bundle © Stampin’ Up!
Here’s what I made:


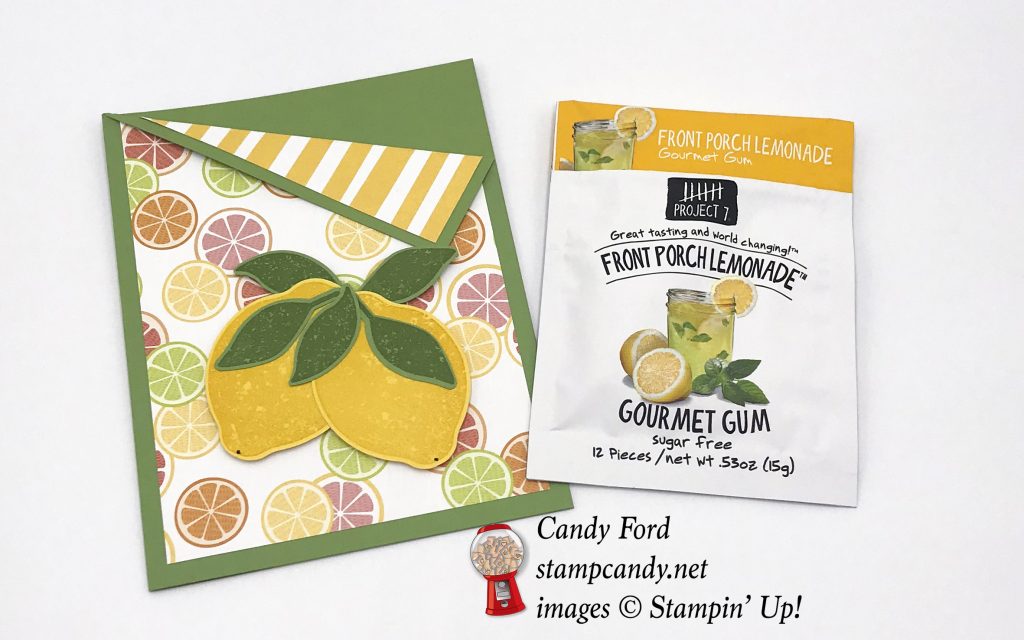


Here’s what I did:
Cut and scored with my Stampin’ Trimmer:
- Tempting Turquoise card stock (CS) cut to 8-1/2″ x 5-1/2″, then scored in half at 4-1/4″
- Fresh Florals Designer Series Paper (DSP) cutt o 4″ x 3″
- Wild Wasabi CS cut to 8-1/2″ x 5-1/2″, then scored in half at 4-1/4″
- Tutti-frutti DSP (fruit) cut to 4″ x 4-1/4″
- Tutti-frutti DSP (stripes) cut to 4″ x 3″
Stamped with the Celebration Time stamp set:
- Let’s Eat Cake sentiment in Berry Burst ink onto a scrap of Whisper White CS
Stamped with the Lemon Zest stamp set:
- lemons in Daffodil Delight ink onto a scrap of Daffodil Delight CS
- leaves in Wild Wasabi ink onto Wild Wasabi CS
- NOTE: I added a black dot at the bottom of each lemon with a black marker.
Die cut using the Celebration Thinlits:
- cake sentiment
- bow from a scrap of Berry Burst CS
Cut using the Lemon Builder Punch:
Assembled the holders:
- burnished the folds in the two CS bases with a Bone Folder
- folded down the top right corner of each CS base and burnished the fold with a Bone Folder
- Fresh Florals DSP glued onto the inside of the Tempting Turquoise CS base, and folded over the corner so the DSP showed on the outside
- Tutti-frutti DSP (stripes) glued onto the inside of the Wild Wasabi CS base, and folded over the corner so the DSP showed on the outside
- Tutti-frutti DSP (fruit) glued onto the front of the Wild Wasabi CS base, the top right corner not showing under the folded over corner of the base
- Used a small bit of adhesive under the corners to keep them folded down.
- bottom and side edges of the inside of the front of each CS base glued to the back of the bases
- die cut cake glued onto the front of the Tempting Turquoise CS base
- bow put together and glued onto the top of the cake
- rhinestone applied to the center of the bow
- lemons and leaves glued together, then adhered to the Tutti-frutti DSP (fruit) using Stampin’ Dimensionals
- inserted the gum packs into the holders
Here are today’s main colors for each holder:
You can click on each one to see all the products that come in that color!
Here’s what I used:
Click on these images for more details and to purchase.
Here’s some stuff you should know:
Thanks for stopping by today, and Sweet Stamping!
Apr 16, 2018 | Boxes, Gallery, Gift Wrap, Gifts, Parties, Retiring Products |
It’s a party! My presentation at the Spring Stamp-Along last week was all about party favors, food, and decor for five different types of party. One type was a birthday party for an adult. I haven’t seen the Over the Hill birthday theme used in a long time, so I decided to go with that. I used black and silver for all the projects. The Five For All stamp set has funny birthday sentiments perfect for this theme.
Today I’m sharing a box that could hold a small gift or a party favor. Don’t you just love the Mini Pizza Boxes? And they’re carrying over to the new catalog! Unfortunately, the Five For All stamp set is not. It’s one of the products that will be retiring, so it will be available through May 31, or while supplies last. See all the retiring products HERE.
Here’s what I made:


Here’s what I did:
Cut and scored with my Stampin’ Trimmer:
- Silver Foil Sheet cut to 3″ x 3″
- Basic Black card stock (CS) cut to 2-1/2″ x 2-1/2″
Stamped with the Five For All stamp set:
- sentiment in Versamark ink onto the Basic Black CS square, then heat embossed in silver
Painted using Archival Basic Black ink refill:
- the outside of the box – let it dry completely before adhering anything to it
- NOTE: I used an old paintbrush. The ink did stain it, but did not hurt it at all.
- NOTE: I used an alcohol pad to remove any ink from the inside of the box.
Assembled the project:
- folded the box together
- adhered the sentiment onto the Silver Foil Sheet piece using Tear & Tape
- adhered the Silver Foil Sheet to the top of the box using Stampin’ Dimensionals, being sure to leave a “tunnel” for the ribbon
- ran ribbon under the Silver Foil Sheet, wrapped it around the box, and tied it on the side
- applied Metallic Enamel Shapes (silver dots) to the top of the box around the Silver Foil Sheet, to resemble a marquis
Here are today’s colors:
You can click on each one to see all the products that come in that color!
Here’s what I used:
Click on these images for more details and to purchase.
Here’s some stuff you should know:
Thanks for stopping by today, and Sweet Stamping!