Mar 26, 2020 | Blog Hop, Boxes, Cards, Gallery, Gift Wrap, Gifts, Paper Pumpkin |
 It’s time for the March APPT Blog Hop! This month’s kit is called No Matter the Weather and it’s designed to make 12 sweet weather themed cards. It also came with an extra stamp set called Spring Splash. Today we are sharing alternate projects made with this kit. I can’t wait to see what everyone on the hop has created!
I decided to make a card and an open top gift box for a friend. The current situation in the world makes almost all of us need a little boost. I want my friend to know I’m there for her…with a bottle of hand soap (you can barely see the top of the pump bottle amongst the tissue paper.)
If you are reading this post in email, the images may appear blurry or not show up at all. Click here to read this post on my blog.
S https://stampcandy.net/blog-hop/no-matter-the-weather-appt-blog-hop-03-2020/ the weather the weather the weather
Here’s what I made:


S
Here’s what I did:
Cut and scored with my paper trimmer:
- 1-3/4″ cut from the bottom of one of the blue/gray cards from the kit, cutting away the gray area and leaving the blue
- Two more of the same cards scored 1-3/4″ from the bottom, and 1/4″ from the printed end
- 1/4″ cut from the plain end of these same two cards
- You should now have two cards 6-1/2″ x 5″ and one card 7″x 3-1/2″
Stamped with the No Matter the Weather stamp set:
- sentiment in Basic Gray ink onto a whit did cut circle
- clouds and raindrops in Basic Gray ink along the top of the front of the 3-1/2″ tall card
- clouds and raindrops in Basic Gray ink along the top of the front of one the other two cards
Cut using Paper Snips:
- one pair of boots cut off the end of a boot line-up die cut
- two pairs of boots cut off the end of a boot line-up die cut, and one of the cut away pairs cut apart into individual boots
- cut along the four score lines, only up to the horizontal score line, of the two 5″ tall cards
Assembled the card:
- burnished the fold in the card base with a Bone Folder
- a plain white circle die cut glued onto the front of the 3-1/2″ tall card
- 3 pink heart die cuts adhered the white circle die cut using Mini Stampin’ Dimensionals
- die cut of 3 pairs of boots and 2 individual boots glued together, then adhered onto the front of the card using Stampin’ Dimensionals
Assembled the box:
- burnished all the folds in the two remaining card bases with a Bone Folder
- glued the 1/4″ flaps to the inside of the opposite end of the other card base
- folded up the four bottom flaps and glued them together to create the bottom of the box
- sentiment glued onto the blue side with clouds and raindrops
- die cut of 4 pairs of boots adhered, overlapping the sentiment, using Stampin’ Dimensionals
- gift and tissue paper put in the box
S
Here’s the No Matter the Weather hop:
S
Here are today’s colors:
You can click on each one to see all the products that come in that color!
S
Here’s what I used, other than the No Matter the Weather kit:
Click on these images for more details and to purchase. If you are reading this post in email, the product images may not show up. Click here to see the post on my blog.
Supply List <— Click here for a clickable and printable list of the products!
S
Here are some helpful links:
Thanks for stopping by today, and Sweet Stamping!
Feb 5, 2020 | Blog Hop, Boxes, Cards, Gallery, Gifts, Sale-A-Bration |

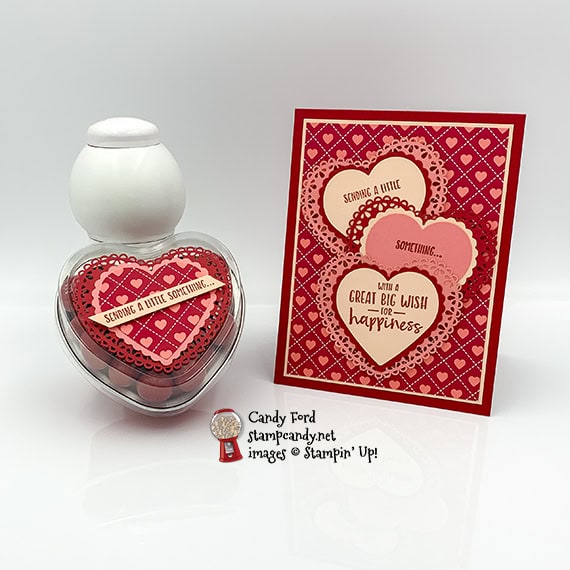
Welcome to the February 2020 ICS Blog Hop! This month’s theme is “Thinking of You” and we’re featuring projects for get well, sympathy, and other times you want to let someone know “I’m thinking of you.” I used the Sending You Thoughts Sale-A-Bration stamp set to create today’s project. It’s free with a $50 order!
Sending You Thoughts Sending You Thoughts
Here’s what I made:
S
Here’s what I did:
Cut and scored with my paper trimmer:
- Real Red card stock (CS) cut to 4-1/4″ x 11″, then scored in half at 5-1/2″
- Petal Pink CS layer cut to 3-7/8″ x 5-1/8″
- From My Heart Specialty Designer Series Paper (DSP) layer cut to 3-3/4″ x 5″
- Petal Pink CS cut to 4″ x 5-1/4″ for the inside of the card base
- Petal Pink CS cut to 2-1/2″ x 5/16″ for the tin sentiment
Stamped with the Sending You Thoughts stamp set:
- tin sentiment in Real Red ink onto the Petal Pink CS strip
- that same sentiment stamped in two parts, one onto a scrap of Petal Pink CS and the other onto a scrap of Flirty Flamingo CS (both in Real Red ink)
- larger sentiment in Real Red ink onto a scrap of Petal Pink CSx
Cut using the Heart Punch Pack:
- plain hearts: the 3 card sentiments and a scrap of DSP
- scalloped hearts: 1 Flirty Flamingo CS, 1 Petal Pink CS, and 2 Real Red CS
Cut using Paper Snips:
- angled the ends of the tin sentiment
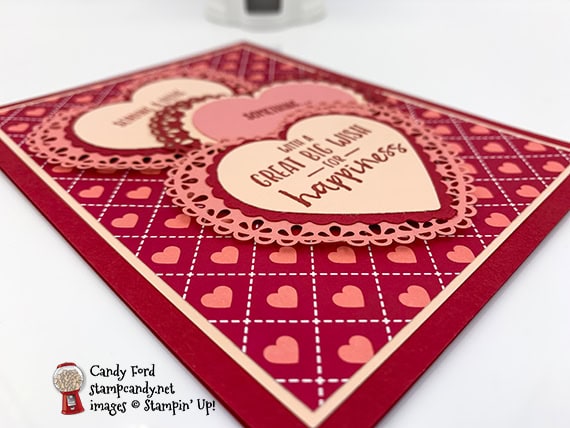
Assembled the card:
- burnished the fold in the card base with a Bone Folder
- Petal Pink CS layer glued onto the front of the card base
- DSP layer glued onto the Petal Pink CS layer
- 2 Petal Pink stamped hearts glued onto 2 Real Red scalloped hearts
- Flirty Flamingo stamped heart glued onto the Petal Pink scalloped heart
- 2 Real Red scalloped hearts glued onto Flirty Flamingo Heart Doilies
- Petal Pink scalloped heart glued onto a Real Red Heart Doily
- hearts glued together in a cascading design
- hearts adhered onto the DSP layer using Stampin’ Dimensionals
- Petal Pink CS glued onto the inside of the card base
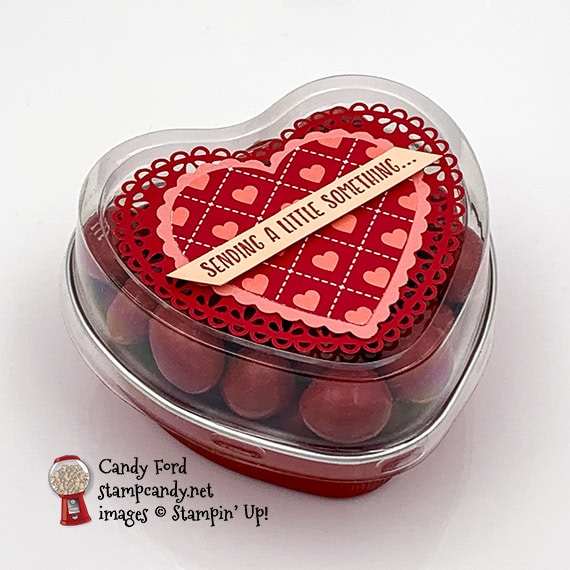
Assembled the tin:
- DSP heart glued onto the Flirty Flamingo scalloped heart
- Flirty Flamingo scalloped heart glued onto a Real Red Heart Doily
- sentiment adhered onto the hearts using Mini Stampin’ Dimensionals
- Heart Doily adhered onto the lid of the tin using Stampin’ Dimensionals
S
Here’s the ICS Blog Hop for January 2020:
Click the Next button to check out Melissa Tennison’s post at Melissa’s Kre8tions:

S
Here are today’s colors:
You can click on each one to see all the products that come in that color!
S
Here’s what I used:
Click on these images for more details and to purchase.
<– Click “Supply List” for a clickable and printable list!
S
Coordination Product Release is Live!
Only available through March 31, 2020, or while supplies last!
Click “Supply List” for a clickable and printable list of the products!
S
Here are some helpful links:
S
Thanks for stopping by today, and Sweet Stamping!
Jan 30, 2020 | Blog Hop, Boxes, Cards, Food, Gallery, Gifts, Paper Pumpkin |
It’s time for the 01-2020 APPT Blog Hop! This month’s kit is called I’ll Bee Yours and it make Valentines and treat bags. I’ve used products from the From My Heart Suite to make an alternate note card and candy tin.
Be sure to hop around to all the stops to check out all the great alternate projects!
S 01-2020 APPT Blog Hop 01-2020 APPT Blog Hop
Here’s what I made:


S
Here’s what I did:
Cut and scored with my paper trimmer:
- Whisper White card stock (CS) cut to 3″ x 3″
- envelope from the kit cut open then trimmed to 2-7/8″ x 2-7/8″, with the fold down the middle
Stamped with the I’ll Bee Yours stamp set:
- larger sentiment in Mint Macaron ink onto a round tag from the kit
- smaller sentiment in Mint Macaron ink onto a small tag from the kitx
Cut using the Heart Punch Pack:
- scalloped heart from a scrap of Mint Macaron CS
- scalloped heart from the center of a Mint Macaron note card base
Assembled the card:
- burnished the fold in the card base with a Bone Folder
- 2-7/8″ square piece glued onto the inside of the note card front, so it shows through the punched heart
- Whisper White CS glued over the 2-7/8″ square piece
- twine from kit tied around the front of the note card and tied in a bow
- larger round sentiment glued onto a Rococo Rose heart
- Highland Heather sequins applied onto the Rococo Rose heart
- tiny Real Red faceted gem glued onto the sequins
- medium Real Red faceted gems glued onto the card front
- large Real Red faceted gem glued onto the sentiment
- Rococo Rose heart and sentiment adhered onto the card front, inside the heart punch, using Stampin’ Dimensionals
Assembled the tin:
- Highland Heather heart glued onto the punched Mint Macaron CS scalloped heart
- Mint Macaron heart glued onto the white side of a Heart Doily
- small sentiment adhered onto the Highland Heather heart using Stampin’ Dimensionals
- Rococo Rose sequins applied onto the Highland Heather heart
- tiny Real Red faceted gem glued onto the sequins
- 2 medium and 1 large Real Red faceted gems glued around the Highland Heather Heart
- medium Real Red faceted gem glued onto the sentiment
- heart doily adhered onto the clear lid of the tin using Stampin’ Dimensionals
S
Here’s the 01-2020 APPT Blog Hop:
S
Here are today’s colors:
You can click on each one to see all the products that come in that color!
S
Here’s what I used, other than what came in the kit:
Click on these images for more details and to purchase.
Click “Supply List” for a clickable and printable list of the products!
S
Here are some helpful links:
Thanks for stopping by today, and Sweet Stamping!
Jan 23, 2020 | Books, Cards, Gallery, Gifts |
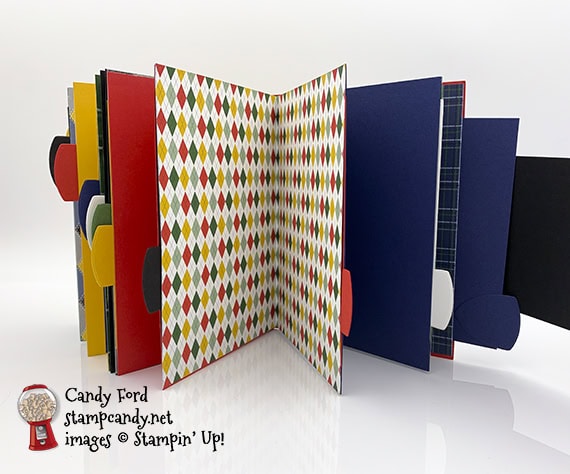
Today’s project, a birthday book, is an example of a non-golf specific project made with the Country Club Suite. I made the book using the Clubhouse stamp set, Golf Club Dies, Absolutely Argyle 3D embossing folder, and Country Club Designer Series Paper.
book book
Here’s what I made:


 S
S
Here’s what I did:
Cut and scored with my paper trimmer:
- Poppy Parade card stock (CS) cut to 8-3/4″ x 5-1/2″, scored at 4-1/4″ and 4-1/2″, for the cover
- CS cut to 5-1/2″ x 8-1/2″, then scored in half at 4-1/4″ (one each of Whisper White Thick, Night of Navy, Crushed Curry, Poppy Parade, Garden Green, and Basic Black) for pages
- Country Club Designer Series Paper (DSP) cut to 5-1/2″ x 8-1/2″, then scored in half at 4-1/4″ (one piece of each non-golf-specific pattern) for pages
- Crushed Curry CS layer cut to 4-1/8″ x 5-3/8″
- Basic Black CS cut to 11″ x 3-1/2″, and scored at 4-3/4″, 5″, 9-3/4″, and 10″ for the belly band
- DSP layer cut to 4-5/8″ x 3-3/8″
- CS cut to 3-1/2” x 3-1/2″ (two each of Whisper White Thick, Night of Navy, Crushed Curry, Poppy Parade, Garden Green, and Basic Black) for tabbed inserts
Stamped with the Clubhouse stamp set:
- sentiment in black Memento ink onto a scrap of Whisper White Thick CS
Cut using the Golf Club Dies:
- sentiment
- 4 pieces from scraps of each color of CS using the crest shape die
Embossed using the Absolutely Argyle embossing folder:
Assembled the book:
- burnished all the folds in the CS and DSP pieces with a Bone Folder
- one side of a CS page glued onto one side of a DSP page, along the fold, top and bottom (being careful not to glue along the outer edge, because this will make a pocket)
- remaining pages glued together the same way, alternating CS and DSP, until they are all glued together in a book (each double-thickness page should have a pocket)
- first and last pages glued the same way inside the Poppy Parade CS cover, creating more pockets
- tabs on CS inserts created by gluing 2 die cut crests together, with the insert between them, then the inserts stuck inside the pockets
- Basic Black CS belly band glued onto the Poppy Parade CS cover on the back, spine, and front
- embossed Crushed Curry CS layer glued onto the front of the Poppy Parade CS cover, covering the end of the Basic Black belly band
- thin velcro fastener applied onto the inside of the belly band and the embossed Crushed Curry CS layer
- DSP layer glued onto the front of the belly band
- sentiment adhered onto the DSP layer using Mini Stampin’ Dimensionals
S
Here are today’s colors:
You can click on each one to see all the products that come in that color!
S
Here’s what I used:
Click on these images for more details and to purchase.
Click “Supply List” for a clickable and printable list!
S
S
Here are some helpful links:
S
Thanks for stopping by today, and Sweet Stamping!
Jan 21, 2020 | Boxes, Gallery, Gift Wrap, Gifts |
Today’s project is sort of a stepped up version of yesterday’s note card. Along with die cuts, I’ve also used wooden Country Club Elements to decorate a Mini Pizza Box.
Tip: The wooden golf clubs are not as long as they appear on this project. The wood is soft, so I used my Paper Snips to cut the clubs in half. At first, I did this just so I could cross them without worrying about the thickness. Then I moved the halves apart to make them look longer. The crest covered the gaps.
pizza box pizza box
Here’s what I made:
S
S
Here’s what I did:
Cut and scored with my paper trimmer:
- Country Club Designer Series Paper (DSP) layer cut to 3-1/4″ x 3-1/4″
Stamped with the Clubhouse stamp set:
- sentiment twice in Night of Navy ink onto a scrap of Whisper White Thick CS
Cut using the Golf Club Dies:
- one of the sentiments using the crest die
- “greatest guy” portion of the other sentiment using the banner die
Cut using Paper Snips:
- 2 wooden golf club elements cut in half
Colored using a Stampin’ Write Marker:
- outer rim of wooden crest element in Garden Green
Assembled the pizza box:
- burnished the folds in the pizza box with a Bone Folder
- DSP layer glued onto the top of the box
- two golf clubs glued onto the DSP layer, spreading apart the halves to make them look longer
- wooden crest glued onto the golf club pieces, covering the gap in the clubs
- die cut sentiment (crest) glued onto the center of the wooden crest
- die cut sentiment (banner) glued onto the crest
S
Here are today’s colors:
You can click on each one to see all the products that come in that color!
S
Here’s what I used:
Click on these images for more details and to purchase.
Click “Supply List” for a clickable and printable list!
S
Here are some helpful links:
S
Thanks for stopping by today, and Sweet Stamping!
Dec 18, 2019 | Blog Hop, Boxes, Christmas, Gallery, Gift Wrap, Gifts, Holiday |

Welcome to the Inking Royalty Christmas 2020 Blog Hop! Today I’m sharing a faceted treat box. I love this little box, and I realized I hadn’t made one in a long time. I used the Perfectly Plaid stamp set and Wrapped in Plaid Specialty Designer Series Paper. The pearls were colored with Stampin’ Blends Markers in Dark Cherry Cobbler, Dark Night of Navy, and Dark Shaded Spruce.
Here’s what I made:

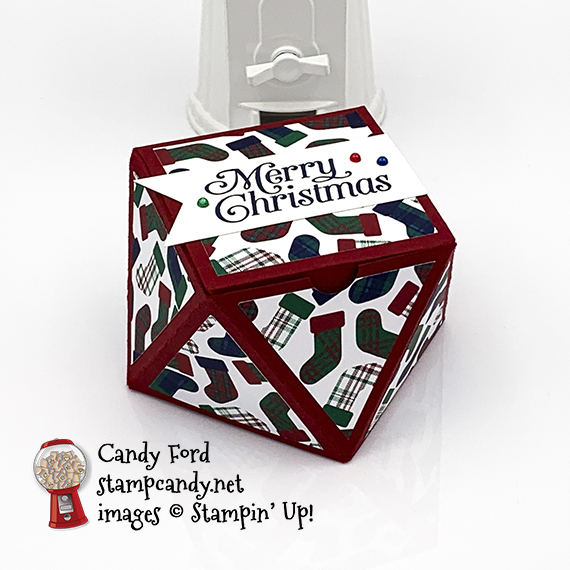 S
S
Here’s what I did:
Cut and scored with my paper trimmer and Simply Scored Tool:
- Cherry Cobbler card stock (CS) cut to 7-7/8″ x 11-1/4″
- scored the Cherry Cobbler CS along the short side at 2-1/2″, 4-5/8″, and 7-1/8″
- rotated the Cherry Cobbler CS 90 degrees so the skinny section is at the top, then scored only down to the second score line (cross one score line and stop at the second) at 2-1/2″, 5″, 7-1/2″, and 10″
- rotated the Cherry Cobbler CS 180 degrees, then scored only down to the first score line at 2-1/2″, 5″, 7-1/2″, and 10″
- used a ruler and stylus to score the diagonal lines as shown in the diagram
- Wrapped in Plaid Specialty Designer Series Paper (DSP) cut to 2-1/4″ x 2-1/4″
- Wrapped in Plaid Specialty Designer Series Paper (DSP) cut into 1-3/4″ strips, then cut into triangles 2″ wide (see diagram below)
- Whisper White Thick CS cut to 1-1/8″ x 3″
 Click on the template for a larger version.
S
Stamped with the Perfectly Plaid stamp set:
- sentiment in Night of Navy ink onto the 1-1/8″ strip of Whisper White CS stamp set
Cut using the Banner Triple Punch:
- left end of the sentiment strip
Cut using the 1/2″ Circle Punch:
- finger notch in the front panel of the box
Colored using Stampin’ Write Markers:
- 1 Pearl Basic Jewel in Dark Cherry Cobbler
- 1 Pearl Basic Jewel in Dark Night of Navy
- 1 Pearl Basic Jewel in Dark Shaded Spruce
Assembled the box:
- made all cuts in the Cherry Cobbler base using Paper Snips (refer to diagram)
- burnished all the folds in the Cherry Cobbler CS base with a Bone Folder (This is much more easily done after making the cuts.)
- 8 DSP triangles glued onto the 8 triangular sides of the box (This is easier while it’s still flat, before assembling the box.)
- DSP square glued onto the lid of the box
- sentiment strip glued onto the lid of the box
- pearls applied onto the sentiment strip
- small triangular section at one end glued onto the inside of the large triangle at the opposite end (A & B on diagram)
- folded all 4 bottom flaps in, one by one, gluing them together
- put goodies in the box and closed up the top
S
Here’s the Inking Royalty Christmas 2020 Blog Hop:
Thank you for hopping along with us. If you get stuck during the Blog Hop, please use this line-up as a guide:
- Brian King at Stamp with Brian
- Jackie Beers at Blue Line Stamping
- Sheryl Sharp at Sharp Notes by Sheryl
- Shawn de Oliveira at Shawn Stamps
- Lynn Kolcun at Avery’s Owlery
- Sue Jackson at Just Peachy Stamping
- Linda Krueger at The Stamp Coach
- Candy Ford at Stamp Candy <———– YOU ARE HERE!
- Julie DiMatteo at The Paper Pixie
- Robbye Hamilton at Miss Hammie’s Crafts
Here are today’s colors:
You can click on each one to see all the products that come in that color!
S
Here’s what I used:
Click on these images for more details and to purchase.
<– Click here for a clickable and printable list!
S
S
Here are some helpful links:
S
Thanks for stopping by today, and Sweet Stamping!


