Feb 27, 2017 | Cards, Gallery, Occasions |
I made today’s card with the Big On Birthdays stamp set, which is on page 6 of the Occasions catalog. The Happy Birthday stamp I used has a straight, rigid feeling font, and can certainly be used for a more minimalistic, masculine card. However, the pretty and carefree floral image stamped above and below it, and the coloring in the letters, transform it into something quite feminine. And it’s a really simple card to make!

Big on Birthdays stamp set © Stampin’ UP!
Here’s what I made:

Here’s what I did:
Cut and scored with my Stampin’ Trimmer:
- Old Olive card stock (CS) to 5-1/2″ x 8-1/2″, and scored it in half at 4-1/4″
- Whisper White CS to 5-1/4″ x 4″
Stamped with the Big On Birthdays stamp set:
- sentiment in Basic Black ink onto the Whisper White CS
- floral image above and below the sentiment in Basic Black ink
Colored in using the Watercolor Pencils (on page 24 of Occasions catalog:)
- flowers and letters in Melon Mambo
- leaves in Old Olive
- I then smoothed out the colors with a Blender Pen.
Assembled the card:
- glued the Whisper White CS onto the front of the card base
Here’s what I used:
Click on the images for more details and to purchase.

Now through March 31, you will earn a FREE item from the Sale-a-bration catalog for every $50 you spend on an order. See the items you can earn here and here.
 ALSO you will earn a Gum Ball for every $50 you spend on an order with me. Keep up with your orders, because when you earn 10 Gum Balls, I’ll send you a FREE STAMP SET of your choice! See the Gum Ball Rewards page for details.
Click here to shop my online store!

February Host Code
C7RRWU4B
Use the Host Code on online orders less than $15o. See how to use a Host Code here.
Online orders of $75-149.99 placed with the Host Code will receive the gift of the month!
Online orders of $150 or more (do not use the Host Code) will automatically receive the gift of the month!
Click here to shop my online store!
Thanks for stopping by today, and Sweet Stamping!

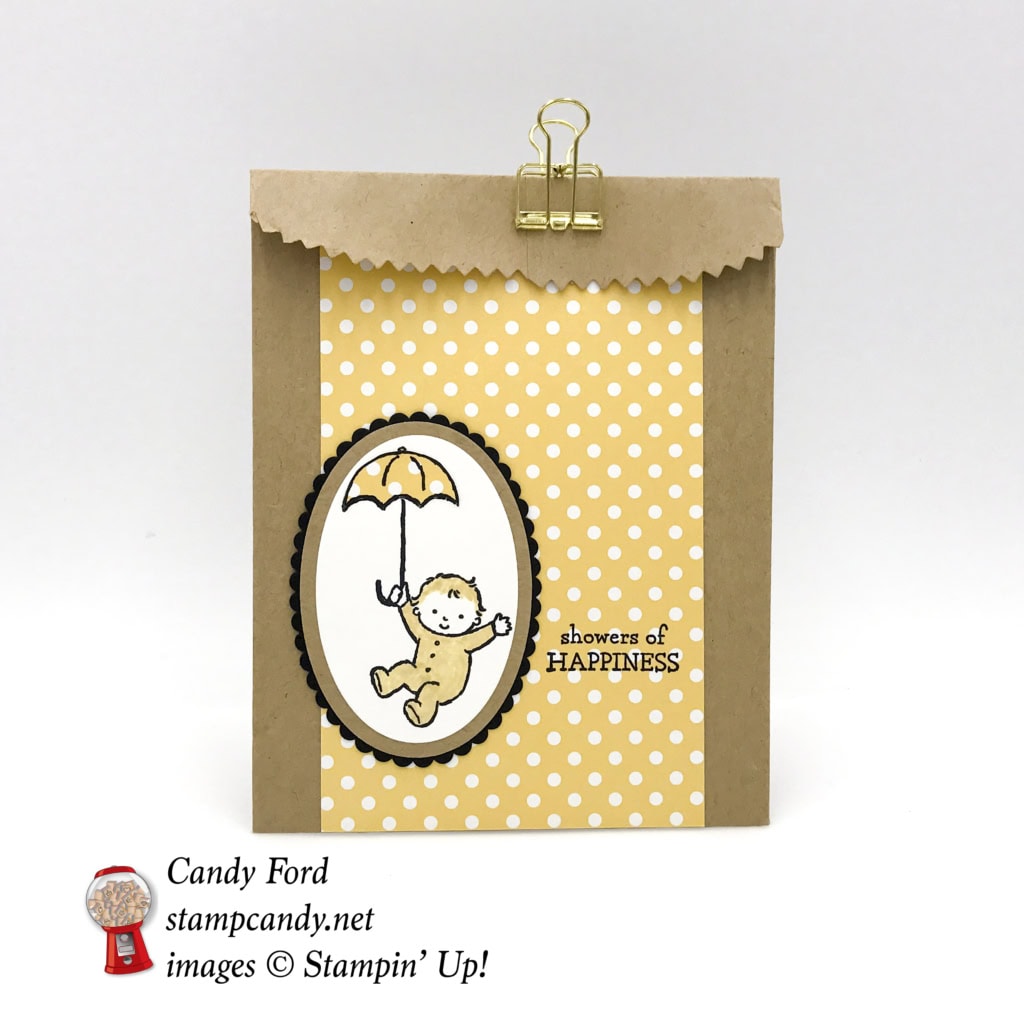
Feb 26, 2017 | Baby, Bags, Challenges, Gallery, Gift Wrap, Gifts, Occasions |
My project today is made with the Moon Baby stamp set, Kraft Tag a Bag Gift Bags, and Layering Ovals Framelits Dies. This sweet little gift bag is perfect for a small baby shower gift or card. The design is inspired by this week’s Freshly Made Sketches Challenge:
Here’s what I made:
Here’s what I did:
Cut with my Stampin’ Trimmer:
- So Saffron DSP from the Subtles Designer Series Paper Stack to 3-1/2″ x 6″
Stamped with the Moon Baby stamp set:
- full image in Basic Black ink onto a piece of Whisper White CS
- sentiment in Basic Black ink onto the 3-1/2″ x 6″ piece of DSP
- just the umbrella in Basic Black ink onto a small scrap of the DSP
Colored in with So Saffron Stampin’ Write Marker:
- baby’s clothes and hair
- tiny circle on the top of the umbrella
Die cut using the Layering Ovals Framelits Dies :
- full image on Whisper White CS
- next size up oval from another Kraft Tag a Bag Gift Bag
- scalloped oval from Basic Black CS
Fussy cut with Paper Snips:
- umbrella top that was stamped on the scrap of DSP
Assembled the bag:
- umbrella top glued to the full image
- full image glued to the oval cut from another kraft bag
- kraft oval glued to scalloped Basic Black oval
- large piece of DSP glued to the front of the bag, and folded over the top of the bag
- Basic Black oval glued to the DSP & bag
- folded over the top of the bag and used a clip to hold it closed
Here’s what I used:
Click on the images for more details and to purchase.
Now through March 31, you will earn a FREE item from the Sale-a-bration catalog for every $50 you spend on an order. See the items you can earn for FREE here and here.
PLUS you will earn a Gum Ball for every $50 you spend on an order with me. Earn 10 Gum Balls and I’ll send you a free stamp set of your choice! See the Gum Ball Rewards page for details.
Click here to shop my online store!
February Host Code
C7RRWU4B
Use the Host Code on online orders less than $15o. See how to use a Host Code here.
Online orders of $75-149.99 placed with the Host Code will receive the gift of the month!
Online orders of $150 or more (do not use the Host Code) will automatically receive the gift of the month!
Click here to shop my online store!
Thanks for stopping by today, and Sweet Stamping!
Feb 20, 2017 | Cards, Gallery, Occasions |
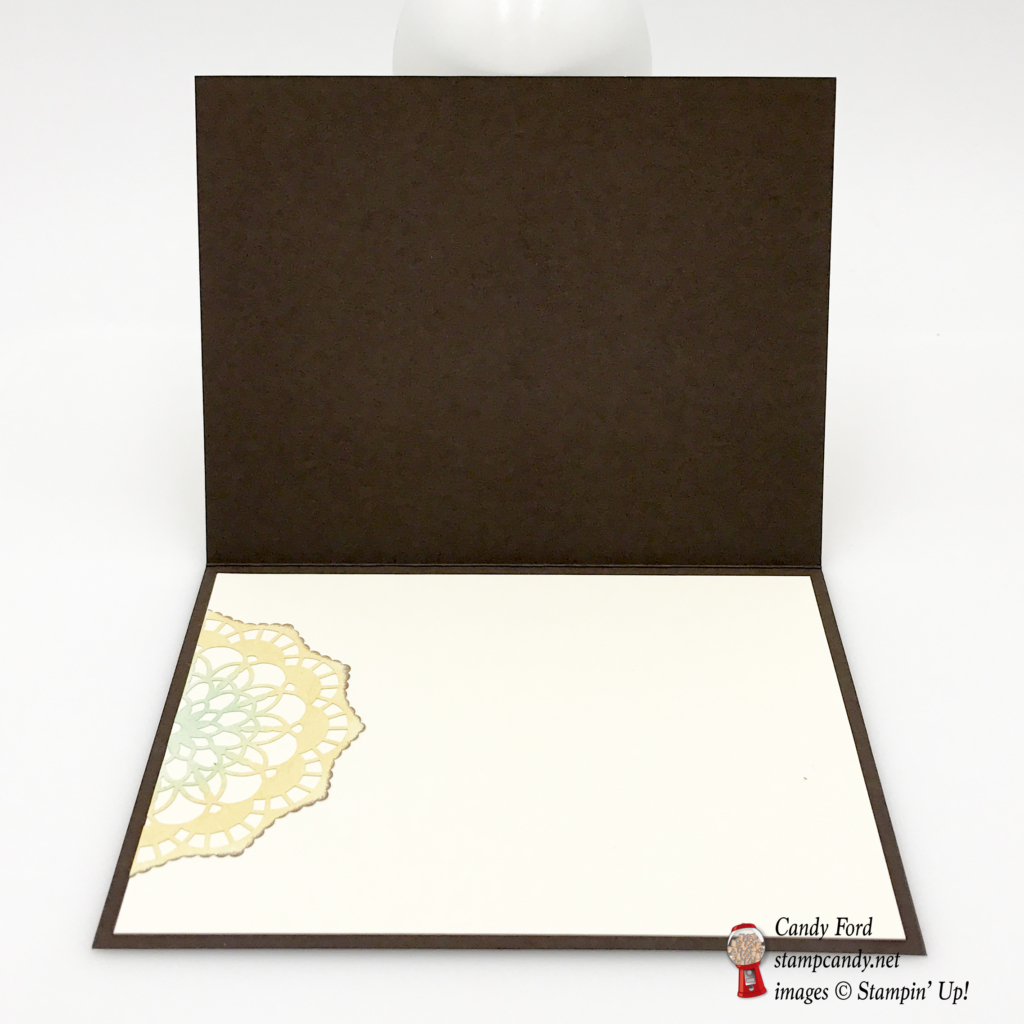
For today’s project I used three products from the 2017 Occasions catalog: the All Things Thanks stamp set (which has nine different ways to say thank you,) the Cupcakes & Carousels Designer Series Paper (DSP,) and the Lace Doilies.
Here’s what I made:

Here’s what I did:
Cut and scored with my Stampin’ Trimmer:
- Early Espresso card stock (CS) to 4-1/4″ x 11″, and scored in half at 5-1/2″
- Emerald Envy CS to 4-1/8″ x 5-3/8″
- Cupcakes & Carousels DSP to 4″ x 5-1/4″
- Very Vanilla CS to 4″ x 5-1/4″
Stamped with the All Things Thanks stamp set:
- inked the sentiment stamp with the So Saffron ink pad
- then added Early Espresso and Emerald Envy inks with Sponge Daubers
- then stamped it onto a piece of Very Vanilla CS
Die cut using the Stitched Shapes Framelits:
Die cut using the Layering Ovals Framelits:
- a piece of Early Espresso CS
Lace Doilies:
- cut a doily in half
- inked the edges of one half for the card front in Early Espresso and Emerald Envy ink with Sponge Daubers
- inked the other half for inside the card in So Saffron, Early Espresso, and Emerald Envy inks with Sponge Daubers.
Adhered:
- inside doily to the 4″ x 5-1/4″ piece of Very Vanilla CS
- Very Vanilla CS to the inside of theEarly Espresso card base.
- sentiment to the Early Espresso CS oval
- outside doily to the back of the Early Espresso CS oval
- ovals/doily to the DSP
- DSP to the Emerald Envy CS
- Emerald Envy CS to the front of the Early Espresso card base
Here’s what I used:
Click on the images for more details and to purchase.
Now through March 31, you will earn a FREE item from the Sale-a-bration catalog for each $50 you spend on an order. See the items you can earn here.
PLUS you will earn a Gum Ball for every $50 you spend on an order with me. Earn 10 Gum Balls and I’ll send you a free stamp set of your choice! See Gum Ball Rewards for details.
Click here to shop my online store.
Thanks for stopping by today, and Sweet Stamping!
Feb 19, 2017 | Cards, Gallery, Occasions |
The Day at the Beach stamp set has eleven images perfect for super fun beach themed cards. I decided to use just one of them, the umbrella, for a more subdued beach themed card.
Here’s what I made:

Here’s what I did:
Cut and scored with my Stampin’ Trimmer:
- Crumb Cake card stock (CS) to 4-1/4″ x 11″, and scored in half at 5-1/2″, for card base
- Island Indigo CS to 4-1/8″ x 5-3/8″
- Serene Scenery Designer Series Paper Stack (DSP) to 4″ x 5-1/4″
Stamped with the Day at the Beach stamp set:
- umbrella in Basic Black ink onto the Serene Scenery DSP
- umbrella in Basic Black ink onto a scrap of Succulent Garden DSP
Stamped with the Dragonfly Dreams stamp set:
- sentiment in Island Indigo ink onto the Serene Scenery DSP
Colored:
- the umbrella’s shadow with a Crumb Cake Stampin’ Write Marker onto the Serene Scenery DSP
Fussy cut using my Paper Snips :
Assembled the card with Multipurpose Liquid Glue:
- umbrella top over the stamped umbrella on the Serene Scenery DSP
- Serene Scenery DSP onto the Island Indigo CS
- Island Indigo CS onto the Crumb Cake card base
Here’s what I used:
Click on the images for more details and to purchase.
Now through March 31, you will earn a FREE item from the Sale-a-bration catalog for each $50 you spend on an order. See the items you can earn here.
PLUS you will earn a Gum Ball for every $50 you spend on an order with me. Earn 10 Gum Balls and I’ll send you a free stamp set of your choice! See Gum Ball Rewards for details.
Click here to shop my online store.
Thanks for stopping by today, and Sweet Stamping!
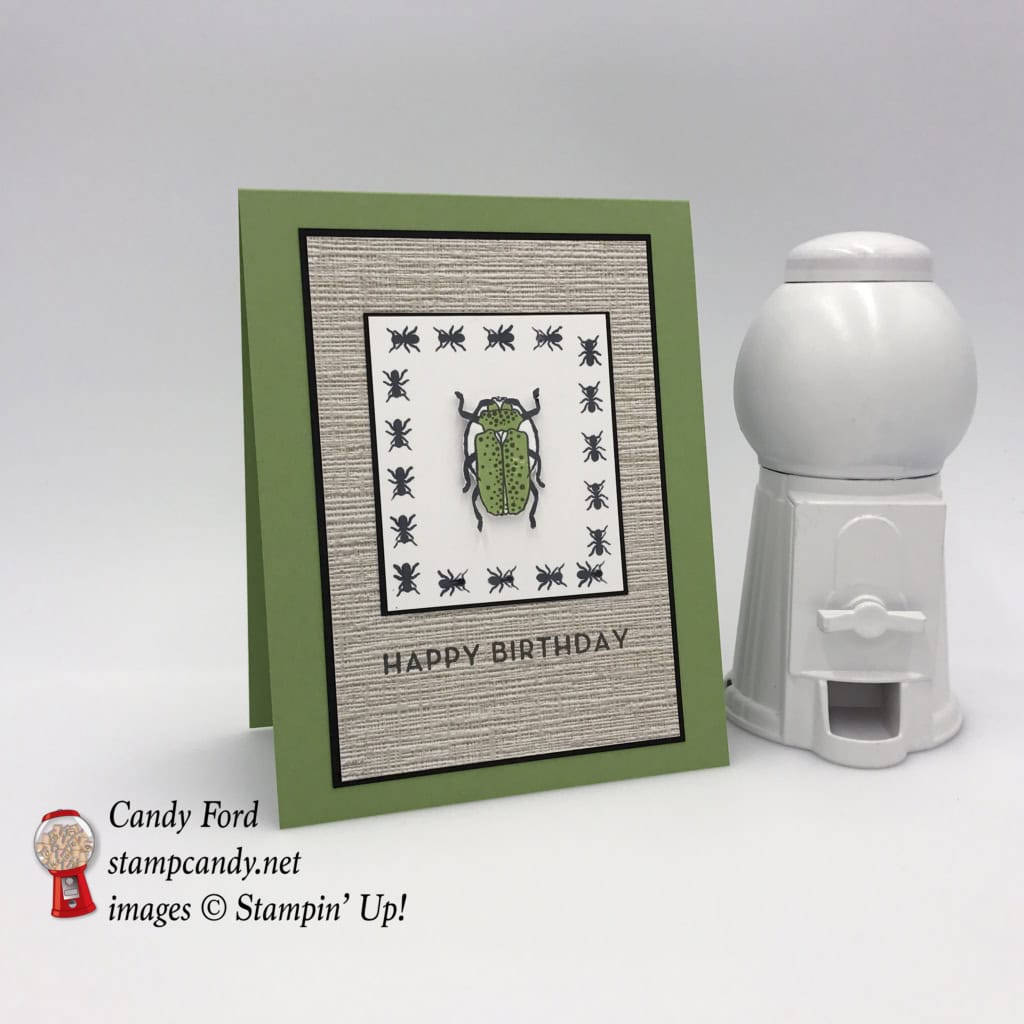
Feb 18, 2017 | Cards, Gallery, Occasions |
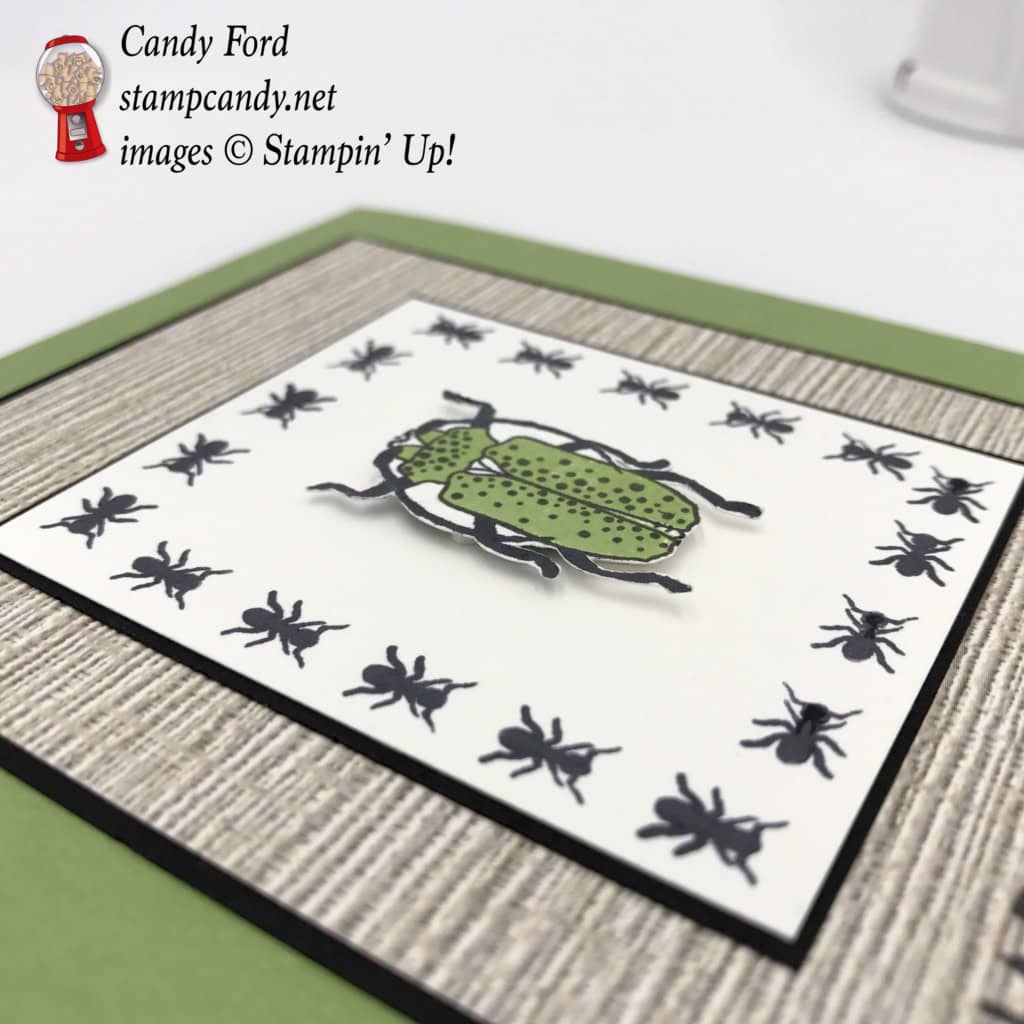
Beetles & Bugs, oh my! This is another stamp set I knew I had to have, without knowing what I would do with it. There are lots of possibilities. You could make something creepy crawly, or something with a pretty nature theme. Since the stamp images include pins, you could even make something scientific. The beetle I used for today’s card is at the bottom right of this picture:

Here’s what I made:
Here’s what I did:
Cut and scored with my Stampin’ Trimmer:
- Wild Wasabi card stock (CS) to 4-1/4″ x 11″, then scored in half at 5-1/2″
- Basic Black CS to 3-3/8″ x 4-7/8″ (large)
- Basic Black CS to 2-3/8″ x 2-3/4″ (small)
- Whisper White CS to 2-1/4″ x 2-5/8″
- Serene Scenery Designer Series Paper Stack (DSP) to 3-1/4″ x 4-3/4″
Stamped with the Beetles & Bugs stamp set:
- ants in Basic Black ink onto the Whisper White CS piece
- outline of beetle in Basic Black ink onto a scrap of Whisper White CS
- body of beetle in Wild Wasabi ink onto the beetle
- spots in Basic Black ink onto the beetle
Stamped with the Big on Birthdays stamp set:
- sentiment in Basic Black ink onto the DSP
Fussy cut using Paper Snips:
- the beetle, only around the outside. I didn’t try to cut out the white bits inside its legs or antennae.
Assembled the card:
- Beetle adhered to the Whisper White CS with Stampin’ Dimensionals
- Whisper White CS glued to the small Basic Black CS
- Small Basic Black CS glued to the center of the DSP
- DSP glued to the large Basic Black CS
- Large Basic Black CS glued to the Wild Wasabi card base
Here’s what I used:
Click on the images for more details and to purchase.
Now through March 31, you will earn a FREE item from the Sale-a-bration catalog for each $50 you spend on an order. See the items you can earn here.
PLUS you will earn a Gum Ball for every $50 you spend on an order with me. Earn 10 Gum Balls and I’ll send you a free stamp set of your choice! See Gum Ball Rewards for details.
Click here to shop my online store.
Thanks for stopping by today, and Sweet Stamping!
Feb 16, 2017 | Cards, Gallery, Occasions |
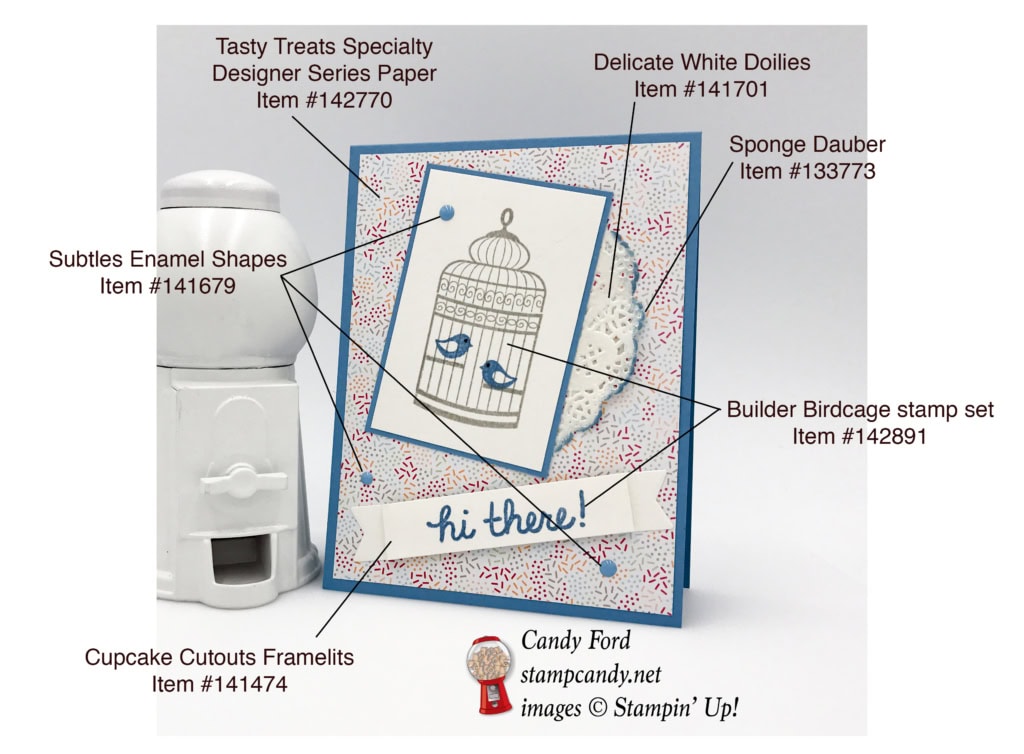
Hello, Sweet Stampers! Today’s card features the Builder Birdcage stamp set and the Tasty Treats Specialty Designer Paper (DSP) from the Occasions catalog. The see-through photopolymer stamps make it super easy to line up the images. And the paper is as cute as all get out.
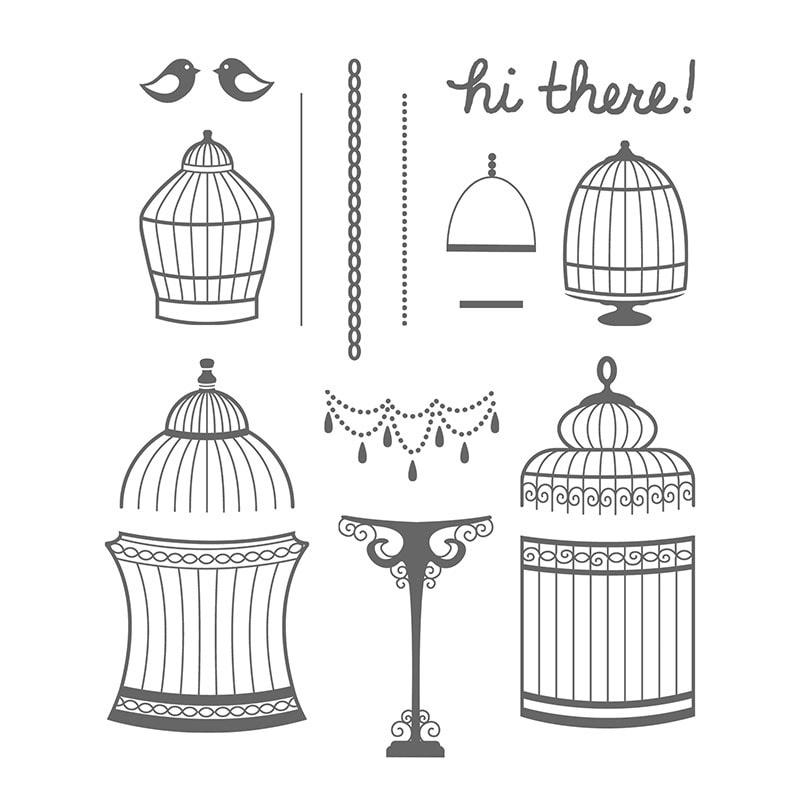
Builder Birdcage stamp set © Stampin’ Up!

Tasty Treats Specialty Designer Series Paper © Stampin’ Up!
Here’s what I made:

Here’s what I did:
Cut with my Stampin’ Trimmer:
- Marina Mist card stock (CS) to 4-1/4″ x 11″, and scored in half at 5-1/2″.
- Tasty Treats Specialty Designer Series Paper (DSP) to 4″ x 5-1.4″.
- a smaller piece of Marina Mist CS to 2-1/4″ x 3-3/8″.
- Whisper White CS to 2-1/8″ x 3-1/4″.
- You may be wondering why the smaller pieces have such odd measurements. When designing the card, I stamped the image first, then trimmed around it until I liked the way it looked. And those just happened to be the measurements.
Stamped using the Builder Birdcage stamp set:
- birdcage in Crumb Cake ink onto the Whisper White CS.
- birds in Marina Mist ink “inside” the birdcage.
- sentiment in Marina Mist ink onto a strip of Whisper White CS big enough to accommodate the banner die (see below.)
Inked:
- edges of doily in Marina Mist ink with a Sponge Dauber.
Die cut:
- stamped sentiment using the Cupcake Cutouts Framelits. Then fold on the score lines created by the die.
Adhered, using glue unless otherwise noted:
- DSP to the card base.
- birdcage piece to the smaller piece of Marina Mist CS.
- doily to the back of the smaller piece of Marina Mist CS.
- smaller piece of Marina Mist CS (with birdcage and doily) to the DSP.
- adhered the middle part of the banner with Stampin’ Dimensionals, and the ends with glue, to the DSP.
- self stick dots in Marina Mist from the Subtles Enamel Shapes.
Here’s what I used:
Now until March 31, you can choose a FREE item from the Sale-a-bration Catalog for each $50 you spend on an order! See the catalog here.
You also earn a Gum Ball from me for each $50. Earn 10 Gum Balls and I’ll send you the stamp set of your choice FREE! See details on Gum Ball Rewards here.
Thanks for stopping by today, and Sweet Stamping!


