Welcome to InKing Royalty’s March Blog Hop! Today’s hop is filled to the brim with projects that celebrate Spring and Summer. With inspiration from Katrina & the Waves’ song “Walking on Sunshine,” we’ve created projects that share the joy and excitement that accompany warmer weather. We are excited to share our projects with you. After you read my post, I hope you’ll hop over to the next person on the list at the base of this post.
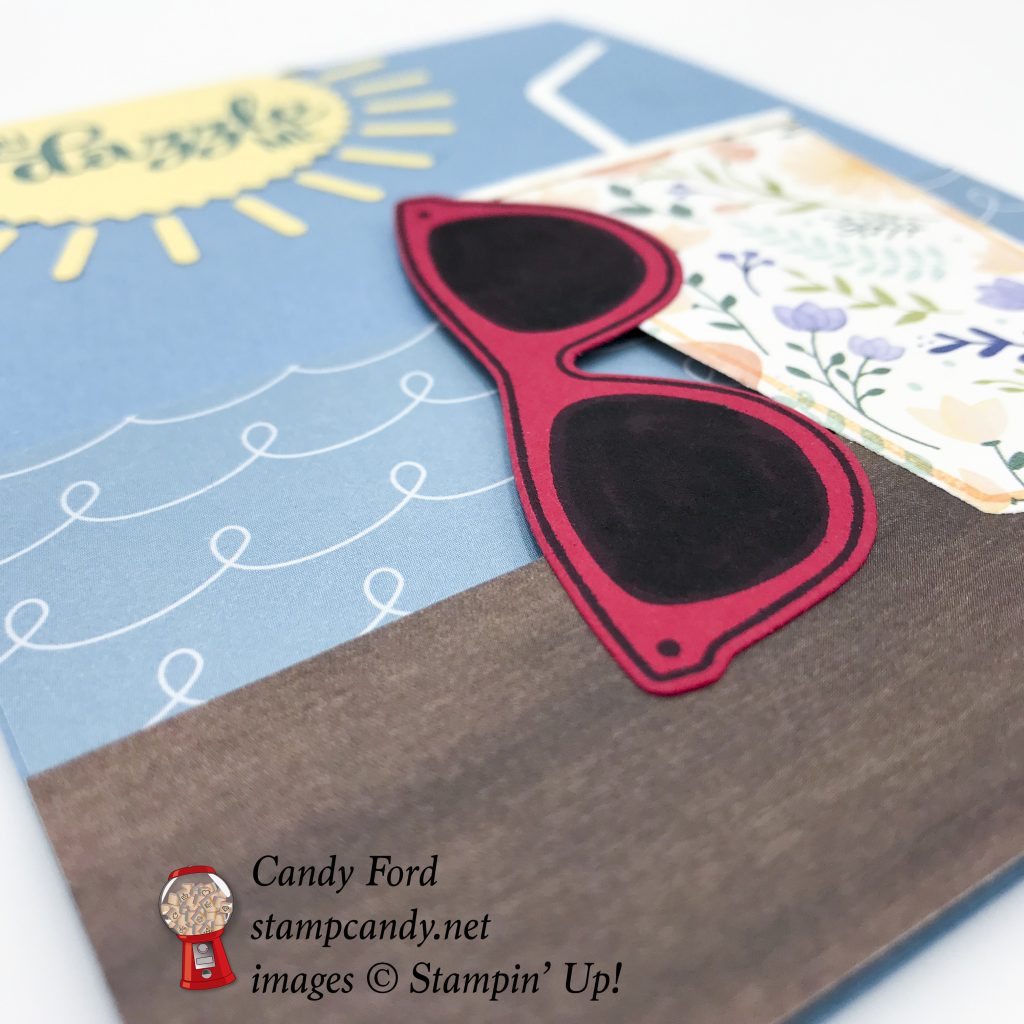
You know how I like to mix and match products. For my card, I used 2 bundles and 3 Designer Series Papers (DSP) to create a summery scene by the sea. The waves are from the Sweet Soiree DSP. The table is from the Wood Textures DSP. The tumbler is from the Delightful Daisy DSP – I think I saw one just like this recently in a store.
Whether you remember the song or not, be sure to check it out here:
Here’s what I made:
Here’s what I did:
Cut and scored with my Stampin’ Trimmer:
Marina Mist card stock (CS) cut to 4-1/4″ x 11″, then scored in half at 5-1/2″
Sweet Soiree DSP cut to 4-1/4″ x 2-1/2″
Wood Textures DSP cut to 4-1/4″ x 1-1/4″
Whisper White Cs cut to 4″ x 5-1/4″ for the inside of the card
Stamped with the Pocketful of Sunshine stamp set:
sentiment in Marina Mist ink onto a scrap of So Saffron CS
glasses in Basic Black ink onto a scrap of Real Red CS
Stamped with the Coffee Cafe stamp set:
cup in Peekaboo Peach ink onto a scrap of Delightful Daisy DSP
straw from a scrap of Whisper White CS
Die cut using the Pocket Framelits:
glasses
rays of sunshine from a scrap of So Saffron CS
Die cut using the Coffee Cups Framelits:
stamped cup
just the top part of the cup from a scrap of Whisper White CS
Cut using Paper Snips:
rim of the cup from the Whisper White die cut piece
Cut using the Starburst Punch:
sentiment
Colored using a Stampin’ Write Marker:
lenses of glasses in Basic Black
Assembled the card:
burnished the fold in the card base with a Bone Folder
Sweet Soiree DSP glued onto the front of the card base
white rim of the cup glued onto the DSP cup
cup glued onto the Wood Textures DSP
glasses glued onto the Wood Textures DSP and the cup
cup, glasses, and Wood Textures DSP adhered onto the card front using Stampin’ Dimensionals
straw glued onto the card front with the bottom part under the cup
sentiment sun glued onto the front of the card base, then trimmed away the excess with Paper Snips
sun rays glued onto the front of the card base
Here’s the hop:
Use this list if you get lost along the hop. Be sure to check out all the stops, because you don’t want to miss any of the projects made by this amazing group of stampers!
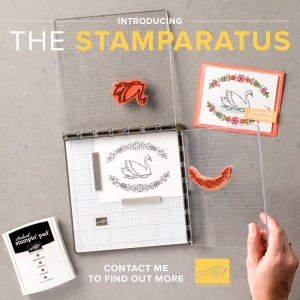
The In the Trees stamp set is has a lovely tree and lots of things to build scenes with. There are several things to hang between two of the trees, but how do you get the spacing just right? Enter the Stamparatus. This set was made to use with this amazing new tool – not that you have to us it, but it sure makes things a lot easier. See, the Stamparatus has hinges, and the plates (there are 2 reversible ones) come out and can be moved down one hinge space at a time. So with this stamp set, you stamp the tree, then step down 3 hinges and stamp again. Now the hammock, lights, etc. fit perfectly between the trees!
If you didn’t get a Stamparatus during the November and December reservation windows, don’t fret. It will be in the 2018-2019 Annual Catalog that goes live June 1. Can’t wait that long to play with one? Come to one of my Stamparatus Classes, April 13 or May 11.
Click on these images for more details and to purchase.
Here’s some stuff you should know:
This is a fabulous time to join my team! Sale-A-Bration is the biggest event of the Stampin’ Up! year and you can save big on the ultimate bundle, the Starter Kit. CLICK HEREfor more information. Contact me with any questions: email candy@stampcandy.net or call/text 404-661-5222
Newsletter: subscribe for exclusive deals, projects, and more! Enter your email address and click SUBSCRIBE at the top right of this page, just under the picture of my smiling face. You can also choose to receive an email every day that I have a blog post.
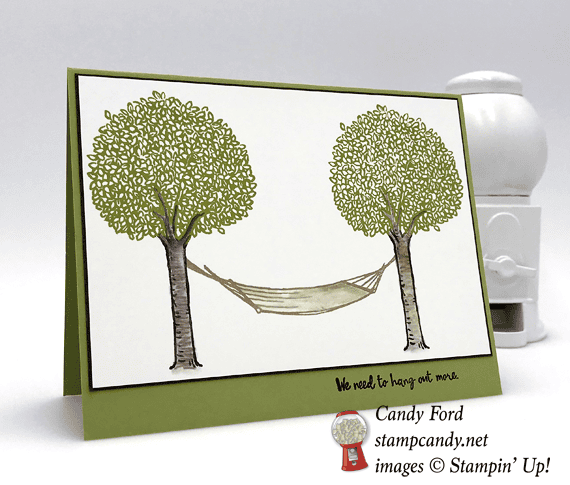
I wanted to use green for my project today, in honor of the holiday. I didn’t really find a good way to make shamrocks or clover that I haven’t already done. So I tried to create greenery along a wooden wall, and I used Glimmer Paper (yes, I did!) to add some sparkle. The Teeny Tiny Wishes stamp set (which should be in everyone’s collection) provided the sentiment. I hope you like what I came up with.
Here’s what I made:
Here’s what I did:
Cut and scored with my Stampin’ Trimmer:
Early Espresso card stock (CS) cut to 4-1/4″ x 11″, then scored in half at 5-1/2″
Wood Textures Designer Series Paper (DSP) cut to 4″ x 5-1/4″
Myths & Magic Glimmer Paper cut to 4″ x 3″
Whisper White Thick CS cut to 4″ x 2-3/8″
Very Vanilla CS cut to 4″ x 5-1/4″ for the inside of the card
Stamped with the Teeny Tiny Wishes stamp set:
sentiment in Wild Wasabi ink onto a scrap of the DSP
Die cut using the Detailed Floral Thinlits:
floral design from the 4″ x 5-1/4″ DSP
Cut using Paper Snips:
cut around the sentiment
Assembled the card:
burnished the fold in the card base with a Bone Folder
Glimmer Paper glued onto the back of the die cut area of the DSP layer
Whisper White Thick CS glued to the remainder of the back of the DSP
Glimmer Paper & Whisper White Thick CS (that are glued to the back of the DSP layer) glued to the front of the card base
Linen Thread adhered to the back of the sentiment using Stampin’ Dimensionals
sentiment adhered to the DSP layer using those same Stampin’ Dimensionals
small Pearl Basic Jewel colored with a Sharpie marker, then adhered to the DSP layer as if the sentiment was hanging from it
Very Vanilla CS glued to the inside of the card base
Here are today’s colors:
You can click on each one to see all the products that come in that color!
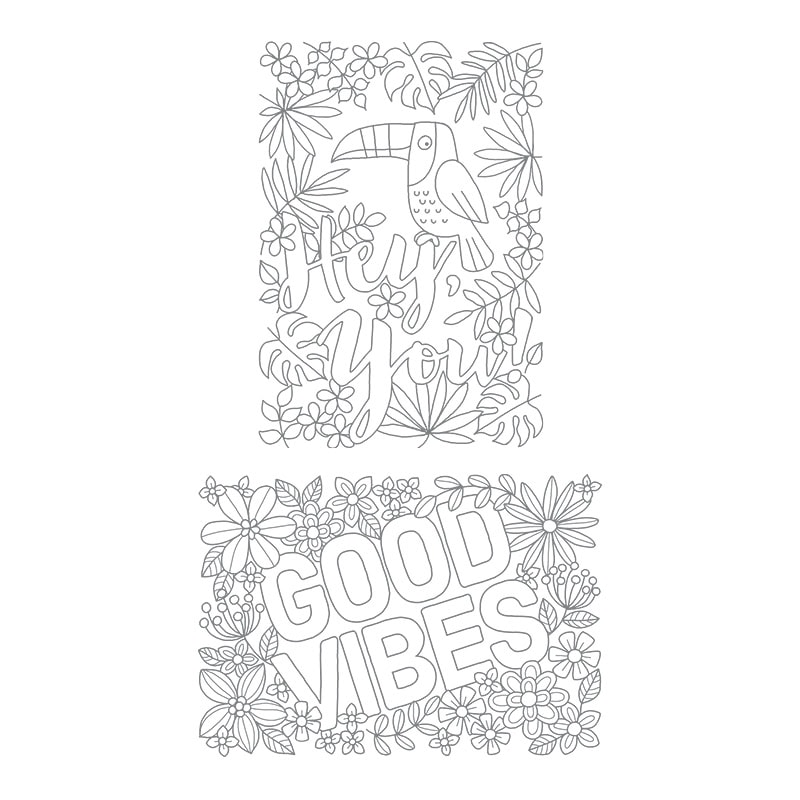
Talk about an easy peasy card! Today’s is made with one piece of card stock and one stamp. It’s the third in a trio of cards I’ve made recently with different coloring techniques. I used Watercolor Pencils to color in the image. Even though they’re for using with water, you don’t have to. I really like the effect I got using them dry. The image is from the Good Vibes stamp set, which is made for coloring. Check out these great images:
Here’s what I made:
Here’s what I did:
Cut and scored with my Stampin’ Trimmer:
Whisper White Thick card stock (CS) cut to 5-1/2″ x 8-1/2″, then scored in half at 4-1/4″
Stamped with the Good Vibes stamp set:
image in Archival Basic Black ink onto the front of the card base
Colored using Watercolor Pencils:
words in Real Red
flowers and leaves in Bermuda Bay, Calypso Coral, Daffodil Delight, Melon Mambo, Old Olive, Pacific Point, Pumpkin Pie, and Rich Razzleberry
Assembled the card:
burnished the fold in the card base with a Bone Folder
Done!
Here are today’s colors:
You can click on each one to see all the products that come in that color!
Yesterday I told you how I’d been in a coloring mood, and I shared a card that I colored using Stampin’ Write Markers. For today’s card, I used an Aqua Painter to watercolor on Shimmery White card stock. I stamped the flower and sentiment from the Beautiful Day stamp set in Archival Basic Black ink, so it wouldn’t smear with the water. I’ve been in the mood for soft Springy colors, so that’s how I colored this card. Berry Burst is a pretty deep color, but that’s the nice thing about watercoloring. You can water down the color to make it much lighter. Another thing I like about it is that you don’t really know what it’s going to look like until it dries. It’s always a little surprise, which I think is fun.
Here’s what I made:
Here’s what I did:
Cut and scored with my Stampin’ Trimmer:
Shimmery White card stock (CS) cut to 5-1/2″ x 8-1/2″, then scored in half at 4-1/4″
Shimmery White CS cut to 5-1/4″ x 4″
Stamped with the Beautiful Day stamp set:
flower and sentiment in Archival Basic Black ink onto the 5-1/4″ x 4″ Shimmery White CS layer
Watercolored using the Aqua Painters:
flower in Berry Burst
flower center in Daffodil Delight
leaf in Lemon Lime Twist
background in Pool Party
Assembled the card:
burnished the fold in the card base with a Bone Folder
completely dried watercolored layer glued onto the front of the card base
Here are today’s colors:
You can click on each one to see all the products that come in that color!
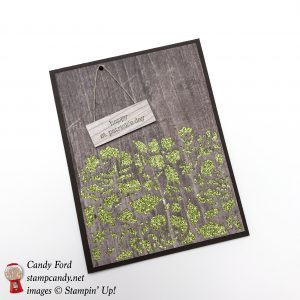
I was in a real coloring mood recently, and I came up with several cards, using different coloring tools, that I’ll be sharing in the next few days. I colored today’s card using Stampin’ Write Markers. The sentiment is from the Bird Banter stamp set, which I thought was appropriate with the feather background from the Just Add Color Specialty Designer Series Paper.
But before I show you my card I want to be sure you know about my Tool Sale. CLICK HERE for all the details. Through tonight at midnight PT, get 10% off Stampin’ Up! Tools. Since this is my offer and is not through Stampin’ Up!, you must contact me directly to place your order: candy@stampcandy.net.
What’s included? Big Shot and accessories, dies, embossing folders, punches, punch boards, heat tool, Aqua Painters, Brayers, masks, palette knives, sponges & daubers, spritzers, Bone Folder, Color Caddy, Paper Snips, Paper Piercing Tool, Stampin’ Pierce Mat, Simply Scored, Stampin’ Trimmer & accessories.
What is not included? Stamps, inks, paper, adhesives, Memories & More, embossing powder, embossing paste, kits, Paper Pumpkin, markers, Brusho, glitter, embellishments, ribbon & trim, washi tape – most anything consumable, basically.
Here’s what I made:
Here’s what I did:
Cut and scored with my Stampin’ Trimmer:
Whisper White Thick card stock (CS) cut to 5-1/2″ x 8-1/2″, then scored in half at 4-1/4″
Basic Black CS cut to 5-3/8″ x 4-1/8″
Just Add Color Specialty Designer Series Paper (DSP) cut to 5-1/4″ x 4″
Stamped with the Bird Banter stamp set:
sentiment part 1 in Basic Black ink onto a scrap of Whisper White CS
sentiment part 2 in Basic Black ink onto the inside of the card base (I forgot to photograph the inside. It says, “Obviously, it wasn’t an early bird”)
Die cut using the Lots of Labels :
sentiment
Basic Black CS scrap a size larger than the sentiment
Colored using Stampin’ Write Markers:
DSP layer in Crumb Cake, Soft Sky, Wisteria Wonder, Calypso Coral, Rich Razzleberry, Berry Burst, Chocolate Chip, Pear Pizzazz, So Saffron, Real Red, Crushed Curry, Marina Mist, and Tranquil Tide. At least I think that’s all of them. Of course you can color them in any colors you like, since the rest of the card is simply black and white.
Assembled the card:
burnished the fold in the card base with a Bone Folder
Basic Black CS layer glued onto the front of the card base
DSP layer glued onto the Basic Black CS layer
sentiment glued onto the Basic Black CS die cut
Basic Black CS die cut adhered to the DSP layer using Stampin’ Dimensionals
Here are today’s colors:
You can click on each one to see all the products that come in/with that color!