May 3, 2018 | Catalogs, Deals, New Products, Retiring Products |

Out With the Old
Only 28 days left to buy retiring products. That is, only 28 days to buy what’s left of the retiring products. If there is something you want, I highly recommend you get it now rather than later. Some products have already sold out – see the discontinued chart below. Retiring stamp sets are guaranteed available until May 25. Everything else is available only while supplies last.
Here are the retiring product lists in pdf and spreadsheet format:
Here are the products from the retiring lists that are no longer available: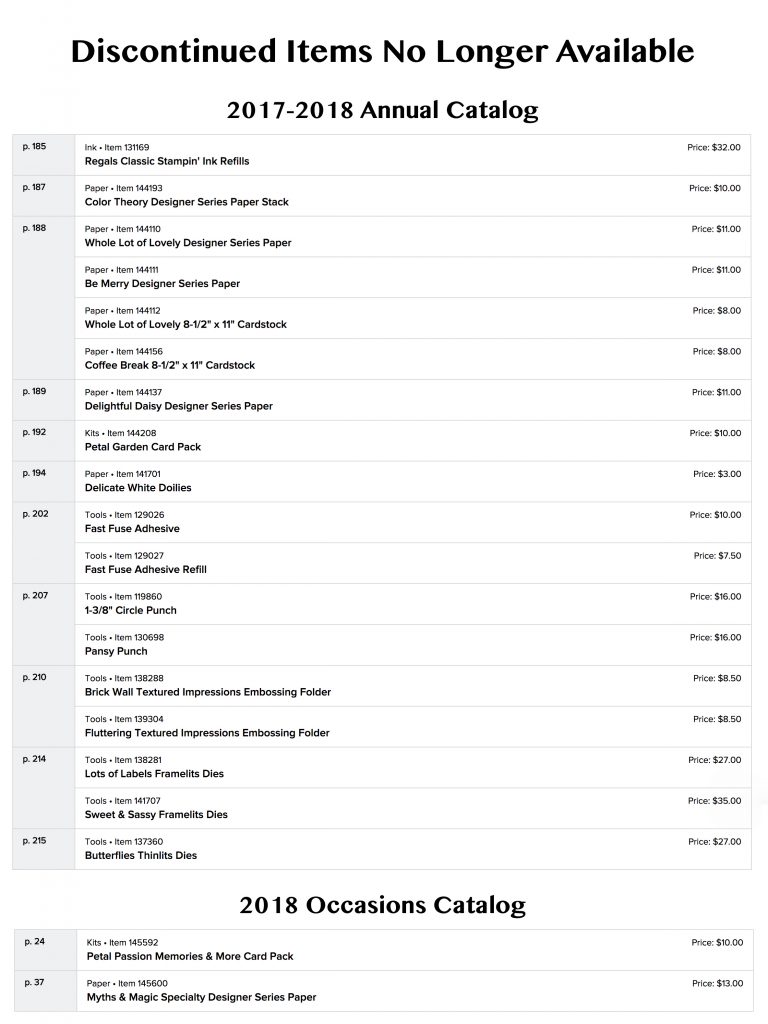
In With the New
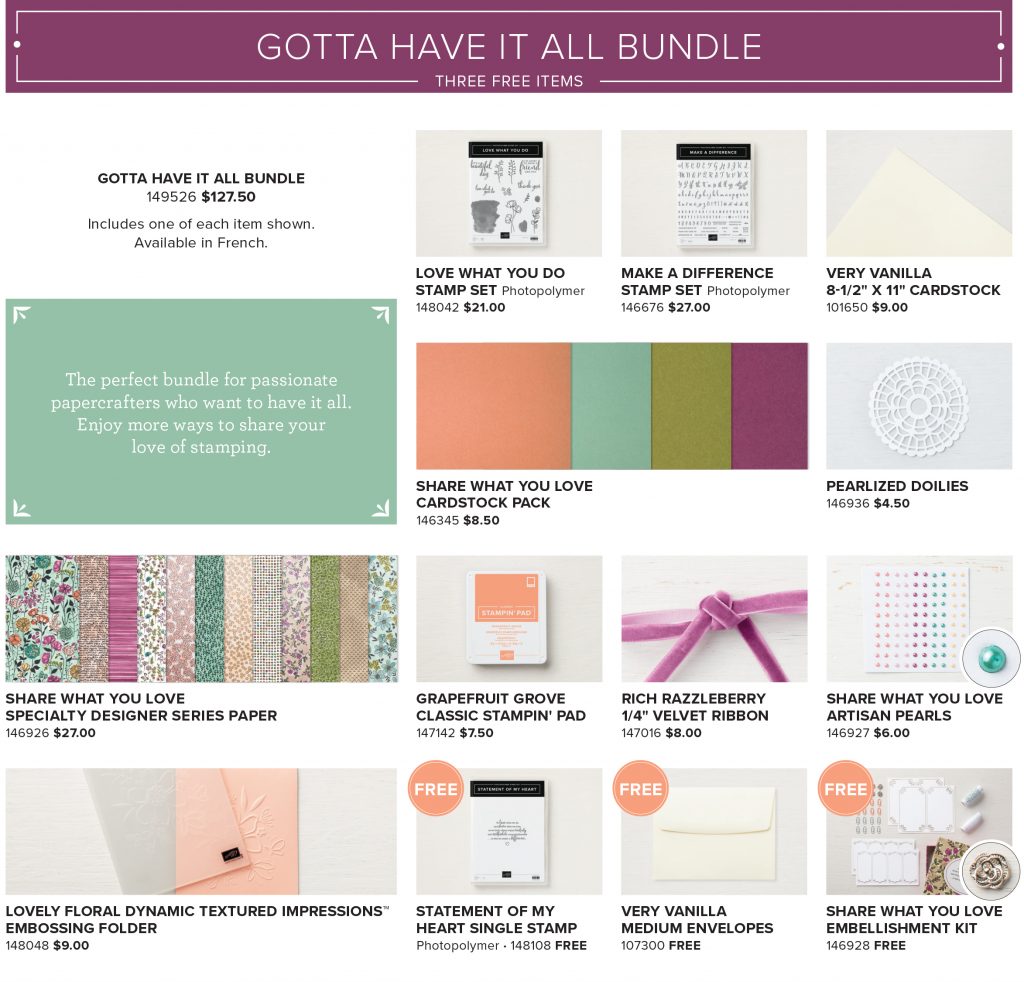
There are four amazing bundles of brand new products that you can order now! The first three Share What You Love theme bundles include free products. With the fourth bundle, of the new in color ink pads, you save 10%! These bundle prices and free product offers end on May 31, so order them now and save!
If a bundle is “backordered” that means that one of the items in the bundle is on backorder. You will receive everything else in the order as usual, then the backordered item will be delivered to you as soon as it’s available.
Here’s Candy’s Choice:
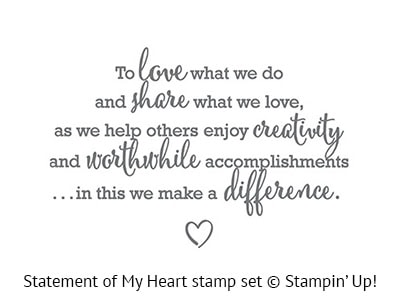
This bundle has 13 items (3 of them free) including 3 stamp sets. This is the only way you can get the limited edition Statement of My Heart stamp set – it is only available in this bundle, and only through May 31 – and it’s free!
CANDY’S EXTRA MAY SPECIAL: Order the Gotta Have It All Bundle from me and earn more Gumball Rewards!
This bundle would normally earn you 2 gumballs, but while it’s available in May, I’ll give you 3! That’ll get you 1 gumball closer to a free stamp set of your choice!
Here’s some more stuff you should check out:
Thanks for stopping by today, and Sweet Stamping!
May 2, 2018 | Blog Hop, Cards, Retiring Products |

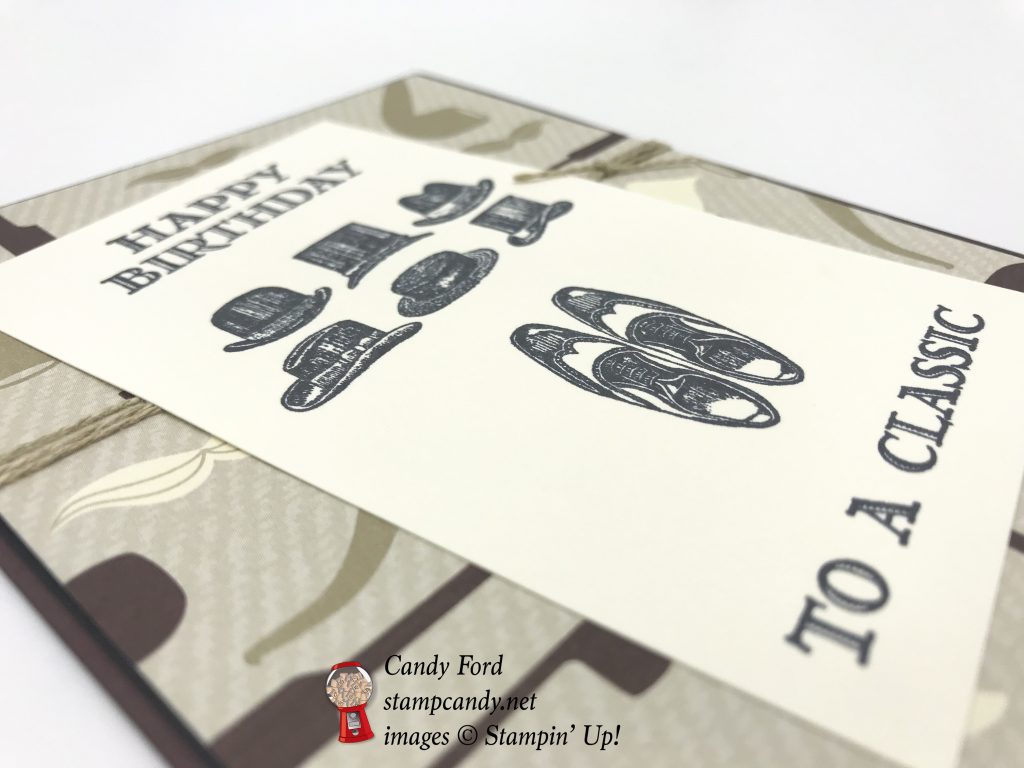
It’s time for the ICS Blog Hop for May. This month’s theme is It’s a Guy Thing, and we’re making masculine projects. Why do we have so much trouble with guy cards? I think it’s because we aren’t using the right products. Because when you have the right stuff, it’s easy. Like the Guy Greetings stamp set and True Gentleman Designer series Paper. With these two products and some card stock, I created this very simple and oh so masculine birthday card for a classic guy.
After reading my post, I hope you’ll hop to the next stop, Joni Metras of Joni in the Spotlight Stamping. Just scroll down and click on the arrow.
Here’s what I made:

Here’s what I did:
Cut and scored with my Stampin’ Trimmer:
- Chocolate Chip card stock (CS) cut to 4-1/4″ x 11″, then scored in half at 5-1/2″
- Basic Black CS layer cut to 4-1/8″ x 5-3/8″
- True Gentleman Designer Series Paper (DSP) layer cut to 4″ x 5-1/4″
- Very Vanilla CS layer cut to 2-3/4″ x 4-5/8″
- Very Vanilla CS cut to 4″ x 5-1/4″ for the inside of the card
Stamped with the Guy Greetings stamp set:
- “Happy Birthday, hats, shoes, and “To a Classic” in Basic Black ink onto the Very Vanilla layer
Assembled the card:
- burnished the fold in the card base with a Bone Folder
- Basic Black CS layer glued onto the front of the card base
- DSP layer glued onto the Basic Black CS layer
- Very Vanilla CS layer glued onto the DSP layer
- Very Vanilla CS glued onto the inside of the card base
Here’s the hop:
Click the arrow to hop to the next blog, Joni Metras of Joni in the Spotlight Stamping:

Here are today’s colors:
You can click on each one to see all the products that come in that color!
Here’s what I used:
Click on these images for more details and to purchase.
Here’s some stuff you should know:
Thanks for stopping by today, and Sweet Stamping!

Apr 29, 2018 | Cards, Retiring Products |
I really noticed the World’s Best Trophy stamp set for the first time recently. It’s so versatile – it has a stamp for just about anyone you’d ever want to honor with a card. Aaaaaand now it’s retiring. Stampin’ Up! has guaranteed stamps to be available until May 25, so don’t worry if you haven’t ordered this one yet. But do it soon!

World’s Best Trophy stamp set © Stampin’ Up!
The Lots of Labels Framelits Dies are already sold out (see the chart near the bottom of this post) but you can use the Layering Ovals Framelits Dies to recreate today’s card.
Here’s what I made:


Here’s what I did:
Cut and scored with my Stampin’ Trimmer:
- Sweet Soiree Designer Series Paper (DSP) cut to 4-3/4″ x 3-1/4″
Die cut using the Lots of Labels Framelits:
- a scrap of Whisper White CS
Stamped with the World’s Best Trophy stamp set:
- “grandma” in Marina Mist ink onto the die cut label
- sentiments above and below “grandma” in Flirty Flamingo ink
Assembled the card:
- burnished the fold in the note card base with a Bone Folder
- DSP layer glued onto the card front
- silver doily glued onto the DSP layer
- die cut adhered to the doily using Stampin’ Dimentionals
Here are today’s colors:
You can click on each one to see all the products that come in that color!
Here’s what I used:
Click on these images for more details and to purchase.

Only Two Days Until the Share What You Love Bundle is available!
In only two days Stampin’ Up! will release the Share What You Love suite of products a month early! CLICK HERE to see the full brochure! There are three bundles. With the exception of the Statement of My Heart stamp set which is only available through May 31, all the products will carry over to the new annual catalog, but the bundle prices and free products end May 31.
Here’s some other stuff you should know:

Thanks for stopping by today, and Sweet Stamping!
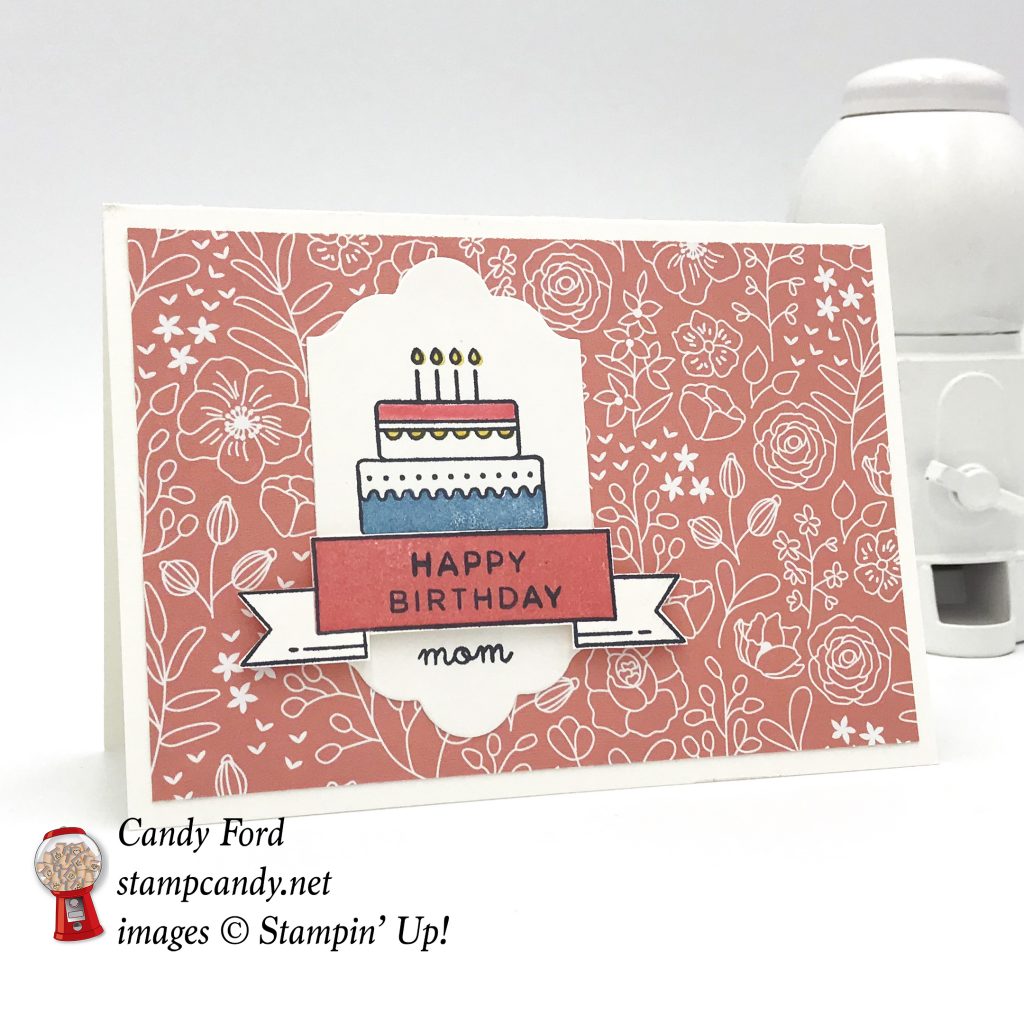
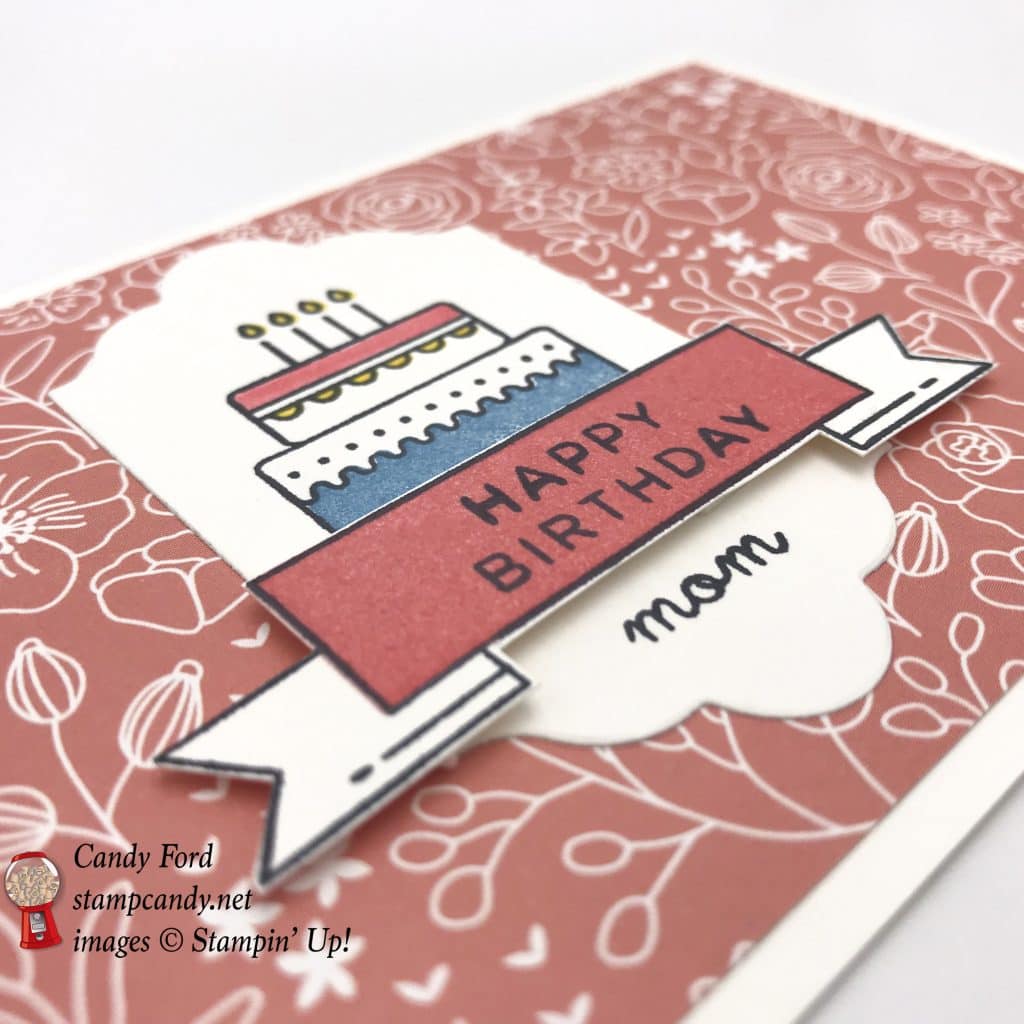
Apr 26, 2018 | Cards, Gallery, Retiring Products |
Today I’m sharing one of four cards I designed for our Candy Hearts team meeting. Since then the Lots of Labels Framelits Dies have sold out. If you got them before that, great! if not, you can use the Layering Ovals Framelits Dies.The Designer Series Papers seem to be selling out quickly, so if the Sweet Soiree Designer Series Paper (DSP) sells out, of course you can substitute any patterned paper that you like, and use ink colors that coordinate with that paper.
Here’s what I made:
Here’s what I did:
Cut and scored with my Stampin’ Trimmer:
- Sweet Soiree Designer Series Paper (DSP) cut to 4-3/4″ x 3-1/4″
Stamped with the World’s Best Trophy stamp set:
- cake outline in Memento Black ink onto a scrap of Whisper White card stock (CS)
- filled in cake in Daffodil Delight, Flirty Flamingo, and Marina Mist inks
- banner and Happy Birthday in Memento black ink
- filled in banner in Flirty Flamingo ink
- Mom in Memento black ink below the cake, leaving room for the banner
Die cut using the Lots of Labels Framelits:
Cut using Paper Snips:
Assembled the card:
- burnished the fold in the note card base with a Bone Folder
- DSP glued onto the front of the note card base
- die cut glued onto the DSP
- banner adhered over the die cut using Stampin’ Dimensionals
Here are today’s colors:
You can click on each one to see all the products that come in that color!
Here’s what I used:
Click on these images for more details and to purchase.
Here’s some stuff you should know:
Thanks for stopping by today, and Sweet Stamping!
Apr 24, 2018 | Gifts, Retiring Products |
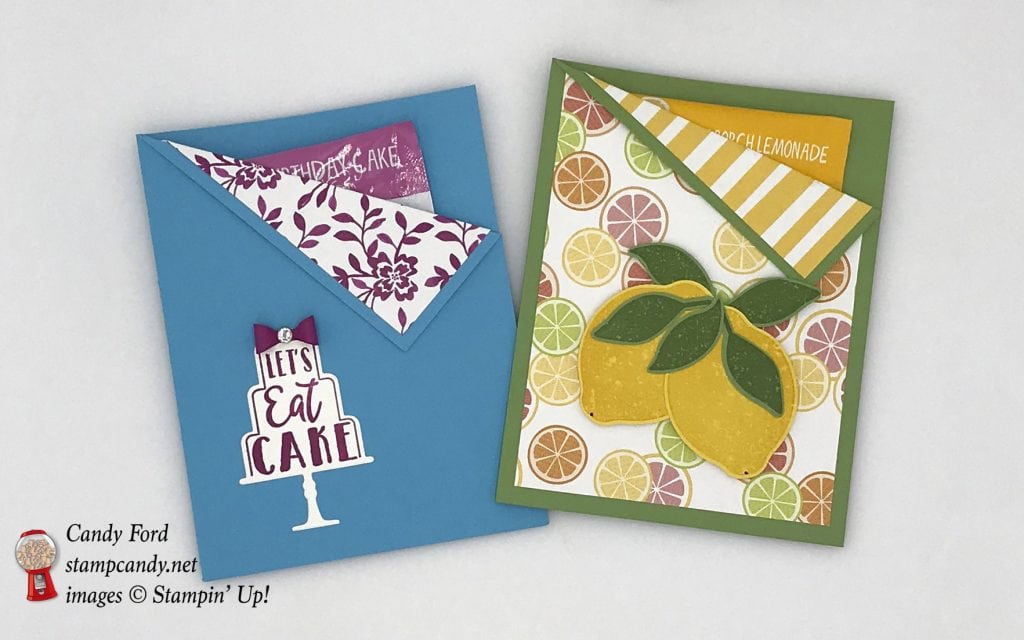
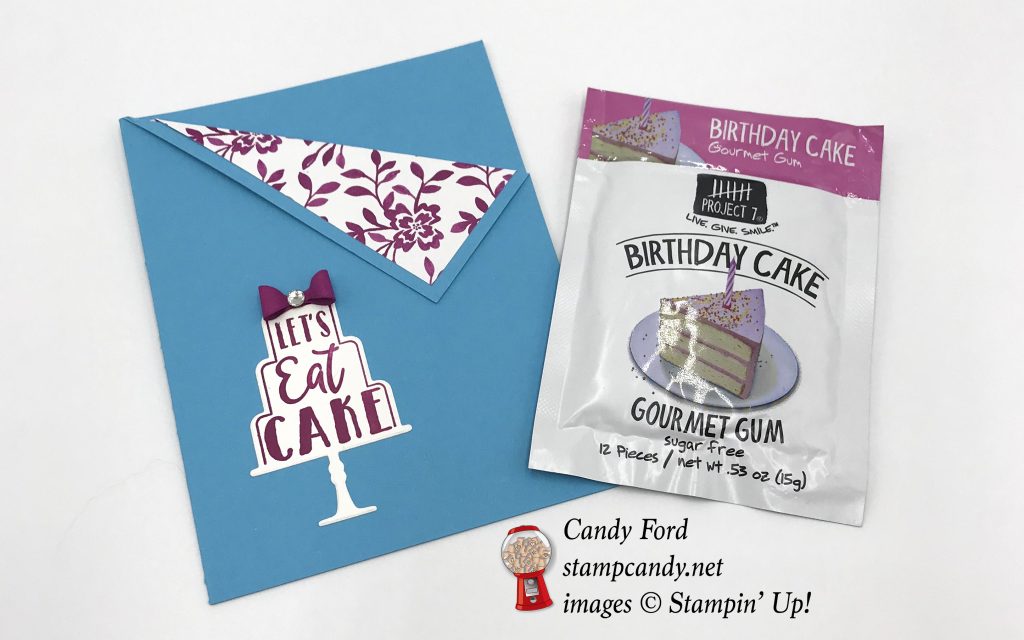
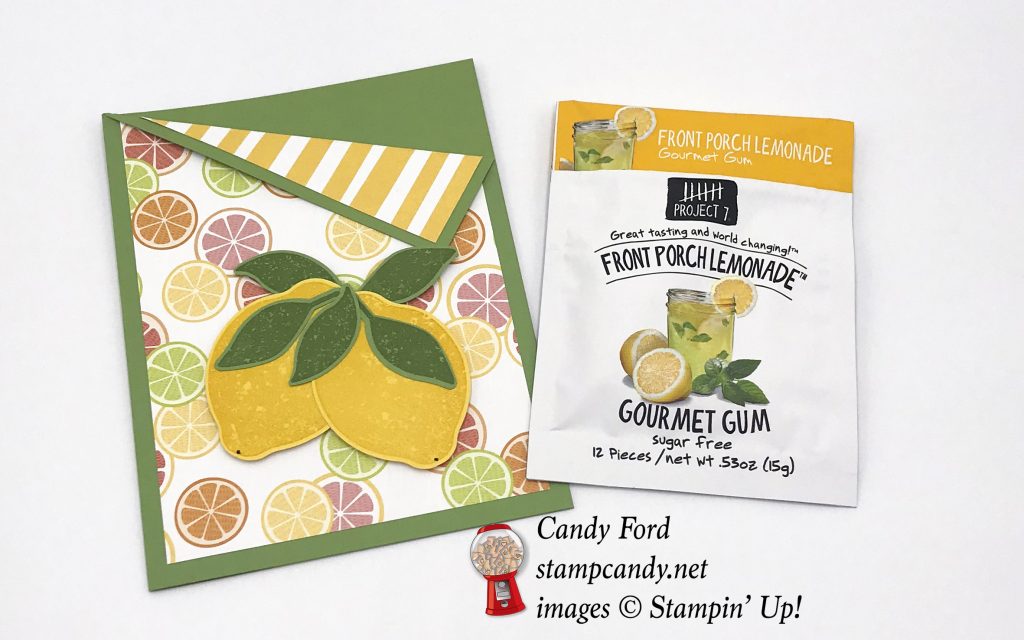
Today’s project is a two-fer. I found these cute little packs of “gourmet gum” at Fresh Market and thought they would make great little gifts. I haven’t tasted them yet, but I’m thinking they might be pretty tasty. I mean, birthday cake and front porch lemonade? Yum! I made these gum holders for them: one using the Celebration Time Bundle and Fresh Florals Designer Series Paper (DSP,) and the other using the Lemon Zest Bundle and Tutti-frutti DSP.

Celebration Time Bundle © Stampin’ Up!
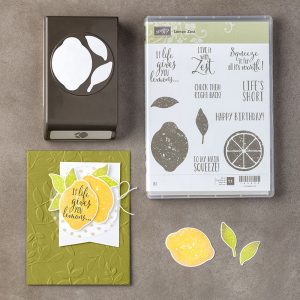
Lemon Zest Bundle © Stampin’ Up!
Here’s what I made:


Here’s what I did:
Cut and scored with my Stampin’ Trimmer:
- Tempting Turquoise card stock (CS) cut to 8-1/2″ x 5-1/2″, then scored in half at 4-1/4″
- Fresh Florals Designer Series Paper (DSP) cutt o 4″ x 3″
- Wild Wasabi CS cut to 8-1/2″ x 5-1/2″, then scored in half at 4-1/4″
- Tutti-frutti DSP (fruit) cut to 4″ x 4-1/4″
- Tutti-frutti DSP (stripes) cut to 4″ x 3″
Stamped with the Celebration Time stamp set:
- Let’s Eat Cake sentiment in Berry Burst ink onto a scrap of Whisper White CS
Stamped with the Lemon Zest stamp set:
- lemons in Daffodil Delight ink onto a scrap of Daffodil Delight CS
- leaves in Wild Wasabi ink onto Wild Wasabi CS
- NOTE: I added a black dot at the bottom of each lemon with a black marker.
Die cut using the Celebration Thinlits:
- cake sentiment
- bow from a scrap of Berry Burst CS
Cut using the Lemon Builder Punch:
Assembled the holders:
- burnished the folds in the two CS bases with a Bone Folder
- folded down the top right corner of each CS base and burnished the fold with a Bone Folder
- Fresh Florals DSP glued onto the inside of the Tempting Turquoise CS base, and folded over the corner so the DSP showed on the outside
- Tutti-frutti DSP (stripes) glued onto the inside of the Wild Wasabi CS base, and folded over the corner so the DSP showed on the outside
- Tutti-frutti DSP (fruit) glued onto the front of the Wild Wasabi CS base, the top right corner not showing under the folded over corner of the base
- Used a small bit of adhesive under the corners to keep them folded down.
- bottom and side edges of the inside of the front of each CS base glued to the back of the bases
- die cut cake glued onto the front of the Tempting Turquoise CS base
- bow put together and glued onto the top of the cake
- rhinestone applied to the center of the bow
- lemons and leaves glued together, then adhered to the Tutti-frutti DSP (fruit) using Stampin’ Dimensionals
- inserted the gum packs into the holders
Here are today’s main colors for each holder:
You can click on each one to see all the products that come in that color!
Here’s what I used:
Click on these images for more details and to purchase.
Here’s some stuff you should know:
Thanks for stopping by today, and Sweet Stamping!
Apr 18, 2018 | Blog Hop, Cards, Gallery, Retiring Products |
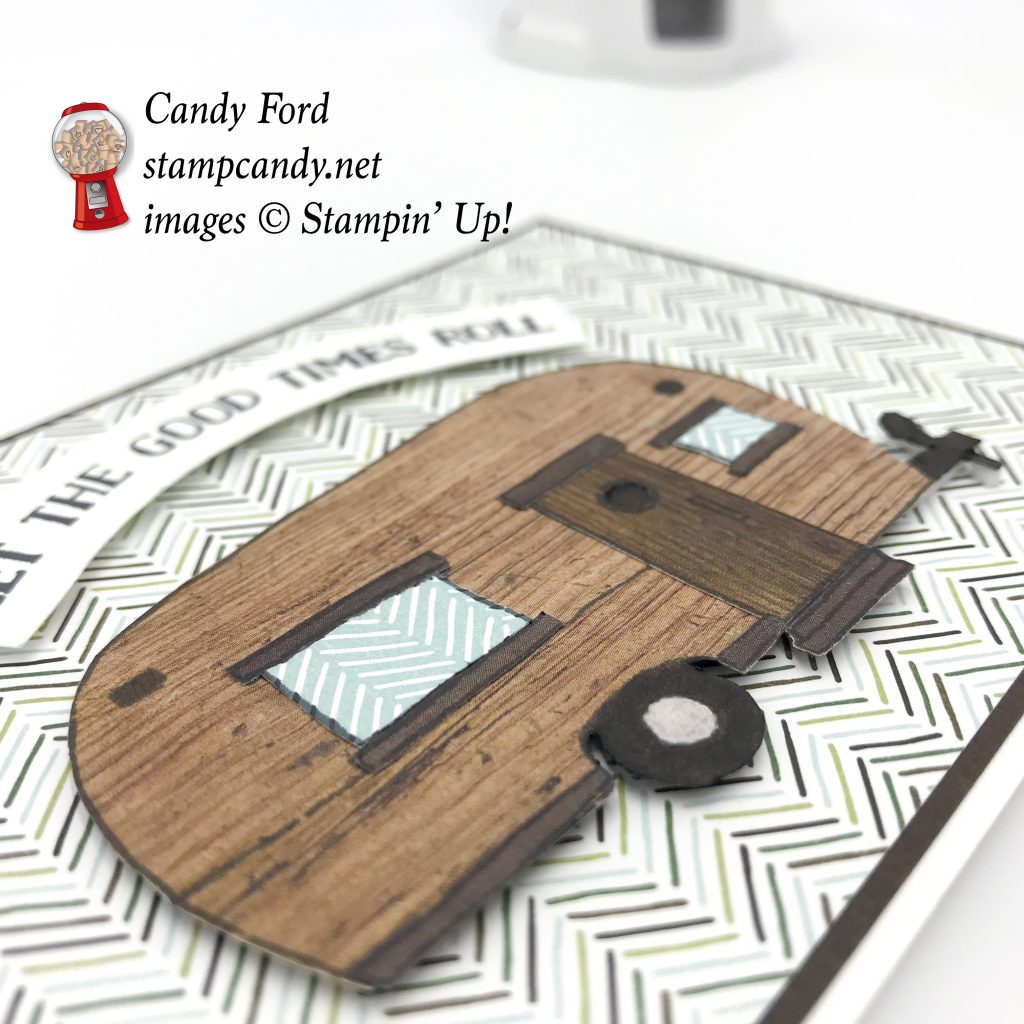
It’s time for the InKing Royalty Blog Hop! This month’s theme is Let the Good Times Roll. We’re sharing projects that are party themed or that have wheels, or both! I’ve use 2 stamp sets (Let the Good Times Roll and Glamper Greetings) and 2 Designer Series Papers (Wood Textures and Coffee Break) to make today’s card. Glamper Greetings and Coffee Break DSP are on the retiring list, so you’d better grab them while you still can.
When you hear “Let the Good Times Roll” you might think of The Cars’ song from the 1980s, but I opted for something a little older. Watch the video below to hear the Shirley & Lee song from the 1950s:
https://www.youtube.com/watch?v=4F98A2BBybE
Here’s what I made:
This camper reminds me of the 1950s. I can imagine it parked somewhere with this song playing on the radio. That would be an AM radio, no stereo!

Here’s what I did:
Cut and scored with my Stampin’ Trimmer:
- Early Espresso card stock (CS) layer cut to 4-7/8″ 3-3/8″
- Coffee Break Designer Series Paper (DSP) layer cut to 4-3/4″ x 3-1/4″
Stamped with the Glamper Greetings stamp set:
- camper in Memento black ink onto scraps of 3 different pieces of Wood Textures DSP
- camper in Memento black ink onto a scrap of Coffee Break DSP (blue)
Stamped with the Let the Good Times Roll stamps set:
- sentiment in Memento black ink onto a scrap of Whisper White Thick CS
- NOTE: I curved the photopolymer stamp into an arc
Cut using Paper Snips:
- one whole camper from the lightest stamped piece of Wood Textures DSP
- door from a darker stamped piece of Wood Textures DSP
- trim from an even darker stamped piece of Wood Textures DSP
- “curtains” from the stamped piece of Coffee Break DSP
- sentiment
Cut using a 1/8″ Circle Punch:
- window in door – the window is a little larger than 1/8″, so I punched around the circle 3 or 4 times
Colored using markers:
- tire and hitch (is that what it’s called?) using a Basic Black Stampin’ Write Marker
- spot behind the door window using a Basic Black Stampin’ Write Marker
- hub cap using a White Stampin’ Chalk Marker
Assembled the card:
- Early Espresso CS layer glued onto the front of a Whisper White Note Card
- Coffee Break DSP layer glued onto the Early Espresso CS layer
- door, trim pieces, and curtains glued onto the whole camper
- sentiment and camper adhered to the Coffee Break DSP layer using Stampin’ Dimensionals
Here’s the hop:
Be sure to check out all the stops on the hop! You don’t want to miss any of these projects! The next stop from here is Imogene Thomas at MomoMakes.com. If you get lost during the hop, you can use this list to find your way.
- Brian King at Stamp with Brian
- Sue Jackson at Just Peachy Stamping
- Jennifer Spiller at Westside Paper Creations
- Rachael Shedeed at Bluebonnet Stampin’
- Lynn Kolcun at Avery’s Owlery
- Lisa Pretto at InkBig Academy Stamps
- Robin Myren at Songbird Designs by Robin
- Shawn de Oliveira at Shawn Stamps
- Nina King at InkPaperSequins
- Candy Ford at StampCandy <—————— YOU ARE HERE
- Imogene Thomas at MomoMakes.com
- Robbye Hamilton at Miss Hammie’s Crafts
- Jackie Beers at Blue Line Stamping
- Julie DiMatteo at The Paper Pixie
- Denise Hoepfner at The Mountain Magpie
- Deb Cozzone at Grand Central Stamping
- Pam Morris at Tap Tap Stamp
Here are today’s main colors:
You can click on each one to see all the products that come in that color!
I know “wood” isn’t technically a color, but I wanted to show you all the different colors and patterns in this pack of 6″ x 6″ Designer Series Paper:
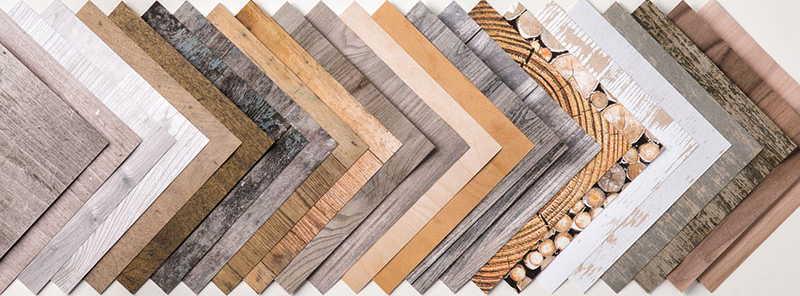
Wood Textures DSP © Stampin’ Up!
Here’s what I used:
Click on these images for more details and to purchase.
Here’s some stuff you should know:
Thanks for stopping by today, and Sweet Stamping!
