Mar 19, 2020 | Cards, Gallery, Sale-A-Bration |
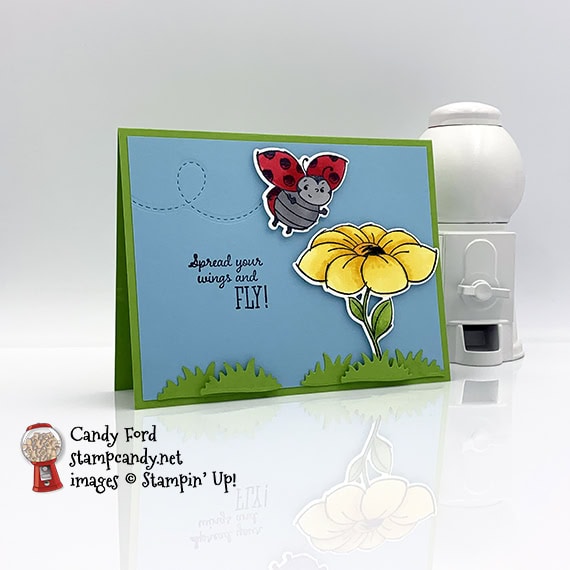
Today I’m sharing a card I made using the Little Ladybug host stamp set and the coordinating Ladybug Dies. I had fun coloring the sweet little ladybug and the big flower using Stampin’ Blends Markers. And check out the bee’s route cut into the card stock layer using a die – so cute!
If you are reading this in email, some photos may appear blurry, or may not appear at all. Please click here to see the post on my blog.
S ladybug ladybug ladybug
Here’s what I made:

S
Here’s what I did:
Cut and scored with my paper trimmer:
- Granny Apple Green card stock (CS) cut to 5-1/2″ x 8-1/2″, then scored in half at 4-1/4″
- Balmy Blue CS layer cut to 5-1/4″ x 4″
- Whisper White CS cut to 5-1/4″ x 4″ for the inside of the card base
Stamped with the Little Ladybug stamp set:
- sentiment in Tuxedo Black Memento ink onto the Balmy Blue CS layer
- ladybug and flower in Tuxedo Black Memento ink onto a scrap of Whisper White Thick CS
Colored using Stampin’ Blends Markers:
- bee’s face in Light Smoky Slate
- belly in Dark Smoky Slate
- arms and legs in Light Basic Black
- back and wings in Real Red (Light & Dark)
- flower petals in Daffodil Delight (Light & Dark)
- flower center in Dark Mango Melody
- stem and leaves in Granny Apple Green (Light & Dark)
Cut using the Ladybugs Dies:
- ladybug and flower from the Whisper White Thick CS
- 5 clumps of grass from a scrap of Granny Apple Green CS
- bee train cut into the Balmy Blue CS layer
Assembled the card:
- burnished the fold in the card base with a Bone Folder
- Balmy Blue CS layer glued onto the front of the card base
- ladybug and flowers adhered onto the Balmy Blue CS layer using Stampin’ Dimensionals
- 3 grass clumps glued along the bottom of the Balmy Blue CS layer
- 2 grass clumps adhered along the bottom of the Balmy Blue CS layer, one covering the bottom of the flower stem
- Whisper White CS glued onto the inside of the card base
Sglued
Here are today’s colors:
You can click on each one to see all the products that come in that color!
S
Here’s what I used:
Click on these images for more details and to purchase. If you are reading this post in email, the product images may not show up. Click here to see the post on my blog.
Click “Supply List” above for a clickable and printable list of the products!
S
Here are some helpful links:
Thanks for stopping by today, and Sweet Stamping!
Mar 13, 2020 | Cards, Gallery, Sale-A-Bration |
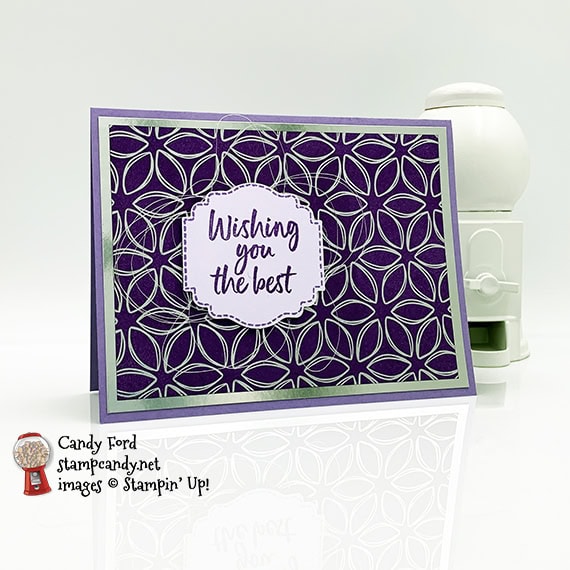
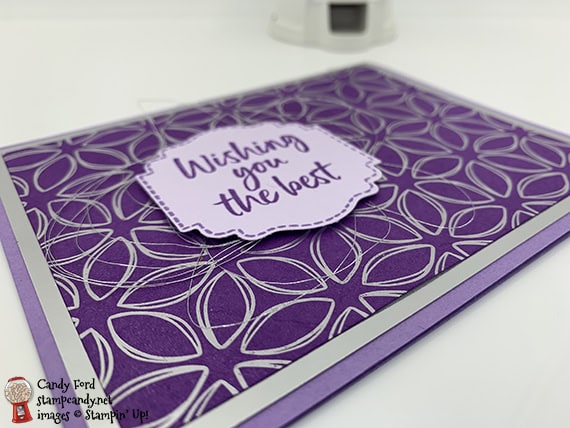
Today’s card is one that we made at my March Stamp Club gathering. I used the Tags In Bloom stamp set, Label Me Lovely Punch, and Flowering Foils Specialty Designer Series Paper. To get the deep color, I rubbed the ink pad directly across the paper, then rubbed off any excess with a paper towel. The silver foil flowers resist the ink, so I only changed the background color.
If you are reading this in email, some photos may appear blurry, or may not appear at all. Please click here to see the post on my blog.

S Tags in Bloom Tags in Bloom Tags in Bloom
Here’s what I made:
S
Here’s what I did:
Cut and scored with my paper trimmer:
- Highland Heather card stock (CS) cut to 5-1/2″ x 8-1/2″, then scored in half at 4-1/4″
- Silver Foil Sheet layer cut to 5-1/4″ x 4″
- Flowering Foils Specialty Designer Series Paper (DSP) layer cut to 5″ x 3-3/4″
- Purple Posy CS cut to 5-1/4″ x 4″ for the inside of the card base (or you could use Whisper White CS, if you prefer)
Stamped with the Tags In Bloom stamp set:
- sentiment in Gorgeous Grape ink onto a scrap of Purple Posy CS
- frame in Highland Heather ink around the sentiment
Cut using the Label Me Lovely Punch:
Colored using an ink pad:
- DSP layer in Gorgeous Grape, then used a paper towel to wipe off the excess inkx
Assembled the card:
- burnished the fold in the card base with a Bone Folder
- Silver Foil layer adhered onto the front of the card base using Snail
- DSP layer adhered onto the Silver Foil layer using Snail
- Silver Thread wrapped around my hand about 9 times, then adhered onto the back of the punched sentiment using Snail
- sentiment adhered onto the SAP layer using Stampin’ Dimensionals
- Purple Posy CS glued onto the inside of the card base
S
Here are today’s colors:
You can click on each one to see all the products that come in that color!
S
Here’s what I used:
Click on these images for more details and to purchase. If you are reading this post in email, the product images may not show up. Click here to see the post on my blog.
Click “Supply List” above for a clickable and printable list of the products!
S
Here are some helpful links:
Thanks for stopping by today, and Sweet Stamping!
Mar 11, 2020 | Cards, Gallery, Sale-A-Bration |
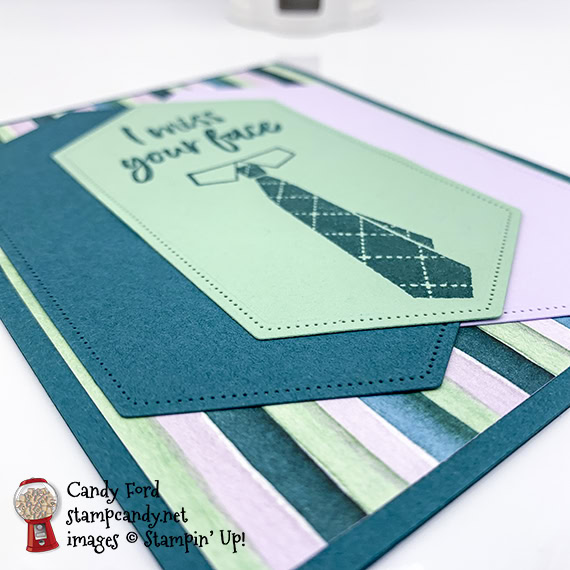
I used the new Well Dressed and Tags In Bloom Sale-A-Bration stamp sets along with the Stitched Nested Labels Dies and Best Dressed Designer Series Paper to create this “missing you” card. I thought the sentiment above the tie and collar, where the face should be, was humorously appropriate.
S Well Dressed Well Dressed
Here’s what I made:

S
Here’s what I did:
Cut and scored with my paper trimmer:
- Pretty Peacock card stock (CS) cut to 4-1/4″ x 11″, then scored in half at 5-1/2″
- Best Dressed Designer Series Paper (DSP) layer cut to 4″ x 5-1/4″
- Purple Posy CS cut to 4″ x 5-1/4″ for the inside of the card base
Stamped with the Tags in Bloom stamp set:
- sentiment in Pretty Peacock ink onto a scrap of Mint Macaron CS
- tie/collar in Pretty Peacock ink below the sentiment
Stamped with the Well Dressed stamp set:
- tie/collar in Pretty Peacock ink below the sentiment
Cut using the Stitched Nested Labels Dies:
- stamped piece
- a scrap of Pretty Peacock CS and a Scrap of Purple Posy CS
Assembled the card:
- burnished the fold in the card base with a Bone Folder
- DSP layer glued onto the front of the card base
- Pretty Peacock and Purple Posy die cut labels glued onto the DSP layer
- stamped die cut glued onto the first two die cut labels
- Purple Posy CS glued onto the inside of the card base (You might prefer to glue a piece of Whisper White CS instead of the Purple Posy.)
S
Here are today’s colors:
You can click on each one to see all the products that come in that color!
S
Here’s what I used:
Click on these images for more details and to purchase. If you are reading this post in email, the product images may not show up. Click here to see the post on my blog.
Click “Supply List” above for a clickable and printable list of the products!
S
Here are some helpful links:
Thanks for stopping by today, and Sweet Stamping!
Mar 10, 2020 | Cards, Gallery, Sale-A-Bration |
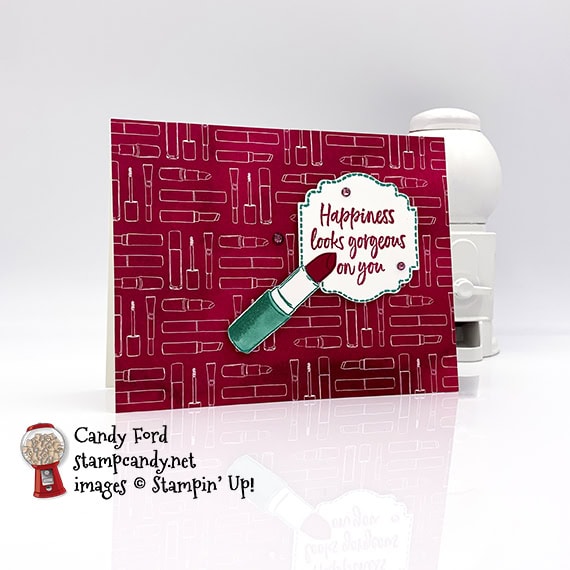
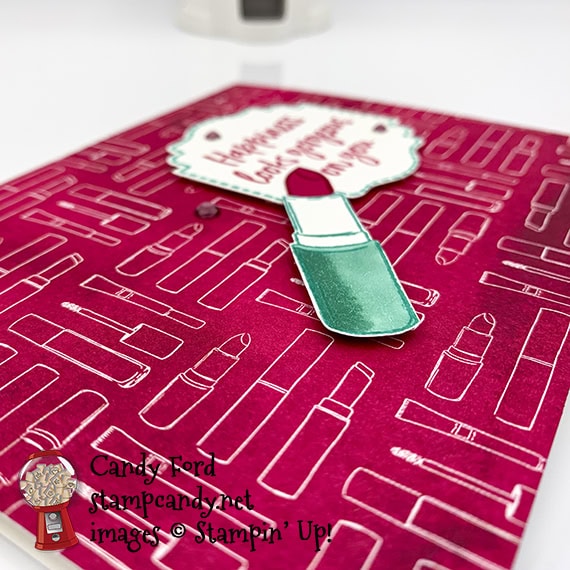
For today’s card, I used the Dressed to Impress stamp set and the new Tags in Bloom stamp set along with the Best Dressed Designer Series Paper. I stamped, fussy cut, and paper pieced the lipstick.
Remember, all the Sale-A-Bration and Coordination Product Release items are available only through March 31 or while supplies last.
S Dressed to Impress Dressed to Impress
Here’s what I made:
S
Here’s what I did:
Cut and scored with my Paper Trimmer:
- Whisper White Thick card stock (CS) cut to 5-1/2″ x 8-1/2″, then scored in half at 4-1/4″
- Best Dressed Designer Series Paper (DSP) layer cut to 5-1/2″ x 4-1/4″
Stamped with the Dressed to Impress stamp set:
- lipstick in Coastal Cabana ink onto a scrap of Whisper White Thick CS
- lipstick in Lovely Lipstick ink onto a scrap of Lovely Lipstick CS
Stamped with the Tags in Bloom stamp set:
- sentiment in Lovely Lipstick ink onto a scrap of Whisper White Thick CS
- frame in Coastal Cabana ink around the sentiment
Cut using the Label Me Lovely Punch:
Cut using Paper Snips:
- both lipsticks – I cut the actual lipstick part off of the top of the Coastal Cabana one.
- NOTE: I completely forgot that I had the All Dressed Up Dies! I should have used the lipstick die to cut both lipsticks, then used the Paper Snips only to cut off the top part of the Coastal Cabana one. Senility stinks!
Colored using Stampin’ Blends Markers:
- bottom part of the Coastal Cabana lipstick case
Assembled the card:
- burnished the fold in the card base with a Bone Folder
- DSP layer glued onto the front of the card base
- Coastal Cabana lipstick case glued onto the Lovely Lipstick lipstick, then the tip glued onto the sentiment
- lipstick and sentiment adhered onto the DSP layer using Stampin’ Dimensionals
- 3 pink rhinestones applied to the card front: 2 on the sentiment and 1 on the DSP layer
S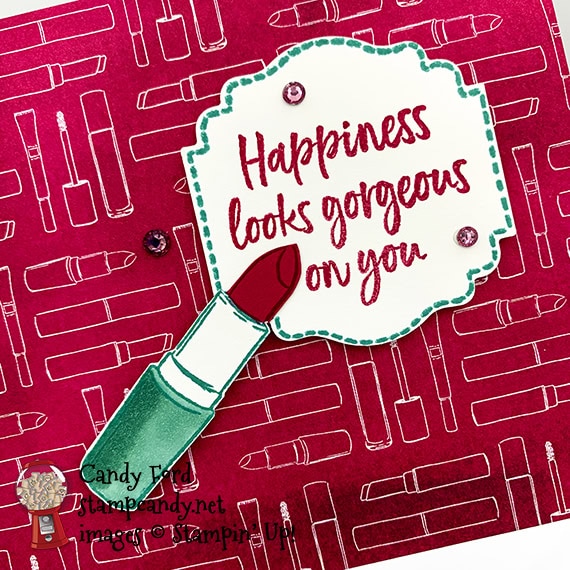
S
Here are today’s colors:
You can click on each one to see all the products that come in that color!
S
Here’s what I used (or should have used):
Click on these images for more details and to purchase. If you are reading this post in email, the product images may not show up. Click here to see the post on my blog.
Click “Supply List” above for a clickable and printable list of the products!
S
Here are some helpful links:
Thanks for stopping by today, and Sweet Stamping!
Mar 6, 2020 | Cards, Gallery, Sale-A-Bration |
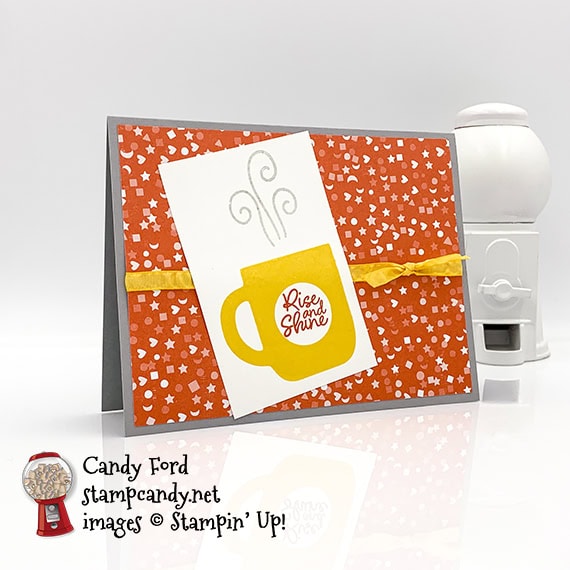
I made today’s card using the Rise & Shine stamp set (one of the new 2nd release Sale-A-Bration items,) Follow Your Art Designer Series Paper, and Daffodil Delight 1/4″ Ruched Ribbon. Be sure to check out all the newest Sale-A-Bration items. You can see them at the bottom of this post.
S rise rise
Here’s what I made:
S
Here’s what I did:
Cut and scored with my paper trimmer:
- Smoky Slate card stock (CS) cut to 5-1/2″ x 8-1/2″, then scored in half at 4-1/4″
- Follow Your Art Designer Series Paper (DSP) layer cut to 5-1/4″ x 4″
- Whisper White CS layer cut to 2-3/8″ x 3-5/8″
- Whisper White CS cut to 5-1/4″ x 4″ for the inside of the card base
Stamped with the Rise & Shine stamp set:
- cup in Daffodil Delight ink onto the Whisper White CS layer
- sentiment in Calypso Coral in center of the cup
- steam in Smoky Slate ink, stamped off once, above the cup
Assembled the card:
- burnished the fold in the card base with a Bone Folder
- ribbon adhered onto the DSP layer using Tear & Tape, wrapping the ends around to the back
- smaller piece of ribbon tied in a knot around the first piece of ribbon
- DSP layer glued onto the front of the card base
- Whisper White CS layer glued onto the DSP layer
- Whisper White CS glued onto the inside of the card base
S
Here are today’s colors:
You can click on each one to see all the products that come in that color!
S
Here’s what I used:
Click on these images for more details and to purchase. If you are reading this post in email, the product images may not show up. Click here to see the post on my blog.
Click “Supply List” above for a clickable and printable list of the products!
S
Here are all the 2020 Sale-A-Bration items:
S
Here are some helpful links:
Thanks for stopping by today, and Sweet Stamping!
Feb 14, 2020 | Cards, Gallery, Guest Stamper, Sale-A-Bration, Swaps |

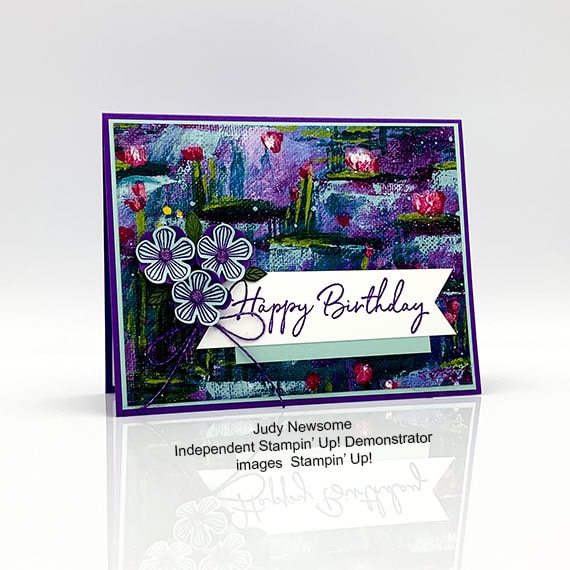
A couple days ago I shared my January swap card made with the Lily Impressions Designer Series Paper. You can see that post here. The swap theme was Sale-A-Bration. Coincidentally, Judy Newsome used the very same pattern from the same Lily Impressions Designer Series Paper for her swap cards, and out layouts are even very similar. You know what they say: great minds think alike! Judy, a member of my Candy Hearts team, lives in LaFayette, GA.
Lily Impressions Lily Impressions
Here’s what she made:
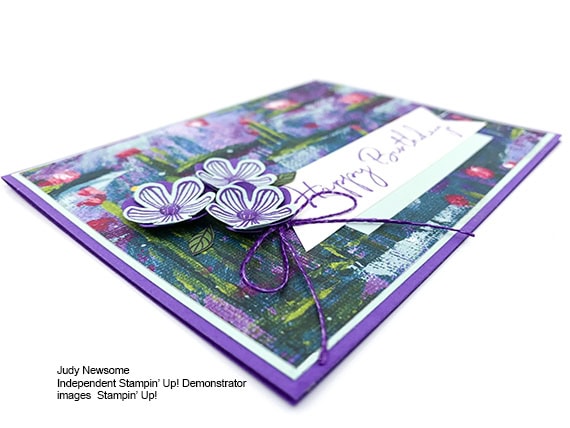
S
S
Here’s what she did:
Cut and scored with her paper trimmer:
- Gorgeous Grape card stock (CS) cut to 5-1/2″ x 8-1/2″, then scored in half at 4-1/4″
- Pool Party CS layer cut to 5-3/8″ x 4-1/8″
- Lily Impressions Designer Series Paper (DSP) layer cut to 5-1/4″ x 4″
- Whisper White CS layer cut to 4-1/2″ x 1″
- Pool Party CS layer cut to 3″ x 1/2″
- Whisper White CS cut to 5-1/4″ x 4: for the inside of the card base
Stamped with the Thoughtful Blooms stamp set:
- 3 flowers in Gorgeous Grape ink onto a scrap of Pool Party CS
- 3 leaves in Gorgeous Grape ink onto a scrap of Garden Green CS
Stamped with the Happy Birthday to You stamp set:
- sentiment in Gorgeous Grape ink onto the Whisper White CS layer
Cut using the Small Blossom Punch:
- 3 stamped flowers
- 3 flowers from a scrap of Gorgeous Grape CS
Cut using the Banner Triple Punch:
- both ends of the sentiment layer
Cut using Paper Snips:
Colored using a Stampin’ Write Marker:
- a piece of Linen Thread in Gorgeous Grape
Assembled the card:
- burnished the fold in the card base with a Bone Folder
- large Pool Party CS layer glued onto the front of the card base
- DSP layer glued onto the Pool Party CS layer
- small Pool Party CS layer glued onto the back of the sentiment layer, then both glued onto the DSP layer
- all 6 punched flowers burnished, using the bottom round end of an Aqua Painter and a Stampin’ Pierce Mat, so the petals curl up
- 3 stamped flower glued onto the 3 Gorgeous Grape CS flowers
- Gorgeous Grape Glitter Enamel Dot applied onto the center of each flower
- flowers and leaves glued onto the DSP layer
- thread tied into a bow and adhered onto the DSP layer using a Mini Glue Dot
- Whisper White CS glued onto the inside of the card base
S
Here are today’s main colors:
You can click on each one to see all the products that come in that color!
S
Here’s what she used:
Click on these images for more details and to purchase.
Click “Supply List” for a clickable and printable list of the products!
S
Here are some helpful links:
Thanks for stopping by today, and Sweet Stamping!

