Jul 13, 2020 | Blog Hop, Cards, Gallery |
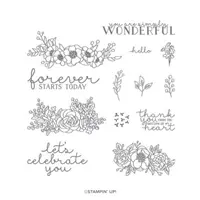
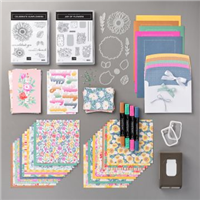
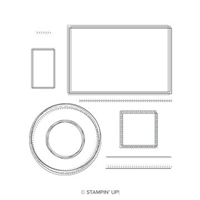
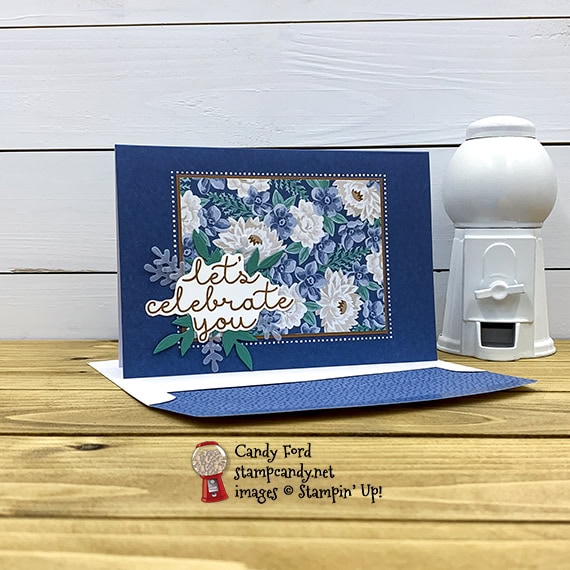
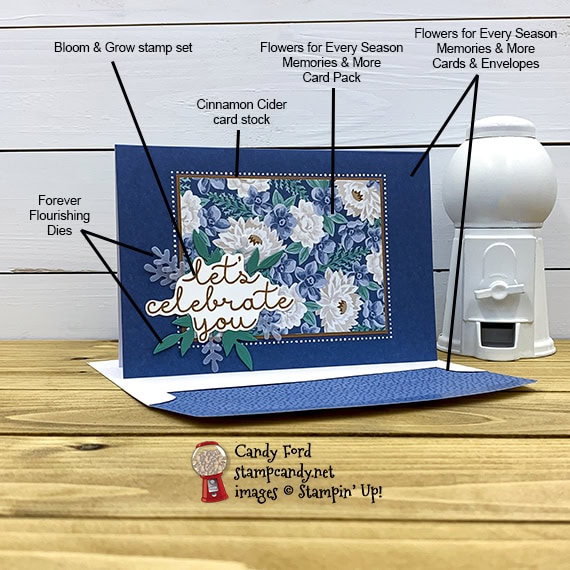
Welcome to the July 2020 Candy Hearts Blog Hop! This month we are featuring the new 2020-2022 In Colors. I used three of them on my card: Cinnamon Cider, Just Jade, and Misty Moonlight. I used Memories & More (M&M) products from the Flowers for Every Season Suite along with the bloom & Grow Stamp set and Forever Flourishing Dies. The matching M&M card bases and envelopes and the M&M card pack make it a cinch to create a great card in no time.
If you are reading this in email, some photos may appear blurry, or may not appear at all. Please click here to see the post on my blog.

We have a special guest hopper today, Brian King of Stamp with Brian. He’s an amazingly talented stamper and I can’t wait to see what he has made for us. Be sure to hop around to all the stops, because you don’t want to miss any of the great projects the Candy Hearts have in store for you today!
S July 2020 Candy Hearts Blog Hop July 2020 Candy Hearts Blog Hop July 2020 Candy Hearts Blog Hop July 2020 Candy Hearts Blog Hop
Here’s what I made:
S
Here’s what I did:
Cut and scored with my paper trimmer:
- Cinnamon Cider card stock (CS) layer cut to 3-1/8″ x 4-1/8″
Stamped with the Bloom & Grow stamp set:
- sentiment in Cinnamon Cider ink onto a scrap of Whisper White Thick CS
Cut using the Forever Flourishing Dies:
- leaves from a scrap of Just Jade CS (cut two, then cut them in half with Paper Snips)
- small leaves from a scrap of Vellum CS
Cut using Paper Snips:
Assembled the card:
- burnished the fold in the card base with a Bone Folder
- M&M card glued onto the Cinnamon Cider CS layer
- Cinnamon Cider CS layer glued onto the front of the card base, within the dotted frame
- die cut leaves glued onto the card front
- sentiment adhered using Mini Stampin’ Dimensionals over the leaves
S
Here’s the July 2020 Candy Hearts Blog Hop:
Thank you for hopping with the Hearts today! Be sure to hop around to all the stops. You do not want to miss any of the creativity in this talented group of stampers!
- Candy Ford of Stamp Candy <—– YOU ARE HERE!!!
- Brian King of Stamp with Brian
- Linda Krueger of The Stamp Coach
- Joanne Brown of Stamping with Jojo
S
Bonus Days are here!
Click the image below to shop now!

S
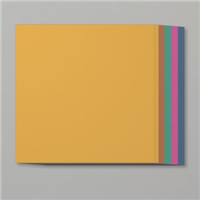
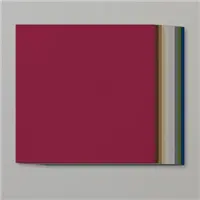
Here are today’s colors:
You can click on each one to see all the products that come in that color!
S
Here’s what I used:
Click on these images for more details and to purchase. If you are reading this post in email, the product images may not show up. Please click here to see the post on my blog.
Supply List. <— Click for a clickable and printable list of the products!
S
Here are some helpful links:
S
Thanks for stopping by today, and Sweet Stamping!
Jul 9, 2020 | Blog Hop, Cards, Gallery, Tags |

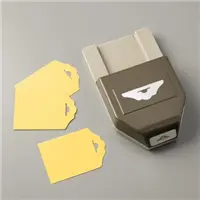
Welcome to the July 2020 OSAT Blog Hop! This month’s theme is Pretty in Pink, so we’re featuring the amazing pinks in the Stampin’ Up! color line up. As usual, I couldn’t choose just one, so I used them all: Petal Pink, Blushing Bride, Flirty Flamingo, Rococo Rose, Melon Mambo, and Magenta Madness. I cut strips of card stock in all the colors and arranged them in a sort of pinwheel design for the front of the card. The sentiment I cut using the Playful Alphabet Dies, Whisper White Card stock, and the new Foam Adhesive Sheets. I stamped the frame from the Swirly Frames stamp set and heat embossed it in white. For the tag, I covered one side in the same strips, and cut the top with the Fancy Tag Topper Punch.
Be sure to hop around to all the stops! I can’t wait to see what all the blog hop team members have for us today!
If you are reading this in email, some photos may appear blurry, or may not appear at all. Please click here to see the post on my blog.
S July 2020 OSAT Blog Hop July 2020 OSAT Blog Hop July 2020 OSAT Blog Hop July 2020 OSAT Blog Hop
Here’s what I made:


S
Here’s what I did:
Cut and scored with my paper trimmer:
- Whisper White thick card stock (CS) cut to 5-1/2″ x 8-1/2″, then scored in half at 4-1/4″
- Magenta Madness CS layer cut to 5″ x 3-3/4″
- Whisper White CS layer cut to 4-5/8″ x 3-3/8″
- Whisper White CS layer cut to 4-1/2″ x 3-1/4″
- Petal Pink, Blushing Bride, Flirty Flamingo, Rococo Rose, Melon Mambo, and Magenta Madness CS cut into strips varying from 1/2″ down to 1/8″ wide by about 5″ long
- Whisper White CS cut to 2″ x 6″
- Flirty Flamingo CS cut to 2″ x 1-1/4″
- Melon Mambo CS cut to 2″ x 1″
Stamped with the Swirly Frames stamp set:
- frame in Versamark ink onto the strip layer, then heat embossed in white (after the strip layer was assembled)*
Cut using the Playful Alphabet Dies:
- Whisper White CS applied onto a Foam Adhesive Sheet, then die cut the sentiment
Cut using the Fancy Tag Topper Punch:
Assembled the card:
- burnished the fold in the card base with a Bone Folder
- drew an X at the center of the smaller Whisper White CS layer as a guide for the CS strips
- strips glued onto the smaller Whisper White CS layer, starting in the middle and working my way out
- trimmed away the excess strip bits around the edge of the layer
- stamped and heat embossed the frame in white*
- peeled the backing off the die cut letters and applied them onto the strip layer, inside the white embossed frame
- 3 Magenta Madness enamel dots applied around the sentiment
- strip layer glued onto the larger Whisper White CS layer
- Whisper White CS layer glued onto the Magenta Madness CS layer
- Magenta Madness CS layer glued onto the front of the Whisper White Thick CS card base
Assembled the tag:
- burnished the fold in the card base with a Bone Folder
- glued assorted pink CS strips onto one side of the tag at an angle
- trimmed excess strip bits from all edges
- glued the 2″ x 1″ Melon Mambo CS piece onto the bottom of the other side of the tag, and another skinny strip next to it
- glued the 2″ x 1-1/4″ Flirty Flamingo CS piece onto the top end of the tag, and another skinny strip next to it, leaving a large white space to write on the tag
- cut top end of the tag with the Tag Topper Punch
- tied a piece of Magenta Madness ribbon through the hole in the tag
S
Here’s the July 2020 OSAT Blog Hop:
If you get lost during the hop, use this line up as a guide:
S
Bonus Days are here!
Click the image below to shop now and earn Bonus Days coupons to use next month!
S
Here are today’s colors:
You can click on each one to see all the products that come in that color!
S
Here’s what I used:
Click on these images for more details and to purchase. If you are reading this post in email, the product images may not show up. Please click here to see the post on my blog.
Supply List. <— Click for a clickable and printable list of the products!
S
Here are some helpful links:
S
Thanks for stopping by today, and Sweet Stamping!
Jul 1, 2020 | Blog Hop, Cards, Gallery |

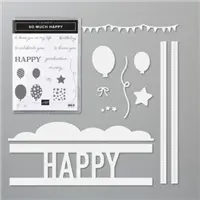
It’s time for the July 2020 ICS Blog Hop! This month’s theme is My Favorite Bundle. How anyone can pick just one favorite out of this Annual Catalog, I have no idea, so I chose a bundle that I hadn’t used yet, the So Much Happy Bundle. What a fun sounding name for a super fun bundle! My card is Happy Happy Happy! There are numerous ways to complete the sentiment, like birthday, anniversary, retirement, etc. I left mine without for now until I decide when to use it. I will probably sstamp the word birthday on the inside of the card base so it is hidden by the part of the card front where the green streamer is.
If you are reading this in email, some photos may appear blurry, or may not appear at all. Please click here to see the post on my blog.
S July 2020 ICS Blog Hop July 2020 ICS Blog Hop July 2020 ICS Blog Hop July 2020 ICS Blog Hop
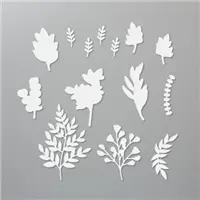
Here’s the bundle:


S
Here’s what I made:


S
Here’s what I did:
Cut and scored with my paper trimmer:
- Whisper White Thick card stock (CS) cut to 4-1/4″ x 11″, then scored in half at 5-1/2″
Stamped with the So Much Happy stamp set:
- assorted balloons in Daffodil Delight, Granny Apple Green, Melon Mambo, and Pacific Point onto scraps of Whisper White Thick CS
Cut using the Happy Dies:
- stamped balloons
- 3 streamers, one from each color CS (Daffodil Delight, Granny Apple Green, and Melon Mambo)
- HAPPY from the front of the card base 3 times
Assembled the card:
- burnished the fold in the card base with a Bone Folder
- streamers glued onto the front of the card base, above each HAPPY
- balloons glued or adhered using Mini Stampin’ Dimensionals onto the front of the card base
- NOTE: I cut some of the dimensionals into skinny pieces so they wouldn’t show inside the card
- When I decide which sentiment to use, I will stamp it on the inside of the card base in Pacific Point ink.
S
Here’s the July 2020 ICS Blog Hop:
Click on the button below to hop to the next stop and see what Tricia Butts of Tricia’s Stamping Creations has in store for you today!

S
Here are today’s colors:
You can click on each one to see all the products that come in that color!
S
Here’s what I used:
Click on these images for more details and to purchase. If you are reading this post in email, the product images may not show up. Please click here to see the post on my blog.
Supply List. <— Click for a clickable and printable list of the products!
S
Here are some helpful links:
S
Thanks for stopping by today, and Sweet Stamping!
Jun 30, 2020 | Blog Hop, Boxes, Cards, Gallery, Kits, Paper Pumpkin |

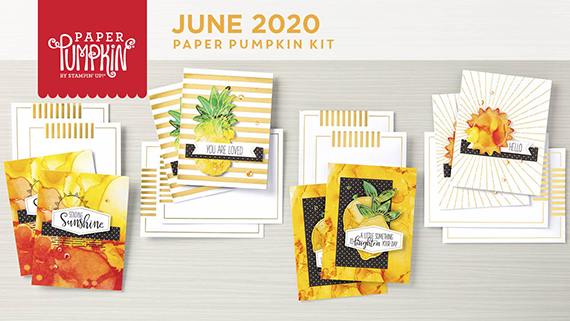
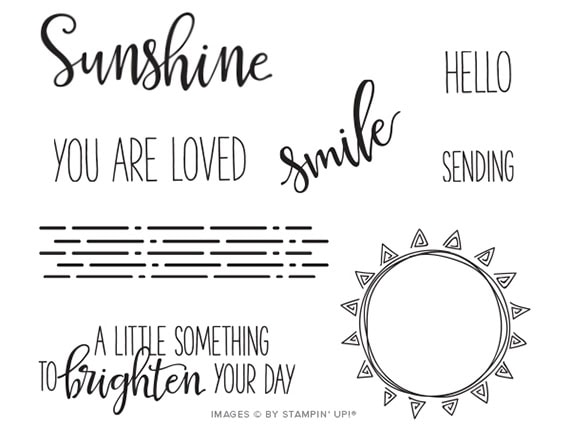
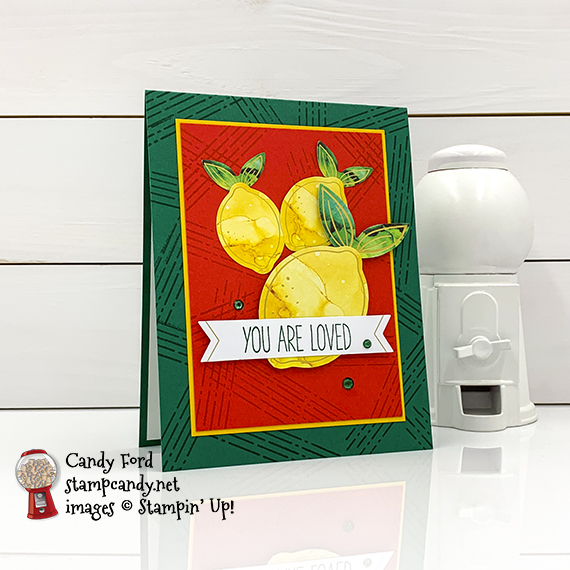
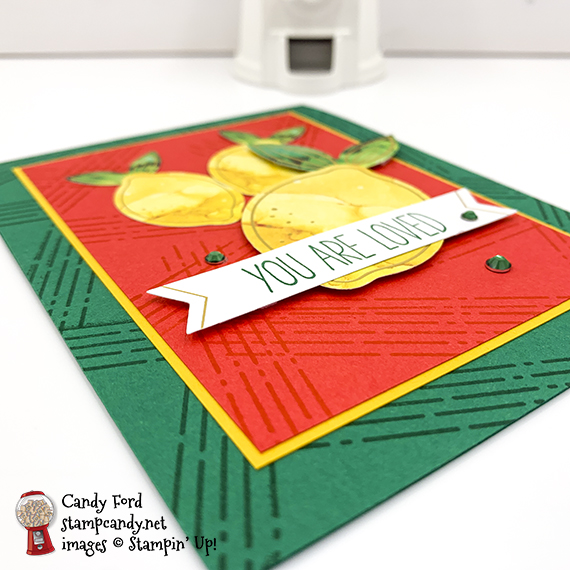
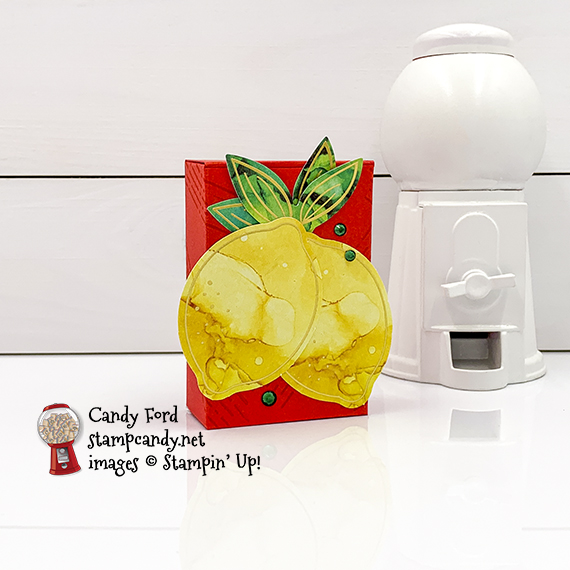
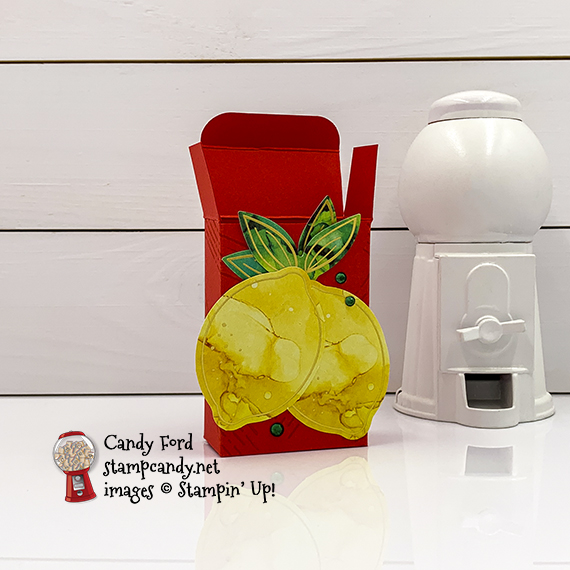
It’s time for the 06-2020 PPPBH. This month’s kit is called Box of Sunshine and it’s filled with enough goodies to make 8 bright and cheery cards so you can send some sunshine someone’s way. I used some pieces from the kit and some extra card stock and ink to create a card and a small treat box with lovely lemons on them, because what’s cheerier that lemons, right? I took a cue from the kit for the colors, which are listed on the back of the kit’s instruction sheet.
If you are reading this in email, some photos may appear blurry, or may not appear at all. Please click here to see the post on my blog.
S 06-2020 PPPBH 06-2020 PPPBH 06-2020 PPPBH 06-2020 PPPBH 06-2020 PPPBH
Here’s the Box of Sunshine kit:
CLICK HERE to download the printable stamp case insert for this month’s kit.

 S
S
Here’s what I made:

S
Here’s what I did:
Cut and scored with my paper trimmer:
- Shaded Spruce card stock (CS) cut to 4-1/4″ x 11″, then scored in half at 5-1/2″
- Crushed Curry CS layer cut to 3-3/8″ x 4-5/8″
- Poppy Parade CS layer cut to 3-1/4″ x 4-1/2″
- Whisper White CS cut to 4″ x 5-1/4″ for the inside of the card base
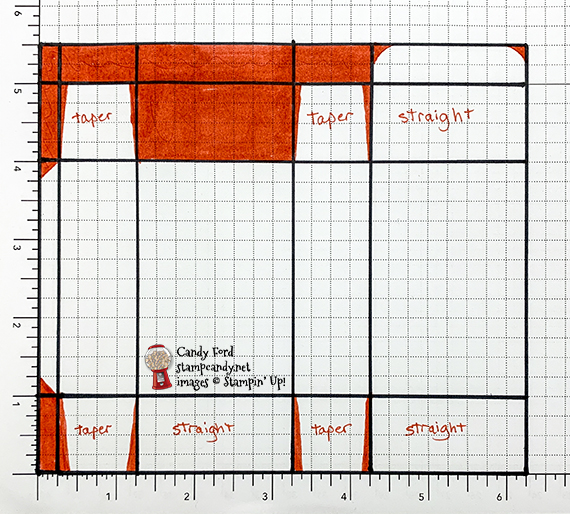
- Poppy Parade CS cut to 6-1/4″ x 5-1/2″, scored along the longer side at 1/4″, 1-1/4″, 3-1/4″, and 4-1/4″, and along the shorter side at 1″, 4″, and 5″ (See the diagram below. Remove all red areas with Paper Snips. Note that the smaller tabs are tapered and the wide ones have straight sides.)
Stamped with the Box of Sunshine stamp set:
- sentiment in Shaded Spruce ink onto one of the banners from the kit
- lines in Poppy Parade ink onto the Poppy Parade CS card layer and the outside of the box
- NOTE: I stamped the box after I had scored and cut it. I think it would be easier to stamp on the card stock before doing that.
- lines in Shaded Spruce ink onto the front of the card base
Cut using the Detailed Trio Punch:
Assembled the card:
- burnished the fold in the card base with a Bone Folder
- Crushed Curry CS layer glued onto the front of the card base
- Poppy Parade CS layer glued onto the Crushed Curry CS layer
- 2 small lemon and leaf stickers applied onto the Poppy Parade CS layer
- large die cut leaf adhered onto the back of a large lemon die cut using a glue dot
- large lemon/leaf adhered onto the Poppy Parade CS layer using Stampin’ Dimensionals
- sentiment adhered over the lemon using Stampin’ Dimensionals at each end
- 3 Shaded Spruce rhinestones applied onto the card front
- Whisper White CS glued onto the inside of the card base
Assembled the box:
- burnished the folds in the box with a Bone Folder
- rounded the two corners of the box top tab using the Detailed Trio Punch
- long side tab adhered onto the inside of the opposite end using Tear & Tape
- on the bottom of the box, folded in the back tab, then adhered the side tabs to it
- adhered the front bottom tab over the 2 side tabs (Doing it this way hides the little side tabs between the two full size tabs.)
- adhered 2 large lemons and leaves onto the front of the box using glue dots
- 3 Shaded Spruce rhinestones applied onto the front of the box
the scored, cut, and stamped box
adhesive strip on the outside of the skinny flap
adhesive on the inside of the bottom flaps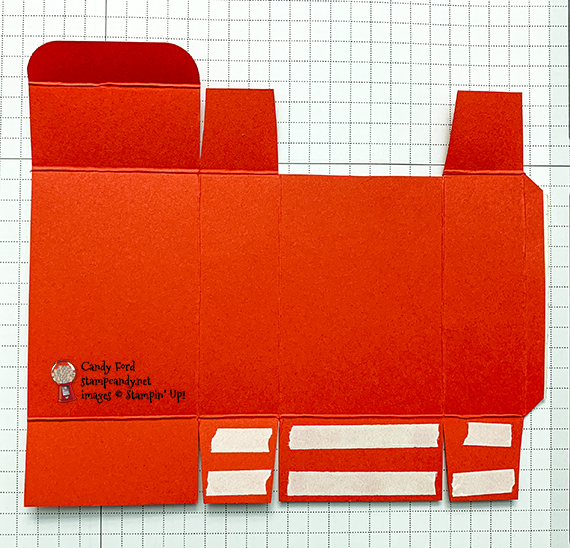
S
Here’s the hop:
Click the pumpkin below to hop to the next stop and see what Anastasia Radloff of Stampin’ Blondie has for you today!

Here are today’s main colors:
You can click on each one to see all the products that come in that color!
S
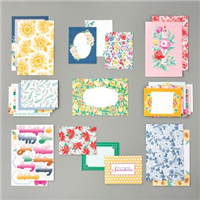
Here’s what I used other that the kit:
Click on these images for more details and to purchase. If you are reading this post in email, the product images may not show up. Please click here to see the post on my blog.
Supply List. <— Click for a clickable and printable list of the products!
S
Here’s how to get Paper Pumpkin:
- Order one of the items below.
- You will receive an email with a redemption code.
- CLICK HERE to redeem your code.
Supply List <— Click for a clickable and printable list of the products!
S
TODAY IS THE LAST DAY FOR THESE 2 GREAT PROMOTIONS!

It’s a bundle bash! When you purchase your Starter Kit in June, you can select one stamp and punch bundle (p. 168–169) OR one stamp and die bundle (p. 173-179) from the 2020–2021 Annual Catalog, in addition to your regular Starter Kit. Click here for more information.
Order Deadlines
- Phone: tonight 8:50 PM (ET), 7:50 PM (CT), 6:50 PM (MT), 5:50 PM (PT), 4:50 PM (Alaska), 2:50 PM (HI-Aleutian)
- Online: tonight 1:50 AM (ET), 12:50 AM (CT), 11:50 PM (MT), 10:50 PM (PT), 9:50 PM (Alaska), 7:50 PM (HI-Aleutian)
S

- Any order $250 or more will earn $25 EXTRA Stampin’ Rewards.
- All order types qualify for this promotion.
- Starter Kit orders do not qualify for this promotion.
- Paper Pumpkin prepaid subscriptions count toward a qualifying purchase. Month-to-month subscriptions do not qualify for this promotion.
- The qualifying amount must be reached prior to shipping and tax.
- Additional Stampin’ Rewards for this promotion will only be awarded once per order.
- Click here to shop now
Order Deadlines
- Phone: 30 June 2020; 6:50 PM (MT)
- Online: 30 June 2020; 11:50 PM (MT)
S
Here are some helpful links:
S
Thanks for stopping by today, and Sweet Stamping!

Jun 25, 2020 | Blog Hop, Cards, Gallery, Paper Pumpkin |

It’s time for the 06-2020 APPT Blog Hop! This month’s kit is called Box of Sunshine, and it’s all about sending some sunshine to those who need it. Even the box is yellow, and there’s a label in the kit that covers the Paper Pumpkin logo, so you can mail some sunshiney goodies in it. For my alternate projects today, I used the kit to make a Scrappy Strip card and a treat box.
If you are reading this in email, some photos may appear blurry, or may not appear at all. Please click here to see the post on my blog.
S 06-2020 APPT 06-2020 APPT 06-2020 APPT 06-2020 APPT 06-2020 APPT
Here’s the kit:
CLICK HERE to download the printable stamp case insert for this kit.
S
Here’s what I made:


S
Here’s what I did:
Cut and scored with my paper trimmer:
- Poppy Parade card stock (CS) cut to 5-1/2″ x 8-1/2″, then scored in half at 4-1/4″
- Basic Black CS layer cut to 5-1/8″ x 3-7/8″
- Basic Black CS layer cut to 5″ x 3-3/4″
- front of two card bases from the kit cut to 4-5/8″ x 3-3/4″, then cut into random strips (I cut them together so the strips would be the same on both)
- Whisper White CS cut to 5-1/4″ x 4″ for the inside of the card base
- Basic Black CS cut to 7-1/2″ x 7-1/2″ and scored at 2-1/2″ and 5″ in both directions
- Basic Black CS cut to 4-1/16″ x 4-1/16″ and scored 3/4″ from all four sides
Stamped with the Box of Sunshine stamp set:
- sentiment in Poppy Parade ink onto two of the provided die cut labels
Cut using the Layering Circles Dies:
- 2 scalloped circles from a scrap of Gold Foil Sheet
- 1 larger scalloped circle from a scrap of Basic Black CS
Assembled the card:
- burnished the fold in the Poppy Parade card base with a Bone Folder
- card front strips glued onto the 5″ x 3-3/4″ Basic Black CS layer, about 1/16″ apart, alternating strips from the two different card fronts
- strip layer glued onto the 5-1/8″ x 3-7/8″ Basic Black CS layer
- 5-1/8″ x 3-7/8″ Basic Black CS layer glued onto the front of the card base
- a sun die cut adhered onto a gold foil scalloped circle using Stampin’ Seal
- gold foil scalloped circle adhered onto the Basic Black scalloped circle
- Basic Black scalloped circle glued onto the strips
- one of the sentiments glued onto a scrap of Basic Black CS, then trimmed the mat using Paper Snips
- matted sentiment adhered over strips and sun using Black Stampin’ Dimensionals
- Whisper White CS glued onto the inside of the card base
Assembled the box:
- burnished the folds in the two Basic Black CS box pieces with a Bone Folder
- using Paper Snips, cut the two pieces as shown below
- flaps of the smaller piece glued onto the inside of the adjacent sides to form the lid
- a sun die cut adhered onto a gold foil scalloped circle using Stampin’ Seal
- gold foil scalloped circle adhered onto the Basic Black lid using Stampin’ Seal
- sentiment glued onto a scrap of Basic Black CS, then trimmed the mat using Paper Snips
- matted sentiment glued onto the sun die cut on the lid
- folded up the sides of the box and put the lid on top
- NOTE: You can glue the sides of the box, but I like the way they fall open when the lid is removed.


S
Here’s the 06-2020 APPT Blog Hop:
S
Here are today’s main colors:
You can click on each one to see all the products that come in that color!
S
Here’s what I used other that what came in the kit:
Click on these images for more details and to purchase. If you are reading this post in email, the product images may not show up. Please click here to see the post on my blog.
Supply List. <— Click for a clickable and printable list of the products!
S
Here’s how to get Paper Pumpkin:
- Order one of the items below.
- You will receive an email with a redemption code.
- CLICK HERE to redeem your code.
Supply List <— Click for a clickable and printable list of the products!
S
Here are some helpful links:
S
Thanks for stopping by today, and Sweet Stamping!
Jun 18, 2020 | Blog Hop, Gallery, Scrapbooking |

S
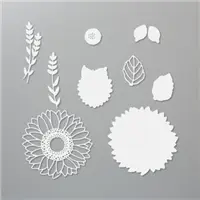
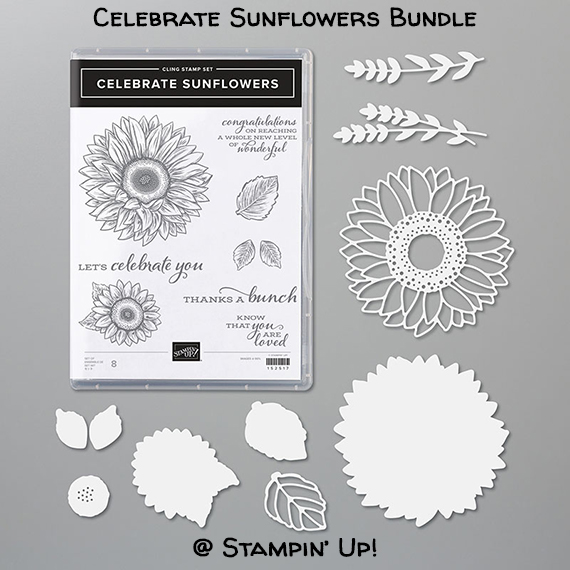
Welcome to the Scrapbooking Global June 2020 Blog Hop! This month we’re featuring new products from the new 2020-2021 Annual Catalog. I used the new Celebrate Sunflowers bundle (Celebrate Sunflowers stamp set & Sunflowers Dies) as well as a few of the new 2020-2022 In Colors (Bumblebee, Cinnamon Cider, and Just Jade.) I used Press n Seal plastic wrap to keep all the little pieces of the die cuts in the right place. I’ve used this technique several times in the last couple weeks. I printed the photo in sepia so it would match the yellow/brown feel of the page.
S

S
If you are reading this in email, some photos may appear blurry, or may not appear at all. Please click here to see the post on my blog.
S Scrapbooking Global June 2020 Scrapbooking Global June 2020 Scrapbooking Global June 2020 Scrapbooking Global June 2020e
Here’s the bundle:
 S
S
Here’s what I made:
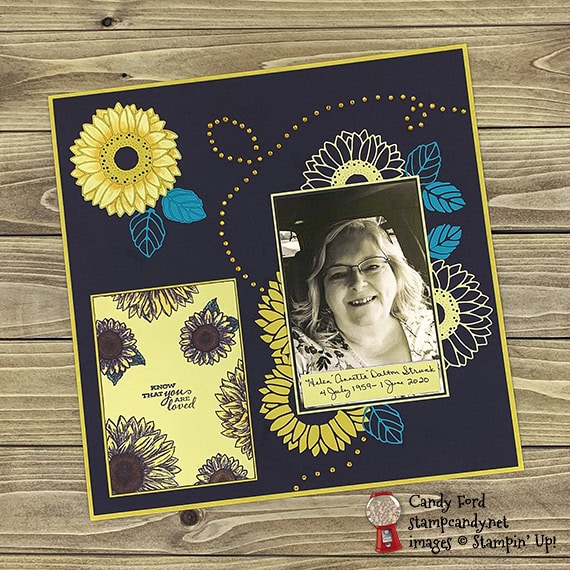 My dear, sweet cousin Annette and her husband were both infected with COVID-19 last month. He has been in ICU since May 19, and on a ventilator since June 6, but he’s still hanging on. She went into ICU on May 21 and died on June 1.
S
Here’s what I did:
Cut and scored with my paper trimmer:
- Early Espresso card stock (CS) cut to 11-3/4″ x 11-3/4″
- Bumblebee CS cut to 4-1/8″ x 5-5/8″
- So Saffron CS cut to 4″ x 5-1/2″
- So Saffron CS cut to 4-1/4″ x 6-1/4″
- Early Espresso CS cut to 4-1/8″ x 6-1/8″
- So Saffron CS cut to 3-3/4″ x 7/8″
Stamped with the Celebrate Sunflowers stamp set:
- sentiment and sunflowers (large and small) in Early Espresso ink onto the 4″ x 5-1/2″ So Saffron CS
- I also used the Early Espresso ink pad to ink just the very edges of the stamped CS piece.
Cut using the Sunflowers Dies:
- one detailed sunflower from a scrap of So Saffron CS
- one detailed sunflower from a scrap of Bumblebee CS
- 4 leaves from a scrap of Just Jade CS
- NOTE: I applied Press n Seal plastic wrap over the tops of all the die cuts to keep all the little pieces in place while I transferred them to the page.
Colored using Stampin’ Blends Markers:
- stamped sunflowers in So Saffron, Just Jade, and Cinnamon Cider
- die cut sunflower at top left in So Saffron
Assembled the page:
- 11-3/4″ square Early Espresso CS glued onto a piece of 12″ x 12″ Bumblebee CS
- stamped So Saffron CS glued onto the 4-1/8″ x 5-5/8″ Bumblebee CS, then glued onto the Early Espresso CS background
- wrote name and dates on the So Saffron CS strip and adhered it onto the 4″ x 6″ photo using Stampin’ Seal
- photo adhered onto the 4-1/8″ x 6-1/8″ Early Espresso CS, then onto the 4-1/4″ x 6-1/4″ So Saffron CS, using Stampin’ Seal
- NOTE: I never use a wet adhesive, like glue, on photos.
- outline parts removed from both die cut sunflowers – very carefully, making sure none of the inner petals came off of the Press n Seal
- Bumblebee sunflower outline glued onto the top left of the Early Espresso CS background
- applied glue onto the backs of all the So Saffron sunflower petals and used the Press n Seal to line them up inside the Bumblebee outline, then colored the petals with the So Saffron Stampin’ Blends Marker
- So Saffron sunflower outline cut in half with my Paper Snips and glued onto the Early Espresso background so the cut edges would be covered up by the photo
- Bumblebee sunflower (petals only) cut into 2 different size pieces, then applied glue to the backs of the petals and used the Press n Seal to place them so the cut edges would be covered up by the photo
- photo adhered onto the Early Espresso background using Stampin’ Seal
- leaves glued around the sunflowers, some whole, some only outlines, some only insides
- Pumpkin Pie rhinestones applied onto the Early Espresso background in a meandering pattern
Sa
Here’s the Scrapbooking Global June 2020 Blog Hop:
Click the next button to go to the next stop on the hop, Sharni Haines of Stampin’ at the Maples.

S
If you get lost during the hop, use this line up as a guide:
S
Here are today’s colors:
You can click on each one to see all the products that come in that color!
S
Here’s what I used:
Click on these images for more details and to purchase. If you are reading this post in email, the product images may not show up. Please click here to see the post on my blog.
Supply List. <— Click for a clickable and printable list of the products!
S
Here are some helpful links:
S
Thanks for stopping by today, and Sweet Stamping!