Feb 5, 2020 | Blog Hop, Boxes, Cards, Gallery, Gifts, Sale-A-Bration |

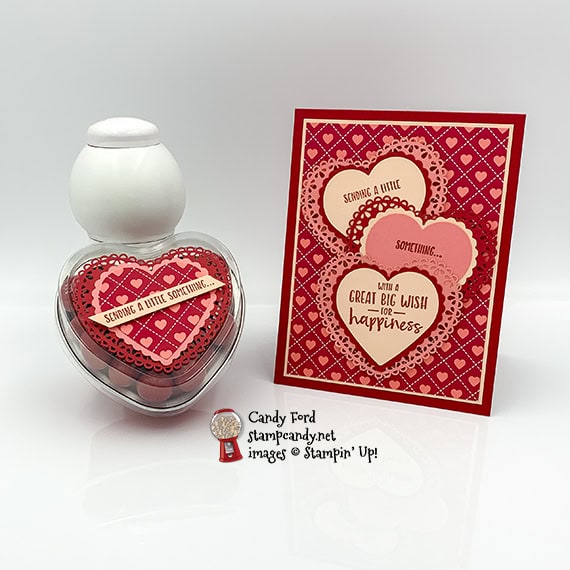
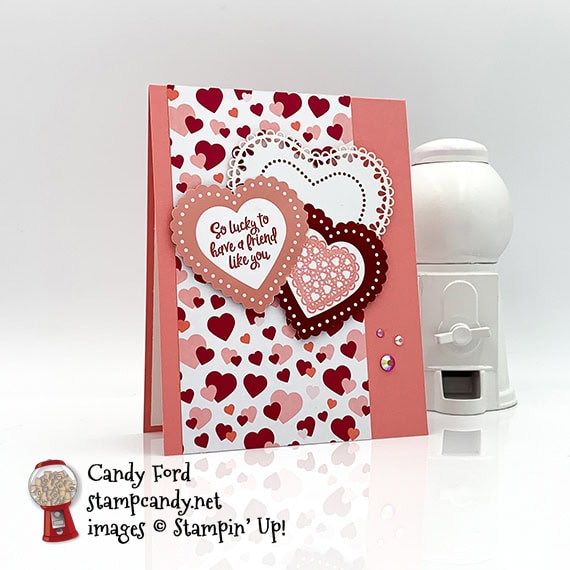
Welcome to the February 2020 ICS Blog Hop! This month’s theme is “Thinking of You” and we’re featuring projects for get well, sympathy, and other times you want to let someone know “I’m thinking of you.” I used the Sending You Thoughts Sale-A-Bration stamp set to create today’s project. It’s free with a $50 order!
Sending You Thoughts Sending You Thoughts
Here’s what I made:
S
Here’s what I did:
Cut and scored with my paper trimmer:
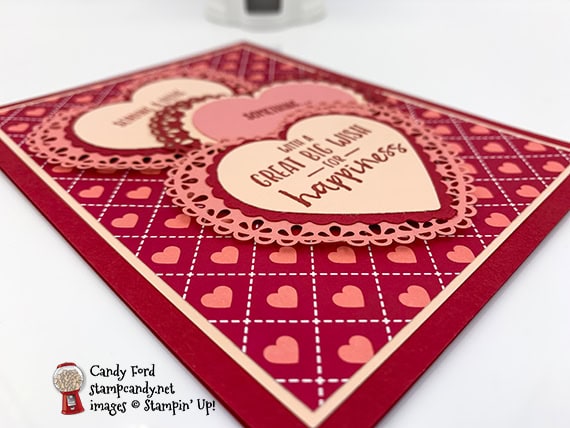
- Real Red card stock (CS) cut to 4-1/4″ x 11″, then scored in half at 5-1/2″
- Petal Pink CS layer cut to 3-7/8″ x 5-1/8″
- From My Heart Specialty Designer Series Paper (DSP) layer cut to 3-3/4″ x 5″
- Petal Pink CS cut to 4″ x 5-1/4″ for the inside of the card base
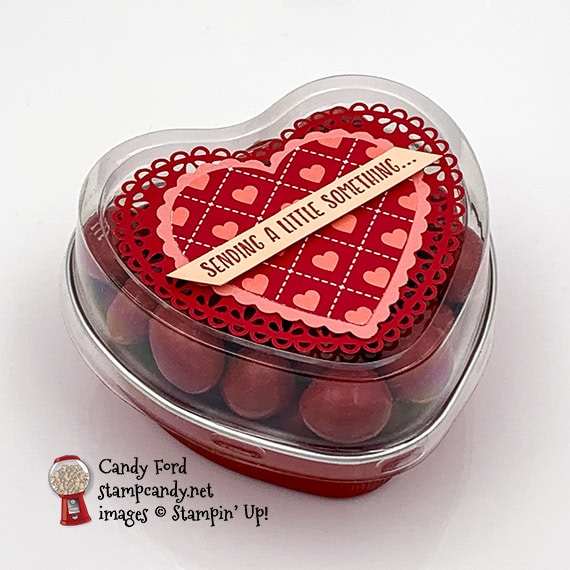
- Petal Pink CS cut to 2-1/2″ x 5/16″ for the tin sentiment
Stamped with the Sending You Thoughts stamp set:
- tin sentiment in Real Red ink onto the Petal Pink CS strip
- that same sentiment stamped in two parts, one onto a scrap of Petal Pink CS and the other onto a scrap of Flirty Flamingo CS (both in Real Red ink)
- larger sentiment in Real Red ink onto a scrap of Petal Pink CSx
Cut using the Heart Punch Pack:
- plain hearts: the 3 card sentiments and a scrap of DSP
- scalloped hearts: 1 Flirty Flamingo CS, 1 Petal Pink CS, and 2 Real Red CS
Cut using Paper Snips:
- angled the ends of the tin sentiment
Assembled the card:
- burnished the fold in the card base with a Bone Folder
- Petal Pink CS layer glued onto the front of the card base
- DSP layer glued onto the Petal Pink CS layer
- 2 Petal Pink stamped hearts glued onto 2 Real Red scalloped hearts
- Flirty Flamingo stamped heart glued onto the Petal Pink scalloped heart
- 2 Real Red scalloped hearts glued onto Flirty Flamingo Heart Doilies
- Petal Pink scalloped heart glued onto a Real Red Heart Doily
- hearts glued together in a cascading design
- hearts adhered onto the DSP layer using Stampin’ Dimensionals
- Petal Pink CS glued onto the inside of the card base
Assembled the tin:
- DSP heart glued onto the Flirty Flamingo scalloped heart
- Flirty Flamingo scalloped heart glued onto a Real Red Heart Doily
- sentiment adhered onto the hearts using Mini Stampin’ Dimensionals
- Heart Doily adhered onto the lid of the tin using Stampin’ Dimensionals
S
Here’s the ICS Blog Hop for January 2020:
Click the Next button to check out Melissa Tennison’s post at Melissa’s Kre8tions:

S
Here are today’s colors:
You can click on each one to see all the products that come in that color!
S
Here’s what I used:
Click on these images for more details and to purchase.
<– Click “Supply List” for a clickable and printable list!
S
Coordination Product Release is Live!
Only available through March 31, 2020, or while supplies last!
Click “Supply List” for a clickable and printable list of the products!
S
Here are some helpful links:
S
Thanks for stopping by today, and Sweet Stamping!
Jan 30, 2020 | Blog Hop, Boxes, Cards, Food, Gallery, Gifts, Paper Pumpkin |

It’s time for the 01-2020 APPT Blog Hop! This month’s kit is called I’ll Bee Yours and it make Valentines and treat bags. I’ve used products from the From My Heart Suite to make an alternate note card and candy tin.
Be sure to hop around to all the stops to check out all the great alternate projects!
S 01-2020 APPT Blog Hop 01-2020 APPT Blog Hop
Here’s what I made:


S
Here’s what I did:
Cut and scored with my paper trimmer:
- Whisper White card stock (CS) cut to 3″ x 3″
- envelope from the kit cut open then trimmed to 2-7/8″ x 2-7/8″, with the fold down the middle
Stamped with the I’ll Bee Yours stamp set:
- larger sentiment in Mint Macaron ink onto a round tag from the kit
- smaller sentiment in Mint Macaron ink onto a small tag from the kitx
Cut using the Heart Punch Pack:
- scalloped heart from a scrap of Mint Macaron CS
- scalloped heart from the center of a Mint Macaron note card base
Assembled the card:
- burnished the fold in the card base with a Bone Folder
- 2-7/8″ square piece glued onto the inside of the note card front, so it shows through the punched heart
- Whisper White CS glued over the 2-7/8″ square piece
- twine from kit tied around the front of the note card and tied in a bow
- larger round sentiment glued onto a Rococo Rose heart
- Highland Heather sequins applied onto the Rococo Rose heart
- tiny Real Red faceted gem glued onto the sequins
- medium Real Red faceted gems glued onto the card front
- large Real Red faceted gem glued onto the sentiment
- Rococo Rose heart and sentiment adhered onto the card front, inside the heart punch, using Stampin’ Dimensionals
Assembled the tin:
- Highland Heather heart glued onto the punched Mint Macaron CS scalloped heart
- Mint Macaron heart glued onto the white side of a Heart Doily
- small sentiment adhered onto the Highland Heather heart using Stampin’ Dimensionals
- Rococo Rose sequins applied onto the Highland Heather heart
- tiny Real Red faceted gem glued onto the sequins
- 2 medium and 1 large Real Red faceted gems glued around the Highland Heather Heart
- medium Real Red faceted gem glued onto the sentiment
- heart doily adhered onto the clear lid of the tin using Stampin’ Dimensionals
S
Here’s the 01-2020 APPT Blog Hop:
S
Here are today’s colors:
You can click on each one to see all the products that come in that color!
S
Here’s what I used, other than what came in the kit:
Click on these images for more details and to purchase.
Click “Supply List” for a clickable and printable list of the products!
S
Here are some helpful links:
Thanks for stopping by today, and Sweet Stamping!
Jan 28, 2020 | Blog Hop, Boxes, Cards, Gallery, Paper Pumpkin |

It’s time for the PPP Blog Hop 01-2020! This month’s kit is called I’ll Bee Yours and it makes adorable note cards and treat bags. Of course, we are sharing alternate projects with you today, so you can see just how versatile the kit is. I used the kit to adorn a Whisper White card and a Mini Pizza Box. And the sentiment is, you guessed it, a pun! You know how I like puns.
I cut a hole in the card front and filled it with vellum for a soft, ethereal feel. I used the cut out piece on the box. No waste!
PPP Blog Hop 01-2020 PPP Blog Hop 01-2020
Here’s what I made:


PPP Blog Hop 01-2020 PPP Blog Hop 01-2020
Here’s what I did:
Cut and scored with my paper trimmer:
- Whisper White Thick card stock (CS) cut to 4-1/4″ x 11″, then scored in half at 5-1/2″
- card from the kit cut in half and each side cut to 3″ x 3″, so you have a Mint Macaron layer for the card and a Whisper White layer for the box
- Vellum CS cut to 2-7/8″ x 2-7/8″
Stamped with the I’ll Bee Yours stamp set:
- large floral stamp in Highland Heather ink onto the center of the Vellum (I heat set the ink with my Heat Tool.)
- large floral stamp in Highland Heather ink onto the Whisper White layer, around all the edges
- sentiment in Mint Macaron ink onto the bottom left corner of the Mint Macaron layer
Cut using the Layering Squares Dies:
- center from the Mint Macaron layer
- same size cut from the front of the Whisper White Thick CS card basex
Assembled the card:
- burnished the fold in the card base with a Bone Folder
- vellum glued onto the back of the Mint Macaron layer, then glued onto the card front, lining up the die cuts
- bees from the kit adhered onto the card front using glue dots
- 3 Highland Heather adhesive sequins applied onto the card front
Assembled the box:
- burnished the folds in the pizza box with a Bone Folder, and folded to assemble
- Mint Macaron die cut glued onto the Whisper White Thick CS layer
- bees from the kit adhered onto the layers using glue dots
- 3 Highland Heather adhesive sequins applied onto the Mint Macaron layer
- Whisper White CS layer adhered onto the top of the box using Stampin’ Dimensionals
Here you can see the translucence of the vellum window in the card front: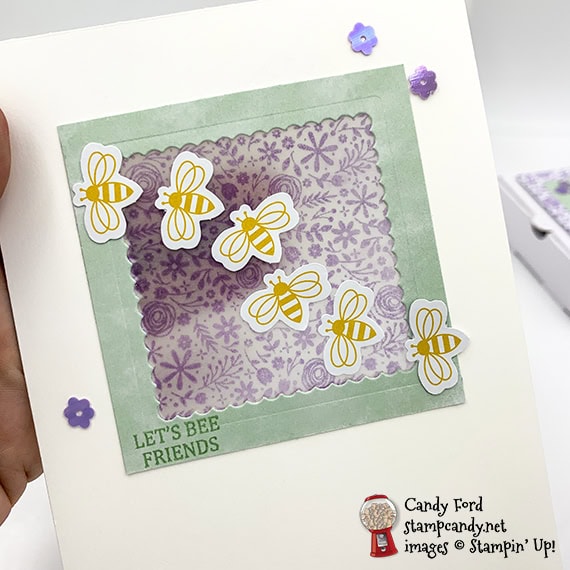 S
S
Here’s the PPP Blog Hop 01-2020:
Click the Next button to hop to the next stop, Deb Naylor of The Flying Stamper:
 S
S
Here are today’s colors:
You can click on each one to see all the products that come in that color!
S
Here’s what I used, other than what came in the kit:
Click on these images for more details and to purchase.
Click “Supply List” for a clickable and printable list of the products!
S
Here are some helpful links:
Thanks for stopping by today, and Sweet Stamping!
Jan 15, 2020 | Blog Hop, Cards, Holiday |

January 2020 InKing Royalty January 2020 InKing Royalty
Welcome to the January 2020 InKing Royalty Blog Hop! During this year’s blog hops, we are enjoying a year of celebrations. This month’s projects celebrate Valentine’s Day, so prepare yourself for lots of hearts and beautiful showcases of love. I used the From My Heart Suite in the new Mini Catalog to make this love card for a special friend.
Be sure to hop around to all the stops. You don’t want to miss any of the great projects made by this talented group!
S
Here’s what I made:

S
Here’s what I did:
Cut and scored with my paper trimmer:
- Flirty Flamingo card stock (CS) cut to 4-1/4″ x 11″, then scored in half at 5-1/2″
- From My Heart Specialty Designer Series Paper (DSP) layer cut to 3″ x 5-1/2″
- Whisper White CS cut to 4″ x 5-1/4″ for the inside of the card base
Stamped with the Heartfelt stamp set:
- sentiment in Real Red ink onto a pink foil heart on the DSP
- lacy heart in Flirty Flamingo ink onto a red foil heart on the DSP
- 2 small hearts in Real Red ink onto the Whisper White CS
Cut using the Heart Punch Pack:
- the 2 stamped hearts from the DSP
Assembled the card:
- burnished the fold in the card base with a Bone Folder
- DSP layer glued onto the front of the card base , 1/4″ from the left
- 2 punched hearts glued together, then glued onto the back of a Heart Doily
- heart bunch adhered onto the DSP layer using Stampin’ Dimensionals
- 3 faceted gems glued onto the front of the card base
- Whisper White CS glued onto the inside of the card base

S
Here’s the January 2020 InKing Royalty Blog Hop:
Thank you for hopping along with us. If you get stuck during the Blog Hop, please use this line-up as a guide:
- Brian King at Stamp with Brian
- Ann Murray at Murray Stamps Ink
- Jennifer Spiller at Westside Paper Creations
- Candy Ford at Stamp Candy <—– YOU ARE HERE!
- Pam Morris at Tap Tap Stamp
- Julie DiMatteo at The Paper Pixie
- Sheryl Abernathy at Elegant Sentiments
- Lynn Kolcun at Avery’s Owlery
- Shawn de Oliveira at Shawn Stamps
- Jackie Beers at Blue Line Stamping
- Sue Jackson at Just Peachy Stamping
- Linda Krueger at The Stamp Coach
- Sheryl Sharp at Sharp Notes by Sheryl
S
Here are today’s colors:
You can click on each one to see all the products that come in that color!
S
Here’s what I used:
Click on these images for more details and to purchase.
Click “Supply List” for a clickable and printable list!
S
Here are some helpful links:
Thanks for stopping by today, and Sweet Stamping!
Jan 9, 2020 | Blog Hop, Boxes, Cards |

Welcome to the OSAT 01-2020 Blog Hop! It’s the first hop of the new year, and the theme is Purses, Poppies, & Paris. We are featuring new products from the January – June 2020 Mini Catalog. I decided to focus on the Paris part of the theme, and use the Parisian Blossoms Suite to make my card and faceted box.
S OSAT 01-2020
Here’s what I made:


 S
S
Here’s what I did:
Cut and scored with my paper trimmer:
- Cherry Cobbler card stock (CS) cut to 4-1/4″ x 11″, then scored in half at 5-1/2″, for the card base
- Petal Pink CS cut to 3-1/2″ x 1-1/8″, for the sentiment
- Petal Pink CS cut to 3-3/4″ x 5″, for the inside of the card
- Cherry Cobbler (CS) cut to 7-7/8″ x 11-1/4″, for the box
- scored the Cherry Cobbler CS for the box along the short side at 2-1/2″, 4-5/8″, and 7-1/8″
- rotated the Cherry Cobbler CS for the box 90 degrees so the skinny section is at the top, then scored only down to the second score line (cross one score line and stop at the second) at 2-1/2″, 5″, 7-1/2″, and 10″
- rotated the Cherry Cobbler CS 180 degrees, then scored only down to the first score line at 2-1/2″, 5″, 7-1/2″, and 10″
- used a ruler and stylus to score the diagonal lines as shown in the diagram (see below)
- Parisian Blossoms Specialty Designer Series Paper (DSP) cut to 2-1/4″ x 2-1/4″, for the top of the box
- DSP cut into 1-3/4″ strips, then cut into triangles 2″ wide (20 triangles total)
Stamped with the Parisian Beauty stamp set:
- sentiment in Cherry Cobbler ink onto the smaller piece of Petal Pink CS
- fleur-de-lys in Cherry Cobbler ink onto the larger piece of Petal Pink CS
Cut using the Parisian Dies:
- “Amour” from a scrap of Cherry Cobbler CS
- Eiffel Tower from a scrap of Cherry Cobbler CS
Cut using the 1/2″ Circle Punch:
- finger notch in the front panel of the box – I recommend doing this after the DSP triangle is glued on.
Assembled the card:
- burnished the fold in the card base with a Bone Folder
- DSP triangles glued onto the front of the card base, cutting 3 of them in half for the edges
- die cut tower glued over the triangles
- sentiment adhered over the tower using Stampin’ Dimensionals
- 3 Champagne Rhinestone Basic Jewels applied onto the sentiment, the tower, and a DSP triangle
- larger Petal Pink CS glued onto the inside of the card base
Assembled the box:
- made all cuts in the Cherry Cobbler base using Paper Snips, cutting the two C sections about 1/2″ below the score line (refer to diagram)
- burnished all the folds in the Cherry Cobbler CS base with a Bone Folder
- 8 DSP triangles glued onto the 8 triangular sides of the box (This is easier while it’s still flat, before assembling the box.)
- DSP square glued onto the lid of the box
- die cut “Amour” glued onto the DSP square on the lid of the box
- 3 Champagne Rhinestone Basic Jewels applied onto the DSP square on the lid of the box
- small triangular section at one end glued onto the inside of the large triangle at the opposite end (A & B on diagram)
- folded all 4 bottom flaps in, one by one, gluing them together
- put goodies in the box and closed up the top
Here’s the diagram for the box:
Click on the image for a larger view.
S
Here’s the OSAT 01-2020 Blog Hop:
Here are today’s colors:
You can click on each one to see all the products that come in that color!
S
Here’s what I used:
Click on these images for more details and to purchase.
<– Click here for a clickable and printable list!
S
Here are some helpful links:
S
Thanks for stopping by today, and Sweet Stamping!
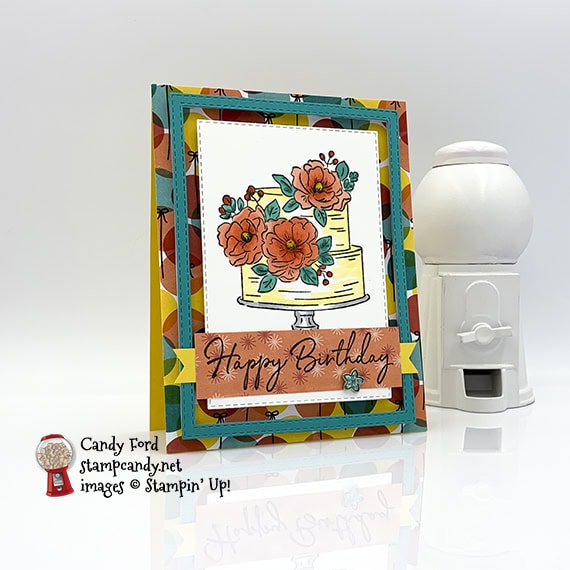
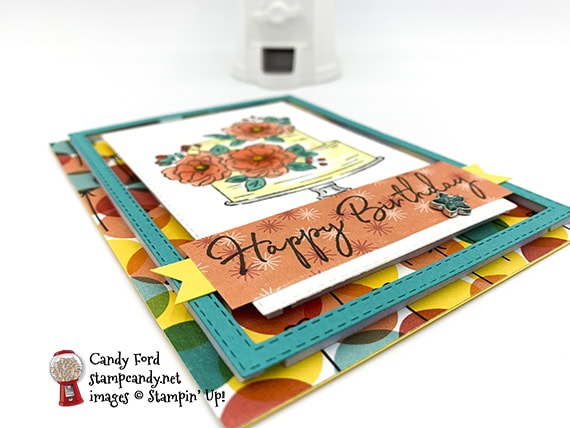
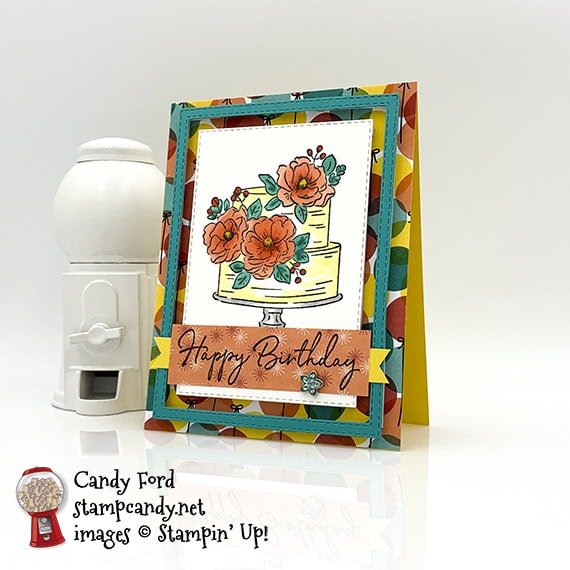
Jan 1, 2020 | Blog Hop, Cards, Sale-A-Bration |
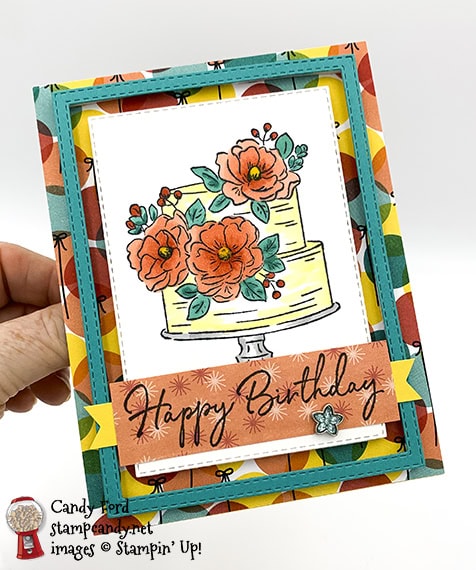
Happy New Year! Welcome to the first ICS Blog Hop of 2020! This month’s theme is “Let the Sale-A-Bration Begin” and we’re featuring products from the new Sale-A-Bration brochure that goes live in just 2 days. I used the Happy Birthday to You stamp set to create today’s project.
S
Here’s what I made:
 S
S
Here’s what I did:
Cut and scored with my paper trimmer:
- Daffodil Delight card stock (CS) cut to 4-1/4″ x 11″, then scored in half at 5-1/2″
- Birthday Bonanza Designer Series Paper (DSP) layer cut to 4-1/4″ x 5-1/2″
- DSP sentiment layer cut around the stamped sentiment
- Daffodil Delight CS cut to 4-1/2″ x 1/2″
Stamped with the Happy Birthday to You stamp set:
- cake in black Memento ink onto a scrap of Whisper White Thick CS
- sentiment in black Memento ink onto a scrap of DSP
Cut using the Stitched Rectangle Dies:
- cake layer (used the 3rd largest rectangle die)
- border from a scrap of Bermuda Bay CS (used the largest and the 2nd largest rectangle dies)
Cut using the Banner Triple Punch:
- both ends of the Daffodil Delight CS strip
Colored using Stampin’ Blends Markers:
- cake in Light Daffodil Delight, leaving the center white
- flowers in Light and Dark Calypso Coral, and Dark Daffodil Delight
- leaves in Light and Dark Bermuda Bay
- cake stand in Light Smoky Slate, leaving the center white
Assembled the card:
- burnished the fold in the card base with a Bone Folder
- DSP layer glued onto the front of the card base
- Bermuda Bay CS border and cake layer adhered onto the DSP layer using Foam Adhesive Strips
- Daffodil Delights CS strip glued onto the back of the sentiment layer
- sentiment layer glued onto the cake layer
- Flower Faceted Gem applied onto the sentiment layer
- optional: glue a 4″ x 5-1/4″ piece of Whisper White CS onto the inside of the card. This isn’t needed because the Daffodil Delight CS is light enough to write on.
 SS
SS
Here’s the ICS Blog Hop for January 2020:
Click the button below to go to the next stop on the hop, Terri Takashige of Territerbear’s Stamp & Scrap Spot:
S
Here are today’s main colors:
You can click on each one to see all the products that come in that color!
S
Here’s what I used:
Click on these images for more details and to purchase.
<– Click here for a clickable and printable list!
S
Here are some helpful links:
S
Thanks for stopping by today, and Sweet Stamping!

