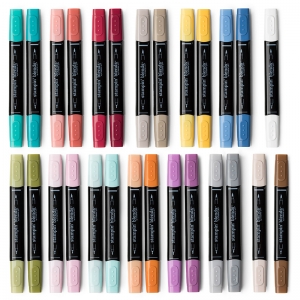
Woohoo! It’s time for the November edition of the Remarkably Created Blog Tour! This month we’re featuring the new Stampin’ Blends Markers. They come in 12 of your favorite Stampin’ Up! colors (a light and a dark in each color) plus Ivory and Bronze. And there’s a Color Lifter! You can buy them all individually or you can purchase all 27 as a collection.
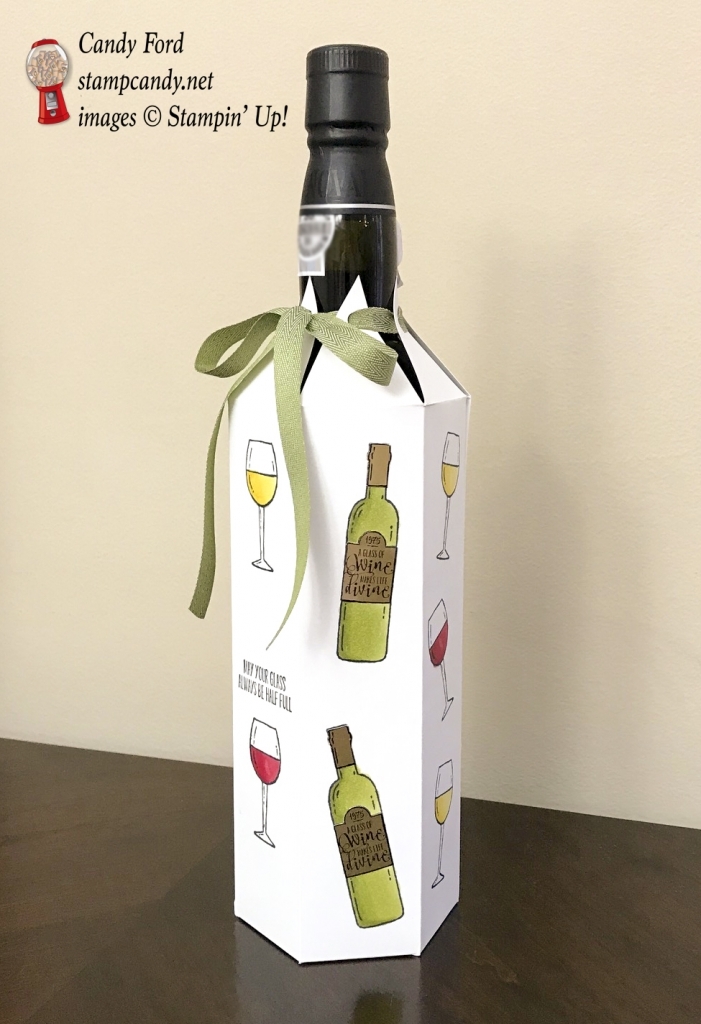
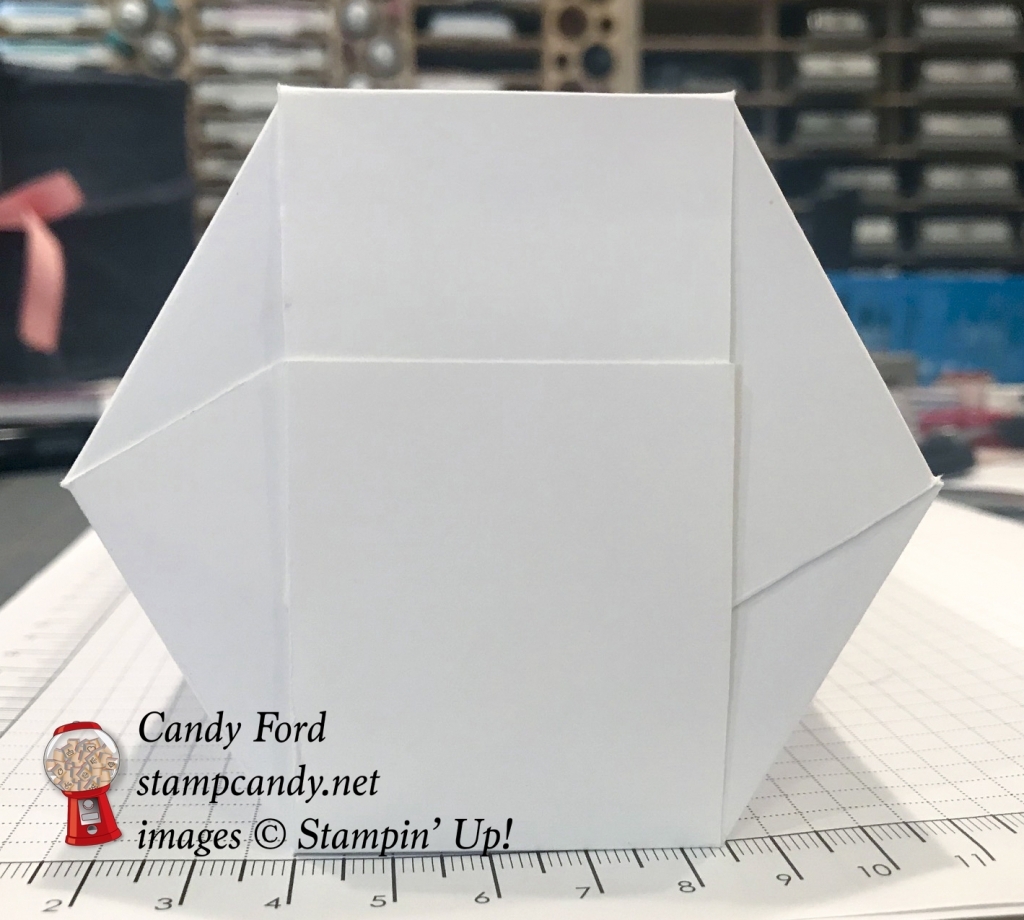
My project today is a cover for a wine bottle. A bottle of wine is such a popular gift to take to a party or a dinner, and of course, you want to give it in something nice. This cover is perfect for year round, any occasion or holiday. And it’s easy!
Whisper White Thick card stock (CS) cut to 11″ x 12″
scored along the 11″ side at 1-3/4″, 3-1/2″, 5-1/4″, 7″, 8-3/4″, 10-1/2″
scored along the 12″ side at 2″ and 10″
burnished all score lines with a Bone Folder
Cut using Paper Snips, according to the diagram:
removed two smallest rectangles and angled the leftover tab (in blue)
cut vertical score lines along the bottom just up to the first horizontal score line
marked along the top side with a pencil at 7/8″, 2-5/8″, 4-3/8″, 6-1/8″, 7-7/8″, and 9-5/8″
cut from pencil marks to the intersections of the vertical score lines and the first horizontal score line – this cuts away the green areas
used a 1/4″ circle punch to cut a hole in each triangle, about 1/2″ or so from the top – you may want to use a smaller one, like the 1/8″ Circle Punch, depending on the size of your ribbon
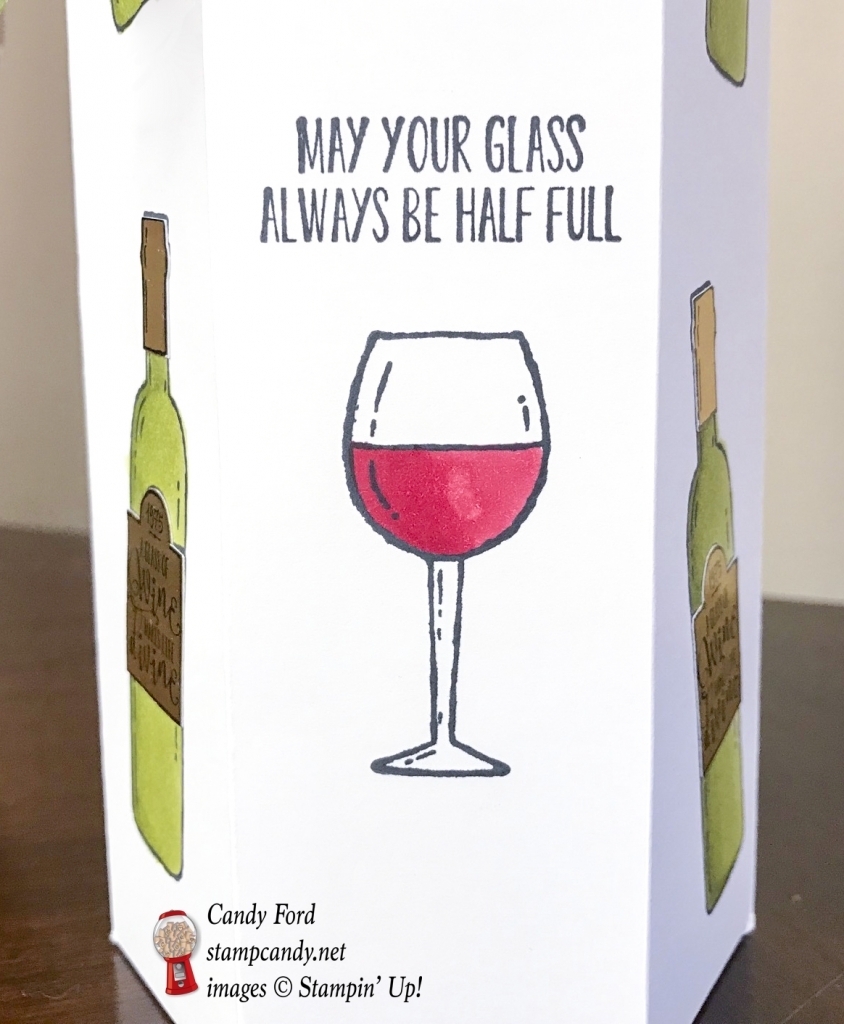
Stamped with the Half Full stamp set:
bottles, wine glasses, and sentiment in Memento Black ink onto the six largest rectangles of the Whisper White Thick CS cover
bottles in Archival Basic Clack ink onto a scrap of a Gold Foil Sheet
Fussy Cut using Paper Snips:
tops and labels of wine bottles stamped on Gold Foil Sheet
Colored using Stampin’ Blends Markers:
bottles in Old Olive
wine in glasses in Cherry Cobbler and Daffodil Delight
Assembled the project:
gold wine bottle tops and labels adhered over the colored wine bottles on the cover, using Fast Fuse
skinny tab at one side of the cover adhered to the inside of the opposite side, using Fast Fuse
inserted wine bottle to make the next step easier
folded in one bottom tab, then glued the opposite tab to it
rotated the bottle and glued the next pair of tabs, then the last pair.
NOTE: Do one pair at a time so they line up and create a symmetrical hexagon when you’re through. The only tab that doesn’t get glue is the first one, so it won’t stick to the bottle. All the other tabs are glued to the one(s) above it.
starting in the front, ran about 22″ ribbon through the holes in the tops of the triangles, always front to back
ran the ribbon through the first hole again, back to front, then tied a bow, and trimmed the ribbon ends
Here’s the blog tour:
Here are today’s colors:
You can click on each one to see all the products that come in that color!
Click on the images for more details and to purchase.
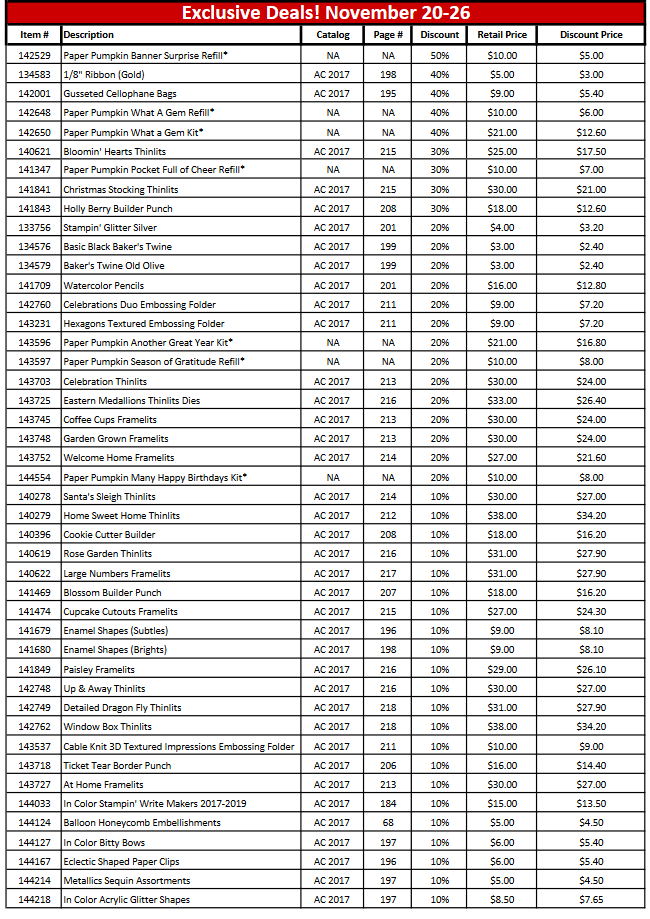
Online Extravaganza Begins Tomorrow!
with a 24 hour Flash Sale!
The first incredible offering of this promotion is the 24-hour Flash Sale. Select stamp sets will be 20% off for the first 24 hours of Online Extravaganza. Because of the limited time of this sale, I encourage you to stock up on these awesome stamps! The Flash Sale starts November 20 12:00 AM and ends November 20 11:59 PM.
The second chart below shows stamps on sale November 20-26, 2017.
Here are some other key points to remember:
Stampin’ Blends alcohol markers are now available! Click HERE for more info.
Online Extravaganza is from November 20-26th – watch for 24hr flash sales!
Hostess Code for the month of November (JBHB42YT) Find out more about HOW, WHEN and WHY to use the code HERE.
November’s FREE gift: Stitched Felt Embellishments Find out more HERE.
Gumball Rewards for all orders over $50. Find out more HERE
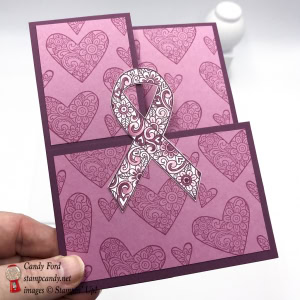
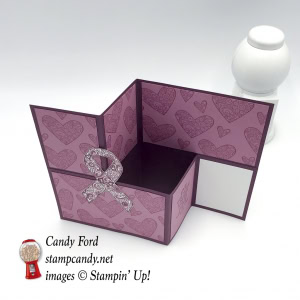
Today’s project is a double Z-fold card made using the Ribbon of Courage Bundle (Ribbon of Courage stamp set and Support Ribbon Framelits dies) for the ICS Blog Hop. The theme for this month’s hop is Colors of Courage. We’ve made projects to inspire those wanting to send cards or projects to friends/family in cancer treatment.
The Ribbon of Courage stamp set is perfect for this month’s theme.
October is Breast Cancer Awareness month, but there are lots of other types of support ribbon colors. See the chart below. I used Rich Razzleberry and Sweet Sugarplum as the main colors, and the sentiment is all purpose, so you can decide if it’s for Breast Cancer or something else.
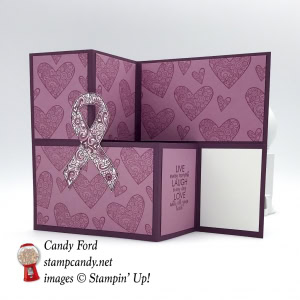
Here’s what I made:
Here’s what I did:
Cut and scored with my Stampin’ Trimmer:
Rich Razzleberry card stock (CS) cut to 8-1/2″ x 5-1/2″, then scored along the 8-1/2″ side at 2-1/8″ and 4-1/4″
Rich Razzleberry card stock (CS) cut to 8-1/2″ x 2-3/4″, then scored along the 8-1/2″ side at 4-1/4″ and 6-3/8″
two pieces of Sweet Sugarplum CS cut to 4″ x 2-1/2″
three pieces of Sweet Sugarplum CS cut to 1-7/8″ x 2-1/2″
Whisper White CS cut to 1-7/8″ x 2-1/2″
Stamped with the Ribbon of Courage stamp set:
ribbon in Rich Razzleberry ink onto a scrap of Whisper White CS
sentiment in Rich Razzleberry ink onto one of the1-7/8″ x 2-1/2″ Sweet Sugarplum CS pieces
large hearts and small hearts all over the remaining four Sweet Sugarplum CS pieces
Colored using Blender Pens:
ribbon in Rich Razzleberry and Sweet Sugarplum inks
Die cut using the Support Ribbon Framelits:
ribbon
Assembled the card:
the far left 2-1/8″ x 2-3/4″ section of the 8-1/2″ x 2-3/4″ glued onto the bottom left of the card base
the far right 2-1/8″ x 2-3/4″ section of the 8-1/2″ x 2-3/4″ glued onto the bottom right of the card base
layers glued onto card as shown
bottom and top left half of ribbon glued onto the card front as shown
Here’s the next stop on the hop:
Click the arrow to visit Nichole Loe of Scrappy Stamps and Ink!
Here are today’s colors:
You can click on each one to see all the products that come in/with that color!
Click on the images for more details and to purchase.
Here are some key points to remember:
World Card Making Day Sale October 1-10, 15% off select card making essentials. See details HERE.
Designer Series Paper Sale October 1-31, Buy 3 Get 1 FREE! See details HERE.
Hostess Code for the month of October (HGB2HGXK)
Find out more about HOW, WHEN and WHY to use that HERE.
October’s FREE gift
Mini Pizza Boxes
Find out more HERE.
New Merry Patterns Hostess Stamp Set – added to your Host Rewards! There’s a brand new stamp set that isn’t in any catalog. You can’t buy it, but you can get if for free with a qualifying order! You can host a party, or place your own order, or join under me and get a 20% discount on your demonstrator order. Find out more HERE.
Gumball Rewards for all orders over $50 Find out more HERE.
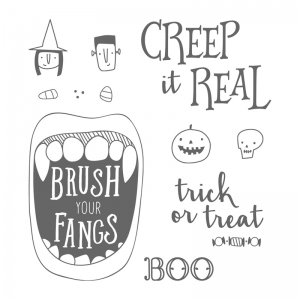
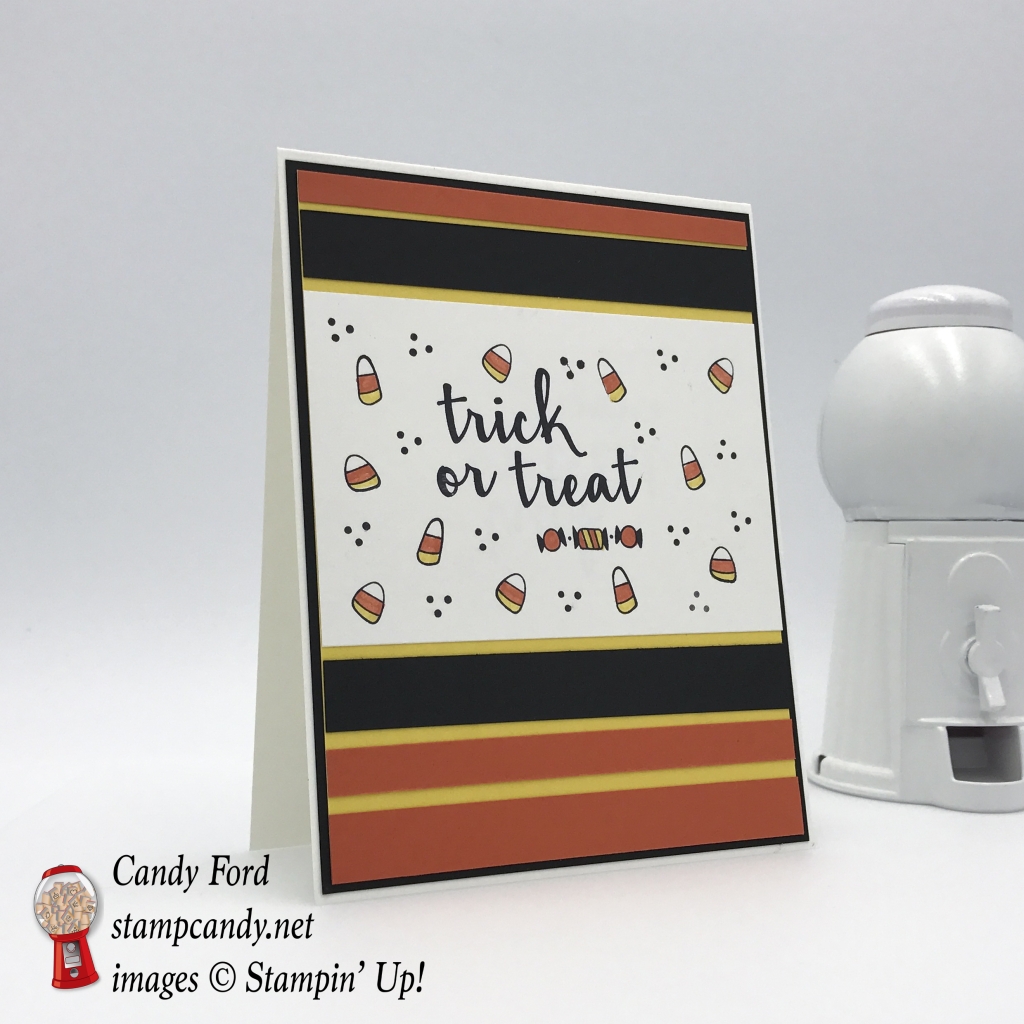
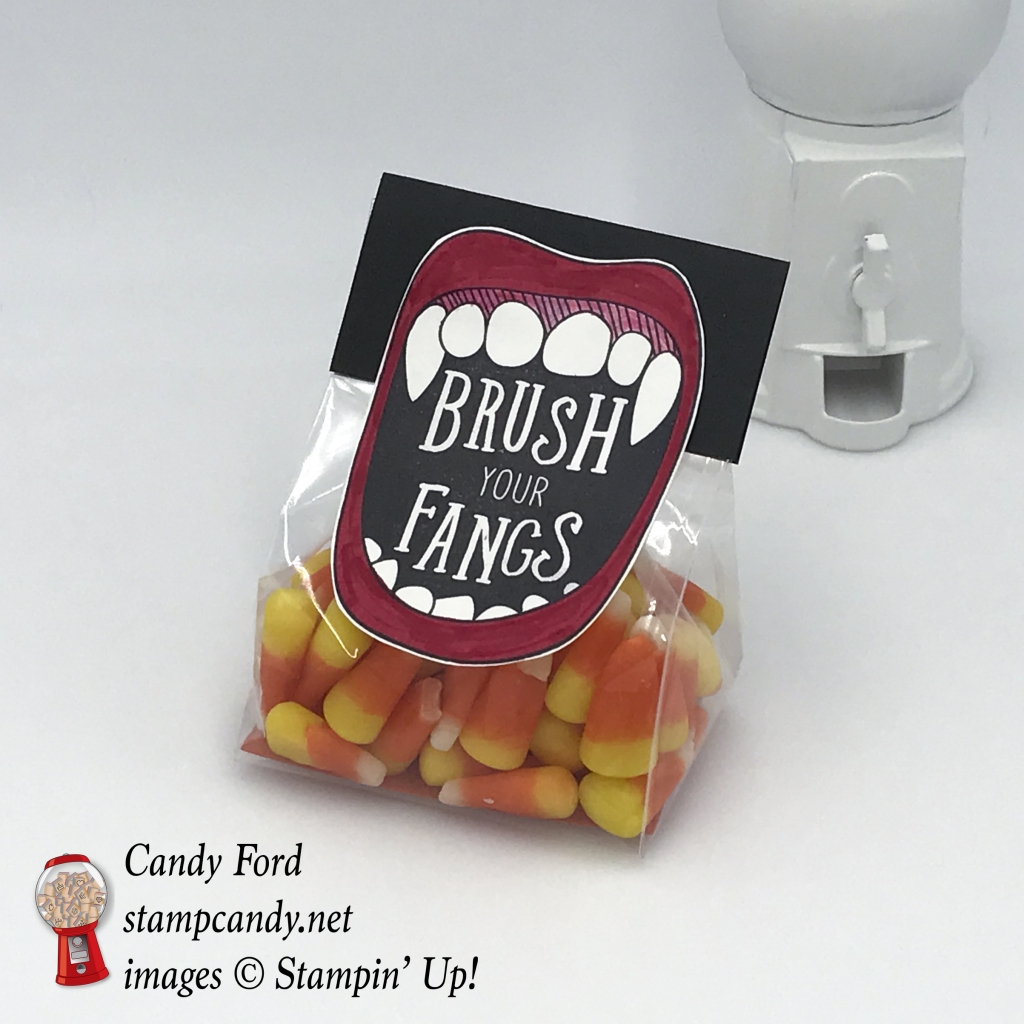
Creep It Real, yo! This is one of the cutest Halloween stamp sets I’ve seen in a while. Just look at the images in this set. A-dor-a-ble! You can see another project I made with this stamp set here.
Welcome to the Blog Hop for September 2017. This month our theme is Halloween! If you get off track at any time, the full lineup below will help you move along from blog to blog so you see all the projects. At the moment you are visiting Candy Ford at Stamp Candy.
Here’s what I made:
Here’s what I did:
Cut and scored with my Stampin’ Trimmer:
Whisper White Thick card stock (CS) cut to 4-1/4″ x 11″, then scored in half at 5-1/2″
Basic Black CS cut to 4-1/8″ x 5-3/8″
Daffodil Delight CS cut to 4″ x 5-1/4″
Whisper White CS cut to 4″ x 2-1/2″
assorted strips of Basic Black and Tangerine Tango CS, cut to 4″ long – I just pulled strips out of my scrap drawers, and spaced them equally on the card. They are probably about 3/8″ to 5/8″ wide
Stamped with the Creep It Real stamp set:
sentiment, candy corns, and dots in Basic Black ink onto the 4″ x 2-1/2″ Whisper White layer
Colored using Stampin’ Write Markers:
candies in Tangerine Tango and Daffodil Delight
Assembled the card:
stamped layer and strips glued onto the Daffodil Delight CS layer
Daffodil Delight CS layer glued onto the Basic Black layer
Basic Black layer glued onto the front of the card base
Thanks for taking part in our blog hop! There are so many amazing ideas and inspiration you don’t want to miss. Remember that currently you are at my blog, Stamp Candy, so check the blog hop line up below to see who is next on the hop.
Here’s the hop:
Here are today’s colors:
You can click on each one to see all the products that come in that color!
Click on the images for more details and to purchase.
Here are some things to remember:
Gumball Reward for all orders over $50. Find out more HERE.
Hostess Code for the month of September (N4ZFHXK9) Find out more about HOW, WHEN and WHY to use that HERE.
September’s FREE gift Quilt Top Textured Impressions Embossing Folder Find out more HERE.
Help those affected by Hurricane Harvey and Irma I will donate 20% of my September sales to the American Red Cross for Hurricane Harvey & Irma Relief. And Stampin’ Up! will match my donation! Please help make a difference. CLICK HERE to shop now.
New Merry Patterns Hostess Stamp Set – added to your Host Rewards There’s a brand new stamp set that isn’t in any catalog. You can’t buy it, but you can get if for free with a qualifying order! You can host a party, or place your own order, or join under me and get a 20% discount on your demonstrator order. Find out more HERE.
Welcome to InKing Royalty’s September Blog Hop! Today’s Tricked Out Treats Blog Hop is filled with spooky, fun projects for Halloween. We are excited to share our creations with you today and hope these projects inspire you. After you read my post, I hope you’ll hop over to the next person on the list at the base of this post.
Today’s project falls under the category of “simple projects.” You could whip out a bunch of these little treat bags in no time, plenty enough for all your Trick-or-Treaters, neighbors, coworkers, friends, the mailman,… anyone really. The large stamped image is from the Creep It Real stamp set, which contains several fun Halloweeny images and sentiments. Take a look:
Basic Black card stock (CS) cut to 3″ x 3″, and scored in half at 1-1/2″
Pumpkin Pie CS cut to 1-3/4″ x 3″
Stamped with the Creep it Real stamp set:
mouth image in Basic Black ink onto a piece of Whisper White CS (I used regular Whisper White CS, but you can use the Thick Whisper White CS for more stability.
Colored using Stampin’ Write Markers:
lips in Real Read
gums in a lighter shade of Real Red , using a Blender Pen
Cut using Paper Snips:
mouth image
Assembled the treats bag:
put Pumpkin Pie CS in bottom of a 3″ x 6″ Gusseted Cellophane Bag to help keep it flat
put candy corn into the bag
folded over the top of the bag, folded Basic Black CS over it, and stapled it on
top of mouth image glued onto the Basic Black CS
That’s it!
Here’s the hop:
Thank you for hopping with us today. I hope you’ll hop along to the next stop on the hop, the amazingLydia Fiedler at Understand Blue. There’s a lot of inspiration to be found in this group – and you don’t want to miss any of it! If you get stuck during the Blog Hop, please use this line-up as a guide:
Click on the images for more details and to purchase.
Shop and help those affected by
Hurricanes Harvey & Irma
I will donate 20% of my September sales to the American Red Cross for Hurricane Harvey & Irma Relief, and Stampin’ Up! will match my donation!
Please help make a difference. CLICK HERE to shop now.
There’s a brand new stamp set that isn’t in any catalog. You can’t buy it, but you can get if for free with a qualifying order! You can host a party, or place your own order, or join under me and get a 20% discount on your demonstrator order.
Here are the details:
Promotion period: September 1–October 31
The Merry Patterns Stamp Set is exclusive to this promotion and will not be available after October 31
In order to qualify, the event merchandise total must reach $300 (before tax and shipping)
There is no limit to the number of times the Merry Patterns Stamp Set may be earned, but only one set can be redeemed per qualifying order
Demonstrator, Customer, Workshop, and online orders qualify
Orders must be closed by:
October 31 at 10:50 PM (PT)
October 31 at 11:50 PM (MT)
November 1 at 12:50 AM (CT)
November 1 at 1:50 AM (ET)
The Merry Patterns Stamp Set is in addition to Stampin’ Rewards
The Merry Patterns Stamp Set may not be exchanged for another stamp set
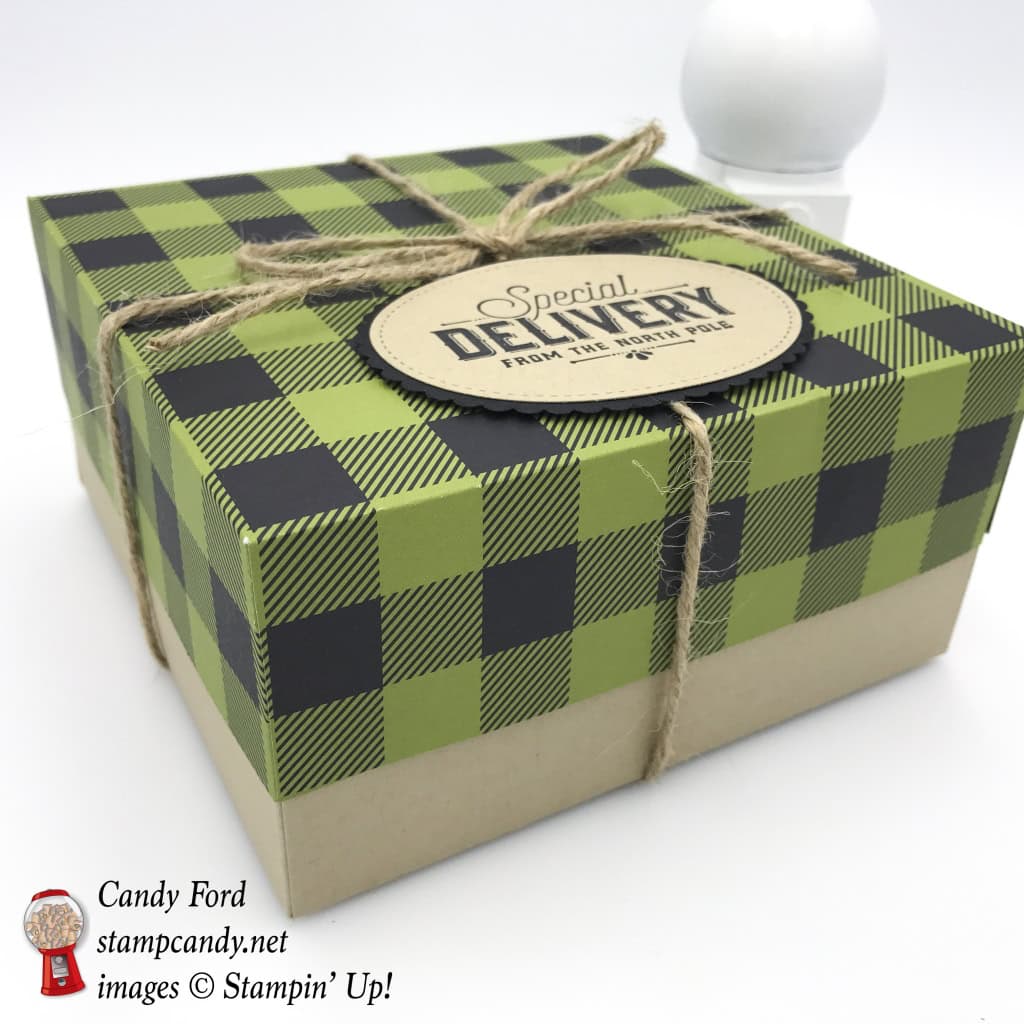
On the TA September Blog Hop, we are sharing some of our favorite products from the 2017 Holiday Catalog. It’s impossible for me to narrow it down to just one…or two…or three… But for today I decided to go with the Merry Little Christmas Mega Suite.
There are so many wonderfully coordinated products in this suite, for card making AND gift wrapping! It includes the Merry Little Labels Bundle (Merry Little Labels stamp set and Everyday Label Punch,) the Carols of Christmas Bundle (Carols of Christmas stamp set and Card Front Builder Thinlits Dies,) Merry Little Christmas Designer Series Paper (DSP) and coordinating 12″ x 12″ card stock (CS) pack, Merry Music Specialty DSP, 7/8″ Striped Ribbon, Acetate Card Boxes, Green Sprigs, Jute Twine, and Mini Ornaments. Holy cow, that’s a lot of cool stuff!
Here’s what I made:
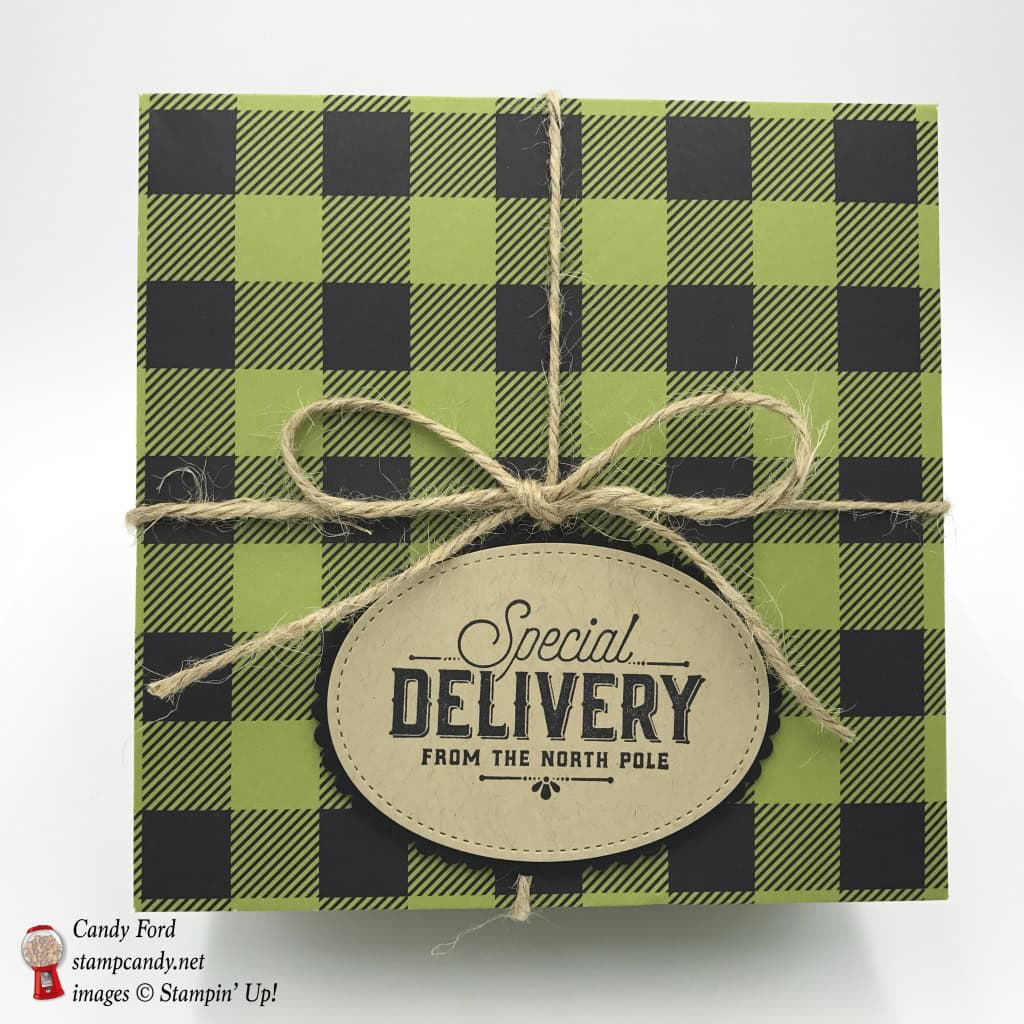
I used some of the products from the Mega Suite to make this gift box
Here’s what I did:
Cut and scored with my Stampin’ Trimmer:
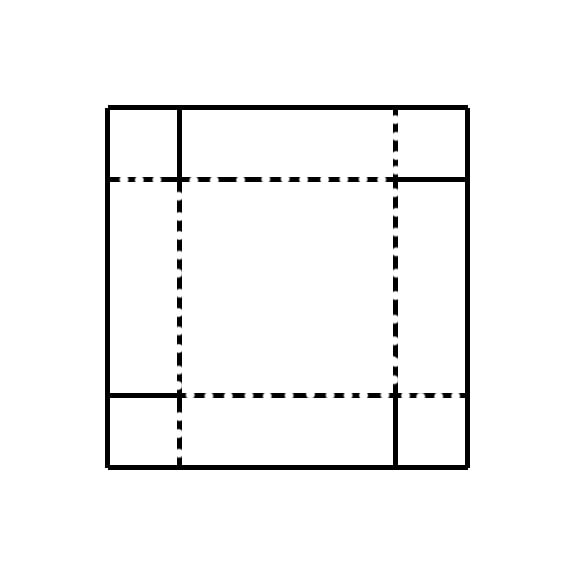
12″ x 12″ Kraft card stock (CS) scored 3″ from each side, then one score line at each corner cut (the center section should be 6″ x 6″)
Merry Little Christmas Designer Series Paper (DSP) cut to 9-9/16″ x 9-9/16″, then scored 1-3/4″ from each side, then one score line at each corner cut (the center section should be 6-1/16″ x 6-1/16″)
This is the same basic diagram for both pieces. Cut solid lines and score dotted lines.
Stamped with the Merry Little Labels stamp set:
sentiment in Basic Black ink onto a scrap of Kraft CS
Die cut using the Stitched Shapes Framelits:
sentiment with an oval die
Die cut using the Layering Ovals Framelits:
scalloped oval from Basic Black CS, just a little bigger than the sentiment oval
Assembled the box:
folded all score lines on both pieces of paper and burnished with a Bone Folder
glued the tab at each corner to the inside of the adjacent side – do this for all four corner and for both pieces of paper
put the lid on the box, then wrapped Jute Twine around it and tied a bow
glued the sentiment oval onto the Basic Black CS scalloped oval
adhered the sentiment to the top of the box using Stampin’ Dimensionals, being careful not to put any along the center, so the twine can slide underneath
Here’s the hop:
Here are today’s colors:
Click on each one to see all the products that come in that color!
Click on the images for more details and to purchase.
Here’s the Merry Little Christmas Mega Suite:
Do you have a long wish list?
How would you like to get a 20% (or more) discount on all the great Stampin’ Up! products you want, with no obligation and no risk? Join my group of Candy Hearts. Click on the candy machine for more information.
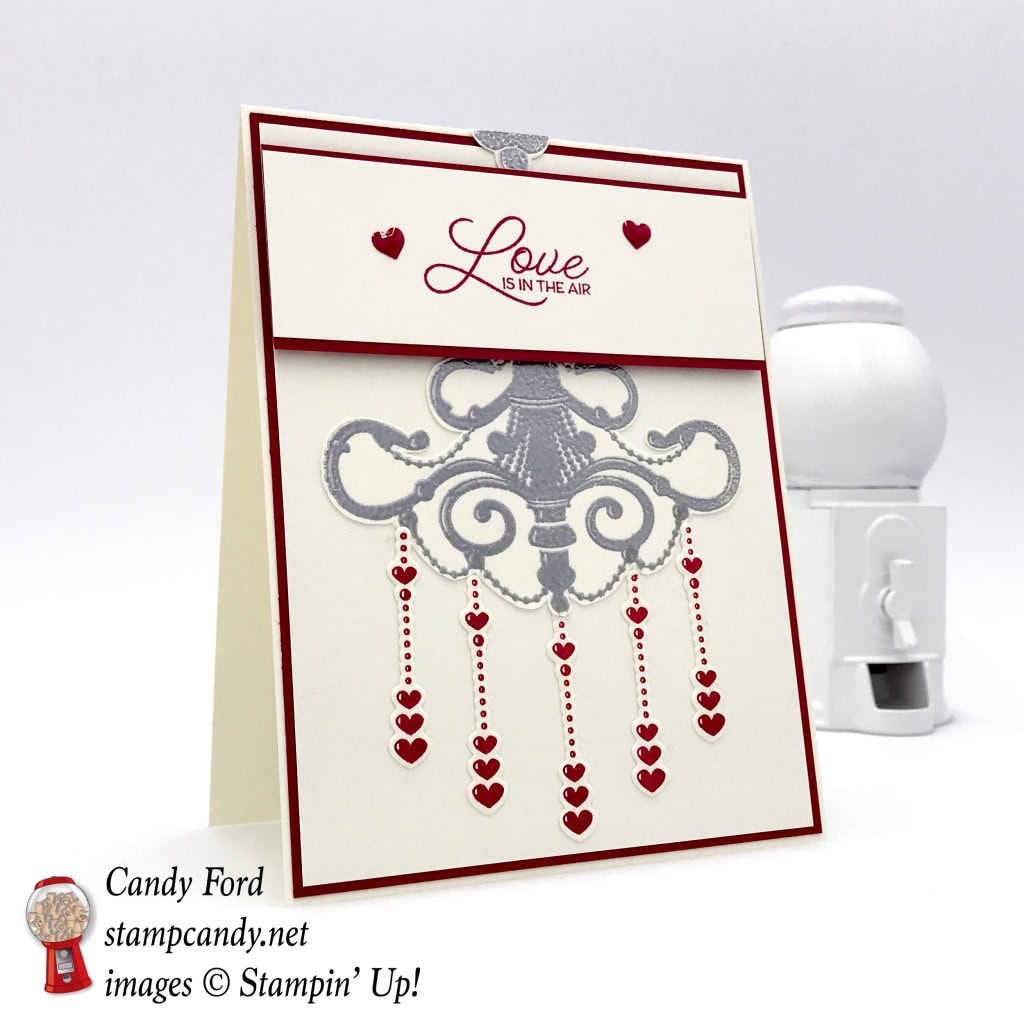
Welcome to the Anything but the Holidays Blog Hop! Today we are using products from the 2017 Holiday Catalog in a non-holiday way. My card is made using the new Season to Sparkle Bundle (Season to Sparkle stamp set and Chandelier Thinlits Dies.) It comes with an assortment of dangles to hang from the chandelier, including pine cones, Christmas ornaments, spiders, hearts, and assorted gems, so you can see that this is really a year-round bundle. I chose the hearts to make a Love themed card for today.
Here’s what I made:
Here’s what I did:
Cut and scored with my Stampin’ Trimmer:
Very Vanilla Thick card stock (CS) cut to 4-1/4″ x 11″, then scored in half at 5-1/2″
Real Red CS cut to 4″ x 5-1/4″
* Very Vanilla CS cut to 3-3/4″ x 5″
Real Red CS cut to 3-3/4″ x 1-1/2″
* Very Vanilla CS cut to 3-3/4″ x 1-1/4″
* these two pieces can be either the thick or the regular Very Vanilla CS
Stamped with the Season to Sparkle stamp set:
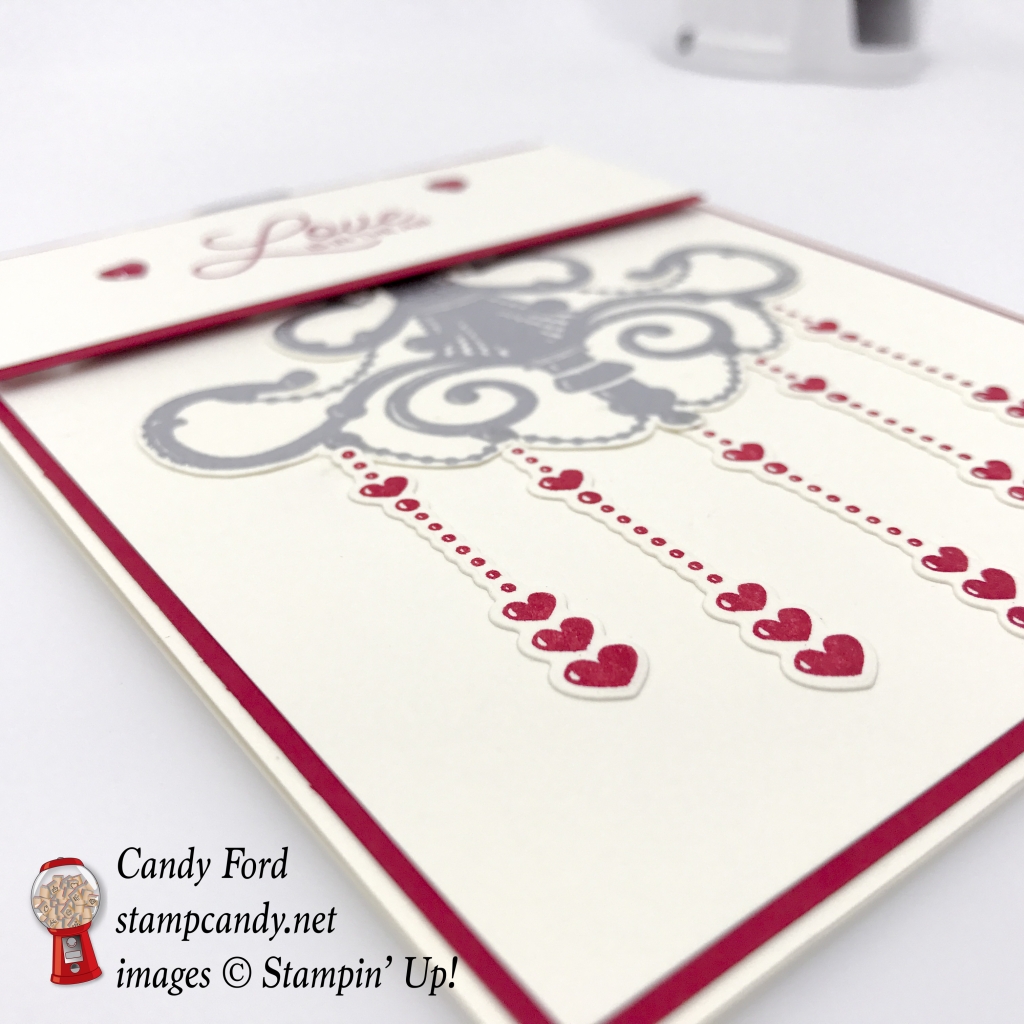
chandelier in Versamark ink onto a scrap of Very Vanilla CS, then heat embossed in silver
heart dangles in Real Red ink onto a scrap of Very Vanilla CS
sentiment in Real Red ink onto the Very Vanilla CS strip
Die cut using the Chandelier Thinlits Dies:
heart dangles
Cut using Paper Snips:
chandelier
Assembled the card:
sentiment strip glued onto the Real Red CS strip
chandelier and dangles glued onto the 3-3/4″ x 5″ Very Vanilla CS layer (the top of the chandelier hung over the top edge, but I trimmed it in another step*
chandelier layer glued onto the Real Red CS layer
Real Red CS layer glued onto the front of the card base
*top of chandelier trimmed flush with the top of the card with Paper Snips
sentiment strip stack adhered to card front with Stampin’ Dimensionals
applied two Real Red enamel hearts to the sentiment area
Here’s the hop:
Here are today’s colors:
You can click on each one to see all the products that come in that color!
Click on the images for more details and to purchase.
Only 3 days left to register for the
Merry Little Christmas Mega Suite Class!
A Class in Two Parts
September 9, 2017 10am-1pm and 2pm-5pm Candy’s Stamping Studio, Atlanta, GA Let me know if you need directions.
In this two part class you’ll make Christmas cards and coordinating gift packaging. You can sign up for just one, but why not sign up for both and have matching cards and gifts, and save money?
Part 1: 10am-1pm, $15 You’ll make 6 cards using products from the suite.
Part 2: 2pm-5pm, $15 You’ll make 4 gift bags and boxes, complete with tags and decoration.
When you register for the class AND you: – buy one of the two bundles included in the Mega Suite, I will give you a $10 gift certificate for Stampin’ Up! product at the class. – buy both bundles, I will give you a $20 gift certificate for Stampin’ Up! product at the class!
Gift certificates are good only for Stampin’ Up! products purchased through Candy Ford. Customer is responsible for tax and shipping.
Shop and help those affected by
Hurricane Harvey
I will donate 20% of my September sales to the American Red Cross for Hurricane Harvey Relief.
Please help make a difference. CLICK HERE to shop now.
September Host Code
N4ZFHXK9
September’s FREE gift is the brand new Quilt Top Textured Impressions Embossing Folder: Create a beautiful quilt pattern background with this Embossing Folder.It’s easy to make a great impression! Just place flat cardstock in this embossing folder, run it through the Big Shot, and out comes cardstock with a bold textured design.* 1 folder * 6″ x 6″ (15.2 x 15.2 cm) * Use with Big Shot
Watch this video on the Quilted Christmas Suite in the new Holiday Catalog
Use the Host Code on your online orders under $150. You can see how to use a Host Code here.
Orders between $75 and $149.99, using the Host Code, will receive my FREE Gift of the Month. Orders of $150 and above will automatically receive the gift – do no use the Host Code.
I can ship only within the United States. “No contact” orders are not eligible.
You always earn a Gum Ball for every $50 you spend on an order with me. Earn 10 Gum Balls and I’ll send you a free stamp set of your choice! See the Gum Ball Rewards page for details.