Sep 15, 2020 | Autumn, Boxes, Cards, Fun Folds, Gallery, Gift Wrap, Gifts |
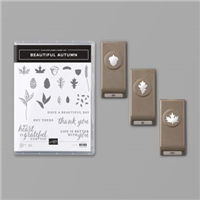
Autumn is almost here, and today’s project is a thank you card that’s all about the season. I used the Beautiful Autumn stamp set and Stitched So Sweetly Dies to create this simple fun fold card. I also made a coordinating little lip balm gift box, which I’ll share with you in a few days (you can see a sneak peek of it below.)
If you are reading this in email, some photos may appear blurry, or may not appear at all. Please click here to see the post on my blog.
S Autumn Autumn Autumn Autumn
Here’s what I made:


S
Here’s what I did:
Cut and scored with my paper trimmer:
- Early Espresso card stock (CS) cut to 5-1/2″ x 8-1/2″, then scored in half at 4-1/4″ and at 7-1/2″
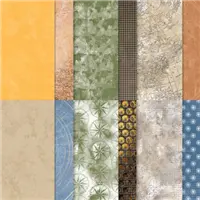
- Gilded Autumn Designer Series Paper (DSP) layer cut to 3″ x 5-1/4″ (speckled)
- speckled DSP layer cut to 1″ x 5-1/4″
- herringbone pattern DSP layer cut to 5-1/4″ tall by 4 pattern stripes wide (just over 3/4″)
- acorn/leaf pattern DSP layer cut to 2-1/2″ x 4-1/4″
- Very Vanilla CS cut to 4″ x 5-1/4″ for the inside of the card base
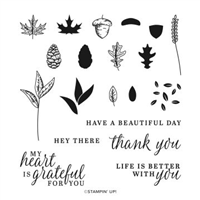
Stamped with the Beautiful Autumn stamp set:
- sentiment in Versamark ink onto a scrap of Early Espresso CS, then heat embossed in gold
- acorn in Early Espresso ink onto the bottom left corner of the Very Vanilla CS
Cut using the Stitched So Sweetly Dies:
Assembled the card:
- burnished the folds in the card base with a Bone Folder, folding the 1″ section back onto the card front
- larger speckled DSP layer glued onto the front of the card base (left side and under the folded over flap)
- acorn/leaf DSP layer glued onto the speckled DSP layer
- herringbone DSP layer glued onto the flap of the card base
- flap glued down onto the DSP layers
- sentiment glued onto the flap and DSP layers, but not the small part hanging off the right side
- 1″ speckled DSP strip glued onto the right side of the Very Vanilla CS
- Very Vanilla CS glued onto the inside of the card base
- If you prefer, you can skip gluing down the flap, and then only glue the sentiment to the flap, leaving the rest loose. I just felt the card would be easier to photograph if I glued them down.
S
Here are today’s main colors:
You can click on each one to see all the products that come in that color!
S
Here’s what I used:
Click on these images for more details and to purchase. If you are reading this post in email, the product images may not show up. Please click here to see the post on my blog.
Supply List. <— Click for a clickable and printable list of the products!
S
Two ways to save in September!
Buy the Starter Kit and receive even more! It’s already the best deal: $99 for $125 in product of your choice plus Free shipping! In September you will also receive the Queen Anne’s Lace stamp set, the So Much Love stamp set, Rhinestone Basic Jewels, and 16 precut card kits! Wow! This is the perfect time to work on your wish list of Stampin’ Up! products! CLICK HERE for more details.

Buy the new Stampin’ Cut & Emboss Machine (standard size) from me by September 30 and I will give you a Magnetic Cutting Plate FREE! You’ll save almost $30! CLICK HERE for more details and to order.

S
Here are some helpful links:
S
Thanks for stopping by today, and Sweet Stamping!

Sep 10, 2020 | Blog Hop, Boxes, Cards, Gallery, Techniques |

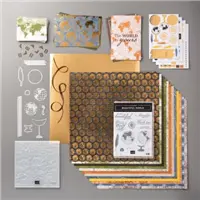
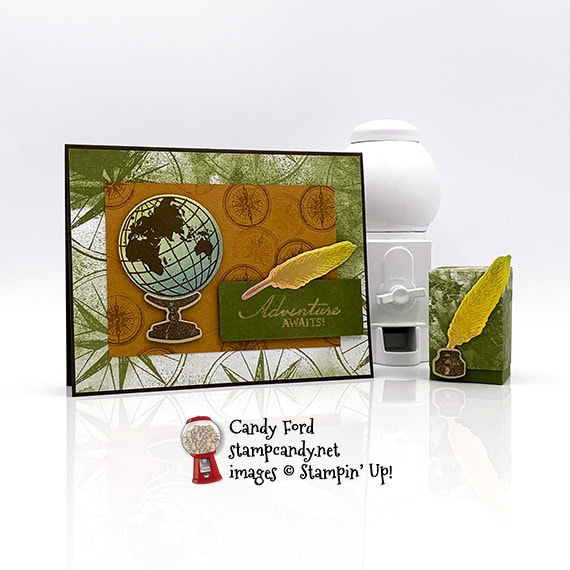
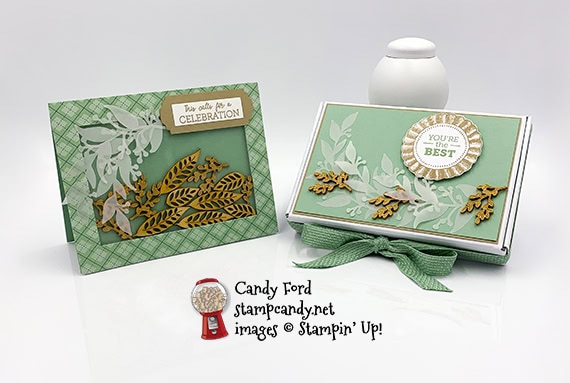
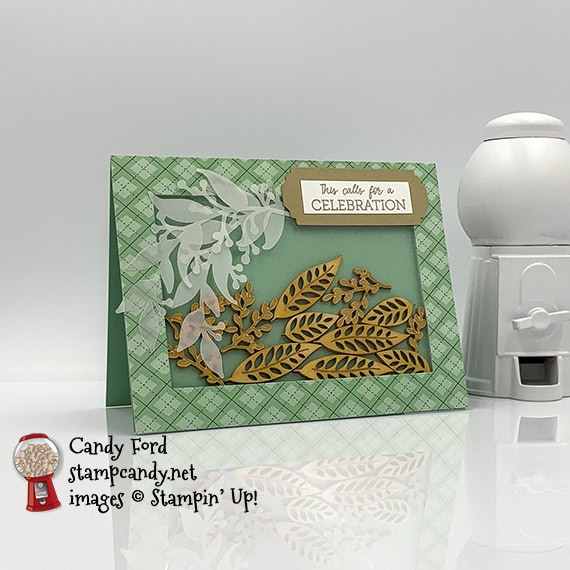
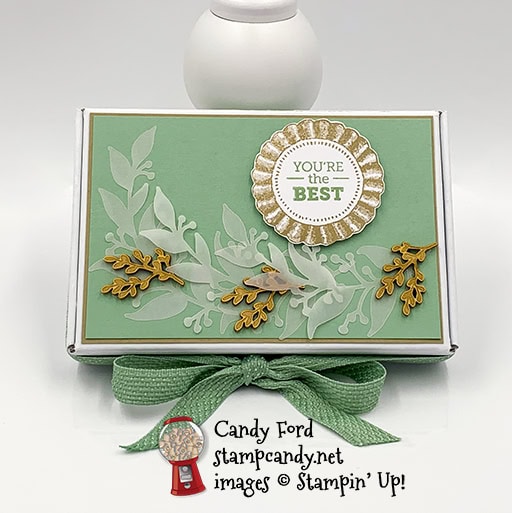
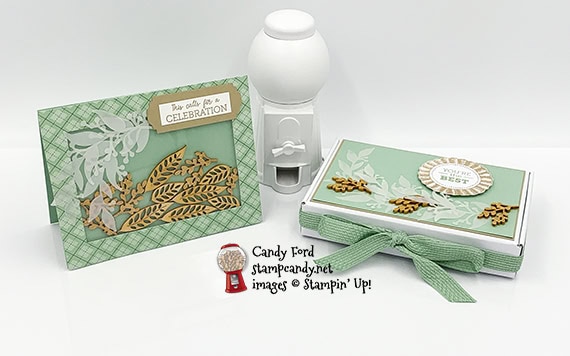
Welcome to the September 2020 OSAT Blog Hop! This month’s theme is You’ve Got This, so we’re featuring projects celebrating empowerment and encouragement for a new job, new school year, or any other new challenge. I used products from the World of Good Suite Collection for my projects today: a card and a small treat box. I also used a makeup brush blending technique that my Candy Hearts team member Lisa Graham demonstrated at our last team meeting.
Be sure to hop around to all the stops, to see all the great projects this group has in store for you today!
If you are reading this in email, some photos may appear blurry, or may not appear at all. Please click here to see the post on my blog.
S September 2020 OSAT September 2020 OSAT September 2020 OSAT
Here’s what I made:

S
Here’s what I did:
Cut and scored with my paper trimmer:
- Early Espresso card stock (CS) cut to 5-1/2″ x 8-1/2″, then scored in half at 4-1/4″
- World of Good Designer Series Paper (DSP) layer cut to 5-3/8″ x 4-1/8″
- Cinnamon Cider CS layer cut to 4-1/4″ x 3″
- Mossy Meadow CS layer cut to 2-3/4″ x 1″
- Whisper White CS cut to 5-1/4″ x 4″ for the inside of the card base
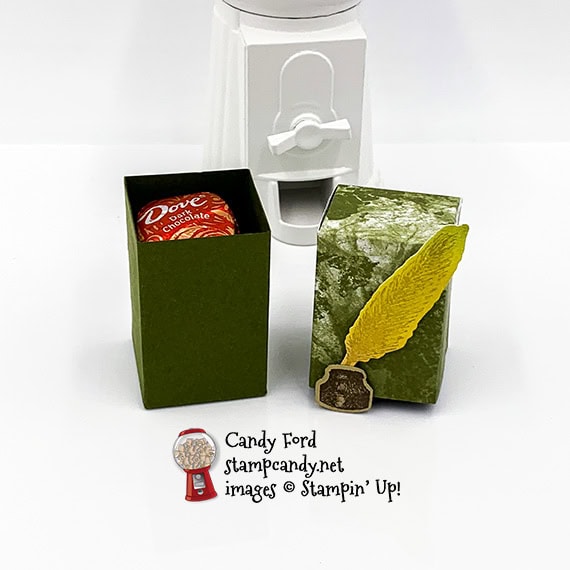
- Mossy Meadow CS cut to 5-1/4″ x 3-1/4″, scored along the long side at 1-1/4″, 2-1/2″, 3-3/4″, 5″, and scored along the short side at 1-1/4″ for the box
- DSP cut to 4-13/16″ x 4-13/16″ and scored 1-3/4″ from all four edges for the lid
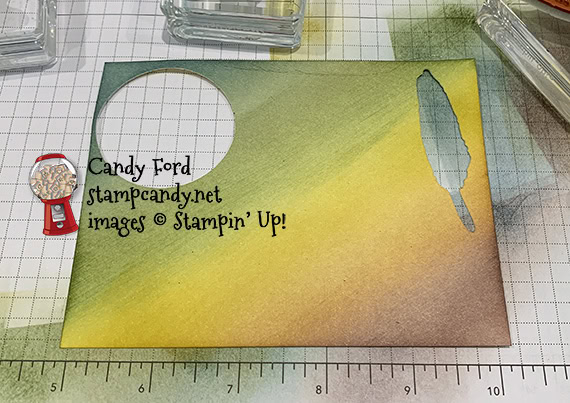
Colored/blended using a makeup brush:
- a scrap of Whisper White Thick CS in Early Espresso, Cinnamon Cider, Bumblebee, Mossy Meadow, and Misty Moonlight inks
- CLICK HERE to see the makeup brush I used. There are many others that I’m sure would be just as good. I wanted a big one, so I got the 2X-Large size.
- I forgot to take a photo until after I had cut out a couple pieces. My blending skills aren’t as good as Lisa’s, but I think you can get the idea.
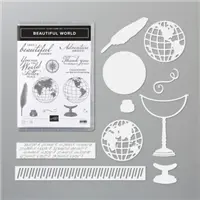
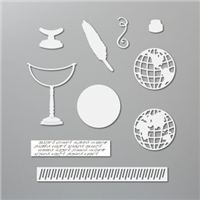
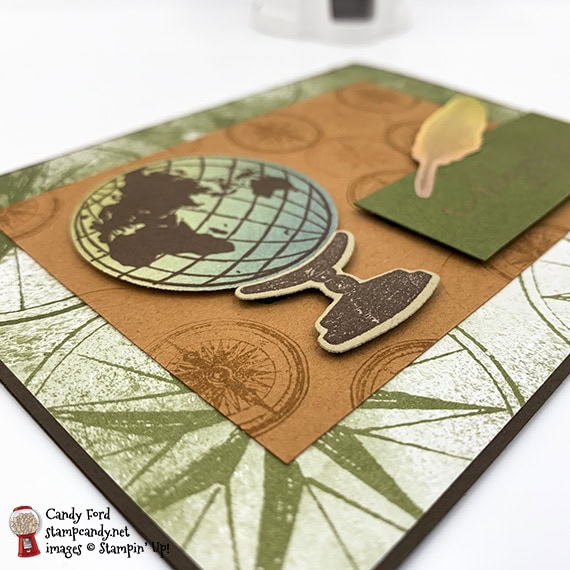
Stamped with the Beautiful World stamp set:
- globe in Early Espresso ink onto the blue/green area of the blended CS (I wanted to make sure I got good ink coverage on the globe, so I used my Stamparatus to stamp it 2 or 3 times times.)
- 2 feathers in Crumb Cake ink onto the yellow/brown area of the blended CS
- globe stand and ink well in Early Espresso ink onto a scrap of Crumb Cake CS
- sentiment in Versamark ink onto the small Mossy Meadow CS layer, then heat embossed in gold
- small globe in Cinnamon Cider ink all over the Cinnamon Cider CS layer
Cut using the World Map Dies:
- globe, globe stand, inkwell, and 2 feathers
Assembled the card:
- burnished the fold in the Early Espresso card base with a Bone Folder
- DSP layer glued onto the front of the card base
- Cinnamon Cider CS layer glued onto the the DSP layer
- globe and stand adhered onto the Cinnamon Cider CS layer using Black Stampin’ Dimensionals
- end of a feather glued onto the sentiment, then both adhered onto the card front using Black Stampin’ Dimensionals
- Whisper White CS glued onto the inside of the card base
Assembled the box:
- burnished the folds in the box and lid with a Bone Folder, and cut according to the diagram using Paper Snips
- tab on box glued onto the inside of the opposite end
- 1 bottom tab folded up, then the other 3 tabs glued in place
- The box is 1-1/4″ square by 2″ high, and fits 4 stacked Dove promises perfectly
- side tabs of DSP lid folded in and glued together, then the skinny tab folded down and glued onto the top one – did this on both sides
- NOTE: I put the lid on the box before gluing the sides, to make sure it wasn’t too snug.
- The lid is 1-5/16″ square by 1-3/4″ high.
- tip of second feather glued onto the back of the inkwell, then both adhered onto the front of the box lid using Black Stampin’ Dimensionals
S
Here’s the September 2020 OSAT Blog Hop:
Here are today’s colors:
You can click on each one to see all the products that come in that color!
S
Here’s what I used:
Click on these images for more details and to purchase. If you are reading this post in email, the product images may not show up. Please click here to see the post on my blog.
Supply List. <— Click for a clickable and printable list of the products!
S
Here are some helpful links:
S
Thanks for stopping by today, and Sweet Stamping!
Aug 27, 2020 | Blog Hop, Boxes, Cards, Gallery, Paper Pumpkin |

Welcome to the August 2020 APPT Blog Hop! This month we’re sharing alternate projects to make with the World’s Greatest kit. I used a Mini Paper Pumpkin Box, Mint Macaron ribbon, and In Good Taste Elements along with the kit to create a shaker card and gift box. The box is the perfect size for note cards. The colors in the kit are pretty bold and bright, and I wanted to make something calmer, so I used the Mint Macaron and white from the kit and added Crumb Cake. And I used glue and Stampin’ Seal+ in addition to the glue dots and dimensionals from the kit, but you don’t have to.
Be sure to hop around to all the stops to see all the great alternate projects shared by this talented group of stampers!
If you are reading this in email, some photos may appear blurry, or may not appear at all. Please click here to see the post on my blog.
S August 2020 APPT August 2020 APPT August 2020 APPT August 2020 APPT
Here’s what I made:
S
Here’s what I did:
Cut and scored with my paper trimmer:
- Mint Macaron card stock (CS) cut to 5-1/2″ x 8-1/2″, then scored in half at 4-1/4″, to create the card base
- Crumb Cake CS layer cut to 5-3/8″ x 3-5/8″
- Mint Macaron CS layer cut to 5-1/4″ x 3-1/2″
- Crumb Cake CS strip cut to 1″ x 3″
- Whisper White CS cut to 5-1/4″ x 4″ for the inside of the card base
Stamped with the World’s Greatest stamp set:
- card sentiment in Crumb Cake ink onto a scrap of Whisper White CS, then trimmed it down using my paper trimmer (It’s about 2″ x 9/16″.)
- round ribbon in Crumb Cake ink onto one of the larger white die cut circles from the kit
- box sentiment in Mint Macaron ink in the center of the Crumb Cake round ribbon
Cut using the Lovely Labels Pick a Punch:
- both ends of the Crumb Cake CS strip
Cut using Paper Snips:
- fussy cut around the Crumb Cake round ribbon
- trimmed the ends of the ribbon after tying the bow on the box
Assembled the card:
- burnished the fold in the card base with a Bone Folder
- a clear piece from the kit adhered onto one side of a foam rectangle, also from the kit
- a plaid frame from the kit adhered over the clear piece
- assorted pieces from the In Good Taste Elements laid onto the front of the card base, in one layer but clustered in the center
- stuck the other side of the foam rectangle onto the card front
- sentiment glued onto the punched Crumb Cake CS piece
- Crumb Cake piece adhered onto the card front using Stampin’ Seal+
- 2 vellum pieces from the kit adhered onto the card front using glue dots and glue
- Note: I used only a couple of glue dots where they wouldn’t show. I applied a small amount of glue to a few of the leaves and spread it with my finger, so it wouldn’t show through.
- Whisper White CS glued onto the inside of the card base (I had not done this yet when I took the photos.)
Assembled the box:
- burnished the folds in the box with a Bone Folder and folded to assemble
- Crumb Cake CS layer glued onto the top of the box
- Mint Macaron CS layer glued onto the Crumb Cake CS layer
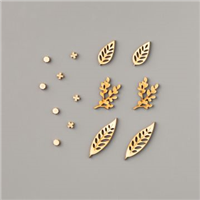
- 3 vellum pieces glued onto the Mint Macaron CS layer, using small amounts of glue spread onto just a few of leaves
- 3 wooden elements tucked into the vellum pieces and adhered using glue dots
- round ribbon/sentiment adhered onto the Mint Macaron CS layer using Stampin’ Dimensionals
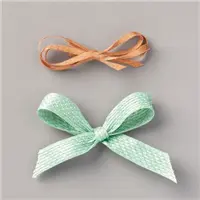
- Mint Macaron ribbon (about a yard or so) adhered onto the back and two sides of the box using Stampin’ Seal + (centering it on the back) then tied in a bow in the front
- Note: Untie the bow to open the box. The ribbon will stay attached to the box around 3 sides.
S
Here’s the August 2020 APPT Blog Hop:
S
Here are today’s colors:
You can click on each one to see all the products that come in that color!
S
Here’s what I used:
Click on these images for more details and to purchase. If you are reading this post in email, the product images may not show up. Please click here to see the post on my blog.
Supply List. <— Click for a clickable and printable list of the products!
S
Here’s how to get a prepaid Paper Pumpkin subscription:
Just click on the items below to order!
S
Here’s the World’s Greatest kit:
What it makes:
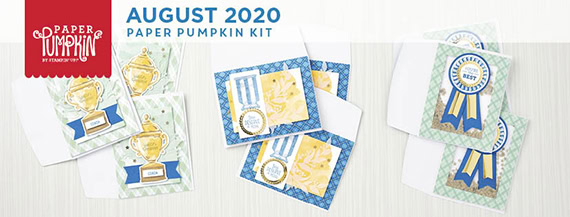
What you get: 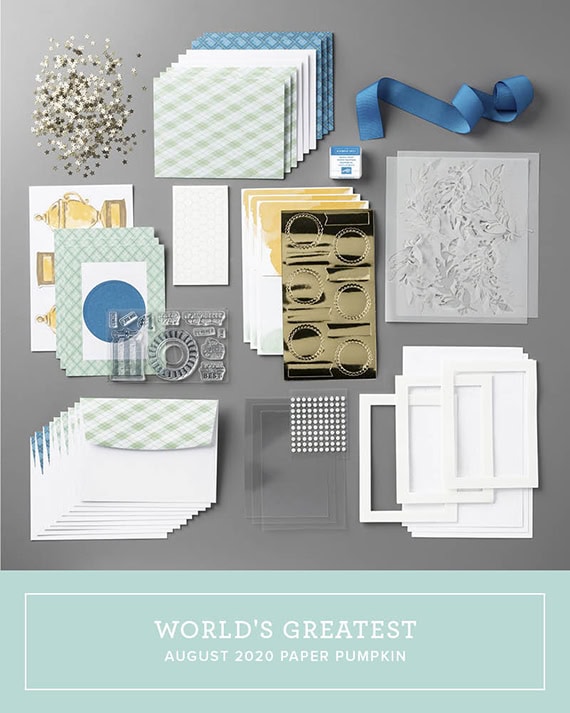
The stamp set: 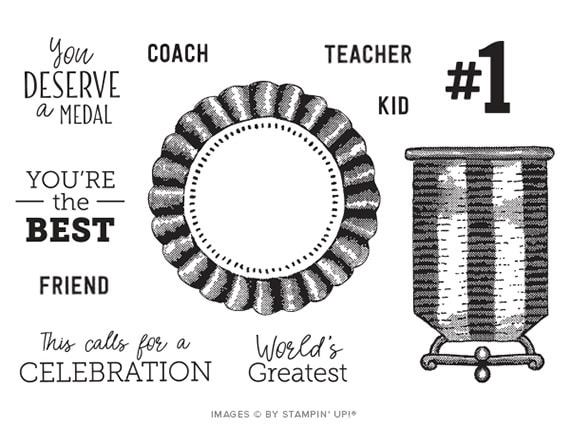
CLICK HERE to download a printable stamp case insert to store the stamp set and any left over pieces of the kit.
Use your Bonus Days coupons by August 31!
Click the image below to shop now and use your Bonus Days coupons!

S
Here are some helpful links:
S
Thanks for stopping by today, and Sweet Stamping!
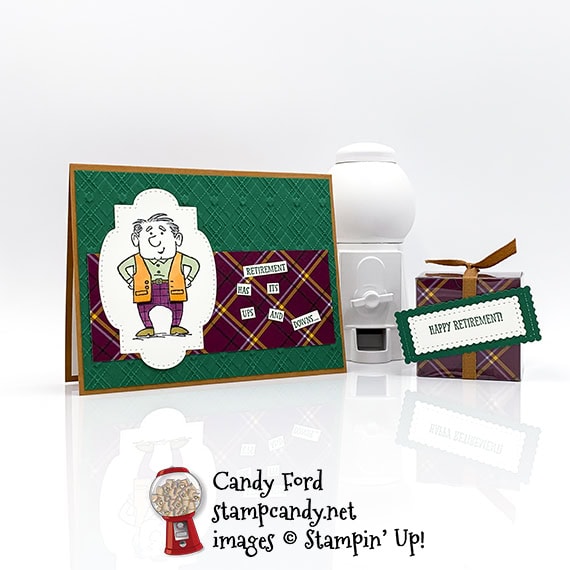
Aug 13, 2020 | Blog Hop, Boxes, Cards, Gallery |
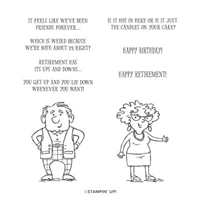
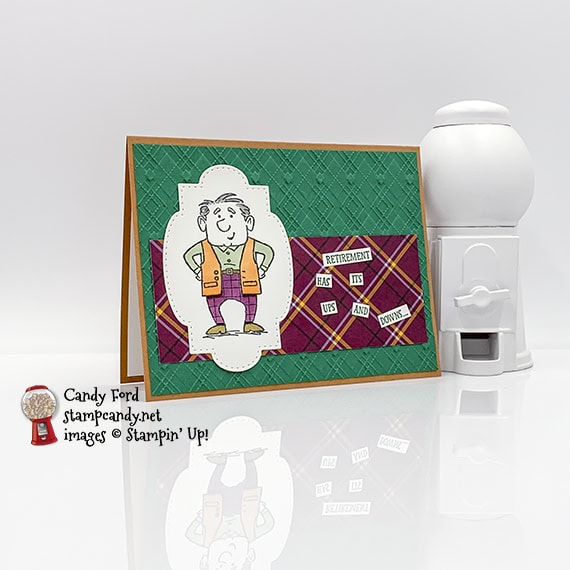
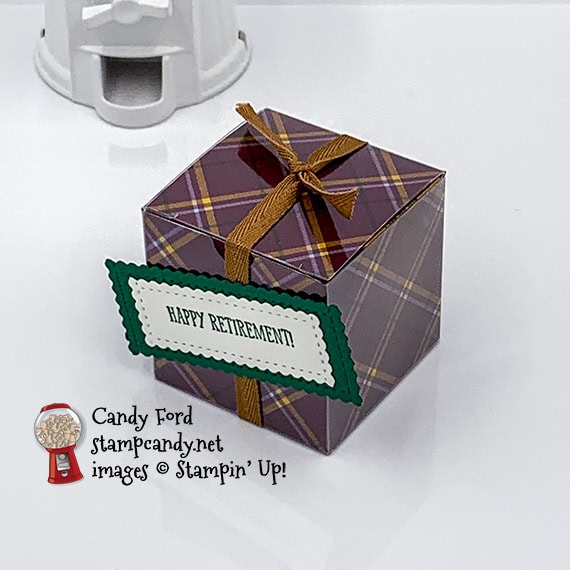
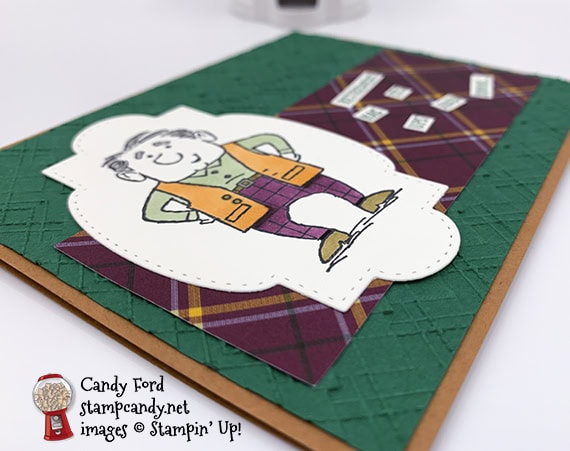
Welcome to the August 2020 OSAT Blog Hop! This month’s theme is New Beginnings, so we’re featuring projects celebrating new job, new marriage, new school year, etc. I used the Senior Years stamp set to make a happy retirement card and gift box. You may think of retirement as the end of a career, but I think of it as the beginning of a new life without the day to day worries of a job. I used the Plaid Tidings Designer Series Paper and Absolutely Argyle 3D Embossing Folder to echo the plaid pants the man is wearing. When I think of a retired man, the first thing that pops into my head is a man wearing mismatched patterns to play golf. And this guy seems very happy with his wardrobe choice, from the Pumpkin Pie vest to the Blackberry Bliss plaid pants.
If you are reading this in email, some photos may appear blurry, or may not appear at all. Please click here to see the post on my blog.
S August 2020 OSAT August 2020 OSAT August 2020 OSAT
Here’s what I made:

 S
S
Here’s what I did:
Cut and scored with my paper trimmer:
- Cinnamon Cider card stock (CS) cut to 5-1/2″ x 8-1/2″, then scored in half at 4-1/4″
- Shaded Spruce CS layer cut to 5-1/4″ x 4″
- Plaid Tidings Designer Series Paper (DSP) layer cut to 5″ x 2″
- Whisper White CS cut to 5-1/4″ x 4″ for the inside of the card base
- Plaid Tidings Designer Series Paper (DSP) cut to 6″ x 2″ (2 pieces)
Stamped with the Senior Years stamp set:
- man in Tuxedo Black Memento ink onto a scrap of Whisper White Thick CS
- front sentiments in Shaded Spruce ink onto a scrap of Whisper White Thick CS
- inner sentiment in Shaded Spruce ink onto the Whisper White CS for the inside of the card base
- box sentiment in Shaded Spruce ink onto a scrap of Whisper White Thick CS
Cut using the Stitched So Sweetly Dies:
- man
- box sentiment
- scrap of Shaded Spruce CS to mat the box sentiment
Embossed using the Absolutely Argyle 3D Embossing Folder:
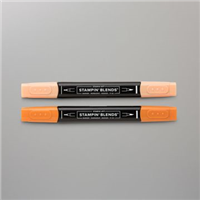
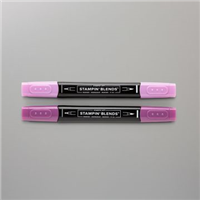
Colored using Stampin’ Blends Markers:
- man in Pumpkin Pie, Soft Sea Foam, Blackberry Bliss, and Soft Suede
Cut using Paper Snips:
- words of front sentiments cut apart
Assembled the card:
- burnished the fold in the card base with a Bone Folder
- embossed Shaded Spruce CS layer glued onto the front of the card base
- DSP layer glued onto the Shaded Spruce CS layer
- man and front sentiments glued onto the card front
- Whisper White CS glued onto the inside of the card base
Assembled the box:
- burnished the folds in the Tiny Treat box and folded it to assemble
- burnished the folds in the two DSP pieces
- Inserted one DSP piece into the box around the front and two sides
- inserted the second DSP piece into the box around the bottom, back, and top
- put treats inside the box and closed the lid
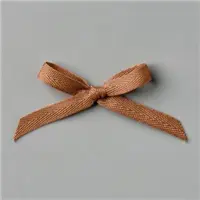
- Cinnamon Cider ribbon tied around the box and tied in a simple knot on top
- die cut sentiment glued onto the die cut Shaded Spruce CS mat
- Shaded Spruce CS mat adhered onto the front of the box using Mini Glue Dots
S
Here’s the August 2020 OSAT Blog Hop:
Here are today’s colors:
You can click on each one to see all the products that come in that color!
S
Here’s what I used:
Click on these images for more details and to purchase. If you are reading this post in email, the product images may not show up. Please click here to see the post on my blog.
Supply List. <— Click for a clickable and printable list of the products!
S
Use your Bonus Days coupons by August 31!
Click the image below to shop now and use your Bonus Days coupons!
S
Here are some helpful links:
S
Thanks for stopping by today, and Sweet Stamping!
Jun 30, 2020 | Blog Hop, Boxes, Cards, Gallery, Kits, Paper Pumpkin |

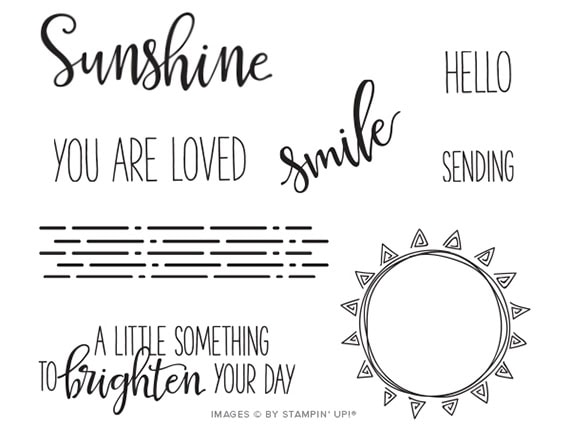
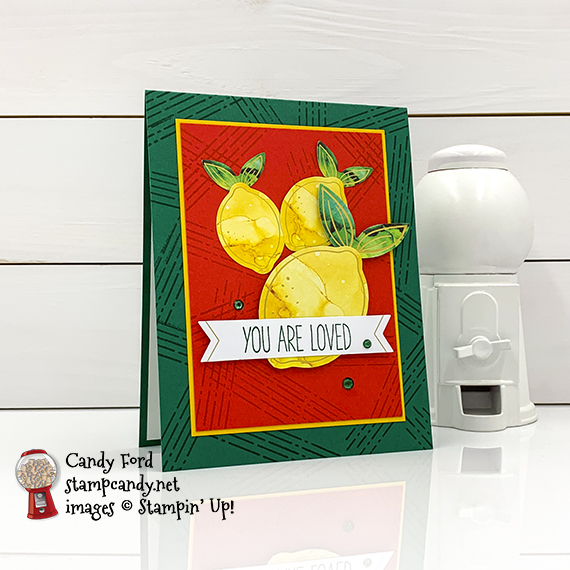
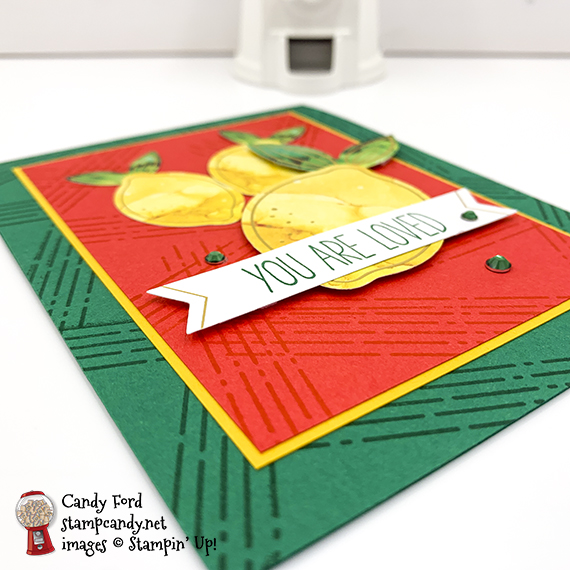
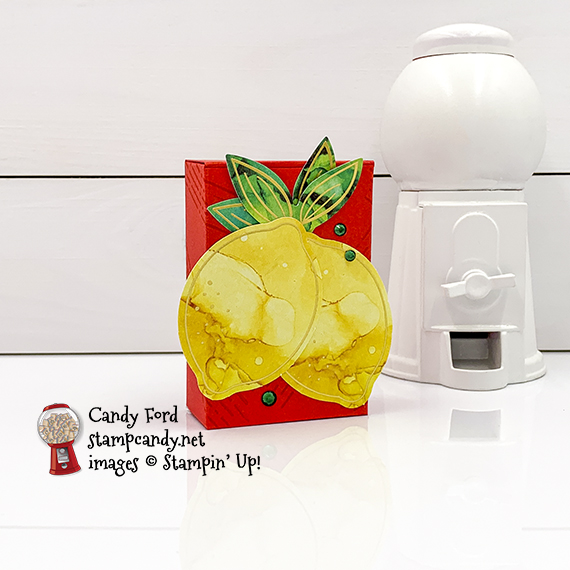
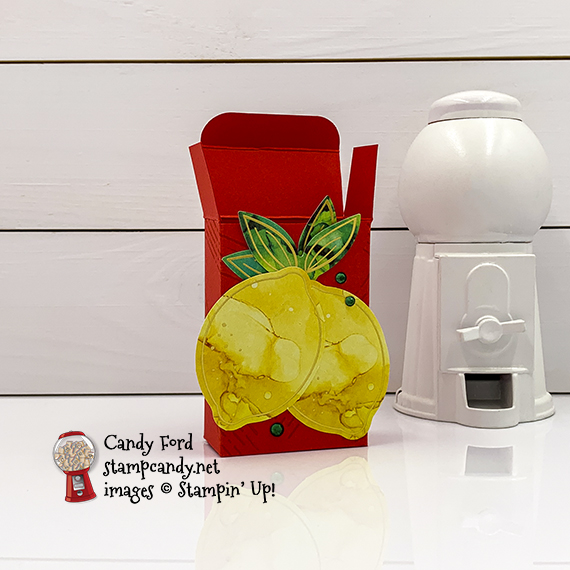
It’s time for the 06-2020 PPPBH. This month’s kit is called Box of Sunshine and it’s filled with enough goodies to make 8 bright and cheery cards so you can send some sunshine someone’s way. I used some pieces from the kit and some extra card stock and ink to create a card and a small treat box with lovely lemons on them, because what’s cheerier that lemons, right? I took a cue from the kit for the colors, which are listed on the back of the kit’s instruction sheet.
If you are reading this in email, some photos may appear blurry, or may not appear at all. Please click here to see the post on my blog.
S 06-2020 PPPBH 06-2020 PPPBH 06-2020 PPPBH 06-2020 PPPBH 06-2020 PPPBH
Here’s the Box of Sunshine kit:
CLICK HERE to download the printable stamp case insert for this month’s kit.

 S
S
Here’s what I made:

S
Here’s what I did:
Cut and scored with my paper trimmer:
- Shaded Spruce card stock (CS) cut to 4-1/4″ x 11″, then scored in half at 5-1/2″
- Crushed Curry CS layer cut to 3-3/8″ x 4-5/8″
- Poppy Parade CS layer cut to 3-1/4″ x 4-1/2″
- Whisper White CS cut to 4″ x 5-1/4″ for the inside of the card base
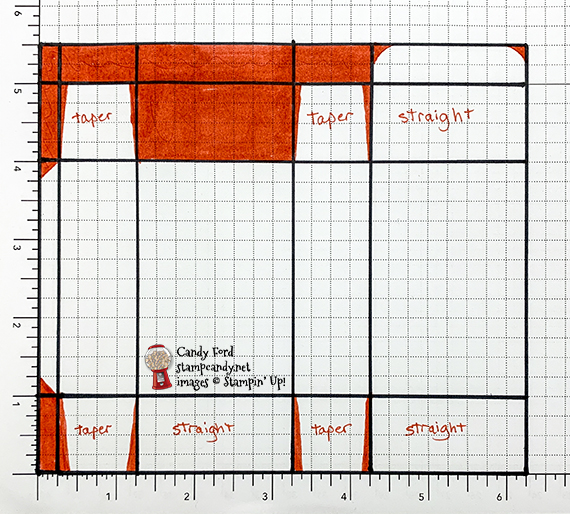
- Poppy Parade CS cut to 6-1/4″ x 5-1/2″, scored along the longer side at 1/4″, 1-1/4″, 3-1/4″, and 4-1/4″, and along the shorter side at 1″, 4″, and 5″ (See the diagram below. Remove all red areas with Paper Snips. Note that the smaller tabs are tapered and the wide ones have straight sides.)
Stamped with the Box of Sunshine stamp set:
- sentiment in Shaded Spruce ink onto one of the banners from the kit
- lines in Poppy Parade ink onto the Poppy Parade CS card layer and the outside of the box
- NOTE: I stamped the box after I had scored and cut it. I think it would be easier to stamp on the card stock before doing that.
- lines in Shaded Spruce ink onto the front of the card base
Cut using the Detailed Trio Punch:
Assembled the card:
- burnished the fold in the card base with a Bone Folder
- Crushed Curry CS layer glued onto the front of the card base
- Poppy Parade CS layer glued onto the Crushed Curry CS layer
- 2 small lemon and leaf stickers applied onto the Poppy Parade CS layer
- large die cut leaf adhered onto the back of a large lemon die cut using a glue dot
- large lemon/leaf adhered onto the Poppy Parade CS layer using Stampin’ Dimensionals
- sentiment adhered over the lemon using Stampin’ Dimensionals at each end
- 3 Shaded Spruce rhinestones applied onto the card front
- Whisper White CS glued onto the inside of the card base
Assembled the box:
- burnished the folds in the box with a Bone Folder
- rounded the two corners of the box top tab using the Detailed Trio Punch
- long side tab adhered onto the inside of the opposite end using Tear & Tape
- on the bottom of the box, folded in the back tab, then adhered the side tabs to it
- adhered the front bottom tab over the 2 side tabs (Doing it this way hides the little side tabs between the two full size tabs.)
- adhered 2 large lemons and leaves onto the front of the box using glue dots
- 3 Shaded Spruce rhinestones applied onto the front of the box
the scored, cut, and stamped box
adhesive strip on the outside of the skinny flap
adhesive on the inside of the bottom flaps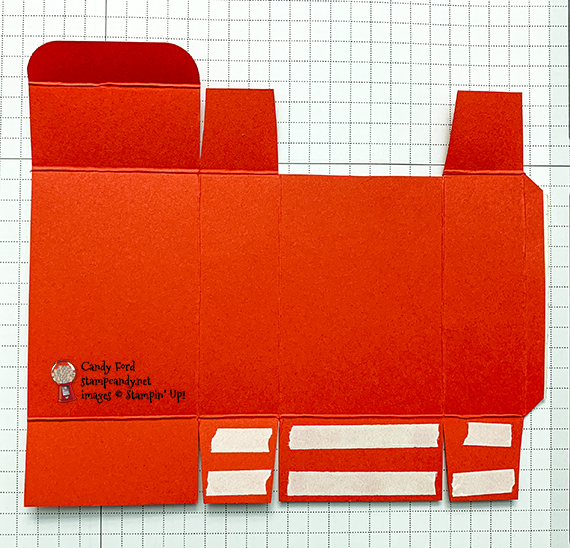
S
Here’s the hop:
Click the pumpkin below to hop to the next stop and see what Anastasia Radloff of Stampin’ Blondie has for you today!

Here are today’s main colors:
You can click on each one to see all the products that come in that color!
S
Here’s what I used other that the kit:
Click on these images for more details and to purchase. If you are reading this post in email, the product images may not show up. Please click here to see the post on my blog.
Supply List. <— Click for a clickable and printable list of the products!
S
Here’s how to get Paper Pumpkin:
- Order one of the items below.
- You will receive an email with a redemption code.
- CLICK HERE to redeem your code.
Supply List <— Click for a clickable and printable list of the products!
S
TODAY IS THE LAST DAY FOR THESE 2 GREAT PROMOTIONS!

It’s a bundle bash! When you purchase your Starter Kit in June, you can select one stamp and punch bundle (p. 168–169) OR one stamp and die bundle (p. 173-179) from the 2020–2021 Annual Catalog, in addition to your regular Starter Kit. Click here for more information.
Order Deadlines
- Phone: tonight 8:50 PM (ET), 7:50 PM (CT), 6:50 PM (MT), 5:50 PM (PT), 4:50 PM (Alaska), 2:50 PM (HI-Aleutian)
- Online: tonight 1:50 AM (ET), 12:50 AM (CT), 11:50 PM (MT), 10:50 PM (PT), 9:50 PM (Alaska), 7:50 PM (HI-Aleutian)
S

- Any order $250 or more will earn $25 EXTRA Stampin’ Rewards.
- All order types qualify for this promotion.
- Starter Kit orders do not qualify for this promotion.
- Paper Pumpkin prepaid subscriptions count toward a qualifying purchase. Month-to-month subscriptions do not qualify for this promotion.
- The qualifying amount must be reached prior to shipping and tax.
- Additional Stampin’ Rewards for this promotion will only be awarded once per order.
- Click here to shop now
Order Deadlines
- Phone: 30 June 2020; 6:50 PM (MT)
- Online: 30 June 2020; 11:50 PM (MT)
S
Here are some helpful links:
S
Thanks for stopping by today, and Sweet Stamping!
May 28, 2020 | Blog Hop, Boxes, Cards, Gallery |
It’s time for the 05-2020 APPT Blog Hop! This month’s kit is called A Kit In Color, and it features some of the new 2020-2022 In Colors. It comes in a fun, colorful box and makes 12 fun, colorful cards. We are featuring alternate projects made with this kit. I made a card and decorated a Mini Pizza Box. Be sure to hop all the way around to see all the great alternate projects!
If you are reading this in email, some photos may appear blurry, or may not appear at all. Please click here to see the post on my blog.
S 05-2020 APPT 05-2020 APPT 05-2020 APPT 05-2020 APPT
Here’s the A Kit In Color kit:

The stamp set:
Click here to download the stamp case insert.
What comes in the kit: 
S
Here’s what I made:
The Misty Moonlight ink looks darker in these photos than in real life.


S
Here’s what I did:
Cut and scored with my paper trimmer:
- the front of one of the multicolor card bases cut into strips 1/2″ x 5-1/2″ (need 7 strips)
- a pink/orange/yellow layer cut to 2-3/4″ x 2-3/4″
- Just Jade card stock (CS) cut to 3-1/3″ x 3-1/4″
- trimmed excess strips from around the card base (see below)*
Stamped with the A Kit In Color stamp set:
- “hey” in Misty Moonlight ink onto the white side of a ticket shaped piece
- “you’re amazing” in Misty Moonlight ink onto a precut label
Assembled the card:
- burnished the fold in a small Purple Posy card base with a Bone Folder
- 1/2″ strips glued onto the front of the card base, staggering them, then trimmed excess from edges*
- adhered one of the larger vellum layers onto the strips
- wrapped a piece of twine around the top of the sentiment piece and tied in a bow
- adhered the sentiment piece onto the vellum
- applied 3 enamel shapes onto the card front

Assembled the box:
- burnished the folds in the pizza box and folded to assemble
- pink/orange/yellow layer glued onto the Just Jade CS layer
- top of a vellum tag folded over the top of the Just Jade CS layer, so the notched end comes just to the bottom of the front, and adhered in place on the back and in the center of the front
- Just Jade CS layer glued onto the top of the box
- sentiment label adhered over vellum layer
- 3 enamel shapes applied onto the box top
S
Here’s the 05-2020 APPT Blog Hop:
S
Here are today’s colors:
You can click on each one to see all the products that come in that color!
S
Here’s what I used other than the kit:
Click on these images for more details and to purchase. If you are reading this post in email, the product images may not show up. Please click here to see the post on my blog.
Supply List. <— Click for a clickable and printable list of the products!
S
Subscribe to Paper Pumpkin!
Once you buy a prepaid subscription, you will receive an email with a redemption code and instructions on how to use it to start your subscription. These make great gifts, too!
S
Last Chance Products!

Get these retiring products while you can. See them in my online store here.
S
Want a new 2020-2021 Annual Catalog?

The new catalog goes live June 3! If you have ordered from me in the past year, or have requested a catalog from me, I have already sent you one. Otherwise, if you would like a catalog, click here to request one. If you already have a Stampin’ Up! Demonstrator, please ask them for your catalog. Thank you.
S
Want a little bit of everything from the new catalog?

Click here to reserve your Swatch Books and Product Shares! Designer Series Paper Swatch Books are a useful tool. Paper Shares, Ribbon Shares, and Embellishment Shares give you a taste of all the new items, so you can decide which ones you want to order more of.
S
COVID-19 Product Giveback

Download this pdf file of fantastic sentiments and images for our current situation. Some are humorous and some are heartfelt. You get 15 pages full, and everything has a black version and a color version for variety. There are also 2 pages telling you the colors used and which punches or dies will work with each one. It’s only $12 and the full amount goes to COVID-19 relief. Download it here.
S
Here are some helpful links:
S
Thanks for stopping by today, and Sweet Stamping!