Jun 25, 2020 | Blog Hop, Cards, Gallery, Paper Pumpkin |

It’s time for the 06-2020 APPT Blog Hop! This month’s kit is called Box of Sunshine, and it’s all about sending some sunshine to those who need it. Even the box is yellow, and there’s a label in the kit that covers the Paper Pumpkin logo, so you can mail some sunshiney goodies in it. For my alternate projects today, I used the kit to make a Scrappy Strip card and a treat box.
If you are reading this in email, some photos may appear blurry, or may not appear at all. Please click here to see the post on my blog.
S 06-2020 APPT 06-2020 APPT 06-2020 APPT 06-2020 APPT 06-2020 APPT
Here’s the kit:
CLICK HERE to download the printable stamp case insert for this kit.

 S
S
Here’s what I made:


S
Here’s what I did:
Cut and scored with my paper trimmer:
- Poppy Parade card stock (CS) cut to 5-1/2″ x 8-1/2″, then scored in half at 4-1/4″
- Basic Black CS layer cut to 5-1/8″ x 3-7/8″
- Basic Black CS layer cut to 5″ x 3-3/4″
- front of two card bases from the kit cut to 4-5/8″ x 3-3/4″, then cut into random strips (I cut them together so the strips would be the same on both)
- Whisper White CS cut to 5-1/4″ x 4″ for the inside of the card base
- Basic Black CS cut to 7-1/2″ x 7-1/2″ and scored at 2-1/2″ and 5″ in both directions
- Basic Black CS cut to 4-1/16″ x 4-1/16″ and scored 3/4″ from all four sides
Stamped with the Box of Sunshine stamp set:
- sentiment in Poppy Parade ink onto two of the provided die cut labels
Cut using the Layering Circles Dies:
- 2 scalloped circles from a scrap of Gold Foil Sheet
- 1 larger scalloped circle from a scrap of Basic Black CS
Assembled the card:
- burnished the fold in the Poppy Parade card base with a Bone Folder
- card front strips glued onto the 5″ x 3-3/4″ Basic Black CS layer, about 1/16″ apart, alternating strips from the two different card fronts
- strip layer glued onto the 5-1/8″ x 3-7/8″ Basic Black CS layer
- 5-1/8″ x 3-7/8″ Basic Black CS layer glued onto the front of the card base
- a sun die cut adhered onto a gold foil scalloped circle using Stampin’ Seal
- gold foil scalloped circle adhered onto the Basic Black scalloped circle
- Basic Black scalloped circle glued onto the strips
- one of the sentiments glued onto a scrap of Basic Black CS, then trimmed the mat using Paper Snips
- matted sentiment adhered over strips and sun using Black Stampin’ Dimensionals
- Whisper White CS glued onto the inside of the card base
Assembled the box:
- burnished the folds in the two Basic Black CS box pieces with a Bone Folder
- using Paper Snips, cut the two pieces as shown below
- flaps of the smaller piece glued onto the inside of the adjacent sides to form the lid
- a sun die cut adhered onto a gold foil scalloped circle using Stampin’ Seal
- gold foil scalloped circle adhered onto the Basic Black lid using Stampin’ Seal
- sentiment glued onto a scrap of Basic Black CS, then trimmed the mat using Paper Snips
- matted sentiment glued onto the sun die cut on the lid
- folded up the sides of the box and put the lid on top
- NOTE: You can glue the sides of the box, but I like the way they fall open when the lid is removed.


S
Here’s the 06-2020 APPT Blog Hop:
S
Here are today’s main colors:
You can click on each one to see all the products that come in that color!
S
Here’s what I used other that what came in the kit:
Click on these images for more details and to purchase. If you are reading this post in email, the product images may not show up. Please click here to see the post on my blog.
Supply List. <— Click for a clickable and printable list of the products!
S
Here’s how to get Paper Pumpkin:
- Order one of the items below.
- You will receive an email with a redemption code.
- CLICK HERE to redeem your code.
Supply List <— Click for a clickable and printable list of the products!
S
Here are some helpful links:
S
Thanks for stopping by today, and Sweet Stamping!

Jun 24, 2020 | Cards, Gallery, Techniques |
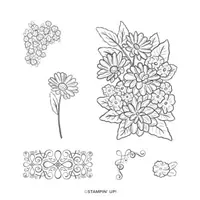
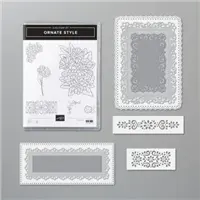
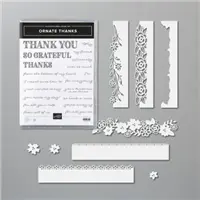
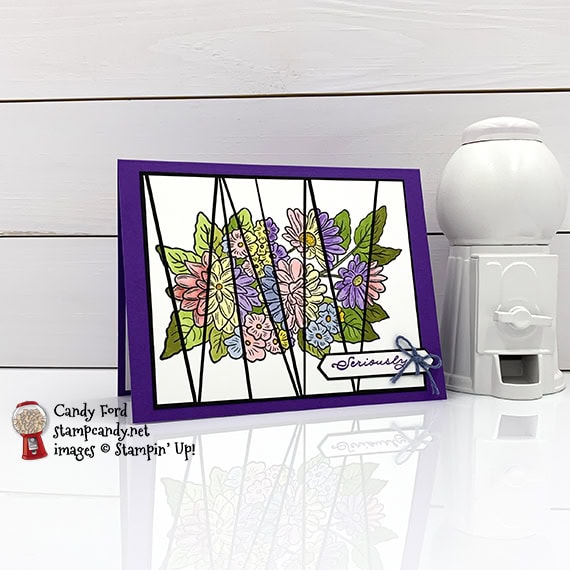
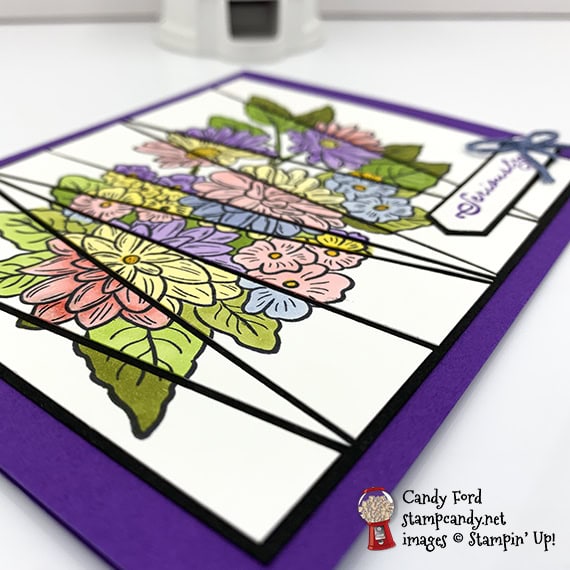
Today’s card doesn’t use the PPPST! Can you believe it? Instead I’m using another popular technique. This is my first try at the Scrappy Strip Technique. I used the Ornate Thanks and Ornate Style stamp sets. I colored in the image using Stampin’ Blends Markers, then cut it into strips. And I cut the sentiment using the Classic Label Punch.
PPPST = Paper Piecing Press n Seal Technique
If you are reading this in email, some photos may appear blurry, or may not appear at all. Please click here to see the post on my blog.
S scrappy scrappy scrappy scrappy scrappy
Here’s what I made:
S
Here’s what I did:
Cut and scored with my paper trimmer:
- Gorgeous Grape card stock (CS) cut to 5-1/2″ x 8-1/2″, then scored in half at 4-1/4″
- Basic Black CS layer cut to 4-3/4″ x 3-7/8″
- Whisper White CS layer cut to 4-1/4″ x 3-3/4″ (*after floral image was stamped, I cut the layer into strips as shown)
- Basic Black CS cut to 2-1/2″ x 7/16″
- Whisper White CS cut to 5-1/4″ x 4″ for the inside of the card base
Stamped with the Ornate Style stamp set:
- floral image in tuxedo Black Memento ink onto the Whisper White CS layer*
Stamped with the Ornate Thanks stamp set:
- front sentiment in Gorgeous Grape ink onto a scrap of Whisper White CS
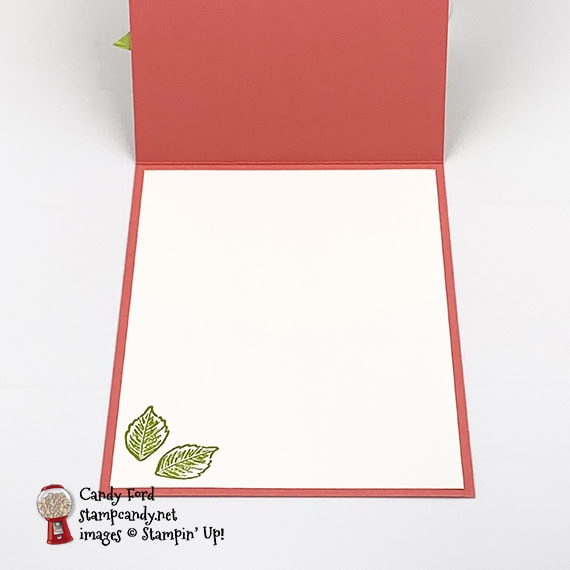
- inner sentiment in Seaside Spray ink onto the Whisper White CS for the inside of the card base
Cut using the Classic Label Punch:
Cut using Paper Snips:
- both ends of the Basic Black CS strip, to mat the front sentiment
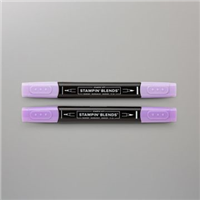
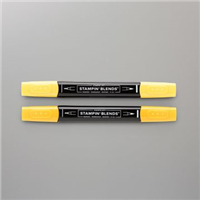
Colored using Stampin’ Blends Markers:
- floral image in Flirty Flamingo, Granny Apple Green, Highland Heather, Mango Melody, Old Olive, Seaside Spray, and So Saffron
- Note: I used different colors in each strip.
Assembled the card:
- burnished the fold in the card base with a Bone Folder
- colored strips glued onto the Basic Black CS layer, about 1/16″ apart
- Basic Black CS layer glued onto the front of the card base
- front sentiment glued onto the Basic Black CS strip
- blue twine pulled out of a piece of blue/white/silver twine, then tied around the sentiment and tied in a bow
- front sentiment glued onto the strips
- Whisper White CS glued onto the inside of the card base
S
Here’s what I would do differently:
I’m not sure why I thought I needed to cut all the strips into triangles with sharp points. When I look at other Scrappy Strip cards I’ve seen lately, I realize their strips have four edges instead of 3. I think that would make it much easier to line up the pieces.
S
Here are today’s colors:
You can click on each one to see all the products that come in that color!
S
Here’s what I used:
Click on these images for more details and to purchase. If you are reading this post in email, the product images may not show up. Please click here to see the post on my blog.
Supply List <— Click for a clickable and printable list of the products!
SS
Here are some helpful links:
S
Thanks for stopping by today, and Sweet Stamping!
Jun 23, 2020 | Cards, Gallery, Techniques |
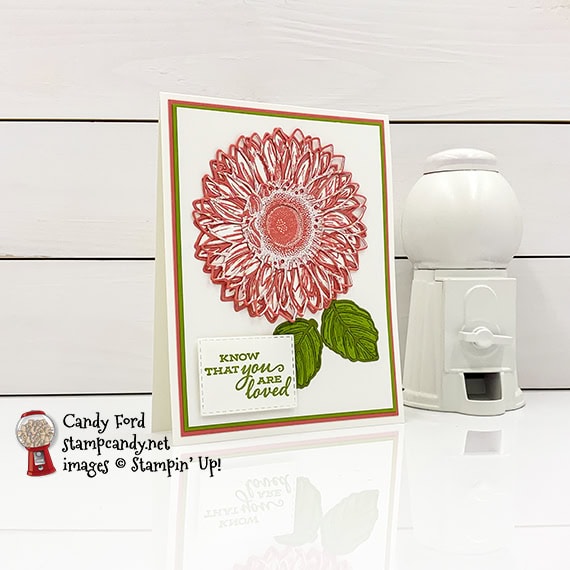
Today I’m sharing a card I used with some of the leftovers from yesterdays card, which you can see here. It’s another PPPST card made with the Celebrate Sunflowers Bundle (Celebrate Sunflowers stamp set and Sunflowers Dies.) I cut today’s sentiment using the Everyday Label Punch, and colored some Whisper White Crinkled Seam Binding Ribbon with a Stampin’ Blends Marker.
If you are reading this in email, some photos may appear blurry, or may not appear at all. Please click here to see the post on my blog.
S PPPST PPPST PPPST PPPST PPPST PPPST
Here’s what I made: 
S
Here’s what I did:
Cut and scored with my paper trimmer:
- Flirty Flamingo card stock (CS) cut to 4-1/4″ x 11″, then scored in half at 5-1/2″
- Granny Apple Green CS layer cut to 3-7/8″ x 5-1/8″
- Daffodil Delight CS layer cut to 3-3/4″ x 5″
- Whisper White CS cut to 4″ x 5-1/4″ for the inside of the card base
Stamped with the Celebrate Sunflowers stamp set:
- sentiment in Granny Apple Green ink onto a scrap of Whisper White Thick CS
- 2 small leaves in Granny Apple Green ink onto the Whisper White CS for the inside of the card base
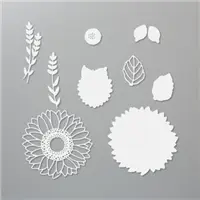
Cut using the Sunflowers Dies:
- large detailed sunflower cut from a scrap of Flirty Flamingo CS
- large detailed sunflower cut from a scrap of Whisper White Thick CS
- 2 detailed leaves cut from an scrap of Granny Apple Green CS
- 2 detailed leaves cut from an scrap of Old Olive CS
- NOTE: I pressed a piece of Press n Seal plastic wrap onto the tops of all the die cuts to keep the pieces in place
Cut using the Everyday Label Punch:
Colored with a Stampin’ Blends Marker:
- a piece of Whisper White Crinkled Seam Binding Ribbon in Granny Apple Green
Assembled the card:
- burnished the fold in the card base with a Bone Folder
- Granny Apple Green CS layer glued onto the front of the card base
- Daffodil Delight CS layer glued onto the Granny Apple Green CS layer
- outline piece of the Whisper White Thick CS die cut sunflower removed from Press n Seal and glued onto the Daffodil Delight CS layer
- outline piece of the 2 Granny Apple Green CS leaf die cuts removed from Press n Seal and glued onto the Daffodil Delight CS layer
- outline piece of the Flirty Flamingo die cut sunflower removed from Press n Seal and set aside
- using the Press n Seal to help with placement, glued the inner petals of the Flirty Flamingo sunflower inside the Whisper White outline
- outline piece of the Old Olive leaves removed from the Press n Seal and set aside
- using the Press n Seal to help with placement, glued the inner pieces of the Old Olive leaves inside the Grany Apple Green outlines
- ribbon folded in half and adhered onto the back of the sentiment using Tear & Tape or Stampin’ Seal
- sentiment adhered onto the Daffodil Delight CS layer using Stampin’ Dimensionals
- Whisper White CS glued onto the inside of the card base
S
Here are today’s colors:
You can click on each one to see all the products that come in that color!
S
Here’s what I used:
Click on these images for more details and to purchase. If you are reading this post in email, the product images may not show up. Please click here to see the post on my blog.
Supply List <— Click for a clickable and printable list of the products!
S
S
Here are some helpful links:
S
Thanks for stopping by today, and Sweet Stamping!
Jun 22, 2020 | Cards, Gallery, Techniques |
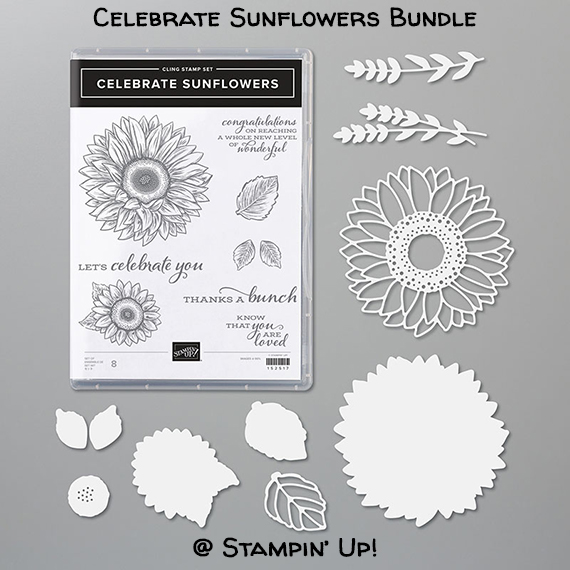
Today I’m sharing another card I made using the Celebrate Sunflowers Bundle (Celebrate Sunflowers stamp set and Sunflowers Dies) and the PPPST (Paper Piecing Press n Seal Technique.) A couple people have said the flower looks like it’s crocheted.
I think I’m sort of addicted to this technique. I mean I just can’t stop using it. Today’s card is similar to another one I made recently using the PPPST. You can see that card here.
Be sure to check back tomorrow to see the card I made using the leftovers from today’s card!
If you are reading this in email, some photos may appear blurry, or may not appear at all. Please click here to see the post on my blog.
S celebrate celebrate celebrate celebrate celebrate
Here’s the bundle:
S
Here’s what I made:

S
Here’s what I did:
Cut and scored with my paper trimmer:
- Whisper White Thick card stock (CS) cut to 4-1/4″ x 11″, then scored in half at 5-1/2″
- Flirty Flamingo CS layer cut to 4″ x 5-1/4″
- Granny Apple Green CS layer cut ti 3-7/8″ x 4-7/8″
- Whisper White CS (regular or thick) layer cut to 3-3/4″ x 5″
Stamped with the Celebrate Sunflowers stamp set:
- sentiment in Granny Apple Green ink onto a scrap of Whisper White Thick CS
- large sunflower in Versamark ink onto a scrap of Flirty Flamingo CS, then heat embossed in white
- 2 leaves in Granny Apple Green ink onto a scrap of Granny Apple Green CS
Cut using the Sunflower Dies:
- stamped sunflower using the large detailed sunflower die
- scrap of Flirty Flamingo CS using the large detailed sunflower die
- stamped leaves using the detailed leaf die
- 2 leaves from a scrap of Old Olive CS using the detailed leaf die
- Note: I pressed a piece of Press n Seal plastic wrap over the die cuts to keep all the pieces in place
Cut using the Stitched Rectangles Dies:
Assembled the card:
- burnished the fold in the card base with a Bone Folder
- Flirty Flamingo CS layer glued onto the front of the card base
- Granny Apple Green CS layer glued onto the Flirty Flamingo CS layer
- Whisper White CS layer glued onto the Granny Apple Green CS layer
- outline pieces of the plain Flirty Flamingo sunflower and the Old Olive leaf die cuts removed from the Press n Seal, then glued onto the Whisper White CS layer
- outline of the stamped and embossed sunflower pulled away from the Press n Seal
- stamped and embossed sunflower petals (and center piece) glued onto the Whisper White CS layer, putting them inside the outline piece
- outline of the Granny Apple Green leaf die cuts removed from the Press n Seal
- inner pieces of the Granny Apple Green leaves glued inside the Old Olive outlines
- outline of the stamped and embossed sunflower glued onto the Flirty Flamingo outline piece, glueing only around the center and leaving the petal outlines loose
- sentiment adhered onto the Whisper White CS layer using Stampin’ Dimensionals
S
Here are today’s colors:
You can click on each one to see all the products that come in that color!
S
Here’s what I used:
Click on these images for more details and to purchase. If you are reading this post in email, the product images may not show up. Please click here to see the post on my blog.
Supply List. <— Click for a clickable and printable list of the products!
S
S
Here are some helpful links:
S
Thanks for stopping by today, and Sweet Stamping!
Jun 19, 2020 | Cards, Gallery |
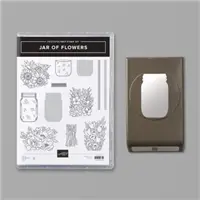
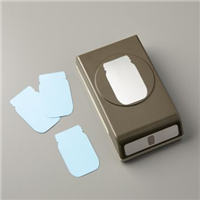
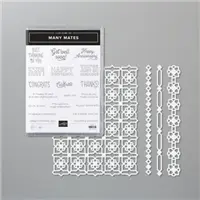
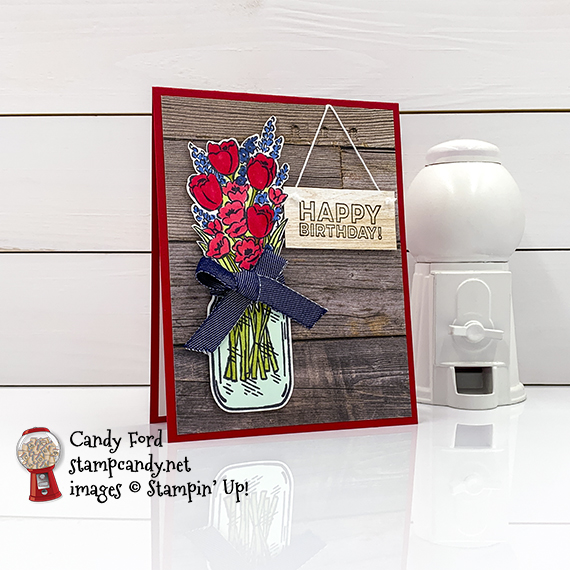
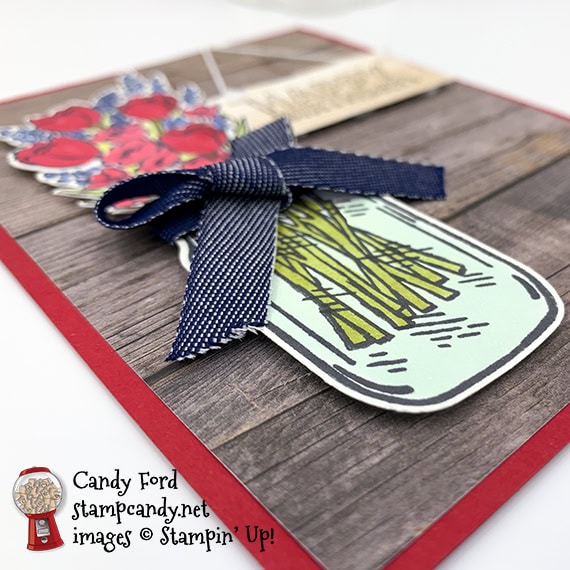
Today’s project is a birthday card I made using the Jar of Flowers Bundle (Jar of Flowers stamp set and Jar Punch) and the Many Mates stamp set (available in a bundle with the Many Medallions Dies.) Once I had made the card, I realized I could have used it for the 4th of July blog hop a couple days ago. You can see the card I made for it here. I guess I got my patriotic card mojo a couple days too late.
I also used the new In Good Taste Designer Series Paper, which is full of amazing designs including carpet, tile, wood, etc. These papers are so incredibly versatile, they make this a must have pack of DSP for everyone. And check out the new 3/8″ Denim Ribbon. If that’s isn’t pure Americana, I don’t know what it.
If you are reading this in email, some photos may appear blurry, or may not appear at all. Please click here to see the post on my blog.
S jar of flowers jar of flowers jar of flowers jar of flowers jar of flowers
Here’s what I made:
S
Here’s what I did:
Cut and scored with my paper trimmer:
- Real Red card stock (CS) cut to 4-1/4″ x 11″, then scored in half at 5-1/2″
- In Good Taste Designer Series Paper (DSP) layer cut to 4 x 5-1/4″ (darker wood)
- In Good Taste Designer Series Paper (DSP) cut to 2″ x 1″ for the sentiment (lighter wood)
- Whisper White CS cut to 4″ x 5-1/4″ for the inside of the card base
Stamped with the Jar of Flowers stamp set:
- jar in black Memento ink onto a scrap of Whisper White Thick CS
- stems in black Memento ink in jar
- flowers in black Memento ink onto another scrap of Whisper White Thick CS
Stamped with the Many Mates stamp set:
- sentiment in Early Espresso ink onto the smaller piece of DSP
Cut using the Jar Punch:
Cut using Paper Snips:
Colored using Stampin’ Blends Markers:
- stems in Old Olive
- water in jar in Pool Party
- flowers in Real Red, Night of Navy, and Old Olivx
Assembled the card:
- burnished the fold in the card base with a Bone Folder
- ribbon adhered onto the top of the jar with Stampin’ Seal, wrapped around the jar, and tied in a bow
- jar and flowers adhered onto the DSP layer using Stampin’ Dimensionals
- poked a hole in the top two corners of the sentiment using a Take Your Pick Tool (paper piercer attachment)
- pulled apart a piece of blue/white/silver twine: pulled the silver out of one end, then the blue and white untwist from each other easily
- threaded the white twine through the two holes in the sentiment and tied both ends in knots on the front
- sentiment adhered onto the DSP layer using Stampin’ Dimensionals
- twine pulled over the top of the DSP layer and adhered onto the back using Stampin’ Seal
- DSP layer glued onto the front of the card base
- Whisper White CS glued onto the inside of the card base
S
Here are today’s colors:
You can click on each one to see all the products that come in that color!
S
Here’s what I used:
Click on these images for more details and to purchase. If you are reading this post in email, the product images may not show up. Please click here to see the post on my blog.
Supply List <— Click for a clickable and printable list of the products!
S
Here are some helpful links:
S
Thanks for stopping by today, and Sweet Stamping!
Jun 17, 2020 | Blog Hop, Cards, Gallery, Holiday |

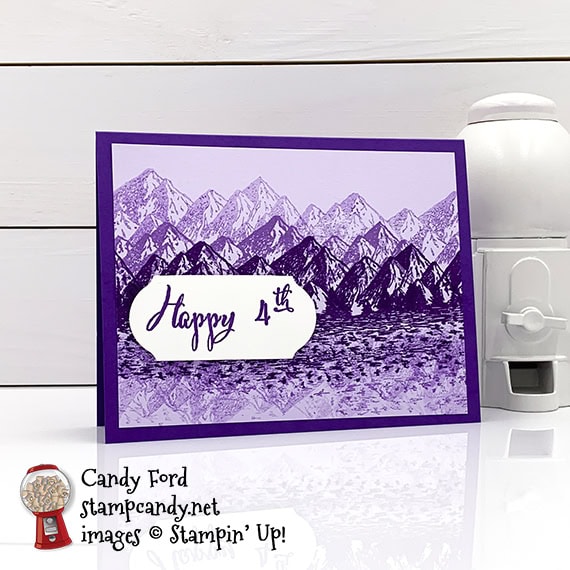
Welcome to the 06-2020 IRBH! This month we are featuring projects with a 4th of July theme. When you first look at my card, you may wonder what it has to do with America’s Independence Day holiday, other than the obvious sentiment. It’s purple instead of red, white, and blue – wait, what?
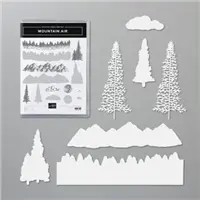
I started to make a more traditionally hued card, I really did, but I just couldn’t find my mojo. I started looking through my stamp sets for inspiration and realized I was humming “America the Beautiful.” Just when I got to the line “purple mountain majesties” my eyes fell upon the Mountain Air stamp set. Light bulb! So I used the Mountain Air stamp set to create a scene of purple mountains, along with a purple lake and a purple sky. I imagined one of those sunsets with vibrant purple at the bottom (you know the ones I’m talking about, right?) that casts its purple glow on everything for a brief moment.
Be sure to visit all the stops on the hop! You don’t want to miss any of the great projects this group has to share!
If you are reading this in email, some photos may appear blurry, or may not appear at all. Please click here to see the post on my blog.
S 06-2020 IRBH 06-2020 IRBH 06-2020 IRBH 06-2020 IRBH 06-2020 IRBH
Here’s what I made for the 06-2020 IRBH:

S
Here’s what I did:
Cut and scored with my paper trimmer:
- Gorgeous Grape card stock (CS) cut to 5-1/2″ x 8-1/2″, then scored in half at 4-1/4″
- Purple Posy CS layer cut to 5-1/8″ x 3-7/8″
- Whisper White Thick CS cut to 4″ x 1-1/8″
- Whisper White CS cut to 5-1/4″ x 4″ for the inside of the card base
Stamped with the Mountain Air stamp set:
- trees/water and first row of mountains in Gorgeous Grape ink across the center of the Purple Posy CS layer
- second row of mountains in Highland Heather ink above the first row
- third row of mountains in Highland Heather ink, stamped off once, above the second row
- mountains upside down in the water in Highland Heather ink, stamped off once
- inked up just the bottom (water) part of the tree/water stamp with Gorgeous Grape ink and stamped below the original water stamp
Stamped with the Make a Difference stamp set:
- “Happy 4th” in Gorgeous Grape ink onto the strip of Whisper White Thick CS
Cut using the Timeless Label Punch:
- both ends of the sentiment – I inserted each end down into the back of the punch to cut.
Assembled the card:
- burnished the fold in the card base with a Bone Folder
- Purple Posy CS layer glued onto the front of the card base
- sentiment adhered onto the Purple Posy CS layer using Stampin’ Dimensonals
- 5-1/4″ x 4″ Whisper White CS glued onto the inside of the card base
S
Here’s the 4th of July 06-2020 IRBH:
Thank you for hopping along with us. I hope you’ll hop along to the next stop on the hop, Jennifer Spiller at Westside Paper Creations. There’s an awful lot of inspiration to be found in this group, and you don’t want to miss any of it!
If you get stuck during the Blog Hop, please use this line-up as a guide:
- Brian King at Stamp with Brian
- Sue Jackson at Just Peachy Stamping
- Shawn de Oliveira at Shawn Stamps
- Ann Murray at Murray Stamps Ink
- Joanne Brown at Stamping with JoJo
- Julie DiMatteo at The Paper Pixie
- Lynn Kolcun at Avery’s Owlery
- Linda Krueger at The Stamp Coach
- Robin Myren at Songbird Designs by Robin
- Candy Ford at Stamp Candy <—– YOU ARE HERE!
- Jennifer Spiller at Westside Paper Creations
S
Did you know?
Inspired by a trip to Pikes Peak in 1893, Katherine Lee Bates (1859-1929) wrote the poem America the Beautiful, which first appeared in print on July 4, 1895 in The Congregationalist, a weekly journal. Ms. Bates revised the lyrics in 1904 and again in 1913. It has 8 verses! Click here to download it.
Here are today’s colors:
You can click on each one to see all the products that come in that color!
S
Here’s what I used:
Click on these images for more details and to purchase. If you are reading this post in email, the product images may not show up. Please click here to see the post on my blog.
Supply List. <— Click for a clickable and printable list of the products!
S
Here are some helpful links:
S
Thanks for stopping by today, and Sweet Stamping!