Welcome to the March 2021 Candy Hearts Blog Hop! This month we are featuring Spring themed projects. Be sure to hop to the next blog on the list, Pam Morris of Tap Tap Stamp. If you get lost, scroll down to see the list of hoppers.
My project features the True Love Designer Series Paper, which is all black and white. I love it because you can make it any color you want. The card has quite a bit of black on it, which may not seem very Springy. But I though the Spring colors really popped off the black background. What do you think?
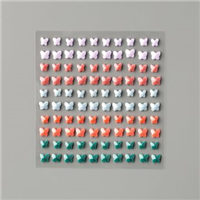
I also used the Butterfly Gems which come in the 2019-2021 In Colors. This is the first time I’ve ever used them. I know! Crazy! How have I neglected these little beauties for so long? They will retire less than two months, so I plan to use them as much as I can until then. (Of course, I do use retired products, but not on anything I post on my blog.)
If you are reading this in email, some photos may appear blurry, or may not appear at all. Please click here to see the post on my blog.
S March 2021 Candy March 2021 Candy March 2021 Candy March 2021 Candy
Here’s what I made:
S
Here’s what I did:
Cut and scored with my paper trimmer:
Basic White Thick card stock (CS) cut to 4-1/4″ x 11″, then scored in half at 5-1/2″
True LoveDesigner Series Paper (DSP) layer cut to 3-3/4″ x 5″
Basic White CS layer cut to 3″ x 4-1/4″
Basic Black CS layer cut to 2-3/4″ x 4″
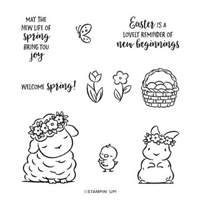
Stamped with the Springtime Joy stamp set:
sentiment in Versamark ink onto a scrap of Granny Apple Green CS, then heat embossed in white
Cut using the Classic Label Punch:
sentiment
Cut using Paper Snips:
fussy cut the flowers from another pattern of the DSP
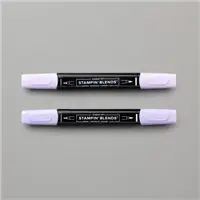
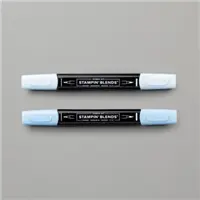
Colored using Stampin’ Blends Markers:
white spots on DSP layer in Seaside Spray, Granny Apple Green, Flirty Flamingo, and Highland Heather
flowers in Seaside Spray, Granny Apple Green, Flirty Flamingo, Highland Heather, Purple Posy, and Daffodil Delight
edges of flowers in Basic Black, to hide any white that showed
Assembled the card:
burnished the fold in the card base with a Bone Folder
flowers glued onto the Basic Black CS layer
Basic Black CS layer glued onto the Basic White CS layer
Basic White CS layer glued onto the DSP layer
DSP layer glued onto the front of the card base
sentiment glued under the flowers
Butterfly Gems (2 Purple Posy and 1 Seaside Spray) applied onto the Basic Black CS layer using a Take Your Pick tool
Click on these images for more details and to purchase. If you are reading this post in email, the product images may not show up. Please click hereto see the post on my blog.
Supply List. <— Click for a clickable and printable list of the products!
S
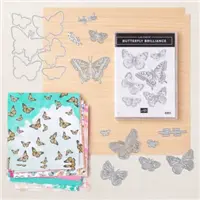
Butterfly Brilliance is here for a limited time!
These new products are out of this world gorgeous. And they’re only available for a couple months, so definitely get them as soon as you can in case they sell out! Click on the images below to see them in my online store. Or CLICK HERE to see them all.
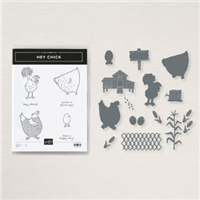
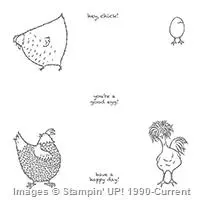
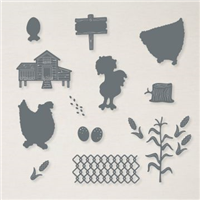
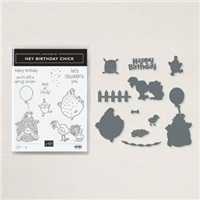
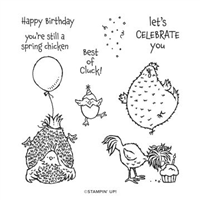
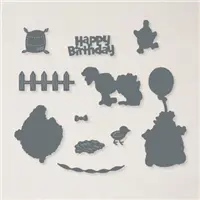
The Hey Chick stamp set from 2017 Sale-a-bration was so popular, Stampin’ Up! has brought it back. But that’s not all! Now there are coordinating dies. AND there’s a second stamp set, Hey Birthday Chick, that also has coordinating dies. One thing though – they’re available for a limited time, so get them while you can! Click on the images below to see them in my online store. Or CLICK HERE to see them all.
Gift Certificates are available in any U.S. dollar amount from me. Contact mefor details.
Have you shopped from me within the past year? Join my private VIP Facebook groupfor exclusive project tutorials and more!
Join my team and enjoy a 20% discount (or more) on all your purchases! You choose $125 in products and pay only $99, and get free shipping! No obligation! No selling required!
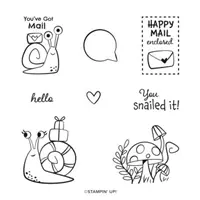
Today I’m sharing a fun card I made with products from the Snail Mail Suite Collection. I just love the colors in this suite. They’re bright and cheerful and fun. And the snails and mushrooms are just as cute as they an be. Don’t you think so?
If you are reading this in email, some photos may appear blurry, or may not appear at all. Please click here to see the post on my blog.
S Snail Mail Snail Mail Snail Mail Snail Mail
Here’s what I made:
S
Here’s what I did:
Cut and scored with my paper trimmer:
Daffodil Delight card stock (CS) cut to 4-1/4″ x 11″, then scored in half at 5-1/2″
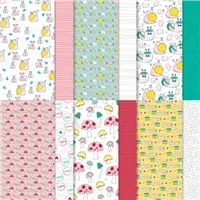
Snail Mail Designer Series Paper (DSP) cut into 4 strips, each a different pattern, two at 4″ x 1-1/2″ and two at 4″ x 1-1/8″
Basic White CS cut to 4″ x 5-1/4″ for the inside of the card base
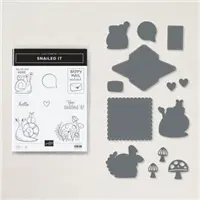
Stamped with the Snailed It stamp set:
2 snails and 2 sentiments in tuxedo Black Memento ink onto a scrap of Basic White Thick CS
hearts in Read Red ink onto the Basic White CS for the inside
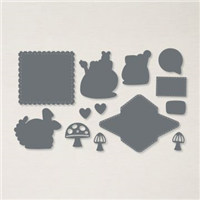
Cut using the Snail Dies:
2 snails, 2 sentiment, and a scrap of vellum
Colored using Stampin’ Blends Markers:
the snails in Bermuda Bay, Flirty Flamingo, Daffodil Delight, and Real Red
Assembled the card:
burnished the fold in the card base with a Bone Folder
4 DSP strips glued onto the front of the card base (they combine to make a 4″ x 5-1/4″ layer)
snails and top sentiment adhered onto the vellum die cut using Stampin’ Seal
vellum, snails and sentiment adhered onto the DSP layer using Stampin’ Seal, but only behind the CS pieces so it wouldn’t show
bottom sentiment glued onto the DSP layer
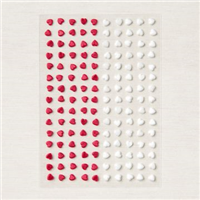
Resin Heart applied onto the bottom sentiment using my Take Your Pick Tool
Basic White CS glued onto the inside of the card base
S
Here are today’s colors:
You can click on each one to see all the products that come in that color!
Click on these images for more details and to purchase. If you are reading this post in email, the product images may not show up. Please click hereto see the post on my blog.
Supply List. <— Click for a clickable and printable list of the products!
S
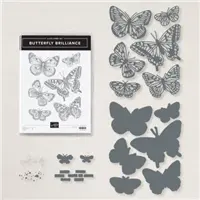
Butterfly Brilliance is here for a limited time!
These new products are out of this world gorgeous. And they’re only available for a couple months, so definitely get them as soon as you can in case they sell out! Click on the images below to see them in my online store. Or CLICK HERE to see them all.
The Hey Chick stamp set from 2017 Sale-a-bration was so popular, Stampin’ Up! has brought it back. But that’s not all! Now there are coordinating dies. AND there’s a second stamp set, Hey Birthday Chick, that also has coordinating dies. One thing though – they’re available for a limited time, so get them while you can! Click on the images below to see them in my online store. Or CLICK HERE to see them all.
Gift Certificates are available in any U.S. dollar amount from me. Contact mefor details.
Have you shopped from me within the past year? Join my private VIP Facebook groupfor exclusive project tutorials and more!
Join my team and enjoy a 20% discount (or more) on all your purchases! You choose $125 in products and pay only $99, and get free shipping! No obligation! No selling required!
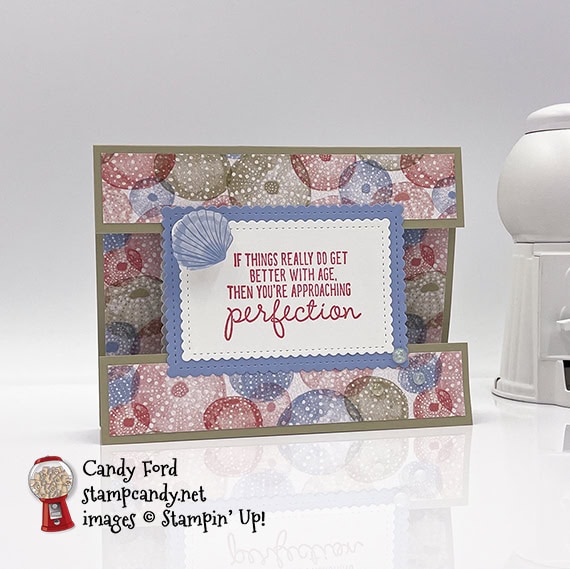
Today I’m sharing the last card we made at our February Candy Hearts team meeting using the Approaching Perfection stamp set. It’s a birthday card, and we also used the Stitched to Sweetly Dies, Special Day Dies, and products from the Sand & Sea Suite Collection. The seashell on the front is attached via a spring mechanism we made with wire. We used the Special Day Dies because the heart from that set fit perfectly behind the seashell sticker, but you could use a circle or any other shape that will fit.
If you are reading this in email, some photos may appear blurry, or may not appear at all. Please click here to see the post on my blog.
S Perfection Perfection Perfection Perfection
Here’s what I made:
S
Here’s what I did:
Cut and scored with my paper trimmer:
Sahara Sand card stock (CS) cut to 5-1/2″ x 5-1/2″, then scored at 4-1/4″
Sahara Sand CS cut to 5-1/2″ x 1-1/4″
Sand & Sea Designer Series Paper (DSP) layer cut to 5-1/4″ x 1″ (2 pieces)
DSP layer cut to 5-1/4″ x 4″
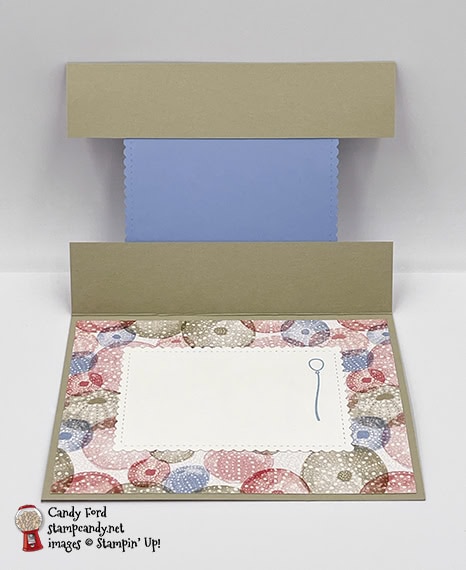
Stamped with the Approaching Perfection stamp set:
sentiment in Flirty Flamingo ink onto a scrap of Basic White Thick CS
balloon in Seaside Spray ink onto a scrap of Basic White CS
Cut using the Stitched So Sweetly Dies:
a scrap of Seaside Spray CS, and the Basic White CS with balloon, using the largest scalloped rectangle die
sentiment using a smaller scalloped rectangle diex
Cut using the Special Day Dies:
2 hearts from a scrap of Basic White Thick CS
Assembled the card:
burnished the fold in the card base with a Bone Folder
a DSP strip glued onto the 1-1/4″ section of the card base
second DSP strip glued onto the smaller piece of Sahara Sand CS
large piece of DSP glued onto the inside of the card base
sentiment piece glued onto the Seaside Spray CS die cut piece
smaller piece of Sahara Sand CS lined up along the bottom of the card base
Seaside Spray CS die cut glued along the top onto the upper part of the card base, and glued along the bottom onto the Sahara Sand strip, to create the full card front
Basic White CS with balloon glued onto the DSP layer on the inside of the card, with the scallops lined up so that it’s hidden by the Seaside Spray CS when the card is closed
a piece of 26 gauge wire (found in jewelry making supplies) wrapped around a pen 5 times
a tiny hole poked in each die cut heart with the sharp end of a Take Your Pick tool
one end of the wire spring poked through the hole in each heart, and glued in place, then let this sit until the next day to make sure it was good and dry
a Seashell sticker applied onto one of the hearts
the other heart glued onto the sentiment piece
3 Opal Rounds applied onto the card front using a Take Your Pick tool
S
Here are today’s colors:
You can click on each one to see all the products that come in that color!
Click on these images for more details and to purchase. If you are reading this post in email, the product images may not show up. Please click hereto see the post on my blog.
These new products are out of this world gorgeous. And they’re only available for a couple months, so definitely get them as soon as you can in case they sell out! Click on the images below to see them in my online store. Or CLICK HERE to see them all.
The Hey Chick stamp set from 2017 Sale-a-bration was so popular, Stampin’ Up! has brought it back. But that’s not all! Now there are coordinating dies. AND there’s a second stamp set, Hey Birthday Chick, that also has coordinating dies. One thing though – they’re available for a limited time, so get them while you can! Click on the images below to see them in my online store. Or CLICK HERE to see them all.
Gift Certificates are available in any U.S. dollar amount from me. Contact mefor details.
Have you shopped from me within the past year? Join my private VIP Facebook groupfor exclusive project tutorials and more!
Join my team and enjoy a 20% discount (or more) on all your purchases! You choose $125 in products and pay only $99, and get free shipping! No obligation! No selling required!
Today I’m sharing a card I didn’t get around to posting before Sale-a-bration ended on Sunday. I used the Approaching Perfection stamp set, which was a free Sale-a-bration item. I hope you were able to get your own. Don’t worry, everything else I used is still available. This was one of our February Candy Hearts Team Meeting cards.
If you are reading this in email, some photos may appear blurry, or may not appear at all. Please click here to see the post on my blog.
S Approaching Approaching Approaching Approaching
Here’s what I made:
S
Here’s what I did:
Cut and scored with my paper trimmer:
Gorgeous Grape card stock (CS) cut to 4-1/4″ x 8-1/2″, then scored in half at 4-1/4″
Gorgeous Grape card stock (CS) cut to 5-1/2″ x 8-1/2″, then scored in half at 4-1/4″
Hydrangea Hill Designer Series Paper (DSP) layer cut to 4″ x 4″ (flowers)
DSP layer cut to 4″ x 5-1/4″ (stripe)
DSP layers cut to 4″ x 3/4″ (stripe)
Basic White CS layer cut to 4″ x 4″
Gorgeous Grape CS layer cut to fit around the outer sentiment (about 2-3/4″x 3/4″)
Stamped with the Approaching Perfection stamp set:
candles in Highland Heather ink onto the Basic White CS layer
sentiment in Misty Moonlight ink onto a scrap of Basic White CS, then cut the sentiment into two parts and trimmed each piece to look uniform all around
NOTE: the front piece is about 2″ x 1/2″ and the inner piece is about 1-1/2″ x 1/2
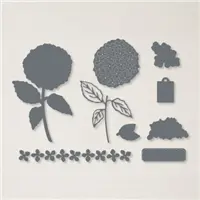
Cut using the Hydrangea Dies:
9 small flowers from a scrap of Gorgeous Grape CS
Assembled the card:
burnished the folds in the card bases with a Bone Folder
two DSP strips glued onto the inside of the larger card base, at the top and at the bottom
left side of smaller card base glued onto the inside of the larger card base, centered so equal amounts of the DSP strips show
largest DSP layer glued onto the front of the larger card base
inner sentiment glued onto the DSP layer
die cut flowers glued around the sentiment
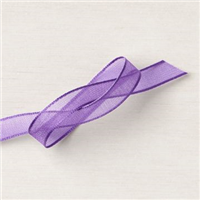
ribbon tied in a bow and the ends adhered onto the back of the layer using Tear & Tape, the held the bow in place using a Mini Glue Dot
4″ x 4″ DSP layer adhered onto the front of the smaller card base using Stampin’ Dimensionals
outer sentiment glued onto the approx. 2-3/4″x 3/4″ Gorgeous Grape CS piece, then glued onto the DSP layer
3 Gorgeous Grape pearls applied onto the card fronts using a Take Your Pick tool
S
Here are today’s colors:
You can click on each one to see all the products that come in that color!
Click on these images for more details and to purchase. If you are reading this post in email, the product images may not show up. Please click hereto see the post on my blog.
Supply List. <— Click for a clickable and printable list of the products!
S
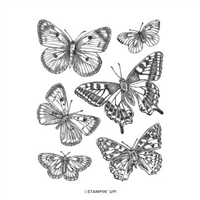
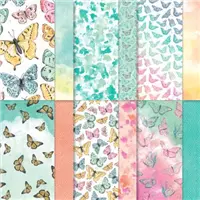
Butterfly Brilliance Today!
There are four new products available today that are out of this world gorgeous. And they’re only available for a couple months, so definitely get them as soon as you can, in case they sell out!
Item #155092
Brilliant Wings Dies, Item #155523
Item #156824
Natural Touch Specialty Paper, Item# 156825
Butterfly Brilliance Bundle, Item #155821
Item #159408
s
Hey Chick & Hey Birthday Chick!
The Hey Chick stamp set from 2017 Sale-a-bration was so popular, Stampin’ Up! has brought it back. But that’s not all! Now there are coordinating dies. AND there’s a second stamp set, Hey Birthday Chick, that also has coordinating dies. CLICK HERE to see them all. One thing though – they’re available for a limited time, so get them while you can!
Gift Certificates are available in any U.S. dollar amount from me. Contact mefor details.
Have you shopped from me within the past year? Join my private VIP Facebook groupfor exclusive project tutorials and more!
Join my team and enjoy a 20% discount (or more) on all your purchases! You choose $125 in products and pay only $99, and get free shipping! No obligation! No selling required!
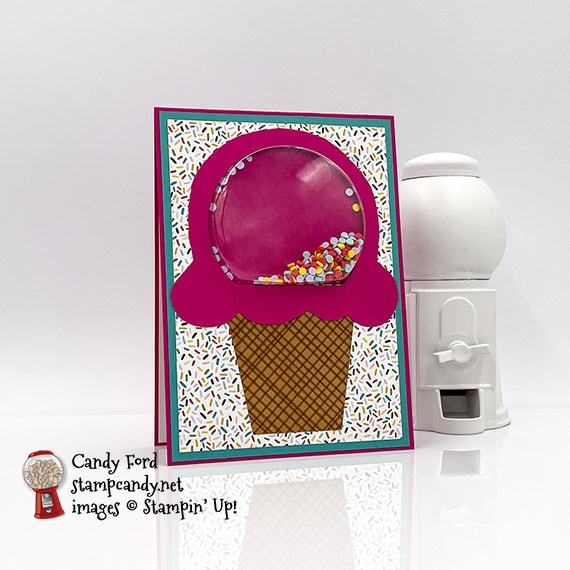
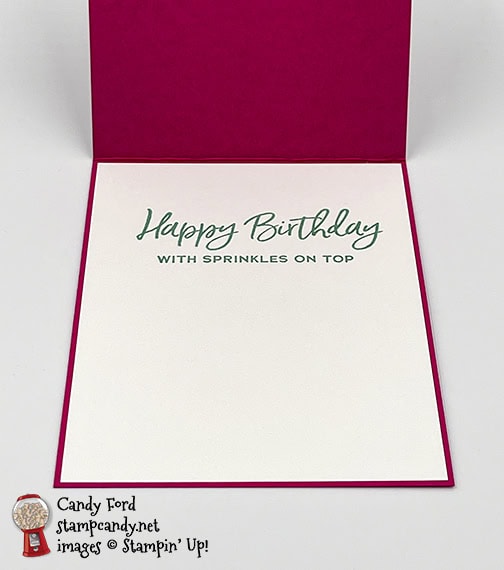
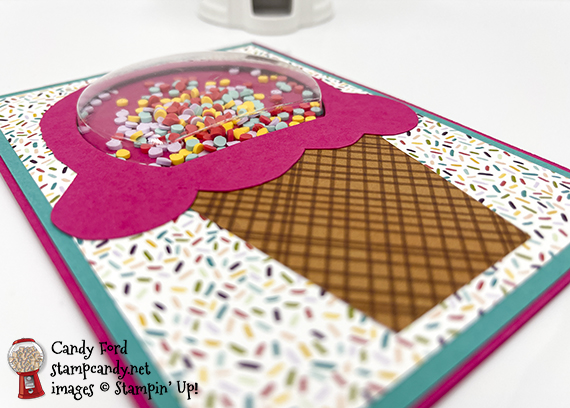
Today’s I’ms sharing a shaker card I made using products from the Ice Cream Corner Suite: Ice Cream Corner Designer Series Paper and Ice Cream Corner Sprinkles, along with the Snow Globe Scenes Dies and Snow Globe Shaker Domes.
If you are reading this in email, some photos may appear blurry, or may not appear at all. Please click here to see the post on my blog.
S Sprinkles Sprinkles Sprinkles Sprinkles
Here’s what I made:
S
Here’s what I did:
Cut and scored with my paper trimmer:
Melon Mambo card stock (CS) cut to 4 x 11″, then scored in half at 5-1/2″ (I intended to make it the standard 4-1/4″ wide, but I didn’t discover my mistake until a lot of the card was done, so I went with it.)
Ice Cream Corner Designer Series Paper (DSP) layer cut to 3-5/8″ x 5-1/8″
Bermuda Bay CS layer cut to 3-7/8″ x 5-3/8″
Basic White CS cut to 3-7/8″ x 5-3/8″ for the inside of the card base
DSP cut to 2-1/4″ x 2-1/4″, then trimmed to form a cone – top is 2-1/4″ wide and bottom is 1-1/4″ wide
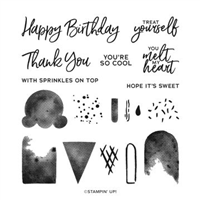
Stamped with the Sweet Ice Cream stamp set:
sentiments in Bermuda Bay ink onto the Basic White CS for the inside
Cut using the Snow Globe Scenes Dies:
snow globe shape from the Bermuda Bay CS layer, the DSP layer, and from a scrap of Melon Mambo CS
Cut using Paper Snips:
the die cut scrap of Melon Mambo CS around the hole and scalloped at the bottom
Assembled the card:
burnished the fold in the card base with a Bone Folder
DSP layer glued onto the Bermuda Bay CS layer
backing removed from top side of shaker dome, then the dome fit through the hole in the two glued layers from the back, and adhered onto the back of the layers
sprinkles piled on the front of the card base, where the dome will cover them
glue applied onto the back of the Bermuda Bay CS layer, and the backing removed from the bottom of the shaker dome, then the whole thing lined up on the card front and pressed down to adhere, making sure the shaker dome adhered all around the perimeter so the sprinkles can’t leak out
DSP cone glued onto the DSP layer, at the bottom of the shaker dome
Melon Mambo ice cream scoop glued around the shaker dome
Basic White CS glued onto the inside of the card base
S
Here are today’s main colors:
You can click on each one to see all the products that come in that color!
Click on these images for more details and to purchase. If you are reading this post in email, the product images may not show up. Please click hereto see the post on my blog.
Join and receive 5 packs of exclusive Designer Series Papers
That’s in addition to everything else you get with the Starter Kit! Click the image below for all the details!
No selling required. You can join for the discount,.That’s what I did! Drop anytime. No penalties. No risk. No brainer!
s
Hey Chick is here!
The Hey Chick stamp set from 2017 Sale-a-bration was so popular, Stampin’ Up! has brought it back. But that’s not all! Now there are coordinating dies. AND there’s a second stamp set, Hey Birthday Chick, that also has coordinating dies. CLICK HERE to see them all. One thing though – they’re available for a limited time, so get them while you can!
S
Basic White is here!
The facility that manufactures Whisper White paper is closed due to COVID-19. But don’t fret. The new Basic White products are here!
Gift Certificates are available in any U.S. dollar amount from me. Contact mefor details.
Have you shopped from me within the past year? Join my private VIP Facebook groupfor exclusive project tutorials and more!
Join my team and enjoy a 20% discount (or more) on all your purchases! You choose $125 in products and pay only $99, and get free shipping! No obligation! No selling required!
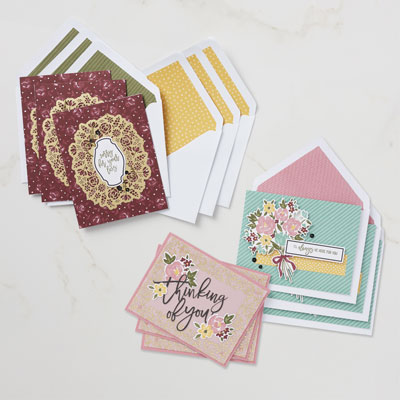
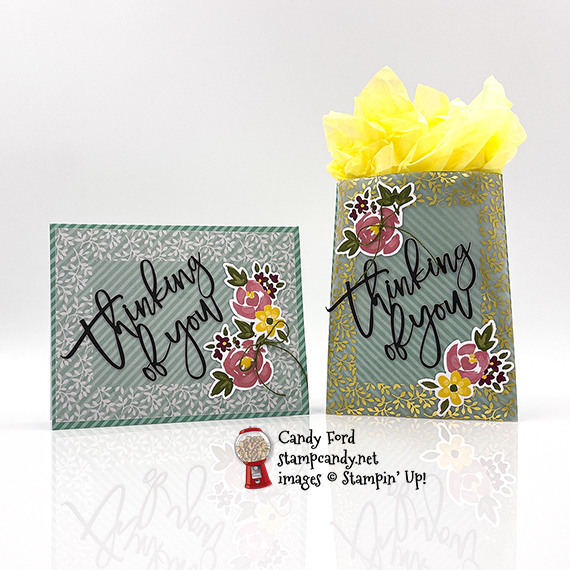
Welcome to the February 2021 APPTBH! This month’s kit is called Bouquet of Hope and it makes lovely cards for sad occasions. I used the kit to make an alternate card and a little gift bag. They’re so easy, there isn’t even any stamping involved!
Be sure to scroll down to the blog hop list and hop to the next blog. You don’t want to miss any of the great alternative projects this group has made for you!
If you are reading this in email, some photos may appear blurry, or may not appear at all. Please click here to see the post on my blog.
S February 2021 APPTBH February 2021 APPTBH February 2021 APPTBH February 2021 APPTBH
Here’s the Bouquet of Hope Kit:
s
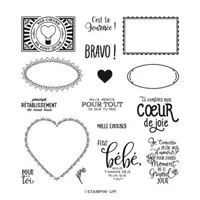
The stamp set:
s
What comes in the kit:
s
What the kit makes:
s
Click here to down load the pdf of the stamp case insert, so you can store your stamp set and any leftover parts for later use.
Just Jade card base from kit scored and cut as shown below for the gift bag
Assembled the card:
burnished the fold in the card base with a Bone Folder
vellum sheet glued onto the front of the card base (I coated the entire surface of the vellum with glue, using a wedge of a Stampin’ Sponge, so spots of adhesive wouldn’t show)
thinking of you sticker applied onto the vellum
2 floral die cuts glued onto the vellum
twine tied into a bow and applied onto the flower using a glue dot rolled into a little log
Assembled the bag:
burnished the folds in the card base with a Bone Folder
tabs on the side and bottom glued onto the inside of the opposite side, to form the bag
vellum sheet glued onto the front of the bag, the same way as onto the card above
NOTE: I intended to glue the vellum on with the gold side down, as on the card – Oops!
thinking of you sticker applied onto the vellum
2 floral die cuts glued onto the vellum
twine tied into a bow and applied onto the flower using a glue dot rolled into a little log
S
Here’s the February 2021 APPTBH:
s
Here are the colors in the kit:
You can click on each one to see all the products that come in that color!
Click on these images for more details and to purchase. If you are reading this post in email, the product images may not show up. Please click hereto see the post on my blog.
Join and receive 5 packs of exclusive Designer Series Papers
That’s in addition to everything else you get with the Starter Kit! Click the image below for all the details!
No selling required. You can join for the discount,.That’s what I did! Drop anytime. No penalties. No risk. No brainer!
s
Hey Chick is here!
The Hey Chick stamp set from 2017 Sale-a-bration was so popular, Stampin’ Up! has brought it back. But that’s not all! Now there are coordinating dies. AND there’s a second stamp set, Hey Birthday Chick, that also has coordinating dies. CLICK HERE to see them all. One thing though – they’re available for a limited time, so get them while you can!
S
Basic White is here!
The facility that manufactures Whisper White paper is closed due to COVID-19. But don’t fret. The new Basic White products are here!
Gift Certificates are available in any U.S. dollar amount from me. Contact mefor details.
Have you shopped from me within the past year? Join my private VIP Facebook groupfor exclusive project tutorials and more!
Join my team and enjoy a 20% discount (or more) on all your purchases! You choose $125 in products and pay only $99, and get free shipping! No obligation! No selling required!