Aug 14, 2018 | Cards, Challenges, Gallery |
For today’s card, I created a seaside scene: a chair and a drink in the sand in front of the waves and sunset. I colored some embossing paste with a Sahara Sand reinker for the sand, and I tore strips of cardstock to make the waves. I made today’s card for the Global Design Project theme challenge this week: Take Me to the Sea. You can see their web site here.
Here’s the Take Me to the Sea theme challenge:

Here’s what I made:
Ah, the sea. Wouldn’t you like to be sitting here right now watching the waves and the sunset?

The sea is torn cardstock and the sand is colored embossing paste.

Here’s what I did:
Cut and scored with my Stampin’ Trimmer:
- Night of Navy card stock (CS) cut to 4-1/4″ x 11″, then scored in half at 5-1/2″
- Sahara Sand CS cut to 4″ x 5-1/4″
- Balmy Blue CS cut to 4″ x 3″
- Soft Sea Foam, Night of Navy, Pacific Point, and Tranquil Tide CS cut to 4″ x 1″
- Coastal Cabana CS cut to 4″ x 2
- Whisper White CS cut to 4″ x 5-1/4″
Stamped with the Colorful Seasons stamp set:
- sentiment in Night of Navy ink onto the Balmy Blue CS
- dring in Real Red & Blueberry Bushel inks onto a scrap fo Whisper White CS
- NOTE: I colored the drink stamp using Stampin’ Write Markers in Real Red & Blueberry Bliss
Die cut using the Seasonal Layers Thinlits:
- chair from a scrap of Whisper White CS
- stamped drink
Cut using the 1″ Circle Punch:
- a scrap of Pumpkin Pie CS
Assembled the card:
- burnished the fold in the card base with a Bone Folder
- mixed Sahara Sand ink into some Shimmery White Embossing Paste, using palette knife on a craft sheet
- spread the paste onto the bottom part of the Sahara Sand CS layer using a palette knife, and let dry
- Balmy Blue CS layer glued onto the top of the Sahara Sand CS layer
- Pumpkin Pie CS circle glued onto the Balmy Blue CS layer
- CS strips torn along the top edge using my fingers
- bottom of the Coastal Cabana CS strip cut in a curve using Paper Snips
- torn strips layered and glued onto the Balmy Blue/Sahara Sand CS layer to create the waves in the sea
- chair and drink glued onto the embossing paste
- mixed a little more Sahara Sand embossing paste and covered the bottoms of the drink and chair, using a palette knife, and let dry
- the whole thing glued onto the front of the card base
- Whisper White CS layer glued onto the inside of the card base
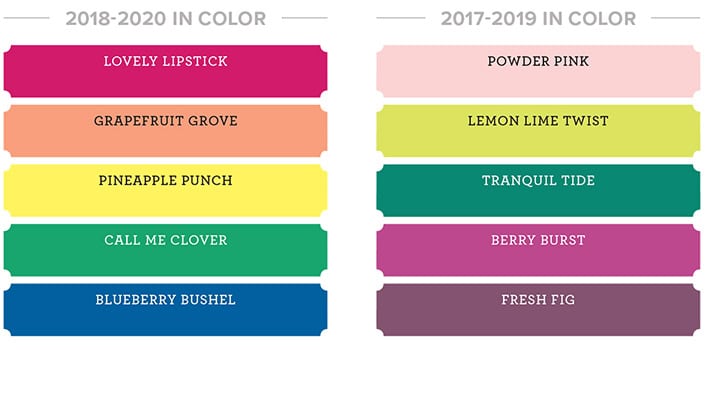
Here are today’s colors:
You can click on each one to see all the products that come in that color!
Here’s what I used:
Click on these images for more details and to purchase.
Here are 3 amazing limited time offers – August only!:
1) Color Your Seasons Special, August 1-31, 2018, While Supplies Last!
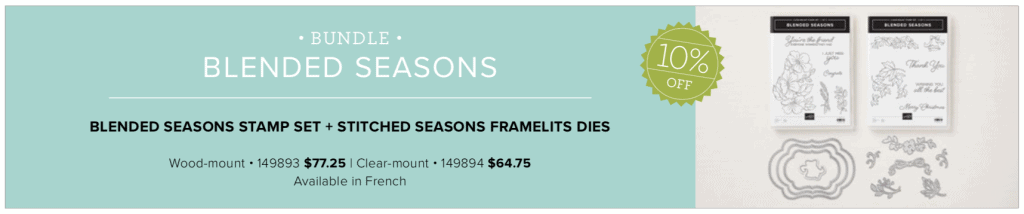
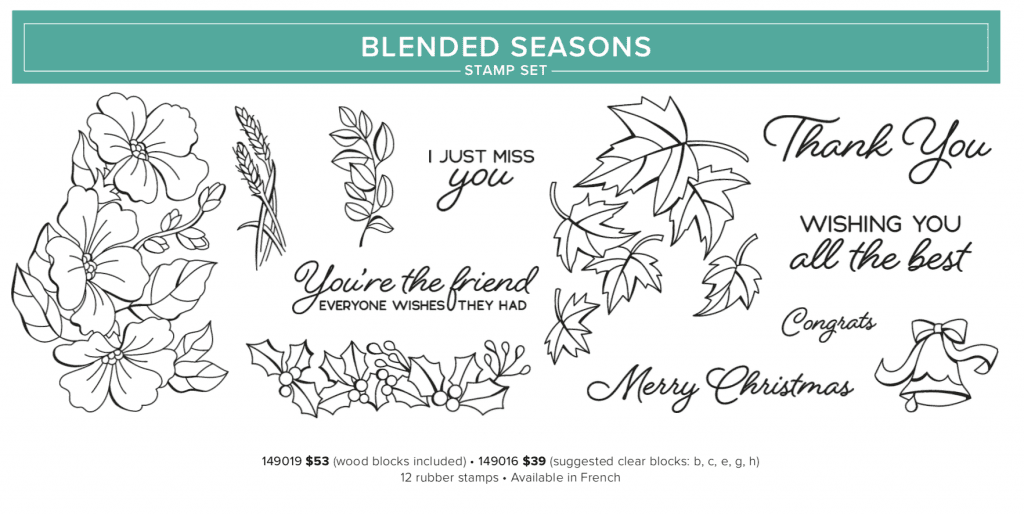
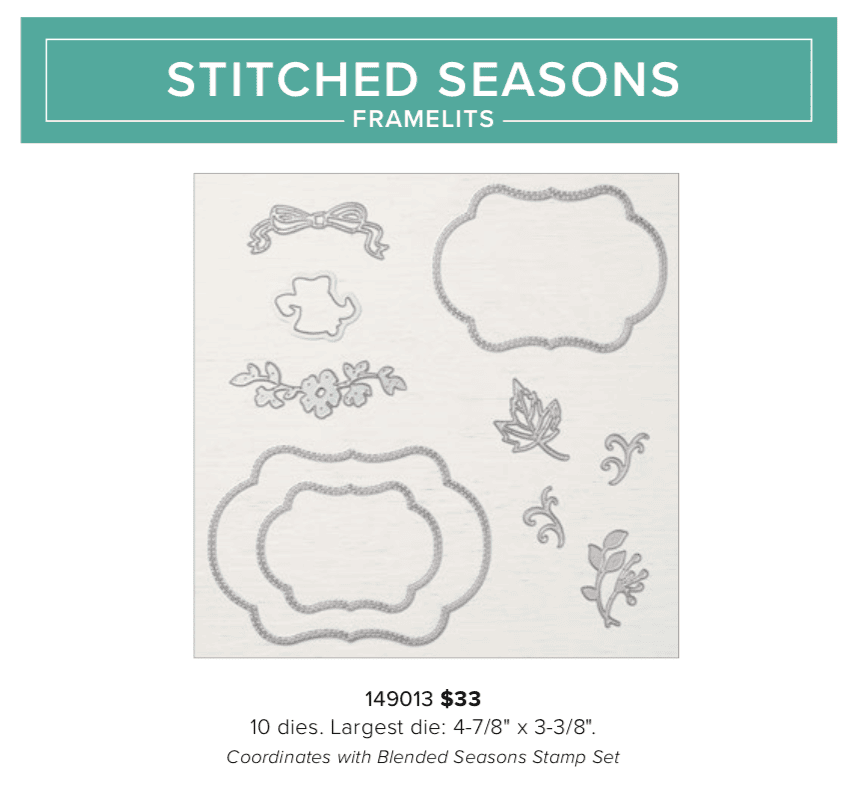
Stampin’ Up!’s® Blended Seasons Stamp Set, coordinating Framelits™ Dies, and Watercolor Pencils are perfect for every season of creating! Plus, save 10% when you buy the stamp set and Framelits in a bundle! But don’t wait—these exclusive products are only available until August 31 while supplies last. So get in the mood to create something full of colors and seasons!
Introducing the all-new, limited-time Color Your Season products:
- Blended Seasons Stamp Set, an exclusive 12-piece wood- or clear-mount stamp set with images for every season – #149019 @ $53 (wood blocks included); #149016 @ $39 (suggested clear blocks: b, c, e, g, h)
- Stitched Season Framelits Dies, a coordinating stitched die that includes stitching on both the positive and negative images! #149013 @ $33. Has10 dies. Largest die: 4-7/8″ x 3-3/8″.
- Save 10%! Blended Seasons BUNDLE – BLENDED SEASONS STAMP SET + STITCHED SEASONS FRAMELITS DIES – Wood-mount #149893 @ $77.25, Clear-mount #149894 @ $64.75
- Watercolor Pencils in 10 new colors! #149014 @ $12.50. Acid free, lignin free.10 pencils in Stampin’ Up! colors: Balmy Blue, Cajun Craze, Cherry Cobbler, Coastal Cabana, Crushed Curry, Flirty Flamingo, Garden Green, Gorgeous Grape, Granny Apple Green, Night of Navy
- Products available while supplies last until August 31, 2018 – while supplies last
- Items may be included as part of a new demonstrator’s Starter Kit.

2) Bonus Days are back!
- For every $50 you spend on an order in August, you will receive a $5 coupon to use in September!
- There is no limit to the number of coupons you may earn.
- An email address is required to participate; Bonus Days coupon codes can be delivered only via email.
- Bonus Days coupon codes may be redeemed for any product (excluding Starter Kits, demonstrator supply items, and Paper Pumpkin subscriptions.) Although new prepaid Paper Pumpkin codes may be discounted with Bonus Days coupon codes.

3) Buy 10 Stampin’ Ink pads in August and get one FREE!!
- Buy any 10 ink pads from me in August, I will give you another one FREE!
- Contact me to place your order, so I can add your FREE ink pad!
Here’s some more cool stuff you should check out:
Thanks for stopping by today, and Sweet Stamping!
Jul 3, 2018 | Cards, Challenges, Gallery |
I made today’s card for this week’s Global Design Project color challenge (GDP145.) I used Stampin’ Write Markers to color the parts of the stamp, from the One For All stamp set, then huffed on it to reactivate the ink before stamping. I used mostly white, because I didn’t want the design to seem to heavy – the Fresh Fig bits look really dark in the photos anyway.
Here’s the GDP145 challenge:

Here’s what I made:


Here’s what I did:
Cut and scored with my Stampin’ Trimmer:
- Whisper White Thick card stock (CS) cut to 4-1/4″ x 11″, then scored in half at 5-1/2″
- Whisper White Thick CS cut to 3-7/8″ x 5-1/8″
- regular Whisper White CS cut to 3-1/2″ x 4-3/4″
- Grapefruit Grove CS cut to 1/2″ x 8-1/2″
- Mint Macaron CS cut to 1/2″ x 8-1/2″
Stamped with the One For All stamp set:
- the image stamp colored with Stampin’ Write Markers in Fresh Fig, Grapefruit Grove, and Mint Macaron, then stamped onto the 3-1/2″ x 4-3/4″ Whisper White CS layer
Assembled the card:
- burnished the fold in the card base with a Bone Folder
- the two CS strips folded at a 90 degree angle, glued together, glued onto the 3-1/2″ x 4-3/4″ Whisper White CS layer, then the excess trimmed off the ends with Paper Snips
- glued half of a Grapefruit Grove doily onto the back of the stamped layer
- 3-1/2″ x 4-3/4″ Whisper White CS layer glued onto the 3-7/8″ x 5-1/8″ Whisper White CS layer
- 3-7/8″ x 5-1/8″ Whisper White CS layer glued onto the front of the card base
- Blackberry Bliss twine tied into a bow and adhered onto the 3-1/2″ x 4-3/4″ Whisper White CS layer using Mini Glue Dots
Here are today’s colors:
You can click on each one to see all the products that come in that color!
Here’s what I used:
Click on these images for more details and to purchase.
Here are a couple of July specials from Stampin’ Up!:
Free ink pads:
- Join my team by July 31 and receive a family of 10 ink pads for free!
- In addition to everything you already get with the Starter Kit!
- Click the image for more information
Designer Series Paper Sale:
- Buy 3 packs of select DSP and receive 1 pack free
- Mix and match
- Stock up on all your favorites
- Click the image for details and to purchase

Here’s some more stuff you should check out:
Thanks for stopping by today, and Sweet Stamping!
Feb 7, 2018 | Blog Hop, Cards, Challenges, Gallery, Sale-A-Bration, Techniques |

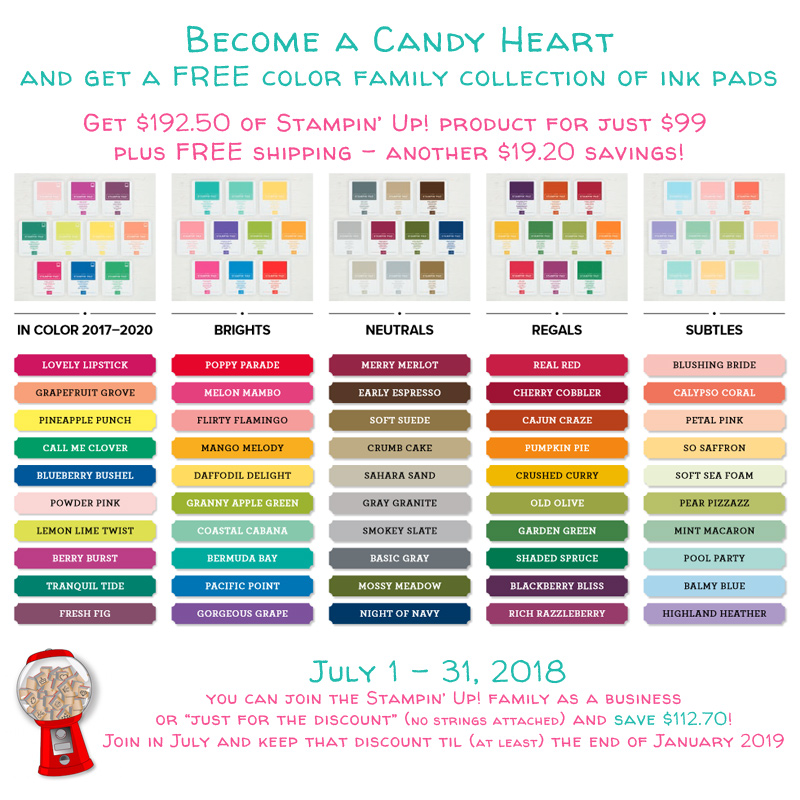
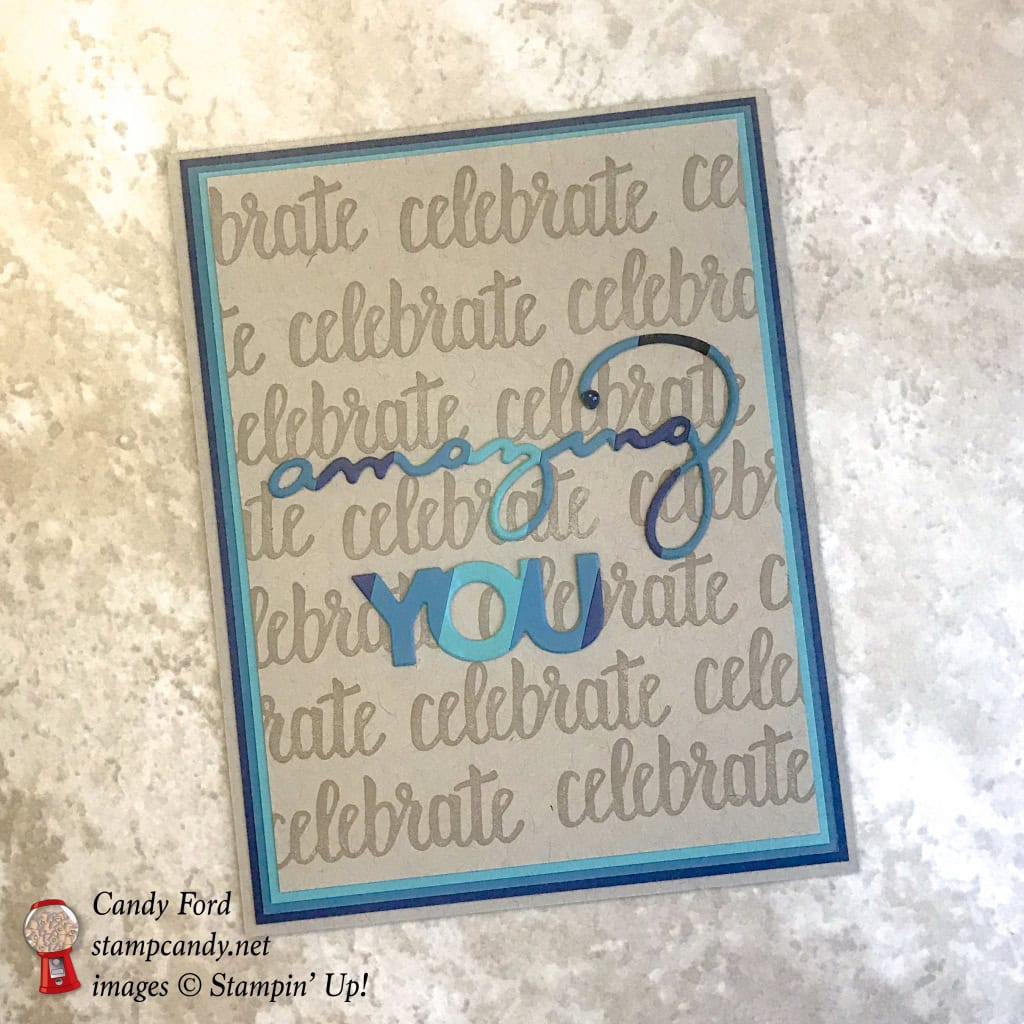
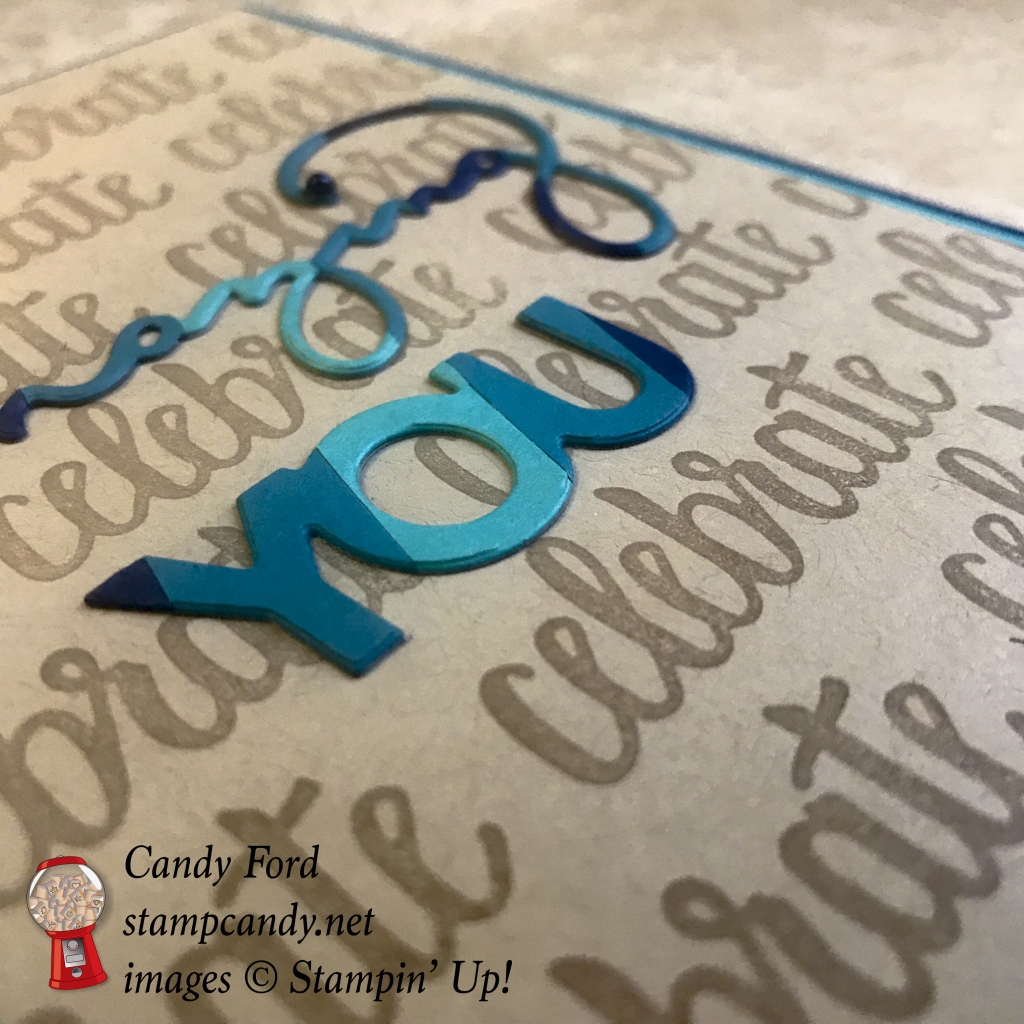
The Sale-A-Bration continues…with a color challenge! This month’s ICS Blog Hop is all about Sale-A-Bration, plus we’re using specific colors. We could use any of these five colors: Crumb Cake, Bermuda Bay, Dapper Denim, Night of Navy, and Island Indigo for our projects. I used all but one (Dapper Denim.) I used the Amazing You stamp set and the coordinating Celebrate You Thinlits Dies – both are available for FREE with a qualifying order during Sale-A-Bration (only through March 31!)

I used a technique whose name I can’t remember to save my life. I glued different colored strips of card stock to a larger piece of CS, then die cut from that, so the die cut words are multicolor. Tell me what you think!
Here’s what I made:
Here’s what I did:
Cut and scored with my Stampin’ Trimmer:
- Crumb Cake card stock (CS) cut to 4-1/4″ x 11″, then scored in half at 5-1/2″
- Night of Navy CS cut to 4-1/8″ x 5-3/8″
- Island Indigo CS cut to 4″ x 5-1/4″
- Bermuda Bay CS cut to 3-7/8″ x 5-1/8″
- Crumb Cake CS cut to 3-3/4″ x 5″
- Crumb Cake CS cut to 3-3/4″ x 3″
- Bermuda Bay, Island Indigo, and Night of Navy CS cut into 1/2″ x 3″ strips, a few of each color
- Optional: Whisper White CS cut to 4″ x 5-1/4″ for the inside
Stamped with the Amazing You stamp set:
- “celebrate” in Crumb Cake ink onto the Crumb Cake CS layer
Die cut using the Celebrate You Thinlits:
- two words from the strips of CS (see below)
- NOTE: I used the Precision Base Plate on the Big Shot to cut through the layers with the Thinlits Dies.
Assembled the card:
- burnished the fold in the card base with a Bone Folder
- Night of Navy CS layer glued onto the front of the card base
- Island Indigo CS layer glued onto the Night of Navy CS layer
- Bermuda Bay CS layer glued onto the Island Indigo CS layer
- stamped Crumb Cake CS layer glued onto the Bermuda Bay CS layer
- 1/2″ strips of CS glued onto the 3-3/4″ x 3″ Crumb Cake CS piece (this is what I die cut the words from above)
- die cut words glued onto the stamped Crumb Cake CS layer
- Optional: Whisper White CS glued onto the inside of the card base
Here’s the hop:
Click the arrow to hop on over to visit Cynthia McQueen of Beautiful Peacock:

Here are today’s colors:
You can click on each one to see all the products that come in that color!
Here’s what I used:
Click on these images for more details and to purchase.
Here’s some stuff you should know:
- This is an amazing time to join the Candy Hearts! Sale-A-Bration is the biggest event of the Stampin’ Up! year and you can save big on the ultimate bundle, the Starter Kit. CLICK HERE for more information.
- Newsletter: subscribe for exclusive deals, projects, and more! Enter your email address and click SUBSCRIBE at the top right of this page, just under the picture of my smiling face. You can also choose to receive an email every day that I have a blog post.
- Check out My Events Calendar HERE
- Host Code for the month of February (2T9AQTKG) Find out more about HOW, WHEN and WHY to use the code HERE.
- My Thank You Gift to You in February: Narrow Note Cards & Envelopes – Find out more HERE.
- Gift Certificates are available in any U.S. dollar amount from me. Contact me – email: candy@stampcandy.net OR call/text: 404-661-5222
- Gumball Rewards for all orders over $50. Find out more HERE.
Contact me with any questions – email: candy@stampcandy.net or call/text: 404-661-5222
Thanks for stopping by today, and Sweet Stamping!

Dec 31, 2017 | Cards, Challenges, Gallery, Guest Stamper, Holiday, New Products, New Year, Techniques |
Whether you go out partying all night or just run around the corner for a minute, please be careful out there. I hope you all have a very happy – and safe – New Year’s Eve.
On December 17, I hosted the December Candy Hearts Team Meeting and Christmas Shindig. We had a lot of fun with demonstrations, Make & Takes, yummy food, and talking – and yes there was a whole lot of laughing. Our swap theme was New Year’s, so today I’m sharing the Hearts’ swap cards. I know you’ll agree with me when I say that these are some very talented card makers.
Here’s what they made:
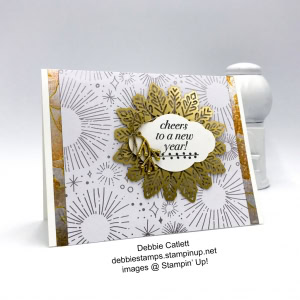
Debbie’s card has a Whisper White card base and a layer of Year of Cheer Designer Series Paper. It includes Year of Cheer Washi Tape & Embellishments, a Foil Snowflake, and a sentiment from the Cheer to the Year stamp set cut with the Pretty Label Punch.

Judy’s card has a Berry Burst card base with a layer of Foil Frenzy Designer Series Paper. 2018 has been cut from the DSP layer with the Large Numbers Framelits Dies, then adhered with Foam Adhesive Strips. This is the Eclipse Technique. Metallic Edged Berry Burst Ribbon (a sneak peek from the upcoming 2018 Occasions Catalog) and a sentiment from the Teeny Tiny Wishes stamp set are the final touches.


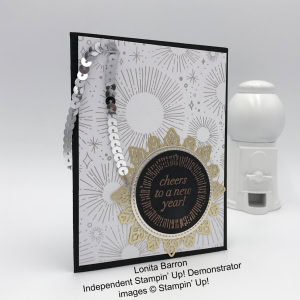
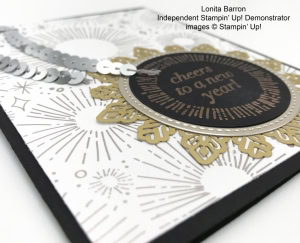
Great minds think alike! Lonita also used the Year of Cheer Designer Series Paper and a Foil Snowflake, but her card has a Basic Black card base. The sentiment is heat embossed on a piece of Basic Black card stock, and layered with a circle cut with the Stitched Shapes Framelits Dies and the snowflake. A piece of Silver Sequin Trim finishes off the design.

Here are today’s colors:
You can click on each one to see all the products that come in that color!
Here’s what they used:
Here’s some stuff you should know:
- Swatch Books and Product Shares from the 2018 Occasions and Sale-A-Bration Catalogs – order yours by January 2 HERE.
- Newsletter: subscribe for exclusive deals, projects, and more! Enter your email address and click SUBSCRIBE at the top right of this page, just under the picture of my smiling face.
- Gift Certificates are available in any U.S. dollar amount from me. Contact me – email: candy@stampcandy.net OR call/text: 404-661-5222
- Year End Sales Event ends January 2, 2018 – CLICK HERE for details. Order soon so you don’t miss your favorite retiring items!
- This is a great time to join my team! With the demonstrator discount of at least 20%, you can get Christmas gifts for all the stampers on your list! Plus you can order from the 2018 Occasions and Sale-A-Bration catalogs now! CLICK HERE for more information. Contact me with any questions: email candy@stampcandy.net or call/text 404-661-5222
- Sale-a-bration Stamp Fest coming January 20. Details and register HERE
- Check out My Events Calendar HERE
- Stampin’ Blends alcohol markers are now available! Click HERE for more info.
- Host Code for the month of December (HS67FXTS) Find out more about HOW, WHEN and WHY to use the code HERE.
- December’s FREE gift: Year of Cheer Specialty Washi Tape – Find out more HERE.
- Gumball Rewards for all orders over $50. Find out more HERE.
- This is a treat for those of you who read my entire blog post! Comment below whether you are staying IN or going OUT for New Year’s Eve, to be entered in a drawing to win these three beautiful cards! I’ll draw a winner tomorrow, so comment today!!!
Thanks for stopping by today, and Sweet Stamping!
Sep 22, 2017 | Cards, Challenges, Color Palette, Gallery |
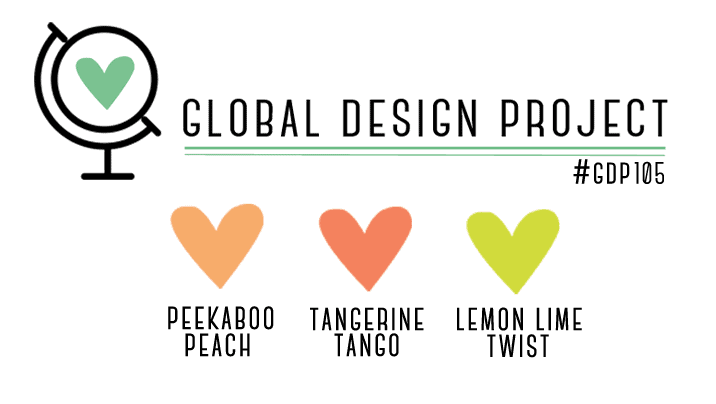
I am in love with the Painted Harvest Suite of products on pages 48-49 of the 2017 Holiday Catalog. The two step images in this stamp set are sooooo easy to do. And the Painted Autumn Designer Series Paper (DSP) is gorgeous – it has 10 colors in it so you can use it with lots of different projects. I used some of the products in the suite for today’s card, which I made for this week’s Global Design Project color challenge (GDP105.)
Here’s the GDP105 challenge:
Here’s what I made:
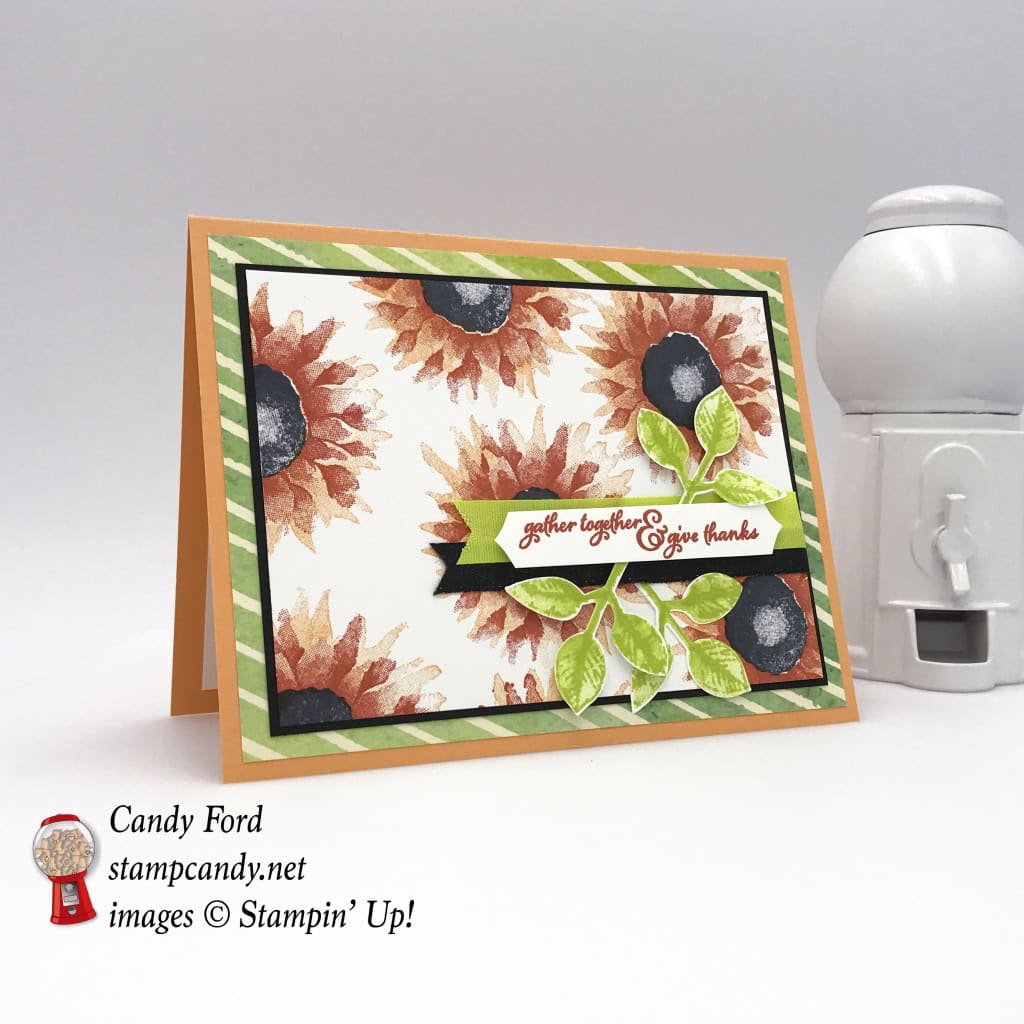
Here’s what I did:
Cut and scored with my Stampin’ Trimmer:
- Peekaboo Peach card stock (CS) cut to 5-1/2″ x 8-1/2″, then scored in half at 4-1/4″
- Painted Autumn Designer Series Paper (DSP) cut to 5-1/4″ x 4″ (I chose a design with Lemon Lime Twist stripes.)
- Basic Black CS cut to 4-7/8″ x 3-5/8″
- Whisper White CS to 4-3/4″ x 3-1/2″
- Whisper White CS cut to 7/8″ x 4″
- Whisper White CS cut to 5-1/4″ x 4″, for the inside
Stamped with the Painted Harvest stamp set:
- first flower stamp in Peekaboo Peech ink onto the 4-3/4″ x 3-1/2″ Whisper White CS layer
- second flower stamp in Tangerine Tango onto the Peekaboo Peach images
- flower center in Basic Black ink onto the flowers
- first leaf stamp (x 3) in Lemon Lime Twist ink onto a scrap of Whisper White CS
- second leaf stamp in Lemon Lime Twist ink onto the first leaf images
- sentiment in Tangerine Tango ink onto the center of the 7/8″ strip of Whisper White CS
Punched using the Leaf Punch :
Punched using the Best Badge Punch:
- ends of the sentiment strip, by inserting each end into the punch from the back side

Assembled the card:
- cut one end of a piece of Lemon Lime Twist ribbon and a piece of Basic Black ribbon in a notch using Paper Snips
- adhered the two pieces of ribbon to the stamped layer with Tear & Tape adhesive (Fast Fuse would work well also) and wrapped the non-notched end around to the back of the layer
- glued one leaf onto the bottom right, sticking the stem end under the ribbon slightly
- adhered two leaves using Mini Stampin’ Dimensionals, making sure the stem ends would be covered by the sentiment
- adhered sentiment using Stampin’ Dimmensionals
- top layer glued to Basic Black layer
- Basic Black layer glued to DSP layer
- DSP layer glued onto the front of the card base
- 5-1/4″ x 4″ Whisper White CS glued to the inside of the card base
Here are today’s colors:
You can click on each one to see all the products that come in that color!
Here’s what I used:
Click on the images for more details and to purchase.
Here are some key points to remember:
- Gumball Reward for all orders over $50.
Find out more HERE. - Hostess Code for the month of September (N4ZFHXK9)
Find out more about HOW, WHEN and WHY to use that HERE. - September’s FREE gift
Quilt Top Textured Impressions Embossing Folder
Find out more HERE. - Help those affected by Hurricane Harvey and Irma
I will donate 20% of my September sales (matched by Stampin’ Up! corporate) to the American Red Cross for Hurricane Harvey & Irma Relief. Please help make a difference. CLICK HERE to shop now. Click HERE for more details. - New Merry Patterns Hostess Stamp Set – added to your Host Rewards
There’s a brand new stamp set that isn’t in any catalog. You can’t buy it, but you can get if for free with a qualifying order! You can host a party, or place your own order, or join under me and get a 20% discount on your demonstrator order. Find out more HERE.
Thanks for stopping by today, and Sweet Stamping!
Apr 6, 2017 | Cards, Challenges, Gallery |
It’s been a while since I participated in the Global Design Project’s weekly challenge, so I figured it was about time. This week’s challenge (GDP081) is to use Night of Navy, Whisper White, and another color we get to choose. I love the color combo of Night of Navy and Cucumber Crush, so that’s what I used. For the Night of Navy and Whisper White, it was obvious to go to the Floral Boutique Designer Series paper – those are the only two colors in the whole set! The Designer Tin of Cards had the perfect sentiment to stamp onto an oval for the card front.
Here’s the GDP081 challenge:
Here’s what I made:
I added Cucumber Crush to the DSP with a Stampin’ Write Marker.
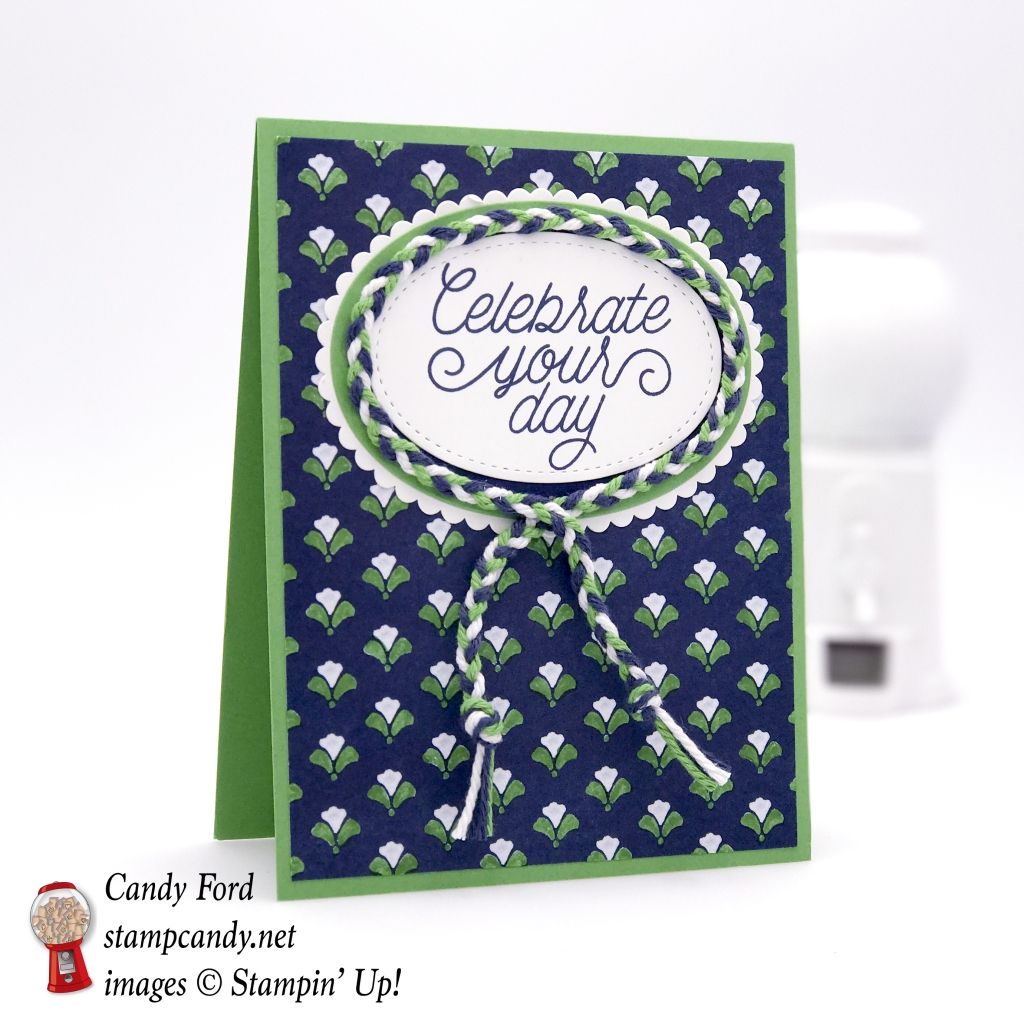
Here’s what I did:
Cut and scored with my Stampin’ Trimmer:
- Cucumber Crush card stock (CS) to 4-1/4″ x 11″, then scored in half at 5-1/2″
- Floral Boutique Designer Series Paper (DSP) to 4″ x 5-1/4″
Stamped with the Designer Tin of Cards stamp set:
- sentiment in Night of Navy ink onto Whisper White CS
Colored with Stampin’ Write Marker:
- part of white designs on DSP in Cucumber Crush
Die cut using the Stitched Shapes Framelits:
Die cut using the Layering Ovals Framelits:
- Night of Navy CS oval slightly larger than Whisper White oval
- Cucumber Crush CS oval slightly larger than Night of Navy oval
- Whisper White CS scalloped oval slightly larger than Cucumber Crush oval
Created the braid:
- braided Whisper White, Cucumber Crush, and Night of Navy Solid Baker’s Twines together, and tied knots in the ends
- NOTE: The Whisper White and Cucumber Crush twines are thick and the Night of Navy twine is regular size, so I used two pieces of Night of Navy twine to make up for the difference in thickness.
Assembled the card:
- all four ovals glued together in a stack, sentiment on top
- braid adhered around ovals with Mini Glue Dots – I folded the glue dots in half so they wouldn’t show, and placed them about every 1/4″ around the oval.
- ovals glued to DSP
- DSP glued to front of card base
Here’s what I used:
Click on the images for more details and to purchase.

RETIRING IN COLORS
DID YOU KNOW the 2015-2017 In Colors will retire at the end of May? That means that they will no longer be available to order on June 1. Don’t wait until then to order them. At some point before the end of May, they will become available only while supplies last. So get what you need now.
SPEAKING OF RETIRING PRODUCTS
The Designer Series Papers always retire, too. So these products won’t be available after May 31. And just like the retiring In Colors above, at some point before the end of May, these items will become available only while supplies last. Don’t wait until the last minute. Get them now!
Gum Ball Rewards
 You always earn a Gum Ball for every $50 you spend on an order with me. Earn 10 Gum Balls and I’ll send you a free stamp set of your choice! See the Gum Ball Rewards page for details.
Click here to shop my online store!
April Host Code
HV6MJT2X
Use the Host Code on online orders less than $15o. See how to use a Host Code here.
Online orders of $75-149.99 placed with the Host Code will receive the gift of the month!
Online orders of $150 or more will automatically receive the gift of the month! Do not use the Host Code.
April’s gift is a pack of Urban Underground Embellishments! Each pack contains 24 brushed silver embellishments – 8 each of 3 designs. (I can ship within US only.)
Urban Underground Embellishments © Stampin’ Up!
Thanks for stopping by today, and Sweet Stamping!

