Dec 30, 2017 | Boxes, Christmas, Food, Gallery, Gift Wrap, Gifts, Holiday |
These mini coffee cups, or espresso cups, are great for tiny gifts. They’re easy to decorate and fill. Today I’m sharing two different batches of these that I made. One batch of Christmas themed cups contains Starbucks Holiday Blend coffee k-cups. The other batch of coffee themed cups contain coffee flavored candies.
Here’s what I made:


Here’s what I did:
Made cup cover and belly band:
- rolled a cup on a large piece of scrap paper, following it with a pencil
- cut out the template with Paper Snips and wrapped it around a cup to make sure it fit
- held the template on the cup with my fingers and drew a belly band onto the template with a pencil
- used that to create a template for the belly band
- covers and cut using Paper Snips from Coffee Break, Be Merry, and Merry Music Specialty Designer Series Papers (DSP)
- belly bands cut using Paper Snips from DSP and from CS in Pool Party, Whisper White, Garden Green, and Cherry Cobbler
Stamped with the Hug in a Mug stamp set:
- sentiment onto Whisper White card stock (CS) in Pear Pizzazz, Early Espresso, Garden Green, and Cherry Cobbler inks
Stamped with the Merry Cafe stamp set:
- sentiment in Memento Tuxedo Black ink onto Whisper White CS
- snowflake in Cherry Cobbler ink above the sentiment
Die cut using the Layering Circles Framelits:
- all sentiments
- larger circles to layer with sentiment, from Pool Party, Early Espresso, Garden Green, and Cherry Cobbler CS
Assembled the cups:
- covers glued onto the cups
- belly bands glued onto the covers
- sentiments layered with coordinating larger circles, then adhered to the cup lids with Stampin’ Dimensionals (The center part of the lid is lower than the rim.)
- adhered a small Rhinestone Basic Jewel to the center of the stamped snowflakes
NOTE: The cups, lids, k-cups, and candies were all ordered from Amazon.com.
Here are today’s colors:
You can click on each one to see all the products that come in that color!
Here’s what I used:
Click on the images for more details and to purchase.
Here’s some stuff you should know:
- Swatch Books and Product Shares from the 2018 Occasions and Sale-A-Bration Catalogs – order yours by January 2 HERE.
- Newsletter: subscribe for exclusive deals, projects, and more! Enter your email address and click SUBSCRIBE at the top right of this page, just under the picture of my smiling face.
- Gift Certificates are available in any U.S. dollar amount from me. Contact me – email: candy@stampcandy.net OR call/text: 404-661-5222
- Year End Sales Event ends January 2, 2018 – CLICK HERE for details. Order soon so you don’t miss your favorite retiring items!
- This is a great time to join my team! With the demonstrator discount of at least 20%, you can get Christmas gifts for all the stampers on your list! Plus you can order from the 2018 Occasions and Sale-A-Bration catalogs now! CLICK HERE for more information. Contact me with any questions: email candy@stampcandy.net or call/text 404-661-5222
- Sale-a-bration Stamp Fest coming January 20. Details and register HERE
- Check out My Events Calendar HERE
- Stampin’ Blends alcohol markers are now available! Click HERE for more info.
- Host Code for the month of December (HS67FXTS) Find out more about HOW, WHEN and WHY to use the code HERE.
- December’s FREE gift: Year of Cheer Specialty Washi Tape – Find out more HERE.
- Gumball Rewards for all orders over $50. Find out more HERE.
Thanks for stopping by today, and Sweet Stamping!

Dec 29, 2017 | Boxes, Christmas, Food, Gallery, Gift Wrap, Gifts, Holiday, New Year, Retiring Products |
I guess I’m a little late posting this one, but you can always change the colors and the sentiment for any occasion, or save it for next year. The Christmas Around the World Designer Series Paper has so many different patterns, even some that can be used for non-Christmas projects. I used the design with lots of tiny mints for today’s project. And the sentiment is made using the Brightly Lit Christmas Bundle. Both the paper and the bundle are retiring. They’ll be available only until January 2, or while supplies last.

Christmas Around the World DSP © Stampin’ Up!

Brightly Lit Christmas Bundle © Stampin’ Up!
Here’s what I made:
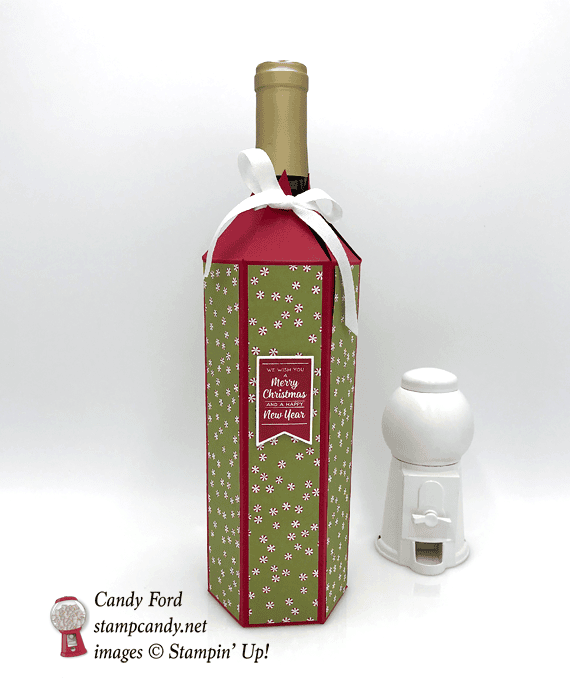

Here’s what I did:
Cut and scored with my Stampin’ Trimmer:
- Real Red card stock (CS) cut to 11″ x 12
- CS scored along the 11″ side at 1-3/4″, 3-1/2″, 5-1/4″, 7″, 8-3/4″, 10-1/2″
- CS scored along the 12″ side at 2″ and 10″
- Christmas Around the World Designer Series Paper (DSP) cut to 1-1/2″ x 7-3/4″ (6 pieces)
Cut CS using Paper Snips, according to the diagram:
- removed two smallest rectangles, and angled the leftover tab (in blue)
- cut vertical score lines along the bottom just up to the first horizontal score line
- marked along the top side at 7/8″, 2-5/8″, 4-3/8″, 6-1/8″, 7-7/8″, and 9-5/8″
- cut from marks to the intersections of the vertical score lines and the first horizontal score line – this cuts away the green areas
- used a 1/4″ circle punch to cut a hole in each triangle, about 1/2″ or so from the top – you may want to use a smaller circle punch, like the 1/8″, depending on the size of your ribbon

Stamped with the Brightly Lit Christmas stamp set:
- sentiment in Real Red ink onto a scrap of Whisper White card stock (CS)
Die cut using the Christmas Lamppost Thinlits:
Assembled the bottle cover:
- all score lines burnished with a Bone Folder
- DSP pieces glued onto the panels of the CS cover
- sentiment adhered to one of the DSP pieces with Stampin’ Dimensionals
- skinny tab on one side of the bottle cover adhered to the inside of the other end of the cover with Fast Fuse
- bottle inserted into the cover to make the next step easier:
- folded in one of the bottom tabs, then glued the opposite tab to it, making sure the tabs lined up with each other
- repeated this step for the remaining two pairs of tabs, gluing them all together
- ran a 22″ piece of ribbon through each hole in the top triangles, always front to back, then pulled it tight (not too hard or you’ll tear the paper) and tied a bow
Here are today’s colors:
You can click on each one to see all the products that come in that color!
Here’s what I used:
Click on the images for more details and to purchase.
Here’s some stuff you should know:
- Swatch Books and Product Shares from the 2018 Occasions and Sale-A-Bration Catalogs – order yours by January 2 HERE.
- Newsletter: subscribe for exclusive deals, projects, and more! Enter your email address and click SUBSCRIBE at the top right of this page, just under the picture of my smiling face.
- Gift Certificates are available in any U.S. dollar amount from me. Contact me – email: candy@stampcandy.net OR call/text: 404-661-5222
- Year End Sales Event ends January 2, 2018 – CLICK HERE for details. Order soon so you don’t miss your favorite retiring items!
- This is a great time to join my team! With the demonstrator discount of at least 20%, you can get Christmas gifts for all the stampers on your list! Plus you can order from the 2018 Occasions and Sale-A-Bration catalogs now! CLICK HERE for more information. Contact me with any questions: email candy@stampcandy.net or call/text 404-661-5222
- Sale-a-bration Stamp Fest coming January 20. Details and register HERE
- Check out My Events Calendar HERE
- Stampin’ Blends alcohol markers are now available! Click HERE for more info.
- Host Code for the month of December (HS67FXTS) Find out more about HOW, WHEN and WHY to use the code HERE.
- December’s FREE gift: Year of Cheer Specialty Washi Tape – Find out more HERE.
- Gumball Rewards for all orders over $50. Find out more HERE.
Thanks for stopping by today, and Sweet Stamping!
Dec 28, 2017 | Boxes, Christmas, Food, Gallery, Gift Wrap, Gifts, Holiday, Tags |
It’s winter, and a lot of you have snow. Here in Atlanta we had a nice snow a couple weeks ago, but it only lasted a couple days, and it’s probably the only one we’ll have all year. If you want to give someone a small gift this winter, just fill a Clear Tiny Treat Box with goodies. You can stick on a fast and easy tag made with the Merry Little Labels Bundle (Merry Little Labels stamp set and Everyday Label Punch.)
Here’s what I made:
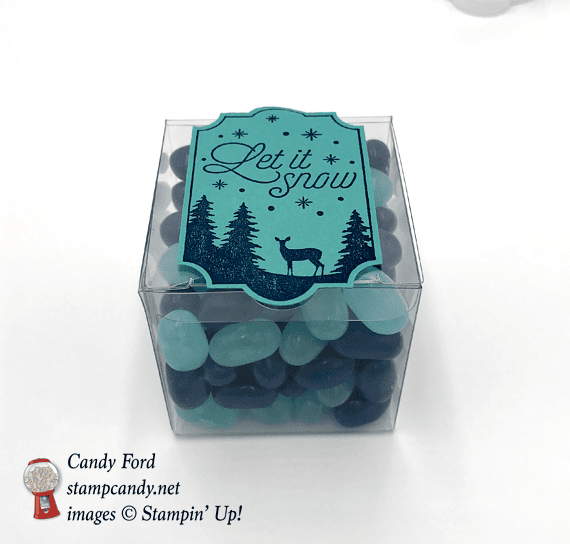
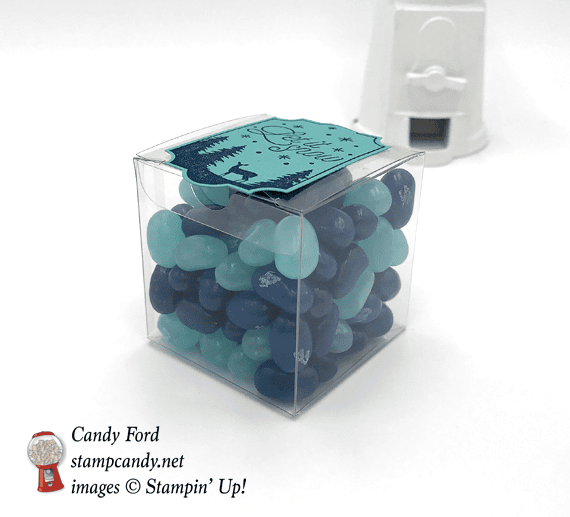

Here’s what I did:
Stamped with the Merry Little Labels stamp set:
- tag in Night of Navy ink onto a scrap of Bermuda Bay card stock (CS)
Cut using the Everyday Label Punch:
Assembled the card:
- filled a Clear Tiny Treat Box with blue jelly beans (These are Jelly Bellies in flavors Blueberry and Berry Blue.)
- adhered the tag to the top of the box with Fast Fuse
Here are today’s colors:
You can click on each one to see all the products that come in that color!
Here’s what I used:
Click on the images for more details and to purchase.
Here’s some stuff you should know:
- Swatch Books and Product Shares from the 2018 Occasions and Sale-A-Bration Catalogs – order yours by January 2 HERE.
- Newsletter: subscribe for exclusive deals, projects, and more! Enter your email address and click SUBSCRIBE at the top right of this page, just under the picture of my smiling face.
- Gift Certificates are available in any U.S. dollar amount from me. Contact me – email: candy@stampcandy.net OR call/text: 404-661-5222
- Year End Sales Event ends January 2, 2018 – CLICK HERE for details. Order soon so you don’t miss your favorite retiring items!
- This is a great time to join my team! With the demonstrator discount of at least 20%, you can get Christmas gifts for all the stampers on your list! Plus you can order from the 2018 Occasions and Sale-A-Bration catalogs now! CLICK HERE for more information. Contact me with any questions: email candy@stampcandy.net or call/text 404-661-5222
- Sale-a-bration Stamp Fest coming January 20. Details and register HERE
- Check out My Events Calendar HERE
- Stampin’ Blends alcohol markers are now available! Click HERE for more info.
- Host Code for the month of December (HS67FXTS) Find out more about HOW, WHEN and WHY to use the code HERE.
- December’s FREE gift: Year of Cheer Specialty Washi Tape – Find out more HERE.
- Gumball Rewards for all orders over $50. Find out more HERE.
Thanks for stopping by today, and Sweet Stamping!
Dec 27, 2017 | Cards, Christmas, Gallery, Holiday, New Year |
So here we are in the limbo between Christmas and New Year’s. I don’t know about you , but this is always an odd feeling week to me. All the excitement of Christmas is over. There will be more celebrating in a few days, but what to do until then? I fill much of my time making cards, of course. I used the Cheers to the Year stamp set and some wintery blues to make today’s card. It’s my wish for you to continue feeling the joy of Christmas all the way into the New Year.
Here’s what I made:

Here’s what I did:
Cut and scored with my Stampin’ Trimmer:
- Whisper White Thick card stock (CS) cut to 4-1/4″ x 11″, then scored in half at 5-1/2″
- Island Indigo CS cut to 4″ x 5-1/4″
- Whisper White CS (thick or regular) cut to 3-7/8″ x 5-1/8″
- Whisper White CS cut to 4″ x 3/4″
Stamped with the Cheers to the Year stamp set:
- circle images in Versamark ink onto three scraps of CS, one Island Indigo, one Bermuda Bay, and one Pool Party, then heat embossed in white
- sentiment in Island Indigo ink onto the Whisper White CS strip
Die cut using the Layering Circles Framelits:
- the three embossed circles
- the ends of the sentiment strip
Assembled the card:
- Island Indigo CS layer glued onto the front of the card base
- Whisper White CS layer glued onto the Island Indigo CS layer
- three blue circles glued onto the Whisper White CS layer
- sentiment strip adhered with Stampin’ Dimensionals
Here are today’s colors:
You can click on each one to see all the products that come in that color!
Here’s what I used:
Click on the images for more details and to purchase.
Here’s some stuff you should know:
- Swatch Books and Product Shares from the 2018 Occasions and Sale-A-Bration Catalogs – order yours by January 2 HERE.
- Newsletter: subscribe for exclusive deals, projects, and more! Enter your email address and click SUBSCRIBE at the top right of this page, just under the picture of my smiling face.
- Gift Certificates are available in any U.S. dollar amount from me. Contact me – email: candy@stampcandy.net OR call/text: 404-661-5222
- Year End Sales Event ends January 2, 2018 – CLICK HERE for details. Order soon so you don’t miss your favorite retiring items!
- This is a great time to join my team! With the demonstrator discount of at least 20%, you can get Christmas gifts for all the stampers on your list! Plus you can order from the 2018 Occasions and Sale-A-Bration catalogs now! CLICK HERE for more information. Contact me with any questions: email candy@stampcandy.net or call/text 404-661-5222
- Sale-a-bration Stamp Fest coming January 20. Details and register HERE
- Check out My Events Calendar HERE
- Stampin’ Blends alcohol markers are now available! Click HERE for more info.
- Host Code for the month of December (HS67FXTS) Find out more about HOW, WHEN and WHY to use the code HERE.
- December’s FREE gift: Year of Cheer Specialty Washi Tape – Find out more HERE.
- Gumball Rewards for all orders over $50. Find out more HERE.
Thanks for stopping by today, and Sweet Stamping!
Dec 25, 2017 | Cards, Christmas, Gallery, Holiday, Retiring Products |
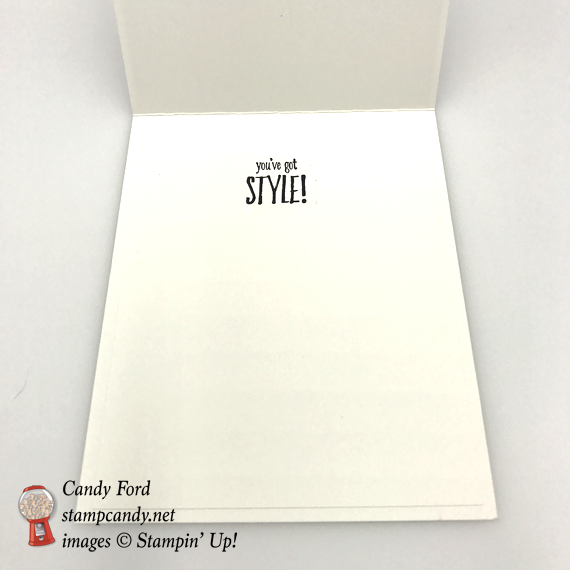
Merry Christmas! Today is the day – the one that kids of all ages look forward to all year long. The man in red made his rounds last night, and I hope he left some goodies under your tree. I’ve saved a special card to share with you today. I like “ugly” Christmas sweaters – I think they’re a hoot and a half – and this card is covered in them. The Christmas Sweaters stamp set has six different sweaters, all of which I used on today’s card. It’s retiring and will only be available through January 2, 2018, or while supplies last. The You’ve Got Style stamp set provides the perfect sentiment inside the card.
Here’s what I made:

Here’s what I did:
Cut and scored with my Stampin’ Trimmer:
- Whisper White Thick card stock (CS) cut to 4-1/4″ x 11″, then scored in half at 5-1/2″
- Basic Black CS layer cut to 4-1/8″ x 5-3/8″
- Whisper White CS layer cut to 4″ x 5-1/4″
Stamped with the Christmas Sweaters stamp set:
- the six sweaters in Basic Black ink onto a piece of Whisper White CS
Stamped with the You’ve Got Style stamp set:
- sentiment in Basic Black ink onto the inside of the card base
- NOTE: you may notice that I have an extra layer of Whisper White CS inside the card base. That’s because I made a mistake when I stamped the sentiment, so I stamped it again on a separate piece of Whisper White CS and glued it over the mistake.
Colored using Stampin’ Write Markers:
- the sweaters in Blushing Bride, Crumb Cake, Real Red, Cherry Cobbler, Pool Party, Island Indigo, Garden Green, Crushed Curry, So Saffron, and Pacific Point.
Cut using Paper Snips:
Assembled the card:
- sweaters adhered to the Whisper White CS layer with Stampin’ Dimensionals
- Whisper White CS layer glued onto the Basic Black CS layer
- Basic Black CS layer glued onto the front of the card base
Here are today’s colors:
You can click on each one to see all the products that come in that color!
Here’s what I used:
Click on the images for more details and to purchase.
Here’s some stuff you should know:
- Newsletter: subscribe for exclusive deals, projects, and more! Enter your email address and click SUBSCRIBE at the top right of this page, just under the picture of my smiling face.
- Gift Certificates are available in any U.S. dollar amount from me. Contact me – email: candy@stampcandy.net OR call/text: 404-661-5222
- Swatch Books and Product Shares from the 2018 Occasions and Sale-A-Bration Catalogs – you can order yours beginning December 27 HERE.
- Year End Sales Event – December 1, 2017 to January 2, 2018 – CLICK HERE for details. Order soon so you don’t miss your favorite retiring items!
- This is a great time to join my team! With the demonstrator discount of at least 20%, you can get Christmas gifts for all the stampers on your list! Plus you can order from the 2018 Occasions and Sale-A-Bration catalogs now! CLICK HERE for more information. Contact me with any questions: email candy@stampcandy.net or call/text 404-661-5222
- Sale-a-bration Stamp Fest coming January 20. Details and register HERE
- Check out My Events Calendar HERE
- Stampin’ Blends alcohol markers are now available! Click HERE for more info.
- Hostess Code for the month of December (HS67FXTS) Find out more about HOW, WHEN and WHY to use the code HERE.
- December’s FREE gift: Year of Cheer Specialty Washi Tape – Find out more HERE.
- Gumball Rewards for all orders over $50. Find out more HERE.
Thanks for stopping by today, and Sweet Stamping!
Dec 24, 2017 | Boxes, Cards, Christmas, Gallery, Gift Wrap, Gifts, Holiday, New Year |
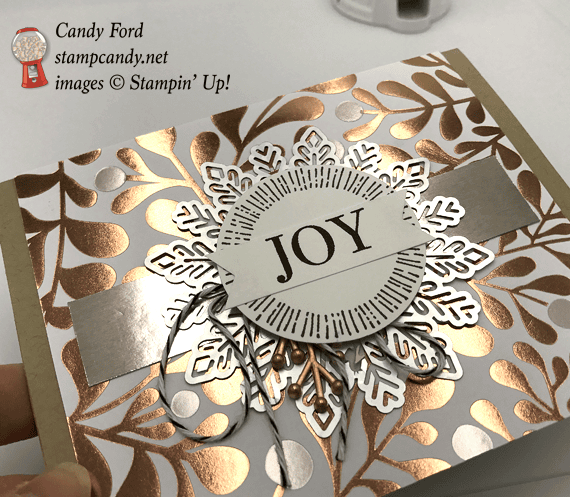
Happy Christmas Eve! Santa is loading his sleigh and getting ready for his big ride tonight. Whether you are home or visiting, with family or friends, wherever you are, I wish you a very Merry and Safe Christmas!
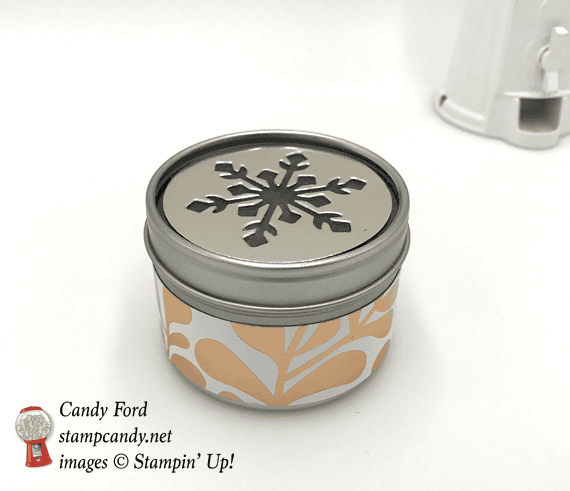
Last year I was fortunate enough to earn Stampin’ Up!’s incentive trip to Thailand. The trip was this past July. While we were there we were given the 2017 Holiday Catalog (a month before anyone else, and two months before the catalog went live for customers!) We also got to do some fantastic Make & Take projects using the new products. Today’s card made with products from the Year of Cheer Suite was one of those. I’ve used some of the same products to decorate a small tin with a clear top.
Here’s what I made:


Here’s what I did:
Cut and scored with my Stampin’ Trimmer:
- Crumb Cake card stock (CS) cut to 5-1/2″ x 8-1/2″, then scored in half at 4-1/4″
- Year of Cheer Designer Series Paper (DSP) cut to 5″ x 4-1/4″
- Champagne Foil Sheet cut to 4-1/2″ x 1″
- Whisper White CS cut to 2″ x 3/4″
- DSP cut to 1″ x 9″
Stamped with the Cheers to the Year stamp set:
- sentiment in Early Espresso ink onto the Whisper White CS strip
- starburst design in Early Espresso ink onto a scrap of Whisper White CS
Die cut using the Layering Circle Framelits:
- starburst design from the scrap of Whisper White CS
- a scrap of Champagne Foil Sheet
Die cut using the Trim Your Stocking Thinlits:
- snowflake from the Champagne Foil circle
Assembled the card:
- notches cut in the ends of the sentiment strip with Paper Snips
- large DSP layer adhered to the front of the card base with Fast Fuse
- Champagne Foil strip adhered to the DSP layer with Fast Fuse
- silver Foil Snowflake adhered to the foil strip with Fast Fuse (it’s easier to put the Fast Fuse on the strip, then stick the snowflake to it, instead of trying to apply the Fast Fuse to the snowflake)
- Basic Black Baker’s Twine tied in a bow and adhered to the snowflake with Mini Glue Dots, so it will stick out from under the upper layers
- a Year of Cheer Embellishment adhered to the snowflake with Mini Glue Dots, so it will stick out from under the upper layers
- starburst die cut adhered to the snowflake with Stampin’ Dimensionals
- sentiment glued to the starburst die cut
Decorated the tin:
- wrapped the DSP strip around the tin and secured it with Fast Fuse
- adhered the snowflake cut foil circle to the clear part of the lid with Fast Fuse
Here are today’s colors:
You can click on each one to see all the products that come in that color!
Here’s what I used:
Here’s some stuff you should know:
- Newsletter: subscribe for exclusive deals, projects, and more! Enter your email address and click SUBSCRIBE at the top right of this page, just under the picture of my smiling face.
- Gift Certificates are available in any U.S. dollar amount from me. Contact me – email: candy@stampcandy.net OR call/text: 404-661-5222
- Swatch Books and Product Shares from the 2018 Occasions and Sale-A-Bration Catalogs – you can order yours beginning December 27 HERE.
- Year End Sales Event – December 1, 2017 to January 2, 2018 – CLICK HERE for details. Order soon so you don’t miss your favorite retiring items!
- This is a great time to join my team! With the demonstrator discount of at least 20%, you can get Christmas gifts for all the stampers on your list! Plus you can order from the 2018 Occasions and Sale-A-Bration catalogs now! CLICK HERE for more information. Contact me with any questions: email candy@stampcandy.net or call/text 404-661-5222
- Sale-a-bration Stamp Fest coming January 20. Details and register HERE
- Check out My Events Calendar HERE
- Stampin’ Blends alcohol markers are now available! Click HERE for more info.
- Hostess Code for the month of December (HS67FXTS) Find out more about HOW, WHEN and WHY to use the code HERE.
- December’s FREE gift: Year of Cheer Specialty Washi Tape – Find out more HERE.
- Gumball Rewards for all orders over $50. Find out more HERE.
Thanks for stopping by today, and Sweet Stamping!
