Dec 11, 2017 | Boxes, Christmas, Food, Gallery, Gift Wrap, Gifts, Holiday |
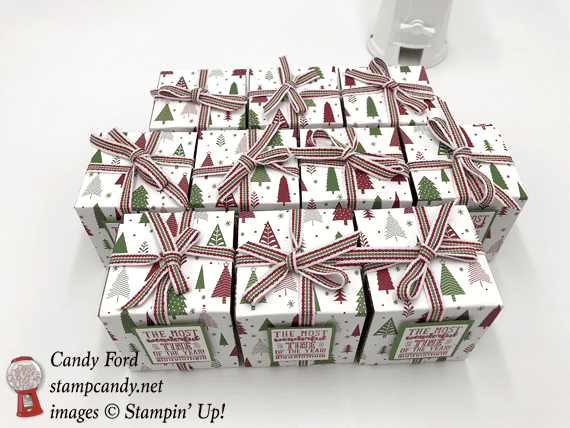
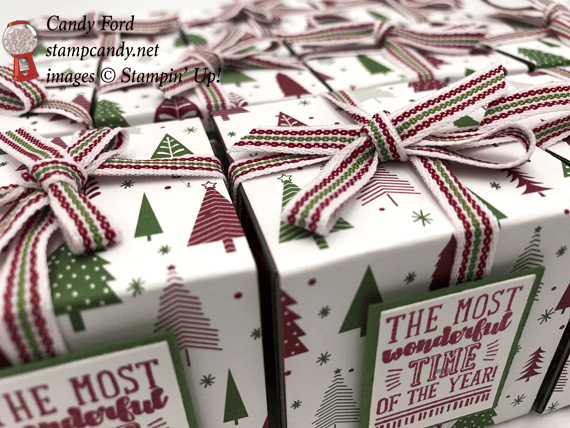
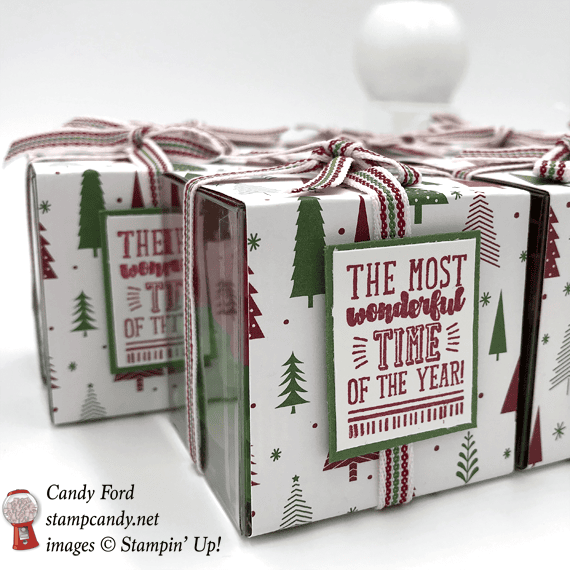
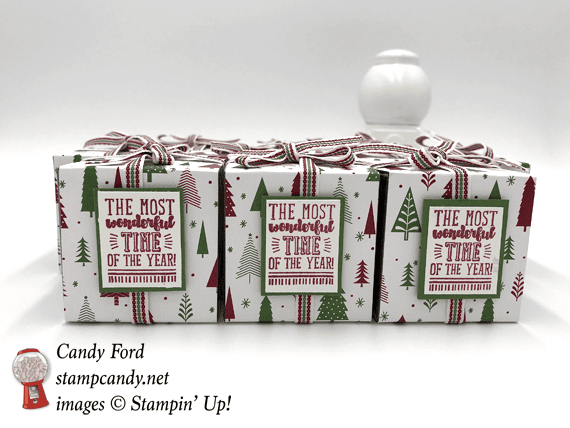
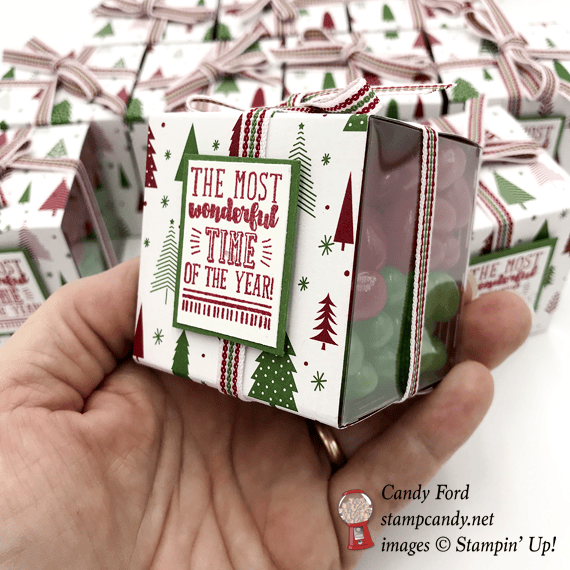
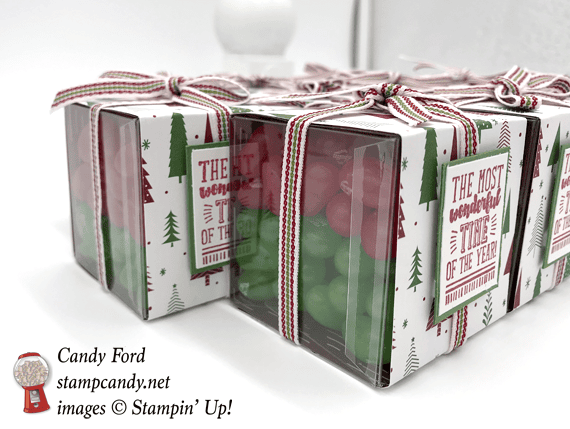
The Clear Tiny Treat Boxes are perfect for so many things. Here I’ve decorated them for Christmas and filled them with red and green jelly beans. I plan to put one at each place setting at Christmas dinner. I may even attach names to them to use as place cards.
Here’s what I made:
Here’s what I did:
Cut and scored with my Stampin’ Trimmer:
- Be Merry Designer Series Paper (DSP) cut to 2″ x 9″
- Garden Green card stock (CS) cut to 1-1/8″ x 1-3/8″
- Whisper White CS cut to 1″ x 1-1/4″
Stamped with the Brightly Lit Christmas stamp set:
- sentiment in Cherry Cobbler ink onto the Whisper White CS piece
Assembled the project:
- assembled Clear Tiny Treat box (It’s easy to fold in the flaps to make the box)
- filled box with jelly beans (I used green and red Jelly Bellies)
- closed the lid and wrapped the DSP around the box, with the jelly beans showing on both sides, then glued the ends together on the bottom of the box
- NOTE: do not glue the DSP to the box itself, because the DSP “belly band” should slide off of the box to open
- wrapped about 30″ Quilted Christmas Ribbon around the box and tied it in a bow on top (You can tell by the topmost photo that I tied those bows in a hurry!)
- sentiment glued onto the Garden Green CS piece
- Garden Green CS piece adhered to the front of the box with Stampin’ Dimensionsals – I made sure the dimensionals were on either side of the ribbon, so the ribbon could be loosened easily
Here are today’s colors:
You can click on each one to see all the products that come in that color!
Here’s what I used:
Click on the images for more details and to purchase.
Here are some key points to remember:
- Swatch Books and Product Shares from the 2018 Occasions and Sale-A-Bration Catalogs – you can order yours now HERE.
- Year End Sales Event – December 1, 2017 to January 2, 2018 – CLICK HERE for details. Order soon so you don’t miss your favorite retiring items!
- This is a great time to join my team! With the demonstrator discount of at least 20%, you can get Christmas gifts for all the stampers on your list! CLICK HERE for more information. Contact me with any questions: email candy@stampcandy.net or call/text 404-661-5222
- Sale-a-bration Stamp Fest coming January 20. Details and register HERE
- Check out My Events Calendar HERE
- Stampin’ Blends alcohol markers are now available! Click HERE for more info.
- Hostess Code for the month of December (HS67FXTS) Find out more about HOW, WHEN and WHY to use the code HERE.
- December’s FREE gift: Year of Cheer Specialty Washi Tape – Find out more HERE.
- Gumball Rewards for all orders over $50. Find out more HERE
Thanks for stopping by today, and Sweet Stamping!

Dec 10, 2017 | Cards, Christmas, Gallery, Holiday |
Santa’s getting ready for Christmas. It’s laundry day and time for his Suit to hang on the line to dry. Don’t worry, he has on his red union suit to keep him warm. This adorable Christmas card is sure to bring a smile to anyone who receives it. And it’s a snap to make with the Santa’s Suit Bundle (Santa’s Suit stamp set and Santa Builder Framelits Dies.)
Here’s what I made:


Here’s what I did:
Cut and scored with my Stampin’ Trimmer:
- Real Red card stock (CS) cut to 5-1/2″ x 8-1/2″, then scored in half at 4-1/4″
- Crumb Cake CS cut to 5-3/8″ x 4-1/8″
- Whisper White CS cut to 5-1/4″ x 4″ (2 pieces)
- Crumb Cake CS cut to 1/4″ x 2″
Stamped with the Santa’s Suit stamp set:
- Santa, jacket, pants, hat, mittens, boots, and clothespins in Basic Black ink onto a scrap of Whisper White CS
- sentiment in Real Red ink onto a scrap of Whisper White CS
- clothesline in Crumb Cake ink onto the 5-1/4″ x 4″ Whisper White CS layer
Colored using a Real Red Stampin’ Write Marker:
- Santa, jacket, pants, hat, and mittens
Colored using Stampin’ Blends Markers:
- suspenders and clothes pins in Crumb Cake
- Santa’s head, hands, and feet in Ivory
- bottom part of the Whisper White CS layer in Pool Party
Die cut using the Santa Builder Framelits:
- santa, jacket, pants, hat, mittens, boots, and clothespins
Die cut using the Layering Squares Framelits:
- scalloped square from Crumb Cake CS to frame the sentiment
Die cut using the Stitched Shapes Framelit Dies:
Cut using Paper Snips:
- a small slit in the bottom right corner for the sign post to stick into
Assembled the card:
- clothes glued onto the Whisper White CS layer, like they’re hanging on the clothesline
- clothes pins glued over the clothes
- 1/4″ x 2″ Crumb Cake CS piece glued onto the Whisper White CS layer, sticking it down through the slit I cut with Paper Snips
- sentiment glued onto the Crumb Cake CS scalloped square, then adhered over the sign post with Stampin’ Dimensionals
- Santa adhered in front of the clothesline with Stampin’ Dimensionals
- the other 5-1/4″ x 4″ piece of Whisper White CS glued to the inside of the card base
Here are today’s colors:
You can click on each one to see all the products that come in that color!
Here’s what I used:
Click on the images for more details and to purchase.
Here are some key points to remember:
- Swatch Books and Product Shares from the 2018 Occasions and Sale-A-Bration Catalogs – you can order yours now HERE.
- Year End Sales Event – December 1, 2017 to January 2, 2018 – CLICK HERE for details. Order soon so you don’t miss your favorite retiring items!
- This is a great time to join my team! With the demonstrator discount of at least 20%, you can get Christmas gifts for all the stampers on your list! CLICK HERE for more information. Contact me with any questions: email candy@stampcandy.net or call/text 404-661-5222
- Sale-a-bration Stamp Fest coming January 20. Details and register HERE
- Check out My Events Calendar HERE
- Stampin’ Blends alcohol markers are now available! Click HERE for more info.
- Hostess Code for the month of December (HS67FXTS) Find out more about HOW, WHEN and WHY to use the code HERE.
- December’s FREE gift: Year of Cheer Specialty Washi Tape – Find out more HERE.
- Gumball Rewards for all orders over $50. Find out more HERE
Thanks for stopping by today, and Sweet Stamping!
Dec 9, 2017 | Cards, Christmas, Gallery, Holiday |
Some may feel black isn’t a very Christmasy color, but I disagree. The most elegant Christmas cards I’ve seen were black. Today’s card is black and white with just a pop of Cherry Cobbler, and it features the Snowflake Sentiments Bundle (Snowflake Sentiments stamp set and Swirly Snowflakes Thinlits Dies) along with the Layering Ovals Framelits Dies, Vellum card stock, Dazzling Diamonds Glimmer Paper, and a little heat embossing.

Snowflake Sentiments stamp set © Stampin’ Up!
Here’s what I made:


Here’s what I did:
Cut and scored with my Stampin’ Trimmer:
- Basic Black card stock (CS) cut to 5-1/2″ x 8-1/2″, then scored in half at 4-1/4″
- Vellum CS cut to 5-1/2″ x 2″ (2 pieces)
- Dazzling Diamonds Glimmer Paper cut to 5-1/2″ x 2″ (2 pieces)
- Cherry Cobbler CS cut to 5-1/2″ x 3/4″
- Whisper White C cut to 5-1/4″ x 4″ for the inside
Stamped with the Snowflake Sentiments stamp set:
- outside sentiment in Versamark ink onto a scrap of Vellum CS, then heat embossed in White
- NOTE: be very careful not to overheat the Vellum with the heat tool, or it can bubble and warp
- inside sentiment in Cherry Cobbler ink onto the 5-1/4″ x 4″ piece of Whisper White CS
- NOTE: The two sentiments are from the same stamp. I masked off the part I didn’t need with a piece of Post-It Note before inking.

Die cut using the Swirly Snowflakes Thinlit Dies:
- the 2 pieces of 5-1/2″ x 2″ Vellum CS with the Edgelit die that has little holes along the edge
- the 2 pieces of 5-1/2″ x 2″ of Glimmer Paper with the Snowflake Edgelit Die
Die cut using the Layering Ovals Framelit Dies:
- sentiment
- a larger oval from a scrap of Basic Black CS
Assembled the card:
- Glimmer Paper snowflakes glued onto the Vellum CS pieces
- Vellum CS glued onto the front of the card base
- Cherry Cobbler CS strip adhered over the seam where the two snowflake/vellum pieces meet with Fast Fuse
- sentiment glued onto the Basic Black CS oval
- Basic Black CS oval adhered to the card front with Stampin’ Dimensionals
- 5-1/4″ x 4″ Whisper White CS glued to the inside of the card base
- Black Rhinestones adhered to the center of the snowflakes
Here are today’s colors:
You can click on each one to see all the products that come in that color!
Here’s what I used:
Click on the images for more details and to purchase.
Here are some key points to remember:
- Gift Certificates are available in any U.S. dollar amount. Give them to stampers or ask for them for your Christmas gift! Contact me: call/text 404-661-5222 OR email candy@stampcandy.net
- Swatch Books and Product Shares from the 2018 Occasions and Sale-A-Bration Catalogs – you can order yours now HERE.
- Year End Sales Event – December 1, 2017 to January 2, 2018 – CLICK HERE for details. Order soon so you don’t miss your favorite retiring items!
- This is a great time to join my team! With the demonstrator discount of at least 20%, you can get Christmas gifts for all the stampers on your list! CLICK HERE for more information. Contact me with any questions: email candy@stampcandy.net or call/text 404-661-5222
- Sale-a-bration Stamp Fest coming January 20. Details and register HERE
- Check out My Events Calendar HERE
- Stampin’ Blends alcohol markers are now available! Click HERE for more info.
- Hostess Code for the month of December (HS67FXTS) Find out more about HOW, WHEN and WHY to use the code HERE.
- December’s FREE gift: Year of Cheer Specialty Washi Tape – Find out more HERE.
- Gumball Rewards for all orders over $50. Find out more HERE
Thanks for stopping by today, and Sweet Stamping!
Dec 8, 2017 | Cards, Christmas, Gallery, Holiday, New Year |
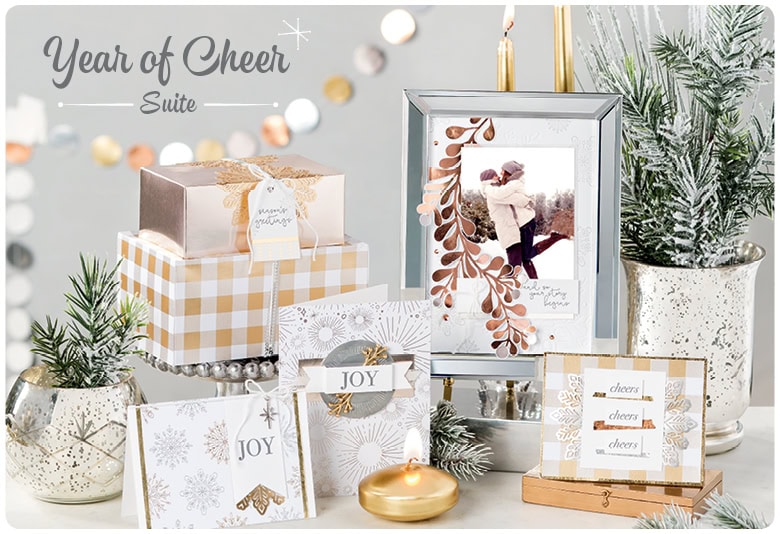
Silver and gold, silver and gold. Remember the song from the old Rudolph animated show? If you’re in the mood for some holiday glitz, you can make this very easy card using a Silver Foil Sheet, the metallic Year of Cheer Specialty Washi Tape, and Year of Cheer Embellishments. The Winter Wonder Textured Impressions Embossing Folder provides the focal point, and the greeting from the Cheers to the Year stamp set is heat embossed in gold to continue the shiny, metallic theme. Click on the image below to see the entire Year of Cheer Suite of products.
Gift Certificates:
Before I show you today’s project, I want to make sure you know about my Gift Certificates. They’re the perfect gift for you to give to stamping loved ones, and the perfect gift to you from loved ones. Contact me, or have your loved one contact me, for details. Gift Certificates can be for any amount.
call/text: 404-661-5222 OR email: candy@stampcandy.net
Here’s what I made:


Here’s what I did:
Cut and scored with my Stampin’ Trimmer:
- Whisper White Thick card stock (CS) cut to 5-1/2″ x 8-1/2″, then scored in half at 4-1/4″
- Silver Foil Sheet cut to 5-1/4″ x 4″
Stamped with the Cheers to the Year stamp set:
- greeting in Versamark ink onto a scrap of Whisper White CS, then heat embossed using Gold stampin’ emboss powder
- used Paper Snips to trim down to about 1/8″ from the greeting on all sides
Embossed using the Winter Wonder TIEF :
- Silver Foil Sheet, on the left side
Assembled the card:
- four different pieces of the washi tape wrapped around the right end of the Silver Foil Sheet
- Silver Foil Sheet glued onto the front of the card base
- two embellishments adhered to the washi tape with Mini Glue Dots
- greeting adhered the the washi tape, over the embellishments, using Stampin’ Dimensionals
- a small gold vinyl sticker adhered to the center of the big snowflake
Here are today’s colors:
You can click on each one to see all the products that come in that color!
Here’s what I used:
Click on the images for more details and to purchase.
Here are some key points to remember:
- Year End Sales Event – December 1, 2017 to January 2, 2018 – CLICK HERE for details
- This is a great time to join my team! With the demonstrator discount of at least 20%, you can get Christmas gifts for all the stampers on your list! CLICK HERE for more information. Contact me with any questions: email candy@stampcandy.net or call/text 404-661-5222
- Sale-a-bration Stamp Fest coming January 20. Details and register HERE
- Check out My Events Calendar HERE
- Stampin’ Blends alcohol markers are now available! Click HERE for more info.
- Hostess Code for the month of December (HS67FXTS) Find out more about HOW, WHEN and WHY to use the code HERE.
- December’s FREE gift: Year of Cheer Specialty Washi Tape – Find out more HERE.
- Gumball Rewards for all orders over $50. Find out more HERE
Thanks for stopping by today, and Sweet Stamping!
Dec 6, 2017 | Blog Hop, Boxes, Christmas, Food, Gift Wrap, Gifts, Holiday |
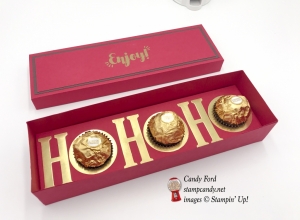
Need an inexpensive gift in a hurry for someone who loves Christmas and chocolates? Today’s gift box is just what you need. I love this big, bold sentiment from the Tags & Trimmings stamp set heat embossed in gold, but of course, you can use any sentiment you’d like. You can also change the word inside to any word with at least one O, like Noel, Mom, Wow, Boo, Robert,… 
 This month’s blog hop theme is A December to Remember. We are highlighting Christmas cards and gifts. After you check out my post, be sure to check out everyone else on the hop.
Here’s what I made:

Here’s what I did:
Cut and scored with my Stampin’ Trimmer:
- Real Red card stock (CS) cut to 5-1/2″ x 11-1/2″ and scored 1-1/2″ from each of the four sides, for the box
- Real Red CS cut to 4-1/16″ x 10-1/16″ and scored 3/4″ from each of the four sides, for the lid
- Chocolate Chip CS cut to 2-1/4″ x 8-1/4″ for a layer on the lid
- Real Red CS cut to 2″ x 8″ for a layer on the lid
- Real Red CS cut to 3-7/16″ x 9-7/16″ and scored 1/2″ from each of the four sides, for the insert
Stamped with the Tags & Trimmings stamp set:
- “Enjoy” in Versamark ink onto the Real Red layer for the lid, then heat embossed in gold

Die cut using the Large Letters Framelits:
- three Hs from a Gold Foil Sheet
Cut using the 1-3/8″” Circle Punch:
- 3 circles from a contrasting scrap of paper
- laid the die cut Hs and the punched circles on the insert to determine where they should go
- glued the Hs in place
- punched the 3 circles from the insert – fold under the 1/2″ side to get the CS all the way into the punch
- 3 circles from a scrap of a Gold Foil Sheet, leaving enough room to stamp around the holes with the larger punch*
Cut with the 1-3/4″ Circle Punch:
- the 3 gold foil circles, to make rings*
Assembled the box:
- The box, lid, and insert are all put together the same way:
- a) burnished all score lines with a bone folder for nice crisp corners
- b) glued the tabs to the inside of the adjacent side
- set insert into the box (no adhesive required)
- glued gold rings around each hole
- added candies to the holes – I put one Mini Glue Dot under each so they would stick to the bottom of the box and not move around in case the box was jostled.
- put the lid on the box
Here’s how to get to the next stop on the hop:
Just click the arrow. 
Here are today’s colors:
Click on each one to see all the products that come in/with that color!
Here’s what I used:
Click on the images for more details and to purchase.
Here are some key things to remember:
- Year End Sales Event – December 1, 2017 to January 2, 2018 – CLICK HERE for details
- This is a great time to join my team! With the demonstrator discount of at least 20%, you can get Christmas gifts for all the stampers on your list! CLICK HERE for more information. Contact me with any questions: email candy@stampcandy.net or call/text 404-661-5222
- Sale-a-bration Stamp Fest coming January 20. Details and register HERE
- Check out My Events Calendar HERE
- Stampin’ Blends alcohol markers are now available! Click HERE for more info.
- Hostess Code for the month of December (HS67FXTS) Find out more about HOW, WHEN and WHY to use the code HERE.
- December’s FREE gift: Year of Cheer Specialty Washi Tape – Find out more HERE.
- Gumball Rewards for all orders over $50. Find out more HERE
Thanks for stopping by today, and Sweet Stamping!
Dec 6, 2017 | Cards, Christmas, Gallery, Holiday |
Season’s Greetings stampers! Isn’t this card lovely? The Swirly Snowflakes Thinlits Dies over champagne foil paired with the Snowflake Sentiments “Season’s Greetings” embossed in gold gives such a beautiful look. And Pool Party is the perfect calm color for the background.
Here’s what I made:


Here’s what I did:
Cut and scored with my Stampin’ Trimmer:
- Pool Party card stock (CS) cut to 5-1/2″ x 8-1/2″, then scored in half at 4-1/4″
- Champagne Foil Sheet cut to 5-1/4″ x 2-1/2″
- Whisper White CS cut to 5-1/2″ x 2-1/2″
Stamped with the Snowflake Sentiments stamp set:
- sentiment in Versamark ink onto the front of the card base, then heat embossed using Gold Stampin’ Emboss Powder
Die cut using the Swirly Snowflakes Thinlit Dies :
- Champagne Foil Sheet with the scalloped die
- Whisper White CS with the multi-snowflake die, and with the line of dots
- a small scrap of Whisper White CS with the small snowflake die
Assembled the card:
- Champagne Foil die cut glued onto the front of the card base
- large Whisper White CS die cut glued onto the Champagne Foil die cut
- small snowflake glued onto the front of the card base
- Rhinestone Basic Jewel adhered to the center of the small snowflake
- NOTE: You can glue a piece of Whisper White CS to the inside of the card base, but I feel the Pool Party CS is plenty light enough to write on
Here are today’s colors:
You can click on each one to see all the products that come in that color!
Here’s what I used:
Click on the images for more details and to purchase.
Here are some key points to remember:
- Year End Sales Event – December 1, 2017 to January 2, 2018 – CLICK HERE for details
- This is a great time to join my team! With the demonstrator discount of at least 20%, you can get Christmas gifts for all the stampers on your list! CLICK HERE for more information. Contact me with any questions: email candy@stampcandy.net or call/text 404-661-5222
- Sale-a-bration Stamp Fest coming January 20. Details and register HERE
- Check out My Events Calendar HERE
- Stampin’ Blends alcohol markers are now available! Click HERE for more info.
- Hostess Code for the month of December (HS67FXTS) Find out more about HOW, WHEN and WHY to use the code HERE.
- December’s FREE gift: Year of Cheer Specialty Washi Tape – Find out more HERE.
- Gumball Rewards for all orders over $50. Find out more HERE
Thanks for stopping by today, and Sweet Stamping!
