Dec 6, 2017 | Blog Hop, Boxes, Christmas, Food, Gift Wrap, Gifts, Holiday |
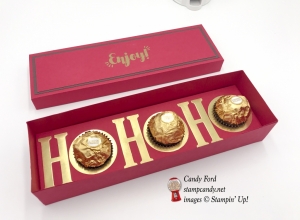
Need an inexpensive gift in a hurry for someone who loves Christmas and chocolates? Today’s gift box is just what you need. I love this big, bold sentiment from the Tags & Trimmings stamp set heat embossed in gold, but of course, you can use any sentiment you’d like. You can also change the word inside to any word with at least one O, like Noel, Mom, Wow, Boo, Robert,… 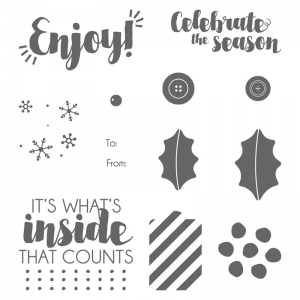
 This month’s blog hop theme is A December to Remember. We are highlighting Christmas cards and gifts. After you check out my post, be sure to check out everyone else on the hop.
Here’s what I made:

Here’s what I did:
Cut and scored with my Stampin’ Trimmer:
- Real Red card stock (CS) cut to 5-1/2″ x 11-1/2″ and scored 1-1/2″ from each of the four sides, for the box
- Real Red CS cut to 4-1/16″ x 10-1/16″ and scored 3/4″ from each of the four sides, for the lid
- Chocolate Chip CS cut to 2-1/4″ x 8-1/4″ for a layer on the lid
- Real Red CS cut to 2″ x 8″ for a layer on the lid
- Real Red CS cut to 3-7/16″ x 9-7/16″ and scored 1/2″ from each of the four sides, for the insert
Stamped with the Tags & Trimmings stamp set:
- “Enjoy” in Versamark ink onto the Real Red layer for the lid, then heat embossed in gold

Die cut using the Large Letters Framelits:
- three Hs from a Gold Foil Sheet
Cut using the 1-3/8″” Circle Punch:
- 3 circles from a contrasting scrap of paper
- laid the die cut Hs and the punched circles on the insert to determine where they should go
- glued the Hs in place
- punched the 3 circles from the insert – fold under the 1/2″ side to get the CS all the way into the punch
- 3 circles from a scrap of a Gold Foil Sheet, leaving enough room to stamp around the holes with the larger punch*
Cut with the 1-3/4″ Circle Punch:
- the 3 gold foil circles, to make rings*
Assembled the box:
- The box, lid, and insert are all put together the same way:
- a) burnished all score lines with a bone folder for nice crisp corners
- b) glued the tabs to the inside of the adjacent side
- set insert into the box (no adhesive required)
- glued gold rings around each hole
- added candies to the holes – I put one Mini Glue Dot under each so they would stick to the bottom of the box and not move around in case the box was jostled.
- put the lid on the box
Here’s how to get to the next stop on the hop:
Just click the arrow. 
Here are today’s colors:
Click on each one to see all the products that come in/with that color!
Here’s what I used:
Click on the images for more details and to purchase.
Here are some key things to remember:
- Year End Sales Event – December 1, 2017 to January 2, 2018 – CLICK HERE for details
- This is a great time to join my team! With the demonstrator discount of at least 20%, you can get Christmas gifts for all the stampers on your list! CLICK HERE for more information. Contact me with any questions: email candy@stampcandy.net or call/text 404-661-5222
- Sale-a-bration Stamp Fest coming January 20. Details and register HERE
- Check out My Events Calendar HERE
- Stampin’ Blends alcohol markers are now available! Click HERE for more info.
- Hostess Code for the month of December (HS67FXTS) Find out more about HOW, WHEN and WHY to use the code HERE.
- December’s FREE gift: Year of Cheer Specialty Washi Tape – Find out more HERE.
- Gumball Rewards for all orders over $50. Find out more HERE
Thanks for stopping by today, and Sweet Stamping!

Nov 30, 2017 | Christmas, Food, Gallery, Gift Wrap, Gifts, Holiday |
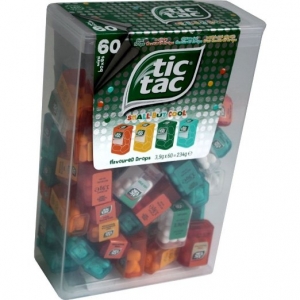
I wanted to make something very small for a large group, when I came across Mini Tic Tacs. Well, the boxes are mini, not the Tic Tacs themselves. The tiny container holds about 9-10 Tic Tacs. Perfect! But how to dress them up? I needed something really easy that I could make a lot of quickly. Today I’m sharing what I came up with.
But before that, I want to make sure you now that today is the last day to use this month’s host code (JBHB42YT) and receive my free gift of the month. Click HERE for more details.
Here’s what I made:
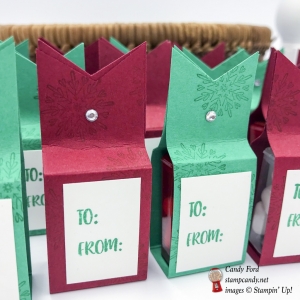
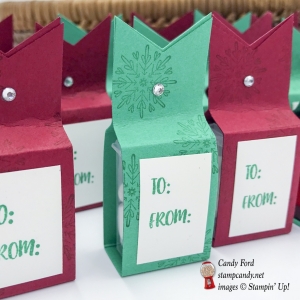
Here’s what I did:
Cut and scored with my Stampin’ Trimmer:
- Cherry Cobbler card stock (CS) cut to 1″ x 6-3/8″, then scored at 1-1/2″, 2-7/8″, 3-1/2″, and 4-7/8″
- Emerald Envy CS cut to 1″ x 6-3/8″, then scored at 1-1/2″, 2-7/8″, 3-1/2″, and 4-7/8″
- whisper White CS cut to 7/8″ x 1-1/8″
Stamped with the Cheers to the Year stamp set:
- snowflakes in Cherry Cobbler ink onto the Cherry Cobbler CS strips
- snowflakes in Emerald Envy ink onto the Emerald Envy CS strips
Stamped with the Season Like Christmas stamp set:
- “To From” in Emerald Envy ink onto the Whisper White CS pieces
Cut using the Banner Triple Punch:
- both ends of the Cherry Cobbler and Emerald Envy CS strips
Assembled the treats:
- burnished all score lines on the CS strips
- adhered 4 Stampin’ Dimensionals (2 stacks of 2) into the indention on bottom of each Tic Tac box, then adhered the box to the center of a CS strip
- folded the CS strip around the box and glued the tops together
- glued the Whisper White CS piece onto the front of the holder
- adhered a Rhinestone Basic Jewel to the top of the holder
Here are today’s colors:
You can click on each one to see all the products that come in that color!
Here’s what I used:
Click on the images for more details and to purchase.
Here are the Tic Tacs:
Click the image to see where I got them.
Here are some key points to remember:
- This is a great time to join my team! With the demonstrator discount of at least 20%, you can get Christmas gifts for all the stampers on your list! CLICK HERE for more information. Contact me with any questions: email candy@stampcandy.net or call/text 404-661-5222
- Sale-a-bration Stamp Fest coming January 20. Details and register HERE
- Check out My Events Calendar HERE
- Stampin’ Blends alcohol markers are now available! Click HERE for more info.
- Hostess Code for the month of November (JBHB42YT) Find out more about HOW, WHEN and WHY to use the code HERE.
- November’s FREE gift: Stitched Felt Embellishments – Find out more HERE.
- Gumball Rewards for all orders over $50. Find out more HERE
Thanks for stopping by today, and Sweet Stamping!
Nov 28, 2017 | Christmas, Food, Gallery, Gift Wrap, Gifts, Holiday, Tags |
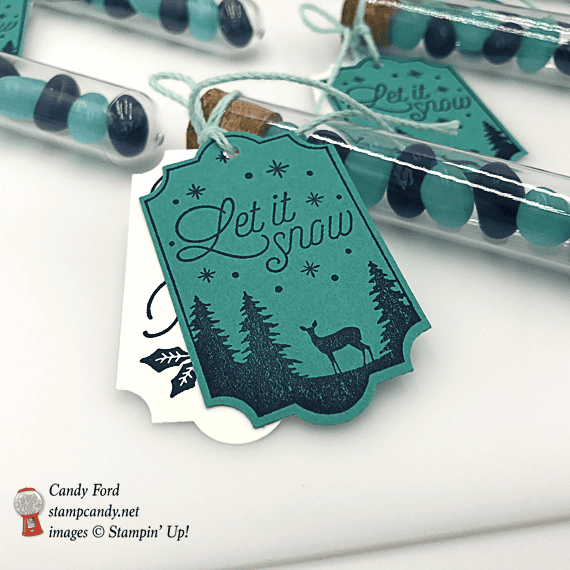
I love using blues for Christmas and Winter projects. For today’s Treat Tubes, I made tags in two lovely blues from the Stampin’ Up! repertoire: Bermuda Bay and Night of Navy. I was able to find jelly beans that matched really well: Blueberry and Berry Blue by Jelly Bellies. The Merry Little Labels Bundle (Merry Little Labels stamp set and Everyday Label Punch) from the 2017 Holiday Catalog made quick work of these little goodies. I set up a sort of assembly line for these, stamping lots of tags on full sheets of card stock, them punching them all out at once, etc. I made a few dozen of these.
Here’s what I made:
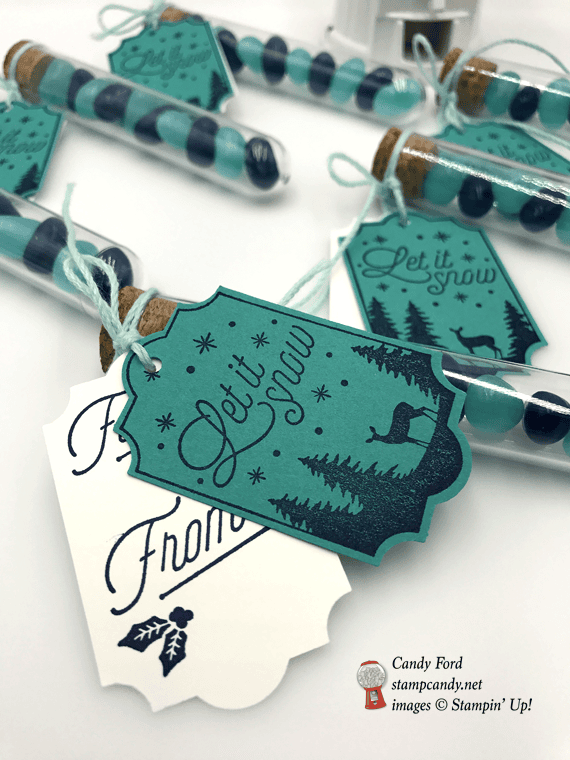


Here’s what I did:
Stamped with the Merry Little Labels stamp set:
- To From image in Night of Navy ink onto Whisper White Thick card stock (CS)
- Let it Snow image in Night of Navy ink onto Bermuda Bay CS (I tried pressing down on the stamp with less pressure than usual, and got the sort of speckled appearance of the trees and deer, which I like.)
Cut using the Everyday Label Punch:
Cut using the 1/8″ Circle Punch:
- a hole in the top of each tag
Assembled the treats:
- put jelly beans in the Treat Tube, alternating colors, and put in the cork
- ran Pool Party Solid Twine through both tags and tied them to the treat tube, around the cork just above the tube itself
Here are today’s colors:
You can click on each one to see all the products that come in that color!
Here’s what I used:
Click on the images for more details and to purchase.
Here are some key points to remember:
- Sale-a-bration Stamp Fest coming January 20. Details and register HERE
- Check out My Events Calendar HERE
- Stampin’ Blends alcohol markers are now available! Click HERE for more info.
- Hostess Code for the month of November (JBHB42YT) Find out more about HOW, WHEN and WHY to use the code HERE.
- November’s FREE gift: Stitched Felt Embellishments – Find out more HERE.
- Gumball Rewards for all orders over $50. Find out more HERE
- This is a great time to join my team! With you demonstrator discount of at least 20%, you can get Christmas gifts for all the stampers on your list, including yourself! No selling required! CLICK HERE for more information. Contact me with any questions: email candy@stampcandy.net or call/text 404-661-5222
Thanks for stopping by today, and Sweet Stamping!
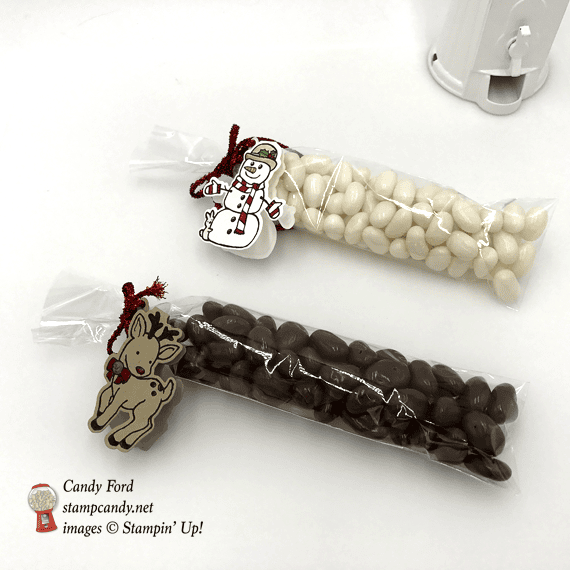
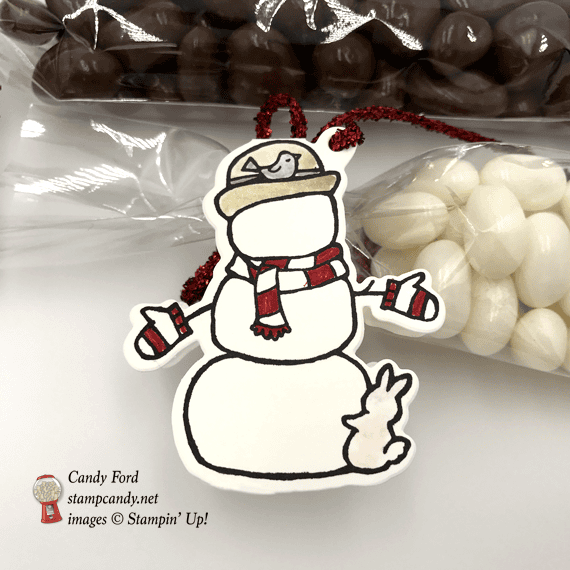
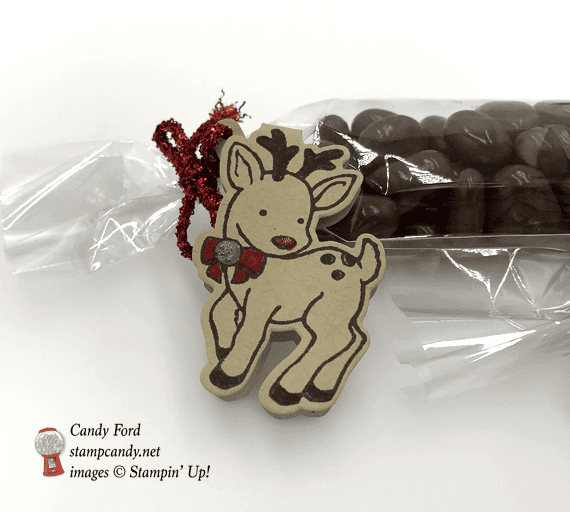
Nov 26, 2017 | Bags, Christmas, Food, Gallery, Gift Wrap, Gifts, Holiday, Sales, Tags |
Today’s little gifts are so easy to make and they are adorable! I filled these bags with candy, but you could fill them with anything small. The tags, made with the Seasonal Chums Bundle, fold in half for a front side and a back side to the image, with space inside for To and From.

Seasonal Chums Bundle © Stampin’ Up!
In these examples from Stampin’ Up!, you can see how the stamp and die create the whole tag. You can also trim away the little hanger and add the image to a card, like the reindeer here: 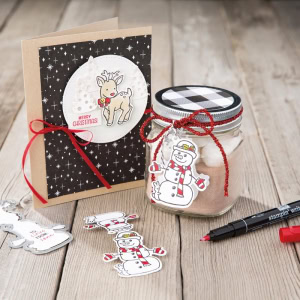
Here’s what I made:


Here’s what I did:
Stamped with the Seasonal Chums stamp set:
- snowman in Basic Black ink onto a scrap of Whisper White Thick card stock (CS)
- reindeer in Basic Black ink onto a scrap of Crumb Cake CS
Die cut using the Seasonal Tags:
- snowman tag and reindeer tag
Colored using Stampin’ Write Markers:
- snowman tag in Real Red, Crumb Cake, Pumpkin Pie, Garden Green, Smoky Slate, Pink Pirouette, and Soft Sky
- NOTE: I colored the bunny Pink Pirouette, but I let it white on the rest of these I made later. I prefer the white bunny, but you make him any color you want!
- reindeer in Early Espresso, Real Red, and Smoky Slate, then added Clear Wink of Stella to the bell
Assembled the gifts:
- filled a 2″ x 8″ Cellophane Bag with white (coconut) jelly beans
- filled another 2″ x 8″ Cellophane Bag with chocolate covered raisins
- used Red Tinsel Trim to attach the tags and tie both bags closed
Here are today’s main colors:
You can click on each one to see all the products that come in that color!
Here’s what I used:
Click on the images for more details and to purchase.
Here are some key points to remember:- Online Extravaganza ends today! Click HERE to shop these amazing deals!
- FREE SHIPPING tomorrow only! Any order you place on November 27 will receive free regular shipping! These are the times of the offer by Time Zone: 2am Nov 27 – 2am Nov 28 Eastern; 1am Nov 27 – 1am Nov 28 Central; 12am Nov 27 – 12 am Nov 28 Mountain; 11pm Nov 26 – 11pm Nov 27 Pacific. SHOP HERE
- Sale-a-bration Stamp Fest coming January 20. Details and register HERE
- Check out my events calendar HERE
- Stampin’ Blends alcohol markers are now available! Click HERE for more info.
- Hostess Code for the month of November (JBHB42YT) Find out more about HOW, WHEN and WHY to use the code HERE.
- November’s FREE gift: Stitched Felt Embellishments Find out more HERE.
- Gumball Rewards for all orders over $50. Find out more HERE
- This is a great time to join my team! In addition to the great sale prices in the Online Extravaganza, you’ll also get the demonstrator discount of 20%. CLICK HERE for more information. Contact me with any questions: email candy@stampcandy.net or call/text 404-661-5222
Thanks for stopping by today, and Sweet Stamping!
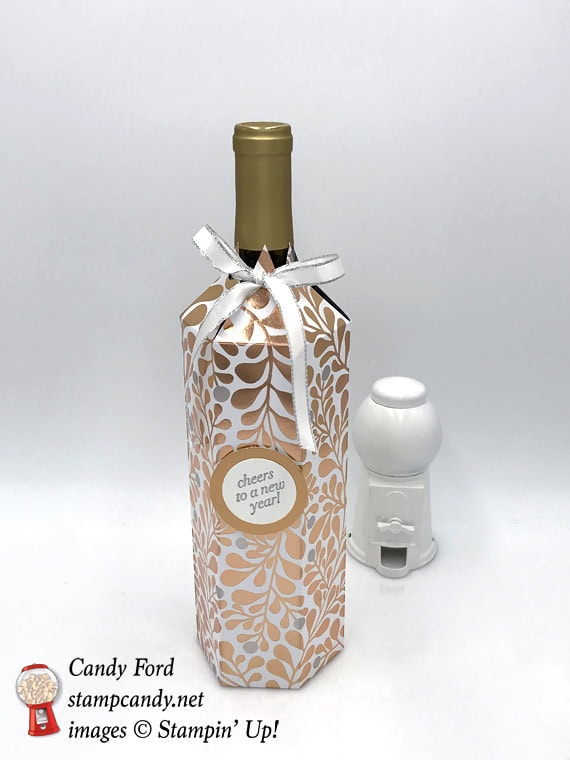
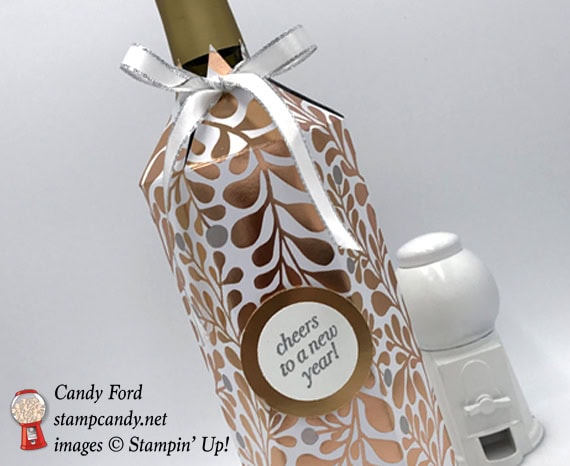
Nov 24, 2017 | Christmas, Food, Gallery, Gift Wrap, Gifts, Holiday, New Year |
This time of year we all have lots of parties and events to attend. A bottle of wine (or fancy vinegar, or flavored oil, or…) is the most common host gift to take. Make it extra special with a beautiful cover you made yourself. You’ll feel proud to give the gift, and they will appreciate it so much more. And this cover is deceptively easy to make! You can see another one I made recently here.
Here’s what I made:
Here’s what I did:
Cut and scored with my Stampin’ Trimmer:
- Year of Cheer Specialty Designer Series Paper (DSP) cut to 11″ x 12
- scored along the 11″ side at 1-3/4″, 3-1/2″, 5-1/4″, 7″, 8-3/4″, 10-1/2″
- scored along the 12″ side at 2″ and 10″
Cut using Paper Snips, according to the diagram:
- removed two smallest rectangles, and angled the leftover tab (in blue)
- cut vertical score lines along the bottom just up to the first horizontal score line
- marked along the top side at 7/8″, 2-5/8″, 4-3/8″, 6-1/8″, 7-7/8″, and 9-5/8″
- cut from marks to the intersections of the vertical score lines and the first horizontal score line – this cuts away the green areas
- used a 1/4″ circle punch to cut a hole in each triangle, about 1/2″ or so from the top – you may want to use a smaller circle punch, like the 1/8″, depending on the size of your ribbon

Stamped with the Cheers to the Year stamp set:
- sentiment in Versamark ink onto a piece of Whisper White card stock (CS), then heat embossed in silver
Die cut using the Layering Circles Framelits:
- sentiment
- a scrap of Copper Foil Sheet
Assembled the project:
- skinny tab on one side of the bottle cover adhered to the inside of the other end of the cover with Fast Fuse
- bottle inserted into the cover to make the next step easier:
- folded in one of the bottom tabs, then adhered the opposite tab to it with Fast Fuse, making sure the tabs lined up with each other
- repeated this step for the remaining two pairs of tabs, adhering them all together
- ran a 22″ piece of ribbon through each hole in the top triangles, always front to back, then pulled it tight (not too hard or you’ll tear the paper) and tied a bow
- sentiment adhered onto the Copper circle with Fast Fuse
- adhered sentiment to the cover with Stampin’ Dimensionals
NOTE 1: I prefer to use dry adhesives (like Fast Fuse, Tear & Tape, and Stampin’ Dimensionals) on slick papers like the metallic foils.
NOTE 2: If you’d like to make the cover from solid color card stock, and add panels of DSP to it, each DSP panel should be 1-1/2″ x 7-3/4″.
Here are today’s colors:
You can click on each one to see all the products that come in that color!
Here’s what I used:
Click on the images for more details and to purchase.
Here are some key points to remember:
- Online Extravaganza is happening now through November 26! Click HERE to shop these amazing deals!
- Sale-a-bration Stamp Fest coming January 20. Details and register HERE
- Check out my events calendar HERE
- Stampin’ Blends alcohol markers are now available! Click HERE for more info.
- Hostess Code for the month of November (JBHB42YT)
Find out more about HOW, WHEN and WHY to use the code HERE. - November’s FREE gift: Stitched Felt Embellishments
Find out more HERE. - Gumball Rewards for all orders over $50. Find out more HERE
Thanks for stopping by today, and Sweet Stamping!
Nov 19, 2017 | Blog Hop, Food, Gallery, Gift Wrap, Gifts, Sales |
Woohoo! It’s time for the November edition of the Remarkably Created Blog Tour! This month we’re featuring the new Stampin’ Blends Markers. They come in 12 of your favorite Stampin’ Up! colors (a light and a dark in each color) plus Ivory and Bronze. And there’s a Color Lifter! You can buy them all individually or you can purchase all 27 as a collection.
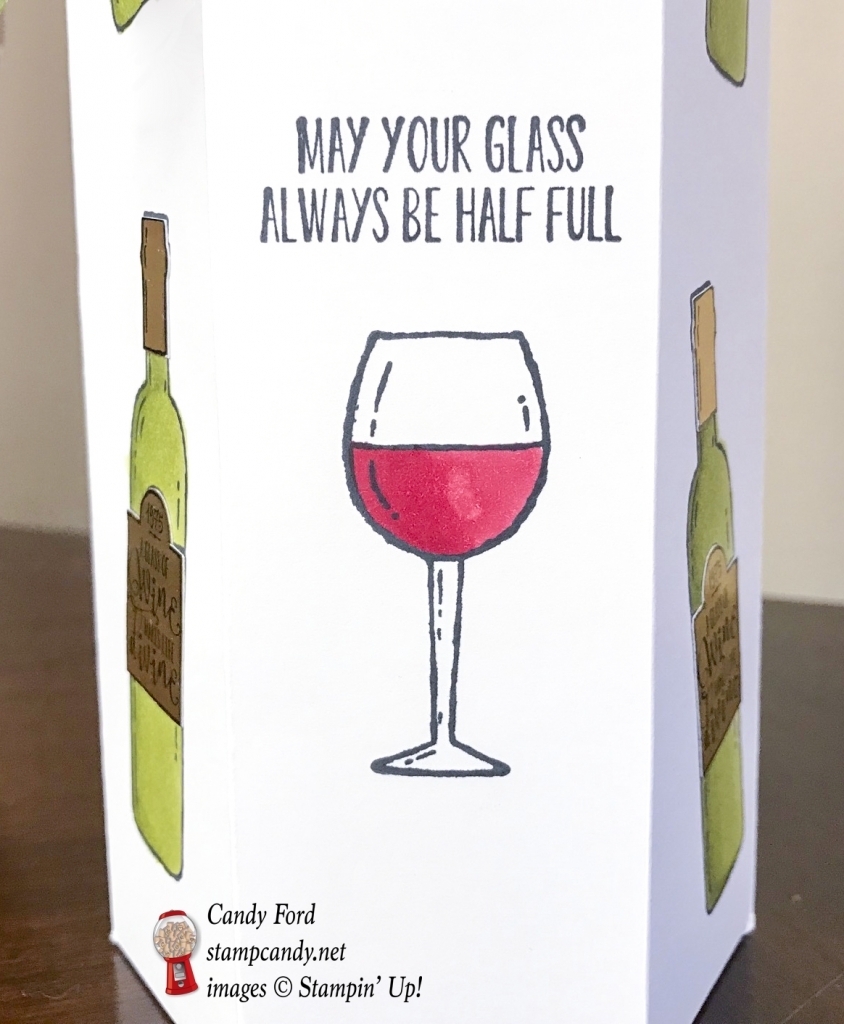
My project today is a cover for a wine bottle. A bottle of wine is such a popular gift to take to a party or a dinner, and of course, you want to give it in something nice. This cover is perfect for year round, any occasion or holiday. And it’s easy!

Half Full stamp set © Stampin’ Up!
Here’s what I made:
front view:

side view: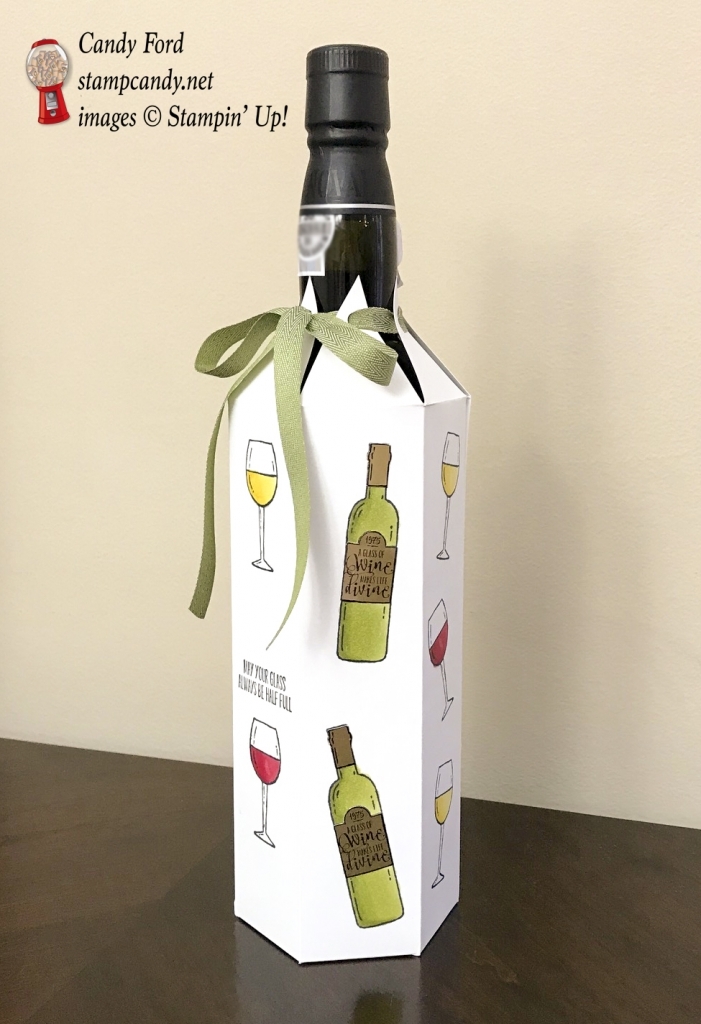
back view:

close up of sentiment:
Here’s what I did:
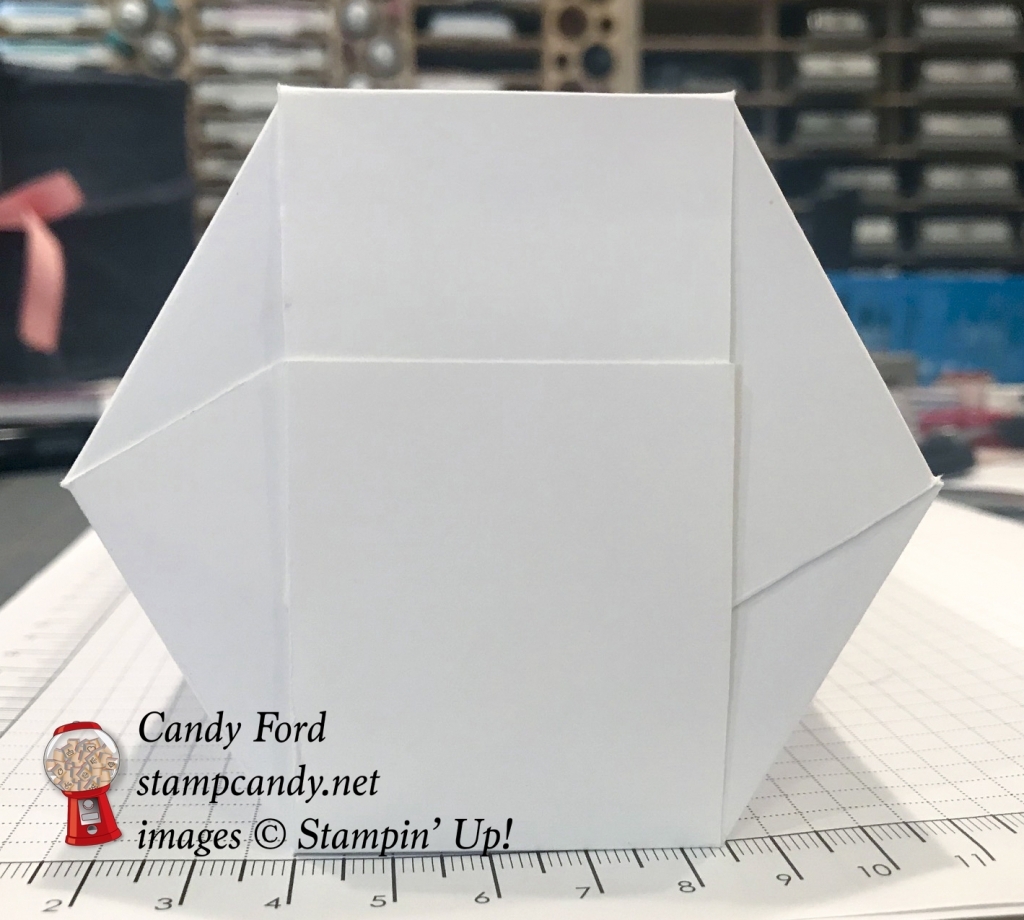
Cut and scored with my Stampin’ Trimmer:
- Whisper White Thick card stock (CS) cut to 11″ x 12″
- scored along the 11″ side at 1-3/4″, 3-1/2″, 5-1/4″, 7″, 8-3/4″, 10-1/2″
- scored along the 12″ side at 2″ and 10″
- burnished all score lines with a Bone Folder
Cut using Paper Snips, according to the diagram:
- removed two smallest rectangles and angled the leftover tab (in blue)
- cut vertical score lines along the bottom just up to the first horizontal score line
- marked along the top side with a pencil at 7/8″, 2-5/8″, 4-3/8″, 6-1/8″, 7-7/8″, and 9-5/8″
- cut from pencil marks to the intersections of the vertical score lines and the first horizontal score line – this cuts away the green areas
- used a 1/4″ circle punch to cut a hole in each triangle, about 1/2″ or so from the top – you may want to use a smaller one, like the 1/8″ Circle Punch, depending on the size of your ribbon
Stamped with the Half Full stamp set:
- bottles, wine glasses, and sentiment in Memento Black ink onto the six largest rectangles of the Whisper White Thick CS cover
- bottles in Archival Basic Clack ink onto a scrap of a Gold Foil Sheet
Fussy Cut using Paper Snips:
- tops and labels of wine bottles stamped on Gold Foil Sheet
Colored using Stampin’ Blends Markers:
- bottles in Old Olive
- wine in glasses in Cherry Cobbler and Daffodil Delight
Assembled the project:
- gold wine bottle tops and labels adhered over the colored wine bottles on the cover, using Fast Fuse

- skinny tab at one side of the cover adhered to the inside of the opposite side, using Fast Fuse
- inserted wine bottle to make the next step easier
- folded in one bottom tab, then glued the opposite tab to it
- rotated the bottle and glued the next pair of tabs, then the last pair.
- NOTE: Do one pair at a time so they line up and create a symmetrical hexagon when you’re through. The only tab that doesn’t get glue is the first one, so it won’t stick to the bottle. All the other tabs are glued to the one(s) above it.

- starting in the front, ran about 22″ ribbon through the holes in the tops of the triangles, always front to back
- ran the ribbon through the first hole again, back to front, then tied a bow, and trimmed the ribbon ends

Here’s the blog tour:
Here are today’s colors:
You can click on each one to see all the products that come in that color!
Here’s what I used:
Click on the images for more details and to purchase.
Online Extravaganza Begins Tomorrow!
with a 24 hour Flash Sale!
The first incredible offering of this promotion is the 24-hour Flash Sale. Select stamp sets will be 20% off for the first 24 hours of Online Extravaganza. Because of the limited time of this sale, I encourage you to stock up on these awesome stamps! The Flash Sale starts November 20 12:00 AM and ends November 20 11:59 PM.
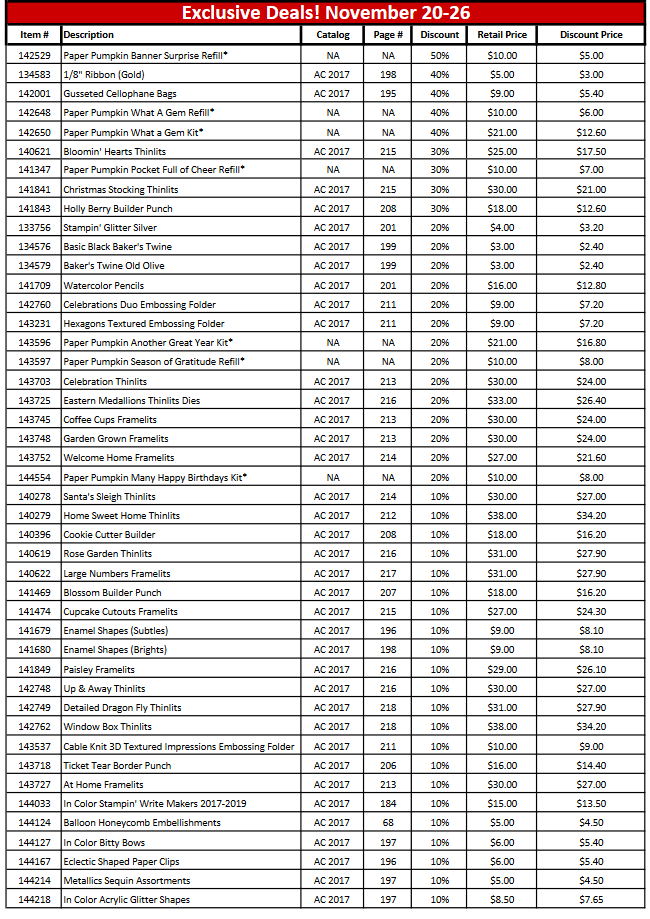
The second chart below shows stamps on sale November 20-26, 2017.
Here are some other key points to remember:
- Stampin’ Blends alcohol markers are now available! Click HERE for more info.
- Online Extravaganza is from November 20-26th – watch for 24hr flash sales!
- Hostess Code for the month of November (JBHB42YT)
Find out more about HOW, WHEN and WHY to use the code HERE. - November’s FREE gift: Stitched Felt Embellishments
Find out more HERE. - Gumball Rewards for all orders over $50. Find out more HERE
Thanks for stopping by today, and Sweet Stamping!