Sep 15, 2020 | Autumn, Boxes, Cards, Fun Folds, Gallery, Gift Wrap, Gifts |
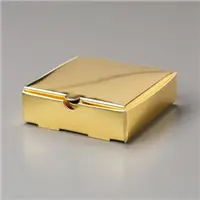
Autumn is almost here, and today’s project is a thank you card that’s all about the season. I used the Beautiful Autumn stamp set and Stitched So Sweetly Dies to create this simple fun fold card. I also made a coordinating little lip balm gift box, which I’ll share with you in a few days (you can see a sneak peek of it below.)
If you are reading this in email, some photos may appear blurry, or may not appear at all. Please click here to see the post on my blog.
S Autumn Autumn Autumn Autumn
Here’s what I made:


S
Here’s what I did:
Cut and scored with my paper trimmer:
- Early Espresso card stock (CS) cut to 5-1/2″ x 8-1/2″, then scored in half at 4-1/4″ and at 7-1/2″
- Gilded Autumn Designer Series Paper (DSP) layer cut to 3″ x 5-1/4″ (speckled)
- speckled DSP layer cut to 1″ x 5-1/4″
- herringbone pattern DSP layer cut to 5-1/4″ tall by 4 pattern stripes wide (just over 3/4″)
- acorn/leaf pattern DSP layer cut to 2-1/2″ x 4-1/4″
- Very Vanilla CS cut to 4″ x 5-1/4″ for the inside of the card base
Stamped with the Beautiful Autumn stamp set:
- sentiment in Versamark ink onto a scrap of Early Espresso CS, then heat embossed in gold
- acorn in Early Espresso ink onto the bottom left corner of the Very Vanilla CS
Cut using the Stitched So Sweetly Dies:
Assembled the card:
- burnished the folds in the card base with a Bone Folder, folding the 1″ section back onto the card front
- larger speckled DSP layer glued onto the front of the card base (left side and under the folded over flap)
- acorn/leaf DSP layer glued onto the speckled DSP layer
- herringbone DSP layer glued onto the flap of the card base
- flap glued down onto the DSP layers
- sentiment glued onto the flap and DSP layers, but not the small part hanging off the right side
- 1″ speckled DSP strip glued onto the right side of the Very Vanilla CS
- Very Vanilla CS glued onto the inside of the card base
- If you prefer, you can skip gluing down the flap, and then only glue the sentiment to the flap, leaving the rest loose. I just felt the card would be easier to photograph if I glued them down.
S
Here are today’s main colors:
You can click on each one to see all the products that come in that color!
S
Here’s what I used:
Click on these images for more details and to purchase. If you are reading this post in email, the product images may not show up. Please click here to see the post on my blog.
Supply List. <— Click for a clickable and printable list of the products!
S
Two ways to save in September!
Buy the Starter Kit and receive even more! It’s already the best deal: $99 for $125 in product of your choice plus Free shipping! In September you will also receive the Queen Anne’s Lace stamp set, the So Much Love stamp set, Rhinestone Basic Jewels, and 16 precut card kits! Wow! This is the perfect time to work on your wish list of Stampin’ Up! products! CLICK HERE for more details.

Buy the new Stampin’ Cut & Emboss Machine (standard size) from me by September 30 and I will give you a Magnetic Cutting Plate FREE! You’ll save almost $30! CLICK HERE for more details and to order.

S
Here are some helpful links:
S
Thanks for stopping by today, and Sweet Stamping!

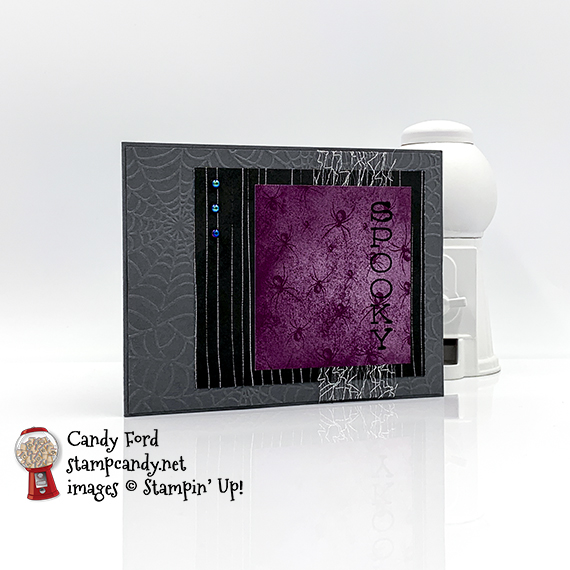
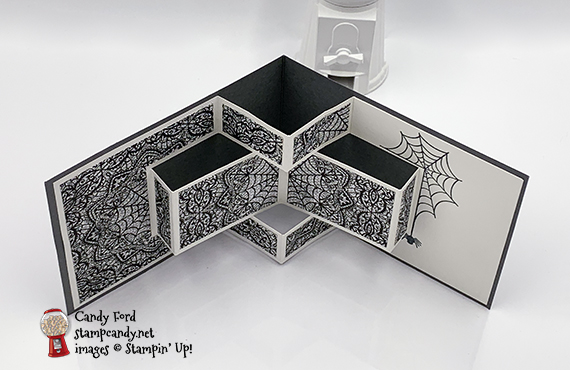
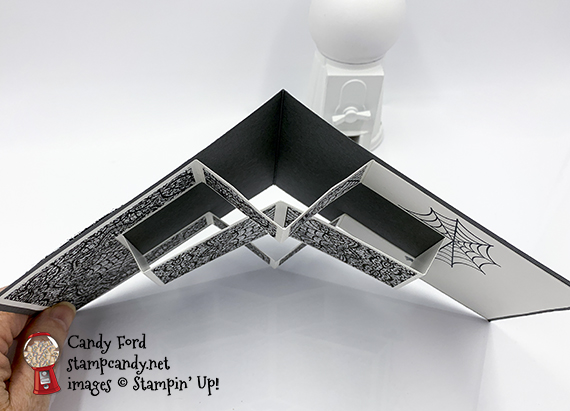
Sep 14, 2020 | Blog Hop, Cards, Fun Folds, Gallery, Halloween, Holiday |

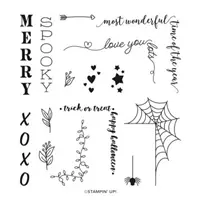
Welcome to the September 2020 Candy Hearts Blog Hop! This month’s theme is Halloween. I used the Festive Corners stamp set, Cobwebs 3D Embossing Folder, and Magic in this Night Designer Series Paper to create a spooky fun 3D Pop Up card.
We have two special guests hopping with us today. One is the amazing and talented Mikaela Titheridge of The Crafty Oink Pen, and I can’t wait to see what she has in store for us. Mikaela has been a member of the prestigious Stampin’ Up! Artisan Design Team, and her projects are always spectacular. She’s also cute as a button! Next, Pam Morris of Tap Tap Stamp, is joining us on a regular basis, and I know she’ll have a super fun project for us. She is one of my Stampin’ Up! uplines, and she’s an absolute hoot and a half!
Be sure to hop around to all the stops, be cause you definitely don’t want to miss any of the projects from this group of terrific stampers!
If you are reading this in email, some photos may appear blurry, or may not appear at all. Please click here to see the post on my blog.
S September 2020 Candy Hearts September 2020 Candy Hearts September 2020 Candy Hearts September 2020 Candy Hearts
Here’s what I made:

S
Here’s what I did:
Cut and scored with my paper trimmer:
- Basic Gray card stock (CS) cut to 11″ x 4-1/4″, then scored in half at 5-1/2″
- Basic Gray CS layer cut to 5-3/8″ x 4-1/8″
- Magic in this Night Designer Series Paper (DSP) layer cut to 4″ x 3-1/2″ (stripes)
- DSP layer cut to 2-3/4″ x 3″ (spiders)
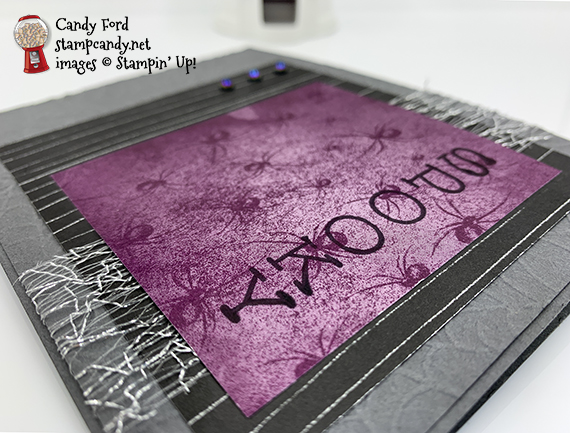
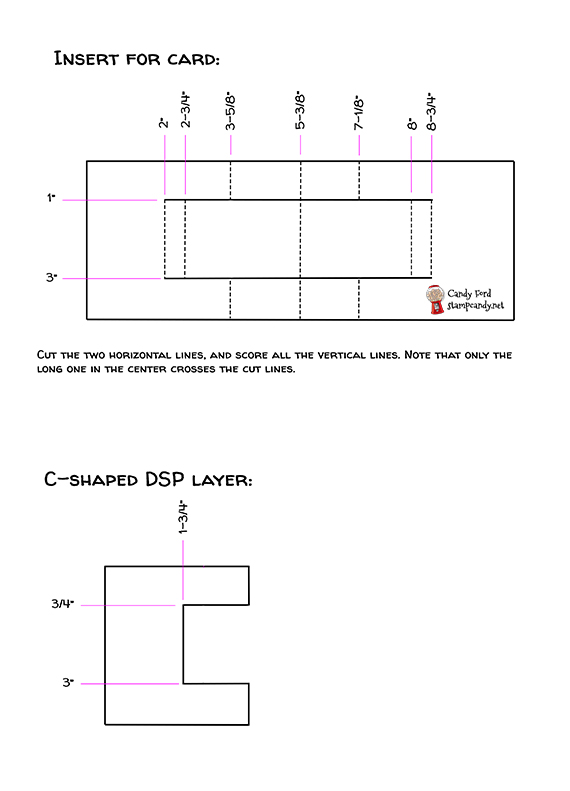
- Whisper White Thick CS cut to 5-1/2″ x 8-1/2″, then cut and scored according to the diagram below
- DSP (cobwebs) cut to 2-3/8″ x 1-3/4″ (2 pieces), to 1-1/2″ x 3/4″ (4 pieces), and to 1/2″ x 1-3/4″ (2 pieces)
- DSP (cobwebs) cut to 3-3/8″ x 3-3/4″ (1 piece) then cut into a C shape according to the diagram below
Stamped with the Festive Corners stamp set:
- sentiment in Memento Tuxedo Black ink onto the spider DSP layer (I used my Stamparatus to stamp it a couple of times so it would be nice and dark.)
- cobweb in Memento Tuxedo Black ink onto the Whisper White Thick CS around the farthest right cut/score line
- spider in Memento Tuxedo Black ink hanging from the cobweb
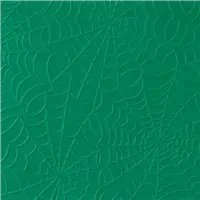
Embossed using the Cobwebs 3D Embossing Folder:
Assembled the card:
- burnished the fold in the card base, and all the folds in the Whisper White Thick CS, with a Bone Folder
- striped DSP layer glued onto the embossed Basic Gray CS layer
- Metallic Mesh ribbon wrapped around both layers and adhered onto the back using Stampin’ Seal +
- Basic Gray CS layer glued onto the front of the card base
- spider DSP layer glued onto the striped DSP layer over the ribbon
- 3 Iridescent pearls applied onto the striped DSP layer (I like to use the pointy end of the Take Your Pick tool.)
- center score line of the Whisper White Thick CS lined up with the score line in the card base, then the C-shaped areas at both ends glued onto the inside of the card base
- cobwebs DSP pieces glued onto their corresponding scored areas of the Whisper White Thick CS
S
Here’s the September 2020 Candy Hearts Blog Hop:
Thank you for hopping with the Hearts today! Be sure to hop around to all the stops. You do not want to miss any of the creativity in this talented group of stampers!
S
Here are today’s colors:
You can click on each one to see all the products that come in that color!
S
Here’s what I used:
Click on these images for more details and to purchase. If you are reading this post in email, the product images may not show up. Please click here to see the post on my blog.
Supply List. <— Click for a clickable and printable list of the products!
S
Two ways to save in September!
Buy the Starter Kit and receive even more! It’s already the best deal: $99 for $125 in product of your choice plus Free shipping! In September you will also receive the Queen Anne’s Lace stamp set, the So Much Love stamp set, Rhinestone Basic Jewels, and 16 precut card kits! Wow! This is the perfect time to work on your wish list of Stampin’ Up! products! CLICK HERE for more details.
Buy the new Stampin’ Cut & Emboss Machine (standard size) from me by September 30 and I will give you a Magnetic Cutting Plate FREE! You’ll save almost $30! CLICK HERE for more details and to order.
S
Here are some helpful links:
S
Thanks for stopping by today, and Sweet Stamping!
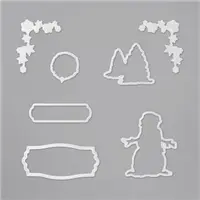
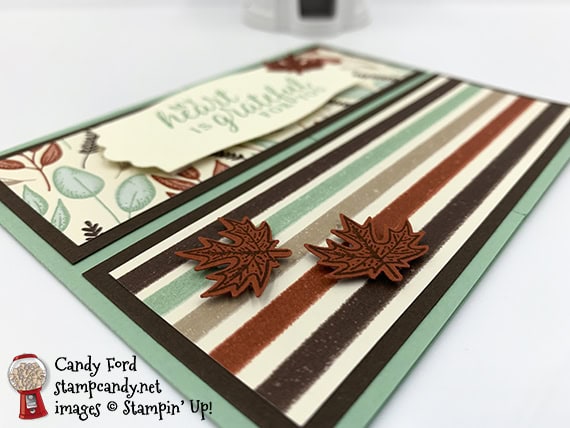
Sep 11, 2020 | Autumn, Cards, Fun Folds, Gallery |
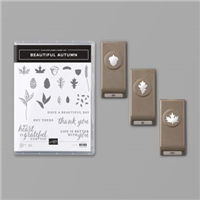
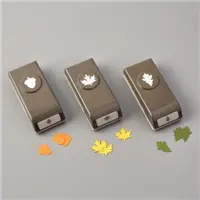
For today’s gate fold card, I used the Beautiful Autumn Bundle (Beautiful Autumn stamp set and Autumn Punch Pack,) Snow Time Dies, and Gilded Autumn Designer Series Paper. It’s a simple fun fold, or fancy fold, that packs a lot of punch for little effort.
If you are reading this in email, some photos may appear blurry, or may not appear at all. Please click here to see the post on my blog.
S beautiful beautiful beautiful beautiful
Here’s what I made:
S
Here’s what I did:
Cut and scored with my paper trimmer:
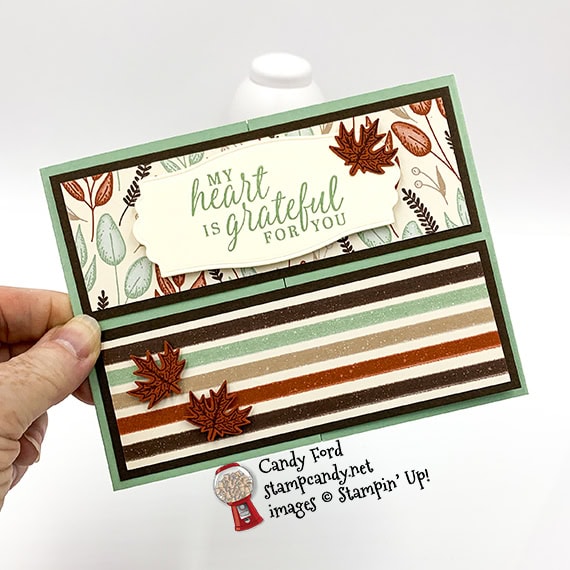
- Mint Macaron card stock (CS) cut to 11″ x 4-1/4″, then scored at 2-3/4″ and 8-1/4″
- 2 Early Espresso CS layers cut to 5-1/4″ x 1-7/8″
- 2 Gilded Autumn Designer Series Paper (DSP) layers cut to 5″ x 1-5/8″
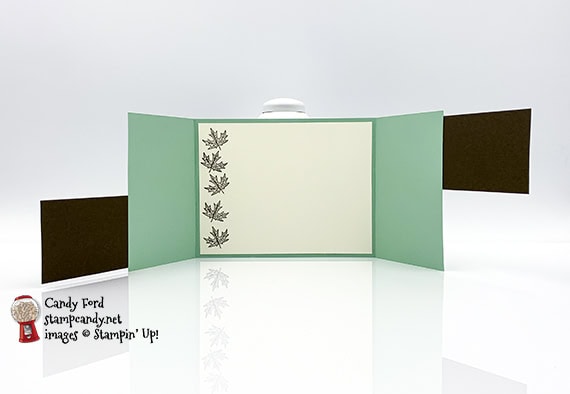
- Very Vanilla CS cut to 5-1/4″ x 4″ for the inside of the card base
Stamped with the Beautiful Autumn stamp set:
- sentiment in Mint Macaron ink onto a scrap of Very Vanilla Thick CS
- 3 leaves in Early Espresso ink onto a scrap of Cajun Craze CS
- 5 leaves in Early Espresso ink onto the Very Vanilla CS for the inside
Cut using the Autumn Punch Pack:
- the 3 stamped leaves on Cajun Craze CS
Cut using the Snow Time Dies:
Assembled the card:
- burnished the folds in the card base with a Bone Folder
- the 2 Early Espresso CS layer lined up on the front of the closed card, then the right end of the top one glued only on the right, and the left end of the bottom glued only on the left
- DSP layers glued onto the Early Espresso CS layers
- die cut sentiment adhered onto the top DSP layer using Stampin’ Dimensionals
- one punched leaf glued onto the sentiment
- 2 punched leaves adhered onto the bottom DSP layer using Mini Stampin’ Dimensionals
- Very Vanilla CS glued onto the inside of the card base
S
Here are today’s colors:
You can click on each one to see all the products that come in that color!
S
Here’s what I used:
Click on these images for more details and to purchase. I appreciate your business! If you are reading this post in email, the product images may not show up. Please click here to see the post on my blog.
Supply List. <— Click for a clickable and printable list of the products!
S
Two ways to save in September!
Buy the Starter Kit and receive even more! It’s already the best deal: $99 for $125 in product of your choice plus Free shipping! In September you will also receive the Queen Anne’s Lace stamp set, the So Much Love stamp set, Rhinestone Basic Jewels, and 16 precut card kits! Wow! This is the perfect time to work on your wish list of Stampin’ Up! products! CLICK HERE for more details.
Buy the new Stampin’ Cut & Emboss Machine (standard size) from me by September 30 and I will give you a Magnetic Cutting Plate FREE! You’ll save almost $30! CLICK HERE for more details and to order.
S
Here are some helpful links:
S
Thanks for stopping by today, and Sweet Stamping!
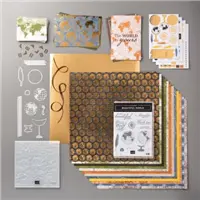
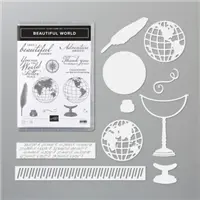
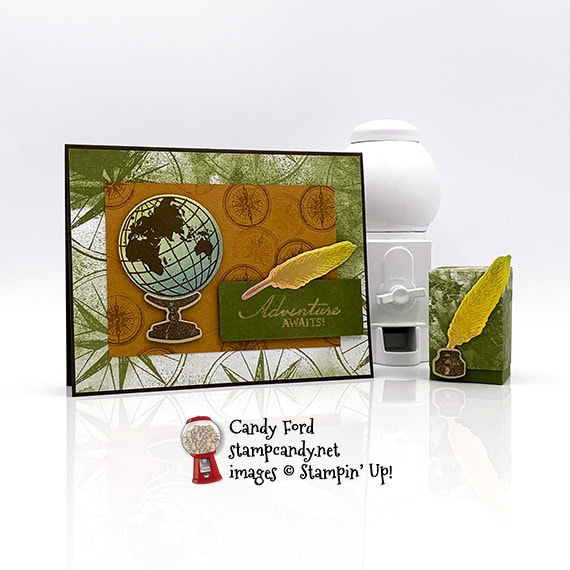
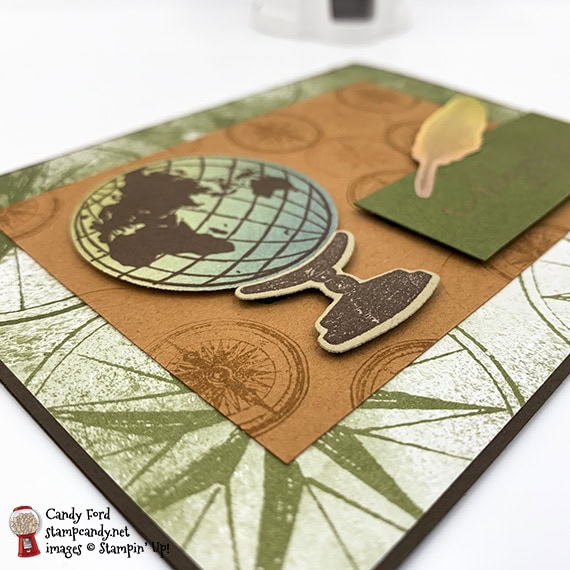
Sep 10, 2020 | Blog Hop, Boxes, Cards, Gallery, Techniques |

Welcome to the September 2020 OSAT Blog Hop! This month’s theme is You’ve Got This, so we’re featuring projects celebrating empowerment and encouragement for a new job, new school year, or any other new challenge. I used products from the World of Good Suite Collection for my projects today: a card and a small treat box. I also used a makeup brush blending technique that my Candy Hearts team member Lisa Graham demonstrated at our last team meeting.
Be sure to hop around to all the stops, to see all the great projects this group has in store for you today!
If you are reading this in email, some photos may appear blurry, or may not appear at all. Please click here to see the post on my blog.
S September 2020 OSAT September 2020 OSAT September 2020 OSAT
Here’s what I made:

S
Here’s what I did:
Cut and scored with my paper trimmer:
- Early Espresso card stock (CS) cut to 5-1/2″ x 8-1/2″, then scored in half at 4-1/4″
- World of Good Designer Series Paper (DSP) layer cut to 5-3/8″ x 4-1/8″
- Cinnamon Cider CS layer cut to 4-1/4″ x 3″
- Mossy Meadow CS layer cut to 2-3/4″ x 1″
- Whisper White CS cut to 5-1/4″ x 4″ for the inside of the card base
- Mossy Meadow CS cut to 5-1/4″ x 3-1/4″, scored along the long side at 1-1/4″, 2-1/2″, 3-3/4″, 5″, and scored along the short side at 1-1/4″ for the box
- DSP cut to 4-13/16″ x 4-13/16″ and scored 1-3/4″ from all four edges for the lid
Colored/blended using a makeup brush:
- a scrap of Whisper White Thick CS in Early Espresso, Cinnamon Cider, Bumblebee, Mossy Meadow, and Misty Moonlight inks
- CLICK HERE to see the makeup brush I used. There are many others that I’m sure would be just as good. I wanted a big one, so I got the 2X-Large size.
- I forgot to take a photo until after I had cut out a couple pieces. My blending skills aren’t as good as Lisa’s, but I think you can get the idea.
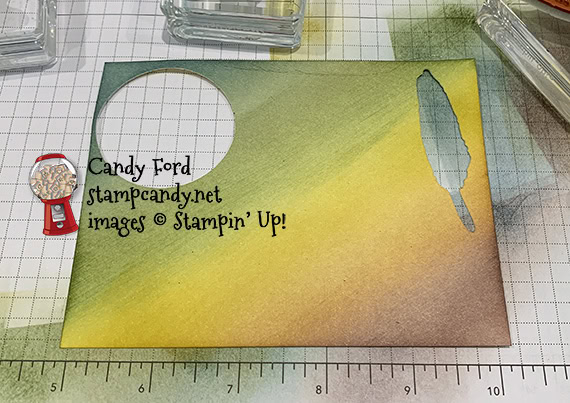
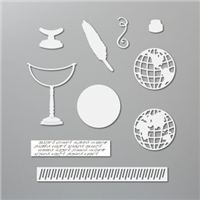
Stamped with the Beautiful World stamp set:
- globe in Early Espresso ink onto the blue/green area of the blended CS (I wanted to make sure I got good ink coverage on the globe, so I used my Stamparatus to stamp it 2 or 3 times times.)
- 2 feathers in Crumb Cake ink onto the yellow/brown area of the blended CS
- globe stand and ink well in Early Espresso ink onto a scrap of Crumb Cake CS
- sentiment in Versamark ink onto the small Mossy Meadow CS layer, then heat embossed in gold
- small globe in Cinnamon Cider ink all over the Cinnamon Cider CS layer
Cut using the World Map Dies:
- globe, globe stand, inkwell, and 2 feathers
Assembled the card:
- burnished the fold in the Early Espresso card base with a Bone Folder
- DSP layer glued onto the front of the card base
- Cinnamon Cider CS layer glued onto the the DSP layer
- globe and stand adhered onto the Cinnamon Cider CS layer using Black Stampin’ Dimensionals
- end of a feather glued onto the sentiment, then both adhered onto the card front using Black Stampin’ Dimensionals
- Whisper White CS glued onto the inside of the card base
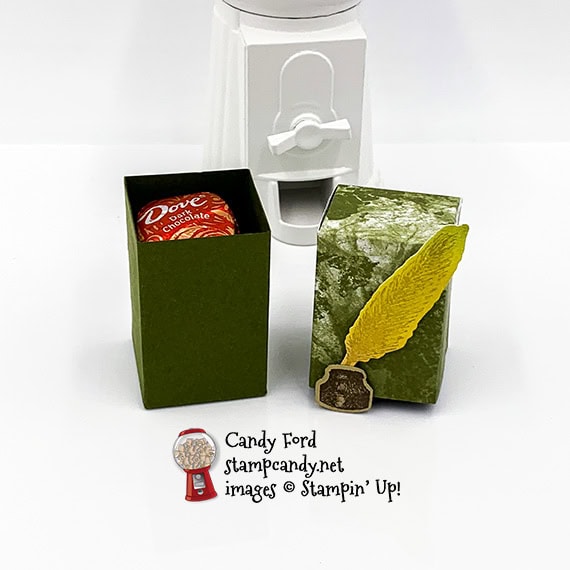
Assembled the box:
- burnished the folds in the box and lid with a Bone Folder, and cut according to the diagram using Paper Snips
- tab on box glued onto the inside of the opposite end
- 1 bottom tab folded up, then the other 3 tabs glued in place
- The box is 1-1/4″ square by 2″ high, and fits 4 stacked Dove promises perfectly
- side tabs of DSP lid folded in and glued together, then the skinny tab folded down and glued onto the top one – did this on both sides
- NOTE: I put the lid on the box before gluing the sides, to make sure it wasn’t too snug.
- The lid is 1-5/16″ square by 1-3/4″ high.
- tip of second feather glued onto the back of the inkwell, then both adhered onto the front of the box lid using Black Stampin’ Dimensionals
S
Here’s the September 2020 OSAT Blog Hop:
Here are today’s colors:
You can click on each one to see all the products that come in that color!
S
Here’s what I used:
Click on these images for more details and to purchase. If you are reading this post in email, the product images may not show up. Please click here to see the post on my blog.
Supply List. <— Click for a clickable and printable list of the products!
S
Here are some helpful links:
S
Thanks for stopping by today, and Sweet Stamping!
Sep 8, 2020 | Blog Hop, Cards, Fun Folds, Gallery, Techniques |

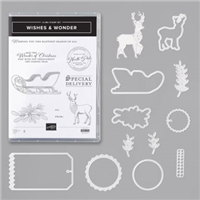
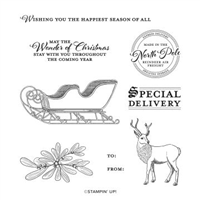
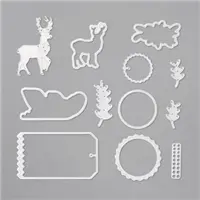
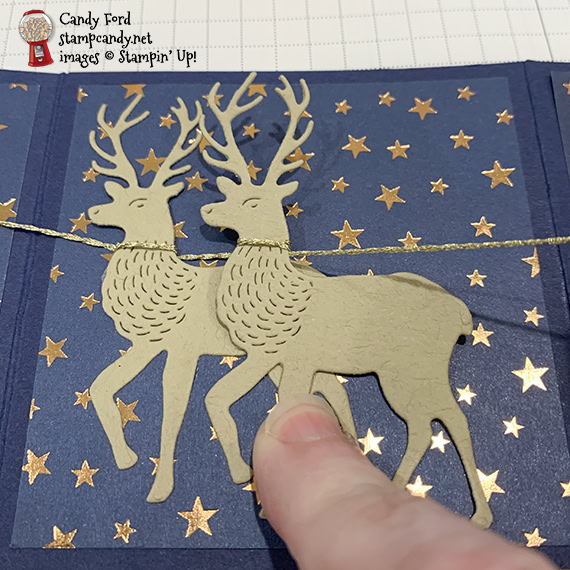
Welcome to the September 2020 ICS Blog Hop! This month’s theme is Mini Catalog Fun Folds. I made an accordion fold card that fits into a Mini Pizza Box. I used the Wishes & Wonder Bundle (Wishes & Wonder stamp set and North Pole Wonder Dies,) along with the Stitched Rectangle Dies, Stitched Shapes Dies, Brightly Gleaming Designer Series Paper, and Forever Gold Laser-Cut Specialty Paper, to create a long skinny card with Santa’s sleigh and eight tiny reindeer, plus Rudolph who has a Red Rhinestone for his nose.
Be sure to hop all the way around to all the stops because you don’t want to miss any of the great fun fold projects this group has for you today.
If you are reading this in email, some photos may appear blurry, or may not appear at all. Please click here to see the post on my blog.
S September 2020 ICS September 2020 ICS September 2020 ICS September 2020 ICS https://bit.ly/34ibSpX. https://stampcandy.net/blog-hop/september-2020-ics-blog-hop-fun-folds/
Here’s what I made:
The box: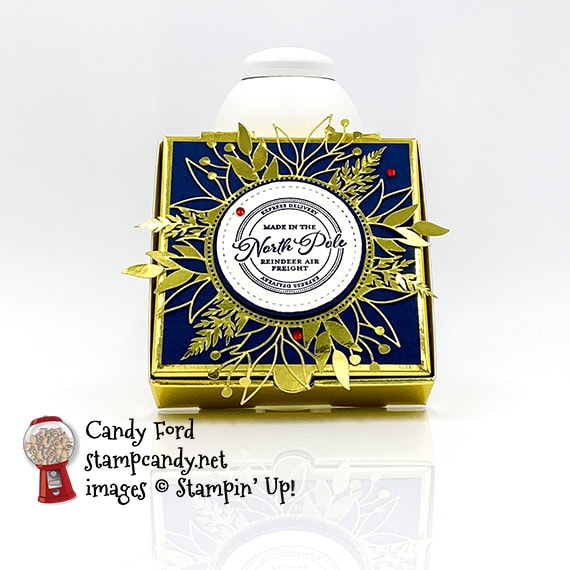
The card front: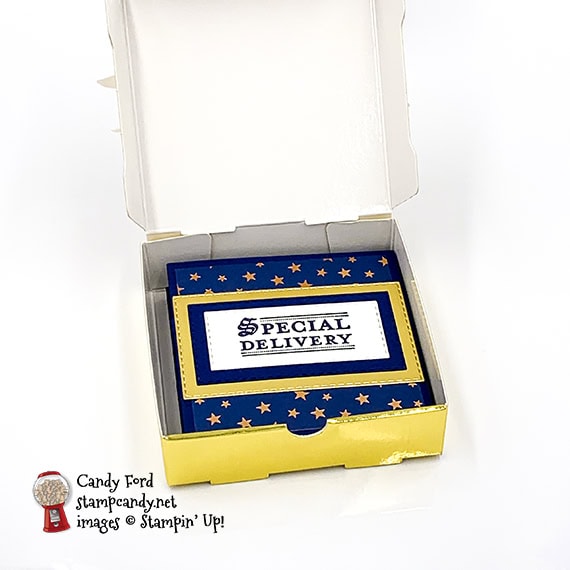
Pulling the card out of the box:
Inside the card: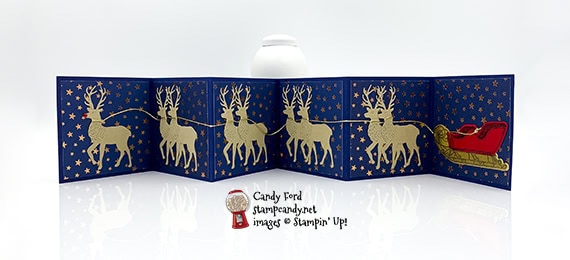
Rudolph leads the way: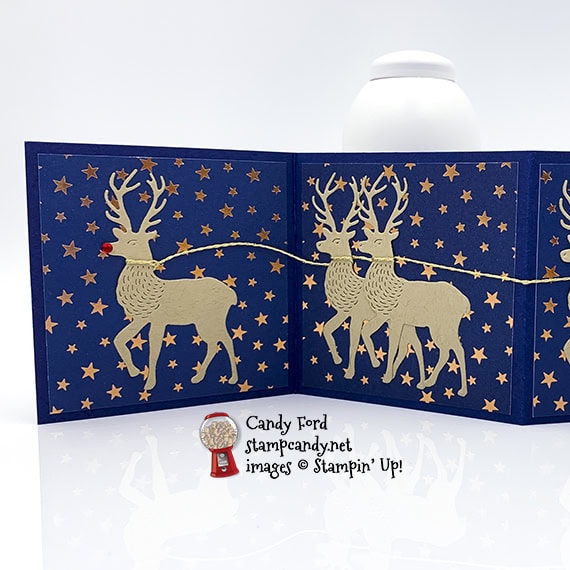
Sleigh ready for Santa and his toy sack:
Back of card: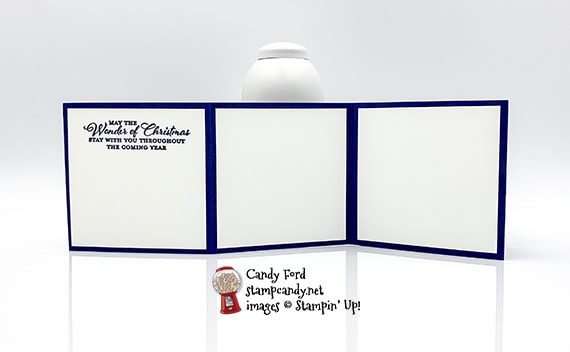 S
S
Here’s what I did:
Cut and scored with my paper trimmer:
- Night of Navy card stock (CS) cut to 11″ x 3-1/4″, then scored at 3-1/4″, 6-1/2″, and 9-3/4″
- Night of Navy card stock (CS) cut to 9-3/4″ x 3-1/4″, then scored at 3-1/4″ and 6-1/2″
- Brightly Gleaming Designer Series Paper (DSP) layers cut to 3″ x 3″ (7 pieces)
- Whisper White CS layers cut to 3″ x 3″ (3 pieces)
- Night of Navy CS cut to 3-1/4″ x 3-1/4″ for the top of the box
Stamped with the Wishes & Wonder stamp set:
- card front sentiment in Night of Navy ink onto a scrap of Whisper White Thick CS
- card back sentiment in Night of Navy ink onto one of the Whisper White CS layers
- box top sentiment in Night of Navy ink onto a scrap of Whisper White Thick CS
- sleigh in Jet Black Stazon ink onto a scrap of Gold Foil Sheet
- sleigh in Jet Black Stazon ink onto a scrap of Real Red CS
Cut using the North Pole Wonder Dies:
- the two stamped sleighs
- 9 reindeer from scraps of Crumb Cake CS
Cut using the Stitched Rectangle Dies:
- sentiment for the card front
- scrap of Night of Navy CS larger than the sentiment
- scrap of Gold Foil Sheet larger than the Night of Navy piece
Cut using the Stitched Shapes Dies:
- sentiment for the box top
Cut using the 2″ Circle Punch:
- scrap of Night of Navy CS
Cut using Paper Snips:
- cut away the rails from the Real Red CS sleigh
Assembled the card:
- burnished the folds in the two long Night of Navy CS pieces with a Bone Folder
- smallest section of the 11″ piece glued onto one end of the 9-3/4″ piece, to create a 19-1/2″ x 3-1/4″ accordion card base, with 6 3-1/4″ square sections
- 6 DSP layers glued onto the 6 sections on one side of the card base
- remaining DSP layer glued onto the front of the card base
- 3 Whisper White CS layers glued onto the back of the card base
- Stampin Seal+ applied onto the back of the first reindeer’s neck
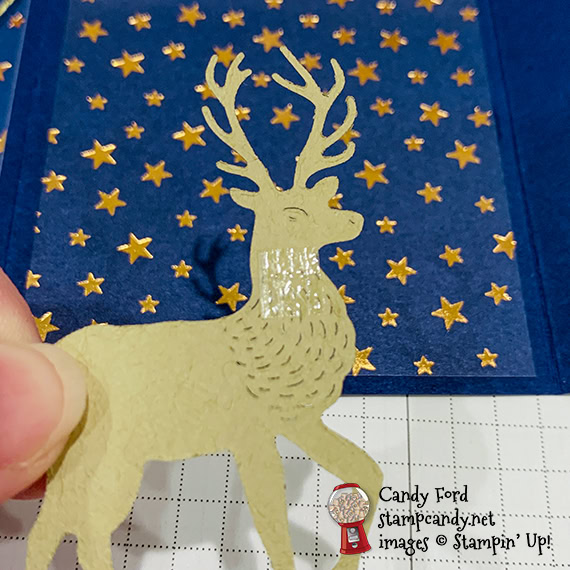
- Gold Twine tied around the reindeer’s neck, then the reindeer glued onto the first DSP layer
- Stampin Seal+ applied onto the back of the next reindeer’s neck, the twine looped around the neck, then the reindeer glued onto the second DSP layer
- continued adding reindeer, looping the twine around each neck and gluing them onto the DSP layers
- NOTE: Don’t pull the twine too tight between the reindeer. Lay the reindeer where it needs to go, then loop the twine around its neck and stick it to the Stampin’ Seal+ on the back (see photo below.) Then carefully turn over the reindeer to apply glue onto the back. Make sure to glue down all the points of the antlers so they don’t get tangled with the others when the card is closed.
- red sleigh pieces adhered onto the gold sleigh using Stampin’ Seal+
- sleigh adhered onto the last DSP layer using Stampn’ Seal+, with the twine under the front rail
- knot tied in the end of the twine to keep it from raveling
- twine adhered onto the sleigh using one tiny strip of Stampn’ Seal+ (I used my Take Your Pick tool to remove just one strip from the adhesive and place it on the sleigh.)
- Red Rhinestone applied onto the first reindeer’s nose
- sentiment for card front glued onto the Night of Navy CS die cut rectangle
- Night of Navy CS die cut rectangle adhered onto the gold foil die cut rectangle using Stampin’ Seal+
- gold rectangle adhered onto the DSP layer on the card front using Stampin’ Seal+
Assembled the box:
- burnished the folds in the box and folded it to assemble
- adhered the 2 back tabs to the back of the box using Stampin’ Seal+
- 3-1/4″ Night of Navy CS square layer adhered onto the top of the box using Stampin’ Seal+
- gold accent adhered onto the Night of Navy CS layer using Stampin’ Seal+
- box sentiment glued onto the punched Night of Navy CS circle
- Night of Navy CS circle adhered onto the center of the gold accent using Black Stampin’ Dimensionals
- 3 Red Rhinestones applied randomly onto the box top
S
Here’s the September 2020 ICS Blog Hop:
Click on the next button below to hop to the next stop, Charmane Hopkins of Renee’s Paper Treasures:
.

S
Here are today’s colors:
You can click on each one to see all the products that come in that color!
S
Here’s what I used:
Click on these images for more details and to purchase. If you are reading this post in email, the product images may not show up. Please click here to see the post on my blog.
Supply List. <— Click for a clickable and printable list of the products!
S
Here are some helpful links:
S
Thanks for stopping by today, and Sweet Stamping!
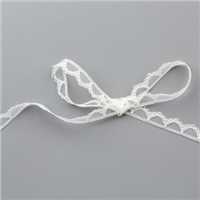
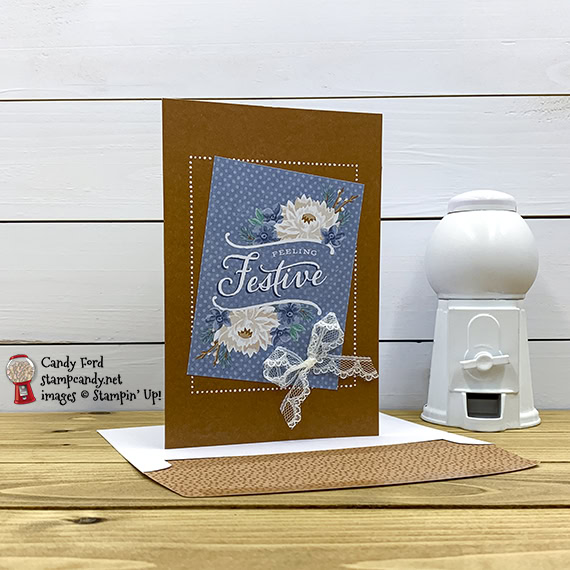
Sep 8, 2020 | Cards, Gallery |
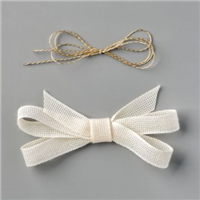
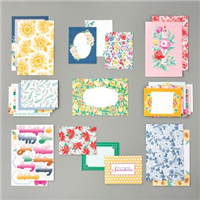
It is so easy to make pretty cards with the Flowers for Every Season Memories & More Card & Envelopes and Card Pack – you just stick one onto the other and you’re done! I’ve added extra interest to today’s project by angling the card on the front and adding a bow made with Very Vanilla Scalloped Lace Trim. It was done in no time!
If you are reading this in email, some photos may appear blurry, or may not appear at all. Please click here to see the post on my blog.
S lace trim lace trim lace trim lace trim
Here’s what I made:
S
Here’s what I did:
Assembled the card:
- burnished the fold in the Cinnamon Cider card base with a Bone Folder
- 3″ x 4″ M&M card glued onto the front of the card base, at an angle
- lace trim tied in a bow and adhered onto the M&M card using a glue dot
- That’s it!
S
Here are today’s colors:
You can click on each one to see all the products that come in that color!
S
Here’s what I used:
Click on these images for more details and to purchase. If you are reading this post in email, the product images may not show up. Please click here to see the post on my blog.
Supply List. <— Click for a clickable and printable list of the products!
S
Here are some helpful links:
S
Thanks for stopping by today, and Sweet Stamping!