You know how much I like making cute boxes, right? Well, today I’m sharing a great one. It’s all gold and silver and shiny, and it’s the perfect gift box to give something special to someone special. And it’s really quick and easy. I made it with Year of Cheer Suite and the Labels to Love stamp set.
Here’s what I made:
Here’s what I did:
Cut and scored with my Stampin’ Trimmer:
Whisper White Thick card stock (CS) cut to 8-1/2″ x 8-1/2″, then scored 1-3/4″ from each of the four edges
Year of Cheer Specialty Designer Series Paper (DSP) cut to 7-1/16″ x 7-1/16″, then scored 1″ from each of the four edges
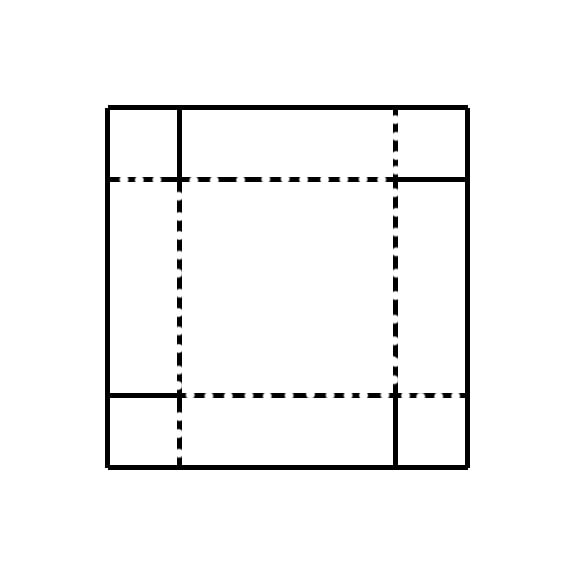
These two pieces should look something like this. Dotted lines are folded and solid lines are cut.
Stamped with the Labels to Love stamp set:
tag border and To/From in Versamark ink onto the back of a piece of Gold Foil Sheet, then heat embossed in gold
Punched using the Everyday Label punch:
heat embossed tag
a piece of Gold Foil Sheet
Punched using the 1/16″ Circle Punch:
the top end of each of the tags
Punched using the 1″ Circle Punch:
a piece of Gold Foil Sheet
Punched using the 2″ Circle Punch:
piece of Whisper White CS
Assembled the box:
for the box and the lid: cut one score line at each corner, fold up each side, and adhere the tab inside the adjacent side
wrapped box once in Silver Edged Ribbon, then adhered ends of ribbon together with Tear & Tape (not adhered to the box)
adhered the 2″ circle to the bottom side of the the overlapping part of the ribbon with Tear & Tape
adhered a Silver Foil Snowflake to top of the 2″ circle and ribbon with Tear & Tape
adhered the 1″ gold foil circle to the center of the snowflake with Tear & Tape
Metal Rimmed Pearl adhered to the center of the 1″ gold foil circle
tied tags to the ribbon using Gold Thread
Since the ribbon isn’t adhered to the box, you can slide it off to fill the box, then slide it back on.
Here are today’s colors:
You can click on each one to see all the products that come in that color!
Click on the images for more details and to purchase.
Here are some key points to remember:
Designer Series Paper Sale October 1-31, Buy 3 Get 1 FREE! See details HERE.
Hostess Code for the month of October (HGB2HGXK) Find out more about HOW, WHEN and WHY to use that HERE.
October’s FREE gift Mini Pizza Boxes Find out more HERE.
New Merry Patterns Hostess Stamp Set – added to your Host Rewards There’s a brand new stamp set that isn’t in any catalog. You can’t buy it, but you can get if for free with a qualifying order! You can host a party, or place your own order, or join under me and get a 20% discount on your demonstrator order. Find out more HERE.
Gumball Rewards for all orders over $50 Find out more HERE.
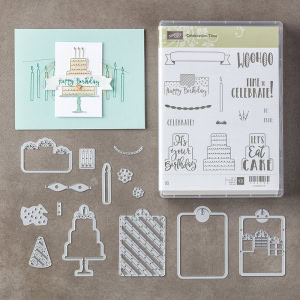
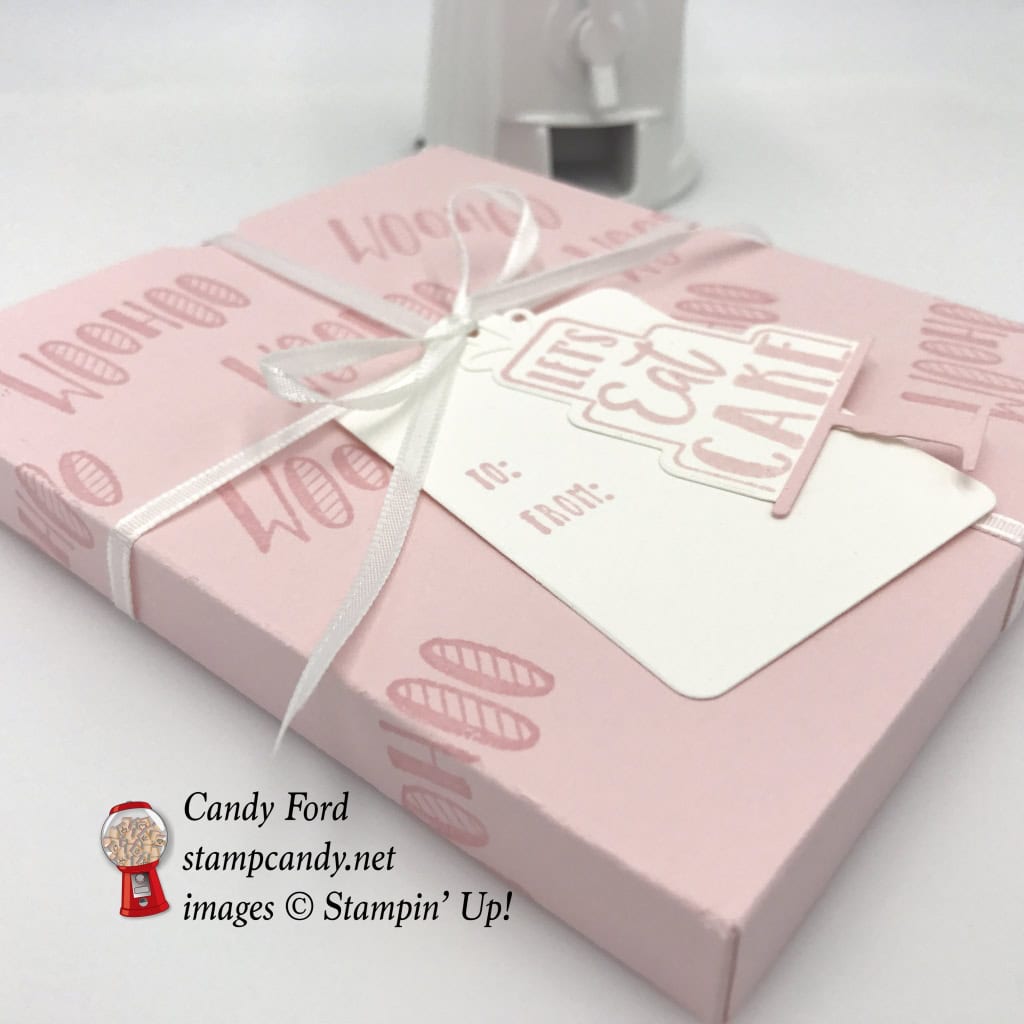
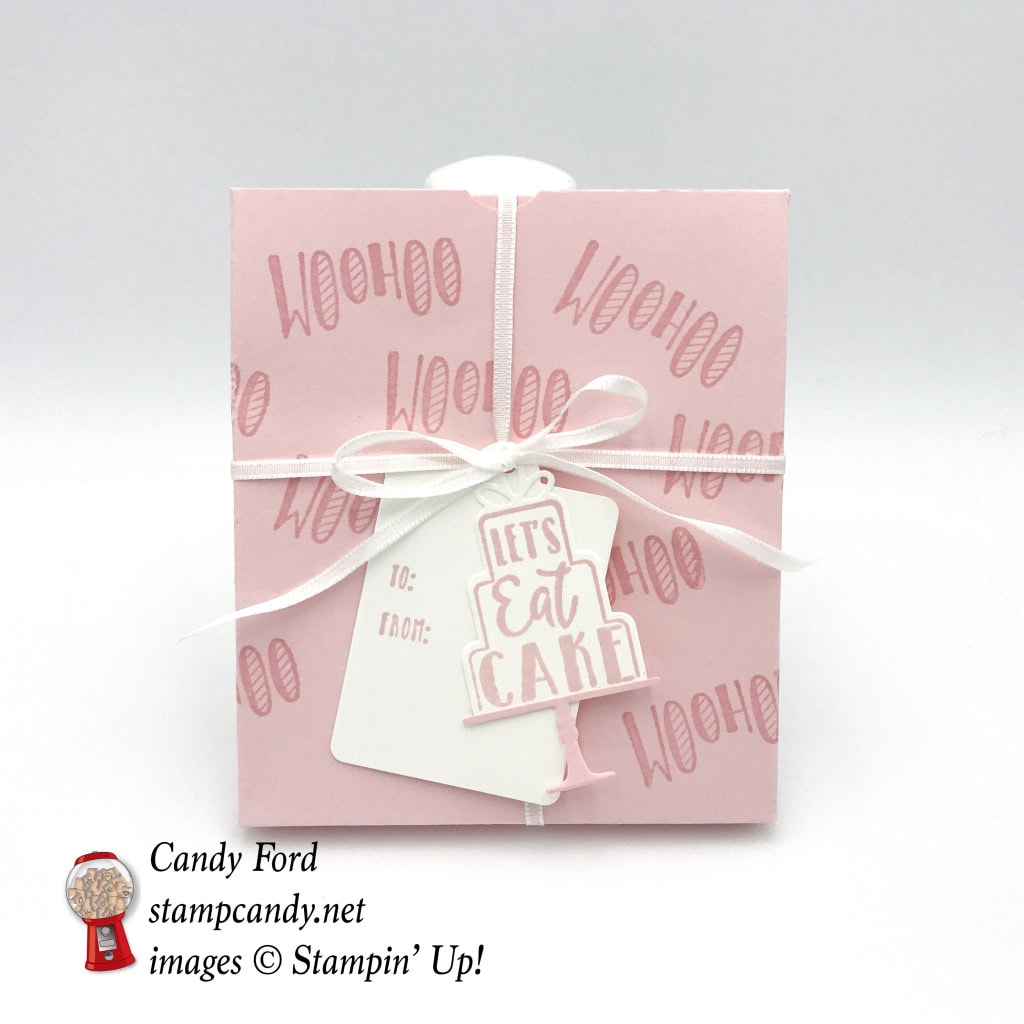
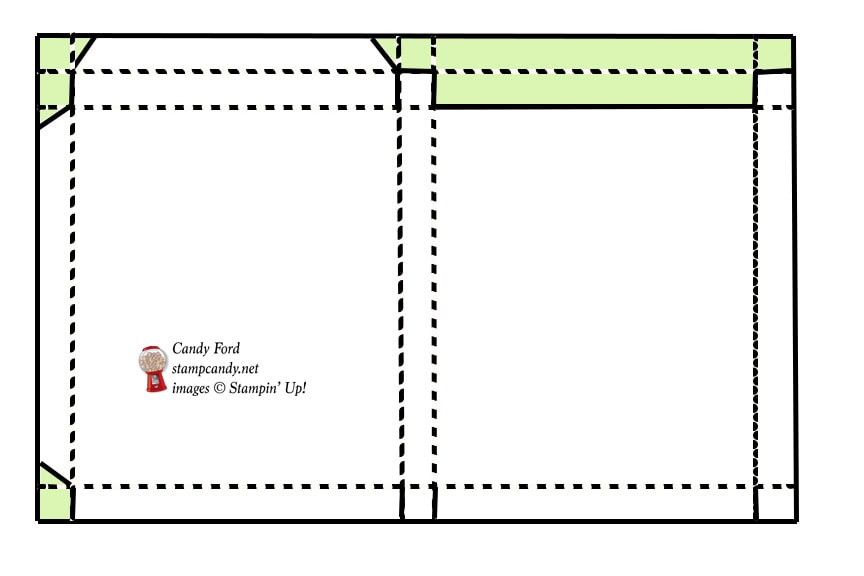
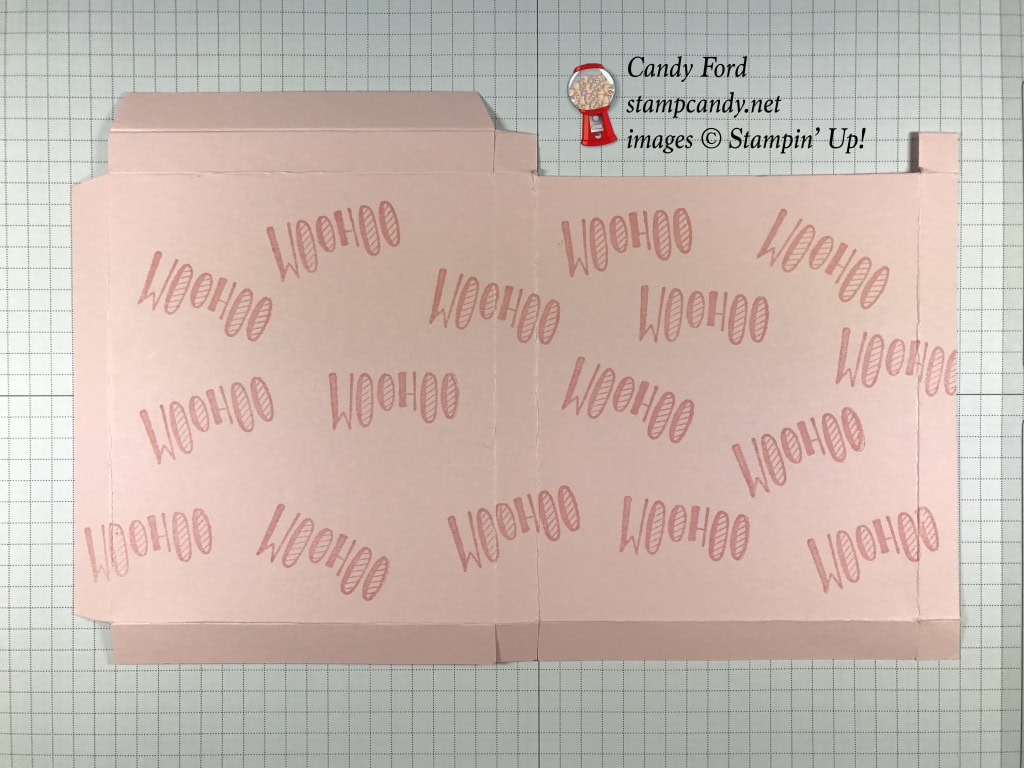
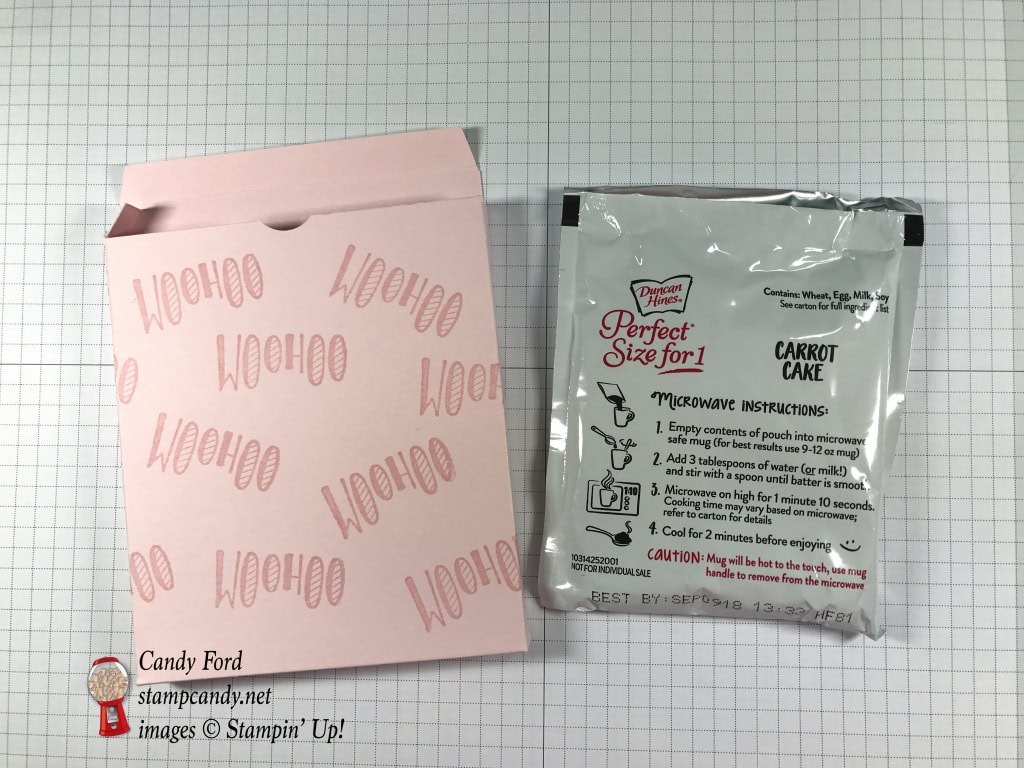
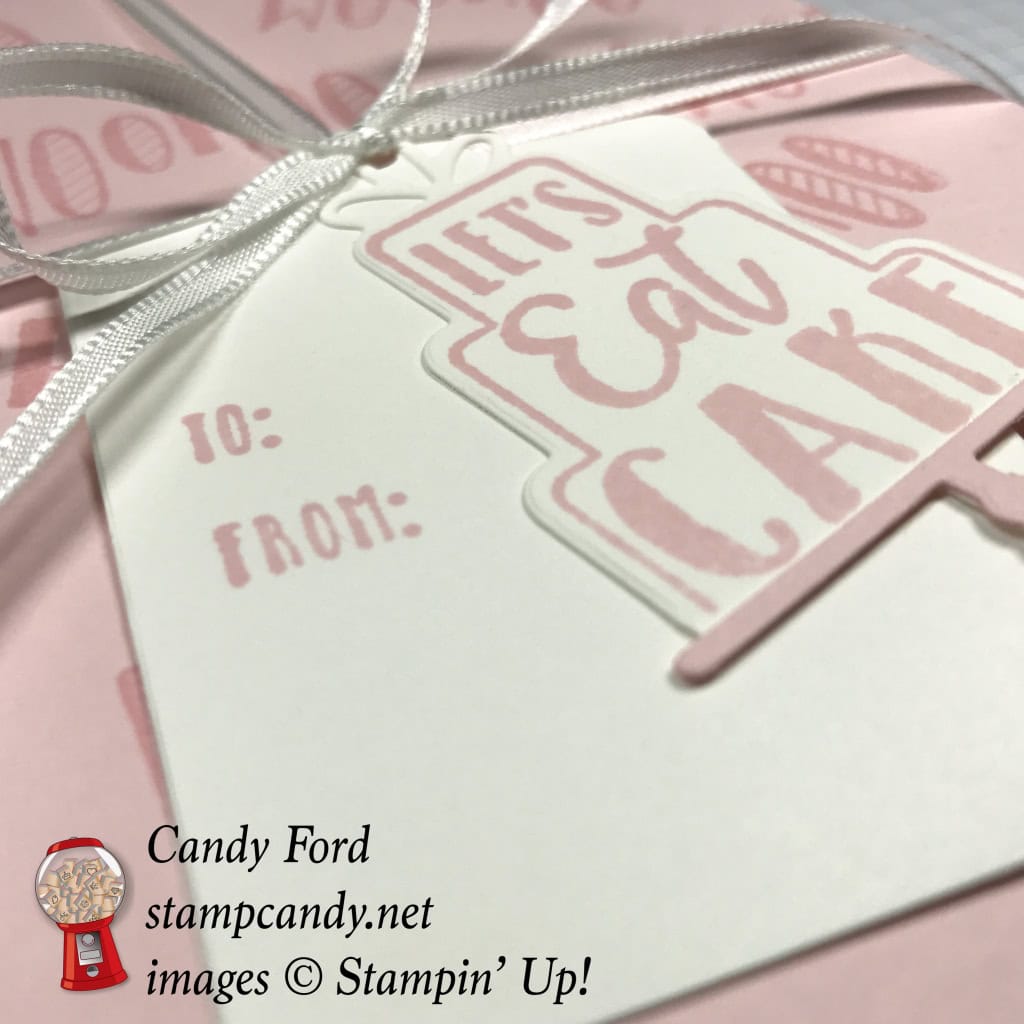
Mug Cakes are very popular now. I mean, what’s not to love? You pour the mix in a mug, stir in water or milk, and microwave it. Let it cool a couple minutes and you’ve got cake! Today I’m sharing packaging I made to hold one of these yummy pre-made cake mix pouches. I used the Celebration Time Bundle (Celebration Time stamp set and Celebration Thinlits Dies) to make this Powder Pink gift box and tags.
Click on the images for more details and to purchase.
Here’s a Bonus Project:
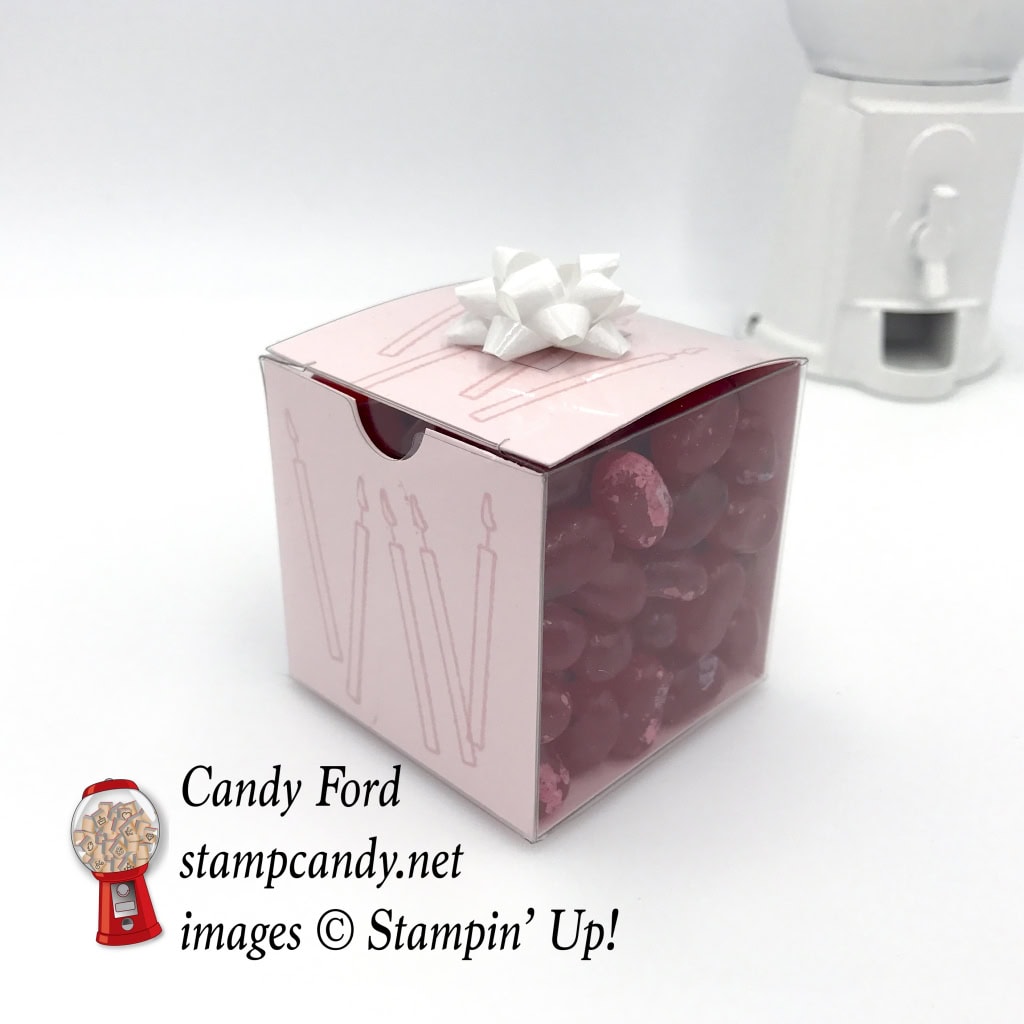
This little coordinating box of jelly beans:
It’s very simple. Cut a piece of Powder Pink CS to 2″ x 8″. Score it at 2″, 4″, and 6″. Stamp candles on each 2″ x 2″ section. Put it in the Clear Tiny Treat box so it lines the front, bottom, back and top. Add your goodies (I used pomegranate jelly bellies) and close the lid. Apply a tiny Whisper White Bow to the top. Done!
Here’s what I used for the tiny box:
Here are some key points to remember:
Hostess Code for the month of October (HGB2HGXK)
Find out more about HOW, WHEN and WHY to use that HERE.
October’s FREE gift
Mini Pizza Boxes
Find out more HERE.
New Merry Patterns Hostess Stamp Set – added to your Host Rewards There’s a brand new stamp set that isn’t in any catalog. You can’t buy it, but you can get if for free with a qualifying order! You can host a party, or place your own order, or join under me and get a 20% discount on your demonstrator order. Find out more HERE.
Gumball Rewards for all orders over $50 Find out more HERE.
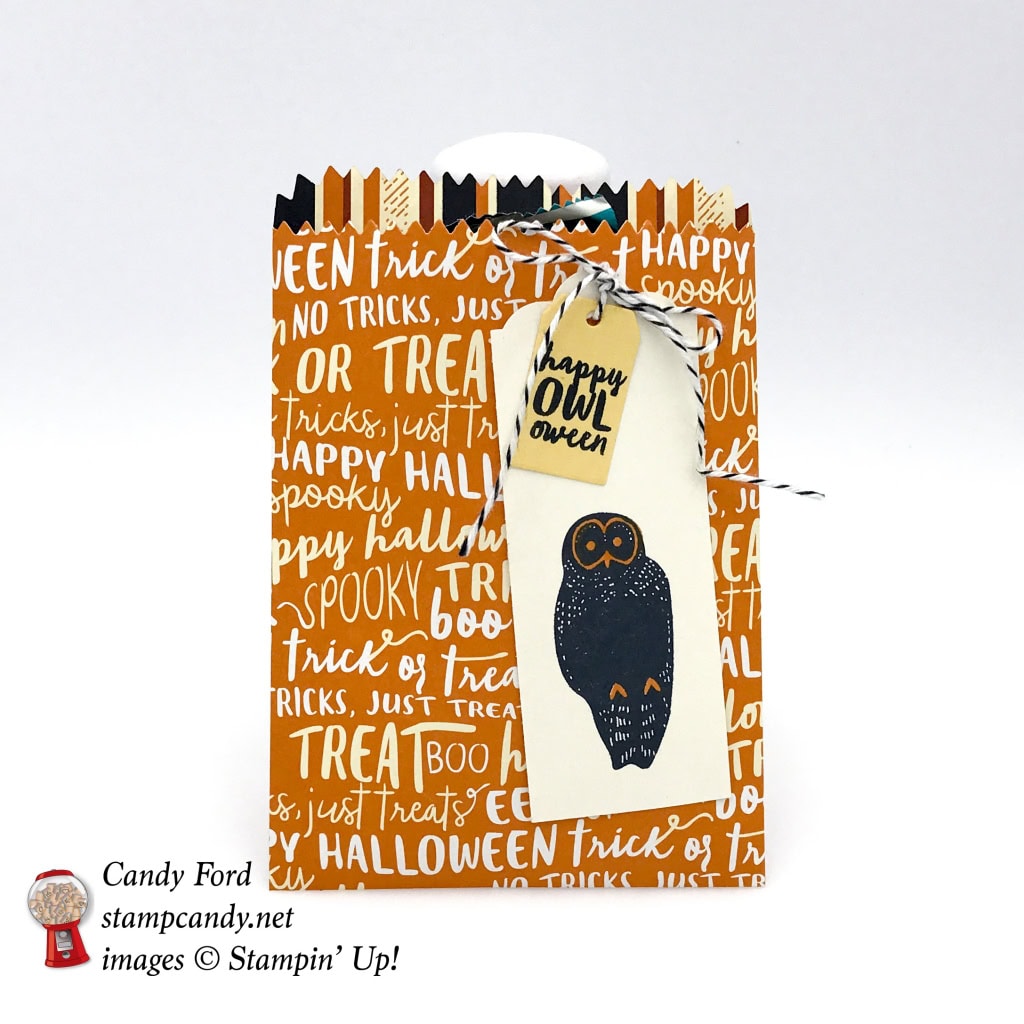
I am so enjoying the Spooky Night Suite of products in the 2017 Holiday Catalog. It’s cute, scary, pretty, and creepy – whatever you need it to be! Today I’ve used it to make a treat bag so you can give some yummy little treats or gifts to your Trick-or-Treaters this Halloween. The owl image and the sentiment are from the Spooky Cat stamp set. The Mini Treat Bag Thinlits Dies make it super quick and easy to make treat bags out of any of Stampin’ Up!’s amazing paper, including the Spooky Night Designer Series Paper (DSP) I’ve used here today.
Here’s the Spooky Night Suite:
Here’s what I made:
Wouldn’t you love to receive some little goodies in this?
Here’s what I did:
Cut and scored with my Stampin’ Trimmer:
Very Vanilla card stock (CS) cut to 2″ x 6″
Spooky Night Designer Series Paper (DSP) cut to 6″ x 12″ (6″ so it will fit through the Big Shot)
Stamped with the Spooky Cat stamp set:
owl in Basic Black ink* onto the Very Vanilla CS strip, close to the bottom end
owl features in Pumpkin Pie ink
sentiment in Basic Black ink* onto a scrap of So Saffron CS
*NOTE: you can use Archival Black ink or Memento Black ink
Cut using the Scalloped Tag Topper Punch:
top end of the Very Vanilla CS strip
Die cut using the Mini Treat Bag Thinlits:
both pieces of the bag from the Spooky Night DSP
Die cut using the Ornamental Christmas Framelits:
sentiment with the tag die
Assembled the bag:
glued two pieces of the bag together, up the side, up the back, and across the bottom
tied sentiment tag onto owl tag with Basic Black Baker’s Twine
adhered tags, at an angle, to the front of the bag with Tear & Tape
Here are today’s colors:
You can click on each one to see all the products that come in that color!
Click on the images for more details and to purchase.
Here are some key points to remember:
Hostess Code for the month of October (HGB2HGXK)
Find out more about HOW, WHEN and WHY to use that HERE.
October’s FREE gift
Mini Pizza Boxes
Find out more HERE.
New Merry Patterns Hostess Stamp Set – added to your Host Rewards There’s a brand new stamp set that isn’t in any catalog. You can’t buy it, but you can get if for free with a qualifying order! You can host a party, or place your own order, or join under me and get a 20% discount on your demonstrator order. Find out more HERE.
Gumball Rewards for all orders over $50 Find out more HERE.
Welcome to InKing Royalty’s September Blog Hop! Today’s Tricked Out Treats Blog Hop is filled with spooky, fun projects for Halloween. We are excited to share our creations with you today and hope these projects inspire you. After you read my post, I hope you’ll hop over to the next person on the list at the base of this post.
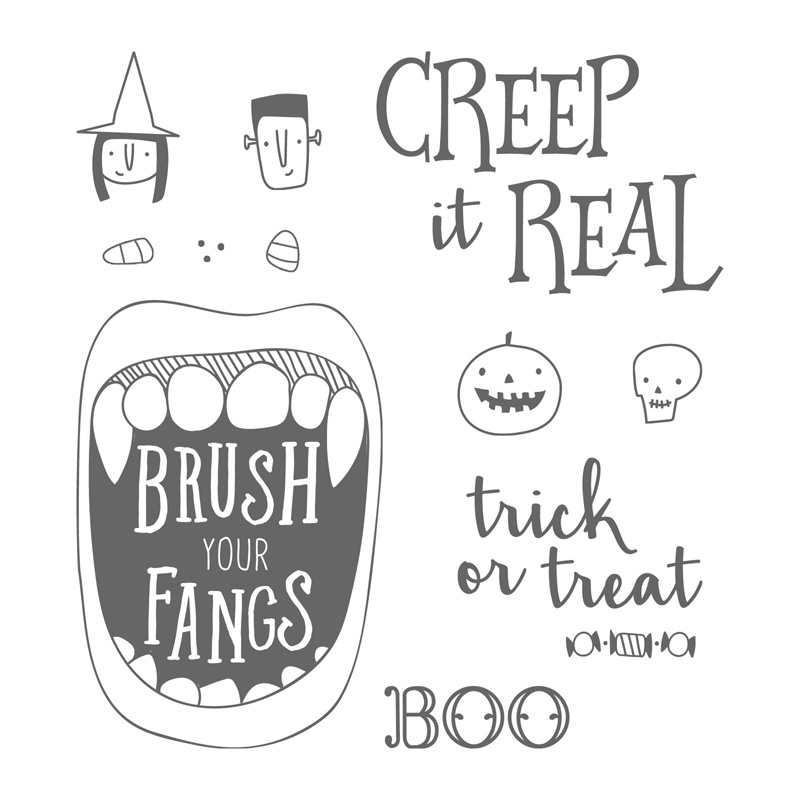
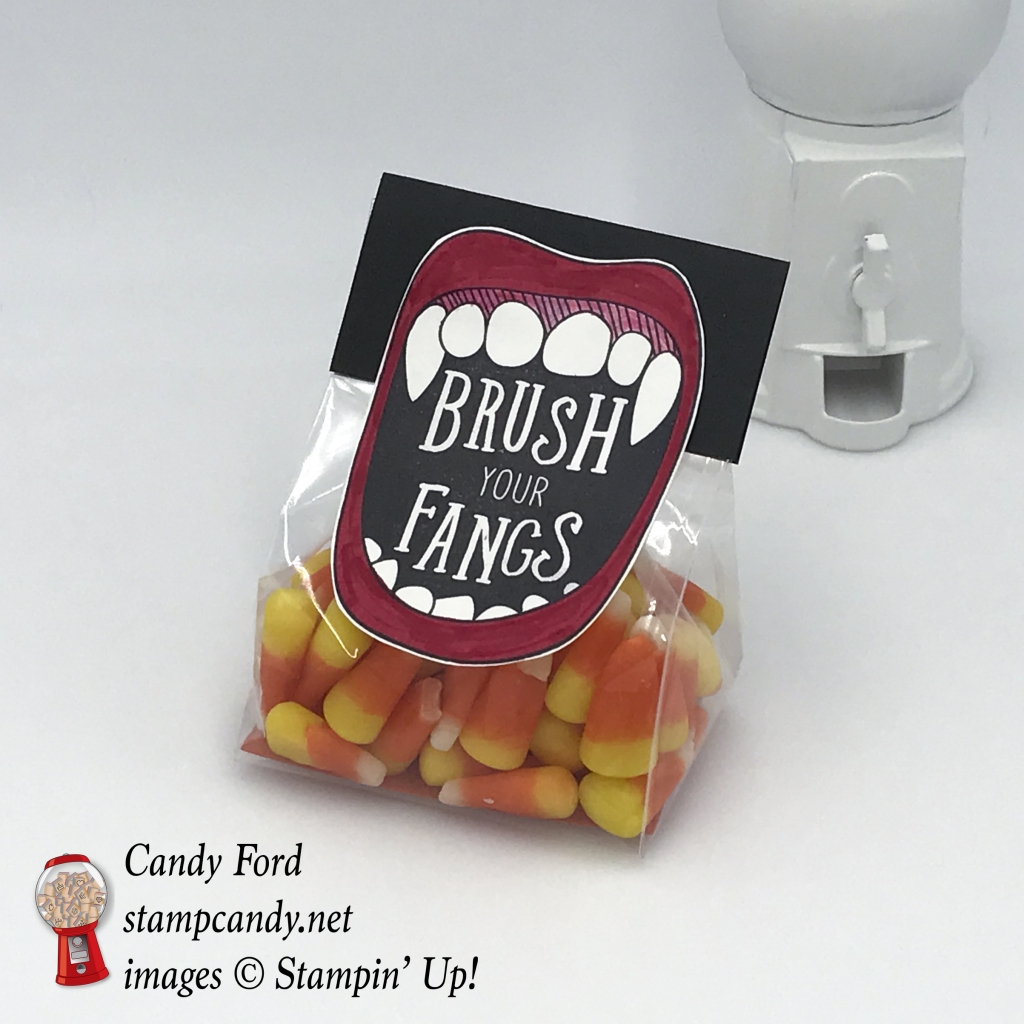
Today’s project falls under the category of “simple projects.” You could whip out a bunch of these little treat bags in no time, plenty enough for all your Trick-or-Treaters, neighbors, coworkers, friends, the mailman,… anyone really. The large stamped image is from the Creep It Real stamp set, which contains several fun Halloweeny images and sentiments. Take a look:
Basic Black card stock (CS) cut to 3″ x 3″, and scored in half at 1-1/2″
Pumpkin Pie CS cut to 1-3/4″ x 3″
Stamped with the Creep it Real stamp set:
mouth image in Basic Black ink onto a piece of Whisper White CS (I used regular Whisper White CS, but you can use the Thick Whisper White CS for more stability.
Colored using Stampin’ Write Markers:
lips in Real Read
gums in a lighter shade of Real Red , using a Blender Pen
Cut using Paper Snips:
mouth image
Assembled the treats bag:
put Pumpkin Pie CS in bottom of a 3″ x 6″ Gusseted Cellophane Bag to help keep it flat
put candy corn into the bag
folded over the top of the bag, folded Basic Black CS over it, and stapled it on
top of mouth image glued onto the Basic Black CS
That’s it!
Here’s the hop:
Thank you for hopping with us today. I hope you’ll hop along to the next stop on the hop, the amazingLydia Fiedler at Understand Blue. There’s a lot of inspiration to be found in this group – and you don’t want to miss any of it! If you get stuck during the Blog Hop, please use this line-up as a guide:
Click on the images for more details and to purchase.
Shop and help those affected by
Hurricanes Harvey & Irma
I will donate 20% of my September sales to the American Red Cross for Hurricane Harvey & Irma Relief, and Stampin’ Up! will match my donation!
Please help make a difference. CLICK HERE to shop now.
There’s a brand new stamp set that isn’t in any catalog. You can’t buy it, but you can get if for free with a qualifying order! You can host a party, or place your own order, or join under me and get a 20% discount on your demonstrator order.
Here are the details:
Promotion period: September 1–October 31
The Merry Patterns Stamp Set is exclusive to this promotion and will not be available after October 31
In order to qualify, the event merchandise total must reach $300 (before tax and shipping)
There is no limit to the number of times the Merry Patterns Stamp Set may be earned, but only one set can be redeemed per qualifying order
Demonstrator, Customer, Workshop, and online orders qualify
Orders must be closed by:
October 31 at 10:50 PM (PT)
October 31 at 11:50 PM (MT)
November 1 at 12:50 AM (CT)
November 1 at 1:50 AM (ET)
The Merry Patterns Stamp Set is in addition to Stampin’ Rewards
The Merry Patterns Stamp Set may not be exchanged for another stamp set
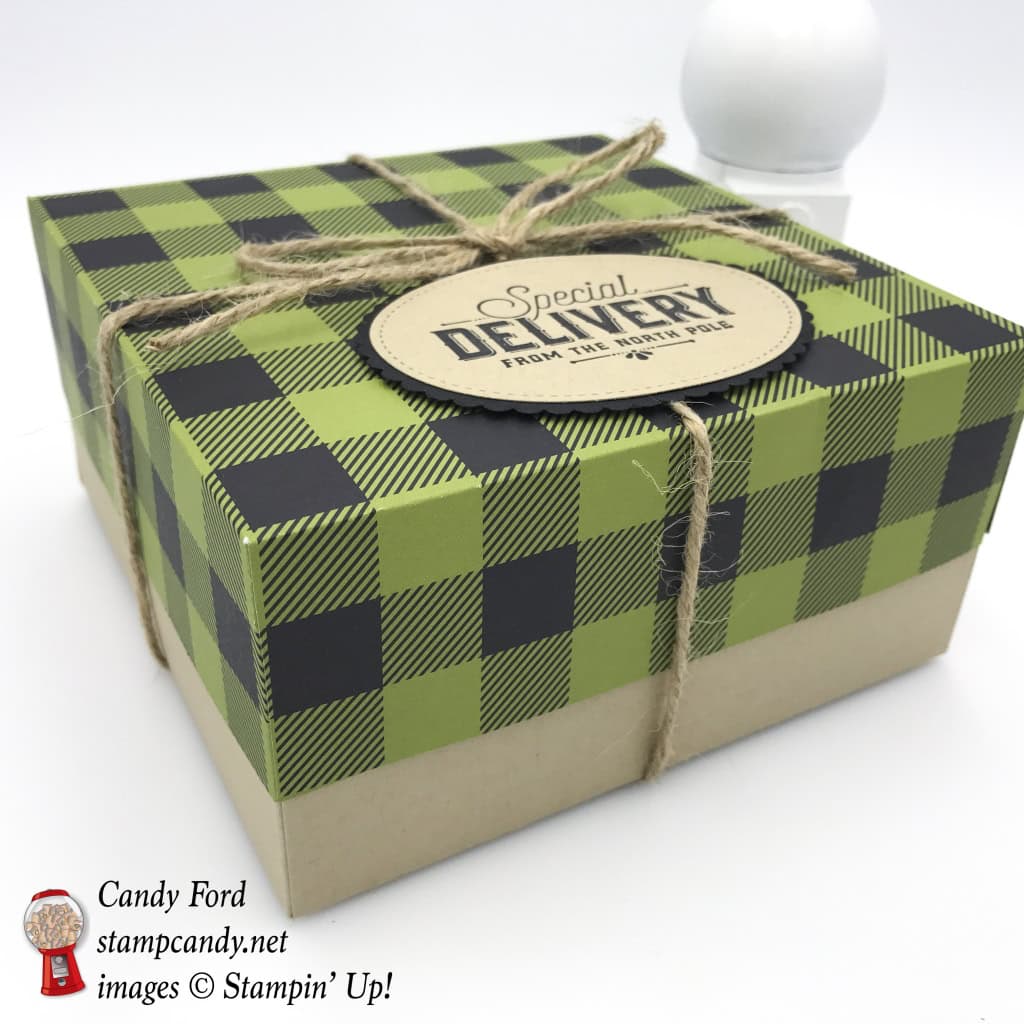
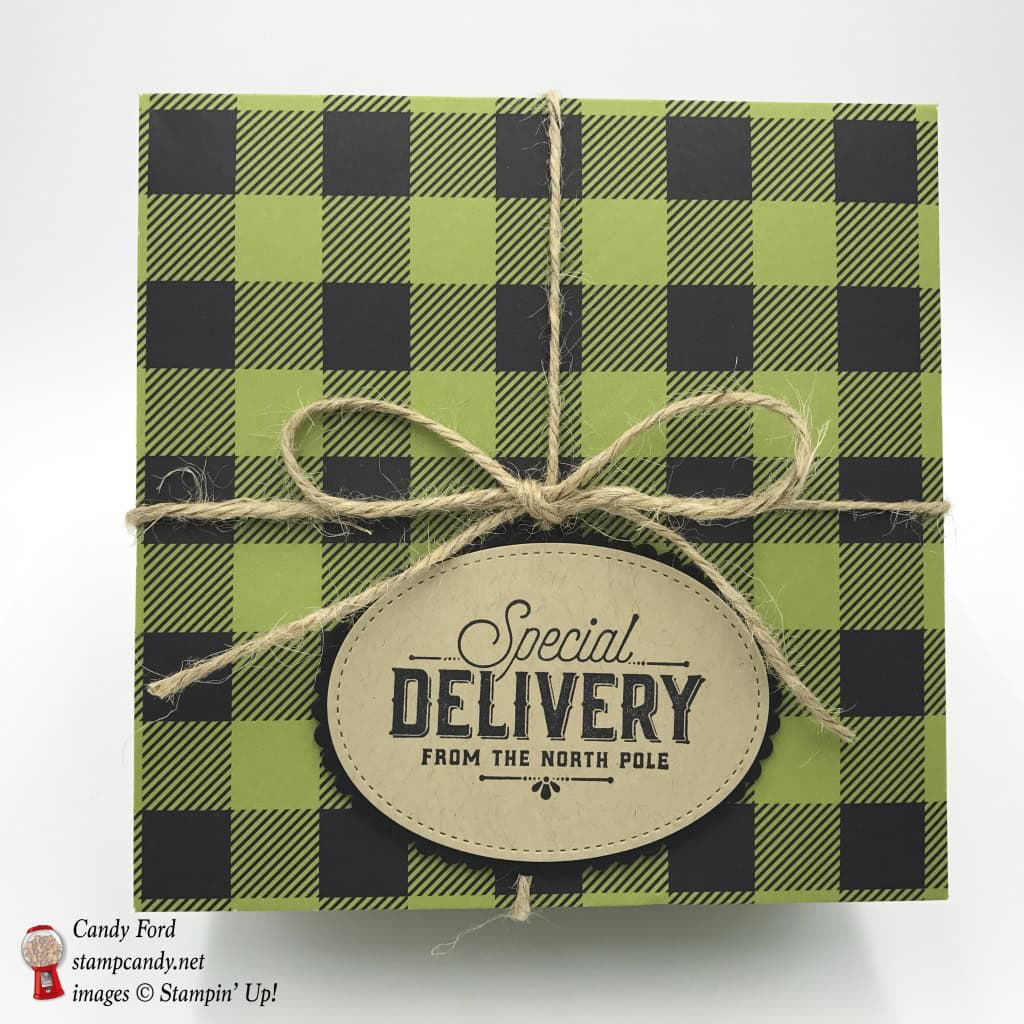
On the TA September Blog Hop, we are sharing some of our favorite products from the 2017 Holiday Catalog. It’s impossible for me to narrow it down to just one…or two…or three… But for today I decided to go with the Merry Little Christmas Mega Suite.
There are so many wonderfully coordinated products in this suite, for card making AND gift wrapping! It includes the Merry Little Labels Bundle (Merry Little Labels stamp set and Everyday Label Punch,) the Carols of Christmas Bundle (Carols of Christmas stamp set and Card Front Builder Thinlits Dies,) Merry Little Christmas Designer Series Paper (DSP) and coordinating 12″ x 12″ card stock (CS) pack, Merry Music Specialty DSP, 7/8″ Striped Ribbon, Acetate Card Boxes, Green Sprigs, Jute Twine, and Mini Ornaments. Holy cow, that’s a lot of cool stuff!
Here’s what I made:
I used some of the products from the Mega Suite to make this gift box
Here’s what I did:
Cut and scored with my Stampin’ Trimmer:
12″ x 12″ Kraft card stock (CS) scored 3″ from each side, then one score line at each corner cut (the center section should be 6″ x 6″)
Merry Little Christmas Designer Series Paper (DSP) cut to 9-9/16″ x 9-9/16″, then scored 1-3/4″ from each side, then one score line at each corner cut (the center section should be 6-1/16″ x 6-1/16″)
This is the same basic diagram for both pieces. Cut solid lines and score dotted lines.
Stamped with the Merry Little Labels stamp set:
sentiment in Basic Black ink onto a scrap of Kraft CS
Die cut using the Stitched Shapes Framelits:
sentiment with an oval die
Die cut using the Layering Ovals Framelits:
scalloped oval from Basic Black CS, just a little bigger than the sentiment oval
Assembled the box:
folded all score lines on both pieces of paper and burnished with a Bone Folder
glued the tab at each corner to the inside of the adjacent side – do this for all four corner and for both pieces of paper
put the lid on the box, then wrapped Jute Twine around it and tied a bow
glued the sentiment oval onto the Basic Black CS scalloped oval
adhered the sentiment to the top of the box using Stampin’ Dimensionals, being careful not to put any along the center, so the twine can slide underneath
Here’s the hop:
Here are today’s colors:
Click on each one to see all the products that come in that color!
Click on the images for more details and to purchase.
Here’s the Merry Little Christmas Mega Suite:
Do you have a long wish list?
How would you like to get a 20% (or more) discount on all the great Stampin’ Up! products you want, with no obligation and no risk? Join my group of Candy Hearts. Click on the candy machine for more information.
The 2017 Holiday Catalog has a new folded tag bundle called Seasonal Chums. (The first folded tag bundle is called A Little Wild, and it’s on page 108 of the Annual Catalog.) Seasonal Chums has three adorable tags (jack-o-lantern, reindeer, and snowman) as well as five sentiment stamps. Today I’ve used the jack-o-lantern to create a tag for a 2″ x 6″ Cellophane Bag full of black jelly beans. I’ll most definitely be giving this away, because I hate licorice – yes, I’m using the word hate. But I love the this bundle!
Here’s what I made:
Here’s what I did:
Stamped with the Seasonal Chums stamp set:
jack-o-lantern tag in Basic Black ink onto a piece of Pumpkin Pie card stock (CS)
Die cut using the Seasonal Tags Framelits:
jack-o-lantern tag
Colored with Stampin’ Write Markers:
face with Basic Black and Pumpkin Pie markers
leaves with Old Olive marker
stem with Soft Suede marker
Assembled the project:
filled a 2″ x 6″ Cellophane Bag with black jelly beans
tied tag onto the top of the bag with Vintage Crochet Trim
That’s it!!!
Here are today’s colors:
You can click on each one to see all the products that come in that color!
Click on the images for more details and to purchase.
Shop and help those affected by
Hurricane Harvey
I will donate 20% of my September sales to the American Red Cross for Hurricane Harvey Relief.
Please help make a difference. CLICK HERE to shop now.
There’s a brand new stamp set that isn’t in any catalog. You can’t buy it, but you can get if for free with a qualifying order! You can host a party, or place your own order, or join under me and get a 20% discount on your demonstrator order.
Here’s a video from Stampin’ Up!:
Here are the details:
Promotion period: September 1–October 31
The Merry Patterns Stamp Set is exclusive to this promotion and will not be available after October 31
In order to qualify, the event merchandise total must reach $300 (before tax and shipping)
There is no limit to the number of times the Merry Patterns Stamp Set may be earned, but only one set can be redeemed per qualifying order
Demonstrator, Customer, Workshop, and online orders qualify
Orders must be closed by:
October 31 at 10:50 PM (PT)
October 31 at 11:50 PM (MT)
November 1 at 12:50 AM (CT)
November 1 at 1:50 AM (ET)
The Merry Patterns Stamp Set is in addition to Stampin’ Rewards
The Merry Patterns Stamp Set may not be exchanged for another stamp set
Here are the samples from the video:
September Host Code
N4ZFHXK9
September’s FREE gift is the brand new Quilt Top Textured Impressions Embossing Folder: Create a beautiful quilt pattern background with this Embossing Folder.It’s easy to make a great impression! Just place flat cardstock in this embossing folder, run it through the Big Shot, and out comes cardstock with a bold textured design.* 1 folder * 6″ x 6″ (15.2 x 15.2 cm) * Use with Big Shot
Watch this video on the Quilted Christmas Suite in the new Holiday Catalog
Use the Host Code on your online orders under $150. You can see how to use a Host Code here.
Orders between $75 and $149.99, using the Host Code, will receive my FREE Gift of the Month. Orders of $150 and above will automatically receive the gift – do no use the Host Code.
I can ship only within the United States. “No contact” orders are not eligible.
You always earn a Gum Ball for every $50 you spend on an order with me. Earn 10 Gum Balls and I’ll send you a free stamp set of your choice! See the Gum Ball Rewards page for details.