Jan 14, 2016 | Boxes, Gift Wrap, New Products, Sale-A-Bration |
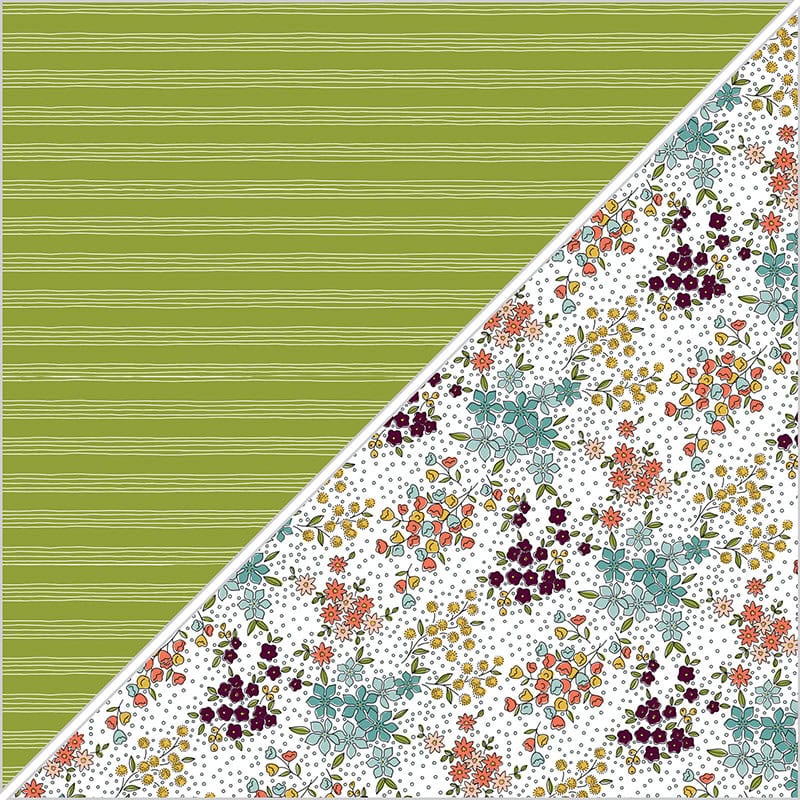
Have you seen the new Wildflower Fields Designer Series Paper in the Sale-a-bra-tion catalog? It’s really beautiful.
Today I used this sheet to create a Curvy Keepsake Box, with the floral pattern on the outside and the stripes on the inside.
I cut the tag from Whisper White card stock with the 1-1/4″ Scallop Circle Punch, punched a hole with the 1/8″ Circle Punch, then stamped on each side with the coordinating Flowering Fields stamp set. On one side I stamped in Lost Lagoon…
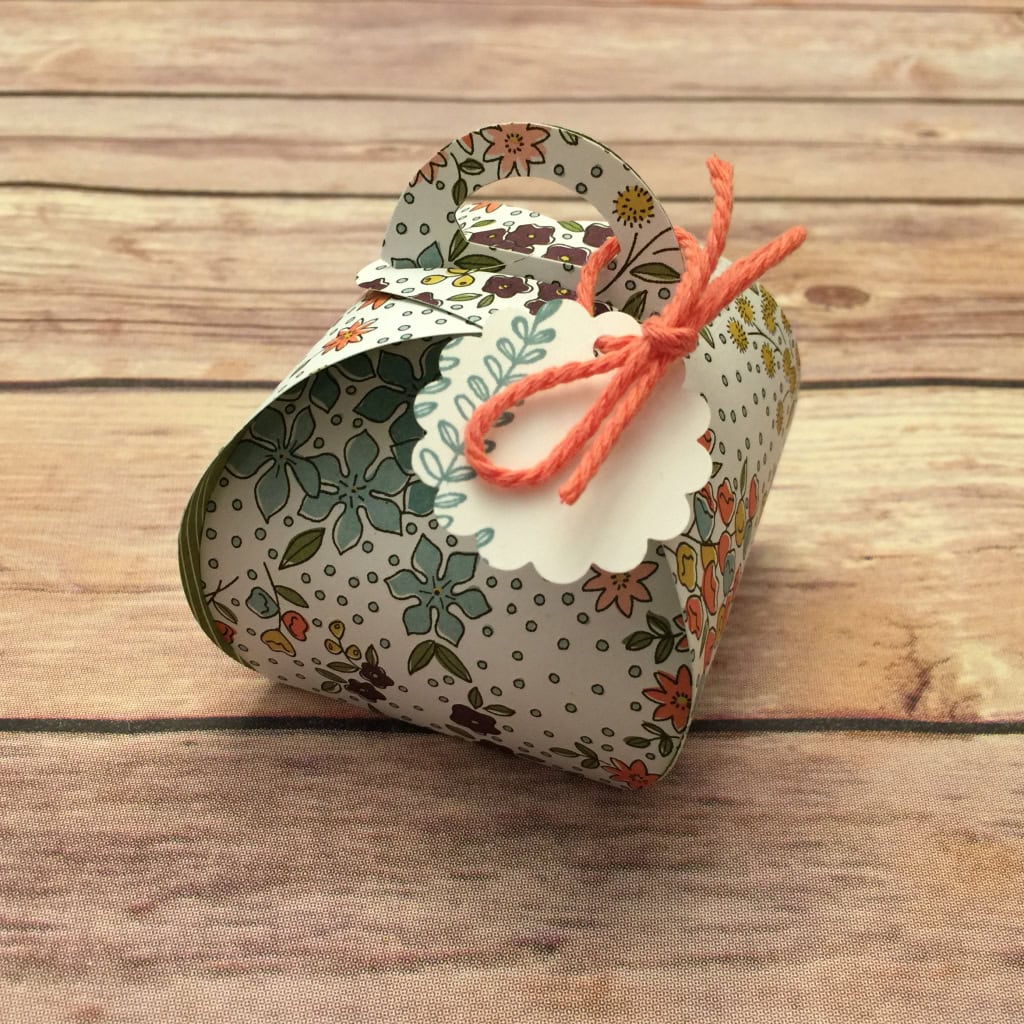
…and on the other side in Calypso Coral. Then I tied on the tag with Calypso Coral Thick Baker’s Twine. I think anyone would love to receive a small gift or treat in this pretty little box, don’t you?

Here’s what I used:
Thanks for stopping by today, and Sweet Stamping!

Dec 23, 2015 | Bags, Christmas, Club, Gift Wrap, Holiday |

I loooooove the Mini Treat Bag Framelits Dies. These little bags are so versatile. You can put so many different things in them: cards, cookies, candies, small toys and gifts,… And since you can use any Designer Series Paper, they are perfect for any occasion.
This was one of the Make & Takes at our December Stamp Club meeting.
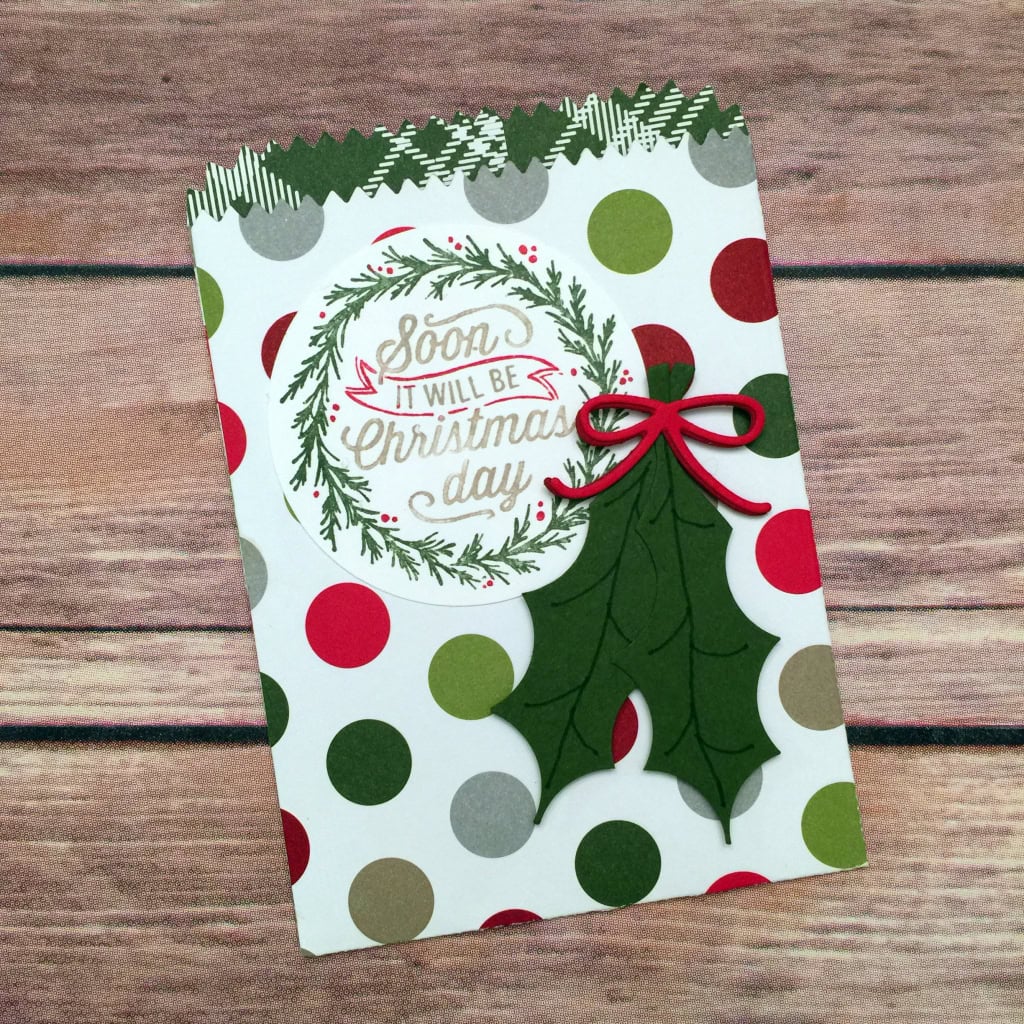
We started by using the Mini Treat Bag Framelits to cut the bag from Merry Moments DSP and assembling it with glue. We cut the bow from Real Red card stock using the bow die included in the set.
We used Stampin’ Write Markers in Real Red, Crumb Cake, and Mossy Meadow to color the stamp from the Cup of Cheer stamp set. We huffed to reactivate the ink, then stamped on Whisper White card stock. We cut it with the 2-1/2″ Circle Punch and adhered it to the bag.
We cut two leaves with the Leaflets Framelits Dies, then used the 1″ Circle Punch to cut around the edges so they would look like holly leaves. We drew veins on the leaves with the Mossy Meadow marker.
To make your own bag, click on these images to buy the products:
Thanks for stopping by today, and Sweet Stamping!

Dec 22, 2015 | Christmas, Gift Wrap, Gifts, Holiday |
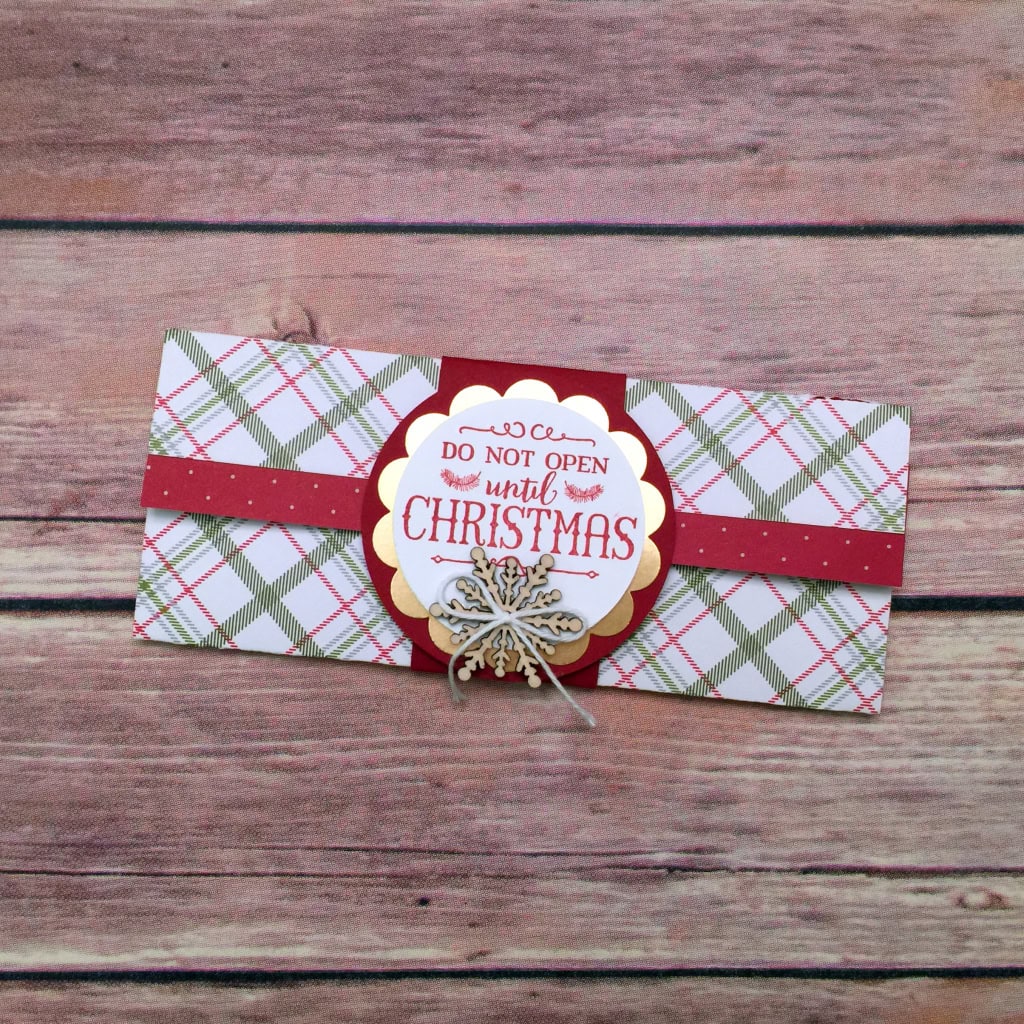
Gift cards are very popular gifts for any time of year, but we give even more during the holidays. Here is an easy gift card holder that anyone would appreciate receiving.
I started with a 6″ x 6″ piece of Merry Moments Designer Series Paper. I scored it at 1″ and at 3-1/2″. I folded it along the score lines, and adhered the sides to make an envelope.
I cut a another piece of the same paper 1″ x 6″ and adhered it to the underside of the flap, with about 1/2″ showing. Using a 1-1/4″ Circle Punch, I cut a finger notch in the inner flap.

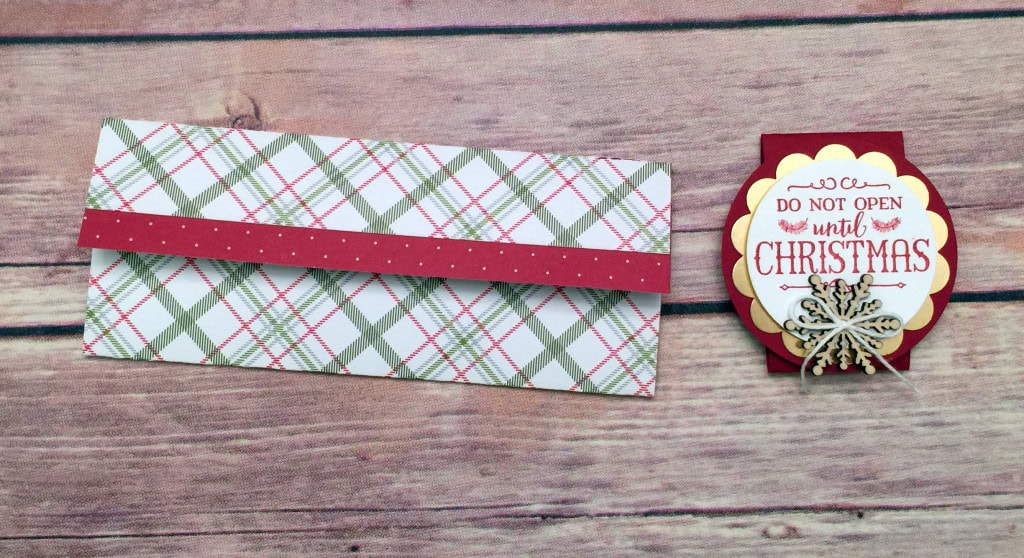
For the belly band, I cut a 1-1/2″ x 8-1/2″ strip of Cherry Cobbler card stock, wrapped it around the envelope, and glued the ends together. I made sure it wasn’t so tight that it’s difficult to slide on and off.
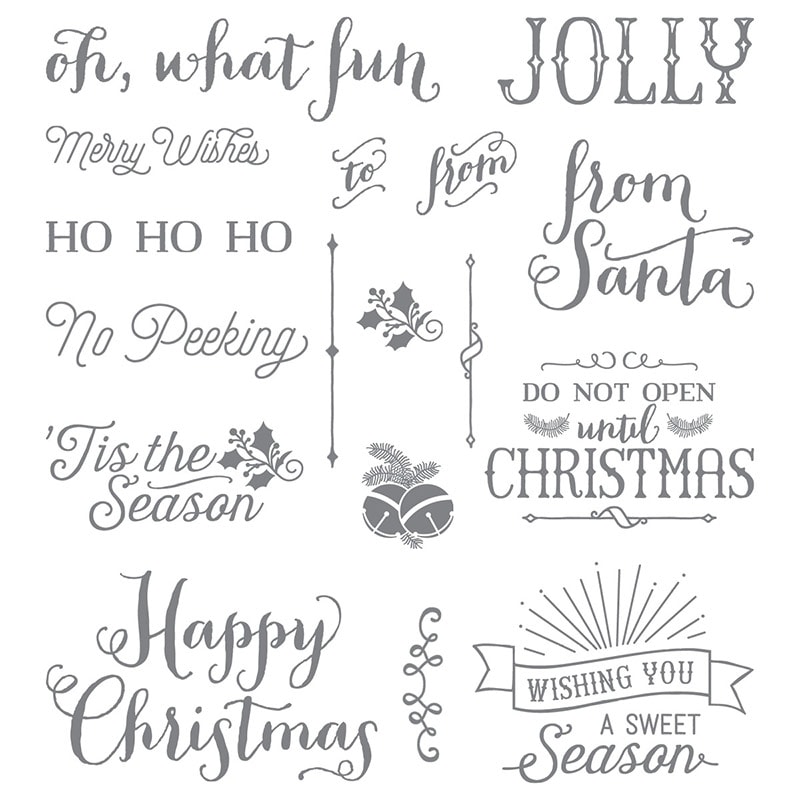
I stamped the sentiment from the Oh, What Fun stamp set on Whisper White card stock in Cherry Cobbler, then cut it out with the 2″ Circle Punch, with the wording toward the top of the circle.
I’ve used this stamp set a lot this holiday season. It coordinates with the Oh, What Fun Tag Project Kit, but is great by itself.
I cut a piece of Gold foil Sheet with he 2-3/8″ Scallop Circle Punch, and a piece of Cherry Cobbler card stock with the 2-1/2″ Circle Punch. I glued the gold piece to the Cherry Cobbler piece, then adhered the sentiment with Stampin’ Dimensionals. I glued the snowflake on then adhered the twine bow with a Glue Dot. I glued this whole piece to the belly band, covering the seam where the two ends overlap.
Here it is from the back.
Here’s what I used:
Thanks for stopping by today, and Sweet Stamping!
Dec 21, 2015 | Christmas, Gift Wrap, Holiday, New Year, Tags |
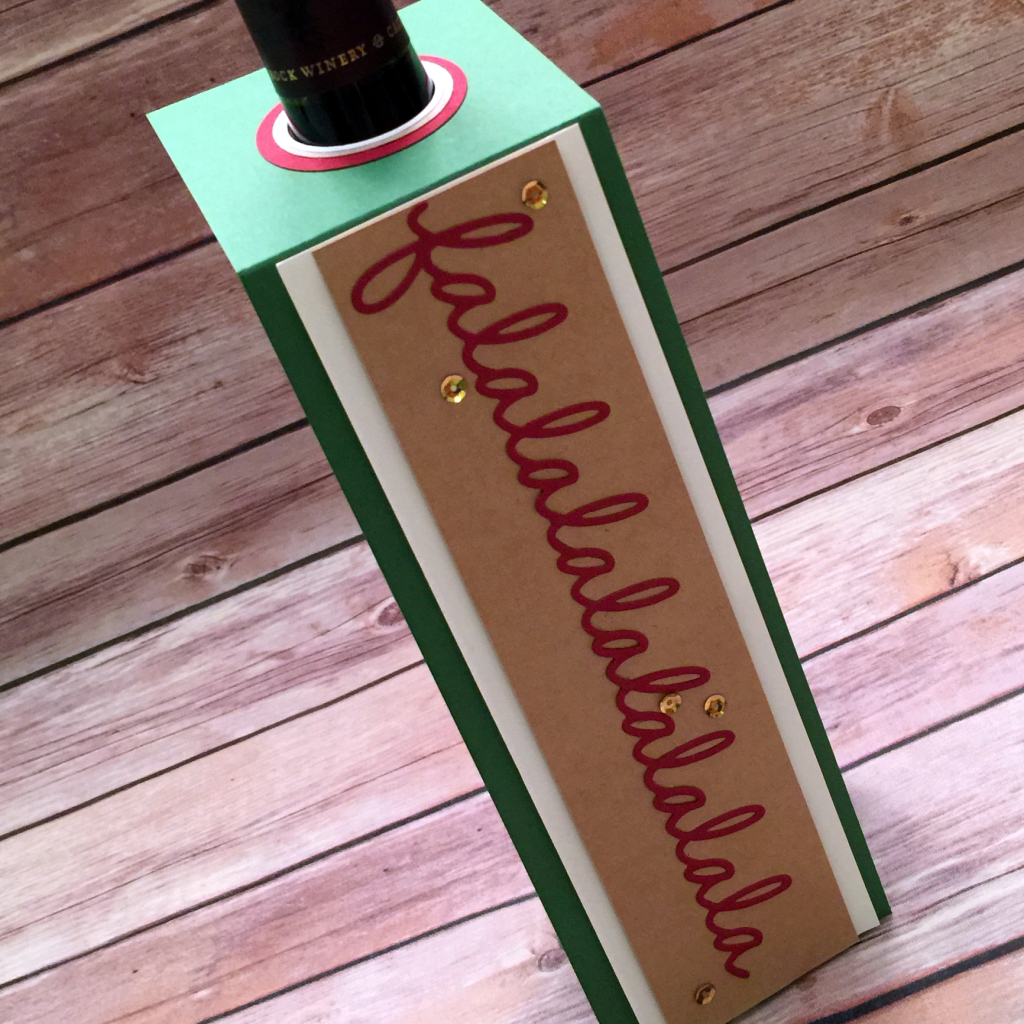
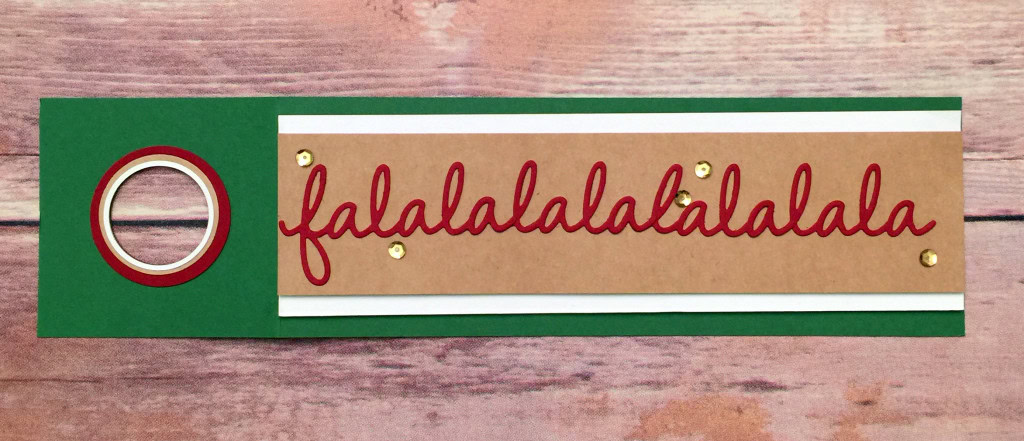
Do you need to decorate a bottle of wine, fancy olive oil, or bath product for a holiday gift? Bottle tags are a quick and easy way to do just that.

This one is made of Garden Green, Cherry Cobbler, Whisper White, and Kraft card stock.
I cut three rings with various sizes of Circle Punches for the top.
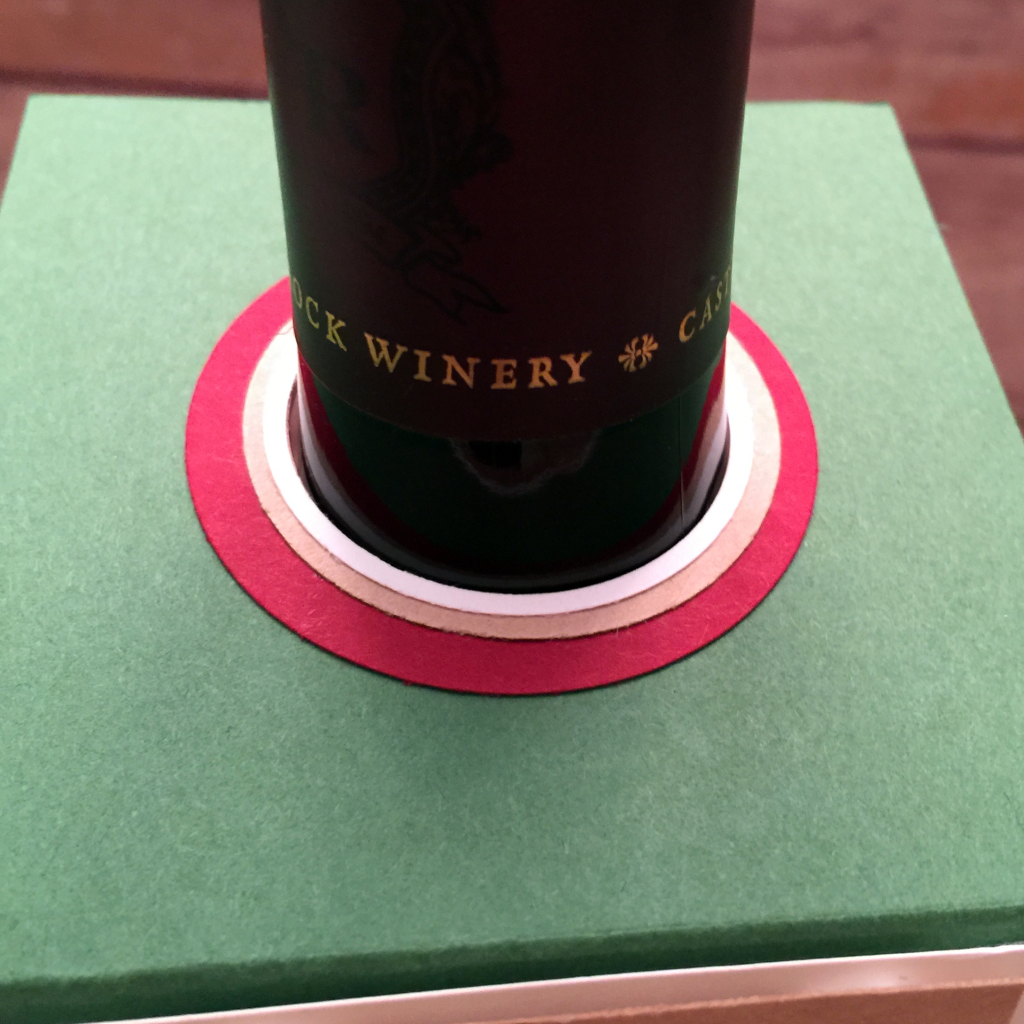
Be sure to cut the inner circle first, then cut the outer circle.

I used the Seasonal Frame Framelits Dies to cut out falala four times, then cut fa off of three of them. I then glued them together, overlapping the ends.

A few gold sequins added some sparkle.
Here’s what I used:
Thanks for stopping by today, and Sweet Stamping!
Dec 17, 2015 | Christmas, Events, Gift Wrap, Holiday, Swaps, Tags |
This past Saturday I went to Monika Davis’ team meeting (her team is called the PAWS) where we talked, laughed, did some Make & Takes, and a tag swap.
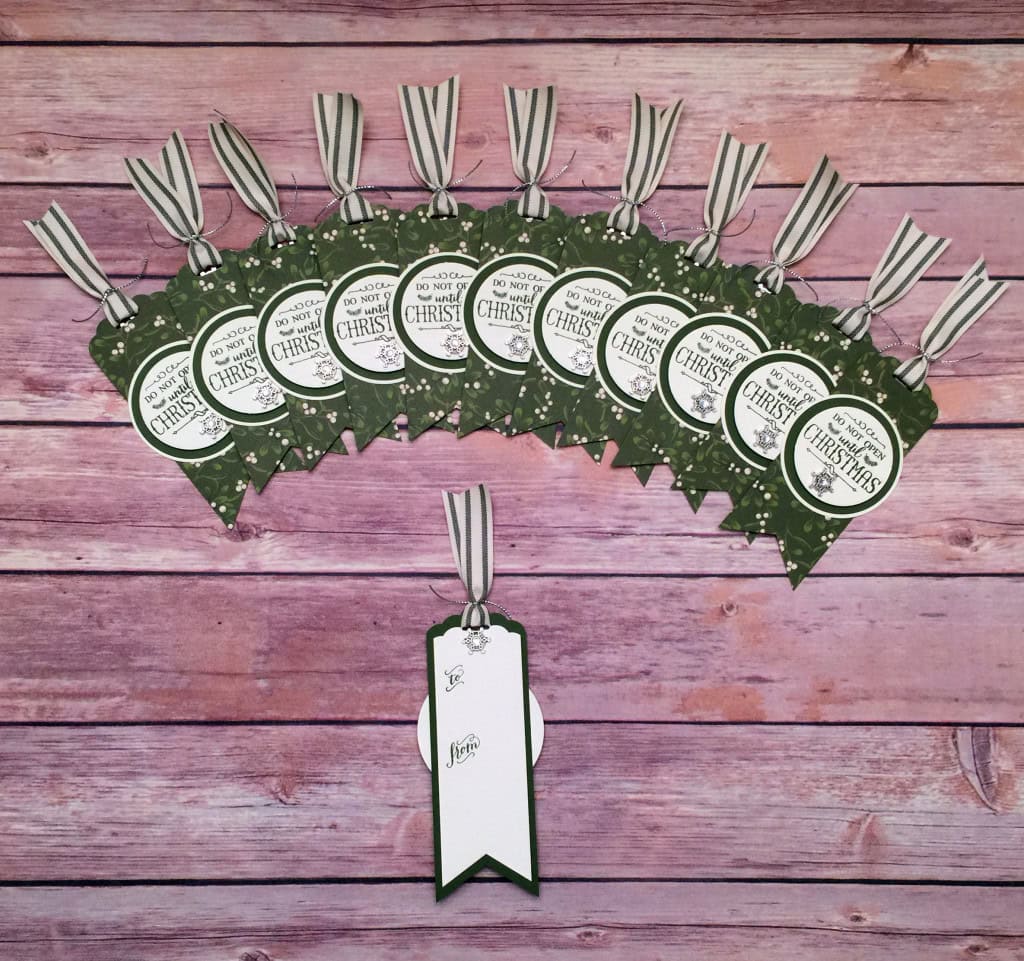
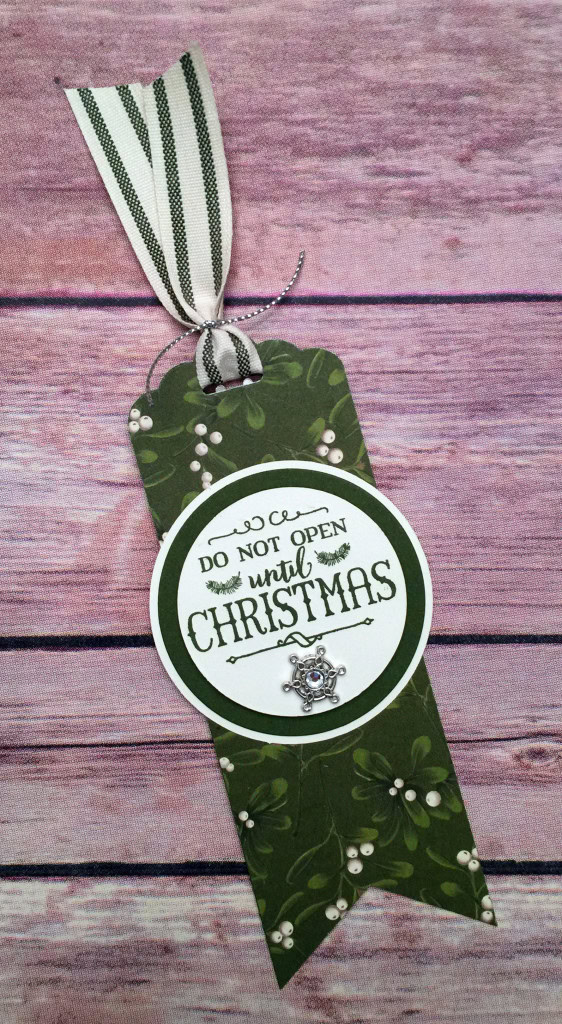
For my swap tag, I cut Home for Christmas Designer Series Paper (I love this mistletoe design) and Mossy Meadow card stock to 2″ x 5″ strips, then glued them back to back. I used the Scalloped Tag Topper Punch on one end and the Banner Triple Punch on the other end.
front of tag
I cut Very Vanilla card stock to 1-3/4″ x 4-1/2″ strips. I punched both ends the same way, stamped To and From in Mossy Meadow, then glued it to the card stock side of the tag base. I used the Scalloped Tag Topper Punch again to re-punch the original hole that just got covered by the Very Vanilla piece. Hold the punch upside down so you can see how to line it up.
back of tag

I stamped the front sentiment in Mossy Meadow on Very Vanilla card stock, then cut it with the 2″ Circle Punch, so that the sentiment is near the top of the circle. I cut another piece of Very Vanilla with the 2-1/2″ Circle Punch, and a piece of Mossy Meadow with the Circles Collection Framelits Dies. I glued together the bottom two circles, and attached the top one with Stampin’ Dimensionals. I attached a Winter Wonderland Embellishment with Glue Dots, then glued the whole thing to the DSP side of the tag base.

I attached another Winter Wonderland Embellishment on the back to cover the hole in the Very Vanilla piece made by the Scalloped Tag Topper Punch.
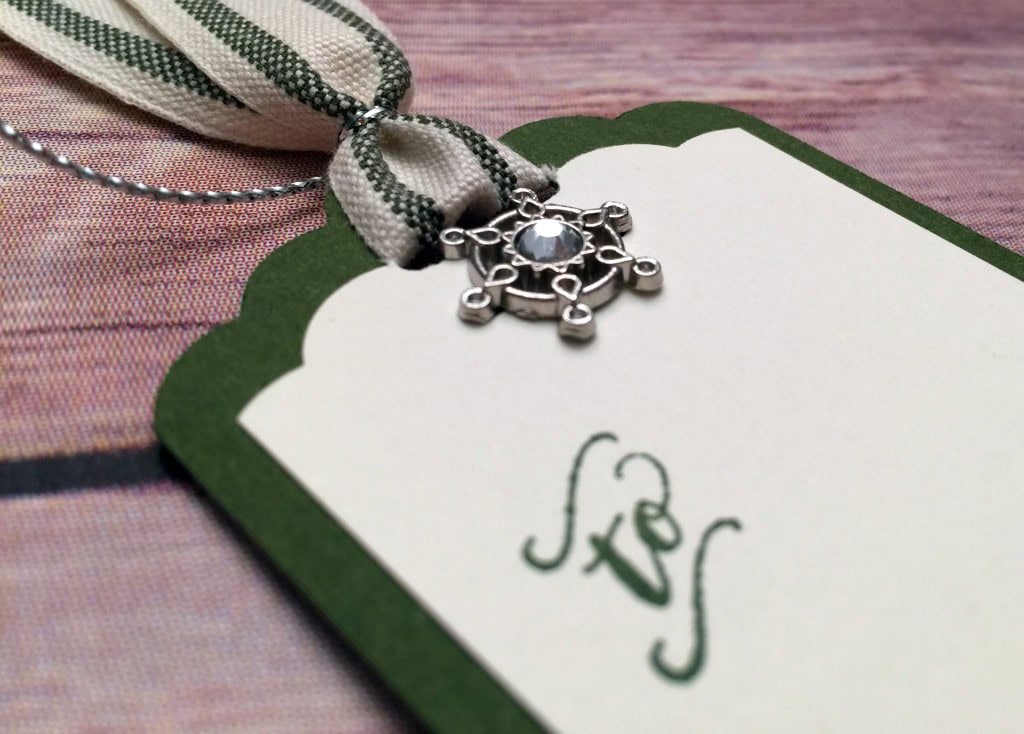
I finished the tag with a piece of Mossy Meadow 5/8″ Striped Cotton Ribbon and a piece of Silver Cording Trim.
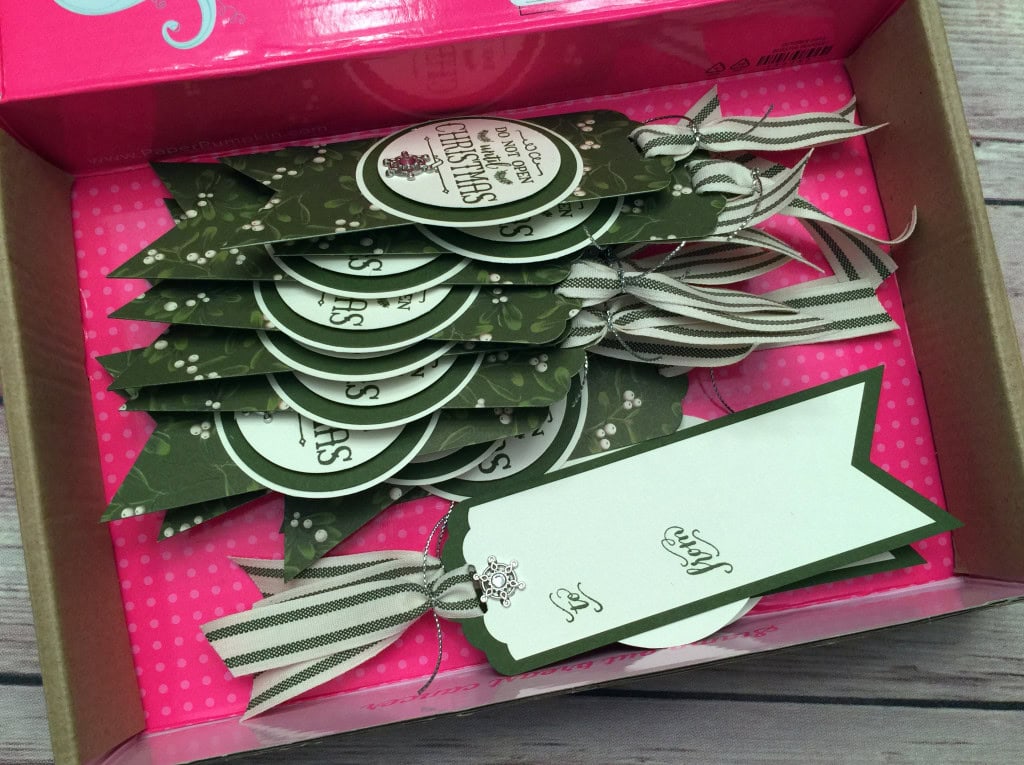
Here are the tags ready to go in their box. Paper Pumpkin boxes are great for so many things, including transporting swaps. See the video here showing how to turn the boxes inside out to create a plain kraft exterior. In this photo you can see I’ve turned one of the pink October 2015 boxes inside out.
Here’s what I used:
Thanks for stopping by today, and Sweet Stamping!
Nov 24, 2015 | Bags, Blog Hop, Gift Wrap, Holiday |
Welcome to InKing Royalty’s November Blog Hop! Today’s hop is filled with inspiring projects that share the gratefulness of the season. Whether you are ready to celebrate Thanksgiving this week or just feel reflective of the things that make you thankful, we are sure you’ll find great inspiration from our talented team members. After you read my post, I hope you’ll continue along the list at the base of this post.
How better to show your gratitude than with a gift? And what better way to present that gift than in a custom decorated gift bag?
The Petite Cafe Bags are perfect for so many things, including food items, and the roll down top prevents spilling. And it’s the only part of this project that wasn’t a scrap!
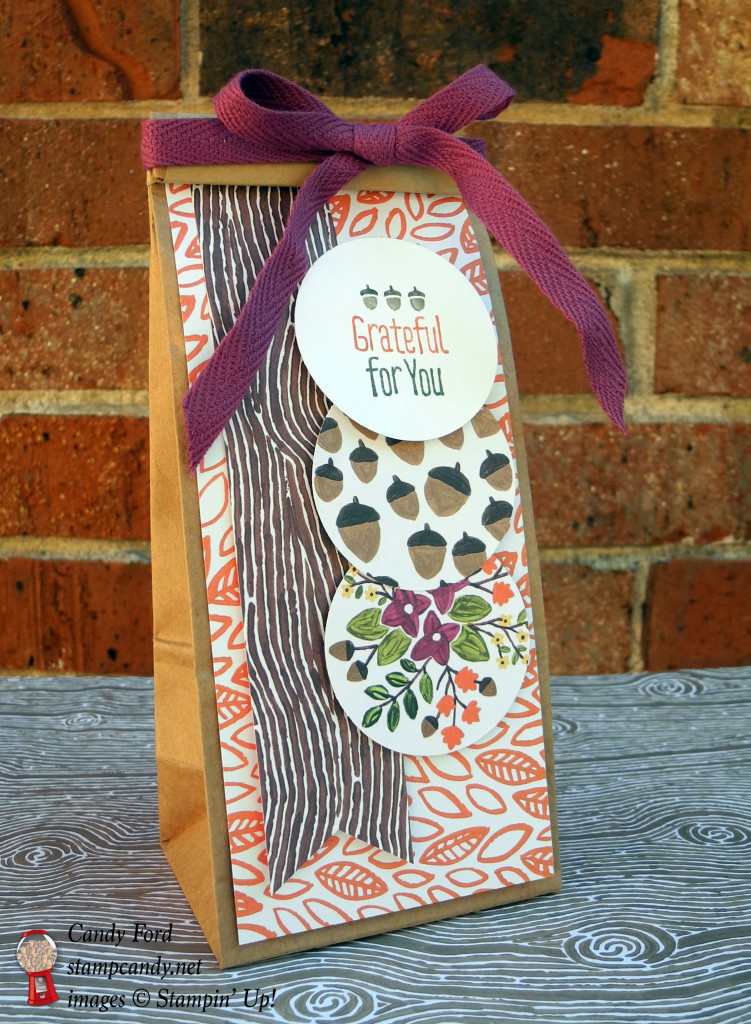
I cut a scrap of Into The Woods Designer Series Paper to 3″ x 7″ and another one to 1-1/4″ x 7″. I cut the notch in the end of the slender piece with the Banner Triple Punch. I adhered these two pieces to the bag with Fast Fuse. I cut a couple more scraps of the DSP with the 2″ Circle Punch.
On a scrap of Whisper White card stock, I stamped the sentiment from the A Little Something stamp set, coloring the stamp with Stampin’ Write Markers in Soft Suede, Early Espresso, Tangelo Twist, and Mossy Meadow (all colors in the paper.) Then I cut it with the 2″ Circle Punch.

I used Stampin’ Dimensionals to adhere all the 2″ circles.
A piece of Into The Woods 3/8″ Cotton Ribbon tied around the top completes the look.
Super duper quick and easy!
Be sure to hop along to the next stop on the blog hop, Shawn de Oliveira at ShawnStamps. There’s alot of inspiration to be found in this group – and you don’t want to miss it!
Thank you for stopping by today, and Sweet Stamping!
Thank you for hopping along with us. If you get stuck during the Blog Hop, please use this line-up as a guide:
- Brian King at Stamp with Brian
- Jennifer Spiller at Westside Paper Creations
- Becky Volpp & Megan Quillen at Ink Blossom with Becky
- Deb Cozzone at Grand Central Stamping
- Candy Ford at StampCandy
- Shawn de Oliveira at ShawnStamps
- Amy Whelan at Amy’s Inklings
- Denise Hoepfner at The Mountain Magpie
- Lynn Kolcun at Avery’s Owlery
- Pam Morris at Tap Tap Stamp
- Lisa Pretto at InkBig Academy Stamps
- Julie DiMatteo at The Paper Pixie
- Kelly DeTommaso at Kelly’s Creative Corner
- Sharon Walker at Stamp with Sharon W
Here’s what I used in today’s project. Click on the images below to get your own so you can make this adorable gift bag!