Oct 16, 2020 | Cards, Christmas, Gallery, Holiday |
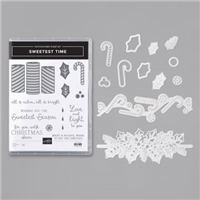
For today’s cards, I used the Sweetest Time Bundle (Sweetest Time stamp set and Sweetest Border Dies) to make just the sweetest Bermuda Bay & Granny Apple Green Christmas holiday card. These may not seem like very traditional Christmas colors, but I think they work, don’t you? I got my inspiration from a card on page 73 of the August – December 2020 Mini Catalog.
If you are reading this in email, some photos may appear blurry, or may not appear at all. Please click here to see the post on my blog.
S Sweetest Bermuda Sweetest Bermuda Sweetest Bermuda Sweetest Bermuda
Here’s what I made:
I made two different cards. They have different sentiments, and the holly leaves and pine sprigs are colored differently. Which do you like better?


S
Here’s how I made the Sweetest Bermuda Bay & Granny Apple Green card:
Cut and scored with my paper trimmer:
- Whisper White Thick card stock (CS) cut to 5-1/2″ x 8-1/2″, then scored in half at 4-1/4″
- Whisper White Thick CS layer cut to 5-1/2″ x 3″
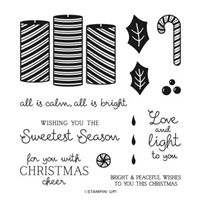
Stamped with the Sweetest Time stamp set:
- sentiment in Bermuda Bay ink onto a scrap of Whisper White Thick CS (I used a different sentiment on each of the two cards. I used the same color ink, and the same die to cut both.)
- candles in Bermuda Bay ink onto a scrap of Whisper White Thick CS
- candle flames in So Saffron ink
- NOTE: On one I stamped the flames on the same CS as the candles, then fussy cut around them. On the other one, I fussy cut only the candles and adhered them onto the card, then stamped the flames above them, which I found to be much easier.
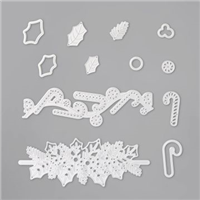
Cut using the Sweetest Borders Dies:
- the Whisper White Thick CS layer using the holly border die
- 2 holly leaves and a pine sprig from a scrap of Whisper White Thick CS
Cut using the Stitched So Sweetly Dies:
Cut using Paper Snips:
Colored using Sponge Daubers:
- all die cuts in Bermuda Bay and Granny Apple Green inks
- NOTE: I made two cards. On one I colored all the holly in Bermuda Bay and the pine sprigs in Granny Apple Green. On the other one I did the opposite.
Colored using a Stampin’ Blends Marker:
- white ribbon in Light Bermuda Bay
Assembled the card:
- burnished the fold in the card base with a Bone Folder
- ribbon adhered onto the layer using Stampin’ Seal+, wrapping the ends around to the back of the layer
- 3 candles glued onto the front of the card base, overlapping them slightly
- die cut holly layer glued onto the front of the card base, over the candles, and lining up the bottom edges
- sentiment glued over the holly layer, hiding the bottoms of the candle (On one I glued the sentiment, and on the other one I adhered it using Stampin’ Dimensionals.)
- individual holly leaves and pine sprig glued onto the sentiment
S
Here are today’s colors:
You can click on each one to see all the products that come in that color!
S
Here’s what I used:
Click on these images for more details and to purchase. If you are reading this post in email, the product images may not show up. Please click here to see the post on my blog.
Supply List. <— Click for a clickable and printable list of the products!
S
Designer Series Paper Sale!
Click the image to see the sale:
S
Here are some helpful links:
S
Thanks for stopping by today, and Sweet Stamping!
Oct 15, 2020 | Cards, Christmas, Gallery, Holiday |
I used the Sweetest Borders Dies and Sweetest Time stamp set along with ribbon and pearls to make this sweet holiday card. I used Petal Pink and Soft Sea Foam instead of the more traditional red and darker green, for a subtler nod to the holidays. It also just happens to be one of my favorite color combos.
If you are reading this in email, some photos may appear blurry, or may not appear at all. Please click here to see the post on my blog.
S Sweetest Borders Sweetest Borders Sweetest Borders Sweetest Borders
Here’s what I made:


S
Here’s what I did:
Cut and scored with my paper trimmer:
- Petal Pink card stock (CS) cut to 5-1/2″ x 8-1/2″, then scored in half at 4-1/4″
- Soft Sea Foam CS layer cut to 5-1/2″ x 4-1/4″
- Whisper White CS layer cut to 4-1/4″ x 1-1/2″
- Soft Sea Foam CS layer cut to 4″ x 1-1/4″
- Petal Pink CS layer cut to 3-3/4″ x 1″
- Whisper White CS layer cut to 3-1/2″ x 3/4″ for the sentiment
- Whisper White CS cut to 5-1/4″ x 4″ for the inside of the card base
Stamped with the Sweetest Time stamp set:
- sentiment in Soft Sea Foam ink onto the smallest Whisper White CS strip
- holly leaves in Soft Sea Foam ink, and berries in Petal Pink ink, onto the Whisper White CS for the inside
Cut using the Sweetest Borders Dies:
- bottom edge of the largest Soft Sea Foam CS layer using the holly border die
- NOTE: I kept the two largest holly berry circles that came out of the die cut
Assembled the card:
- burnished the fold in the card base with a Bone Folder
- ribbon adhered onto the top part of the die cut Soft Sea Foam CS layer using Stampin’ Seal +, wrapping the ends around to the back
- die cut Soft Sea Foam CS layer glued onto the front of the card base, lining up the top edges
- 2 saved Soft Sea Foam CS circles glued into their holes in the center of the die cut area
- sentiment glued onto the Petal Pink CS layer
- Petal Pink CS layer glued onto the small Soft Sea Foam CS layer
- small Soft Sea Foam CS layer glued onto the larger Whisper White CS layer
- larger Whisper White CS layer adhered onto the die cut Soft Sea Foam CS layer, over the ribbon, using Stampin’ Dimensionals
- a second piece of ribbon tied in a bow around the first ribbon, to the left of the sentiment
- pearls applied over the “berries” in the die cut. I used 5 small, 10 medium, and 2 large pearls. The 2 large ones are on the filled in circles. You could leave out the saved circles, and let the 2 large pearls have a Petal Pink ring around them.
- Whisper White CS with stamped holly glued onto the inside of the card base
Here you can see where I glued the two largest circles back in the holes for the two largest pearls:
S
Here are today’s colors:
You can click on each one to see all the products that come in that color!
S
Here’s what I used:
Click on these images for more details and to purchase. If you are reading this post in email, the product images may not show up. Please click here to see the post on my blog.
Supply List. <— Click for a clickable and printable list of the products!
Designer Series Paper Sale!
Click the image to see the sale:
S
Here are some helpful links:
S
Thanks for stopping by today, and Sweet Stamping!
Oct 13, 2020 | Cards, Christmas, Gallery, Holiday |
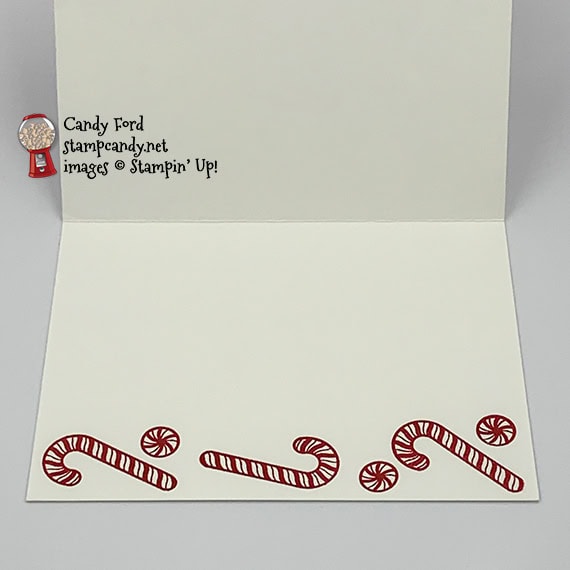
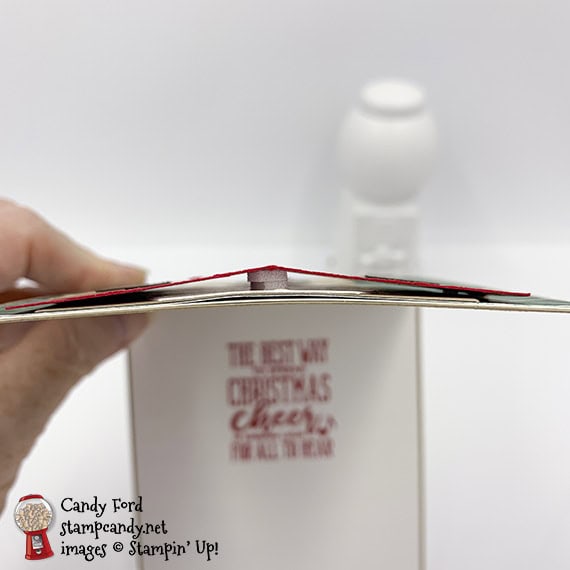
I used the Sweetest Time Bundle (Sweetest Time stamp set and Sweetest Borders Dies) to make today’s card. Even though it has a lot going on, it’s really a simple card to make. I used 2 colors of card stock, 2 colors of ink, and rhinestones. That’s it!
If you are reading this in email, some photos may appear blurry, or may not appear at all. Please click here to see the post on my blog.
S Sweetest Time Sweetest Time Sweetest Time Sweetest Time
Here’s what I made:
S
Here’s what I did:
Cut and scored with my paper trimmer:
- Whisper White Thick card stock (CS) cut to 5-1/2″ x 8-1/2″, then scored in half at 4-1/4″
- Real Red CS cut to 5-1/2″ x 2″
Stamped with the Sweetest Time stamp set:
- sentiment in Shaded Spruce ink onto the front of the card base
- candy canes and mints in Real Red ink onto the inside of the card base
Cut using the Sweetest Borders Dies:
- the Real Red CS using the candy border die
- a candy cane and a round mint from a scrap of Real Red CS
Assembled the card:
- burnished the fold in the card base with a Bone Folder
- Real Red CS border piece glued onto the front of the card base, at the bottom
- die cut candy cane and mint glued around the sentiment
- 3 Shaded Spruce rhinestones applied onto the front of the card base using a Take Your Pick tool
S
Here are today’s colors:
You can click on each one to see all the products that come in that color!
S
Here’s what I used:
Click on these images for more details and to purchase. If you are reading this post in email, the product images may not show up. Please click here to see the post on my blog.
Supply List. <— Click for a clickable and printable list of the products!
Designer Series Paper Sale!
Click the image to see the sale:
S
Here are some helpful links:
S
Thanks for stopping by today, and Sweet Stamping!
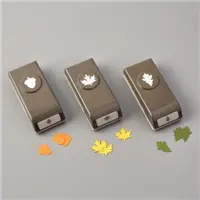
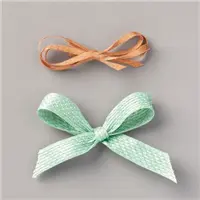
Oct 12, 2020 | Autumn, Blog Hop, Cards, Gallery, Holiday, Thanksgiving |

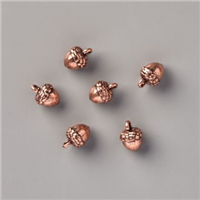
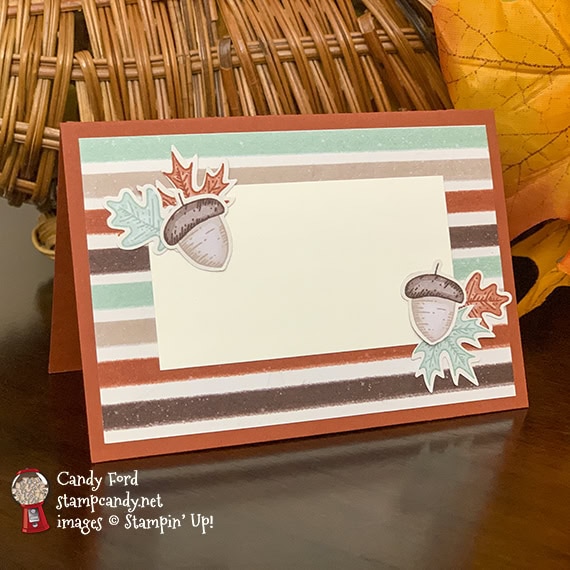
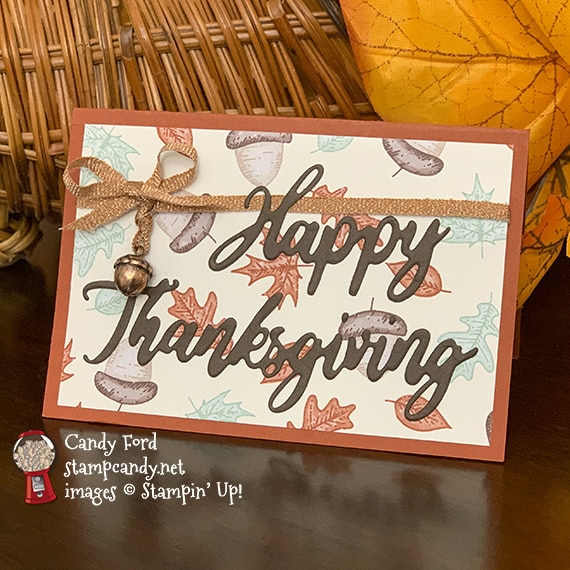
Welcome to the October 2020 Candy Hearts Blog Hop! This month we’re featuring Thanksgiving themed projects. I made place cards using the Word Wishes Dies, Autumn Punch Pack, and Gilded Autumn Designer Series Paper. On one side they have an acorn trinket and copper ribbon with a die cut Happy Thanksgiving sentiment. On the other side, is space to write a person’s name for a seating arrangement, or the name of a dish for a buffet.
Be sure to hop around to all the stops on the hop! You don’t want to miss any of the projects created by this talented group!
If you are reading this in email, some photos may appear blurry, or may not appear at all. Please click here to see the post on my blog.
S October 2020 Candy Hearts October 2020 Candy Hearts October 2020 Candy Hearts October 2020 Candy Hearts
Here’s what I made:
S
Here’s what I did:
Cut and scored with my paper trimmer:
- Cajun Craze card stock (CS) cut to 4″ x 5-1/2″, then scored in half at 2-3/4″
- Gilded Autumn Designer Series Paper (DSP) layer cut to 3-3/4″ x 2-1/2″ (2 pieces)
- Very Vanilla CS layer cut to 2-3/4″ x 1-1/2″
Cut using the Word Wishes Dies:
- “Happy” and “Thanksgiving” from a scrap of Early Espresso CS
Cut using the Autumn Punch Pack:
- 2 acorns and 4 leaves from a scrap of the DSPx
Assembled the place card:
- burnished the fold in the place card base with a Bone Folder
- ribbon adhered onto one of the DSP layers using Stampin’ Seal + and wrapped around to the back
- die cut words glued onto the same DSP layer
- copper ribbon threaded through the top of an Acorn Trinket, then tied around the ribbon on the DSP, and tied in a bow (I put a Glue Dot under the bow to keep it in place. The Take Your Pick tool is perfect for this!)
- DSP layer glued onto one side of the place card base
- Very Vanilla CS layer glued onto the other DSP layer
- punched leaves and acorns glued onto the corners of the Very Vanilla CS layer
- DSP layer glued onto the other side of the place card base
S
Here’s the October 2020 Candy Hearts Blog Hop:
Thank you for hopping with the Hearts today! Be sure to hop around to all the stops. You do not want to miss any of the creativity in this talented group of stampers!
- Candy Ford of Stamp Candy <— YOU ARE HERE
- Linda Krueger of The Stamp Coach
- Pam Morris of Tap Tap Stamp
- Brian King of Stamp with Brian
- Joanne Brown of The Inky Dragon
S
Here are today’s colors:
You can click on each one to see all the products that come in that color!
S
Here’s what I used:
Click on these images for more details and to purchase. If you are reading this post in email, the product images may not show up. Please click here to see the post on my blog.
Supply List. <— Click for a clickable and printable list of the products!
Designer Series Paper Sale!
Click the image to see the sale:
S
Here are some helpful links:
S
Thanks for stopping by today, and Sweet Stamping!
Oct 9, 2020 | Cards, Christmas, Gallery, Holiday |
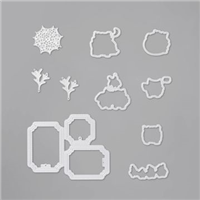
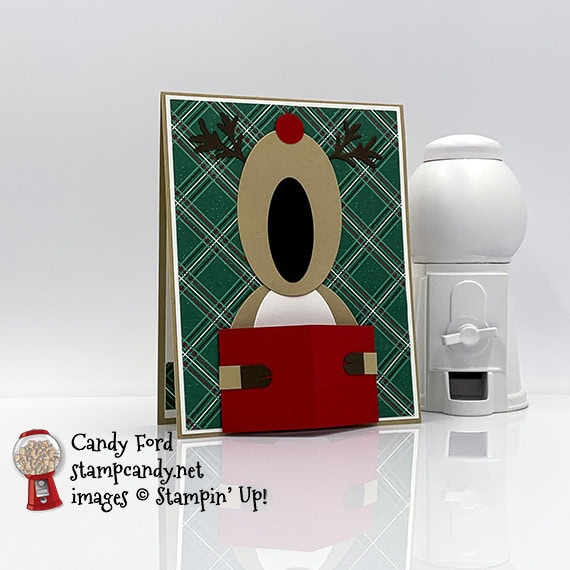
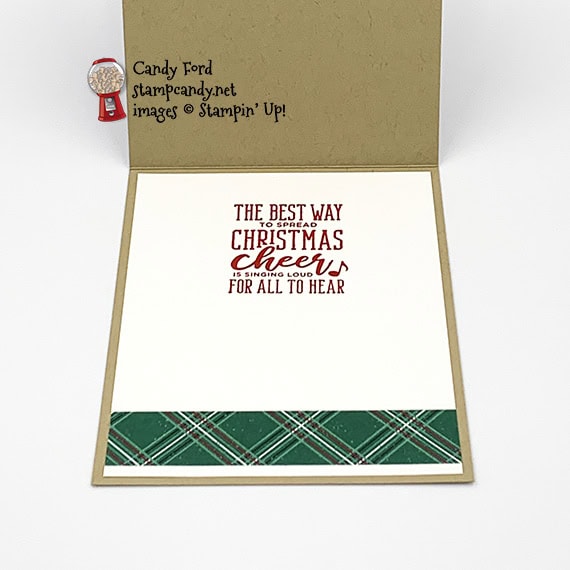
Today I’m sharing another card I made using the Christmas Means More stamp set and ‘Tis the Season Designer Series Paper. I also used the Layering Ovals Dies, Peek-a-Hoot Dies, and Sweetest Borders Dies to create this fun singing reindeer. I used to do a lot of what we used to call “punch art” – creating something using punched (or die cut) pieces. I’m not sure why I stopped, because I always enjoyed it. One of my faves was this reindeer. Today I made his using die cut shapes.
If you are reading this in email, some photos may appear blurry, or may not appear at all. Please click here to see the post on my blog.
S Christmas Means More Christmas Means More Christmas Means More Christmas Means More
Here’s what I made:
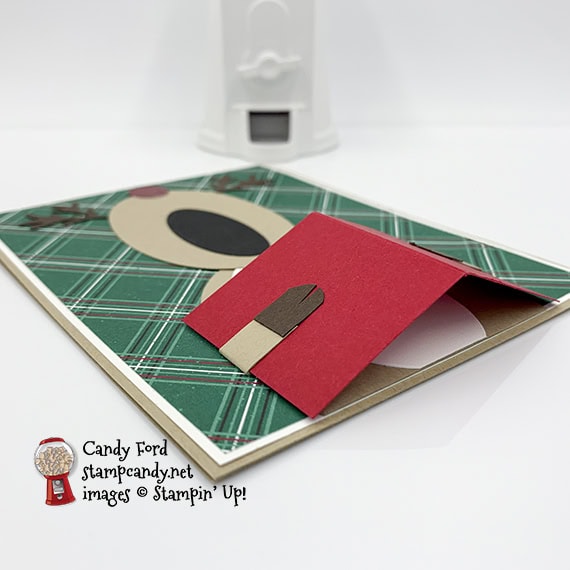
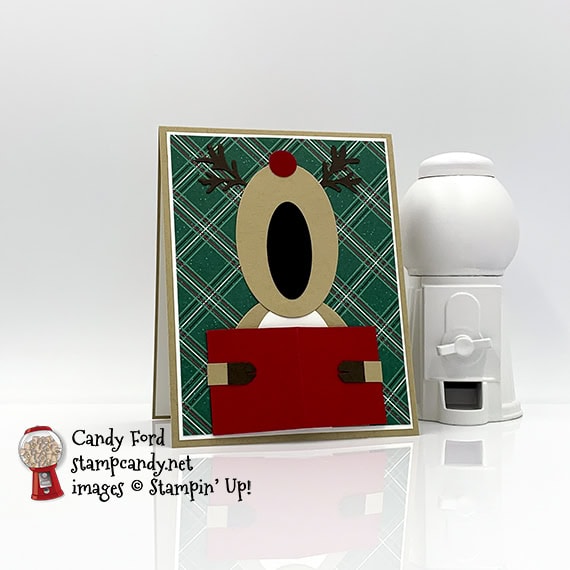
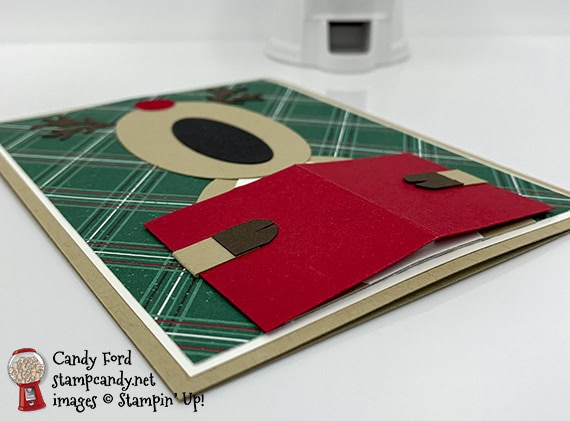
S
Here’s what I did:
Cut and scored with my paper trimmer:
- Crumb Cake card stock (CS) cut to 4-1/4″ x 11″, then scored in half at 5-1/2″
- Whisper White CS layer cut to 4″ x 5-1/4″
- ‘Tis the Season Designer Series Paper (DSP) layer cut to 3-7/8″ x 5-1/8″
- Real Red CS cut to 3″ x 1-1/2″, then scored in half at 1-1/2″
- Crumb Cake CS cut to 3/8″ x 1″, then scored in half at 1/2″ (2 pieces)
- Early Espresso CS cut to 3/8″ x 1/2″ (2 pieces)
- Whisper White CS cut to 4″ x 5-1/4″ for the inside of the card base
- DSP strip cut to 4″ x 7/8″
Stamped with the Christmas Means More stamp set:
- sentiment in Real Red ink onto the Whisper White CS for the inside
Cut scraps of CS using the Layering Ovals Dies:
- Crumb Cake CS using the largest die
- Crumb Cake CS using a middle sized die
- Whisper White CS using a middle sized die
- Basic Black CS using the smallest die
Cut using the Peek-a-Hoot Dies:
- a scrap of Early Espresso CS using the larger branch die
Cut using the Sweetest Borders Dies:
- a scrap of Real Red CS using the little circle die
Assembled the card:
- burnished the fold in the card base with a Bone Folder
- Basic Black CS oval glued onto the smaller Crumb Cake CS oval, near the bottom end, to make the head
- Whisper White CS oval glued onto the larger Crumb Cake CS oval, near the top end, to make the body
- bottom end of smaller Crumb Cake oval glued onto the top end of the larger Crumb Cake oval
- Early Espresso branches glued onto the back of the head, near the top, going out to the side instead of straight up
- small Real Red CS circle glued onto the very tip of the head, for the nose
- reindeer glued onto the DSP layer, then excess body trimmed away from the bottom edge (leaving the sides of the body loose if you want the song book to stand out from the card front)
- fold in the Real Red CS burnished with a Bone Folder, to make the song book
- fold in each 3/8″ x 1″ piece of Crumb Cake CS burnished with a Bone Folder, to make the arms
- 3/8″ x 1/2″ piece of Early Espresso CS glued onto one end of each 3/8″ x 1″ piece of Crumb Cake CS
- Early Espresso ends rounded with Paper Snips, then a skinny V cut from the end, to make the hooves
- front part of arms glued onto the front of the Real Read CS book, folding the rest to the back
- adhered the song book (see 3 options below)
- DSP layer glued onto the Whisper White CS layer
- Whisper White CS layer glued onto the front of the card base
- DSP strip glued onto the Whisper White CS for the inside
- Whisper White CS with sentiment glued onto the inside of the card base
Adhered the song book:
The bottom of the book should be even with the bottom of the reindeer body and DSP layer.
- First is the way I did in the first 2 photos above. Be aware that you will need to hand deliver this card, or send it in a box.
- back part of arms wrapped around and glued onto the back side of the reindeer body
- Second is the way I did in the bottom 3 photos above.
- 2 layers of Mini Stampin’ Dimensionals applied along the inside of the fold in the Real Red CS book
- back part of arms folded back and glued onto the card front, with the Dimensionals sticking to the reindeer body
- Third is to glue the book flat. Simply fold the back part of the arms around to the back of the book and glue the whole thing onto the card front. I would suggest applying a little ink along the spine before gluing it down, so it will still look like a book.
S
Here are today’s colors:
You can click on each one to see all the products that come in that color!
S
Here’s what I used:
Click on these images for more details and to purchase. If you are reading this post in email, the product images may not show up. Please click here to see the post on my blog.
Supply List. <— Click for a clickable and printable list of the products!
S
Designer Series Paper Sale!
Click the image to see the sale:
S
Here are some helpful links:
S
Thanks for stopping by today, and Sweet Stamping!
Oct 8, 2020 | Blog Hop, Cards, Food, Gallery, Gift Wrap, Gifts, Halloween, Holiday |

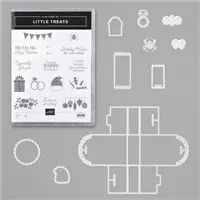
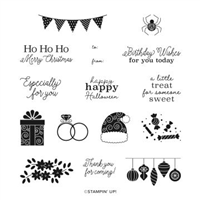
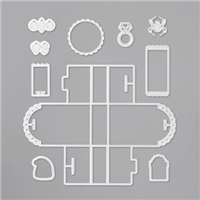
Welcome to the October 2020 OSAT Blog Hop! This month’s theme is Trick or Treats, so we’re featuring Halloween projects, cards, and treat holders. I made a note card and treat holder using the Little Treats Bundle (Little Treats stamp set and Little Treat Box Dies,) Stitched So Sweetly Dies, and Black Glittered Organdy Ribbon.
Be sure to hop all the way around to all the stops to see all the great projects this group has created for you today!
If you are reading this in email, some photos may appear blurry, or may not appear at all. Please click here to see the post on my blog.
S October 2020 OSAT October 2020 OSAT October 2020 OSAT
Here’s what I made:


S
Here’s what I did:
Cut and scored with my paper trimmer:
- Basic Black card stock (CS) cut to 5″ x 7″, then scored in half at 3-1/2″
- Whisper White CS cut to 4-1/2″ x 3″ for the inside of the card base
Stamped with the Little Treats stamp set:
- card sentiment and 3 spiders in Tuxedo Black Memento ink onto a scrap of Real Red CS
- box sentiment and candies in Tuxedo Black Memento ink onto a scrap of Real Red CS
Cut using the Little Treat Box Dies:
- box from a scrap of Basic Black CS
Cut using the Stitched So Sweetly Dies:
Colored using Basic Black Stampin’ Write Marker:
- a straight line from each spider to the top of the die cut panel (I used a clear block as a straight edge.)
Assembled the card:
- burnished the fold in the card base with a Bone Folder
- ribbon wrapped around the front of the card base and tied in a bow
- Real Red die cut adhered onto the front of the card base using Black Stampin’ Dimensionals
- Whisper White CS glued onto the inside of the card base
Assembled the box:
- burnished the folds in the box with a Bone Folder
- box assembled by inserting tabs into the slots and glued in place
- Real Red die cut glued onto the front of the box
- box tied closed with a piece of ribbon
S
Here’s the October 2020 OSAT Blog Hop:
S
Here are today’s colors:
You can click on each one to see all the products that come in that color!
S
Here’s what I used:
Click on these images for more details and to purchase. If you are reading this post in email, the product images may not show up. Please click here to see the post on my blog.
S
S
Designer Series Paper Sale!
Click the image below to see the sale:
stitched so sweetly
Here are some helpful links:
S
Thanks for stopping by today, and Sweet Stamping!