I realize that where you live all the trees may be bear, and there may even be snow on the ground, but in Georgia we still have some nice Autumn colors. That was the inspiration for today’s card. I used the Colorful Seasons stamp set and Seasonal Layers Thinlits Dies, which are available as a bundle to save 10%. I stamped the leaves using a baby wipe technique.
Here’s what I made:
Here’s what I did:
Cut and scored with my Stampin’ Trimmer:
Cajun Craze card stock (CS) cut to 5-1/2″ x 8-1/2″, then scored in half at 4-1/4″
Very Vanilla CS cut to 5-1/4″ x 4″ (2 pieces)
Stamped with the Colorful Seasons stamp set:
sentiment in Old Olive ink onto the Very Vanilla CS layer
leaves onto a scrap of Very Vanilla CS using the following baby wipe technique
Baby Wipe StampingTechnique:
layered baby wipes in one side of a plastic stamp case, four layers thick
used Stampin’ Ink Refills in Cajun Craze, Pumpkin Pie, Crushed Curry, and Old Olive to scatter random dots of ink onto the stack of baby wipes
used this as an ink pad to stamp the leaves, being sure to clean the stamp between each leaf
NOTE: You can close the stamp case to keep it moist for a while, so you can reuse it.
Die cut using the Seasonal Layers Thinlits:
Leaves
Assembled the card:
Very Vanilla CS layer glued onto the front of the card base
Leaves glued onto the Very Vanilla CS layer
Here are today’s colors:
You can click on each one to see all the products that come in that color!
Stampin’ Blends alcohol markers are now available! Click HERE for more info.
Hostess Code for the month of November (JBHB42YT) Find out more about HOW, WHEN and WHY to use the code HERE.
November’s FREE gift: Stitched Felt Embellishments Find out more HERE.
Gumball Rewards for all orders over $50. Find out more HERE
This is a great time to join my team! In addition to the great sale prices in the Online Extravaganza, you’ll also get the demonstrator discount of 20%. CLICK HERE for more information. Contact me with any questions: email candy@stampcandy.net or call/text 404-661-5222
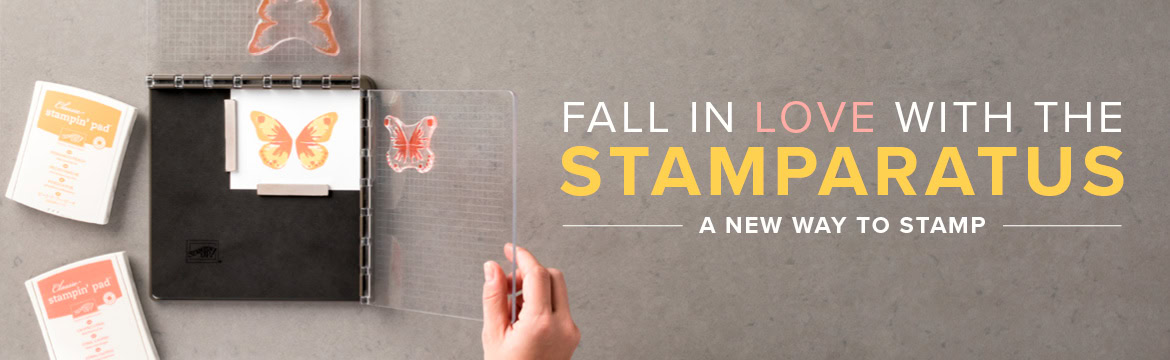
I am so EXCITED that I’m bursting at the seams!! This revolutionary new stamp positioner – the Stamparatus – was unveiled to us at Stampin’ Up! OnStage last week. They made us keep it all a secret until today – but now the “cat’s out of the bag” and you want to be sure to get in line for this one! It’s awesome!!
Why do YOU need one? You’ll fall in love with stamping all over again when you learn everything you can do with it!
Make multiples with ease
Consistently stamp crisp, clean images
If you want a darker impression, apply more ink and restamp—no need to start over
Make fewer mistakes, saving time and money
Easily create 2-step, 3-step, and 4-step stamped images using reversible plates
Develop new and specialized stamping techniques with adjustable stamping plates and precision placement
Product details:
Compatible with Stampin’ Up!’s red rubber and photopolymer stamp
Foam mat to use with photopolymer stamps
Rulers and gridlines for quick measuring
2 open sides so you can stamp on larger paper
2 reversible plates: a total of 4 surfaces to work with
2 magnets to hold the paper in place
Magnet storage areas
Retail Price–$49.00 USD/$65.00 CAD
Okay. I’ve gotta have one. How do I get in line?
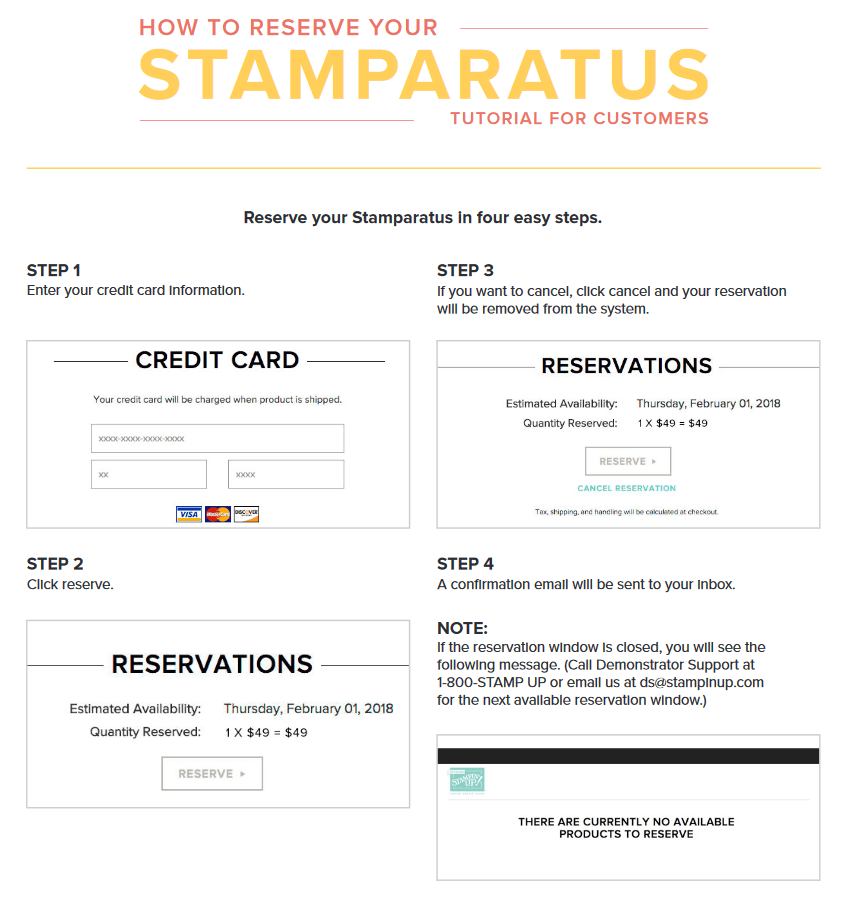
With the launch of this tool, we’re trying something different: testing a new reservation system. It acts like a true preorder: you reserve your spot and we guarantee shipment as soon as the product arrives in our warehouse. Demonstrators and customers will place reservations and receive their product at the same time. This system will allow us to get the product to market as soon as possible while avoiding backorders and efficiently managing inventory.
The global launch will feature two reservation windows. The remaining window is December 5-30, 2017. The tools will ship in the order in which the reservations are received, so order soon! This is the last chance you’ll have to order the Stamparatus until the 2018-2019 Annual Catalog goes live in June 2018. Unless you join my team, in which case you’ll be able to preorder from the new Annual Catalog in May!
For each reservation window, please note the following:
Limit is 1 tool per person per reservation window.
Customers may participate in both reservation windows.
In order to reserve your Stamparatus, you are required to provide your credit card information, so have it handy.
Credit cards will not be charged until the Stamparatus ships from our facility. When you close your order, be sure to verify that your credit card and shipping information is correct.
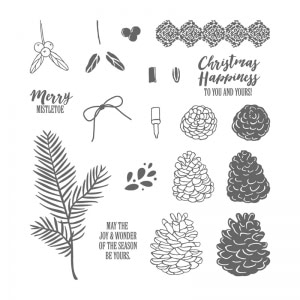
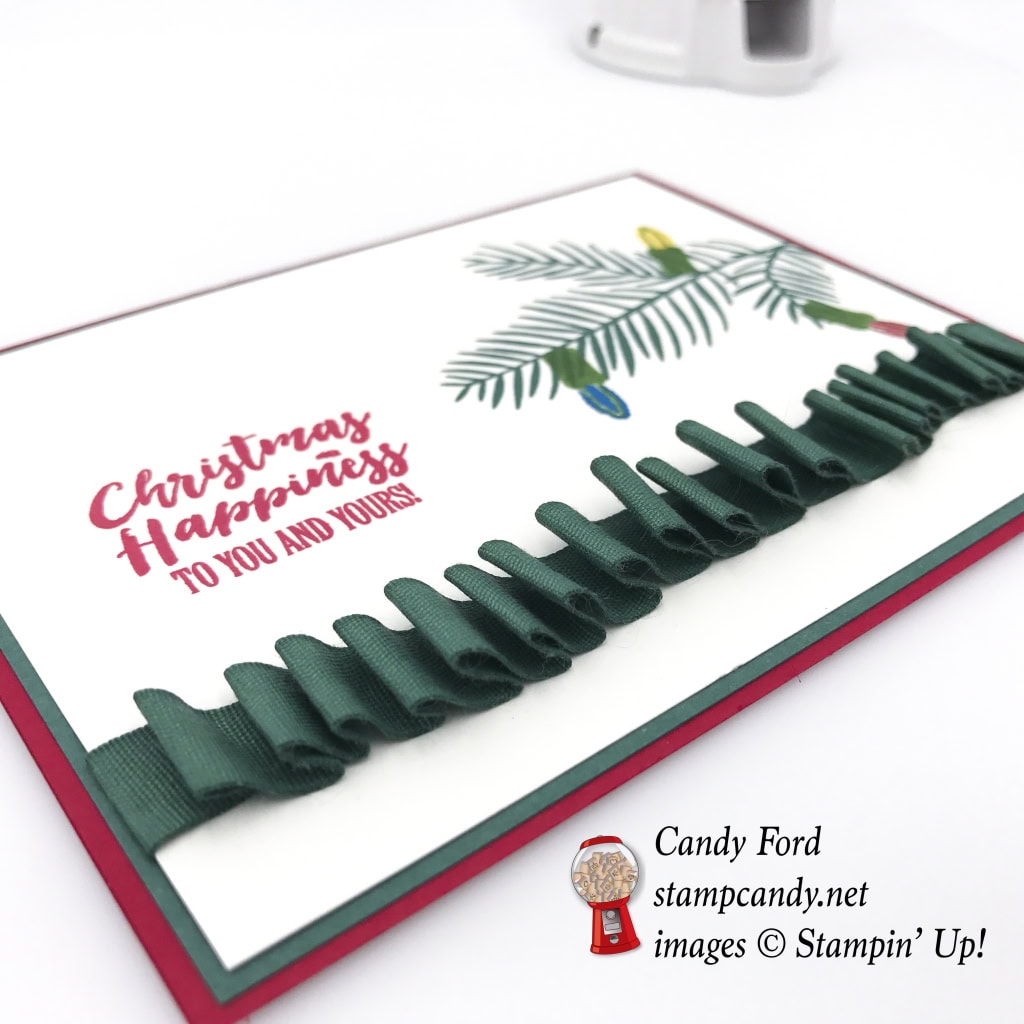
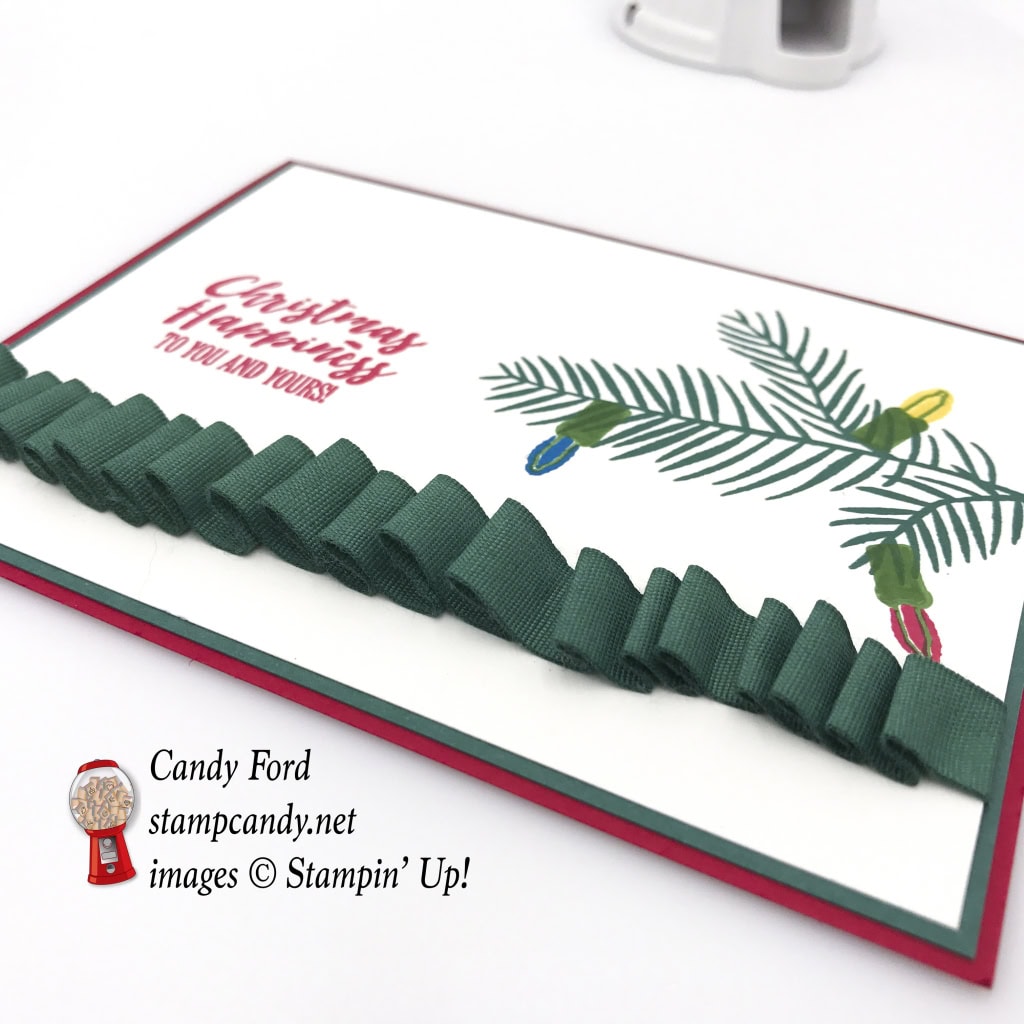
I finally got around to using the Christmas Happiness stamp set from the 2017 Holiday Catalog, and it’s a beauty. It has images of mistletoe, pine cones, pine sprig, and Christmas lights, plus some very sweet sentiments. For today’s card, I used the sprig and lights and one of the sentiments. I added a special touch by ruching some Tranquil Tide 1/2″ Finely Woven Ribbon on the front of the card. At first I tried to make it look uneven, but it looked very even, so I tried to continue making it look even, then it started getting wonky. Tell me what you think.
Real Red card stock (CS) cut to 5-1/2″ x 8-1/2″, then scored in half at 4-1/4″
Tranquil Tide CS cut to 5-1/4″ x 4″
Whisper White CS cut to 5″ x 3-3/4″ (2 pieces: one for the top layer and one for the inside)
Stamped with the Christmas Happiness stamp set:
sprig in Tranquil Tide ink onto the Whisper White CS layer
light sockets in Garden Green ink onto the sprig
light bulbs filled in with Real Red, Pacific Point, and Daffodil Delight inks
sentiment in Real Red ink to the left of the sprig
Assembled the card:
ribbon adhered to the Whisper White CS layer using Fast Fuse – put a line of adhesive on the CS; adhered the ribbon, making waves with my fingers to create the ruched effect; wrapped the ends around to the back of the CS and secured with Fast Fuse (Tear & Tape works well for this technique, too.)
Whisper White CS layer glued onto the Tranquil Tide CS layer
Tranquil Tide CS layer glued onto the front of the card base
second piece of Whisper White CS glued to the inside of the card base
Here are today’s colors:
You can click on each one to see all the products that come in that color!
Click on the images for more details and to purchase.
Here are some great ways to save until October 31:
Designer Series Paper Sale October 1-31, Buy 3 Get 1 FREE! See details HERE.
Hostess Code for the month of October (HGB2HGXK) Find out more about HOW, WHEN and WHY to use that HERE.
October’s FREE gift Mini Pizza Boxes Find out more HERE.
New Merry Patterns Hostess Stamp Set – added to your Host Rewards There’s a brand new stamp set that isn’t in any catalog. You can’t buy it, but you can get if for free with a qualifying order! You can host a party, or place your own order, or join under me and get a 20% discount on your demonstrator order. Find out more HERE.
Join me November 4 in Riverdale, GA for the Autumn Artisan Bazaar. I will have lots of cards and gifts for sale. And I’ll be doing a prize drawing! CLICK HERE for more details!
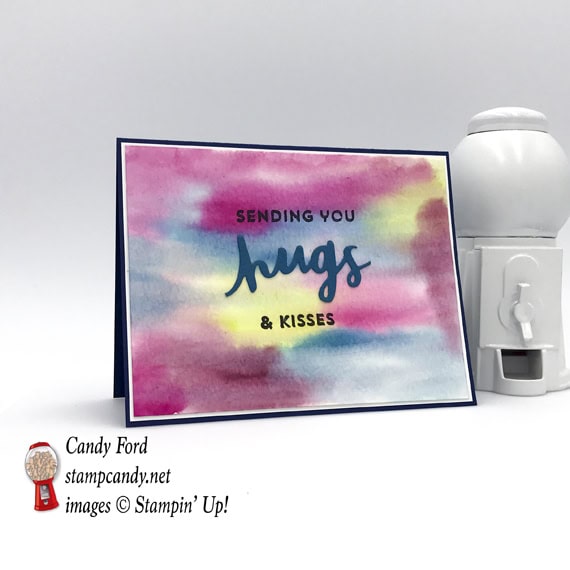
Today I’m sharing a little watercolor fun with this card made using the Lovely Inside & Out stamp set and Lovely Words Thinlits Dies (available in a bundle to save 10%!) I used four of the five 2017-2019 In Colors for a bright and happy palette.
Here’s what I made:
Here’s what I did:
Cut and scored with my Stampin’ Trimmer:
Dapper Denim card stock (CS) cut to 8-1/2″ x 5-1/2″, scored at 4-1/4″
Whisper White CS cut to 5-1/4″ x 4″ (2 pieces)
Watercolor Paper cut to 5″ x 3-3/4″
Colored using Aqua Painters:
watercolor paper layer in Dapper Denim, Fresh Fig, Lemon Lime Twist, and Berry Burst inks
Make sure this is completely dry before stamping. You can use a Heat Tool to speed the drying process.
Stamped with the Lovely Inside & Out stamp set:
small parts of sentiment in Basic Black ink onto the watercolor paper layer
Die cut using the Lovely Words Thinlit Dies :
“hugs” from Dapper Denim CS
Assembled the card:
one Whisper White CS layer glued onto the front of the card base
watercolor paper layer glued onto the Whisper White CS layer
die cut word glued onto the watercolor paper layer
other Whisper White CS glued to the inside of the card base
Here are today’s colors:
You can click on each one to see all the products that come in that color!
Click on the images for more details and to purchase.
Here are some key points to remember:
Designer Series Paper Sale October 1-31, Buy 3 Get 1 FREE! See details HERE.
Hostess Code for the month of October (HGB2HGXK) Find out more about HOW, WHEN and WHY to use that HERE.
October’s FREE gift Mini Pizza Boxes Find out more HERE.
New Merry Patterns Hostess Stamp Set – added to your Host Rewards There’s a brand new stamp set that isn’t in any catalog. You can’t buy it, but you can get if for free with a qualifying order! You can host a party, or place your own order, or join under me and get a 20% discount on your demonstrator order. Find out more HERE.
Gumball Rewards for all orders over $50 Find out more HERE.
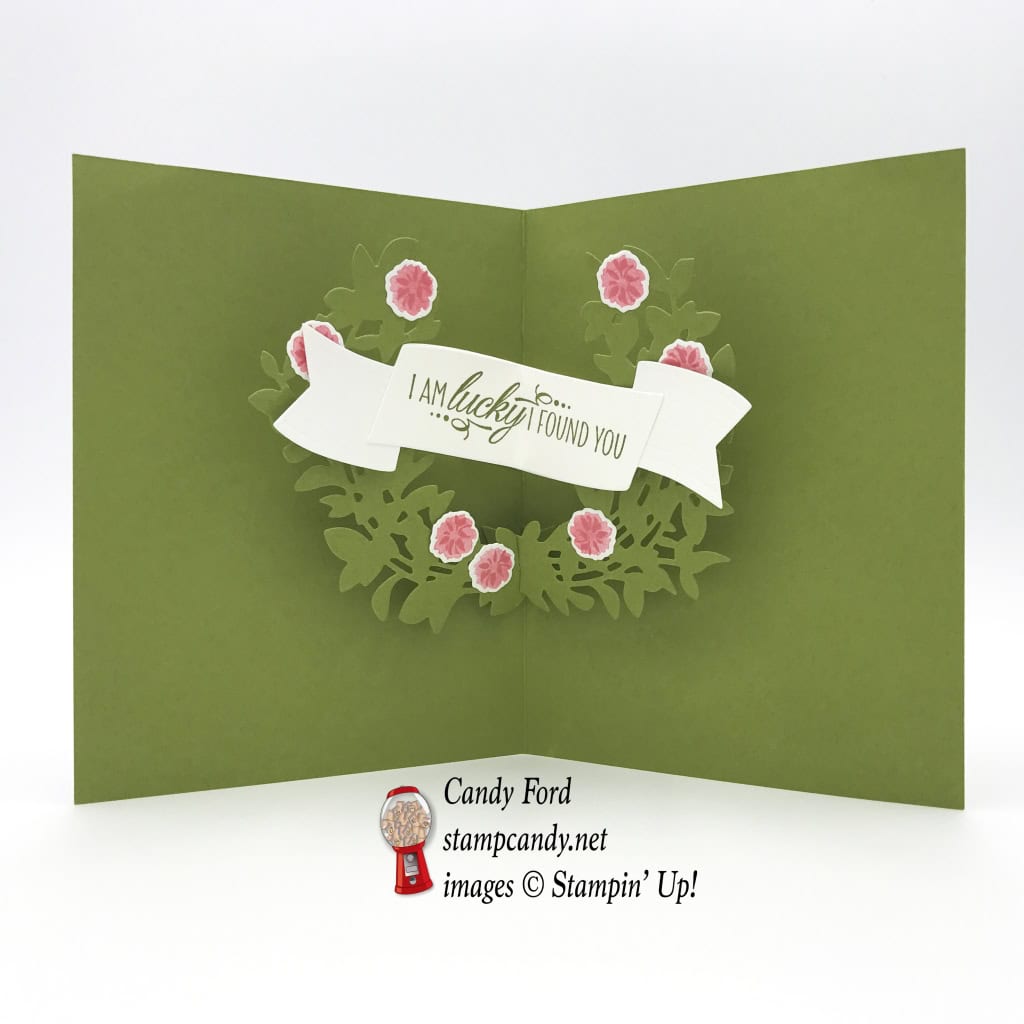
Yes, you! Today’s card is in honor of all of you who support my small stamping business. I am so appreciative, and I’m sure I don’t say it enough. I used the Lovely Friends bundle to create this card with pop up laurel and banner.
I’m sorry I’ve missed posting a few days this week. Tonight my husband and I host our annual Halloween party, and this week has seen a whirlwind of activity getting prepared for it. Hubby’s been out of town so my sister and some friends have been helping me. Our theme this year is Hollywood. Here’s just a little sneak peek:
Here’s what I made:
Here’s what I did:
Cut and scored with my Stampin’ Trimmer:
Old Olive card stock (CS) cut to 8-1/2″ x 5-1/2″, then scored in half at 4-1/4″
Flirty Flamingo CS cut to 4″ x 5-1/4″
Whisper White CS cut to 3-7/8″ x 5-1/8″
Stamped with the Lovely Friends stamp set:
sentiment and dots in Flirty Flamingo ink onto the Whisper White CS layer
leaves in Old Olive ink around the edges of the Whisper White CS layer
small flowers in Flirty Flamingo ink onto a scrap of Whisper White CS (two step stamp: stamped off for lighter layer)
inside sentiment onto the die cut banner
Die cut using the Lovely Laurel Thinlits:
two laurel pieces from a scrap of Old Olive CS
two banner pieces from a scrap of Whisper White CS
flowers
Assembled the card:
assembled laurel glued onto the inside of the card base
assembled banner glued onto the inside of the card base, inside the laurel
flowers glued onto the laurel
Flirty Flamingo CS layer glued onto the front of the card base
Whisper White CS layer glued onto the Flirty Flamingo CS layer
Here are today’s colors:
You can click on each one to see all the products that come in that color!
Click on the images for more details and to purchase.
Here are some key points to remember:
Designer Series Paper Sale October 1-31, Buy 3 Get 1 FREE! See details HERE.
Hostess Code for the month of October (HGB2HGXK) Find out more about HOW, WHEN and WHY to use that HERE.
October’s FREE gift Mini Pizza Boxes Find out more HERE.
New Merry Patterns Hostess Stamp Set – added to your Host Rewards There’s a brand new stamp set that isn’t in any catalog. You can’t buy it, but you can get if for free with a qualifying order! You can host a party, or place your own order, or join under me and get a 20% discount on your demonstrator order. Find out more HERE.
Gumball Rewards for all orders over $50 Find out more HERE.
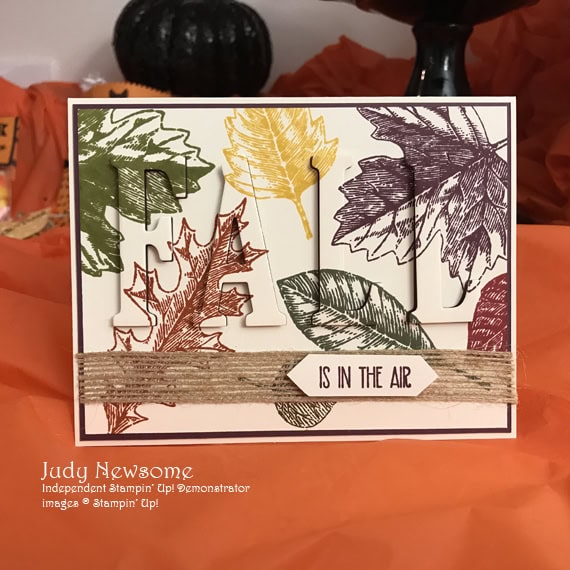
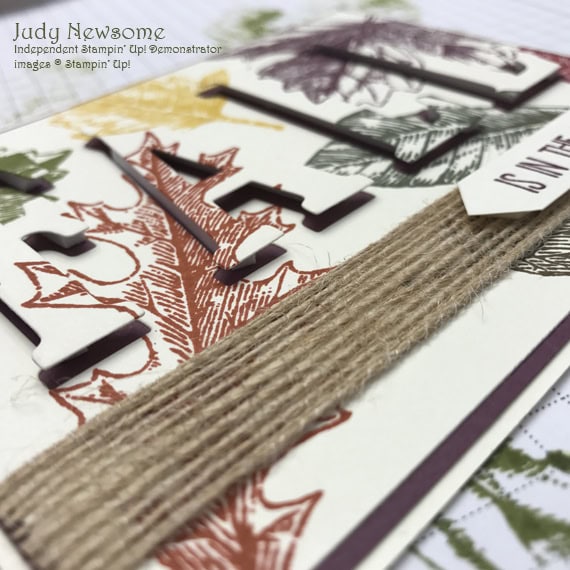
The eclipse technique is all the rage right now. It looks difficult and complicated, but it’s deceptively easy. At the September Candy Hearts Team Meeting, Judy Newsome demonstrated this technique, and we all got to make this awesome Fall card that she designed. The Vintage Leaves stamp set and the Large Letters Framelits Dies are the stars of the card.
Here’s what she made:
Here’s what she did:
Cut and scored with my Stampin’ Trimmer:
Very Vanilla Thick card stock (CS) cut to 5-1/2″ x 8-1/2″, then scored in half at 4-1/4″
Fresh Fig CS cut to 5-3/8″ x 4-1/8″
Very Vanilla CS* cut to 5-1/4″ x 4″
Very Vanilla CS* cut to 1/2″ x 3″
* the top layers can be either regular or thick Very Vanilla CS, but the card base needs to be the thick CS
Stamped with the Vintage Leaves stamp set:
assorted leaves in Fresh Fig, Always Artichoke, Crushed Curry, Cajun Craze, and Early Espresso inks onto the Very Vanilla CS layer
Stamped with the Sunshine Sayings stamp set:
sentiment in Fresh Fig ink onto the Very Vanilla CS strip, then cut the ends into points with Paper Snips
Die cut using the Large Letters Framelit Dies:
four letters: F A L L
Line up the letters on the Very Vanilla CS layer (with leaves) and run through the Big Shot
Keep all pieces that are cut, including the little triangle from the center of the A
Assembled the card:
5-1/4″ piece of Burlap ribbon adhered to the Very Vanilla CS layer with Tear & Tape, then wrapped ends around to the back side (or you could use Fast Fuse)
Very Vanilla CS layer glued onto the Fresh Fig CS layer
letters placed into their negative spaces and adhered with Foam Adhesive Strips
glue the center piece of the A to the Fresh Fig CS layer down in the raised A
Fresh Fig CS glued onto the front of the card base
sentiment adhered to the burlap ribbon with Stampin’ Dimensionals
Here are today’s colors:
You can click on each one to see all the products that come in that color!
Click on the images for more details and to purchase.
Here are some key points to remember:
World Card Making Day Sale October 1-10, 15% off select card making essentials. See details HERE.
Designer Series Paper Sale October 1-31, Buy 3 Get 1 FREE! See details HERE.
Hostess Code for the month of October (HGB2HGXK)
Find out more about HOW, WHEN and WHY to use that HERE.
October’s FREE gift
Mini Pizza Boxes
Find out more HERE.
New Merry Patterns Hostess Stamp Set – added to your Host Rewards There’s a brand new stamp set that isn’t in any catalog. You can’t buy it, but you can get if for free with a qualifying order! You can host a party, or place your own order, or join under me and get a 20% discount on your demonstrator order. Find out more HERE.
Gumball Rewards for all orders over $50 Find out more HERE.