Aug 16, 2018 | Cards, Gallery, Techniques |
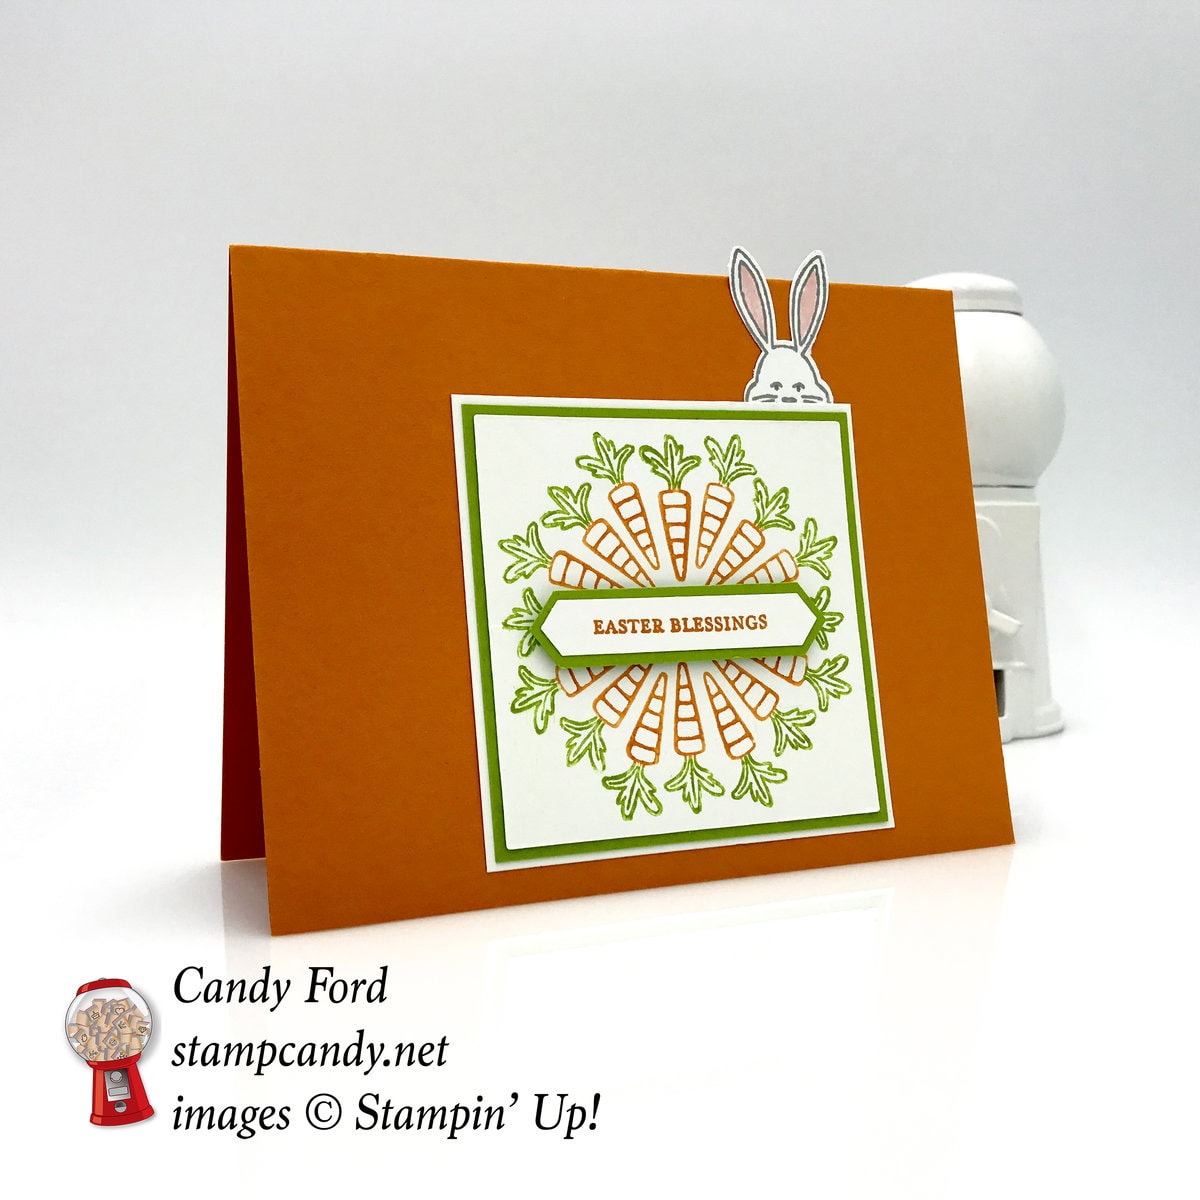
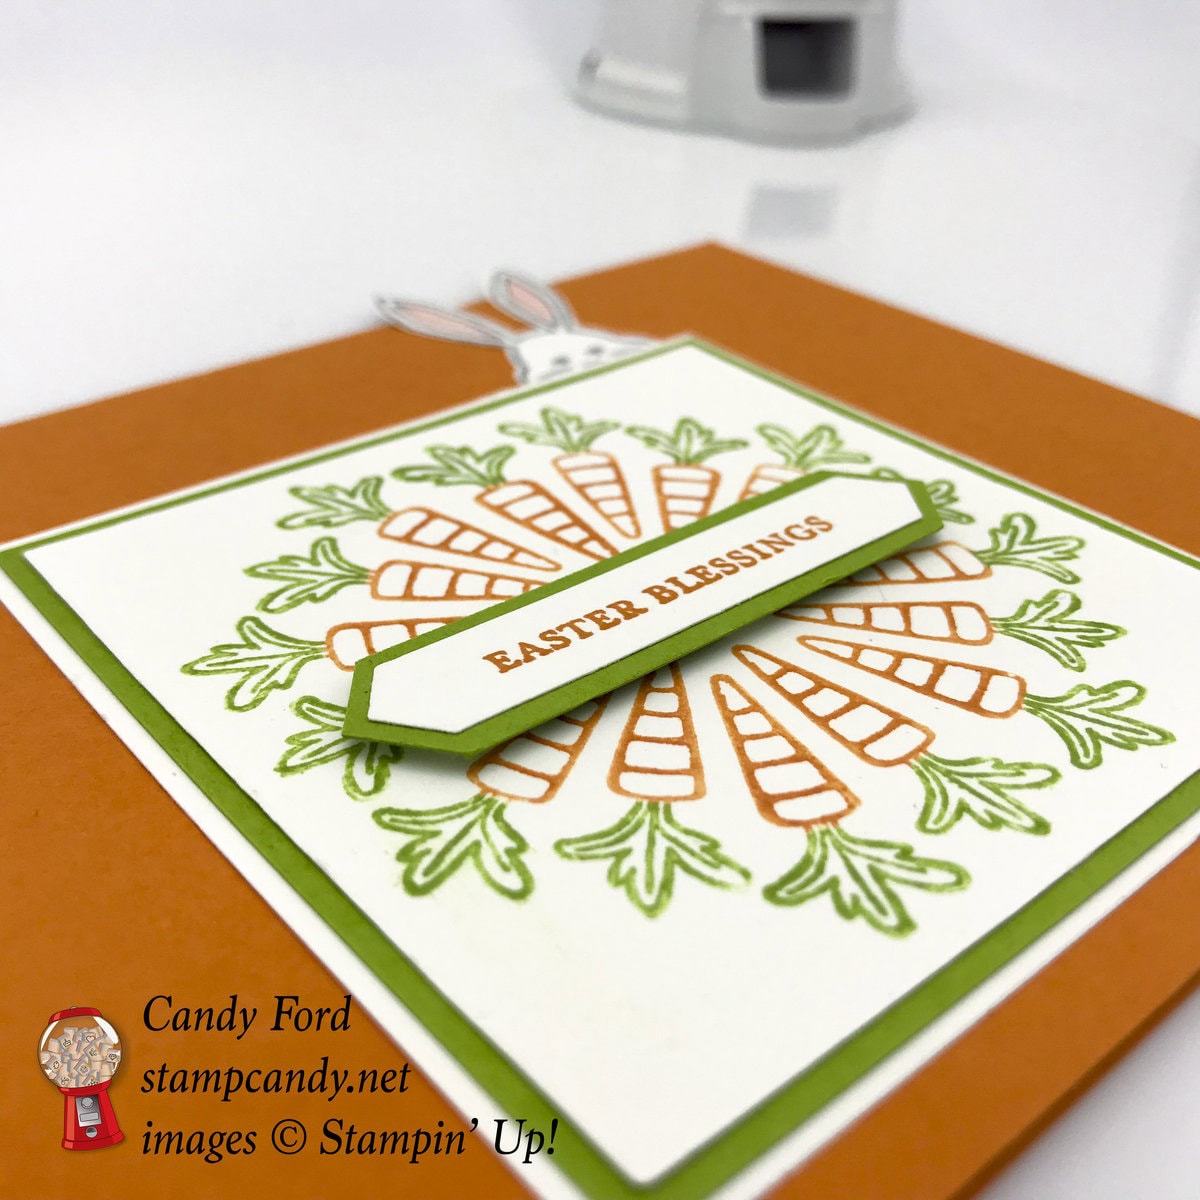
Today I’m sharing another sample card I made for the Stamparatus wreath demonstration I did at the Stamp or Dye group gathering this month. You can see my post about the gathering here. I used the Best Bunny bundle (Best Bunny stamp set & Bunny Builder Punch) and the Itty Bitty Greetings stamp set to create this Easter card. You can see how to stamp the wreath using a Stamparatus on my previous post here.
Here’s what I made:
Here’s what I did:
Cut and scored with my Stampin’ Trimmer:
- Pumpkin Pie card stock (CS) cut to 5-1/2″ x 8-1/2″, then scored in half at 4-1/4″
- Granny Apple Green CS cut to 3″ x 3″
- Whisper White CS cut to 3-1/8″ x 3-1/8″
- Granny Apple Green CS cut to 4″ x 1/2″
- Whisper White CS cut to 5-1/4″ x 4″ for the inside of the card
- Whisper White CS scraps for punches
Stamped with the Best Bunny stamp set:
- bunny in Smoky Slate ink onto a scrap of Whisper White CS
- carrot in Pumpkin Pie and Granny Apple Green inks, colored using Stampin’ Write Markers
- NOTE: I used a Stamparatus to stamp the wreath. I stamped around once, stamping 8 carrots. Then I moved the stamp so it would stamp between the first carrots, and stamped around another time to stamp 8 more carrots.
- See how to stamp a Stamparatus wreath on my previous post here.
Stamped with the Itty Bitty Greetings stamp set:
- sentiment in Pumpkin Pie ink onto a scrap of Whisper White CS
Die cut using the Layering Squares Framelits:
- Whisper White CS using the largest plain die
Cut using the Classic Label Punch:
Colored using a Stampin’ Write Marker:
- inside bunny ears in Powder Pink ink
Cut using the Bunny Builder Punch:
Assembled the card:
- burnished the fold in the card base with a Bone Folder
- sentiment glued onto the Granny Apple Green CS strip, then the ends trimmed using Paper Snips
- Granny Apple Green CS strip adhered onto the stamped wreath layer using Stampin’ Dimensionals
- wreath layer glued onto the Granny Apple Green CS layer
- Granny Apple Green CS square layer glued onto the Whisper White CS square layer
- bunny glued onto the back of the Whisper White CS square layer, peeking over the top
- Whisper White CS square layer glued onto the front of the card base
- 5-1/4″ x 4″ Whisper White CS layer glued onto the inside of the card base
Here are today’s colors:
You can click on each one to see all the products that come in that color!
Here’s what I used:
Click on these images for more details and to purchase.
Here are 3 amazing limited time offers – August only!:
1) Color Your Seasons Special, August 1-31, 2018, While Supplies Last!
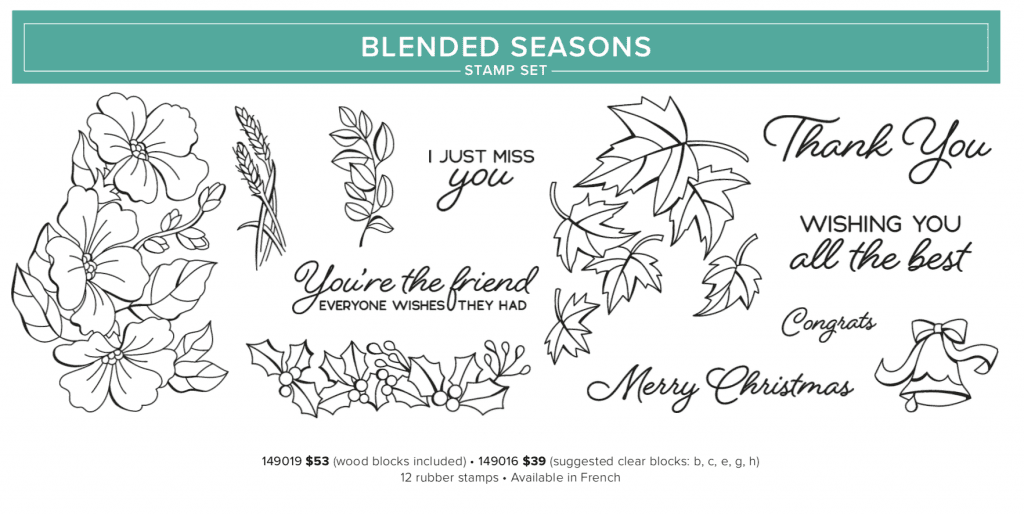
Stampin’ Up!’s® Blended Seasons Stamp Set, coordinating Framelits™ Dies, and Watercolor Pencils are perfect for every season of creating! Plus, save 10% when you buy the stamp set and Framelits in a bundle! But don’t wait—these exclusive products are only available until August 31 while supplies last. So get in the mood to create something full of colors and seasons!
Introducing the all-new, limited-time Color Your Season products:
- Blended Seasons Stamp Set, an exclusive 12-piece wood- or clear-mount stamp set with images for every season – #149019 @ $53 (wood blocks included); #149016 @ $39 (suggested clear blocks: b, c, e, g, h)
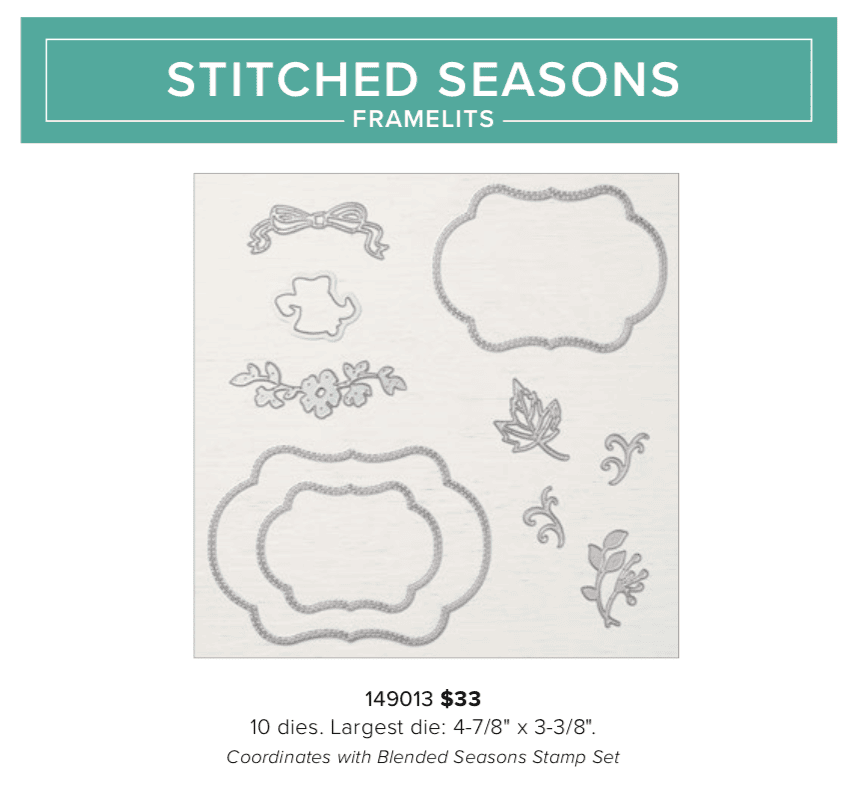
- Stitched Season Framelits Dies, a coordinating stitched die that includes stitching on both the positive and negative images! #149013 @ $33. Has10 dies. Largest die: 4-7/8″ x 3-3/8″.
- Save 10%! Blended Seasons BUNDLE – BLENDED SEASONS STAMP SET + STITCHED SEASONS FRAMELITS DIES – Wood-mount #149893 @ $77.25, Clear-mount #149894 @ $64.75
- Watercolor Pencils in 10 new colors! #149014 @ $12.50. Acid free, lignin free.10 pencils in Stampin’ Up! colors: Balmy Blue, Cajun Craze, Cherry Cobbler, Coastal Cabana, Crushed Curry, Flirty Flamingo, Garden Green, Gorgeous Grape, Granny Apple Green, Night of Navy
- Products available while supplies last until August 31, 2018 – while supplies last
- Items may be included as part of a new demonstrator’s Starter Kit.

2) Bonus Days are back!
- For every $50 you spend on an order in August, you will receive a $5 coupon to use in September!
- There is no limit to the number of coupons you may earn.
- An email address is required to participate; Bonus Days coupon codes can be delivered only via email.
- Bonus Days coupon codes may be redeemed for any product (excluding Starter Kits, demonstrator supply items, and Paper Pumpkin subscriptions.) Although new prepaid Paper Pumpkin codes may be discounted with Bonus Days coupon codes.

3) Buy 10 Stampin’ Ink pads in August and get one FREE!!
- Buy any 10 ink pads from me in August, I will give you another one FREE!
- Contact me to place your order, so I can add your FREE ink pad!
Here’s some more cool stuff you should check out:
Thanks for stopping by today, and Sweet Stamping!
Aug 13, 2018 | Cards, Gallery, Techniques |
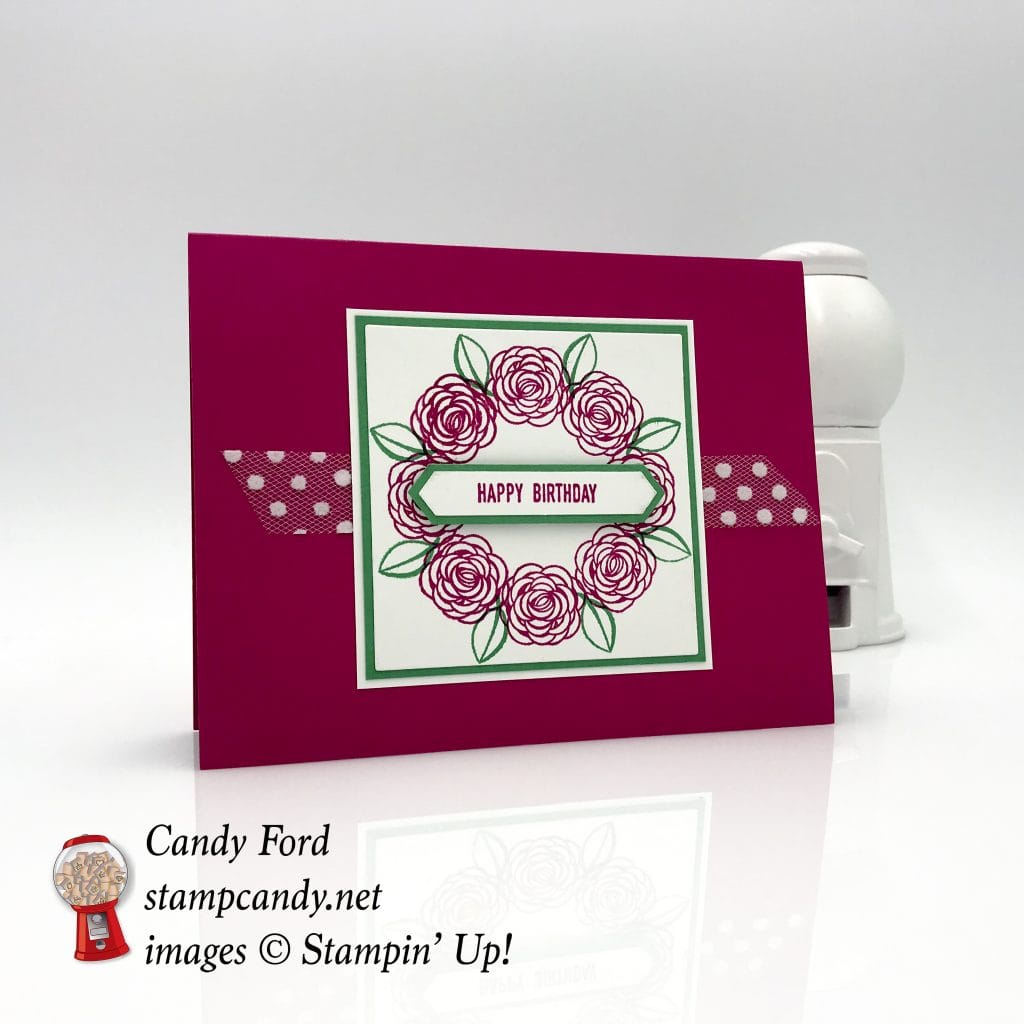
Today I’m sharing one of the examples I made for the day I spent with the Stamp or Dye group. You can see my post about our gathering here. I used the Happy Birthday Gorgeous stamp set for the flowers & leaves of the wreath, and the Itty Bitty Greetings stamp set for the sentiment, which I cut using the Classic Label Punch.
Here’s what I made:
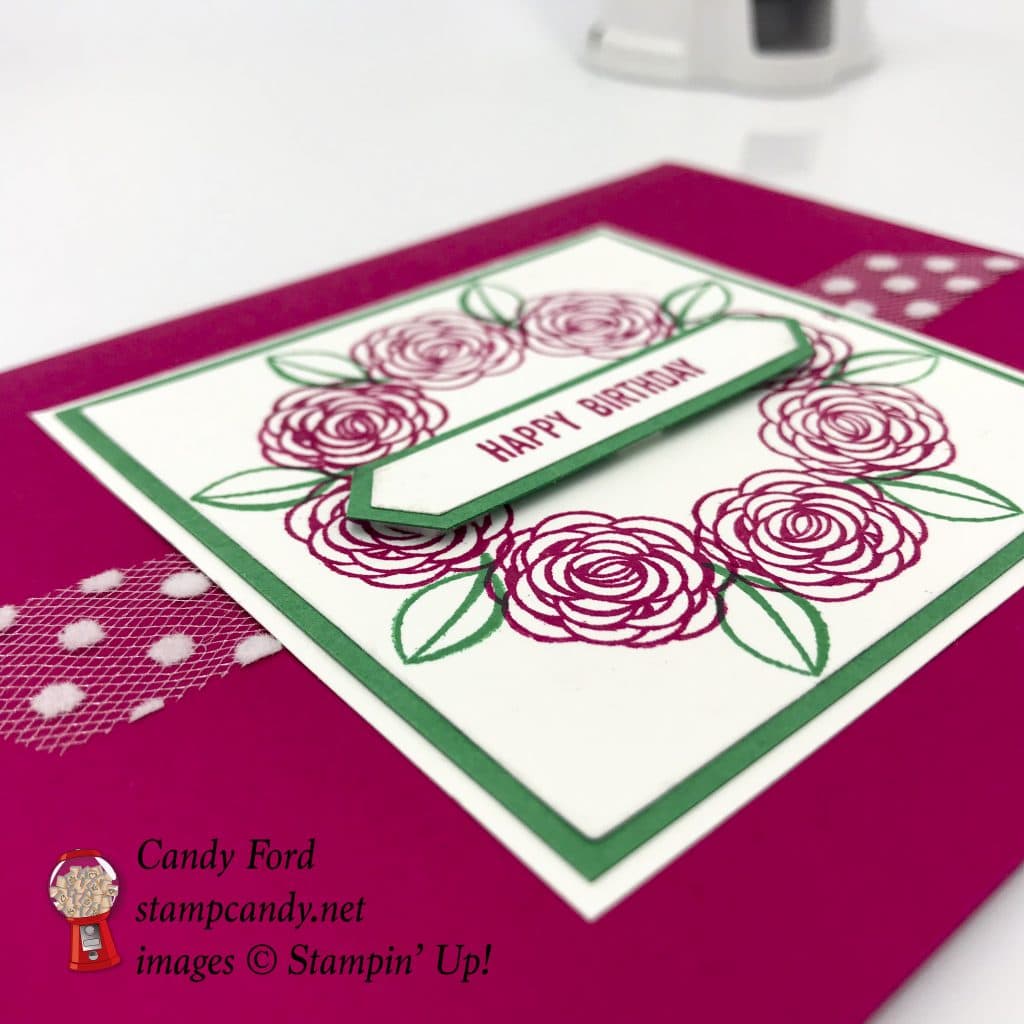
Here’s what I did:
Cut and scored with my Stampin’ Trimmer:
- Lovely Lipstick card stock (CS) cut to 5-1/2″ x 8-1/2″, then scored in half at 4-1/4″
- Call Me Clover CS cut to 3″ x 1/2″
- Whisper White CS cut to 5-1/4″ x 4 for the inside of the card
Die cut using the Layering Squares Framelits:
- one square (appr. 2-7/8″) from a scrap of Whisper White CS
- second square, next size up, from a scrap of Call Me Clover CS
- third square, next size up from the second one, from a scrap of Whisper White CS
Stamped using the Happy Birthday Gorgeous stamp set:
- See how to stamp the wreath with a Stamparatus here.
- flowers in Lovely Lipstick ink onto the smaller Whisper White CS die cut square
- leaves in Call Me Clover ink between the flowers
Stamped using the Itty Bitty Greetings stamp set:
- sentiment in Lovely Lipstick ink onto a scrap of Whisper White CS
Cut using the Classic Label Punch:
Assembled the card:
- burnished the fold in the card base with a Bone Folder
- sentiment glued onto the Call Me Clover CS strip, then trimmed the ends using Paper Snips
- sentiment strips adhered onto the wreath layer using Stampin’ Dimensionals
- wreath layer glued onto the Call Me Clover die cut layer
- Call Me Clover square glued onto the larger Whisper White die cut layer
- whisper White Polka Dot Tulle Ribbon adhered to the front of the card base using Tear & Tape
- larger Whisper White Die cut layer glued over the ribbon
- 5-1/4″ x 4″ Whisper White CS glued onto the inside of the card base
Here are today’s colors:
You can click on each one to see all the products that come in that color!
Here’s what I used:
Click on these images for more details and to purchase.
Here are 3 amazing limited time offers:
1) Color Your Seasons Special, August 1-31, 2018, While Supplies Last!
Stampin’ Up!’s® Blended Seasons Stamp Set, coordinating Framelits™ Dies, and Watercolor Pencils are perfect for every season of creating! Plus, save 10% when you buy the stamp set and Framelits in a bundle! But don’t wait—these exclusive products are only available until August 31 while supplies last. So get in the mood to create something full of colors and seasons!
Introducing the all-new, limited-time Color Your Season products:
- Blended Seasons Stamp Set, an exclusive 12-piece wood- or clear-mount stamp set with images for every season – #149019 @ $53 (wood blocks included); #149016 @ $39 (suggested clear blocks: b, c, e, g, h)
- Stitched Season Framelits Dies, a coordinating stitched die that includes stitching on both the positive and negative images! #149013 @ $33. Has10 dies. Largest die: 4-7/8″ x 3-3/8″.
- Save 10%! Blended Seasons BUNDLE – BLENDED SEASONS STAMP SET + STITCHED SEASONS FRAMELITS DIES – Wood-mount #149893 @ $77.25, Clear-mount #149894 @ $64.75
- Watercolor Pencils in 10 new colors! #149014 @ $12.50. Acid free, lignin free.10 pencils in Stampin’ Up! colors: Balmy Blue, Cajun Craze, Cherry Cobbler, Coastal Cabana, Crushed Curry, Flirty Flamingo, Garden Green, Gorgeous Grape, Granny Apple Green, Night of Navy
- Products available while supplies last until August 31, 2018 – while supplies last
- Items may be included as part of a new demonstrator’s Starter Kit.
2) Bonus Days are back!
- For every $50 you spend on an order in August, you will receive a $5 coupon to use in September!
- There is no limit to the number of coupons you may earn.
- An email address is required to participate; Bonus Days coupon codes can be delivered only via email.
- Bonus Days coupon codes may be redeemed for any product (excluding Starter Kits, demonstrator supply items, and Paper Pumpkin subscriptions.) Although new prepaid Paper Pumpkin codes may be discounted with Bonus Days coupon codes.
3) Buy 10 Stampin’ Ink pads in August and get one FREE!!
- Buy any 10 ink pads from me in August, I will give you another one FREE!
- Contact me to place your order, so I can add your FREE ink pad!
Here’s some more cool stuff you should check out:
Thanks for stopping by today, and Sweet Stamping!
Aug 11, 2018 | Cards, Christmas, Gallery, Holiday, New Products |
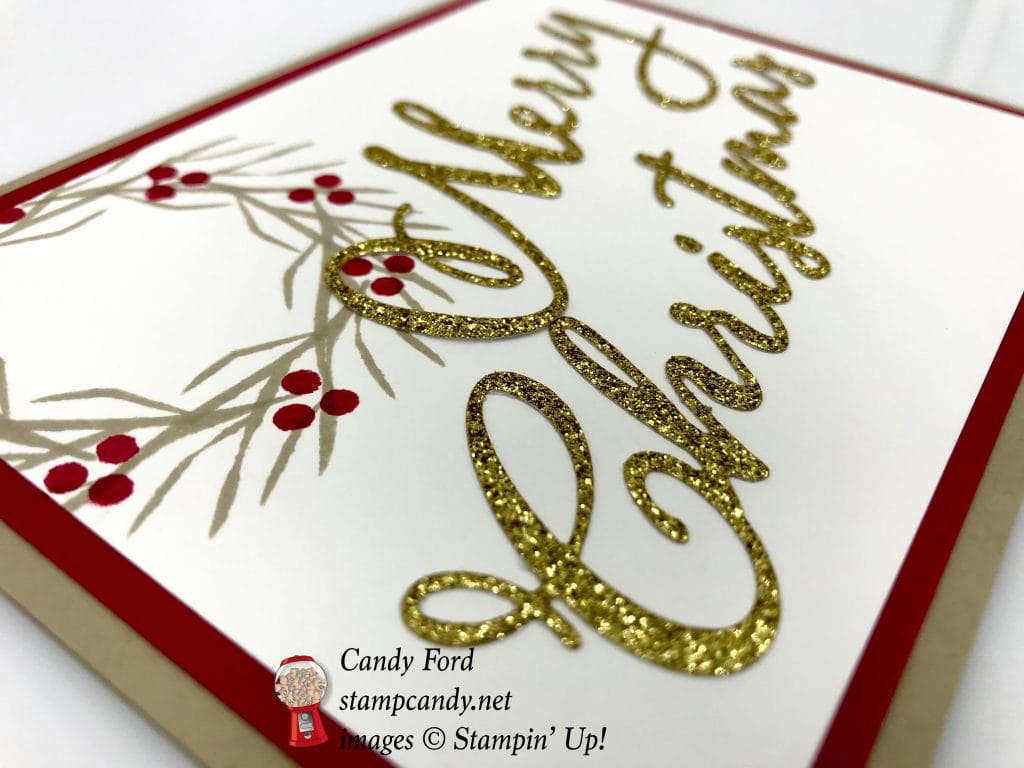
Today’s card features a sneak peek of two new products from the 2018 Stampin’ Up! Holiday Catalog: Peaceful Noel stamp set and Merry Christmas Thinlits Dies. Both of these products are available in a bundle with other products, but I liked them together for this card. I actually started by stamping the wreath in the corner. Then I decided I liked this large die cut sentiment with it. I love how easy it is to mix and match Stampin’ Up! products!
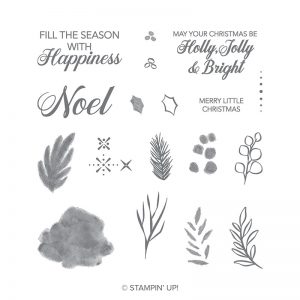
Peaceful Noel Stamp Set © Stampin’ Up!
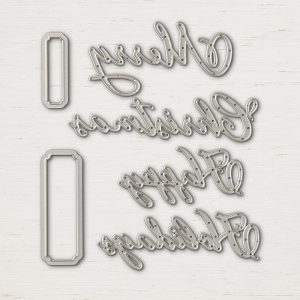
Merry Christmas Thinlits Dies © Stampin’ Up!
The sentiment is die cut from gold Glimmer Paper. I like the look of glitter, but I do not like the mess it can make. That’s why I have rarely used Glimmer Paper in the past. But beginning in the 2018-2019 Annual Catalog, the Glimmer Paper is new and improved. I was told by someone at Stampin’ Up! that the glitter is now milled into the paper, instead of being glued on top of it. There absolutely is no loss of glittery shine – it looks the same. The available colors may be the same as before, but the paper doesn’t shed any glitter now. I’ve cut it with my trimmer and with paper snips, and I’ve die cut it, and I have yet to find a single piece of loose glitter. Not one! You can rub your finger over it and nothing comes off. I just can’t tell you how excited I am about this mess free Glimmer Paper. I mean, I’m talking zero glitter mess! Woohoo!
And did I mention there are 3 new colors of Glimmer Paper in the 2018 Holiday Catalog? Copper, Merry Merlot, and Tranquil Tide, which go with the new Joyous Noel Suite.
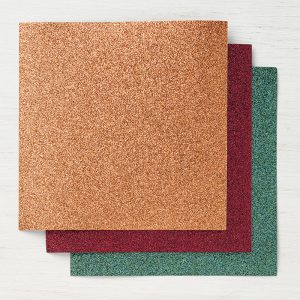
Joyous Noel 6×6 Glimmer Paper © Stampin’ Up!
Here’s what I made:
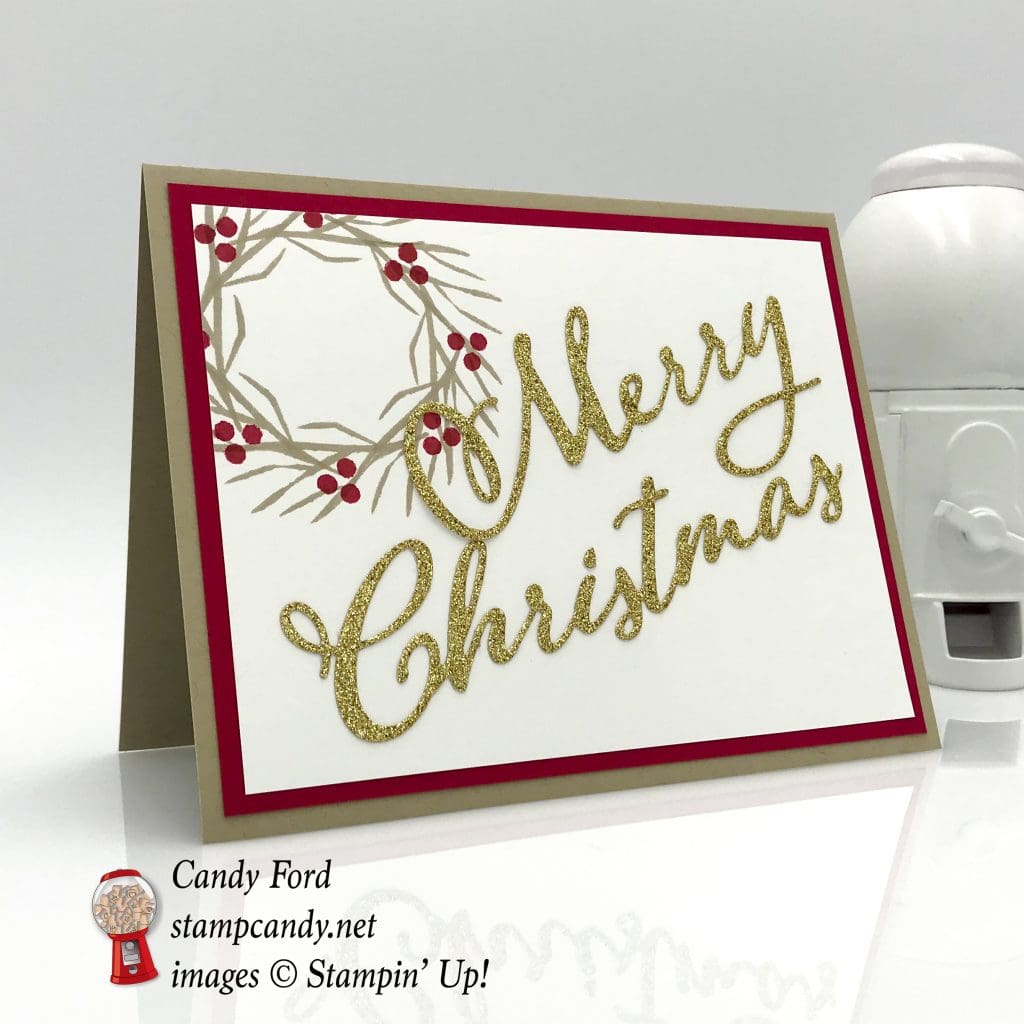
Here’s what I did:
Cut and scored with my Stampin’ Trimmer:
- Crumb Cake card stock (CS) cut to 5-1/2″ 8-1/2″, then scored in half at 4-1/4″
- Real Red CS layer cut to 5-1/4″ x 4″
- Whisper White CS layer cut to 5″ x 3-3/4″
- Whisper White CS cut to 5-1/4″ x 4″ for the inside of the card
Stamped with the Peaceful Noel stamp set:
- wreath in Crumb Cake and Real Red inks onto the Whisper White CS layer using a Stamparatus
- see instructions on stamping a wreath with the Stamparatus in my post here
- to stamp the wreath in the corner, start with a piece of paper larger than you need
- then move the same corner of that piece of paper around to the 8 different points of the template
- then cut the paper down to the desired size
Die cut using the Merry Christmas Thinlits:
- sentiment from gold Glimmer Paper
Assembled the card:
- burnished the fold in the card base with a Bone Folder
- sentiment glued onto the Whisper White CS layer
- Whisper White CS layer glued onto the Real Red CS layer
- Real Red CS layer glued onto the front of the card base
- 5-1/4″ x 4″ Whisper White CS glued onto the inside of the card base
Here are today’s colors:
You can click on each one to see all the products that come in that color!
Here’s what I used:
Click on these images for more details and to purchase.
Here are 4 amazing limited time offers:
1) Paper Pumpkin Sale, through August 10, 2018
- Subscribe between now and August 10
- Use promo code BLOOM0818
- Get 50% off your first kit
- CLICK HERE to subscribe

2) Color Your Seasons Special, August 1-31, 2018, While Supplies Last!
Stampin’ Up!’s® Blended Seasons Stamp Set, coordinating Framelits™ Dies, and Watercolor Pencils are perfect for every season of creating! Plus, save 10% when you buy the stamp set and Framelits in a bundle! But don’t wait—these exclusive products are only available until August 31 while supplies last. So get in the mood to create something full of colors and seasons!
Introducing the all-new, limited-time Color Your Season products:
- Blended Seasons Stamp Set, an exclusive 12-piece wood- or clear-mount stamp set with images for every season – #149019 @ $53 (wood blocks included); #149016 @ $39 (suggested clear blocks: b, c, e, g, h)
- Stitched Season Framelits Dies, a coordinating stitched die that includes stitching on both the positive and negative images! #149013 @ $33. Has10 dies. Largest die: 4-7/8″ x 3-3/8″.
- Save 10%! Blended Seasons BUNDLE – BLENDED SEASONS STAMP SET + STITCHED SEASONS FRAMELITS DIES – Wood-mount #149893 @ $77.25, Clear-mount #149894 @ $64.75
- Watercolor Pencils in 10 new colors! #149014 @ $12.50. Acid free, lignin free.10 pencils in Stampin’ Up! colors: Balmy Blue, Cajun Craze, Cherry Cobbler, Coastal Cabana, Crushed Curry, Flirty Flamingo, Garden Green, Gorgeous Grape, Granny Apple Green, Night of Navy
- Products available while supplies last until August 31, 2018 – while supplies last
- Items may be included as part of a new demonstrator’s Starter Kit.
3) Bonus Days are back!
- For every $50 you spend on an order in August, you will receive a $5 coupon to use in September!
- There is no limit to the number of coupons you may earn.
- An email address is required to participate; Bonus Days coupon codes can be delivered only via email.
- Bonus Days coupon codes may be redeemed for any product (excluding Starter Kits, demonstrator supply items, and Paper Pumpkin subscriptions.) Although new prepaid Paper Pumpkin codes may be discounted with Bonus Days coupon codes.
4) Buy 10 Stampin’ Ink pads in August and get one FREE!!
- Buy any 10 ink pads from me in August, I will give you another one FREE!
- Contact me to place your order, so I can add your FREE ink pad!
Here’s some more cool stuff you should check out:
Thanks for stopping by today, and Sweet Stamping!
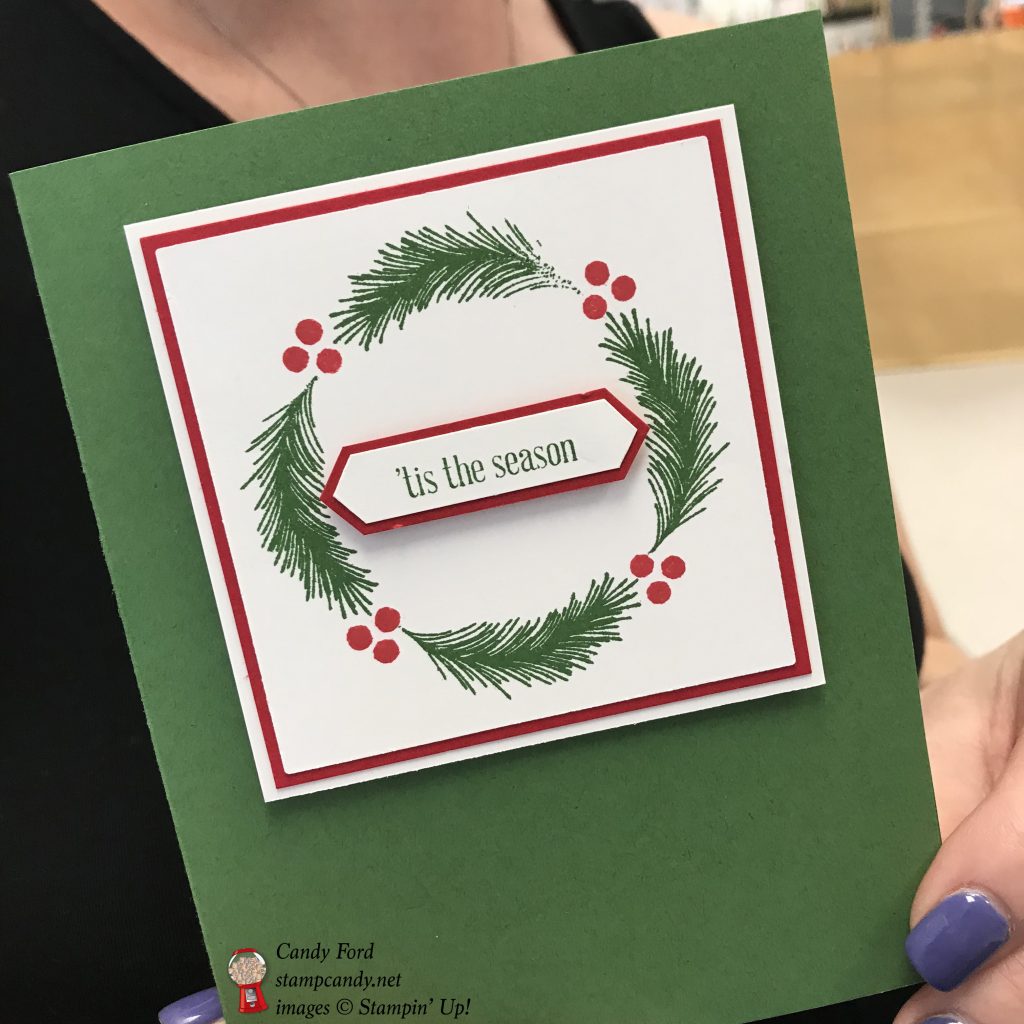
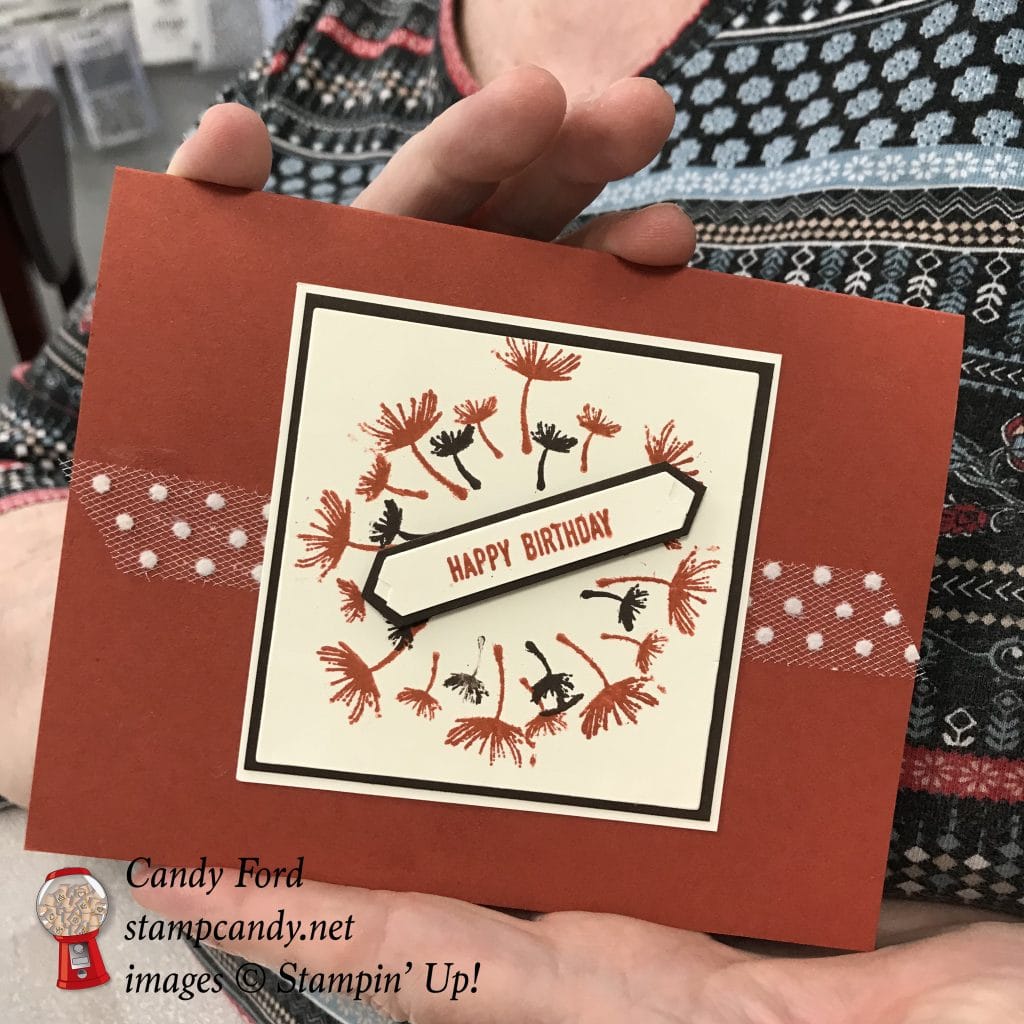
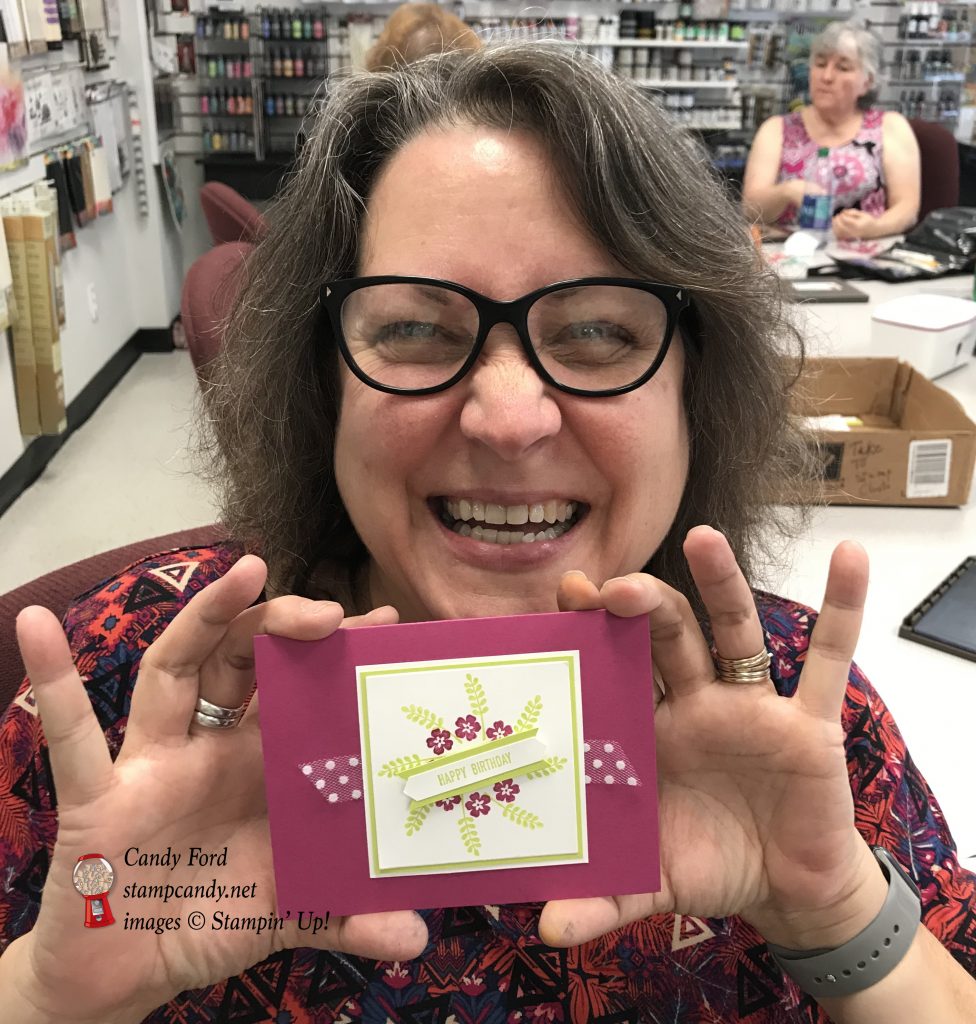
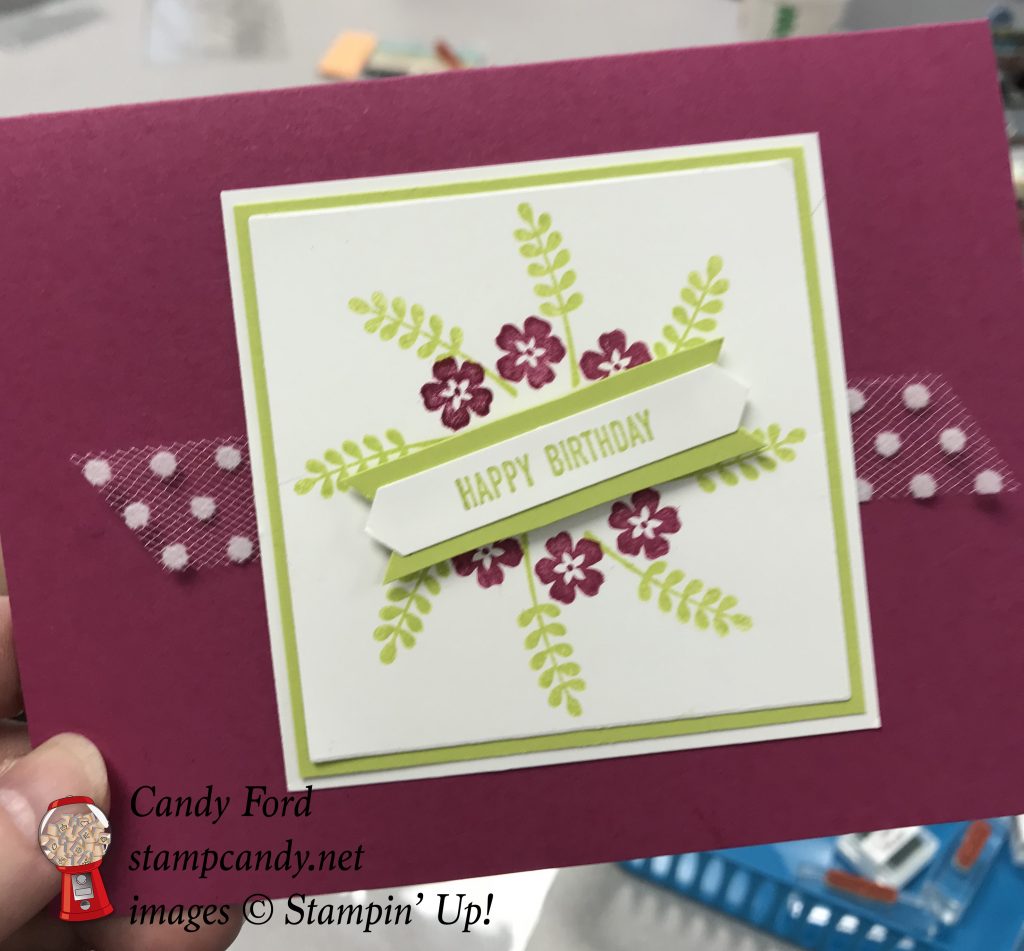
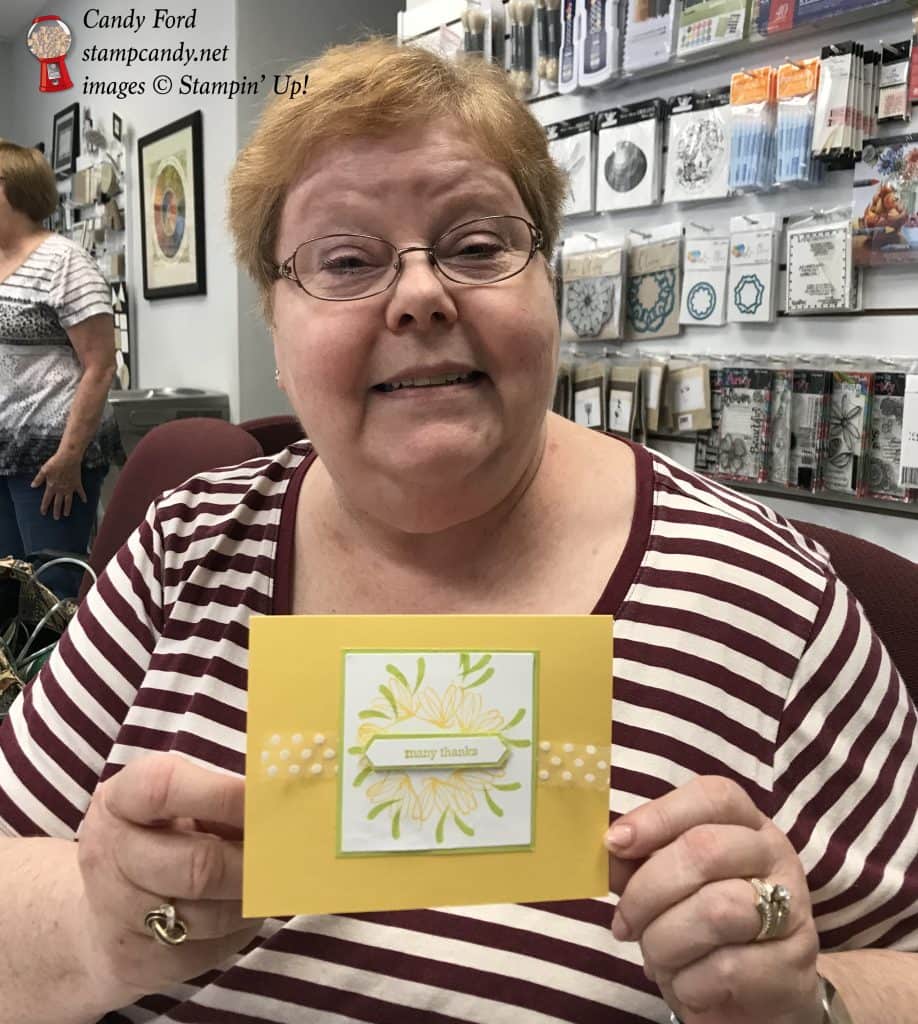
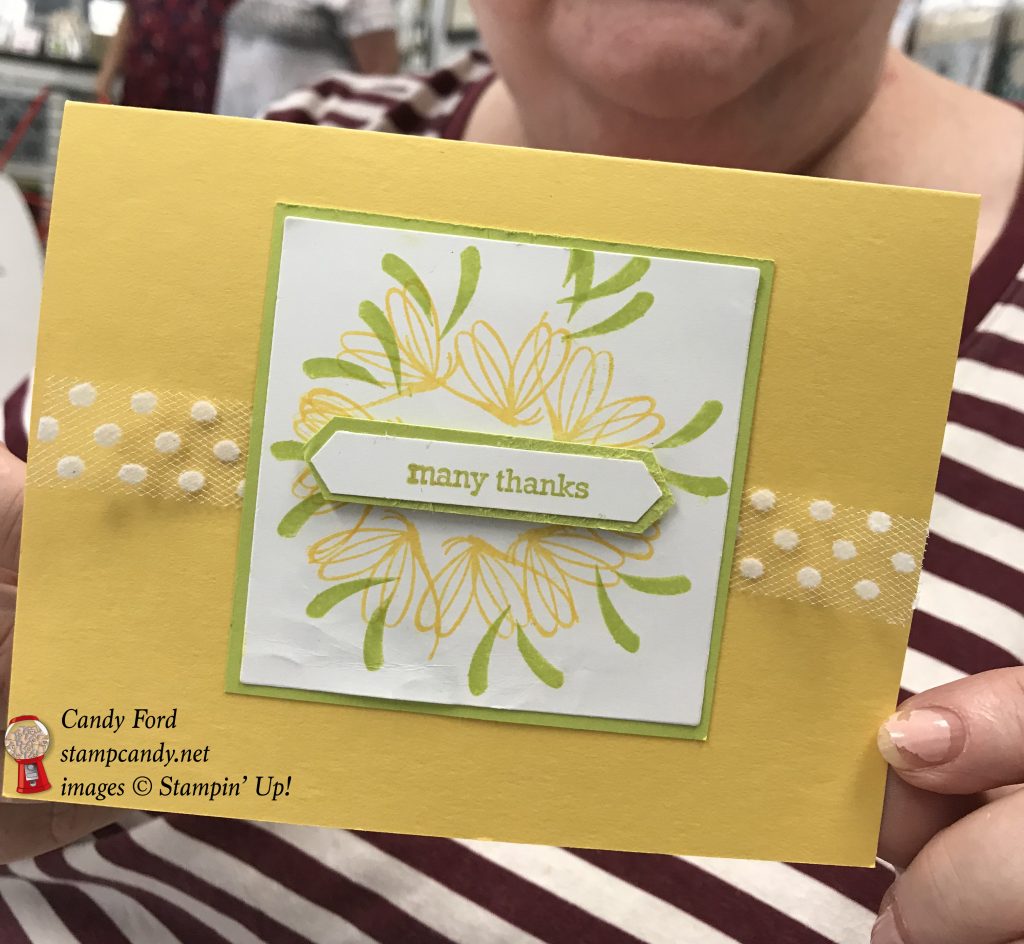
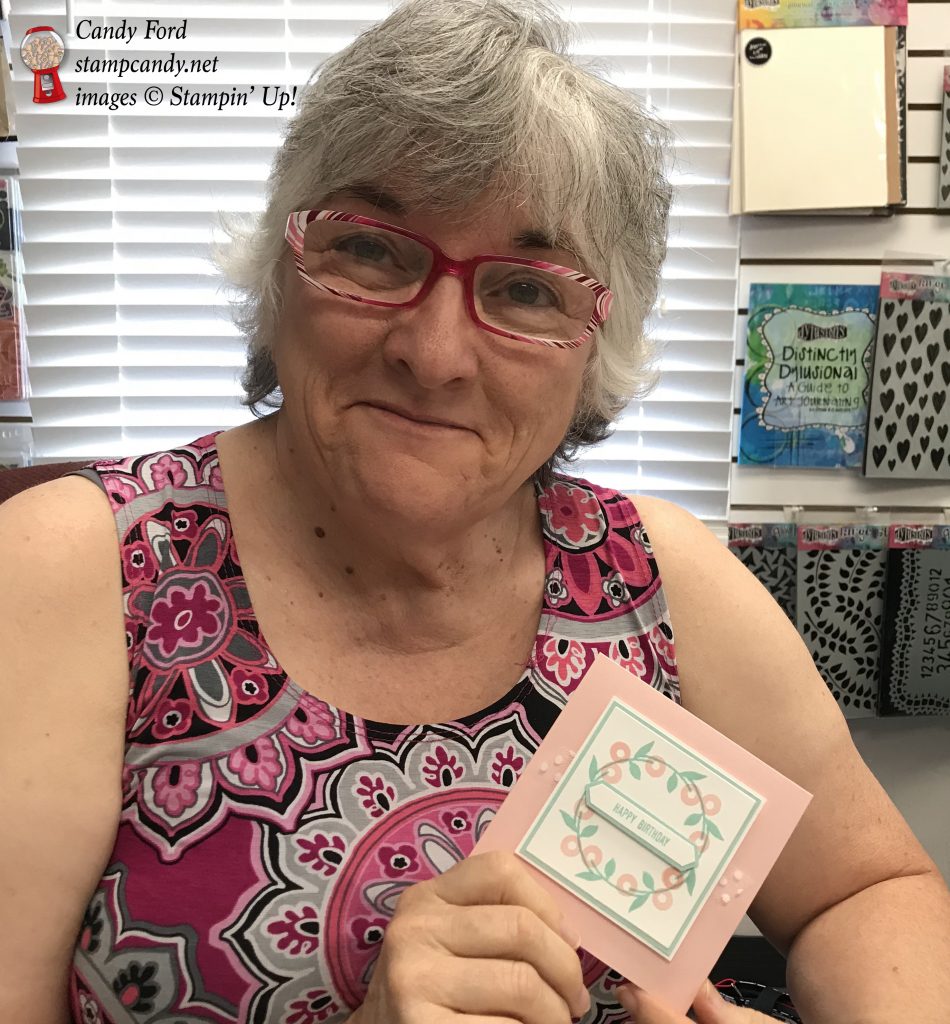
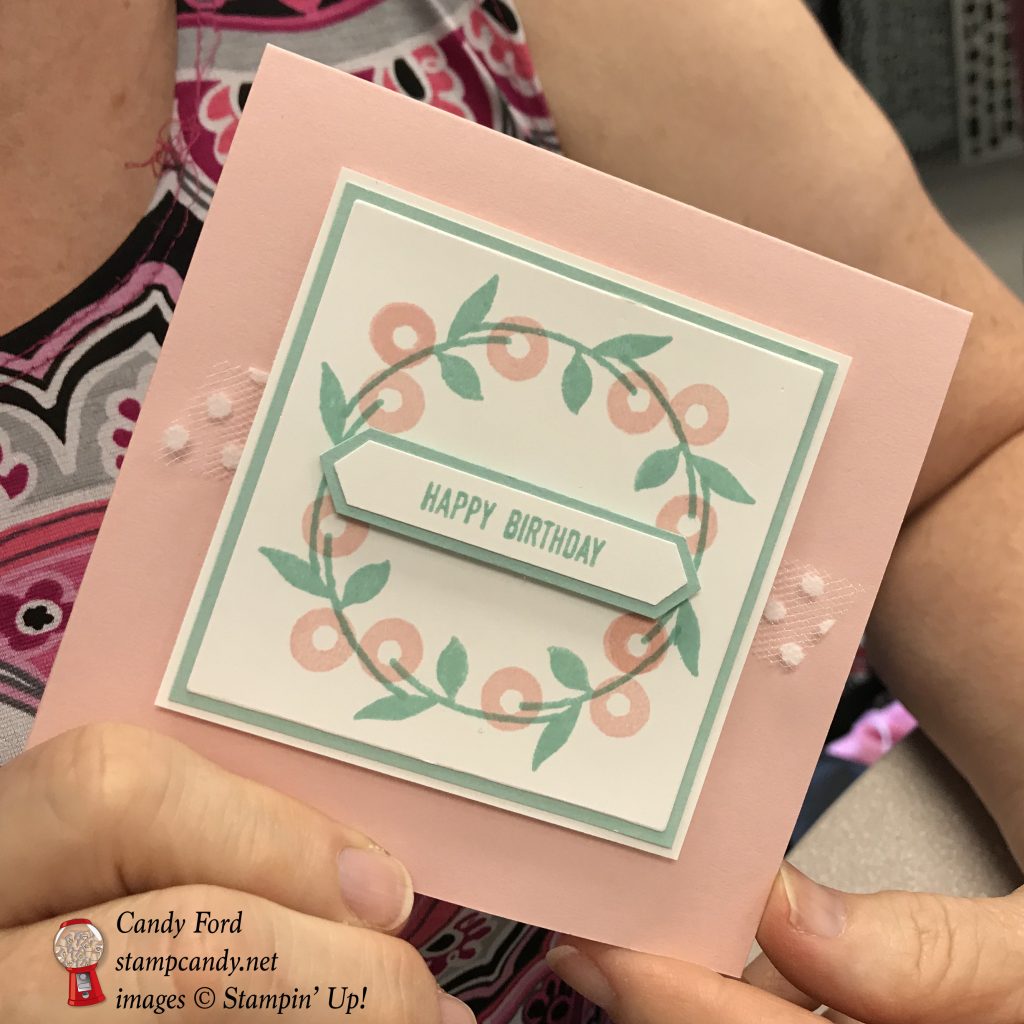
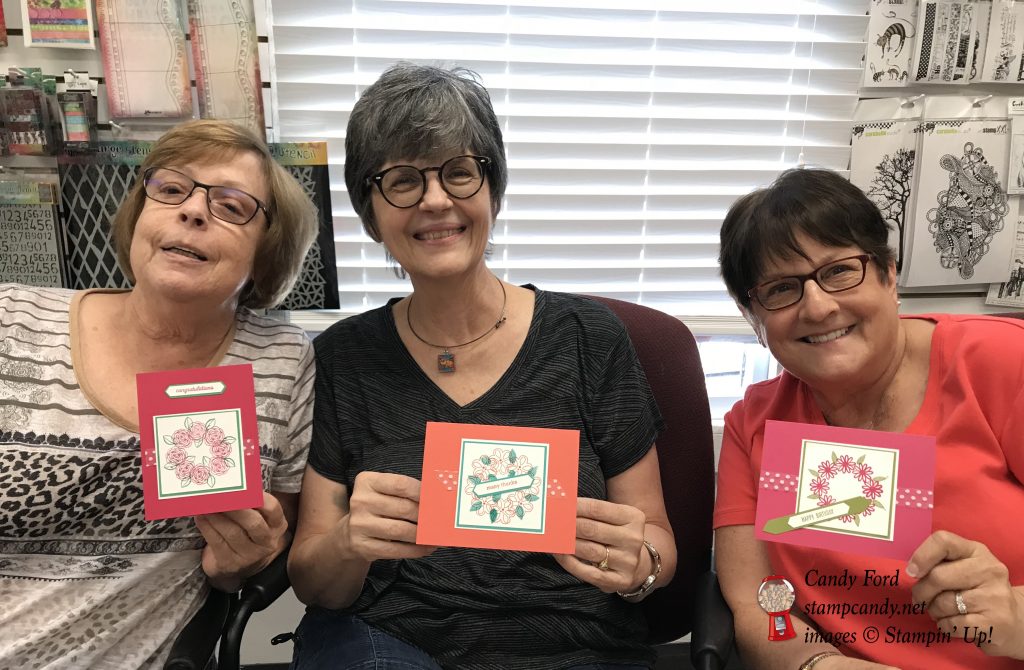
Aug 8, 2018 | Cards, Gallery, Parties |
This Sunday, I had the pleasure of joining a lovely group of ladies for some stamping fun. They call themselves Stamp or Dye. They get together once a month, and I join them as often as I can. This month I provided the projects: wreath cards stamped using the Stamparatus.
Here’s what they made:
Here’s Emily with her holiday card in Garden Green and Real Red. Instead of stamping each image 8 times, she stamped each one 4 times to create a clean and simple design. She used the Mistletoe Season stamp set.

Here’s Jan with her Cajun Craze, Early Espresso, and Very Vanilla birthday card. She used the Balloon Celebration stamp set.
Here’s Karen with her Berry Burst and Lemon Lime Twist birthday card. She used the Jar of Love stamp set.
Here’s Marian with her Daffodil Delight and Lemon Lime Twist thank you card. She used the Peaceful Reflection stamp set.
Here’s Patti with her Powder Pink and Pool Party birthday card. She used the Banners for You stamp set.
And here are Sharon, Linda, and Mary Beth with their cards. Sharon’s is Lovely Lipstick and Call Me Clover card, and she used the Happy Birthday Gorgeous stamp set. Linda’s is Calypso Coral and Bermuda Bay. Mary Beth’s is Melon Mambo and Old Olive (she said Old Olive is her favorite color.) Linda and Mary Beth used different stamps from the A Big Thank You stamp set.
Here’s what they did:
Cut and scored with my Stampin’ Trimmer:
- main color card stock (CS) cut to 5-1/2″ x 8-1/2″, then scored in half at 4-1/4″ for the card base
- Whisper White or Very Vanilla CS cut to 3-1/8″ x 3-1/8″
- secondary color CS cut to 3″ x 3″
- secondary color CS cut to 5″ x 1/2″
- Whisper White or Very Vanilla CS cut to 5″ x 1/2″
- Whisper White or Very Vanilla CS cut to 5-1/4″ x 4″ for the inside of the card
Stamped using the Itty Bitty Greetings stamp set:
- sentiment onto the Whisper White or Very Vanilla CS strip
Die cut using the Layering Squares Framelits:
- Whisper White or Very Vanilla CS to stamp the wreath on
Cut using the Classic Label Punch:
Stamped the wreath using a stamparatus:
- See my post here for directions.
- They all used different stamp sets. See them listed below.
Assembled the card:
- burnished the fold in the card base with a Bone Folder
- wreath glued onto the 3″ x 3″ secondary color CS layer
- 3″ x 3″ secondary color CS layer glued onto the Whisper White or Very Vanilla 3-1/8″ x 3-1/8″ CS layer
- Whisper White or Very Vanilla Polka Dot Tulle Ribbon adhered to the front of the card base using Snail or Tear & Tape
- Whisper White or Very Vanilla 3-1/8″ x 3-1/8″ CS layer glued onto the front of the card base, over the ribbon
- sentiment strip glued onto the secondary color CS strip, then the ends trimmed using Paper Snips
- 4″ x 5-1/4″ Whisper White or Very Vanilla CS glued onto the inside of the card base
Here’s what they used:
Click on these images for more details and to purchase.
Here are 4 amazing limited time offers:
1) Only 2 more days! Paper Pumpkin Sale, through August 10, 2018
- Subscribe between now and August 10
- Use promo code BLOOM0818
- Get 50% off your first kit
- CLICK HERE to subscribe
2) Color Your Seasons Special, August 1-31, 2018, While Supplies Last!
Stampin’ Up!’s® Blended Seasons Stamp Set, coordinating Framelits™ Dies, and Watercolor Pencils are perfect for every season of creating! Plus, save 10% when you buy the stamp set and Framelits in a bundle! But don’t wait—these exclusive products are only available until August 31 while supplies last. So get in the mood to create something full of colors and seasons!
Introducing the all-new, limited-time Color Your Season products:
- Blended Seasons Stamp Set, an exclusive 12-piece wood- or clear-mount stamp set with images for every season – #149019 @ $53 (wood blocks included); #149016 @ $39 (suggested clear blocks: b, c, e, g, h)
- Stitched Season Framelits Dies, a coordinating stitched die that includes stitching on both the positive and negative images! #149013 @ $33. Has10 dies. Largest die: 4-7/8″ x 3-3/8″.
- Save 10%! Blended Seasons BUNDLE – BLENDED SEASONS STAMP SET + STITCHED SEASONS FRAMELITS DIES – Wood-mount #149893 @ $77.25, Clear-mount #149894 @ $64.75
- Watercolor Pencils in 10 new colors! #149014 @ $12.50. Acid free, lignin free.10 pencils in Stampin’ Up! colors: Balmy Blue, Cajun Craze, Cherry Cobbler, Coastal Cabana, Crushed Curry, Flirty Flamingo, Garden Green, Gorgeous Grape, Granny Apple Green, Night of Navy
- Products available while supplies last until August 31, 2018 – while supplies last
- Items may be included as part of a new demonstrator’s Starter Kit.
3) Bonus Days are back!
- For every $50 you spend on an order in August, you will receive a $5 coupon to use in September!
- There is no limit to the number of coupons you may earn.
- An email address is required to participate; Bonus Days coupon codes can be delivered only via email.
- Bonus Days coupon codes may be redeemed for any product (excluding Starter Kits, demonstrator supply items, and Paper Pumpkin subscriptions.) Although new prepaid Paper Pumpkin codes may be discounted with Bonus Days coupon codes.
4) Buy 10 Stampin’ Ink pads in August and get one FREE!!
- Buy any 10 ink pads from me in August, I will give you another one FREE!
- Contact me to place your order, so I can add your FREE ink pad!
Here’s some more cool stuff you should check out:
Thanks for stopping by today, and Sweet Stamping!
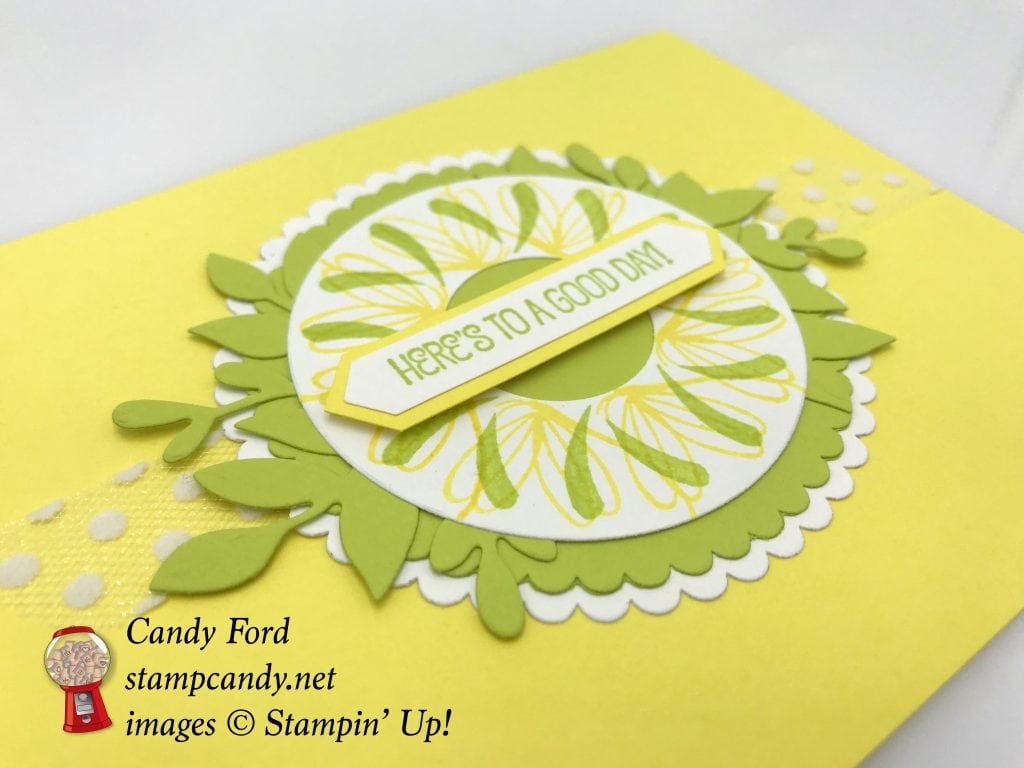
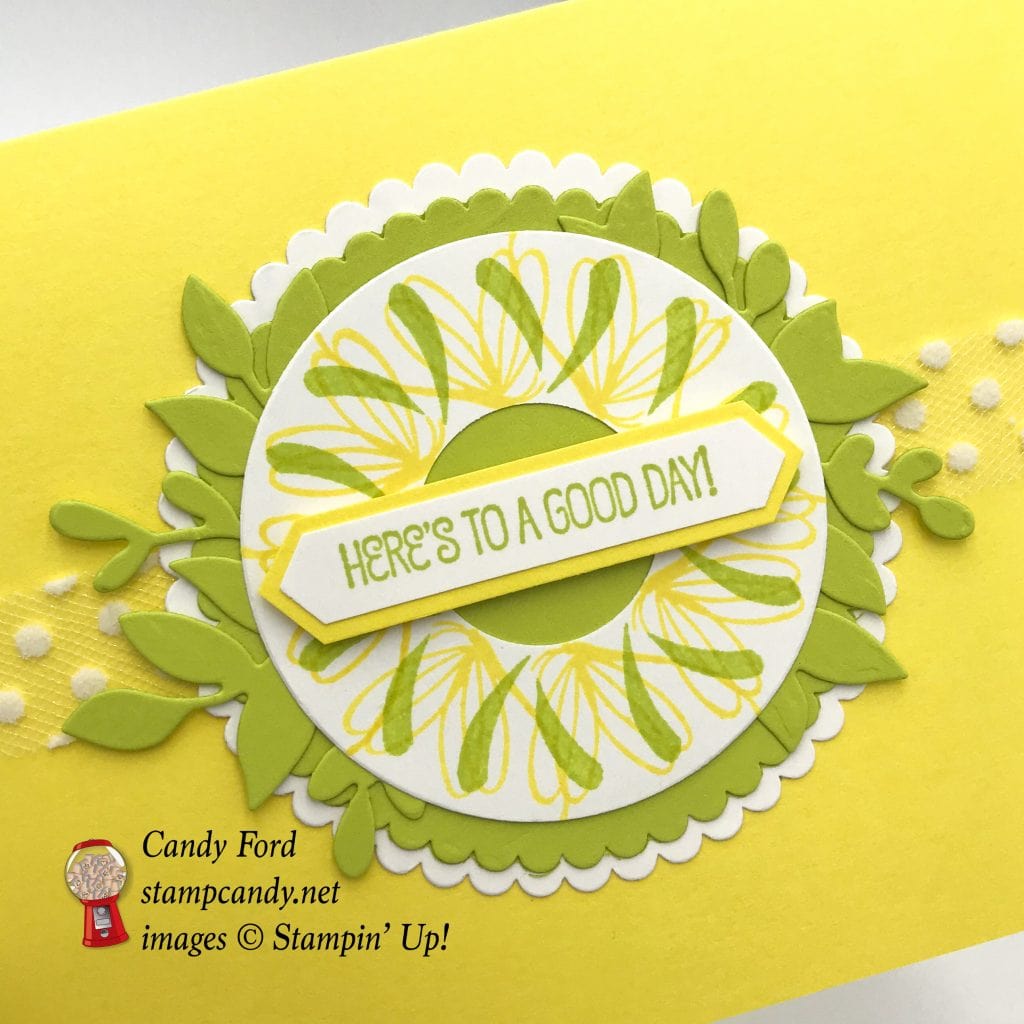
Aug 5, 2018 | Cards, Gallery, Techniques |
Today I’m finally getting around to posting a card with a Stamparatus wreath. I used two images from the Peaceful Reflections stamp set. The one I used as a flower is actually a butterfly, but when you stamp it around in a circle like this, you can make a wreath out of just about any image.
Here’s what I made:
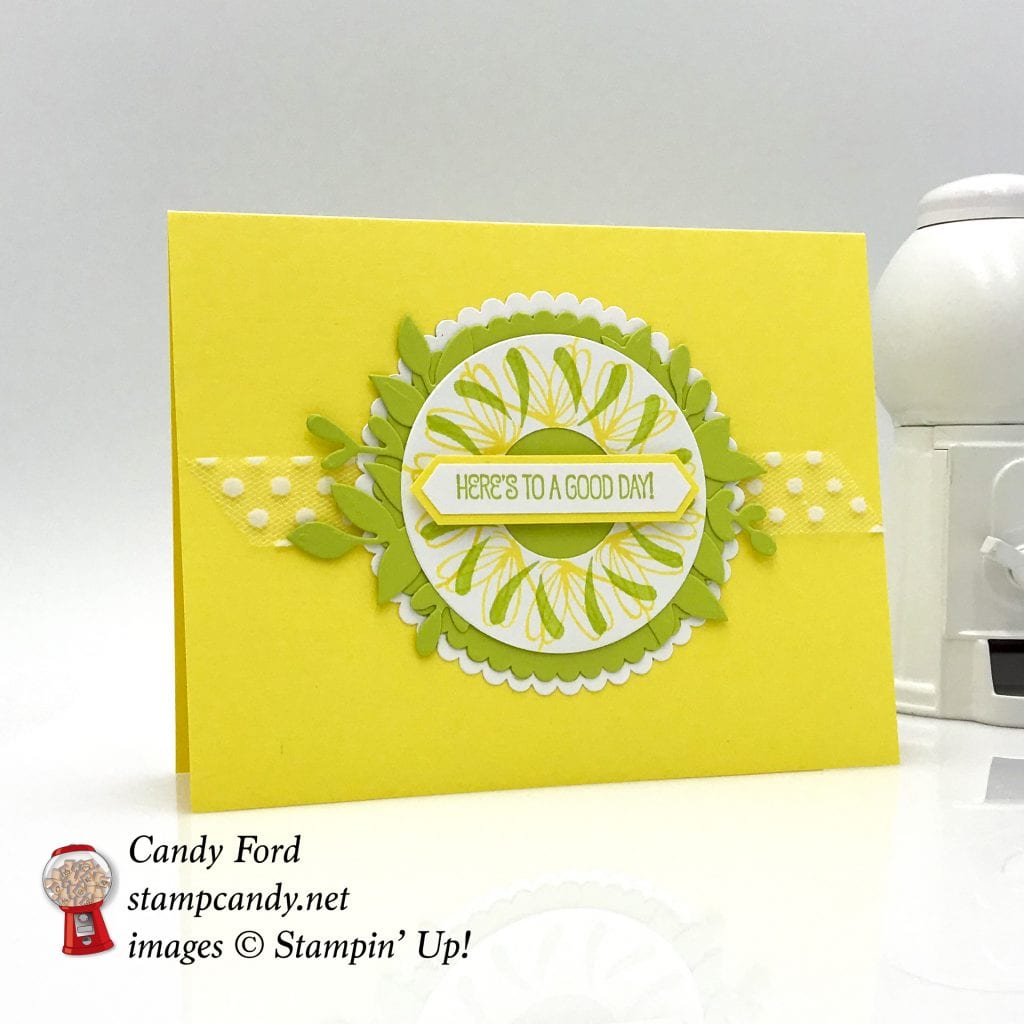
Here’s what I did:
Cut and scored with my Stampin’ Trimmer:
- Pineapple Punch card stock (CS) cut to 5-1/2″ x 8-1/2″, then scored in half at 4-1/4″
- Optional: Whisper White CS cut to 5-1/4″ x 4″ for the inside of the card. Not needed because the Pineapple Punch card base is light enough to write on.
Die cut using the Layering Squares Framelits:
- a piece of Whisper White CS using the largest plain square die
- the same piece a second time, cutting it diagonally across the first cut
- This created the template for the wreath.
Die cut using the Foliage Frame Framelits:
- leafy frame from a scrap of Granny Apple Green CS
Stamped with the Peaceful Reflections stamp set:
- sentiment in Granny Apple Green ink onto a scrap of Whisper White CS
- butterfly/flower in Pineapple Punch ink onto the Whisper White CS die cut square, in a circle on the Stamparatus
- leaf in Granny Apple Green ink onto the Whisper White CS die cut square, in a circle on the Stamparatus
- NOTE: See the Stamparatus wreath technique below.
Die cut using the Layering Circles Framelits:
- one scalloped circle from a scrap of Granny Apple Green CS
- one slightly larger scalloped circle from a scrap of Whisper White CS
- stamped wreath using a plain circle die
Cut using the Classic Label Punch:
Cut using the 1″ Circle Punch:
- center cut from the stamped circle
Assembled the card:
- burnished the fold in the card base with a Bone Folder
- stamped wreath glued onto the leafy frame
- leafy frame glued onto the Granny Apple Green scalloped circle
- Granny Apple Green scalloped circle glued onto the Whisper White scalloped circle
- sentiment glued onto a scrap of Pineapple Punch CS, then trimmed around the edges with Paper Snips to create the mat
- sentiment adhered over the stamped wreath using Stampin’ Dimensionals
- Whisper White Tulle Ribbon adhered to the front of the card base using Tear & Tape, or Snail, just in the center
- Whisper White scalloped circle glued over the ribbon, onto the front of the card base
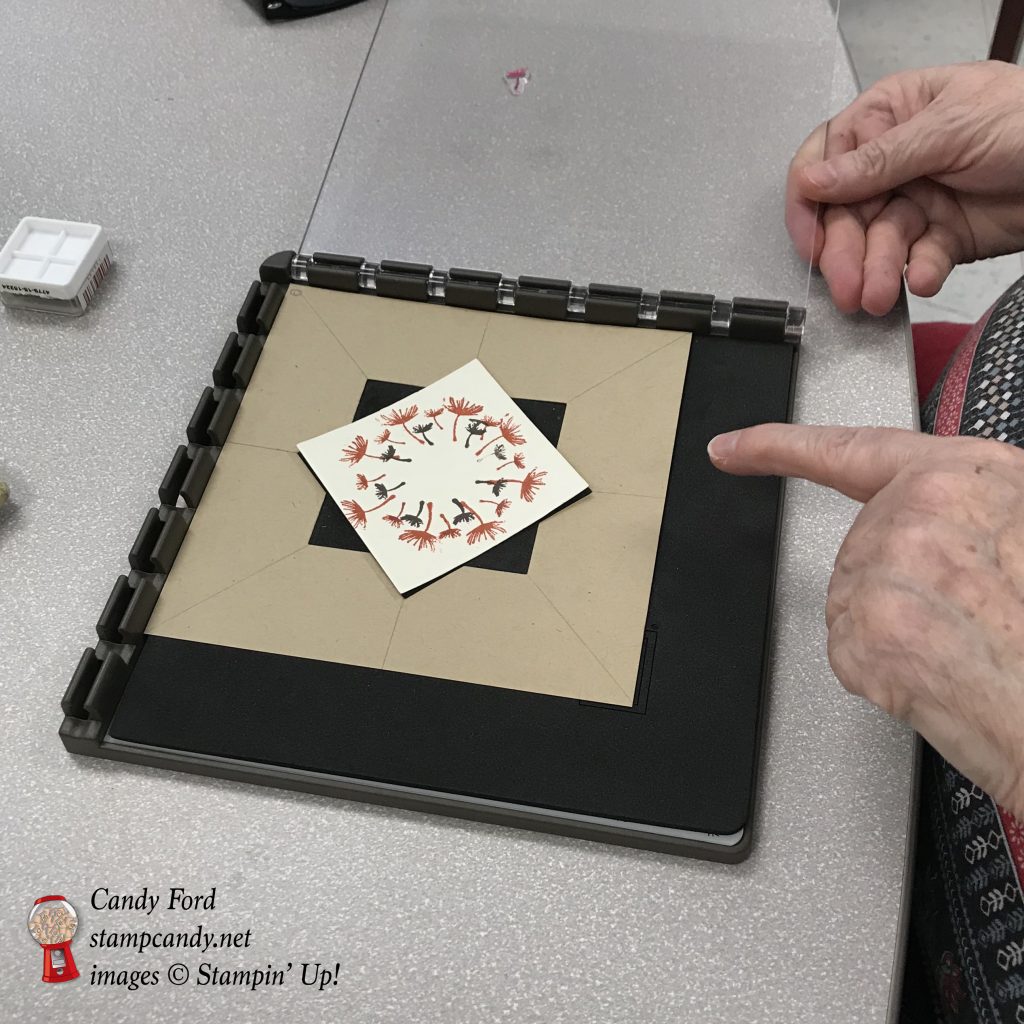
Here’s the Stamparatus Wreath Technique:
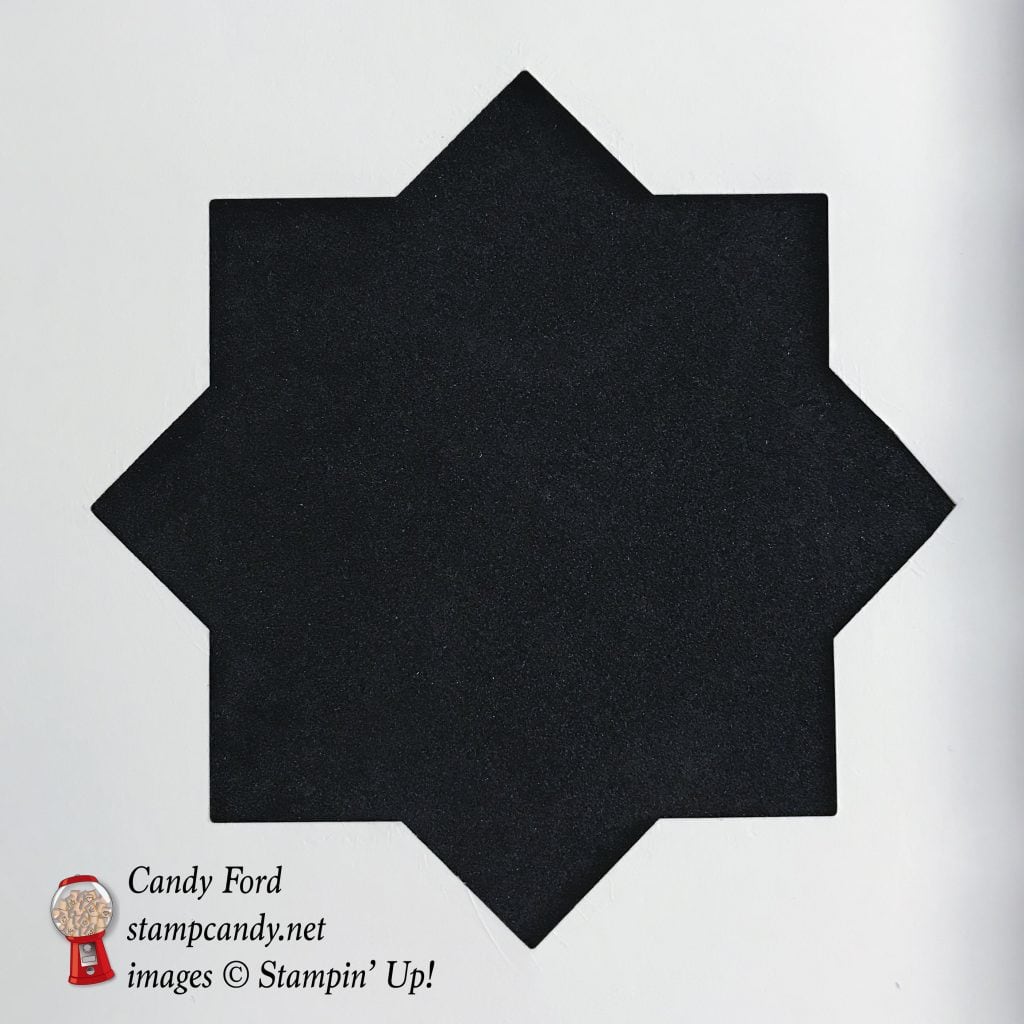
Create the template:
- Die cut a square from a piece of card stock.
- Turn the die 45 degrees and cut again, to make an 8 pointed star.
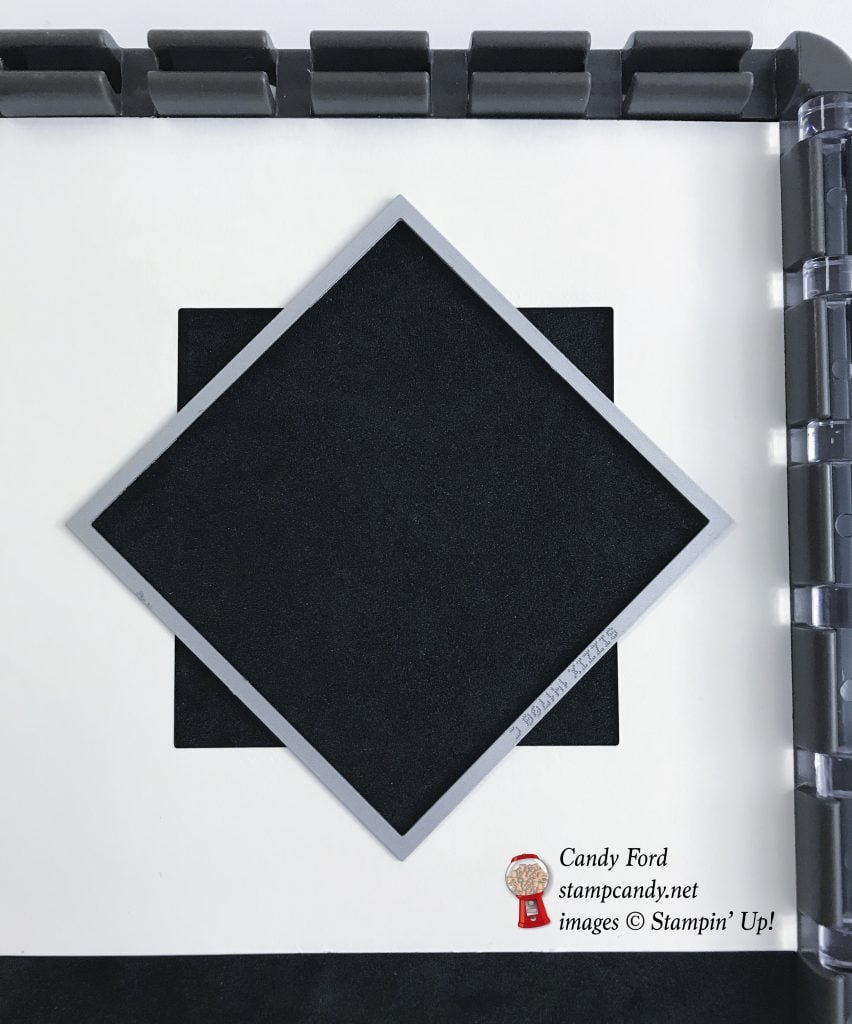
Stamp the wreath:
- Place the template in the Stamparatus and hold in place with a magnet.
- Lay the die cut square in the template.
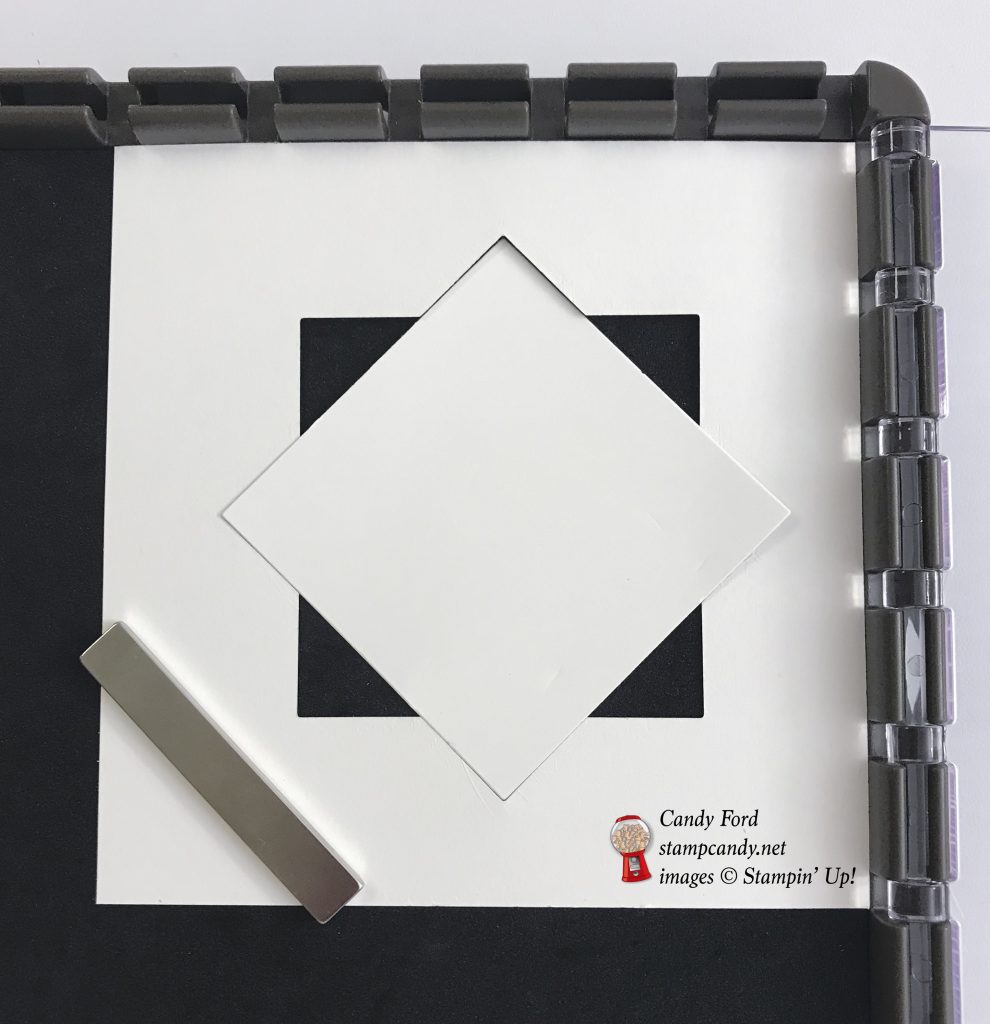
- Line up one of the stamps with the square, then stamp.
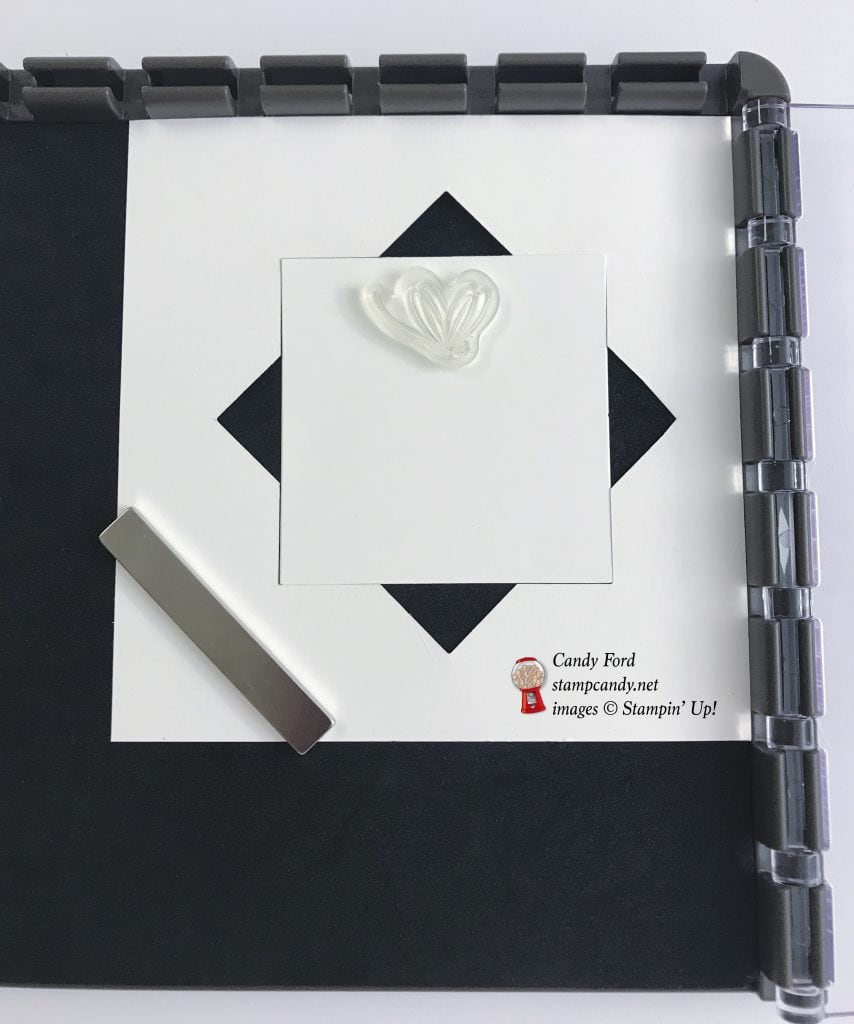
- Move the square around to the next point, and stamp again. (I used darker ink in this example so you could see it better.)
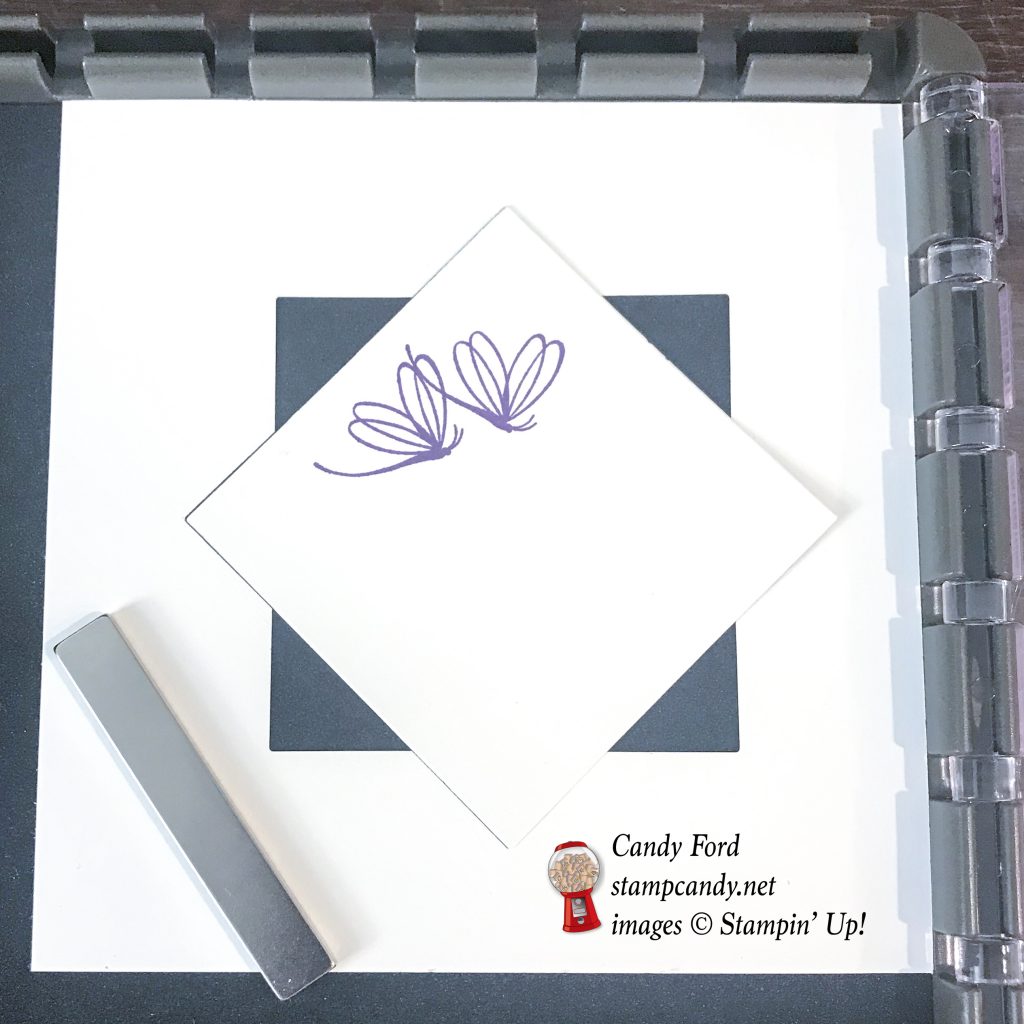
- Continue all around until you’ve stamped it 8 times, once at each point.
- At this point you can line up another stamp, or move the stamp you were using to another spot on the square. Then stamp another 8 times. You can keep adding layers like this as long as you want.
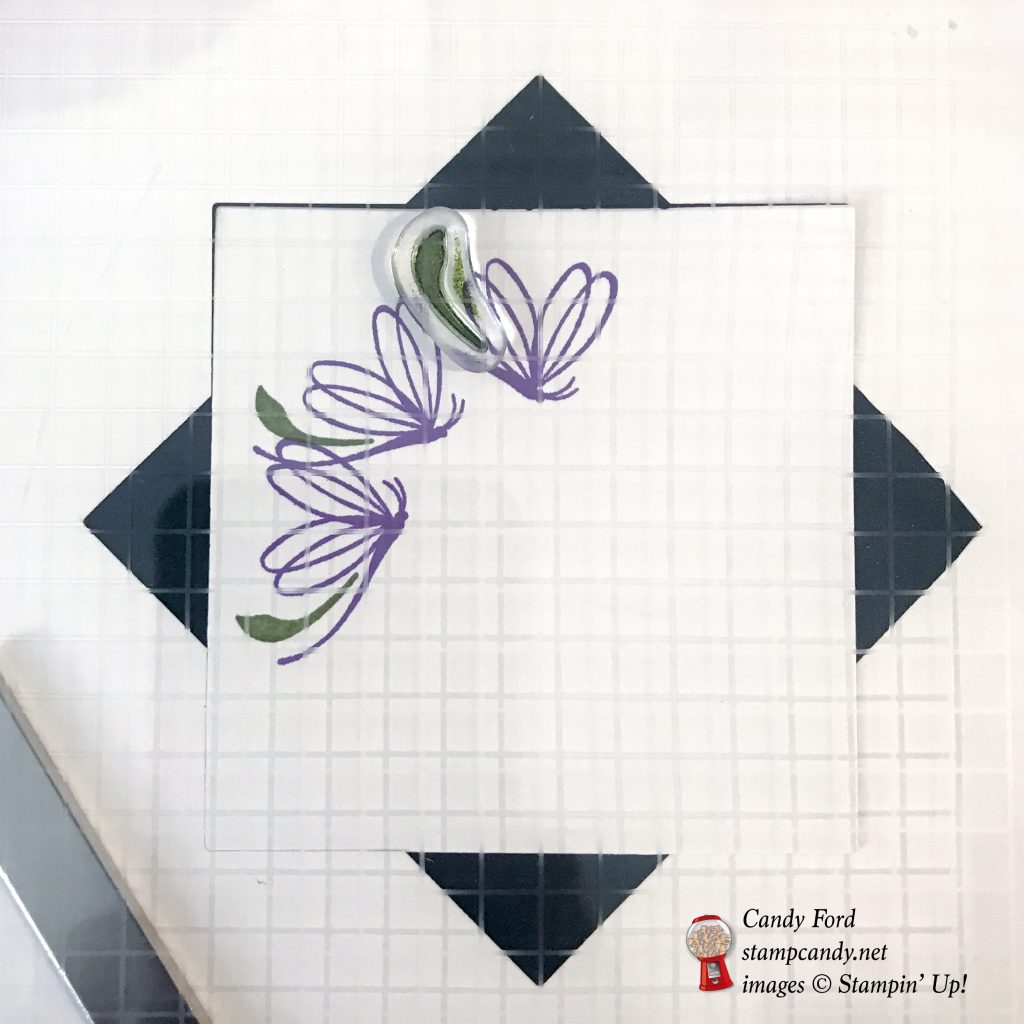
- Be sure to keep the template for future use.
Here are today’s colors:
You can click on each one to see all the products that come in that color!
Here’s what I used:
Click on these images for more details and to purchase.
Here are 2 amazing limited time offers from Stampin’ Up!:
1) Paper Pumpkin Sale, through August 10, 2018
- Subscribe between now and August 10
- Use promo code BLOOM0818
- Get 50% off your first kit
- CLICK HERE to subscribe
2) Color Your Seasons Special, August 1-31, 2018, While Supplies Last!
Stampin’ Up!’s® Blended Seasons Stamp Set, coordinating Framelits™ Dies, and Watercolor Pencils are perfect for every season of creating! Plus, save 10% when you buy the stamp set and Framelits in a bundle! But don’t wait—these exclusive products are only available until August 31 while supplies last. So get in the mood to create something full of colors and seasons!
Introducing the all-new, limited-time Color Your Season products:
- Blended Seasons Stamp Set, an exclusive 12-piece wood- or clear-mount stamp set with images for every season – #149019 @ $53 (wood blocks included); #149016 @ $39 (suggested clear blocks: b, c, e, g, h)
- Stitched Season Framelits Dies, a coordinating stitched die that includes stitching on both the positive and negative images! #149013 @ $33. Has10 dies. Largest die: 4-7/8″ x 3-3/8″.
- Save 10%! Blended Seasons BUNDLE – BLENDED SEASONS STAMP SET + STITCHED SEASONS FRAMELITS DIES – Wood-mount #149893 @ $77.25, Clear-mount #149894 @ $64.75
- Watercolor Pencils in 10 new colors! #149014 @ $12.50. Acid free, lignin free.10 pencils in Stampin’ Up! colors: Balmy Blue, Cajun Craze, Cherry Cobbler, Coastal Cabana, Crushed Curry, Flirty Flamingo, Garden Green, Gorgeous Grape, Granny Apple Green, Night of Navy
- Products available while supplies last until August 31, 2018 – while supplies last
- Items may be included as part of a new demonstrator’s Starter Kit.
Here’s some more cool stuff you should check out:
Thanks for stopping by today, and Sweet Stamping!


