Mar 18, 2020 | Blog Hop, Boxes, Gallery, Holiday |

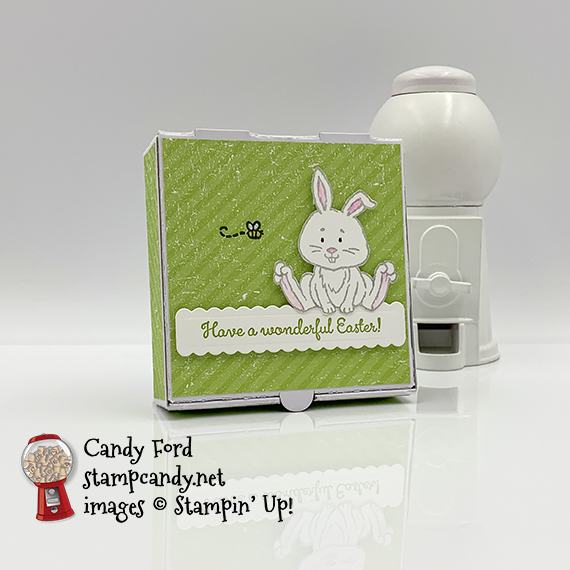
It’s time for the InKing Royalty Blog Hop (IRBH) for March! This month’s theme is Easter. For my project, I used the Welcome Easter stamp set, Sending Flowers Dies, and Pleased as Punch Designer Series Paper to decorate a mini Pizza Box. It’s the perfect size for some sweet treats, and oh so easy!
Be sure to hop around to all the blogs. I know I can’t wait to see all the great projects made by this talented group!
If you are reading this in email, some photos may appear blurry, or may not appear at all. Please click here to see the post on my blog.
S welcome easter welcome easter welcome easter
Here’s what I made:

S
Here’s what I did:
Cut and scored with my paper trimmer:
- Pleased As Punch Designer Series Paper (DSP) cut to 3-3/8″ x 3-3/8″
- DSP cut to 3-3/8″ x 7/8″ (4 pieces)
Stamped with the Welcome Easter stamp set:
- rabbit in Smoky Slate ink (stamped off once) onto a scrap of Whisper White Thick CS
- sentiment in Granny Apple Green ink onto a scrap of Whisper White Thick CS
- bee in Tuxedo Black Memento ink onto the large piece of DSP
Cut using the Sending Flowers Dies:
Cut using the 1/2″ Circle Punch:
- notch in the middle of one of the small DSP strips (for the front of the box)
Cut using Paper Snips:
Colored using markers:
- bee wings and body using a White Stampin’ Chalk Marker
- bee body using a Dark Daffodil Delight Stampin’ Blends Marker (on top of the dried white chalk ink)
- rabbit eyes using a Journaling Pen
- rabbit ears, feet, and nose in Melon Mambo ink using a Blender Pen
Put it all together:
- burnished the folds in the box with a Bone Folder, then folded to assemble the pizza box
- square DSP glued onto the top of the box
- DSP strip with punched notch glued onto the front of the box
- 3 remaining DSP strips glued onto the other 3 sides of the box
- sentiment and rabbit adhered onto the DSP layer on the top of the box using Stampin’ Dimensionals
S
Here’s the InKing Royalty Easter hop:
Thank you for hopping with us today! After reading my post, I hope you’ll hop over to the next stop, Joanne Brown at Stamping with JoJo. If you get lost during the hop, use this lineup as a guide:
- Brian King at Stamp with Brian
- Candy Ford at Stamp Candy <— YOU ARE HERE!!!
- Joanne Brown at Stamping with JoJo
- Susan Fields at Very Simply Susan
- Sue Jackson at Just Peachy Stamping
- Shawn de Oliveira at Shawn Stamps
- Lynn Kolcun at Avery’s Owlery
- Jennifer Spiller at Westside Paper Creations
- Jackie Beers at Blue Line Stamping
- Ann Murray at Murray Stamps Ink
- Pam Morris at Tap Tap Stamp
- Julie DiMatteo at The Paper Pixie
S
Here are today’s colors:
You can click on each one to see all the products that come in that color!
S
Here’s what I used:
Click on these images for more details and to purchase. If you are reading this post in email, the product images may not show up. Click here to see the post on my blog.
Click “Supply List” above for a clickable and printable list of the products!
S
Here are some helpful links:
Thanks for stopping by today, and Sweet Stamping!
Mar 12, 2020 | Blog Hop, Cards, Gallery |

Welcome to the March OSAT Blog Hop! This month’s theme is Chick Ewe Out, and we’re sharing animal themed creations. I used the Special Someone stamp set and coordinating Special Day Dies to create a birthday card, gift box and tag. I already had this awesome black box that a sleep mask came in, so I decided to cover the lid with Flowering Foils Specialty Designer Series Paper to go with my card.
If you are reading this in email, the images may appear blurry, or not at all. Click here to read the post on my blog.
S Chick Ewe Out Chick Ewe Out Chick Ewe Out Chick Ewe Out
Here’s what I made:


S
Here’s what I did:
Cut and scored with my paper trimmer, for the card:
- Basic Black card stock (CS) cut to 5-1/2″ x 8-1/2″, then scored in half at 4-1/4″
- Flowering Foils Specialty Designer Series Paper (DSP) layer cut to 5″ x 3-3/4″
- Basic Black CS layer cut to 3-1/2″ x 2-1/2″
- Whisper White CS layer cut to 3″ x 2″
- Whisper White CS cut to 5-1/4″ x 4″ for the inside of the card base
Cut with my paper trimmer, for the box & tag:
- DSP cut to 6-1/2″ x 12″, to cover the box lid
- Basic Black CS cut to 2″ x 5″
- Whisper White CS cut to 1-3/4″ x 3-3/4″
Stamped with the Special Someone stamp set:
- squirrel and mouse in Tuxedo Black Memento ink onto a scrap of Whisper White Thick CS
- squirrel in Tuxedo Black Memento ink onto a piece of Post-It Tape (you can use a Post-It Note)
- 4 balloon outlines in Tuxedo Black Memento ink onto a scrap of Whisper White Thick CS
- 1 balloon outline, balloon string, and sentiment in Tuxedo Black Memento ink onto the Whisper White CS for the inside of the card base
- filled in 4 balloons on Thick CS in Petal Pink (1), Flirty Flamingo (1), and Soft Sea Foam (2) inks
- filled in balloon on CS for the inside in Flirty Flamingo ink
- 1 balloon string in Tuxedo Black Memento ink onto the 1-3/4″ wide piece of Whisper White CS for the tag
Cut using the Special Day Dies:
- squirrel, mouse, and 3 balloons on the Whisper White Thick CS scrap
Stamped balloon strings on the front of the card:
- cut squirrel face from the Post-It Tape and placed it on the face of the squirrel on the Thick CS, to mask it
- placed the squirrel on the Whisper White CS layer where I wanted it, then stamped the 3 balloon strings over it
- removed Post-It Tape
- This made it look like the squirrel is holding the 3 strings behind his head.

Cut using the Banner Triple Punch:
- one end of the two CS pieces for the tag
Colored using Stampin’ Blends Markers:
- Squirrel in Light and Dark Crumb Cake
- mouse in Bronze and Ivory
Colored DSP layer using Stampin’ Write Markers:
- rose gold flowers in Flirty Flamingo
- silver flowers in Petal Pink
- all flower centers in So Saffron
- background in Soft Sea Foam
- I had planned to color the DSP for the box lid the same way, and tie Basic Black ribbon around the box, but it was late and my creaky old hands were tired of coloring.
- NOTE: You can use Stampin’ Blends Markers in these same colors on the DSP.
Dyed the Whisper White 5/8″ Polka Dot Tulle Ribbon:
- cut 3 lengths of the ribbon long enough to tie around the box and tie in a bow
- put several drops of ink and a few tablespoons alcohol in 3 small bowls (1 Petal Pink, 1 Flirty Flamingo, and 1 Soft Sea Foam)
- put ribbon in the ink/alcohol and let sit (I let them sit overnight, but they are take in the color pretty quickly.)
- dyed ribbons laid out to dry on a piece of grid paper
- Note: I prefer to use glass bowls, because they don’t stain. The ink rinses right out with cold water.
Assembled the card:
- burnished the fold in the card base with a Bone Folder
- DSP layer glued onto the front of the card base
- Basic Black CS layer glued onto the DSP layer
- Whisper White CS layer glued onto the Basic Black CS layer
- squirrel, mouse, and 3 balloons adhered onto the card front using Mini Stampin’ Dimensionals
- Whisper White CS glued onto the inside of the card base
Assembled the box and tag:
- wrapped the DSP around the box lid, creasing it along all edges
- burnished the folds in the DSP with a Bone Folder
- flaps cut at all 4 corners using Paper Snips
- DSP glued onto the box lid, tucking in flaps at the corners
- ribbons tied around the box and in a bow
- Whisper White tag piece glued onto the Basic Black tag piece, lining up punched end and sides
- any extra CS trimmed from the top of the Basic Black CS tag piece
- hole punched in the top of the tag (I used an old 1/4″ circle punch.)
- remaining Soft Sea Foam die cut balloon glued onto the tag
- tag tied onto the ribbon using a piece of Whisper White Solid Baker’s Twine
 S
S
Here’s the OSAT Chick Ewe Out Blog Hop:
S
Here are today’s main colors:
You can click on each one to see all the products that come in that color!
S
Here’s what I used:
Click on these images for more details and to purchase. If you are reading this post in email, the product images may not show up. Click here to see the post on my blog.
S
Here are some helpful links:
Thanks for stopping by today, and Sweet Stamping!
Mar 9, 2020 | Blog Hop, Cards, Gallery |

Welcome to the first ever Candy Hearts Blog Hop! Thank you for hopping along with us today as we share our Spring themed projects. Be sure to hop to all the hops to see all the great projects the team has created.
If you are reading this in email, some photos may appear blurry, or may not appear at all. Please click here to see the post on my blog.
S candy hearts blog hop candy hearts blog hop candy hearts blog hop
Here’s what I made:
What says Spring more than brightly colored flowers? I used the Sending Flowers Dies to create this flowery, square, birthday card.


S
Here’s what I did:
Cut and scored with my paper trimmer:
- Whisper White Thick card stock (CS) cut to 4-1/4″ x 8-1/2″, then scored in half at 4-1/4″
- Granny Apple Green CS layer cut to 4-1/8″ x 4-1/8″
- Balmy Blue CS layer cut to 4″ x 4″
Stamped with the Special Someone stamp set:
- Happy Birthday in Versamark ink onto the Balmy Blue CS layer, then heat embossed in white
Cut using the Sending Flowers Dies:
- Granny Apple Green CS layer using the largest die
- flowers from scraps of Highland Heather, Flirty Flamingo, and Pineapple Punch CS
Drew using a White Stampin’ Chalk Marker:
- dots on the Granny Apple Green CS layer around the circle
Assembled the card:
- burnished the fold in the card base with a Bone Folder
- Balmy Blue CS layer glued onto the back of the Granny Apple Green CS layer, so the sentiment shows above the flowers
- die cut flowers glued onto the coordinating shapes on the Granny Apple Green CS layer, only using the centers of the Pineapple Punch flowers
- Balmy Blue CS layer glued onto the front of the card base
S
Here’s the Candy Hearts Blog Hop:
Thank you for hopping with the Hearts today! Be sure to hop around to all the stops. You do not want to miss any of the creativity in this talented group of stampers!
- Candy Ford of Stamp Candy
- Joanne Brown of Stamping With Jojo
- Linda Krueger of The Stamp Coach
S
Here are today’s colors:
You can click on each one to see all the products that come in that color!
S
Here’s what I used:
Click on these images for more details and to purchase. If you are reading this post in email, the product images may not show up. Click here to see the post on my blog.
Click “Supply List” above for a clickable and printable list of the products!
S
Here are some helpful links:
Thanks for stopping by today, and Sweet Stamping!
Mar 4, 2020 | Blog Hop, Cards |

Welcome to the ICS Blog Hop for March! This month’s theme is “One Stamp Set, So Many Uses” and we’re featuring three cards of varying difficulty using the same stamp set. I’ve used the Clubhouse Bundle and other products from the Country Club Suite to create my three cards.
If you are reading this in email, and the photos don’t look right, please click here to see the post on my blog.
Clubhouse Clubhouse Clubhouse Clubhouse
Here’s what I made:
Card #1, Beginner Stamper:
Card #2, Casual Stamper:
Card #3, Avid Stamper:
S
Here’s what I did:
I used Whisper White note cards for all three card bases.
For card #1:
- stamped the sentiment and the ball/tee image in Garden Green ink onto the front of the card base
For card #2:
- stamped the sentiment in Garden Green ink onto a Whisper White card stock (CS) layer
- stamped the sentiment and the ball image in Garden Green ink onto a scrap of Whisper White CS, then die cut them, and adhered them onto the same layer
- glued that layer onto a Garden Green CS layer, then glued a strip of Country Club Designer Series Paper (DSP) on the left side and tied a piece of Poppy Parade twine around it
- glued the whole thing onto the front of the card base
For card #3:
- stamped the sentiment in Garden Green ink twice onto a scrap of Whisper White CS, then die cut them with two different dies
- die cut 5 clumps of grass from a scrap of Garden Green CS, a tee from a scrap of Crushed Curry CS, and a large golf ball from a scrap of Whisper White Thick CS
- heat embossed the large golf ball in clear to make it shiny
- embossed a layer of Poppy Parade CS using the Absolutely Argyle 3D Embossing Folder, then glued it onto a layer of Garden Green CS
- glued a piece of DSP onto the Poppy Parade CS layer
- adhered the die cut ball, tee, and grass clumps onto a panel of Whisper White CS, some glued and some with dimensionals, then glued that onto the other layers
- glued the crest shape sentiment onto the Poppy Parade CS layer, and adhered the banner sentiment over it using dimensionals
- tied a piece of Garden Green twine around the stack of layers, then glued them onto the front of the card base
S
Here’s the hop:
Click on the next button to hop to the next stop, Terri Takashige of Territerbear’s Stamp & Scrap Spot:

S
Here are today’s colors:
You can click on each one to see all the products that come in that color!
S
Here’s what I used:
Click on these images for more details and to purchase. If you are reading this post in email, the product images may not show up. Click here to see the post on my blog.
Click “Supply List” above for a clickable and printable list of the products!
S
Sale-A-Bration Continues with More Free Items – Available Now!
S
Here are some helpful links:
Thanks for stopping by today, and Sweet Stamping!
Feb 19, 2020 | Blog Hop, Cards, Gallery |

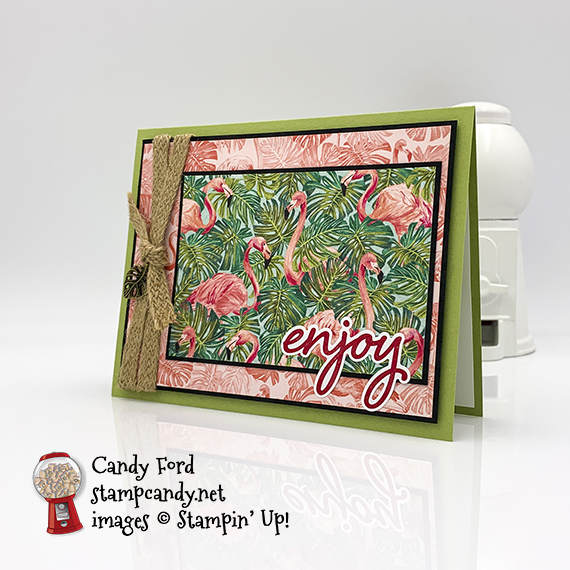
Welcome to the February 2020 InKing Royalty Blog Hop! During this year’s blog hops, we are enjoying a year of celebrations. This month’s projects celebrate Birthdays. I used the Tropical Oasis Suite to make this birthday card.
Be sure to hop around to all the stops. You don’t want to miss any of the great projects made by this talented group! Scroll down to see the list.
Here’s what I made:


Here’s what I did:
Cut and scored with my paper trimmer:
- Old Olive card stock (CS) cut to 5-1/2″ x 8-1/2″, then scored in half at 4-1/4″
- Basic Black CS layer cut to 5-1/8″ x 3-7/8″
- Tropical Oasis Designer Series Paper (DSP) layer cut to 5″ x 3-3/4″ (pink leaves and flamingos)
- Basic Black CS layer cut to 4-1/8″ x 2-7/8″
- Memories & More Card (MM) layer cut to 4″ x 2-3/4″ (green with pink flamingos)
- Whisper White CS cut to 5-1/4″ x 4″ for the inside of the card base
Stamped with the Timeless Tropical stamp set:
- sentiment in Pretty Peacock ink onto the Whisper White CS for the inside of the card base
Assembled the card:
- burnished the fold in the card base with a Bone Folder
- DSP layer glued onto the larger Basic Black CS layer
- MM layer glued onto the smaller Basic Black CS layer
- smaller Basic Black CS layer glued onto the DSP layer, lining it up on the right side
- 2 pieces of braided linen trim adhered onto the left side of the layers using Tear & Tape, wrapping the ends around to the back
- larger Basic Black CS layer adhered onto the front of the card base using Black Stampin’ Dimensionals
- “enjoy” sticker from the MM card pack applied onto the card front
- leaf trinket adhered onto the linen trim using a Mini Glue Dot
- Whisper White CS glued onto the inside of the card base
 S
S
Here’s the February 2020 InKing Royalty Blog Hop:
Thank you for hopping along with us. If you get stuck during the Blog Hop, please use this line-up as a guide:
- Brian King at Stamp with Brian
- Sheryl Abernathy at Elegant Sentiments
- Sue Jackson at Just Peachy Stamping
- Linda Krueger at The Stamp Coach
- Jackie Beers at Blue Line Stamping
- Robin Myren at Songbird Designs by Robin
- Lynn Kolcun at Avery’s Owlery
- Jennifer Spiller at Westside Paper Creations
- Ann Murray at Murray Stamps Ink
- Candy Ford at Stamp Candy <—–————- YOU ARE HERE
- Julie DiMatteo at The Paper Pixie
- Shawn de Oliveira at Shawn Stamps
S
Here are today’s main colors:
You can click on each one to see all the products that come in that color!
S
Here’s what I used:
Click on these images for more details and to purchase. If you are reading this post in email, the product images may not show up. Click here to see the post on my blog.
Click “Supply List” for a clickable and printable list!
S
Here are some helpful links:
Thanks for stopping by today, and Sweet Stamping!
Feb 13, 2020 | Blog Hop, Boxes, Cards, Gallery |
Welcome to the February OSAT Blog Hop! This month’s theme is Sixteen Candles, and we’re sharing birthday themed creations. I used the Outdoor Barbecue stamp set to create a birthday card and treat box, both with punny sentiments. One of the sentiments is included in the stamp set. I created the other one using the corn image stamp and bits and pieces from other stamp sets. Puns may be corn-y, but I love ’em!
S Sixteen Candles Sixteen Candles Sixteen Candles
Here’s what I made:


S
Here’s what I did:
Cut and scored with my paper trimmer, for the card:
- Basic Black card stock (CS) cut to 4-1/4″ x 11″, then scored in half at 5-1/2″
- Best Dressed Designer Series Paper (DSP) layer cut to 4-1/8″ x 5-3/8″
- Basic Black card stock (CS) layer cut to 2-5/8″ x 5″
- Pear Pizzazz CS layer cut to 2-1/2″ x 4-7/8″
- Basic Black CS layer cut to 1-1/2″ x 1-1/8″
- Whisper White CS layer cut to 1-3/8″ x 1″
- Whisper White CS cut to 4-1/8″ x 5-3/8″ for the inside of the card base
Cut and scored with my paper trimmer, for the box:
- Best Dressed Designer Series Paper (DSP) cut to 2″ x 6″ (2 pieces)
- Basic Black CS layer cut to 2-3/4″ x 2-3/4″
- Whisper White CS layer cut to 2-5/8″ x 2-5/8″
Stamped with the Outdoor Barbecue stamp set:
- grill in Tuxedo Black Memento ink onto the Pear Pizzazz CS layer
- grill in Tuxedo Black Memento ink onto a scrap of Real Red CS
- sentiment in Tuxedo Black Memento ink onto the smallest piece of Whisper White CS
- corn in Tuxedo Black Memento ink onto the Whisper White CS layer for the box
Stamped with the Label Me Bold stamp set:
- “smoke” in Smoky Slate ink onto the Pear Pizzazz CS layer
Stamped with the Everything Amazing stamp set:
- “YOU ARE” in Tuxedo Black Memento ink onto the Whisper White CS layer for the box top
- Note: I only inked up the part of the stamp I needed. This is easy since you can see through the photopolymer stamp.

Stamped with the Pocketful of Happiness stamp set:
- “SO” and “y” in Basic Black ink onto the Whisper White CS layer for the box top
- Note: I used a Basic Black Stampin’ Write Marker to color only the parts of the stamps I needed.

Cut using Paper Snips:
- body of the Real Red grill
Colored using Stampin’ Blends Markers:
- grill legs and shelf in Light Smoky Slate
- corn in Dark Daffodil Delight and Light Old Olive
Colored using a Stampin’ Write Marker:
- red grill handle in Basic Black
- hyphen between the corn and the “y” onto the Whisper White CS layer for the box top
Assembled the card:
- burnished the fold in the card base with a Bone Folder
- DSP layer glued onto the front of the card base
- larger Basic Black CS layer glued onto the DSP layer, lined up along the left
- Pear Pizzazz CS layer glued onto the larger Basic Black CS layer
- Real Red CS grill body glued over the grill body on the Pear Pizzazz CS layer
- sentiment glued onto the smaller Basic Black CS layer, then adhered onto the card front using Stampin’ Dimensionals
- Whisper White CS glued onto the inside of the card base
Assembled the box:
- burnished the folds in the box with a Bone Folder, and folded in the flaps to form the box
- a DSP strip put inside the box to cover the front and two sides
- the other DSP strip put inside the box to cover the bottom, back, and top
- filled with treats and closed the box
- Whisper White CS layer glued onto the Basic Black CS layer
- Basic Black CS layer adhered onto the lid of the box using Tear & Tape
S
Here’s the OSAT Sixteen Candles Birthday Blog Hop:
S
Here are today’s colors:
You can click on each one to see all the products that come in that color!
S
Here’s what I used:
Click on these images for more details and to purchase. If you are reading this post in email, the product images may not show up. Click here to see the post on my blog.
Click “Supply List” for a clickable and printable list of the products!
S
Here are some helpful links:
Thanks for stopping by today, and Sweet Stamping!

