Welcome to InKing Royalty’s March Blog Hop! Today’s hop is filled to the brim with projects that celebrate Spring and Summer. With inspiration from Katrina & the Waves’ song “Walking on Sunshine,” we’ve created projects that share the joy and excitement that accompany warmer weather. We are excited to share our projects with you. After you read my post, I hope you’ll hop over to the next person on the list at the base of this post.
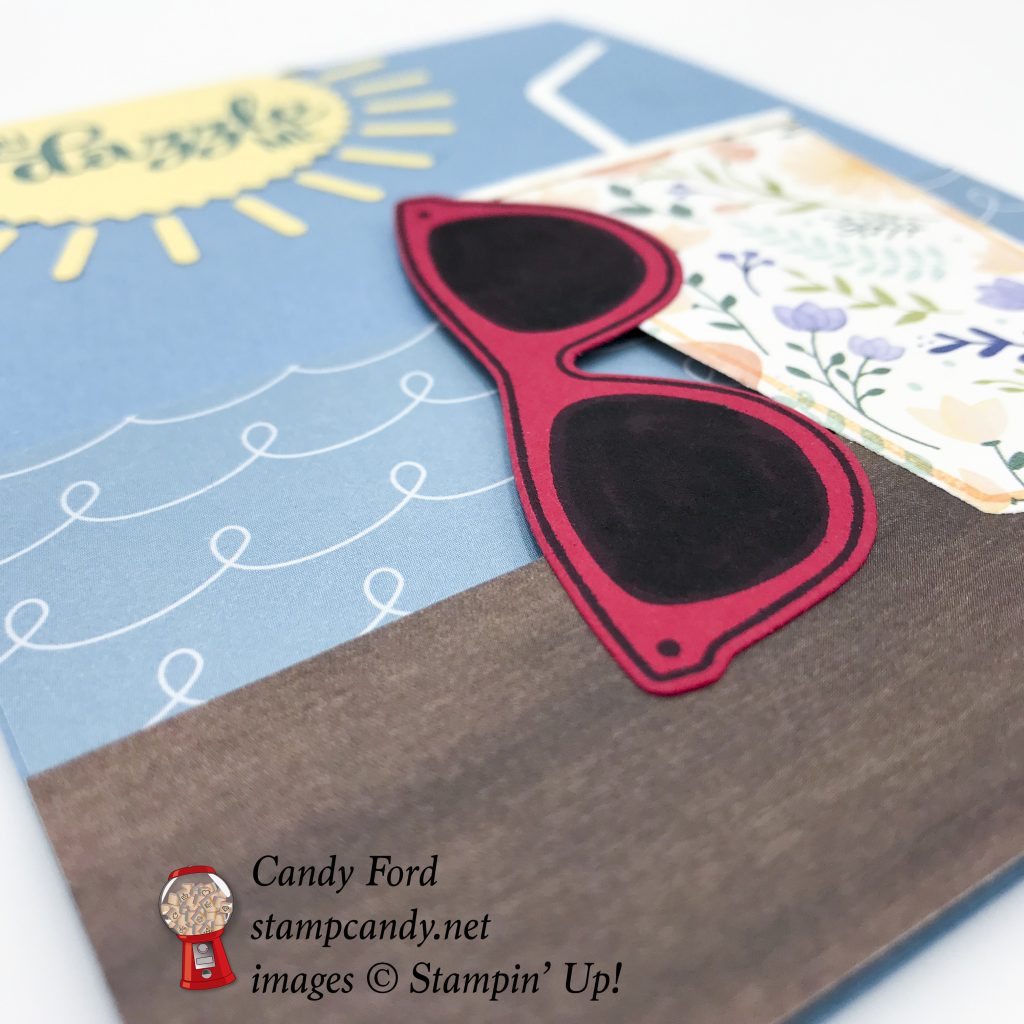
You know how I like to mix and match products. For my card, I used 2 bundles and 3 Designer Series Papers (DSP) to create a summery scene by the sea. The waves are from the Sweet Soiree DSP. The table is from the Wood Textures DSP. The tumbler is from the Delightful Daisy DSP – I think I saw one just like this recently in a store.
Whether you remember the song or not, be sure to check it out here:
Here’s what I made:
Here’s what I did:
Cut and scored with my Stampin’ Trimmer:
Marina Mist card stock (CS) cut to 4-1/4″ x 11″, then scored in half at 5-1/2″
Sweet Soiree DSP cut to 4-1/4″ x 2-1/2″
Wood Textures DSP cut to 4-1/4″ x 1-1/4″
Whisper White Cs cut to 4″ x 5-1/4″ for the inside of the card
Stamped with the Pocketful of Sunshine stamp set:
sentiment in Marina Mist ink onto a scrap of So Saffron CS
glasses in Basic Black ink onto a scrap of Real Red CS
Stamped with the Coffee Cafe stamp set:
cup in Peekaboo Peach ink onto a scrap of Delightful Daisy DSP
straw from a scrap of Whisper White CS
Die cut using the Pocket Framelits:
glasses
rays of sunshine from a scrap of So Saffron CS
Die cut using the Coffee Cups Framelits:
stamped cup
just the top part of the cup from a scrap of Whisper White CS
Cut using Paper Snips:
rim of the cup from the Whisper White die cut piece
Cut using the Starburst Punch:
sentiment
Colored using a Stampin’ Write Marker:
lenses of glasses in Basic Black
Assembled the card:
burnished the fold in the card base with a Bone Folder
Sweet Soiree DSP glued onto the front of the card base
white rim of the cup glued onto the DSP cup
cup glued onto the Wood Textures DSP
glasses glued onto the Wood Textures DSP and the cup
cup, glasses, and Wood Textures DSP adhered onto the card front using Stampin’ Dimensionals
straw glued onto the card front with the bottom part under the cup
sentiment sun glued onto the front of the card base, then trimmed away the excess with Paper Snips
sun rays glued onto the front of the card base
Here’s the hop:
Use this list if you get lost along the hop. Be sure to check out all the stops, because you don’t want to miss any of the projects made by this amazing group of stampers!
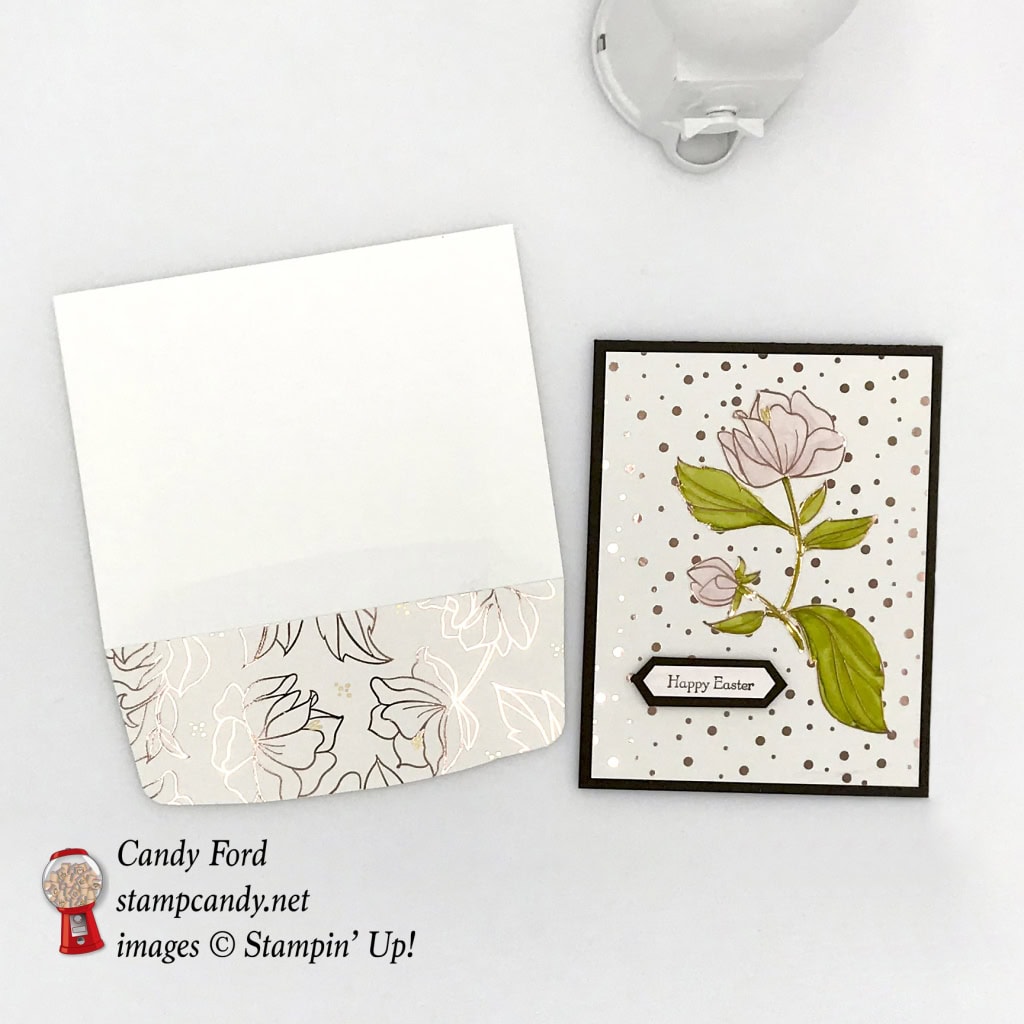
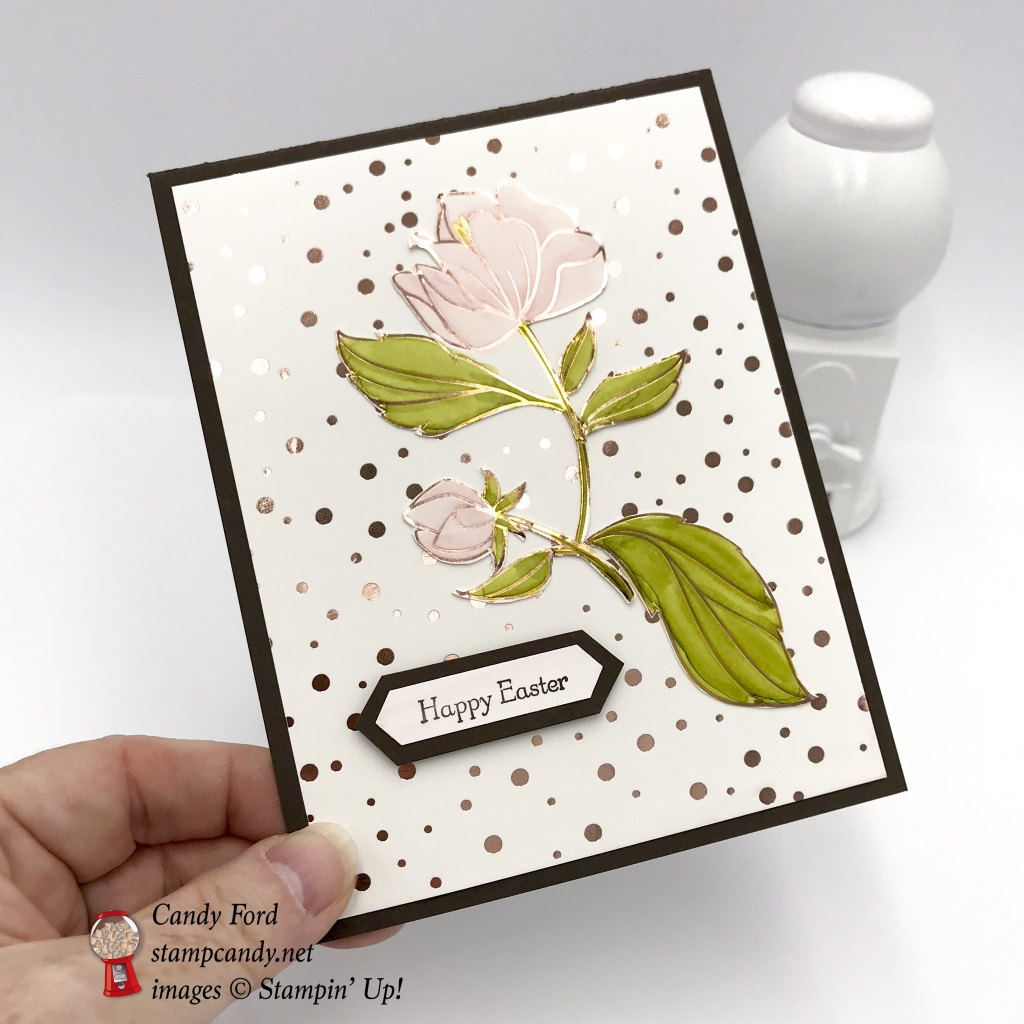
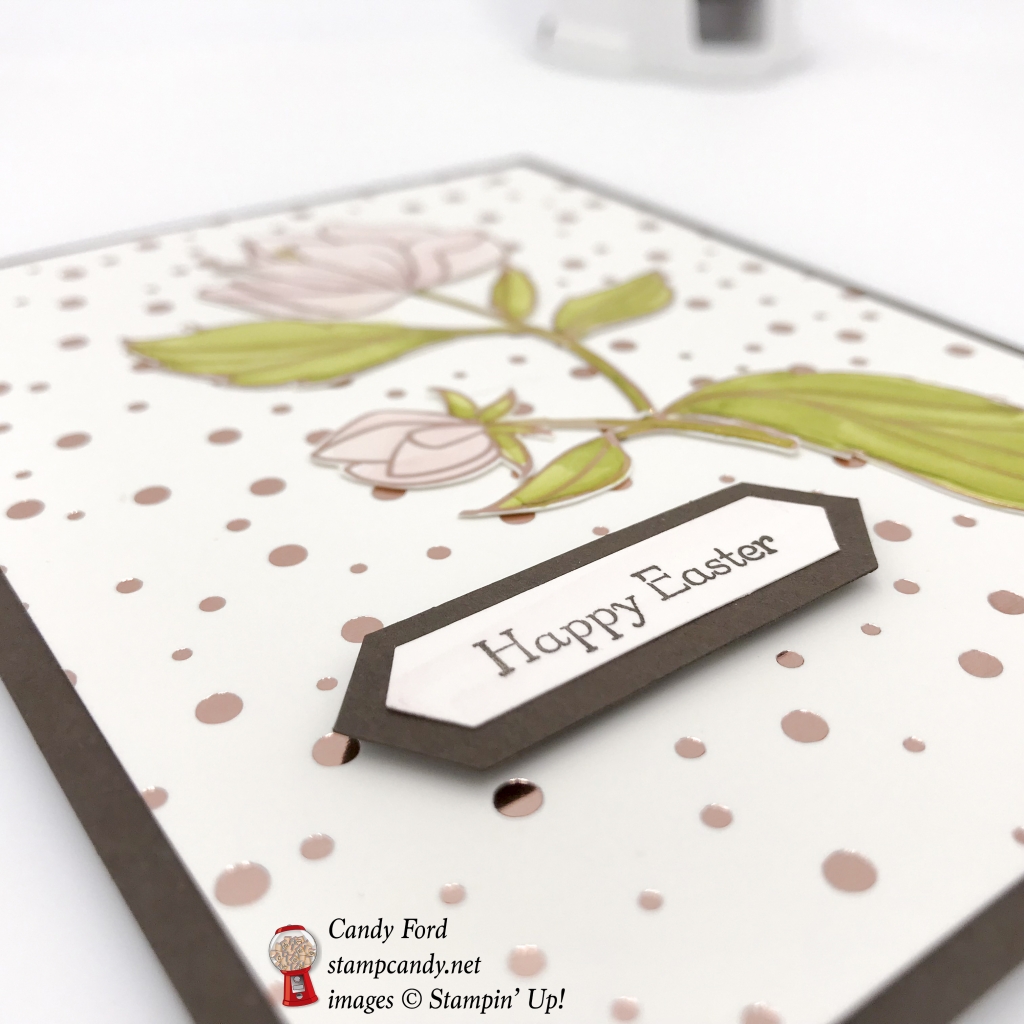
It’s time for the RemARKably Created Blog Tour! The theme is Easter. After you read my post, be sure to follow the list below to all the other blogs on the tour. You don’t want to miss any of the projects made by these amazing stampers! I used the Springtime Foils Specialty Designer Series paper for my card today. This paper pack is FREE with a $50 order, but only through March 31! Don’t miss the opportunity to add this gorgeous paper to your crafting stash!
Here’s what I made:
Here’s what I did:
Cut and scored with my Stampin’ Trimmer:
Early Espresso card stock (CS) cut to 4-1/4″ x 11″, then scored in half at 5-1/2″
Springtime Foils Specialty Designer Series Paper (DSP) cut to 4″ x 5-1/4″ (dots)
Pink Pirouette CS cut to 4″ x 5-1/4″ for the inside of the card
DSP cut to 5-1/2″ x 2-1/2″ for the envelope flap (floral)
Stamped with the Teeny Tiny Wishes stamp set:
sentiment in Early Espresso ink onto a scrap of Whisper White CS
Cut using the Classic Label Punch:
sentiment (I punched it twice – once near one end of the sentiment, then again near the other end of the sentiment.)
Cut using Paper Snips:
a scrap of Early Espresso CS to fit around sentiment (I glued the punched sentiment onto the scrap, then trimmed around it.)
flower from a different piece of the DSP
trimmed excess DSP from around envelope flap (I glued it to the flap first, then trimmed it.)
Colored using Stampin’ Blends Markers:
flower and leaves in Pink Pirouette and Old Olive, with just a touch of Daffodil Delight for the flower center
sentiment in Pink Pirouette (I meant to stamp the sentiment onto a piece of Pink Pirouette CS, but forgot until I had it all glued together, so I just colored it in with the Blends Marker.)
Assembled the card:
burnished the fold in the card base with a Bone Folder
DSP flower glued onto the DSP layer
DSP layer glued onto the front of the card base
sentiment adhered onto the DSP layer using Stampin’ Dimensionals
Pink Pirouette CS glued to the inside of the card layer
Here’s the blog tour:
I hope you’ll check out all the projects on the tour. Use this list as a guide.
Here are today’s colors:
You can click on each one to see all the products that come in that color!
Click on these images for more details and to purchase.
Here’s some stuff you should know:
This is a fabulous time to join my team! Sale-A-Bration is the biggest event of the Stampin’ Up! year and you can save big on the ultimate bundle, the Starter Kit. CLICK HEREfor more information. Contact me with any questions: email candy@stampcandy.net or call/text 404-661-5222
Newsletter: subscribe for exclusive deals, projects, and more! CLICK HEREto subscribe. You can also choose to receive an email every day that I have a blog post.
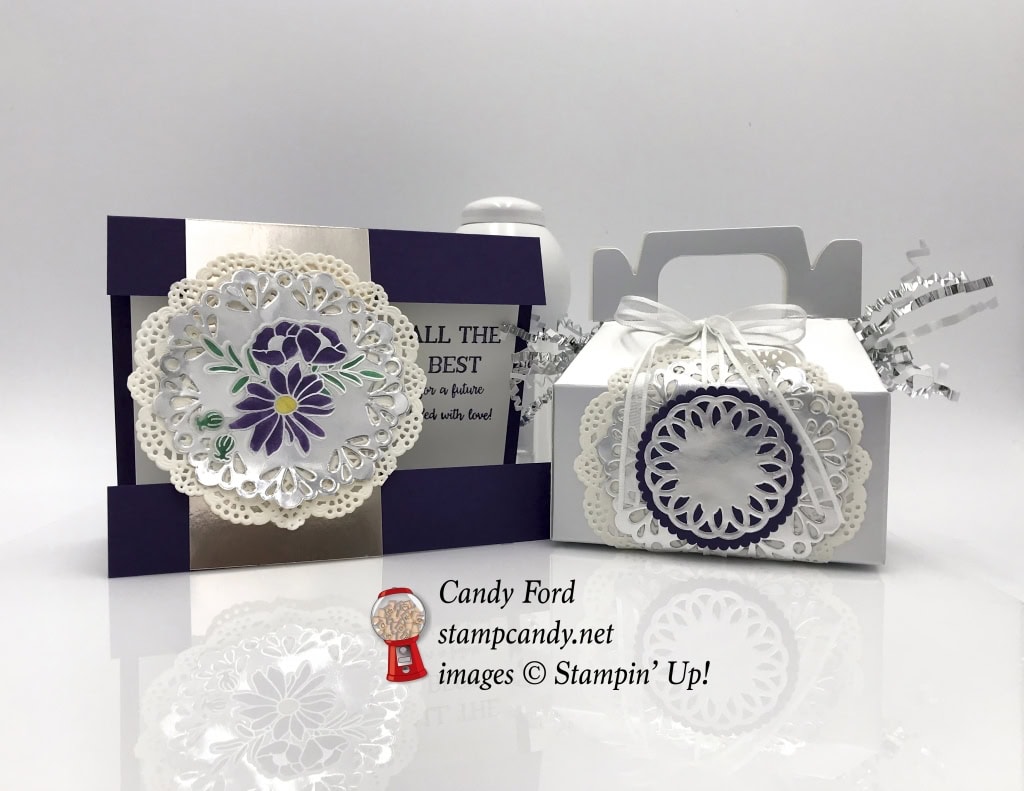
It’s time for the One Stamp at a Time Blog Hop! This month’s theme is Happily Ever After. I used the Better Together stamp set, some doilies, and a few other goodies to create a wedding card and gift box. I can’t wait to see all the projects the other hoppers have created! Be sure to hop around to see them.
Elegant Eggplant card stock (CS) cut to 5-1/2″ x 8-1/2″, scored in half at 4-1/4″, then 1″ strip cut off the bottom of the front, then another 2-1/4″ strip cut from the front – there should be a 1″ strip still attached across the top of the front
Silver Foil Sheet cut to 2″ x 4-1/4″
Whisper White CS cut to 5″ x 3-3/4″ for the inside of the card
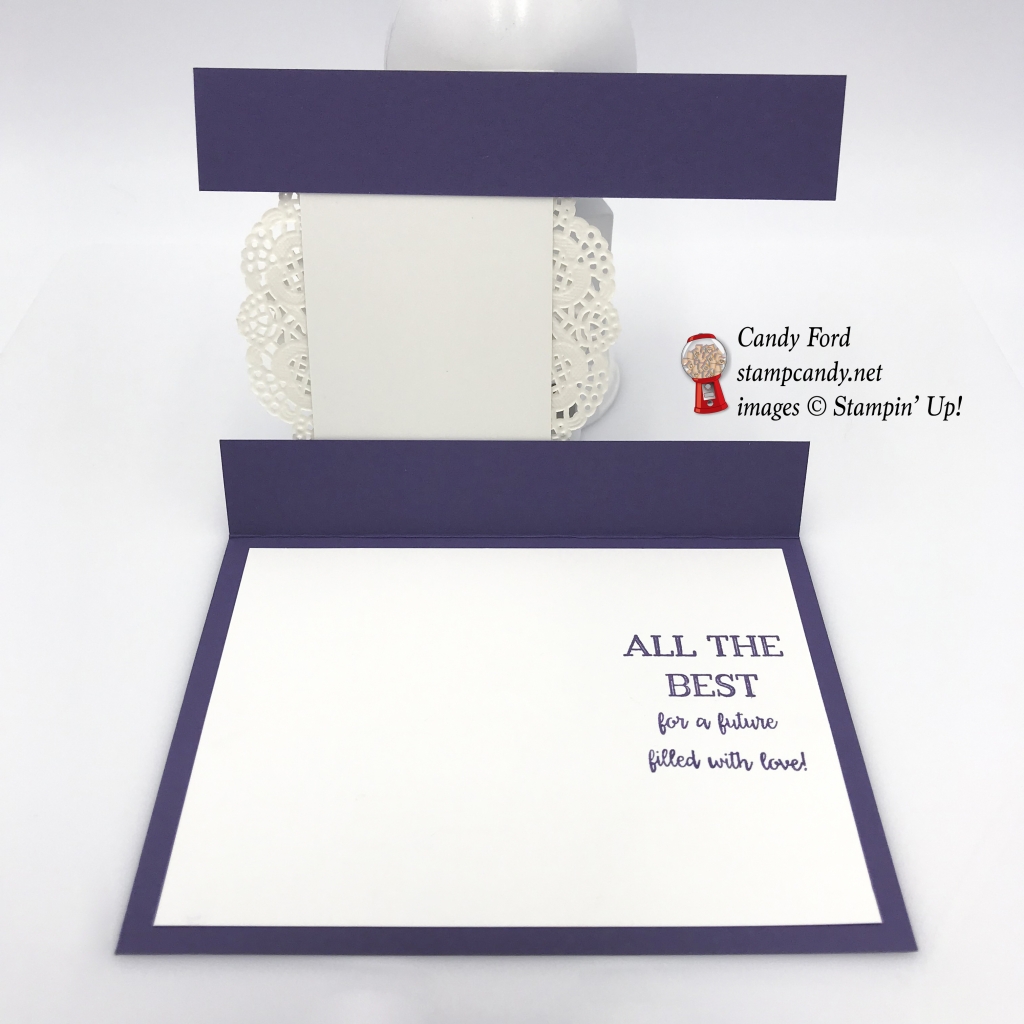
Stamped with the Better Together stamp set:
sentiment in Elegant Eggplant ink onto the Whisper White CS
NOTE: I used an Elegant Eggplant Stampin’ Write Marker to ink up each part of the stamp, and used a Stampamajig to line up the words
Die cut using the Layering Circles Framelits:
scrap of Elegant Eggplant CS with a scalloped circle die
Colored using Stampin’ Write Markers:
vellum embellishment from the Sweet Soiree Embellishment Kit in Elegant Eggplant, Emerald Envy, and Daffodil Delight
NOTE: I colored the vellum on the back, not on the side with the silver
Assembled the card:
folded the card base along the score line, and burnished it with a Bone Folder
Silver Foil strip adhered to the front of the card base at the top, and to the 5-1/2″ x 1″ Elegant Eggplant CS strip at the bottom
Delicate White Doily adhered to the Silver Foil strip using Tear & Tape
Silver Metallic Foil Doily adhered to the white doily using Tear & Tape
colored vellum embellishment adhered to the silver doily using Tear & tape
stamped Whisper White CS glued to the inside of the card base
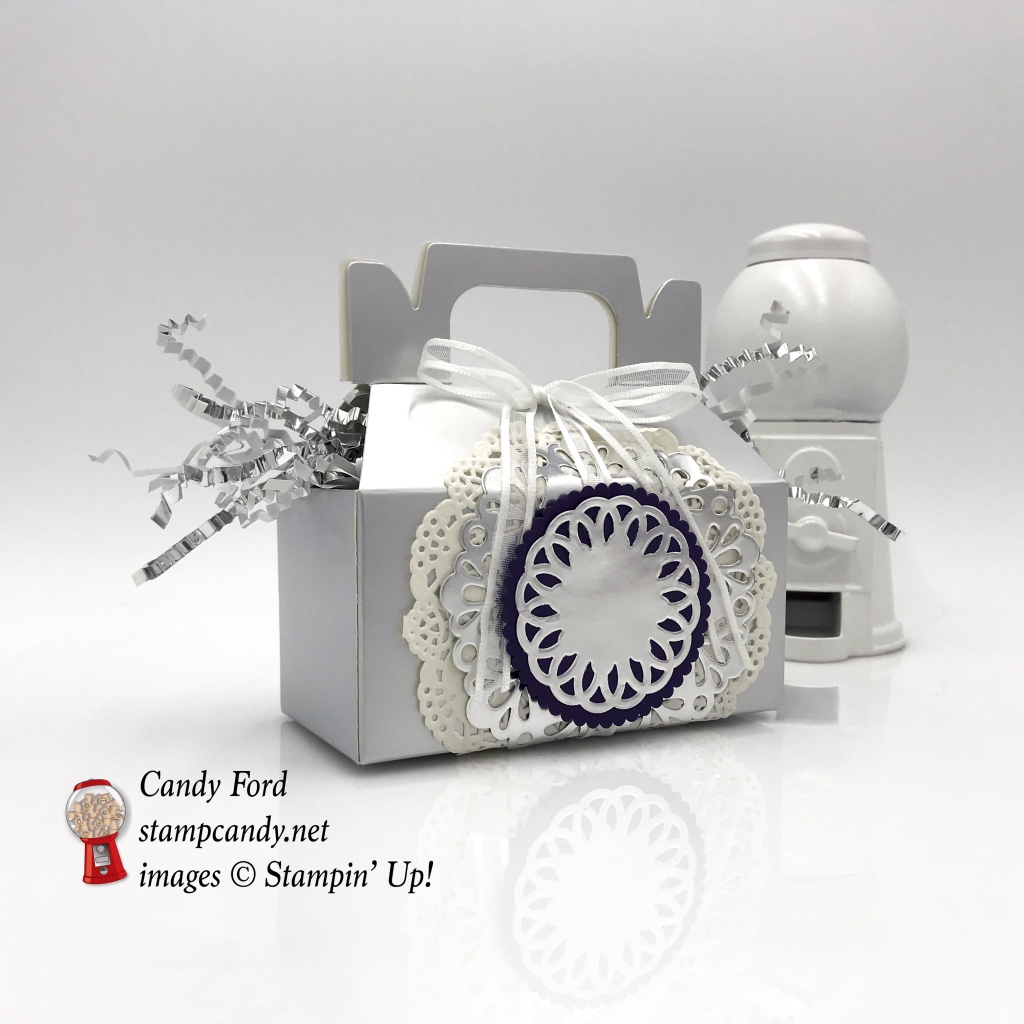
Assembled the box:
burnished the fold lines in the Mini Silver Gable Box, and assembled it – On the bottom, fold in the long flap with two tabs, then the two short side flaps, then the long flap with one tab.
two top end flaps tucked inside the box, instead of inserting the top tabs into them
silver Sweet Soiree Ready Shreddie tucked inside the box with some hanging out the sides
Delicate White Doily adhered to the side of the box using Tear & Tape
silver Metallic Foil Doily adhered to the white doily using Tear & Tape
Whisper White 1/4″ Organza Ribbon wrapped around box and tied in a bow, tying the box closed at the top
die cut Elegant Eggplant CS scalloped circle adhered to the silver doily using Stampin’ Dimensionals, careful to leave a “tunnel” for the ribbon to slide through freely
smaller silver Metallic Foil Doily adhered to the die cut circle using Tear & Tape
Here’s the hop:
You don’t want to miss any of these great projects!
Here are today’s colors:
You can click on each one to see all the products that come in that color!
Click on these images for more details and to purchase.
Here’s some stuff you should know:
This is a fabulous time to join my team! Sale-A-Bration is the biggest event of the Stampin’ Up! year and you can save big on the ultimate bundle, the Starter Kit. CLICK HERE for more information. Contact me with any questions: email candy@stampcandy.net or call/text 404-661-5222
Newsletter: subscribe for exclusive deals, projects, and more! Enter your email address and click SUBSCRIBE at the top right of this page, just under the picture of my smiling face. You can also choose to receive an email every day that I have a blog post.
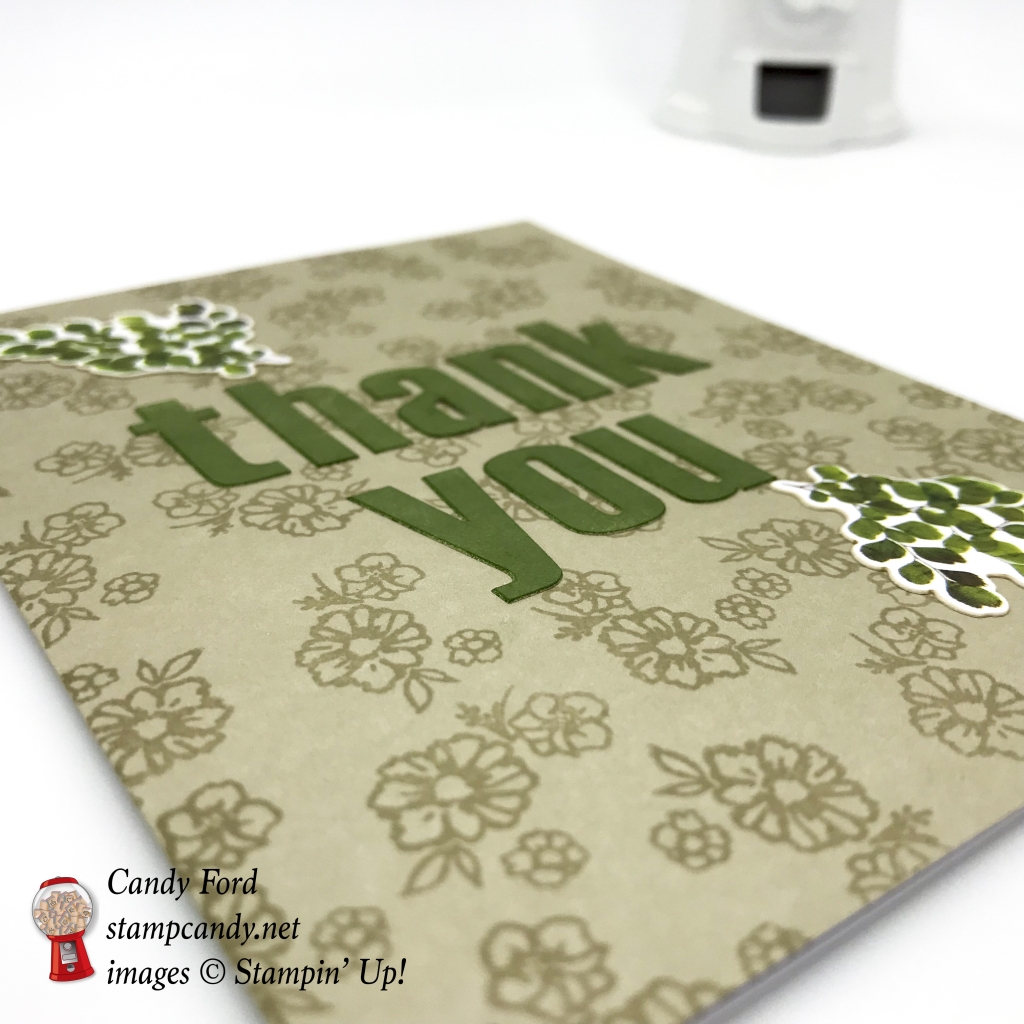
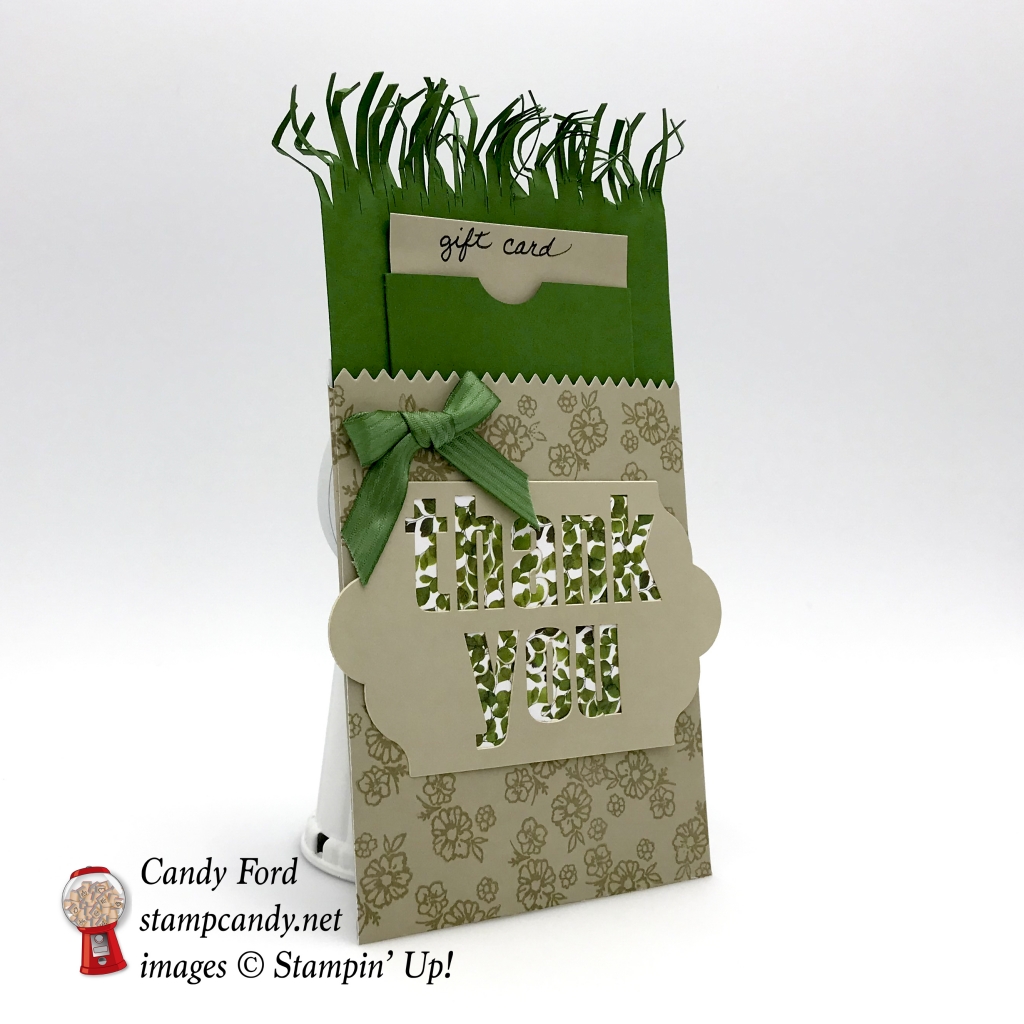
It’s time for the APPT Blog Hop! This is my first time hopping with this talented group of stampers, and I’m thrilled to get to share, not only my alternative projects with you, but theirs as well. This month’s Paper Pumpkin kit is called Wildflower Wishes, and it makes some really lovely cards. I’ve used some of the pieces to make a different card and a coordinating treat bag gift card holder. I hope you like them. And I hope you follow the hop to see all the great projects created by these amazing demonstrators.
The Wildflower Wishes kit appears to be sold out, but the refills are still available, in case you need more pieces. It’s listed in the supply list near the bottom of this post. Remember, only Paper Pumpkin subscribers can purchase extra kits & refills.
Here’s what I made:
First the card…
…then the treat bag…
…with a gift card holder inside.
Here’s what I did:
Cut and scored with my Stampin’ Trimmer:
Garden Green card stock (CS) cut to 3-5/8″ x 5-1/4″
Garden Green CS cut to 3″ x 3-1/2″, then scored 1/4″ from both long sides and from one short side, for the gift card pocket
Cut using a 1″ Circle Punch:
a semicircular notch from the one non-scored side of the small Garden Green CS
Stamped with the Wildflower Wishes stamp set from the kit:
small flower image in Sahara Sand ink onto the front of one of the cards bases, and the front of the assembled treat bag (see below)
Die cut using the Mini Treat Bag Thinlits:
larger bag piece from one of the card bases, lining up the score line of the card base with the score line of the die
NOTE: Since the card base height is shorter than the treat bag die, I ran it through twice with this die – the first time so the bottom flap of the bag got cut, and the second time so the zigzag top of the bag got cut.
smaller bag piece from yet another card base, then used Paper Snips to trim the bottom edge so it would fit with the larger die cut piece
Assembled the card:
folded and burnished the score line in the card base with a Bone Folder
peeled a thank you tag away from its sheet, leaving the letters on the sheet
used a Sponge Dauber to ink the letters with Garden Green ink
applied letters to the card front
applied two green leafy stickers to the card front
Assembled the bag:
assembled the bag using Multipurpose Liquid Glue along the seams, first the side, then the back, then the bottom flap
stamped the small flowers in Sahara Sand inl onto the front of the bag (see above)
applied 8 of the same green leafy stickers to the back of the thank you tag, so the designs showed through the letters
NOTE: I was careful to save the inside pieces of the “a” and the “o”, and placed them over the leafy stickers
applied the tag to the front of the bag
used an Embossing Buddy on the back of the tag areas that stick out past the edge of the bag, so they wouldn’t be sticky
tied a bow with Garden Green ribbon and adhered it to the bag using Mini Glue Dots
Assembled the bag insert:
cut one of the short sides (the top) of the larger Garden Green CS with Paper Snips to resemble grass, then crinkled it with my fingers
folded and burnished the score lines in the small Garden Green CS with a Bone Folder
glued the three flaps to the front of the larger Garden Green CS, to create the pocket for the gift card
Here’s how to get to the next stop on the hop:
Here are today’s colors:
You can click on each one to see all the products that come in that color!
Click on these images for more details and to purchase.
Here’s some awesome info about Paper Pumpkin:
When you buy a 3, 6, or 12 month prepaid Paper Pumpkin subscription, you qualify for FREE Sale-A-Bration items! After purchasing, you will receive a code in your email. Simply go to the Paper Pumpkin web site and enter the code to subscribe.
Paper Pumpkin is celebrating their 5th Anniversary! Subscribe by March 10 to receive the special FREE gift and special box with the March kit! You can watch a video about it here.
Here’s some other stuff you should know:
This is a fabulous time to join my team! Sale-A-Bration is the biggest event of the Stampin’ Up! year and you can save big on the ultimate bundle, the Starter Kit. CLICK HERE for more information. Contact me with any questions: email candy@stampcandy.net or call/text 404-661-5222
Newsletter: subscribe for exclusive deals, projects, and more! Enter your email address and click SUBSCRIBE at the top right of this page, just under the picture of my smiling face. You can also choose to receive an email every day that I have a blog post.
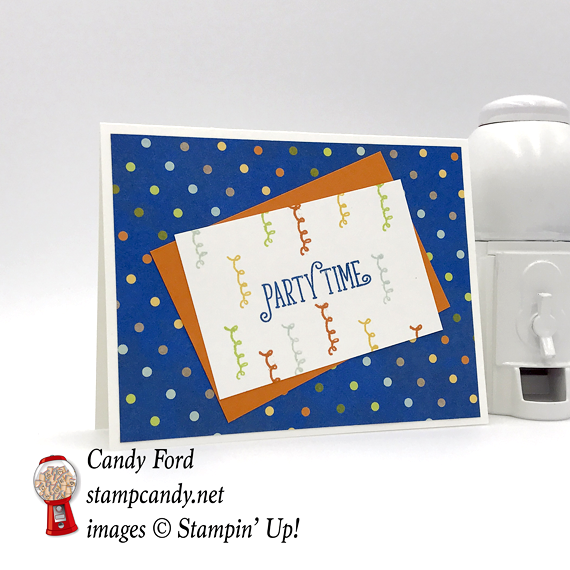
It’s time for the InKing Royalty Blog Hop! This month’s theme is “They Say It’s Your Birthday.” Do you remember the song by The Beatles? Click here to hear it! I’ve made a fun birthday card for today’s hop, but it could be used for any occasion calling for a party, even for the invitation. I took the colors from the Birthday Memories Designer Series Paper that I used, and the stamped images are from a stamp set I’ve used a lot lately, Happy Birthday Gorgeous.
Here’s what I made:
Here’s what I did:
Cut and scored with my Stampin’ Trimmer:
Whisper White Thick card stock (CS) cut to 5-1/2″ x 8-1/2″, then scored in half at 4-1/4″
Birthday Memories Designer Series Paper (DSP) cut to 5-1/4″ x 4″
Pumpkin Pie CS cut to 4-1/4″ x 3-1/4″
Whisper White CS cut to 4″ x 3″
Stamped with the Happy Birthday Gorgeous stamp set:
sentiment in Pacific Point ink onto the center of the Whisper White CS layer
streamers around the sentiment in Daffodil Delight, Lemon Lime Twist, Pumpkin Pie, and Soft Sky inks
Assembled the card:
burnished the fold in the card base with a Bone Folder
DSP layer glued onto the front of the card base
Pumpkin Pie CS layer glued at an angle onto the DSP layer
stamped layer glued at an angle onto the Pumpkin Pie CS layer
Here’s the hop:
Thank you for hopping along with us. If you get stuck during the Blog Hop, please use this line-up as a guide:
Click on these images for more details and to purchase.
Here’s some stuff you should know:
This is a fabulous time to join my team! Sale-A-Bration is the biggest event of the Stampin’ Up! year and you can save big on the ultimate bundle, the Starter Kit. CLICK HERE for more information. Contact me with any questions: email candy@stampcandy.net or call/text 404-661-5222
Newsletter: subscribe for exclusive deals, projects, and more! Enter your email address and click SUBSCRIBE at the top right of this page, just under the picture of my smiling face. You can also choose to receive an email every day that I have a blog post.
It’s time for the OSAT Blog Hop! This month’s theme is Don’t go breaking my heart in honor of Valentine’s Day. Remember the song by Elton John and Kiki Dee? If not, you can watch the video here. My project has plenty of hearts – a large one from the Painted with Love Designer Series Paper, and small ones from the Sure Do Love You stamp set – and fortunately none of them are broken.
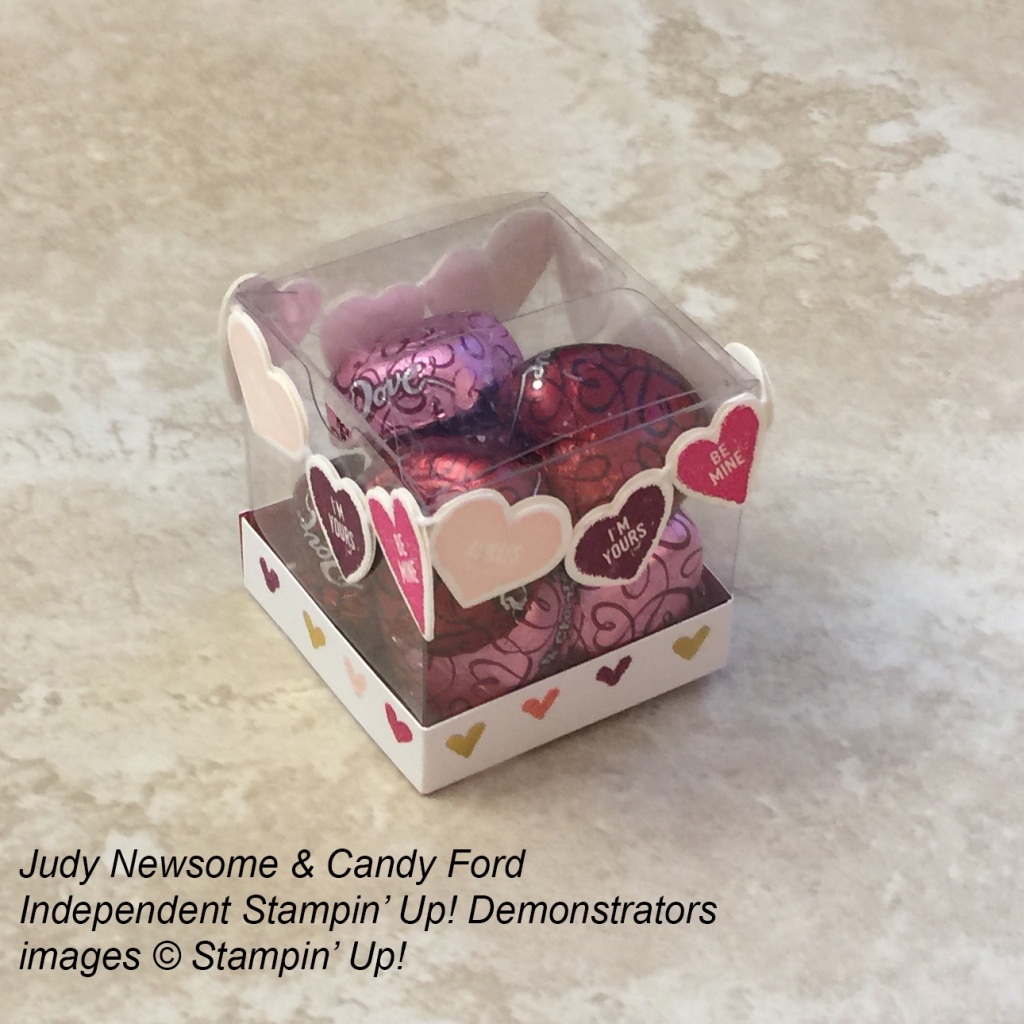
I’m on a ship right now (I’m actually at a live performance by Casey McPherson as I type this, so if there are any typos, that’s why!) My sister, and Candy Hearts team member, Judy Newsome, is house sitting. When I realized I’d forgotten to make the projects for today before I left, I contacted her and begged for help. Of course, she obliged because that’s the kind of gal she is. Between the two of us, we designed the card and treat box, and she actually made and photographed them. So while it was a team effort, she did the lion’s share of the work. Thanks, Judy!
Be sure to hop around to all the blogs listed below. You don’t want to miss any of the great projects by this group!
Here’s what we made:
Here’s what she did:
Cut and scored with my Stampin’ Trimmer:
Rich Razzleberry card stock (CS) cut to 4-1/4″ x 11″, then scored in half at 5-1/2″
Melon Mambo CS cut to 4-1/8″ x 5-3/8″
Powder Pink CS cut to 4″ x 5-1/4″
Painted With Love Designer Series Paper (DSP) cut to 3-7/” x 5-2/8″ (small hearts design)
Melon Mambo CS cut to 3-1/2″ x 3/4″
Powder Pink CS cut to 3-1/2″ x 5/8″
Painted With Love DSP cut to 1/2″ x 8-1/2″ (one row of small hearts) then scored at 2″, 4″, 6″, and 8″
Whisper White CS cut to 4″ x 5-1/4″ for the inside of the card
Stamped with the Sure Do Love You stamp set:
small conversation hearts in Powder Pink,Melon Mambo, and Rich Razzleberry inks onto scraps of of Whisper White CS (4 of each)
Stamped with the Cozy Cottage stamp set:
card sentiment in Melon Mambo ink onto the Powder Spink CS strip
Die cut using the Lots of Love Box Framelits:
small converstaion hearts
large heart from a scrap of the DSP (striped design)
Cut using Paper Snips:
notched one end of the Melon Mambo and Powder Pink CS strips
NOTE: you could use the Banner Triple Punch instead
Assembled the card:
burnished the fold in the card base with a Bone Folder
Melon Mambo CS layer glued onto the front of the card base
Powder Pink CS layer glued onto the Melon Mambo CS layer
DSP layer glued onto the Powder Pink CS layer
sentiment glued onto the Melon Mambo CS strip
Melon Mambo CS strip glued onto the DSP layer
large DSP heart adhered to the DSP layer using Stampin’ Dimensionals
Whisper White CS glued to the inside of the card base
Assembled the treat box:
popped the premade box together (just fold in the bottom flaps!)
glued the conversation hearts to a piece of Whisper White Solid Baker’s Twine to make the garland
adhered garland around the top of the box with Mini Glue Dots
adhered strip of DSP around the bottom of the box with Fast Fuse
filled the box with Dove Milk & Dark Chocolate Hearts
Here’s the hop:
Be sure to hop to all the blogs to see the terrific projects made by this amazing team of stampers. Use the list below if you get lost.
Here are today’s main colors:
You can click on each one to see all the products that come in that color!
Click on these images for more details and to purchase.
Here’s some stuff you should know:
This is an AMAZING time to join the Candy Hearts! Sale-A-Bration is the biggest event of the Stampin’ Up! year and you can save big on the ultimate bundle, the Starter Kit. CLICK HERE for more information. Contact me with any questions: email candy@stampcandy.net or call/text 404-661-5222
Newsletter: subscribe for exclusive deals, projects, and more! Enter your email address and click SUBSCRIBE at the top right of this page, just under the picture of my smiling face. You can also choose to receive an email every day that I have a blog post.