Sep 10, 2020 | Blog Hop, Boxes, Cards, Gallery, Techniques |

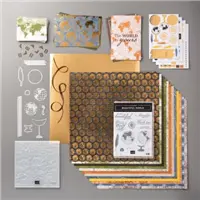
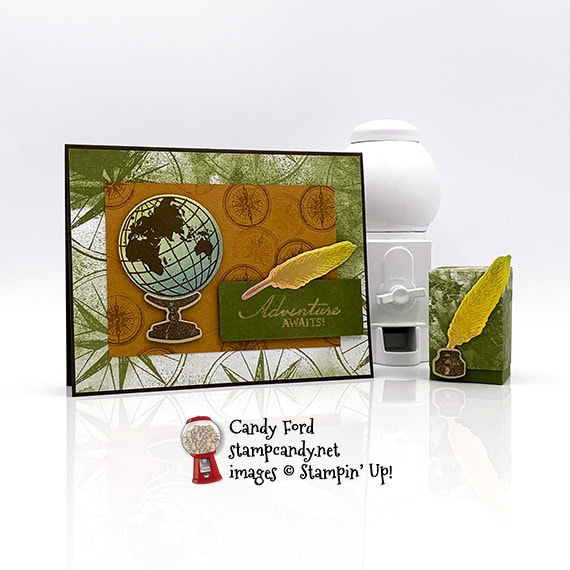
Welcome to the September 2020 OSAT Blog Hop! This month’s theme is You’ve Got This, so we’re featuring projects celebrating empowerment and encouragement for a new job, new school year, or any other new challenge. I used products from the World of Good Suite Collection for my projects today: a card and a small treat box. I also used a makeup brush blending technique that my Candy Hearts team member Lisa Graham demonstrated at our last team meeting.
Be sure to hop around to all the stops, to see all the great projects this group has in store for you today!
If you are reading this in email, some photos may appear blurry, or may not appear at all. Please click here to see the post on my blog.
S September 2020 OSAT September 2020 OSAT September 2020 OSAT
Here’s what I made:

S
Here’s what I did:
Cut and scored with my paper trimmer:
- Early Espresso card stock (CS) cut to 5-1/2″ x 8-1/2″, then scored in half at 4-1/4″
- World of Good Designer Series Paper (DSP) layer cut to 5-3/8″ x 4-1/8″
- Cinnamon Cider CS layer cut to 4-1/4″ x 3″
- Mossy Meadow CS layer cut to 2-3/4″ x 1″
- Whisper White CS cut to 5-1/4″ x 4″ for the inside of the card base
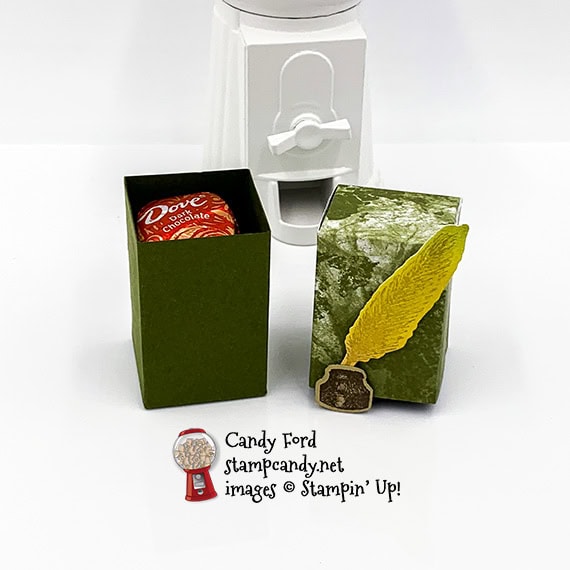
- Mossy Meadow CS cut to 5-1/4″ x 3-1/4″, scored along the long side at 1-1/4″, 2-1/2″, 3-3/4″, 5″, and scored along the short side at 1-1/4″ for the box
- DSP cut to 4-13/16″ x 4-13/16″ and scored 1-3/4″ from all four edges for the lid
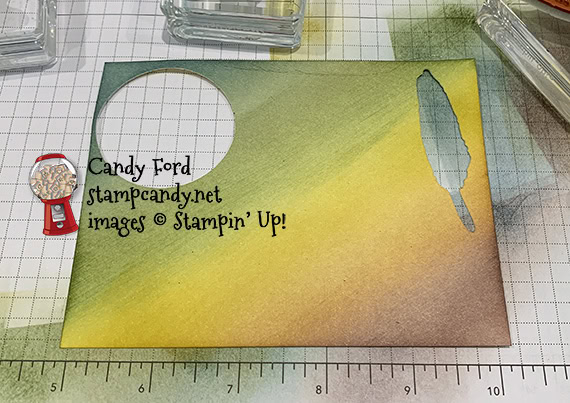
Colored/blended using a makeup brush:
- a scrap of Whisper White Thick CS in Early Espresso, Cinnamon Cider, Bumblebee, Mossy Meadow, and Misty Moonlight inks
- CLICK HERE to see the makeup brush I used. There are many others that I’m sure would be just as good. I wanted a big one, so I got the 2X-Large size.
- I forgot to take a photo until after I had cut out a couple pieces. My blending skills aren’t as good as Lisa’s, but I think you can get the idea.
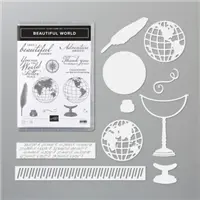
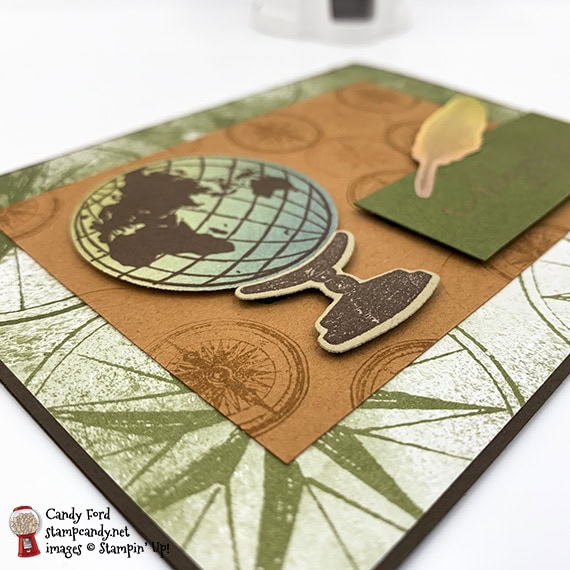
Stamped with the Beautiful World stamp set:
- globe in Early Espresso ink onto the blue/green area of the blended CS (I wanted to make sure I got good ink coverage on the globe, so I used my Stamparatus to stamp it 2 or 3 times times.)
- 2 feathers in Crumb Cake ink onto the yellow/brown area of the blended CS
- globe stand and ink well in Early Espresso ink onto a scrap of Crumb Cake CS
- sentiment in Versamark ink onto the small Mossy Meadow CS layer, then heat embossed in gold
- small globe in Cinnamon Cider ink all over the Cinnamon Cider CS layer
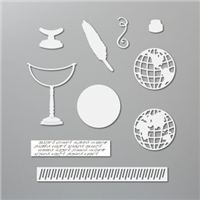
Cut using the World Map Dies:
- globe, globe stand, inkwell, and 2 feathers
Assembled the card:
- burnished the fold in the Early Espresso card base with a Bone Folder
- DSP layer glued onto the front of the card base
- Cinnamon Cider CS layer glued onto the the DSP layer
- globe and stand adhered onto the Cinnamon Cider CS layer using Black Stampin’ Dimensionals
- end of a feather glued onto the sentiment, then both adhered onto the card front using Black Stampin’ Dimensionals
- Whisper White CS glued onto the inside of the card base
Assembled the box:
- burnished the folds in the box and lid with a Bone Folder, and cut according to the diagram using Paper Snips
- tab on box glued onto the inside of the opposite end
- 1 bottom tab folded up, then the other 3 tabs glued in place
- The box is 1-1/4″ square by 2″ high, and fits 4 stacked Dove promises perfectly
- side tabs of DSP lid folded in and glued together, then the skinny tab folded down and glued onto the top one – did this on both sides
- NOTE: I put the lid on the box before gluing the sides, to make sure it wasn’t too snug.
- The lid is 1-5/16″ square by 1-3/4″ high.
- tip of second feather glued onto the back of the inkwell, then both adhered onto the front of the box lid using Black Stampin’ Dimensionals
S
Here’s the September 2020 OSAT Blog Hop:
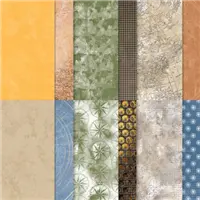
Here are today’s colors:
You can click on each one to see all the products that come in that color!
S
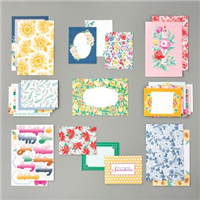
Here’s what I used:
Click on these images for more details and to purchase. If you are reading this post in email, the product images may not show up. Please click here to see the post on my blog.
Supply List. <— Click for a clickable and printable list of the products!
S
Here are some helpful links:
S
Thanks for stopping by today, and Sweet Stamping!
Sep 8, 2020 | Blog Hop, Cards, Fun Folds, Gallery, Techniques |

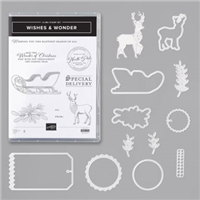
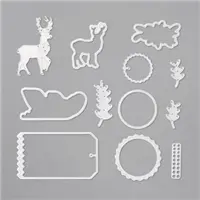
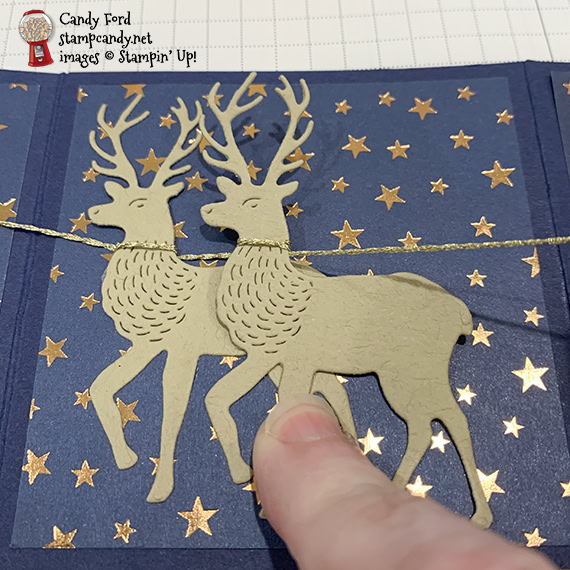
Welcome to the September 2020 ICS Blog Hop! This month’s theme is Mini Catalog Fun Folds. I made an accordion fold card that fits into a Mini Pizza Box. I used the Wishes & Wonder Bundle (Wishes & Wonder stamp set and North Pole Wonder Dies,) along with the Stitched Rectangle Dies, Stitched Shapes Dies, Brightly Gleaming Designer Series Paper, and Forever Gold Laser-Cut Specialty Paper, to create a long skinny card with Santa’s sleigh and eight tiny reindeer, plus Rudolph who has a Red Rhinestone for his nose.
Be sure to hop all the way around to all the stops because you don’t want to miss any of the great fun fold projects this group has for you today.
If you are reading this in email, some photos may appear blurry, or may not appear at all. Please click here to see the post on my blog.
S September 2020 ICS September 2020 ICS September 2020 ICS September 2020 ICS https://bit.ly/34ibSpX. https://stampcandy.net/blog-hop/september-2020-ics-blog-hop-fun-folds/
Here’s what I made:
The box: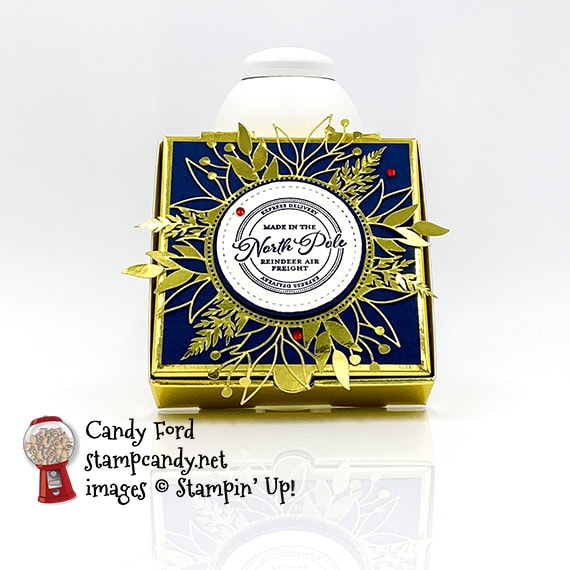
The card front: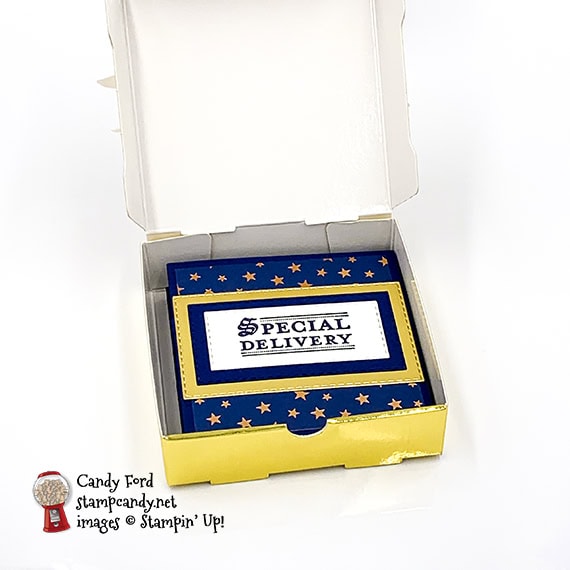
Pulling the card out of the box:
Inside the card: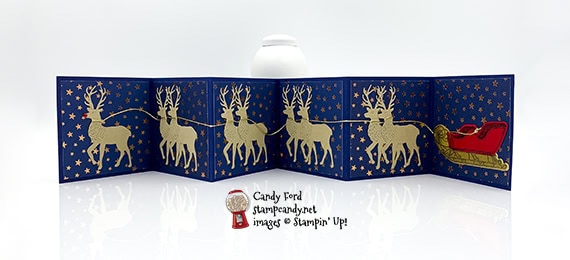
Rudolph leads the way: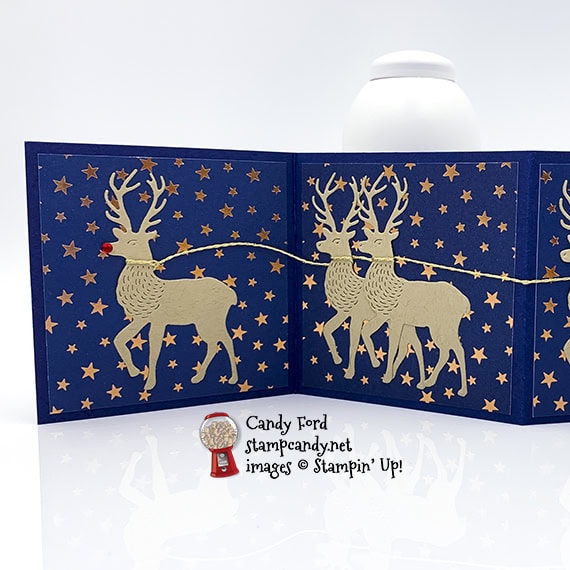
Sleigh ready for Santa and his toy sack:
Back of card: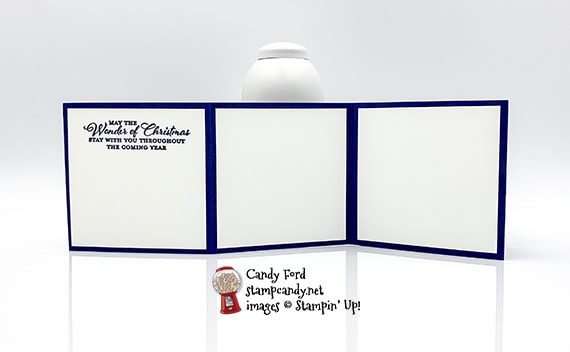 S
S
Here’s what I did:
Cut and scored with my paper trimmer:
- Night of Navy card stock (CS) cut to 11″ x 3-1/4″, then scored at 3-1/4″, 6-1/2″, and 9-3/4″
- Night of Navy card stock (CS) cut to 9-3/4″ x 3-1/4″, then scored at 3-1/4″ and 6-1/2″
- Brightly Gleaming Designer Series Paper (DSP) layers cut to 3″ x 3″ (7 pieces)
- Whisper White CS layers cut to 3″ x 3″ (3 pieces)
- Night of Navy CS cut to 3-1/4″ x 3-1/4″ for the top of the box
Stamped with the Wishes & Wonder stamp set:
- card front sentiment in Night of Navy ink onto a scrap of Whisper White Thick CS
- card back sentiment in Night of Navy ink onto one of the Whisper White CS layers
- box top sentiment in Night of Navy ink onto a scrap of Whisper White Thick CS
- sleigh in Jet Black Stazon ink onto a scrap of Gold Foil Sheet
- sleigh in Jet Black Stazon ink onto a scrap of Real Red CS
Cut using the North Pole Wonder Dies:
- the two stamped sleighs
- 9 reindeer from scraps of Crumb Cake CS
Cut using the Stitched Rectangle Dies:
- sentiment for the card front
- scrap of Night of Navy CS larger than the sentiment
- scrap of Gold Foil Sheet larger than the Night of Navy piece
Cut using the Stitched Shapes Dies:
- sentiment for the box top
Cut using the 2″ Circle Punch:
- scrap of Night of Navy CS
Cut using Paper Snips:
- cut away the rails from the Real Red CS sleigh
Assembled the card:
- burnished the folds in the two long Night of Navy CS pieces with a Bone Folder
- smallest section of the 11″ piece glued onto one end of the 9-3/4″ piece, to create a 19-1/2″ x 3-1/4″ accordion card base, with 6 3-1/4″ square sections
- 6 DSP layers glued onto the 6 sections on one side of the card base
- remaining DSP layer glued onto the front of the card base
- 3 Whisper White CS layers glued onto the back of the card base
- Stampin Seal+ applied onto the back of the first reindeer’s neck
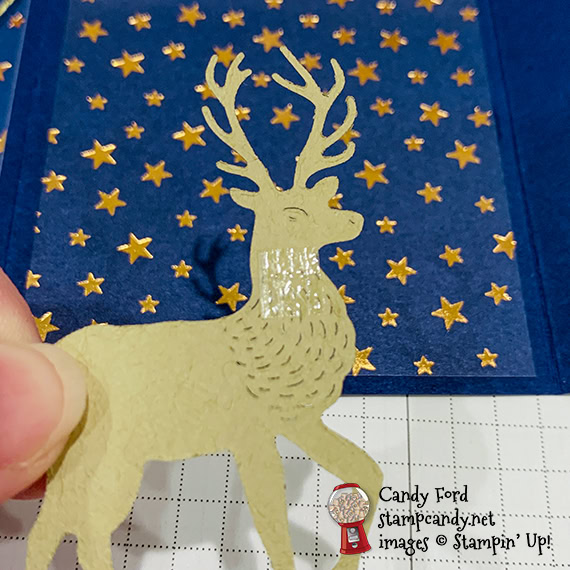
- Gold Twine tied around the reindeer’s neck, then the reindeer glued onto the first DSP layer
- Stampin Seal+ applied onto the back of the next reindeer’s neck, the twine looped around the neck, then the reindeer glued onto the second DSP layer
- continued adding reindeer, looping the twine around each neck and gluing them onto the DSP layers
- NOTE: Don’t pull the twine too tight between the reindeer. Lay the reindeer where it needs to go, then loop the twine around its neck and stick it to the Stampin’ Seal+ on the back (see photo below.) Then carefully turn over the reindeer to apply glue onto the back. Make sure to glue down all the points of the antlers so they don’t get tangled with the others when the card is closed.
- red sleigh pieces adhered onto the gold sleigh using Stampin’ Seal+
- sleigh adhered onto the last DSP layer using Stampn’ Seal+, with the twine under the front rail
- knot tied in the end of the twine to keep it from raveling
- twine adhered onto the sleigh using one tiny strip of Stampn’ Seal+ (I used my Take Your Pick tool to remove just one strip from the adhesive and place it on the sleigh.)
- Red Rhinestone applied onto the first reindeer’s nose
- sentiment for card front glued onto the Night of Navy CS die cut rectangle
- Night of Navy CS die cut rectangle adhered onto the gold foil die cut rectangle using Stampin’ Seal+
- gold rectangle adhered onto the DSP layer on the card front using Stampin’ Seal+
Assembled the box:
- burnished the folds in the box and folded it to assemble
- adhered the 2 back tabs to the back of the box using Stampin’ Seal+
- 3-1/4″ Night of Navy CS square layer adhered onto the top of the box using Stampin’ Seal+
- gold accent adhered onto the Night of Navy CS layer using Stampin’ Seal+
- box sentiment glued onto the punched Night of Navy CS circle
- Night of Navy CS circle adhered onto the center of the gold accent using Black Stampin’ Dimensionals
- 3 Red Rhinestones applied randomly onto the box top
S
Here’s the September 2020 ICS Blog Hop:
Click on the next button below to hop to the next stop, Charmane Hopkins of Renee’s Paper Treasures:
.

S
Here are today’s colors:
You can click on each one to see all the products that come in that color!
S
Here’s what I used:
Click on these images for more details and to purchase. If you are reading this post in email, the product images may not show up. Please click here to see the post on my blog.
Supply List. <— Click for a clickable and printable list of the products!
S
Here are some helpful links:
S
Thanks for stopping by today, and Sweet Stamping!
Sep 8, 2020 | Cards, Gallery |
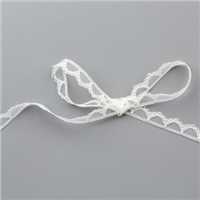
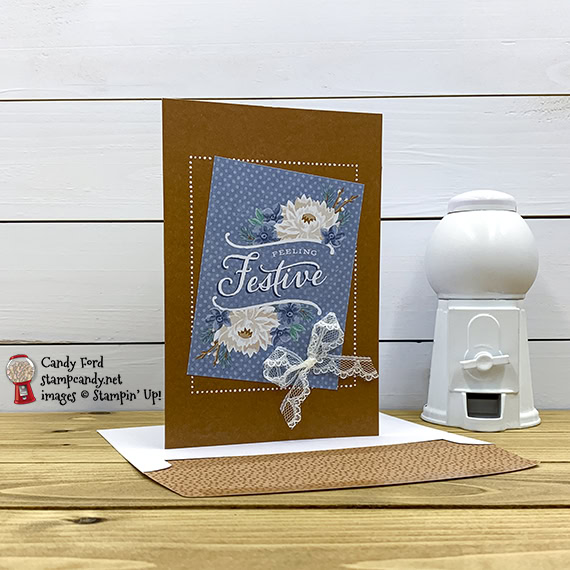
It is so easy to make pretty cards with the Flowers for Every Season Memories & More Card & Envelopes and Card Pack – you just stick one onto the other and you’re done! I’ve added extra interest to today’s project by angling the card on the front and adding a bow made with Very Vanilla Scalloped Lace Trim. It was done in no time!
If you are reading this in email, some photos may appear blurry, or may not appear at all. Please click here to see the post on my blog.
S lace trim lace trim lace trim lace trim
Here’s what I made:
S
Here’s what I did:
Assembled the card:
- burnished the fold in the Cinnamon Cider card base with a Bone Folder
- 3″ x 4″ M&M card glued onto the front of the card base, at an angle
- lace trim tied in a bow and adhered onto the M&M card using a glue dot
- That’s it!
S
Here are today’s colors:
You can click on each one to see all the products that come in that color!
S
Here’s what I used:
Click on these images for more details and to purchase. If you are reading this post in email, the product images may not show up. Please click here to see the post on my blog.
Supply List. <— Click for a clickable and printable list of the products!
S
Here are some helpful links:
S
Thanks for stopping by today, and Sweet Stamping!
Sep 7, 2020 | Cards, Gallery |
Today I’m sharing a card I made using the Flowers for Every Season Memories & More (M&M) Cards & Envelopes and the Flowers for Every Season M&M Card Pack along with the Tasteful Textile 3d Embossing Folder. It’s a quick and easy card, but the embossing, along with the ribbon bow, really packs a punch.
If you are reading this in email, some photos may appear blurry, or may not appear at all. Please click here to see the post on my blog.
S Tasteful Textile 3D Tasteful Textile 3D Tasteful Textile 3D Tasteful Textile 3D
Here’s what I made: 
S
Here’s what I did:
Cut and scored with my paper trimmer:
- Just Jade CS layer cut to 3-3/4″ x 5-3/4″
- Whisper White 3-1/4″ x 4-1/4″
Embossed using the Tasteful Textile 3D Embossing Folder:
Assembled the card:
- burnished the fold in the Bumblebee card base with a Bone Folder
- Just Jade embossed CS layer glued onto the front of the card base
- Whisper White CS layer glued onto the Just Jade CS layer
- 3″ x 4″ M&M card glued onto the Whisper White CS layer
- Bumblebee ribbon tied in a bow and adhered onto the M&M card using a glue dot
S
Here are today’s colors:
You can click on each one to see all the products that come in that color!
S
Here’s what I used:
Click on these images for more details and to purchase. If you are reading this post in email, the product images may not show up. Please click here to see the post on my blog.
Supply List. <— Click for a clickable and printable list of the products!
S
Here are some helpful links:
S
Thanks for stopping by today, and Sweet Stamping!
Sep 4, 2020 | Cards, Club, Gallery |
Who do you know who makes everything better? Make this fun card for them. I used the Nothing’s Better Than Bundle (Nothing’s Better Than stamp set & Love You More Than Dies) to make this messy card, complete with “coffee stain.” It’s one of the projects we made in Stamp Club this month.
If you are reading this in email, some photos may appear blurry, or may not appear at all. Please click here to see the post on my blog.
S Love You More Than Love You More Than Love You More Than Love You More Than
Here’s what I made:


S
Here’s what I did:
Cut and scored with my paper trimmer:
- Rococo Rose card stock (CS) cut to 5-1/2″ x 8-1/2″, then scored in half at 4-1/4″
- Pool Party card stock (CS) layer cut to 5-3/8″ x 4-1/8″
- Shimmery White CS layer cut to 5-1/4″ x 4″
- Whisper White CS cut to 5-1/4″ x 4″ for the inside of the card base
Stamped with the Nothing’s Better Than stamp set:
- sentiment in Pool Party ink onto a scrap of Whisper White Thick CS
- cups (2 in Pool Party and 1 in Rococo Rose) onto a scrap of Whisper White Thick CS
- steam in Early Espresso ink onto the Shimmery White CS layer just above the top cup
Cut using the Love You More Than Dies:
- 3 stamped cups
- word “Coffee”
Cut using Paper Snips:
- separated the words of the stamped sentiment
Watercolored using a Water Painter:
- “coffee stain” in Early Espresso ink onto the Shimmery White CS layer
- splattered same layer with more water and Early Espresso ink, by tapping the Water Painter on my hand over the layer
- Be sure to let the layer dry completely before adhering. You can use a Heat Tool to speed up the drying process.
Assembled the card:
- burnished the fold in the card base with a Bone Folder
- Pool Party CS layer glued onto the front of the card base
- Shimmery White CS layer glued onto the Pool Party CS layer
- die cut “Coffee” glued onto the Shimmery White CS layer
- 3 die cut cups glued together in a stack, then adhered onto the Shimmery White CS layer using Stampin’ Dimensionals
- stamped sentiment words adhered onto the Shimmery White CS layer using Mini Stampin’ Dimensionals
- Whisper White CS glued onto the inside of the card base
S
Here are today’s colors:
You can click on each one to see all the products that come in that color!
S
Here’s what I used:
Click on these images for more details and to purchase. If you are reading this post in email, the product images may not show up. Please click here to see the post on my blog.
Supply List. <— Click for a clickable and printable list of the products!
S
Here are some helpful links:
S
Thanks for stopping by today, and Sweet Stamping!
Sep 3, 2020 | Cards, Gallery, Techniques |
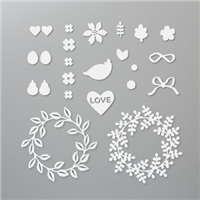
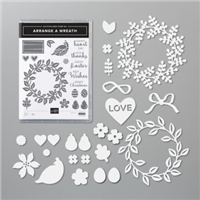
Wreaths aren’t just for the holidays. Today’s wreath card gives encouragement to a dear friend. I used the Wreath Builder Dies, Layering Circle Dies, Ornate Frames Dies, Forever Fern stamp set, and 1-1/2″ Circle Punch. And of course, several colors of card stock. The front of the card base is in two separate pieces that are held together by the wreath and the sentiment.
If you are reading this in email, some photos may appear blurry, or may not appear at all. Please click here to see the post on my blog.
S wreath builder wreath builder wreath builder wreath builder
Here’s what I made:


S
Here’s what I did:
Cut and scored with my paper trimmer:
- Whisper White Thick card stock (CS) cut to 5-1/4″ x 5-1/2″, then scored along the shorter side at 4-1/4″
- Whisper White Thick CS cut to 1″ x 5-1/2″
- Just Jade CS cut to 4″ x 1-1/8″
Stamped with the Forever Fern stamp set:
- inner sentiment in Pretty Peacock ink onto the inside of the card base
- outer sentiment in Pretty Peacock ink onto a scrap of Whisper White Thick CS
Cut using the Wreath Builder Dies:
- leaf wreaths from scraps of Pear Pizzazz, Just Jade, Garden Green, Shaded Spruce, and Pretty Peacock CS
- berry wreath from a scrap of Soft Sea Foam CS
Cut using the Ornate Frames Dies:
Cut using the Layering Circles Dies:
- a scrap of Whisper White Thick CS into a ring, using a larger and a smaller die, for the back of the wreath
- Be sure the ring doesn’t show inside the center of the wreath or outside the perimeter of the wreath.
Cut using the 1-1/2″ Circle Punch:
- both ends of the Just Jade CS piece
Assembled the card:
- burnished the fold in the card base with a Bone Folder
- wreaths stacked and glued onto each other
- 1″ strip of Whisper White Thick CS lined up along the right side of the card base
- Just Jade CS glued only at the ends onto the left side of the card base front and onto the 1″ strip
- flipped over the card base and glued the Whisper White Thick CS ring only on the sides onto the two sides of the card front, making sure the inner sentiment would show through the center
- flipped back over and glued the wreath onto the ring and the two sides of the card front, again making sure the inner sentiment would show through the center
- outer sentiment adhered into the Just Jade CS using Stampin’ Dimensionals
- Magenta Madness ribbon tied in a bow and adhered onto the wreath using a Mini Glue Dot
S
Here are today’s colors:
You can click on each one to see all the products that come in that color!
S
Here’s what I used:
Click on these images for more details and to purchase. If you are reading this post in email, the product images may not show up. Please click here to see the post on my blog.
Supply List. <— Click for a clickable and printable list of the products!
S
Here are some helpful links:
S
Thanks for stopping by today, and Sweet Stamping!