Oct 14, 2021 | Autumn, Blog Hop, Boxes, Cards, Gallery, Gift Wrap, Gifts, Halloween, Holiday, Treat Holders |

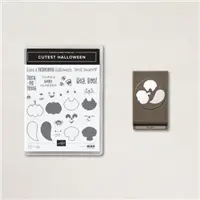
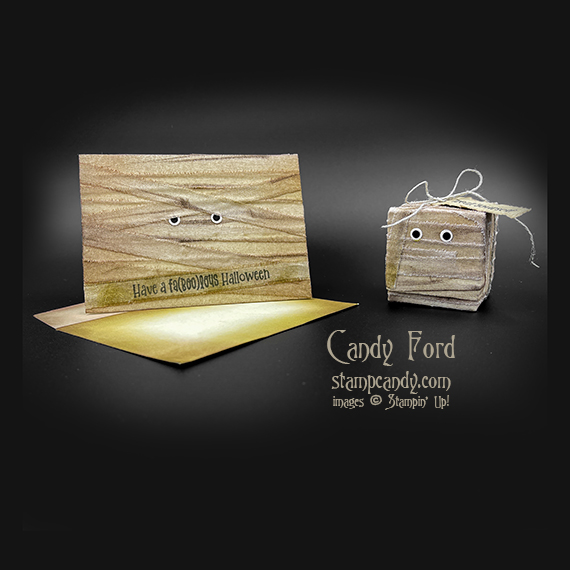
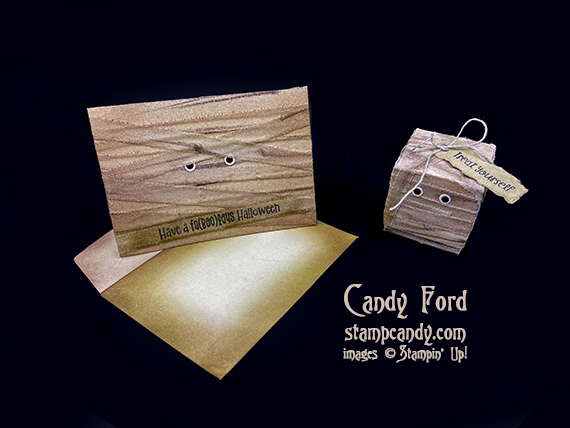
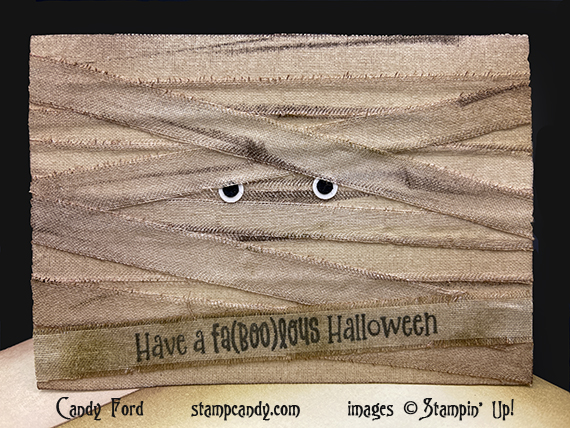
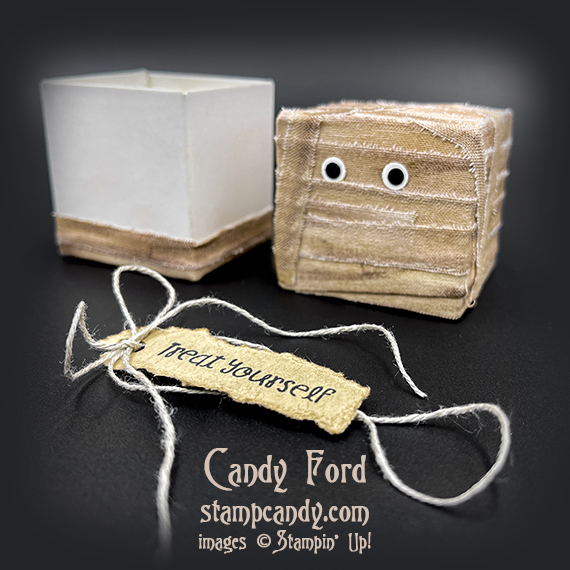
Welcome to the October 2021 OSAT Blog Hop! This month’s theme is A Ghoul’s Night Out, so we’re sharing Halloween projects with you today. The theme suggests fun, and I wanted my projects to be fun, but also spooky. I used Linen Paper and the Cutest Halloween Stamp Set to create a mummy card and treat box. The Cutest Halloween stamp set can be bundled with the Halloween punch to save 10%. The bundle is also a part of the Cute Halloween Suite Collection.
Be sure to hop all the way around to all the blogs to see all the great projects this group has created for you!
If you are reading this in email, some photos may appear blurry, or may not appear at all. Please click here to see the post on my blog.
S October 2021 OSAT Blog Hop October 2021 OSAT Blog Hop October 2021 OSAT Blog Hop October 2021 OSAT Blog Hop
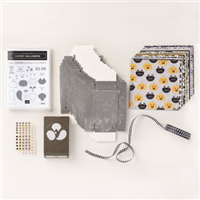
Here’s what I made:

S
Here’s what I did:
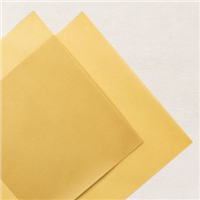
Linen Paper:
- cut Linen paper to 6″ x 6″ (2 pieces)
- used a Blending Brush and ink pads in Crumb Cake, Soft Suede, and Early Espresso to color the Linen paper
- colored the edges and flap of a Very Vanilla Note Card envelope using the same Blending Brush and ink pads
- added more color to the Linen paper with the edges of the ink pads
- used Paper Snips to cut little snips along one edge of the Linen Paper, just to get it started so I could tear it into strips
- tore the Linen paper into strips averaging about 3/8″ wide
- Note: the backing tended to curl up or come off entirely as I tore.
Stamped with the Cutest Halloween stamp set:
- card sentiment in Jet Black Memento ink onto one of the linen strips (I used my Stamparatus to stamp a few times so it would be nice and dark.)
- box sentiment in Jet Black Memento ink onto a scrap of Crumb Cake cardstock (CS)
Envelope:
- colored the edges and flap of a Very Vanilla Note Card envelope using the same Blending Brush and ink pads
Eyes:
- cut 4 circles from Basic Black CS using the Turtle Builder Punch
- cut 4 circles from Basic White Thick CS using a standard hand-held 1/4″ hole punch (available anywhere you buy office or school supplies)
Tag:
- tore the Crumb Cake CS around the box sentiment, leaving a little extra space at one end for the hole
- cut a hole in the end using the Turtle Builder Punch
- used the same Blending Brush and Soft Suede ink pad to “dirty up” the tag a little bit
Assembled the card:
- burnished the fold in a Very Vanilla Note Card with a Bone Folder
- applied torn strips of Linen paper onto the card front, then trimmed the excess from the ends using Paper Snips
- Note: I used the strips from the cut edges of the Linen paper along the top and bottom of the card front.
- applied the strip with sentiment over the other strips
- ran blending brush over strips for a little more dirt
- glued 2 eyes onto the strips
Assembled the box:
- burnished the folds in the box and lid with a Bone Folder, and folded to assemble
- applied linen strips onto the top of the lid, covering up the little ribbon handle
- wrapped linen strips around the sides of the lid to cover the whole thing
- Note: I used the strips from the cut edges of the Linen paper along the top and bottom of the lid.
- wrapped strips around just the bottom of the box (Only cover the part of the box that shows when the lid is on, about 1/4″ to 3/8″. I sent a little above that and the strips tend to curl down in a few places when the lid goes on the box.)
- wrapped any extra strips in a haphazard way over the lid
- ran blending brush over strips for a little more dirt
- glued 2 eyes onto one side of the lid
- wrapped linen thread around the box and tied it in a bow, also tying on the tag
S
Here’s the October 2021 OSAT Blog Hop:
s
Here are today’s colors:
You can click on each one to see all the products that come in that color!
S
Here’s what I used:
Click on these images for more details and to purchase. If you are reading this post in email, the product images may not show up. Please click here to see the post on my blog.
Supply List. <— Click for a clickable and printable list of the products!
Here are some helpful links:
S
Thanks for stopping by today, and Sweet Stamping!
Oct 11, 2021 | Blog Hop, Cards, Gallery |

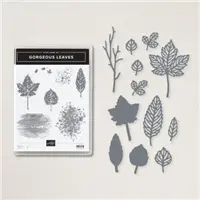
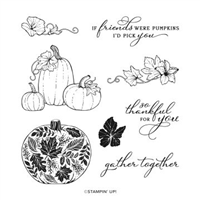
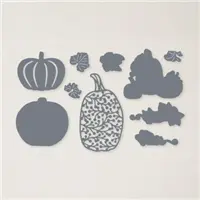
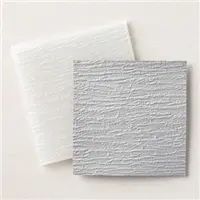
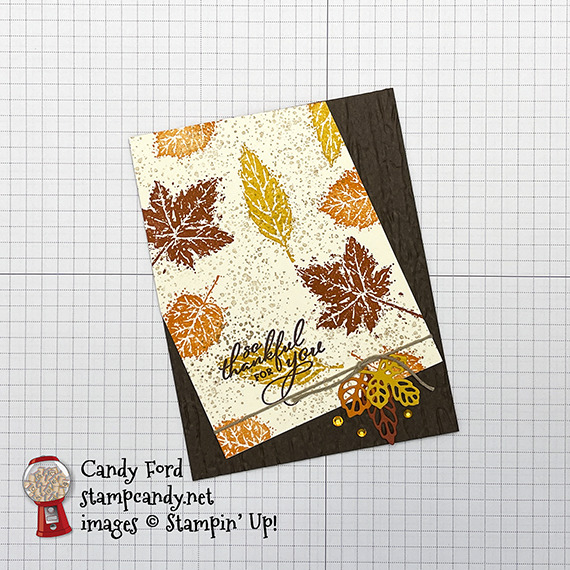
Welcome to the October 2021 Candy Hearts Blog Hop! Today we are sharing Thank You projects. I used the Gorgeous Leaves Bundle, Pretty Pumpkins stamp set, and Bark 3D Embossing Folder to create my card. After reading my post, I hope you’ll hop to the next person on the list below. Be sure to hop around to see ALL the great projects the Candy Hearts have created for you!
If you are reading this post in email, the product images may not show up. Please click here to see the post on my blog.
S October 2021 Candy Hearts October 2021 Candy Hearts October 2021 Candy Hearts October 2021 Candy Hearts
Here’s what I made:
inside the card: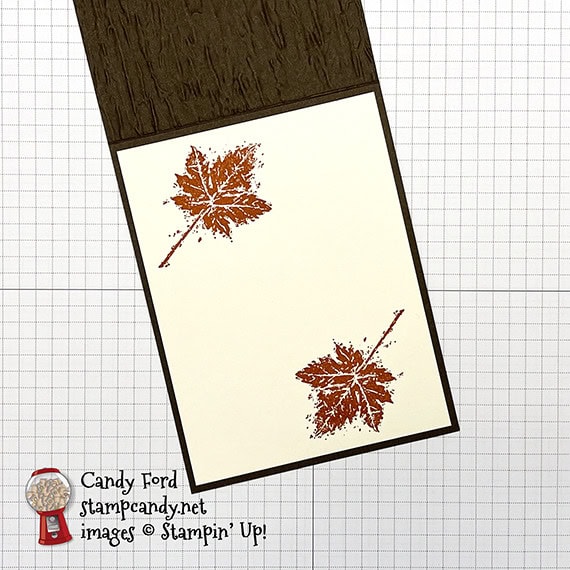
S
Here’s what I did:
Cut and scored with my paper trimmer:
- Early Espresso card stock (CS) cut to 4-1/4″ x 11″, then scored in half at 5-1/2″
- Very Vanilla CS layer cut to 3-3/4″ x 5″, then cut at an angle as shown (Note: I laid it on the card base front and marked with a pencil where I wanted to cut.)
- Very Vanilla CS cut to 4″ x 5-1/4″ for the inside of the card base
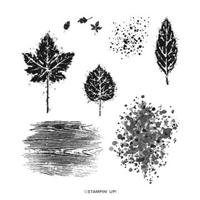
Stamped with the Gorgeous Leaves stamp set:
- leaves in Crushed Curry, Pumpkin Pie, and Cajun Craze inks onto the Very Vanilla CS layer
- speckled background between the leaves in Crumb Cake ink
- 2 leaves in Cajun Craze ink onto the Very Vanilla CS for the inside
Stamped with the Pretty Pumpkins stamp set:
- sentiment in Early Espresso ink over one of the Crushed Curry stamped leaves
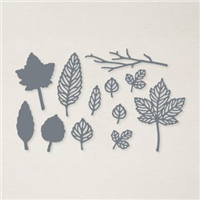
Cut using the Intricate Leaves Dies:
- 3 small leaves, one each from a scrap of Crushed Curry, Pumpkin Pie, and Cajun Craze CS
Embossed using the Bark 3D Embossing Folder:
- the front of the card base
Assembled the card:
- burnished the fold in the card base with a Bone Folder
- Crumb Cake twine wrapped around the stamped layer, secured on the back with Stampin’ Seal, and tied in a knot on the front
- knot secured to the front of the layer using a Mini Glue Dot
- stamped layer glued onto the front of the card base
- 3 die cut leaves glued at the knot
- 3 Pumpkin Pie rhinestones applied onto the card front using my Take Your Pick tool
- Very Vanilla CS glued onto the inside of the card base
S
Here’s the October 2021 Candy Hearts Blog Hop:
Thank you for hopping with the Candy Hearts today! Be sure to hop around to all the stops. You do not want to miss any of the creativity in this talented group of stampers! If you get lost, use the list below.
s
Here are today’s colors:
You can click on each one to see all the products that come in that color!
S
Here’s what I used:
Click on these images for more details and to purchase. If you are reading this post in email, the product images may not show up. Please click here to see the post on my blog.
Supply List. <— Click for a clickable and printable list of the products!
Here are some helpful links:
S
Thanks for stopping by today, and Sweet Stamping!
Sep 20, 2021 | Autumn, Blog Hop, Cards, Gallery |
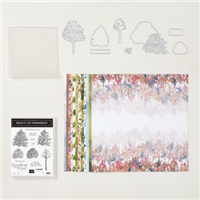
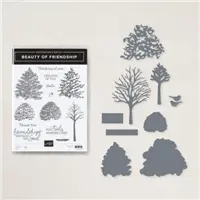
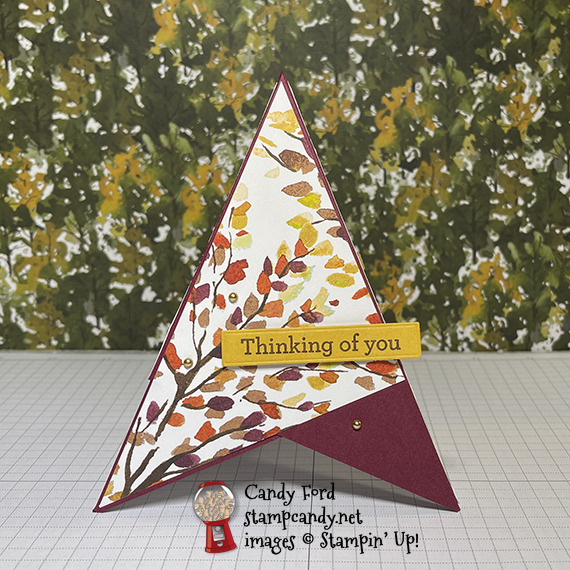
Welcome to the September 2021 Candy Hearts Blog Hop! This month we are featuring Autumn themed projects. I used products from the Beauty of the Earth Suite to create a Teepee Card.
Be sure to hop around to all the stops. If you get lost along the way, scroll down to the list of hoppers.
If you are reading this in email, some photos may appear blurry, or may not appear at all. Please click here to see the post on my blog.
S September 2021 Candy Hearts September 2021 Candy Hearts September 2021 Candy Hearts September 2021 Candy Hearts
Here’s what I made:
The photos aren’t in my usual style because I’m at a stamping retreat in the mountains and don’t have my light box.
S
Here’s what I did:
Cut and scored with my paper trimmer:
- Merry Merlot card stock (CS) cut to 4″ x 8″, then scored in half at 4″, then scored again from the two top corners to the bottom center

- Merry Merlot CS cut to 4″ x 4″, then scored in half diagonally from corner to corner
- 2 pieces Basic White CS cut to 3-7/8″ x 3-7/8″, cut in half diagonally from corner to corner, to make 4 triangles
- 2 pieces Designer Series Paper (DSP) layer cut to 3-7/8″ x 3-7/8″, cut in half diagonally from corner to corner, to make 4 triangles
Stamped with the Beauty of Friendship stamp set:
- sentiment in Cinnamon Cider ink onto a scrap of Bumblebee CS
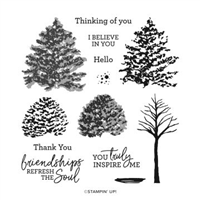
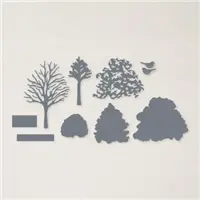
Cut using the Beautiful Trees Dies:
Assembled the card:
- burnished the folds in the Merry Merlot CS card base pieces with a Bone Folder
- 4″ Merry Merlot CS glued onto the 8″ Merry Merlot CS, lining up the score line of the smaller piece with the center score line of the larger piece, and lining up the top point of the smaller piece with the top edge of the larger piece. I made sure the two outer triangles could fold over the diamond in the middle. This is the inside of the card.
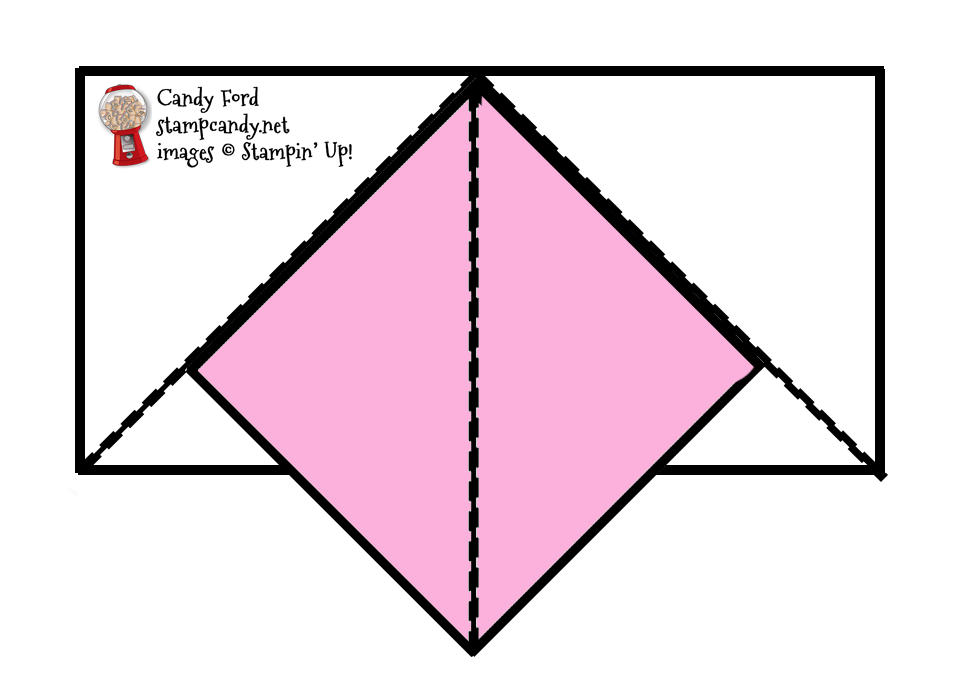 4 Basic White CS triangles glued onto the inside of the card base
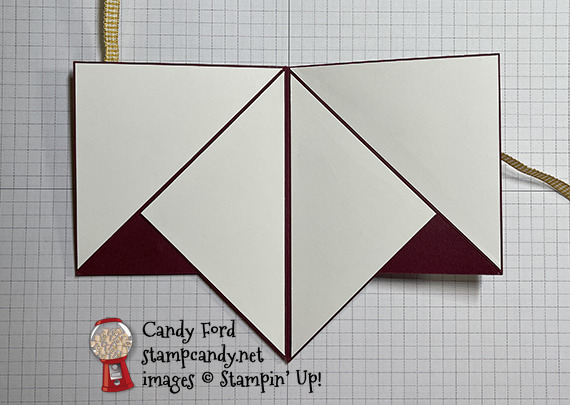
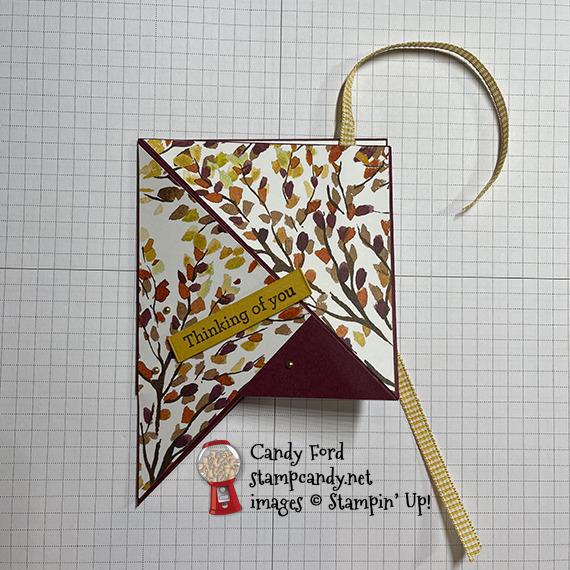
- closed the card into a teepee shape and marked where I wanted the two ribbons to tie in a bow to close the card
- 2 pieces of ribbon adhered onto the card base using Tear & Tape

- 3 DSP layers glued onto the card base as shown (You’ll have an extra triangle leftover for another project.)
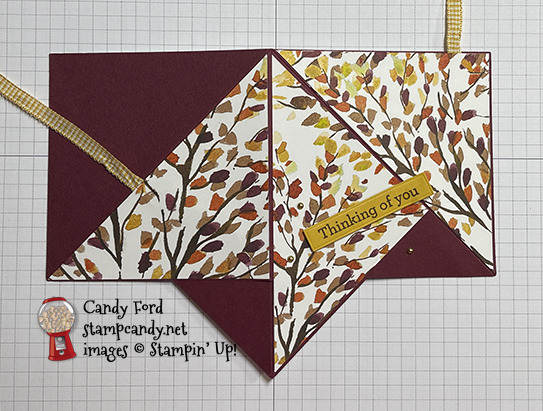
- closed card and tied ribbon in a bow
- sentiment adhered onto the front panel using
- 3 gold pearls applied onto the front panel using my Take Your Pick tool
- Folded the card in half to slip into an envelope.
S
Here’s the September 2021 Candy Hearts Blog Hop:
If you get lost along the way, use this list. Be sure to hop to all the stops!
s
Here are today’s main colors:
You can click on each one to see all the products that come in that color!
S
Here’s what I used:
Click on these images for more details and to purchase. If you are reading this post in email, the product images may not show up. Please click here to see the post on my blog.
Supply List. <— Click for a clickable and printable list of the products!
S
Only 10 More Days of Sale-a-bration!
Don’t miss out on these amazing free products!
Choose one of these free items for every $50 on an order:
s
Choose one of these free items for every $100 on an order:
Any order of $300 or more automatically qualifies you to receive the amazing In Your Words stamp set for free!
How would you like to get a discount on all your Stampin’ Up! purchases? Join my team of Candy Hearts (we have a lot of fun!) and you get to choose $125 in products and pay only $99 and get Free Shipping! During Sale-a-bration you also get to choose a free bundle on top of all that! Here are the bundles you can choose from:
S
Here are some helpful links:
S
Thanks for stopping by today, and Sweet Stamping!

Aug 18, 2021 | Autumn, Blog Hop, Cards, Christmas, Gallery, Holiday, Sale-A-Bration |

Welcome to the August 2021 IRBH! This month’s projects feature leaves and trees, so you are likely to find lots of inspiration for Autumn. We are excited to share our creations with you today! After you read my post, I hope you’ll hop over to the next person on the list further down this post.
If you are reading this in email, some photos may appear blurry, or may not appear at all. Please click here to see the post on my blog.
S August 2021 IRBH August 2021 IRBH August 2021 IRBH August 2021 IRBH
Here’s what I made:
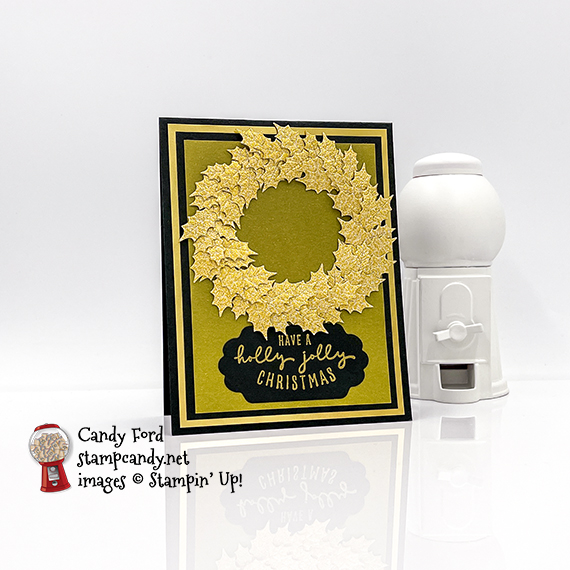
The color is a little off in this photo, but you can see some of the sparkle and shine of the Gold Shimmer Vellum and the heat embossed sentiment:

S
Here’s what I did:
Cut and scored with my paper trimmer:
- Basic Black card stock (CS) cut to 4-1/4″ x 11″, then scored in half at 5-1/2″
- Gold Foil Sheet layer cut to 4″ x 5-1/4″
- Basic Black CS layer cut to 3-3/4″ x 5″
- Gold Shimmer Vellum layer cut to 3-1/2″ x 4-3/4″
- Very Vanilla CS cut to 4″ x 5-1/4″ for the inside of the card base
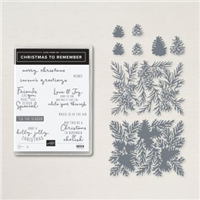
Stamped with the Christmas to Remember stamp set:
- sentiment in Versamark ink onto a scrap of Basic Black CS, then heat embossed in gold
Cut using the Seasonal Labels Dies:
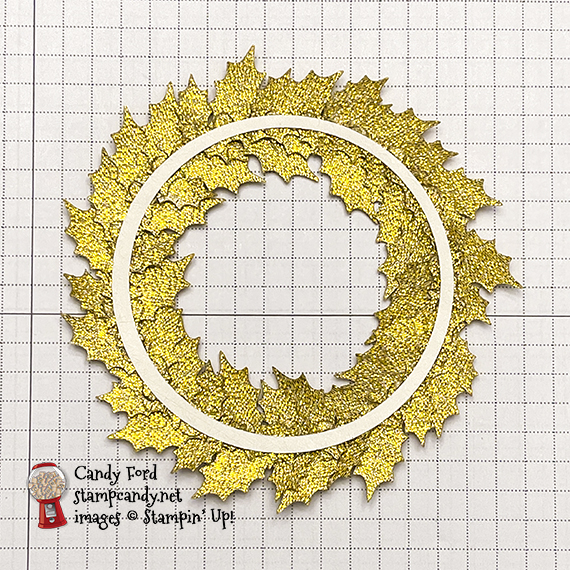
Cut using the Layering Circles Dies:
- a ring from a scrap of Gold Foil Sheet using the two largest plain circle dies
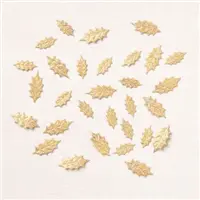
Made the Wreath:
- adhered Gold Holly Leaves, one by one, around the gold foil die cut circle, using Mini Glue Dots
- I used a little over 2 packs of the leaves. You could use fewer by making the circle base smaller and making the wreath thinner.
- The silicone craft sheet is the perfect surface to create the wreath. I happened to have the backing sheet from some labels on my table, and I would’ve had to stand up to get the craft sheet, so of course I used the label backing. But the craft sheet would’ve been better.

- back of the wreath
Assembled the card:
- burnished the fold in the card base with a Bone Folder
- Gold Foil layer adhered onto the front of the card base using Stampin’ Seal+
- Basic Black CS layer adhered onto the Gold Foil layer using Stampin’ Seal+
- sentiment adhered onto the Gold Shimmer Vellum layer using Stampin’ Seal+
- wreath adhered onto the Gold Shimmer Vellum layer using Mini Glue Dots
- Gold Shimmer Vellum layer adhered onto the Basic Black CS layer using Stampin’ Seal+ under the wreath and sentiment, so it wouldn’t show through
- Very Vanilla CS glued onto the inside of the card base
S
Here’s the August 2021 IRBH:
Thank you for hopping along with us. If you get stuck during the Blog Hop, please use this line-up as a guide:
- Brian King at Stamp with Brian
- Lynn Kolcun at Avery’s Owlery
- Renae Novak at Blessed by Cards
- Jackie Beers at Blue Line Stamping
- Sue Jackson at Just Peachy Stamping
- Robin Myren at Songbird Designs by Robin
- Sheryl Abernathy at Elegant Sentiments
- Lisa Graham at Lisa’s Little Ink Spots
- Sheryl Sharp at Sharp Notes by Sheryl
- Joanne Brown at The Inky Dragon
- Candy Ford at Stamp Candy <— YOU ARE HERE!
s
Here are today’s colors:
You can click on each one to see all the products that come in that color!
S
Here’s what I used:
Click on these images for more details and to purchase. If you are reading this post in email, the product images may not show up. Please click here to see the post on my blog.
Supply List. <— Click for a clickable and printable list of the products!
S
It’s Sale-a-bration time…AGAIN!

Stampin’ Up! is having the second Sale-a-bration of this year! Now through 30 September 2021, you can choose a free Level 1 Sale-a-bration item for every $50 on an order, and a free Level 2 item for every $100 on an order (before tax & shipping.)
When you join my Candy Hearts team of stampers during Sale-a-bration, you get to choose $125 in product and FREE shipping and pay only $99 (plus tax) PLUS you get to choose one of a dozen new bundles! for free! You can click on each bundle below to see the details of each in my online store.
S
Here are some helpful links:
S
Thanks for stopping by today, and Sweet Stamping!
Jul 12, 2021 | Birthday, Blog Hop, Cards, Gallery |

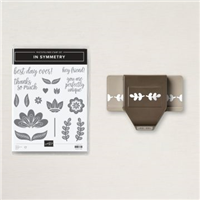
Welcome to the July 2021 Candy Hearts Blog Hop! This month we are sharing projects featuring a Birthday theme. I used the In Symmetry Bundle, Hand-Drawn Blooms stamp set, Batik Dies, and two Designer Series Papers (In Good Taste and Sweet Symmetry) to create a lever card.
After reading my post, I hope you will hop to the next person on the list below. Be sure to hop around to see all the great projects the Candy Hearts have created for you!
If you are reading this in email, some photos may appear blurry, or may not appear at all. Please click here to see the post on my blog.
S July 2021 Candy Hearts July 2021 Candy Hearts July 2021 Candy Hearts July 2021 Candy Hearts
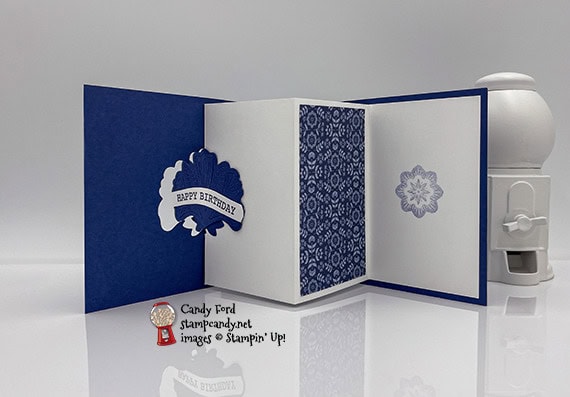
Here’s what I made:

S
Here’s what I did:
Cut and scored with my paper trimmer:
- Night of Navy card stock (CS) cut to 11″ x 4-1/4″, then scored in half at 5-1/2″
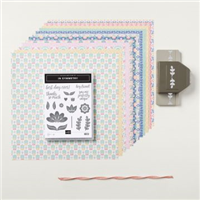
- In Good Taste Designer Series Paper (DSP) layer cut to 5-1/4″ x 4″
- Sweet Symmetry DSP layer cut to 4-1/4″ x 3″
- Sweet Symmetry DSP layer cut to 2-3/8″ x 3-3/4″
- Basic White Thick CS insert cut to 8-3/8″ x 4″, scored at 1/2″, 3-1/8″, and 5-3/4″
Stamped with the Hand-Drawn Blooms stamp set:
- sentiment in Night of Navy ink onto a scrap of Basic White Thick CS
Stamped using the In Symmetry stamp set:
- flower in Night of Navy ink, stamped off 3 times, onto the far right section of the Basic White Thick CS insert
Cut using the Batik Dies:
- scrap of Night of Navy CS using the two largest dies
- sentiment using the largest open die
- card front with two DSP layers (see below)
Fussy Cut using Paper Snips:
- sentiment along the top and bottom
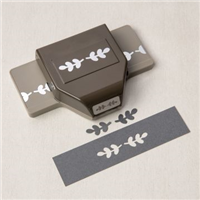
Cut using the Symmetrical Stems Border Punch:
- 4 sprigs from a scrap of Night of Navy CS
Assembled the card:
- burnished the folds in the card base and the Basic White Thick CS insert with a Bone Folder
- In Good Taste DSP layer glued onto the front of the card base
- 4-1/4″ x 3″ Sweet Symmetry DSP layer glued onto the In Good Taste DSP Layer
- using the largest open Batik Die, cut through the three layers of the card front in the center
- 4 sprigs glued onto the corners of the card front
- far right section of the Basic White Thick CS insert glued onto the inside of the card base so that 1/8″ of the card base shows around the top, bottom, and right sides
- 2-3/8″ x 3-3/4″ Sweet Symmetry DSP layer glued onto the middle of the 3 larger sections of the insert
- accordion-folded the insert, except for the 1/2″ section, and closed the card so the score line showing through the die cut hole was centered
- pencil marks made on the 1/2″ section of the insert along the edges of the die cut hole
- fussy cut outside the pencil lines and along the score line to remove the middle of the 1/2″ section and create two tabs
- detailed die cut glued onto the solid die cut
- sentiment glued onto the detailed die cut, lining up the die cut sides
- glue applied onto the part of the insert that shows through the hole
- solid die cut fit into the hole and pressed to adhere onto the insert
- card opened, glue applied onto the two tabs of the insert, then card closed again to adhere
S
Here’s the July 2021 Candy Hearts Blog Hop:
Thank you for hopping with the Hearts today! Be sure to hop around to all the stops. You do not want to miss any of the creativity in this talented group of stampers! If you get lost, use the list below.
s
Here are today’s colors:
You can click on each one to see all the products that come in that color!
S
Here’s what I used:
Click on these images for more details and to purchase. If you are reading this post in email, the product images may not show up. Please click here to see the post on my blog.
Supply List. <— Click for a clickable and printable list of the products!
S
Reserve Your DSP Swatch Books and Product Shares Now!
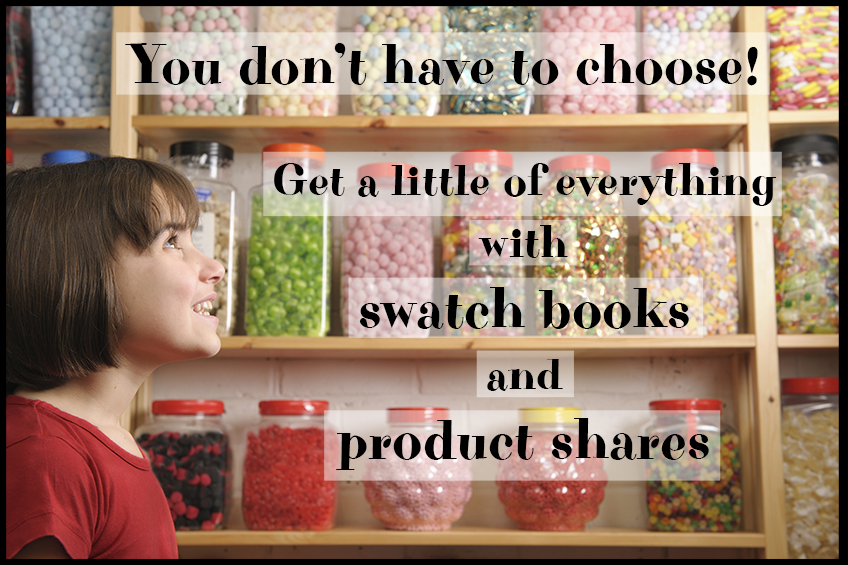
CLICK HERE to get all the details on swatch books and product shares. You must order by 2 August!
s
Designer Series Paper Sale!

These nine Designer Series Papers are out not only of this world gorgeous. They’re also on sale! Click on the images below to see them in my online store.
s
S
Here are some helpful links:
S
Thanks for stopping by today, and Sweet Stamping!
Jun 16, 2021 | Blog Hop, Cards |

Welcome to the June 2021 IRBH (InKing Royalty Blog Hop.) During this year’s blog hops, we are having fun with our stamping favorites – our favorite themes for seasonal cards and projects. This month’s projects feature stars. We are excited to share our creations with you today! After you read my post, I hope you’ll hop over to the next person on the list farther down this post.
I used two stamp sets – one stamp from each – and card stock to create today’s card. It’s a simple card. It’s all about the colors and the heat embossed stars.
If you are reading this in email, some photos may appear blurry, or may not appear at all. Please click here to see the post on my blog.
S June 2021 IRBH June 2021 IRBH June 2021 IRBH June 2021 IRBH
Here’s what I made:

S
Here’s what I did:
Cut and scored with my paper trimmer:
- Night of Navy card stock (CS) cut to 5-1/2″ x 8-1/2″, then scored in half at 4-1/4″
- Polished Pink CS layer cut to 5-3/8″ x 4-1/8″
- Basic White CS layer cut to 5-1/4″ x 4″
- Night of Navy CS layer cut to 5″ x 3-3/4″
- Basic White Thick CS cut to 2-3/8″ x 3/4″ for the sentiment
- Basic White CS cut to 5-1/4″ x 4″ for the inside of the card base
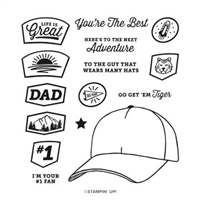
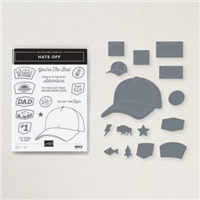
Stamped with the Hats Off stamp set:
- stars in Versamark ink onto the Night of Navy CS layer, then heat embossed in white
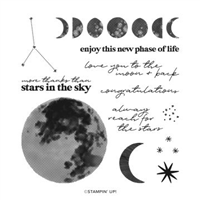
Stamped using the To the Moon stamp set:
- sentiment in Polished Pink ink onto the 2-3/8″ x 3/4″ Basic White Thick CS
Assembled the card:
- burnished the fold in the card base with a Bone Folder
- Polished Pink CS layer glued onto the front of the card base
- Basic White CS layer glued onto the Polished Pink CS layer
- Night of Navy CS layer with stars glues onto the Basic White CS layer
- sentiment glued onto the Night of Navy CS layer
- Basic White CS glued onto the inside of the card base
S
Here’s the June 2021 IRBH:
Thank you for hopping along with us. If you get stuck during the Blog Hop, please use this line-up as a guide:
- Brian King at Stamp with Brian
- Lynn Kolcun at Avery’s Owlery
- Sue Jackson at Just Peachy Stamping
- Renae Novak at Blessed by Cards
- Sheryl Sharp at Sharp Notes by Sheryl
- Pam Morris at Tap Tap Stamp
- Jackie Beers at Blue Line Stamping
- Candy Ford at Stamp Candy <—– YOU ARE HERE!
- Sheryl Abernathy at Elegant Sentiments
s
Here are today’s colors:
You can click on each one to see all the products that come in that color!
S
Here’s what I used:
Click on these images for more details and to purchase. If you are reading this post in email, the product images may not show up. Please click here to see the post on my blog.
Supply List. <— Click for a clickable and printable list of the products!
S
Here are some helpful links:
S
Thanks for stopping by today, and Sweet Stamping!