Dec 16, 2017 | Boxes, Christmas, Gallery, Gift Wrap, Gifts, Holiday |
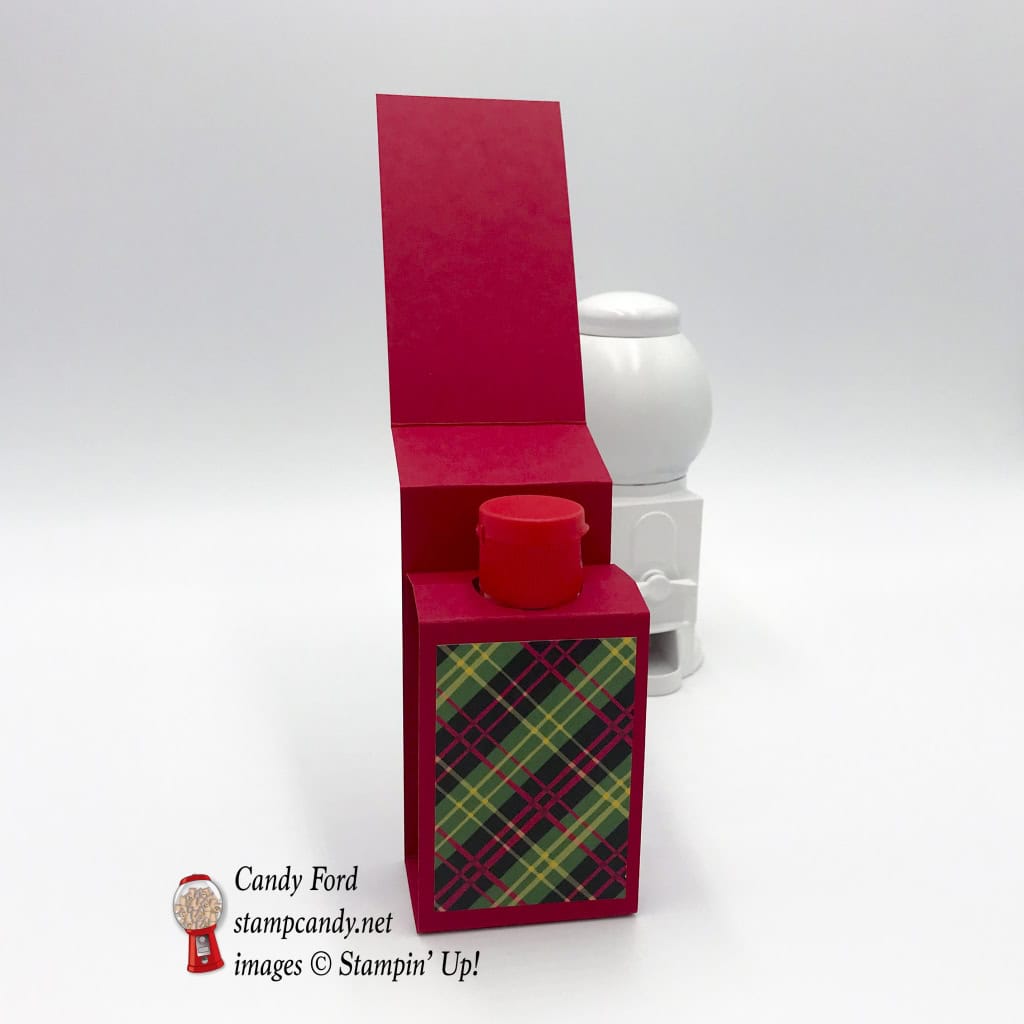
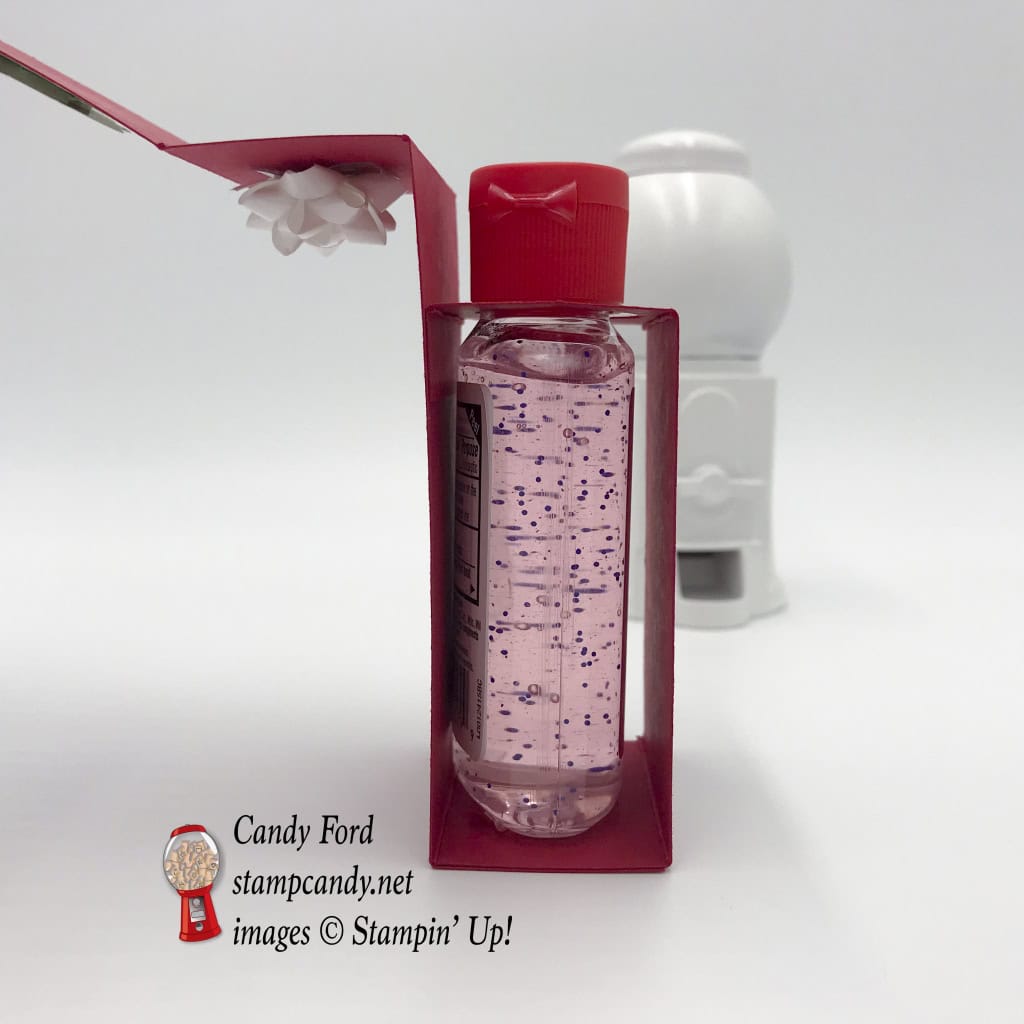
If you’re looking for a small gift that is both easy and useful, this hand sanitizer holder fits the bill perfectly. I’ve seen these online in several places, but I had to essentially start from scratch so it would fit this particular brand of hand sanitizer. Change the Designer Series Paper and the sentiment and you have a great gift for any time of year.
Here’s what I made:


Here’s what I did:
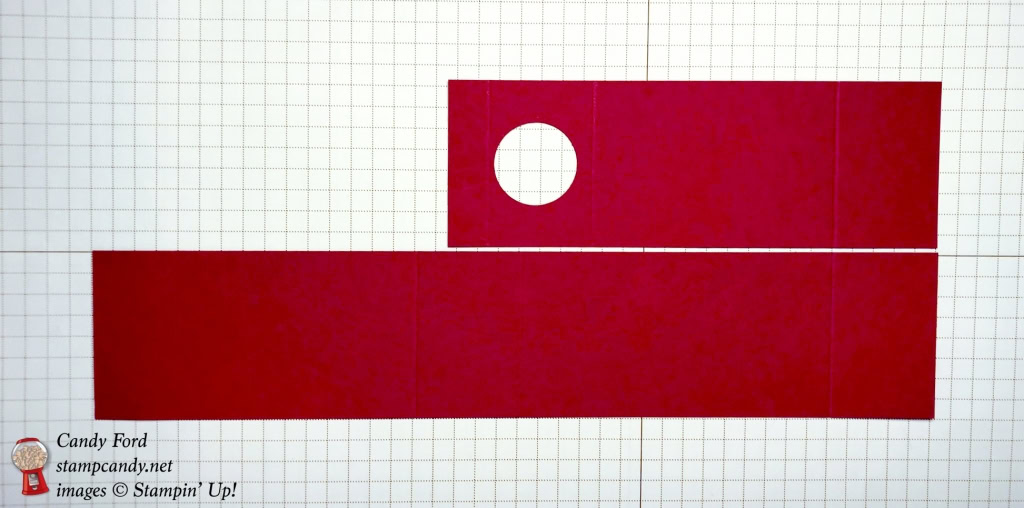
Cut and scored with my Stampin’ Trimmer:
These measurements are to fit a 2 oz. bottle of the Up & Up brand of hand sanitizer from Target.
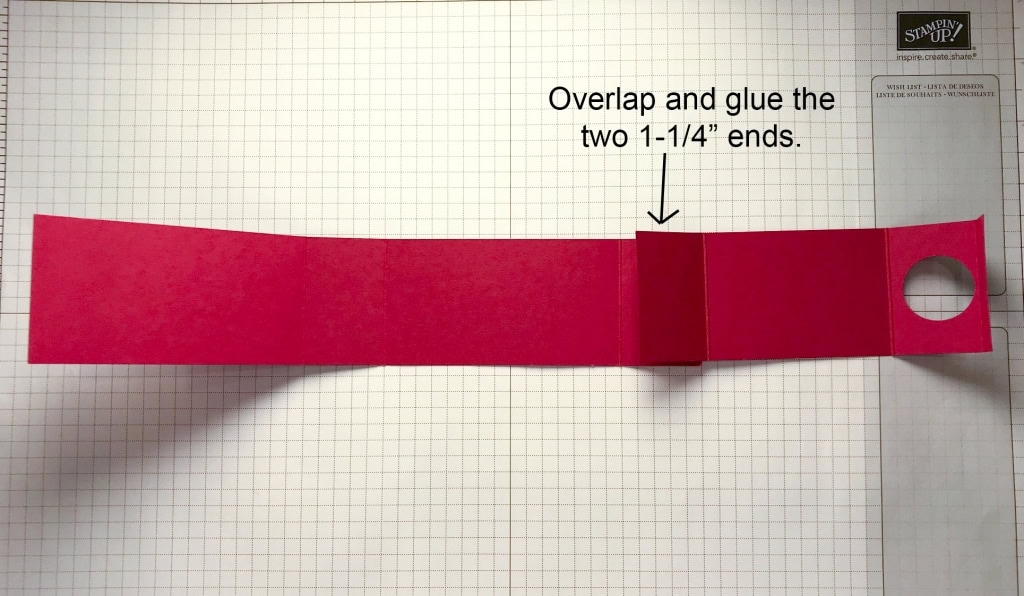
- Real Red card stock (CS) cut to 2″ x 10″, then scored at 3-3/4″, 5″, and 8-3/4″
- Real Red CS cut to 2″ x 5-7/8″, then scored at 1-1/4″, 4-1/8″, and 5-3/8″
- Christmas around the World Designer Series Paper (DSP) cut to 1-3/4″ x 3″
- Christmas around the World Designer Series Paper (DSP) cut to 1-3/4″ x 2-3/8″
- Garden Green CS cut to 1-1/2″ x 3″
Cut using the 1″ Circle Punch:
Stamped with the Labels to Love stamp set:
- sentiment in Real Red ink onto a scrap of Whisper White CS
Stamped with the Iconic Christmas stamp set:
- Santa hat at the top of the sentiment in Memento Black ink
Colored with a Light Cherry Cobbler Stampin’ Blends Marker:
Cut using the Everyday Label Punch:
- sentiment
- the ends of the Garden Green CS piece, by inserting each end into the back side of the punch
Assembled the holder:
- burnished all score lines with a Bone Folder
- the 1-1/4″ area at the end of both Real Red CS pieces glued together, so the pieces bend in toward each other
- two glue dots put on the bottom of the hand sanitizer bottle, inserted the cap up through the 1″ hole, and secored it to the bottom of the holder (where the two 1-1/4″ areas are glued together
- skinniest area of the shorter Real Red CS glued the to the inside back of the longer Real Red CS
- smaller DSP glued to the inner front of the holder
- sentiment adhered onto the Garden Green CS
- Garden Green CS glued onto the larger DSP
- larger DSP glued to the outer front of the holder
- a white box from the Season of Glitz Gift Bows adhered to the top of the holder
Here are today’s colors:
You can click on each one to see all the products that come in that color!
Here’s what I used:
Click on the images for more details and to purchase.
Here’s some stuff you should know:
- Gift Certificates are available in any U.S. dollar amount from me. Contact me – email: candy@stampcandy.net OR call/text: 404-661-5222
- Swatch Books and Product Shares from the 2018 Occasions and Sale-A-Bration Catalogs – you can order yours now HERE.
- Year End Sales Event – December 1, 2017 to January 2, 2018 – CLICK HERE for details. Order soon so you don’t miss your favorite retiring items!
- This is a great time to join my team! With the demonstrator discount of at least 20%, you can get Christmas gifts for all the stampers on your list! Plus you can order from the 2018 Occasions and Sale-A-Bration catalogs now! CLICK HERE for more information. Contact me with any questions: email candy@stampcandy.net or call/text 404-661-5222
- Sale-a-bration Stamp Fest coming January 20. Details and register HERE
- Check out My Events Calendar HERE
- Stampin’ Blends alcohol markers are now available! Click HERE for more info.
- Hostess Code for the month of December (HS67FXTS) Find out more about HOW, WHEN and WHY to use the code HERE.
- December’s FREE gift: Year of Cheer Specialty Washi Tape – Find out more HERE.
- Gumball Rewards for all orders over $50. Find out more HERE
Thanks for stopping by today, and Sweet Stamping!

Dec 15, 2017 | Boxes, Christmas, Gallery, Gift Wrap, Gifts, Holiday |
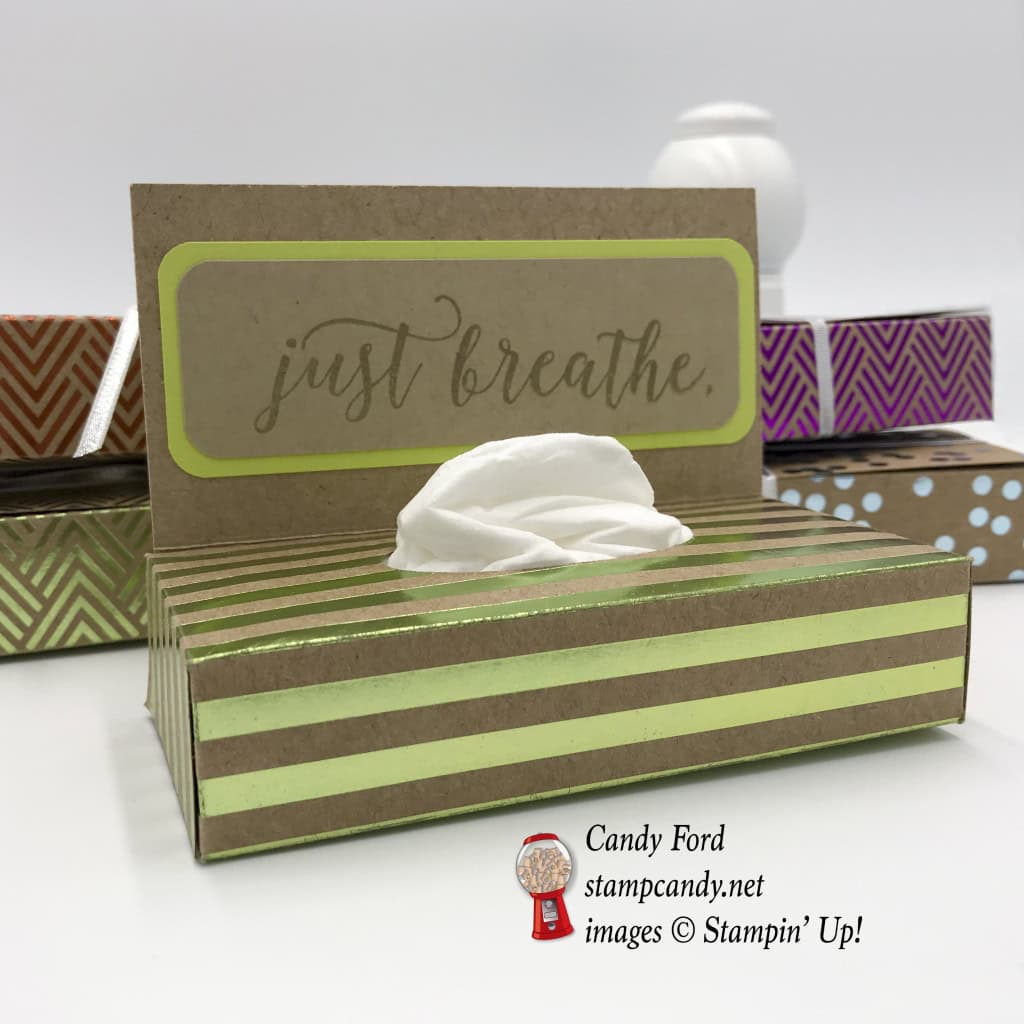
It’s that time of year. Yes, Christmas and Hannukah and gifts and snow…and the sniffles. You can get those little pocket/purse sized packs of tissues but they always end up getting all messed up. These little boxes help keep the tissues clean and prevent them from tearing while fighting for space in your overpacked bag. The sentiment is from the Colorful Seasons stamp set – it seemed perfect, since probably all you want to do is Just Breathe already! The heavy Foil Frenzy Specialty Designer Series Paper is perfect for these little boxes – not too soft and not too stiff.
Here’s what I made:


Here’s what I did:
Cut and scored with my Stampin’ Trimmer:
- Foil Frenzy Specialty Designer Series Paper (DSP) cut to 7″ x 9-3/4″
- scored along the short side at 1″, 5-1/2″, and 6-1/2″
- rotated clockwise, then scored along the long side at 2-1/4″, 3-1/4″, 5-1/2″, 6-1/2″, and 8-3/4″
- cut away the green areas in the diagram

- Crumb Cake card stock (CS) cut to 4″ x 1-1/4″
- Lemon Lime Twist CS cut to 4-1/4″ x 1-1/2″ (I used the color of CS that coordinated with the particular piece of DSP I was using at the time.)
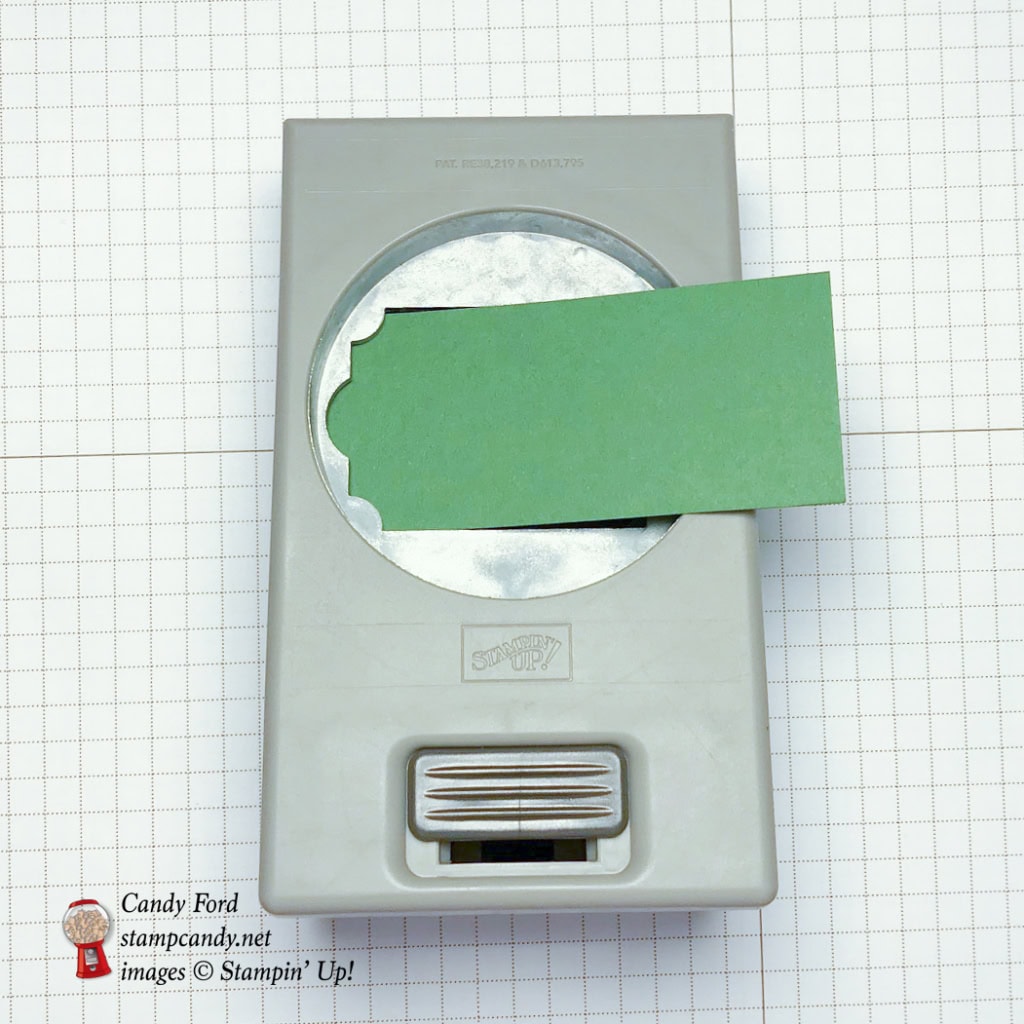
Cut using the Envelope Punch Board:
- all four corners of the Crumb Cake and Lemon Lime Twist CS pieces rounded with the punch on the back of the punch board
Stamped with the Colorful Seasons stamp set:
- sentiment in Crumb Cake ink onto the Crumb Cake CS piece
Die cut using the Layering Ovals Framelits:
- small oval from the inside top of the box
- NOTE: fold under the long 1″ side so it will fit through the Big Shot
Assembled the box:
- burnished all the score lines with a Bone Folder
- glued the outside of area A (in diagram above) to the inside of area B
- Crumb Cake CS glued onto the Lemon Lime Twist CS
- Lemon Lime Twist CS glued onto the inside of the lid
- on the end with four flaps, folded in the bottom flap, then glued the two small flaps to it, then glued the top flap to them
- inserted tissues into the other end of the box and closed it up
- pull tissues through the oval opening
- the lid folds over to protect the tissues
- wrapped a piece of 1/8″ Silver Ribbon around the box to present as a gift
Here are today’s colors:
You can click on each one to see all the products that come in that color!
Here’s what I used:
Click on the images for more details and to purchase.
Here’s some stuff you should know about:
- Gift Certificates are available in any U.S. dollar amount from me. Contact me – email: candy@stampcandy.net OR call/text: 404-661-5222
- Swatch Books and Product Shares from the 2018 Occasions and Sale-A-Bration Catalogs – you can order yours now HERE.
- Year End Sales Event – December 1, 2017 to January 2, 2018 – CLICK HERE for details. Order soon so you don’t miss your favorite retiring items!
- This is a great time to join my team! With the demonstrator discount of at least 20%, you can get Christmas gifts for all the stampers on your list! CLICK HERE for more information. Contact me with any questions: email candy@stampcandy.net or call/text 404-661-5222
- Sale-a-bration Stamp Fest coming January 20. Details and register HERE
- Check out My Events Calendar HERE
- Stampin’ Blends alcohol markers are now available! Click HERE for more info.
- Hostess Code for the month of December (HS67FXTS) Find out more about HOW, WHEN and WHY to use the code HERE.
- December’s FREE gift: Year of Cheer Specialty Washi Tape – Find out more HERE.
- Gumball Rewards for all orders over $50. Find out more HERE
Thanks for stopping by today, and Sweet Stamping!
Dec 14, 2017 | Christmas, Food, Gallery, Gift Wrap, Gifts, Holiday, Parties |
But first:
Today is the U.S. deadline to order from Stampin’ Up! and receive your order by Christmas. Anything ordered after today isn’t likely to arrive in time. But you know what? It isn’t too late to get a Gift Certificate! Give them to your favorite stampers, or better yet, ask Santa for one yourself.
I offer them in any U.S. dollar amount, but I recommend $50 increments. Why? Because Sale-A-Bration begins January 3, and you can earn free exclusive Sale-A-Bration products with orders of $50 or $100. Contact me (or ask Santa) to order your Gift Certificates now!
Email: candy@stampcandy.net OR call/text 404-661-5222.
And now:
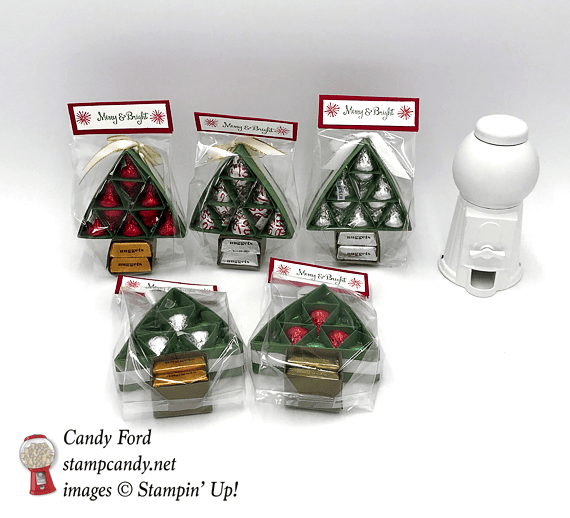
Today’s project is one that I absolutely love to make this time of year. It’s a Christmas tree made of Hershey’s Kisses. Did you know about all the different flavors they come in now? Holy cow. I got some regular milk chocolate ones in green, red, and silver wrappers, and some white chocolate peppermint ones with cute silver wrappers with candy canes. My store didn’t have Hershey’s Nuggets in Christmas wrappers yet, so I used the usual four flavor assortment.
What’s so amazing to me is how these trees stay together with much less adhesive than you would expect to use. All the pieces inside the tree shape are held in place by the snug fit of the outer piece. And while they look complicated, they really are easy to make. Remember to use your Bone Folder to make all the creases crisp!
I’ve been making these trees for a couple years now, and I just found out this project originated with the amazing Brenda Quintano of Qbee’s Quest. CLICK HERE to see her original post. Thank you, Brenda!
Here’s what I made:
I made several trees with different color combinations of Kisses and Nuggets.


This is what the back looks like:
Here’s what I did:
I did a blog post on these little trees about this time last year. CLICK HERE to see that post with full instructions and photos. Today’s trees are made of Garden Green and Soft Suede CS. I wrapped each tree in either Gold or Silver 3/8″ Metallic-Edge Ribbon. Here’s how I made the packaging:
Cut and scored with my Stampin’ Trimmer:
- Real Red card stock (CS) cut to 3″ x 2″, then scored in half at 1″
- Whisper White CS cut to 2-3/4″ x3/4″
Stamped with the Season to Sparkle stamp set:
- sentiment in Garden Green ink onto the Whisper White CS piece
- starburst shapes in Real Red ink on either side of the sentiment
Assembled the gift:
- inserted tree into a 3″ x 6″ Gusseted Cellophane Bag
- Real Red CS piece folded in half over the top of the bag, then stapled it in place
- sentiment glued onto the front of the Real Red CS to cover the staples on the front
Here are today’s colors:
You can click on each one to see all the products that come in that color!
Here’s what I used:
Click on the images for more details and to purchase.
Here are some key points to remember:
- Gift Certificates are available in any U.S. dollar amount from me. Contact me – email: candy@stampcandy.net OR call/text: 404-661-5222
- Swatch Books and Product Shares from the 2018 Occasions and Sale-A-Bration Catalogs – you can order yours now HERE.
- Year End Sales Event – December 1, 2017 to January 2, 2018 – CLICK HERE for details. Order soon so you don’t miss your favorite retiring items!
- This is a great time to join my team! With the demonstrator discount of at least 20%, you can get Christmas gifts for all the stampers on your list! CLICK HERE for more information. Contact me with any questions: email candy@stampcandy.net or call/text 404-661-5222
- Sale-a-bration Stamp Fest coming January 20. Details and register HERE
- Check out My Events Calendar HERE
- Stampin’ Blends alcohol markers are now available! Click HERE for more info.
- Hostess Code for the month of December (HS67FXTS) Find out more about HOW, WHEN and WHY to use the code HERE.
- December’s FREE gift: Year of Cheer Specialty Washi Tape – Find out more HERE.
- Gumball Rewards for all orders over $50. Find out more HERE
Thanks for stopping by today, and Sweet Stamping!
Dec 13, 2017 | Cards, Christmas, Gallery, Holiday |
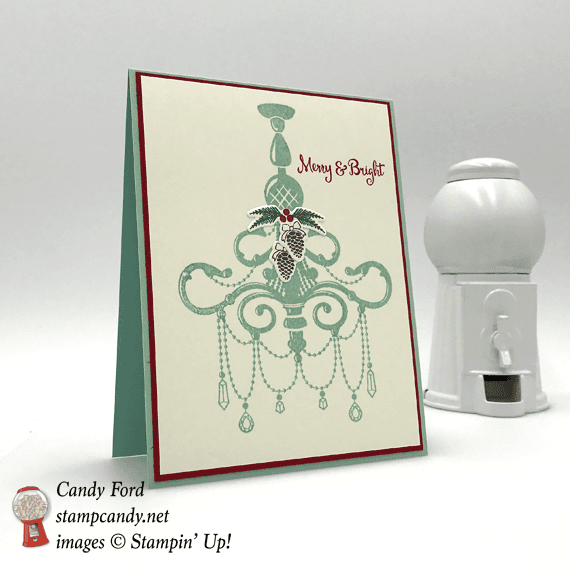
The Season to Sparkle Bundle (Season to Sparkle stamp set and Chandelier Thinlits Dies) is great for many occasions, like Halloween and Valentine’s Day, but today I’ve used it for a Christmas card. The Pool Party chandelier is decorated with pine boughs and red berries and pine cones, as well as a swap of Pool Party gems. The cute font of the sentiment makes this elegant card a little more fun.
These products are retiring and will be available only through January 2, 2018, or while supplies last.

Season to Sparkle Bundle © Stampin’ Up!
Here’s what I made:
Here’s what I did:
Cut and scored with my Stampin’ Trimmer:
- Pool Party card stock (CS) cut to 4-1/4″ x 11″, then scored in half at 5-1/2″
- Real Red CS cut to 4-1/8″ x 5-3/8″
- Very Vanilla CS cut to 4″ x 5-1/4″
Stamped with the Season to Sparkle stamp set:
- chandelier and jewel swag in Pool Party ink onto the Very Vanilla CS layer
- sentiment in Real Red ink onto the Very Vanilla CS layer
- pine cones in Soft Suede ink onto a scrap of Very Vanilla CS
- pine bough in Garden Green ink onto a scrap of Very Vanilla CS
- red berries in Real Red ink on the pine bough
Die cut using the Chandelier Thinlits Dies:
- two pine cones and the pine bough
Assembled the card:
- trimmed the tops of the pine cones and glued them to the stamped chandelier
- pine bough glued onto the stamped chandelier, covering the tops of the pine cones
- Very Vanilla CS stamped layer glued onto the Real Red CS layer
- Real Red CS layer glued onto the front of the card base
- Remember to burnish the score line of the card base for a crisp crease.
- NOTE: If you want, you could cut a second Very Vanilla CS layer and glue it onto the inside of the card base. I felt the Pool Party CS is light enough to write on with a dark pen.
Here are today’s colors:
You can click on each one to see all the products that come in that color!
Here’s what I used:
Click on the images for more details and to purchase.
Here’s some stuff you should know:
- Gift Certificates are available in any U.S. dollar amount from me. Contact me – email: candy@stampcandy.net OR call/text: 404-661-5222
- Swatch Books and Product Shares from the 2018 Occasions and Sale-A-Bration Catalogs – you can order yours now HERE.
- Year End Sales Event – December 1, 2017 to January 2, 2018 – CLICK HERE for details. Order soon so you don’t miss your favorite retiring items!
- This is a great time to join my team! With the demonstrator discount of at least 20%, you can get Christmas gifts for all the stampers on your list! Plus you can order from the 2018 Occasions and Sale-A-Bration catalogs now! CLICK HERE for more information. Contact me with any questions: email candy@stampcandy.net or call/text 404-661-5222
- Sale-a-bration Stamp Fest coming January 20. Details and register HERE
- Check out My Events Calendar HERE
- Stampin’ Blends alcohol markers are now available! Click HERE for more info.
- Hostess Code for the month of December (HS67FXTS) Find out more about HOW, WHEN and WHY to use the code HERE.
- December’s FREE gift: Year of Cheer Specialty Washi Tape – Find out more HERE.
- Gumball Rewards for all orders over $50. Find out more HERE.
Thanks for stopping by today, and Sweet Stamping!
Dec 13, 2017 | Christmas, Food, Gallery, Gift Wrap, Gifts, Holiday |
In October I attended a World Card Making event here in Atlanta, hosted by Brian King and Pam Morris, who just happen to be two of my Stampin’ Up! uplines. It was a great day filled with presentations, Make & Takes, games, and more. My project today is CASEd from one we made there – a Hot Cocoa Packet made with Hug in a Mug stamp set, with a Treat Tube full of dehydrated marshmallows. I believe it was designed by Julie DiMatteo of The Paper Pixie. I had to change the measurements just a little bit to accommodate a different brand of hot cocoa mix. Evidently Ghirardelli cocoa packs are wider than the Swiss Miss packs, but they’re oh so delicious!
Here’s what I made:


Here’s what I did:
Cut and scored with my Stampin’ Trimmer:
- Crumb Cake card stock (CS) cut to 9″ x 5-1/2″, then scored in half at 4-1/2″
- NOTE: if using a smaller packet, use the the standard 8-1/2″ x 5″, scored at 4-1/4″
- cut the CS from 2-1/2″ up the right side to the top of the score line, cutting away the blue area in the diagram

- Christmas Around the World Designer Series Paper (DSP) cut to 4″ x 5-1/4″
- DSP cut from 2-1/4″ up the right side to the top left corner
- Crumb Cake CS cut to 3-1/4″ x 1-1/2″
- Real Red CS cut to 3″ x 1-1/4″
Stamped with the Hug In A Mug stamp set:
- sentiment in Basic Black ink onto the Read Red CS piece
Assembled the project:
- the Crumb Cake CS base folded along the score line and glued together along the bottom edge, to create a pouch
- DSP glued onto the front of the pouch
- the small Crumb Cake CS piece adhered to the front of the pouch with Stampin’ Dimensionals
- sentiment glued onto the small Crumb Cake CS
- punched two holes all the way through both layers of the base on the right side, using the 1/8″ Circle Punch
- ran a piece of Jute Twine through both holes, front to back, then tied on the Treat Tube full of dehydrated marshmallows
- tucked the cocoa pack into the pouch
- NOTE: The dehydrated marshmallows puff up as soon as they hit the liquid. I bought mine at Amazon.com HERE. A one pound bag is enough for many, many, many cups of cocoa. I filled fifteen tubes with them, and you can’t even tell I’ve touched them.
Here are today’s colors:
You can click on each one to see all the products that come in that color!
Here’s what I used:
Click on the images for more details and to purchase.
Here are some key points to remember:
- Swatch Books and Product Shares from the 2018 Occasions and Sale-A-Bration Catalogs – you can order yours now HERE.
- Year End Sales Event – December 1, 2017 to January 2, 2018 – CLICK HERE for details. Order soon so you don’t miss your favorite retiring items!
- This is a great time to join my team! With the demonstrator discount of at least 20%, you can get Christmas gifts for all the stampers on your list! CLICK HERE for more information. Contact me with any questions: email candy@stampcandy.net or call/text 404-661-5222
- Sale-a-bration Stamp Fest coming January 20. Details and register HERE
- Check out My Events Calendar HERE
- Stampin’ Blends alcohol markers are now available! Click HERE for more info.
- Hostess Code for the month of December (HS67FXTS) Find out more about HOW, WHEN and WHY to use the code HERE.
- December’s FREE gift: Year of Cheer Specialty Washi Tape – Find out more HERE.
- Gumball Rewards for all orders over $50. Find out more HERE
Thanks for stopping by today, and Sweet Stamping!
Dec 12, 2017 | Christmas, Gallery, Gift Wrap, Gifts, Holiday |
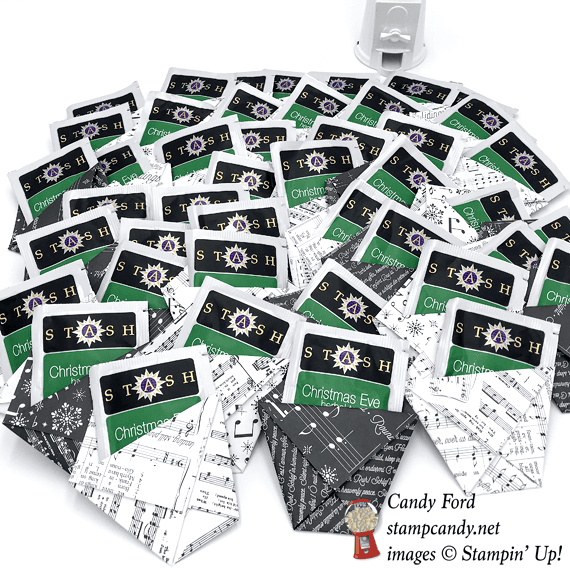
Today I’m sharing one of the quickest and easiest projects I’ve ever made – a pouch to hold a small item. I needed a lot of very small Christmas gifts, and what is more Christmasy than a Christmas Eve herbal tea bag wrapped in Christmas music?
You can make a whole lot of these little gifts in no time. You just cut your paper to size, then fold. That’s it! No stamping, no adhesives, no embellishments. Of course, you can dress it up as much as you’d like, but I left mine plain to show off the beautiful Merry Music Specialty Designer Series Paper.
When you look at the finished pouch, you can see why it’s called a Diaper Fold.
Here’s what I made:


Here’s what I did:
Cut with my Stampin’ Trimmer:
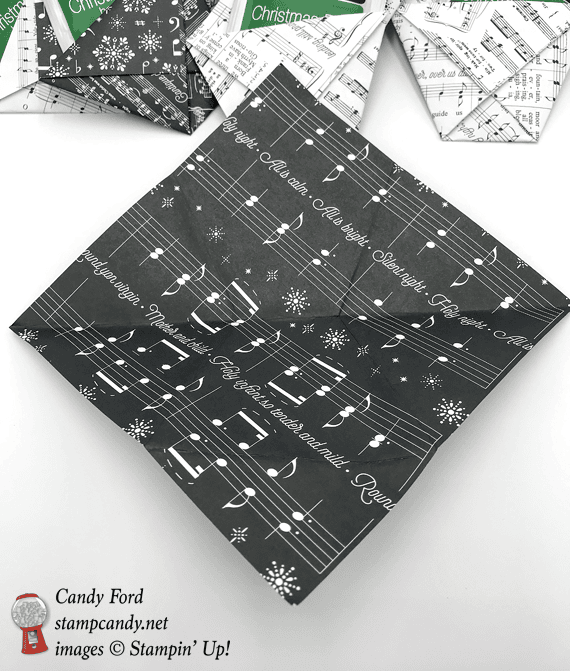
- Merry Music Specialty Designer Series Paper (DSP) cut to 6″ x 6″
- I had already made all of these, so I didn’t have a flat piece of paper to photograph. I had to unfold one, so that’s why the piece in the photo has creases.
- NOTE: for a larger pouch, simply cut the paper to a larger square
Assembled the pouch:
- NOTE: be sure to burnish all the folds with a Bone Folder
- DSP folded in half diagonally
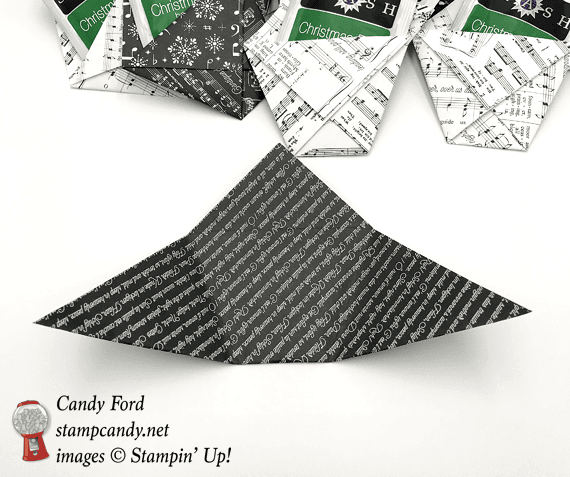
- the sides folded in so the top edges are parallel with the bottom edge
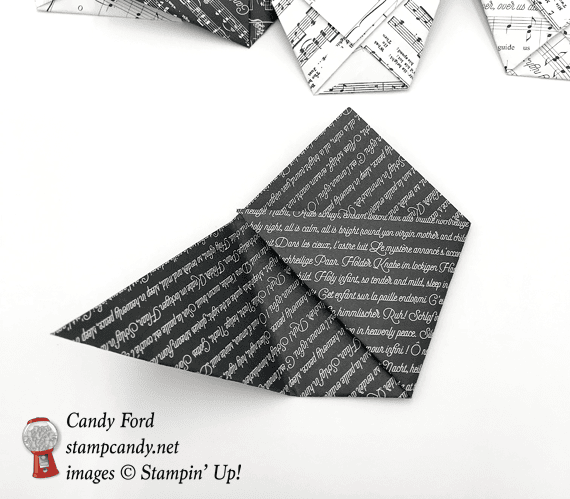
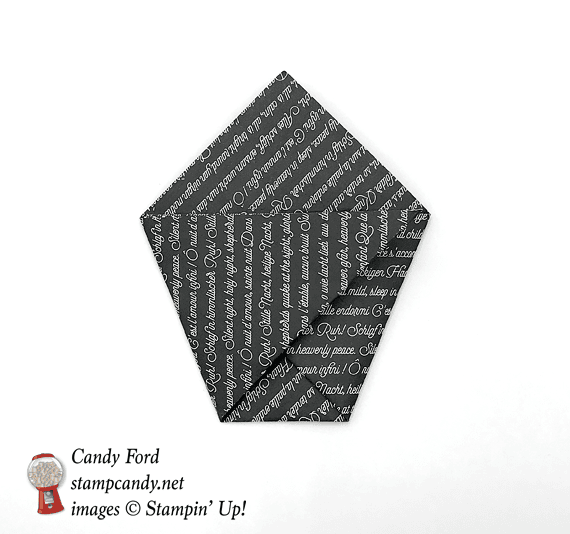
- top flap folded down
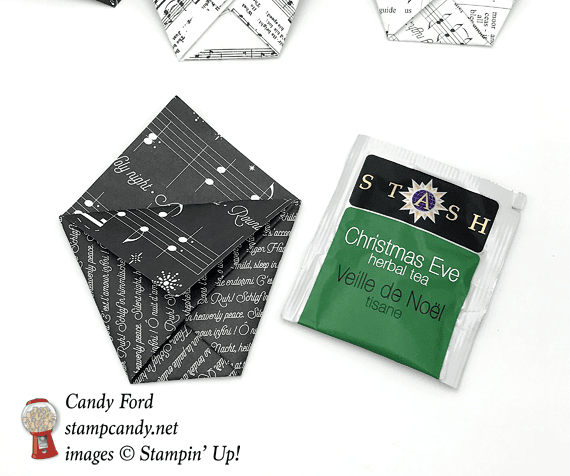
- inserted tea bag into the pouch
Here are today’s colors:
You can click on each one to see all the products that come in that color!
Here’s what I used:
Click on the images for more details and to purchase.
Here are some key points to remember:
- Swatch Books and Product Shares from the 2018 Occasions and Sale-A-Bration Catalogs – you can order yours now HERE.
- Year End Sales Event – December 1, 2017 to January 2, 2018 – CLICK HERE for details. Order soon so you don’t miss your favorite retiring items!
- This is a great time to join my team! With the demonstrator discount of at least 20%, you can get Christmas gifts for all the stampers on your list! CLICK HERE for more information. Contact me with any questions: email candy@stampcandy.net or call/text 404-661-5222
- Sale-a-bration Stamp Fest coming January 20. Details and register HERE
- Check out My Events Calendar HERE
- Stampin’ Blends alcohol markers are now available! Click HERE for more info.
- Hostess Code for the month of December (HS67FXTS) Find out more about HOW, WHEN and WHY to use the code HERE.
- December’s FREE gift: Year of Cheer Specialty Washi Tape – Find out more HERE.
- Gumball Rewards for all orders over $50. Find out more HERE
Thanks for stopping by today, and Sweet Stamping!