Merry Little Christmas Card from Ours to Yours

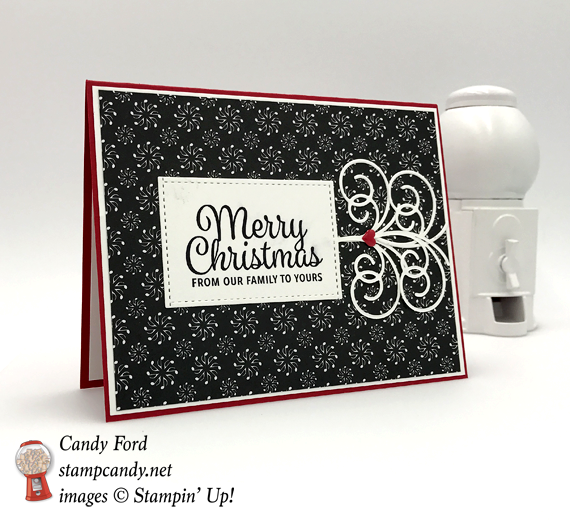
Wishing you a Merry Little Christmas from our family to yours.  I just love the elegant classic look that the Cherry Cobbler, Basic Black and Whisper White give this card.  The Swirly Snowflake dies give this card a “fancy” sort of look.  I added a punch of red in the center with a little heart from the Regals Enamel Shapes.

Snowflake Sentiments Bundle © Stampin’ Up!

Here’s what I made:

Stampin' Up! Merry Little Christmas with Swirly Snowflakes Christmas card by Stamp Candy Stampin' Up! Merry Little Christmas with Swirly Snowflakes Christmas card by Stamp Candy


Here’s what I did:

Cut and scored with my Stampin’ Trimmer:

  • Cherry Cobbler card stock (CS) cut to 5-1/2″ x 8-1/2″, then scored in half at 4-1/4″
  • Whisper White CS cut to 5-3/8″ x 4-1/8″
  • Merry Music Specialty Designer Series Paper (DSP) cut to 5-1/4″ x 4″
  • Whisper White CS cut to 5-1/4″ x 4″ for the inside

Stamped with the Snowflake Sentiments stamp set:

  • sentiment in Basic Black ink onto a piece of Whisper White CS

Die cut using the Swirly Snowflakes Thinlits:

  • 4 of the small swirly shape from Whisper White CS

Die cut using the Stitched Shapes Framelits:

  • sentiment, using a square die to cut around the top, then around the bottom, lining up the stitch marks along both sides, to create a rectangle

Assembled the card:

  • 5-3/8″ x 4-1/8″ piece of Whisper White CS glued onto the front of the card base
  • DSP glued onto the Whisper White layer
  • swirls glued onto the DSP in a sort of fountain design, as shown
  • sentiment glued onto the DSP, covering the base of the fountain
  • Cherry Cobbler heart adhered to the center of the swirls
  • 5-1/4″ x 4″ piece of Whisper White CS glued onto the inside of the card base


Here are today’s colors:

You can click on each one to see all the products that come in that color!


Here’s what I used:

Click on the images for more details and to purchase.


Here are some key points to remember:

  • Year End Sales Event – December 1, 2017 to January 2, 2018 – CLICK HERE for details
  • This is a great time to join my team! With the demonstrator discount of at least 20%, you can get Christmas gifts for all the stampers on your list! CLICK HERE for more information. Contact me with any questions: email candy@stampcandy.net or call/text 404-661-5222
  • Sale-a-bration Stamp Fest coming January 20. Details and register HERE
  • Check out My Events Calendar HERE
  • Stampin’ Blends alcohol markers are now available! Click HERE for more info.
  • Hostess Code for the month of December (HS67FXTS) Find out more about HOW, WHEN and WHY to use the code HERE.
  • December’s FREE gift: Year of Cheer Specialty Washi Tape – Find out more HERE.
  • Gumball Rewards for all orders over $50. Find out more HERE
  Thanks for stopping by today, and Sweet Stamping!


Iconic Christmas Tree Card

I’m having a little fun with Stampin’ Up!’s Iconic Christmas stamp set this morning and decided it would look great on a 6″ x 6″ card base.  The larger card required a custom envelope – that’s when I LOVE our handy dandy Envelope Punch Board.  One piece of Designer Series Paper and a little adhesive and you have an awesome custom envelope that coordinates perfectly with the card!


Here’s what I made:

Stampin' Up! Iconic Christmas Tree card with Cat Punch and Be Merry DSP by Stamp Candy Stampin' Up! Iconic Christmas Tree card with Cat Punch and Be Merry DSP by Stamp Candy


Here’s what I did:

Cut and scored with my Stampin’ Trimmer:

  • Cherry Cobbler card stock (CS) cut to 6″ x 12″, then scored in half at 6″
  • Whisper White CS cut to 5-7/8″ x 5-7/8″ (2 pieces)
  • Be Merry Designer Series Paper (DSP) cut to 5-3/4″ x 5-3/4″

Stamped with the Iconic Christmas stamp set:

  • outlines of tree decorations in Basic Black ink
  • filled in decorations in Cherry Cobbler ink
  • filled in decorations in Garden Green ink
  • sentiment in Cherry Cobbler ink onto a scrap of Whisper White CS

Die cut using the Ornamental Christmas Framelits Dies:

  • tree shape
  • sentiment with the tag die

Punched using the Cat Punch:

  • cat from a scrap of Soft Suede CS

Stamped using the Spooky Cat stamp set:

  • cat face in Basic Black ink onto the punched cat

Colored using the Stampin’ Write Markers:

  • drew cat’s collar in Cherry Cobbler

Assembled the card:

  • Whisper White layer glued onto the front of the card base
  • DSP layer glued onto the Whisper White layer
  • tree glued onto the DSP layer
  • cat adhered to the card front using Stampin’ Dimensionals
  • ran a piece of Whisper White Solid Baker’s Twine through the hole in the tag, then glued the tag to the card front
  • glued the other Whisper White CS piece to the inside of the card base

Crafted the envelope with the Envelope Punch Board:

  • Be Merry DSP cut to 9-5/8″ x 9-5/8″
  • punched and scored at 4-3/4″
  • folded in the side flaps
  • folded in the bottom flap and glued the edges of it to the side flaps 

Here are today’s colors:

You can click on each one to see all the products that come in that color!

Here’s what I used:

Click on the images for more details and to purchase.

Here are some key points to remember:

  • Year End Sales Event – December 1, 2017 to January 2, 2018 – CLICK HERE for details
  • This is a great time to join my team! With the demonstrator discount of at least 20%, you can get Christmas gifts for all the stampers on your list! CLICK HERE for more information. Contact me with any questions: email candy@stampcandy.net or call/text 404-661-5222
  • Sale-a-bration Stamp Fest coming January 20. Details and register HERE
  • Check out My Events Calendar HERE
  • Stampin’ Blends alcohol markers are now available! Click HERE for more info.
  • Hostess Code for the month of December (HS67FXTS) Find out more about HOW, WHEN and WHY to use the code HERE.
  • December’s FREE gift: Year of Cheer Specialty Washi Tape – Find out more HERE.
  • Gumball Rewards for all orders over $50. Find out more HERE


Thanks for stopping by today, and Sweet Stamping!


Starry Night Hometown Christmas Card

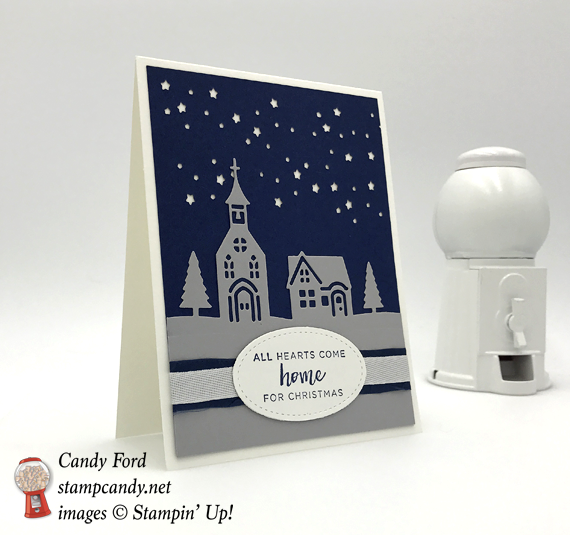
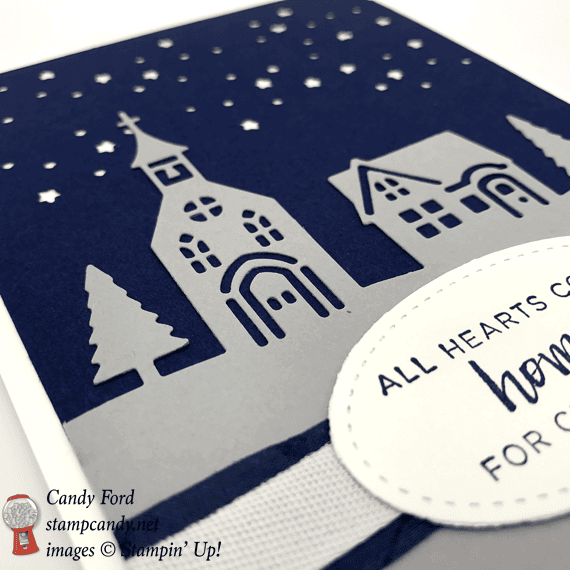
It seems families are scattered all over the country nowadays. So a lot of people go back to their hometown for the holidays. Today’s Christmas card is about that. Whether you’re the one traveling home or the one who lives there, this card shares your heart with the other. And the colors make it perfect for a man – why do male cards seem so scarce?

Hearts Come Home Bundle © Stampin' Up!

Hearts Come Home Bundle © Stampin’ Up!


Here’s what I made:

Stampin' Up! Hearts Come Home stamp sets paired with the Hometown Greetings Edgelit dies Starry Night Christmas card by Stamp Candy Stampin' Up! Hearts Come Home stamp sets paired with the Hometown Greetings Edgelit dies Starry Night Christmas card by Stamp Candy

Here’s what I did:

Cut and scored with my Stampin’ Trimmer:

  • Whisper White Thick card stock (CS) cut to 4-1/4″ x 11″, then scored in half at 5-1/2″
  • Night of Navy CS cut to 4″ x 5-1/4″
  • Smoky Slate CS cut to 4″ x 5-1/4″

Stamped with the Hearts Come Home stamp set:

  • sentiment in Night of Navy ink onto a scrap of Whisper White Thick CS

Die cut using the Hometown Greetings Edgelits:

  • Smoky Slate layer with one of the Edgelits dies
  • Night of Navy layer with the multiple stars die, to create stars in the sky

Die cut using the Stitched Shapes Framelits:

  • sentiment

Assembled the card:

  • Night of Navy ribbon adhered to the Smoky Slate layer with Tear & Tape
  • Whisper White ribbon adhered to the Smoky Slate ribbon with Tear & Tape
  • Smoky Slate layer glued onto the Night of Navy layer, lining up the bottom edges
  • Night of Navy layer glued onto the card front
  • sentiment adhered to the Smoky Slate layer, over the ribbons, with Stampin’ Dimensionals


Here are today’s colors:

You can click on each one to see all the products that come in that color!


Here’s what I used:

Click on the images for more details and to purchase.


Here are some key points to remember:
  • This is a great time to join my team! With the demonstrator discount of at least 20%, you can get Christmas gifts for all the stampers on your list! CLICK HERE for more information. Contact me with any questions: email candy@stampcandy.net or call/text 404-661-5222
  • Sale-a-bration Stamp Fest coming January 20. Details and register HERE
  • Check out My Events Calendar HERE
  • Stampin’ Blends alcohol markers are now available! Click HERE for more info.
  • Hostess Code for the month of December (HS67FXTS) Find out more about HOW, WHEN and WHY to use the code HERE.
  • December’s FREE gift: Year of Cheer Specialty Washi Tape – Find out more HERE.
  • Gumball Rewards for all orders over $50. Find out more HERE
Thanks for stopping by today, and Sweet Stamping!


Add a Little Glitz to these Quick and Easy Treat Box Gifts

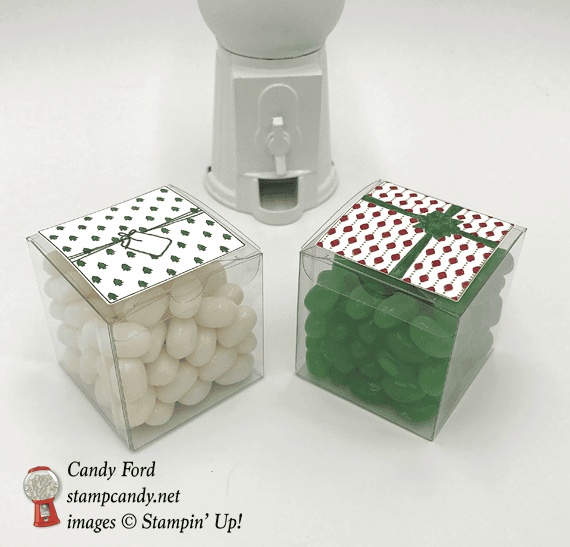
Are you looking for a quick and easy give that won’t break the bank?  How about these adorable clear tiny acetate boxes filled with jelly beans? The box decorations are made with the Add a Little Glitz stamp set. 

Add a Little Glitz Stamp Set © Stampin' Up!

Add a Little Glitz Stamp Set © Stampin’ Up!

Here’s what I made:

Stamin' Up! acetate boxes with Christmas DSP and Jelly beans by candy Ford of Stamp Candy Stamin' Up! acetate boxes with Christmas DSP and Jelly beans by candy Ford of Stamp Candy

Here’s what I did:

Stamped with the Add a Little Glitz stamp set:

  • the two gift images in Garden Green ink onto a piece of Whisper White card stock (CS)

Colored using Stampin’ Write Markers:

  • one of the images in Cherry Cobbler and Garden Green

Cut using the Layering Squares Framelits:

  • both stamped images

Assembled the gifts:

  • assembled the boxes
  • filled boxes with jelly beans, and closed the lids
  • die cut images adhere onto the top of the acetate boxes with Fast Fuse

Here are today’s colors:

You can click on each one to see all the products that come in that color!


Here’s what I used:

Click on the images for more details and to purchase.


Here are some key points to remember:

  • This is a great time to join my team! With the demonstrator discount of at least 20%, you can get Christmas gifts for all the stampers on your list! CLICK HERE for more information. Contact me with any questions: email candy@stampcandy.net or call/text 404-661-5222
  • Sale-a-bration Stamp Fest coming January 20. Details and register HERE
  • Check out My Events Calendar HERE
  • Stampin’ Blends alcohol markers are now available! Click HERE for more info.
  • Hostess Code for the month of December (HS67FXTS) Find out more about HOW, WHEN and WHY to use the code HERE.
  • December’s FREE gift: Year of Cheer Specialty Washi Tape – Find out more HERE.
  • Gumball Rewards for all orders over $50. Find out more HERE

 Thanks for stopping by today, and Sweet Stamping!


Hearts Come Home to a Snowy Neighborhood

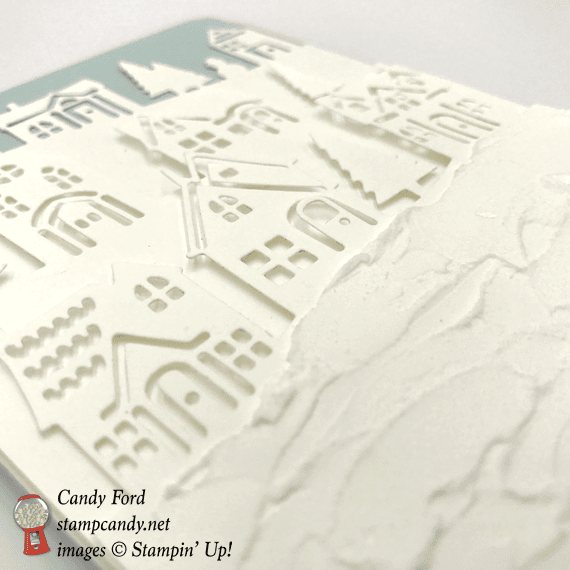
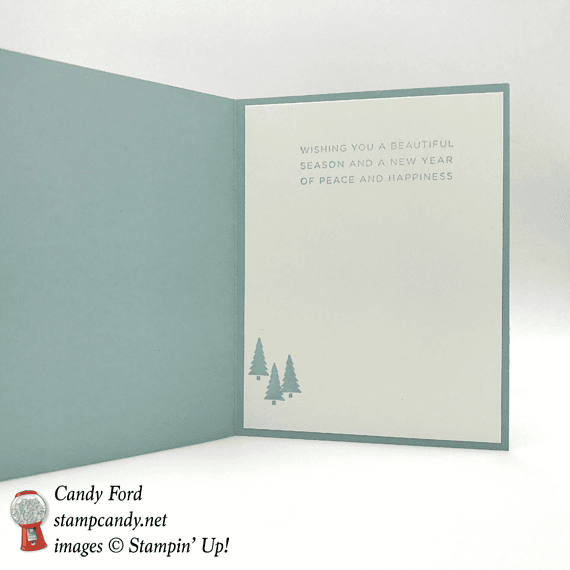
Hearts come home at Christmas, and for many people, home at Christmas includes SNOW!  Today’s card features Stampin’ Up! Embossing Paste being used as snow. This simple technique gives the card a little added texture, and the Palette Knives made it super easy.

Hearts Come Home Bundle © Stampin' Up!

Hearts Come Home Bundle © Stampin’ Up!


Here’s a video about the Embossing Paste:

Here’s what I made:

Stampin' Up! hearts come home hometown greeting christmas card by Candy Ford of Stamp Candy

Stampin' Up! hearts come home hometown greeting christmas card by Candy Ford of Stamp Candy

Stampin' Up! hearts come home hometown greeting christmas card by Candy Ford of Stamp Candy


Here’s what I did:

Cut and scored with my Stampin’ Trimmer:

  • Pool Party card stock (CS) cut to 8-1/2″ x 5-1/2″, then scored in half at 4-1/4″
  • Whisper White CS cut to 4-1/4″ x 5-1/2″ (3 pieces)
  • Whisper White CS cut to 4″ x 5-1/4″ for the inside

Stamped with the Hearts Come Home stamp set:

  • sentiment and trees in Pool Party ink onto the 4″ x 5-1/4″ piece of Whisper White CS

Die cut using the Hometown Greetings Edgelits:

  • the three 4-1/4″ x 5-1/2″ pieces of Whisper White CS with the three largest dies
  • then cut these pieces along the bottom edge so they would stagger as shown

Assembled the card:

  • smeared the Embossing Paste (sort of like icing a cake) with a Palette Knife onto the shortest die cut piece, but not on the buildings, and let it dry
  • tallest die cut glued to the front of the card base
  • middle die cut adhered onto the tallest die cut with Stampin’ Dimensionals, lining up the layers along the bottom
  • shortest die cut adhered onto the middle die cut with Stampin’ Dimensionals, lining up the layers along the bottom
  • NOTE: I used Mini Stampin’ Dimensionals under the buildings
  • 4″ x 5-1/4″ piece of Whisper White CS (with sentiment) glued to the inside of the card base


Here are today’s colors:

You can click on each one to see all the products that come in that color!


Here’s what I used:

Click on the images for more details and to purchase.


Here are some key points to remember:

  • This is a great time to join my team! With the demonstrator discount of at least 20%, you can get Christmas gifts for all the stampers on your list! CLICK HERE for more information. Contact me with any questions: email candy@stampcandy.net or call/text 404-661-5222
  • Sale-a-bration Stamp Fest coming January 20. Details and register HERE
  • Check out My Events Calendar HERE
  • Stampin’ Blends alcohol markers are now available! Click HERE for more info.
  • Hostess Code for the month of December (HS67FXTS) Find out more about HOW, WHEN and WHY to use the code HERE.
  • December’s FREE gift: Year of Cheer Specialty Washi Tape – Find out more HERE.
  • Gumball Rewards for all orders over $50. Find out more HERE 


Thanks for stopping by today, and Sweet Stamping!


email: candy@stampcandy.net
call/text: 404-661-5222

Mini Tic Tac Holders for A Lot of People

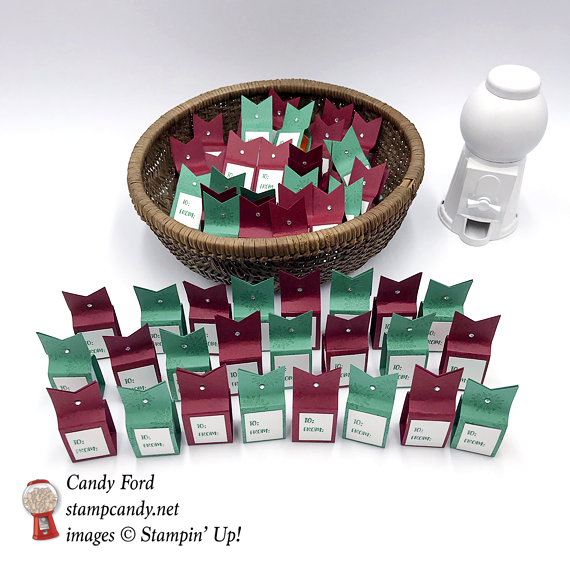
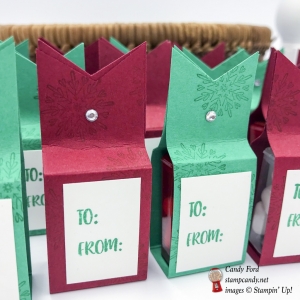
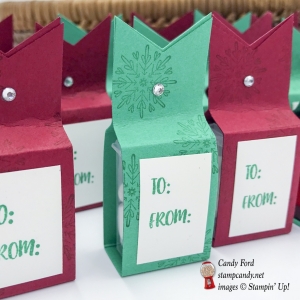
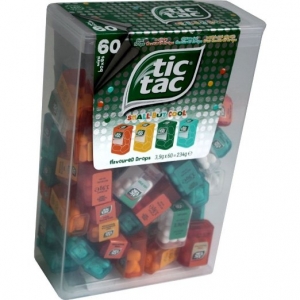
I wanted to make something very small for a large group, when I came across Mini Tic Tacs. Well, the boxes are mini, not the Tic Tacs themselves. The tiny container holds about 9-10 Tic Tacs. Perfect! But how to dress them up? I needed something really easy that I could make a lot of quickly. Today I’m sharing what I came up with.

But before that, I want to make sure you now that today is the last day to use this month’s host code (JBHB42YT) and receive my free gift of the month. Click HERE for more details.


Here’s what I made:

Cheers to the Year and Season Like Christmas stamp sets, Banner Triple Punch, Rhinestone Basic Jewels, Tic Tac Wraps, Stampin' Up! #stampcandy Cheers to the Year and Season Like Christmas stamp sets, Banner Triple Punch, Rhinestone Basic Jewels, Tic Tac Wraps, Stampin' Up! #stampcandy Cheers to the Year and Season Like Christmas stamp sets, Banner Triple Punch, Rhinestone Basic Jewels, Tic Tac Wraps, Stampin' Up! #stampcandy

Here’s what I did:

Cut and scored with my Stampin’ Trimmer:

  • Cherry Cobbler card stock (CS) cut to 1″ x 6-3/8″, then scored at 1-1/2″, 2-7/8″, 3-1/2″, and 4-7/8″
  • Emerald Envy CS cut to 1″ x 6-3/8″, then scored at 1-1/2″, 2-7/8″, 3-1/2″, and 4-7/8″
  • whisper White CS cut to 7/8″ x 1-1/8″

Stamped with the Cheers to the Year stamp set:

  • snowflakes in Cherry Cobbler ink onto the Cherry Cobbler CS strips
  • snowflakes in Emerald Envy ink onto the Emerald Envy CS strips

Stamped with the Season Like Christmas stamp set:

  • “To From” in Emerald Envy ink onto the Whisper White CS pieces

Cut using the Banner Triple Punch:

  • both ends of the Cherry Cobbler and Emerald Envy CS strips

Assembled the treats:

  • burnished all score lines on the CS strips
  • adhered 4 Stampin’ Dimensionals (2 stacks of 2) into the indention on bottom of each Tic Tac box, then adhered the box to the center of a CS strip
  • folded the CS strip around the box and glued the tops together
  • glued the Whisper White CS piece onto the front of the holder
  • adhered a Rhinestone Basic Jewel to the top of the holder


Here are today’s colors:

You can click on each one to see all the products that come in that color!


Here’s what I used:

Click on the images for more details and to purchase.


Here are the Tic Tacs:

Click the image to see where I got them.

Tic Tacs

Here are some key points to remember:
  • This is a great time to join my team! With the demonstrator discount of at least 20%, you can get Christmas gifts for all the stampers on your list! CLICK HERE for more information. Contact me with any questions: email candy@stampcandy.net or call/text 404-661-5222
  • Sale-a-bration Stamp Fest coming January 20. Details and register HERE
  • Check out My Events Calendar HERE
  • Stampin’ Blends alcohol markers are now available! Click HERE for more info.
  • Hostess Code for the month of November (JBHB42YT) Find out more about HOW, WHEN and WHY to use the code HERE.
  • November’s FREE gift: Stitched Felt Embellishments – Find out more HERE.
  • Gumball Rewards for all orders over $50. Find out more HERE 
Thanks for stopping by today, and Sweet Stamping!