Oct 6, 2020 | Cards, Christmas, Gallery, Holiday |
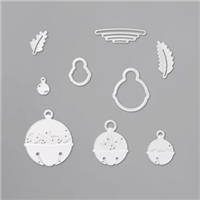
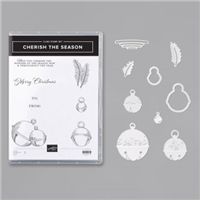
I used the Christmas Means More stamp set, Sounds of the Season Dies, and ‘Tis the Season Designer Series Paper to make today’s Christmas card. I love this sentiment, which is a line from the movie “It’s a Wonderful Life.” But it’s a line that comes before that one that always makes me cry. It goes something like this, “A toast to my big brother George, the richest man in town.” I love to it watch every year around the holidays.
What is your favorite holiday movie?
If you are reading this in email, some photos may appear blurry, or may not appear at all. Please click here to see the post on my blog.
S means more means more means more means more
Here’s what I made:


S
Here’s what I did:
Cut and scored with my paper trimmer:
- Real Red card stock (CS) cut to 4-1/4″ x 11″, then scored in half at 5-1/2″
- ‘Tis the Season Designer Series Paper (DSP) layer cut to 4-1/8″ x 5-3/8″
- Garden Green CS layer cut to 4-1/8″ x 2-1/2″
- Whisper White CS cut to 4″ x 5-1/4″ for the inside of the card base
- DSP strip cut to 4″ x 5/8″
Stamped with the Christmas Means More stamp set:
- sentiment in Tuxedo Black memento ink onto the Garden Green CS layer
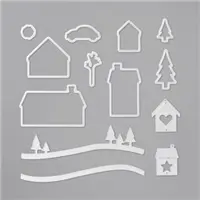
Cut using the Sound of the Seasons Dies:
- largest bell from a scrap of a Silver Foil Sheet
Assembled the card:
- burnished the fold in the card base with a Bone Folder
- DSP layer glued onto the front of the card base
- Garden Green CS layer glued onto the DSP layer
- twine tied in a bow around the top loop of the bell and secured in place with a Mini Glue Dot
- bell adhered onto the Garden Green CS layer using Mini Stampin’ Dimensionals
- DSP strip glued onto the Whisper White CS, near the bottom
- Whisper White CS glued onto the inside of the card base
S
Here are today’s colors:
You can click on each one to see all the products that come in that color!
S
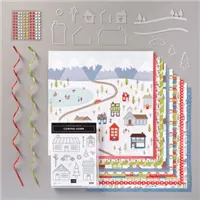
Here’s what I used:
Click on these images for more details and to purchase. If you are reading this post in email, the product images may not show up. Please click here to see the post on my blog.
Supply List. <— Click for a clickable and printable list of the products!
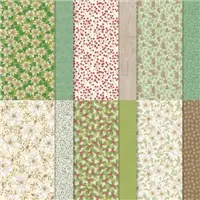
Designer Series Paper Sale!
Click the image to see the sale:
S
Here are some helpful links:
S
Thanks for stopping by today, and Sweet Stamping!
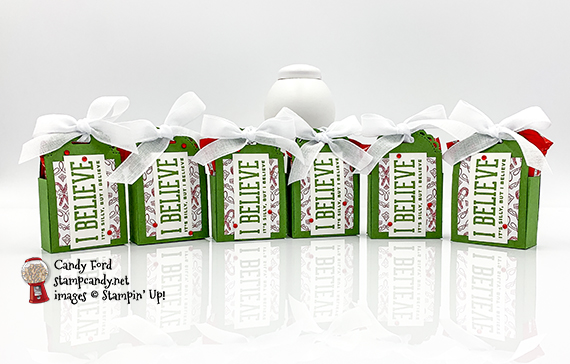
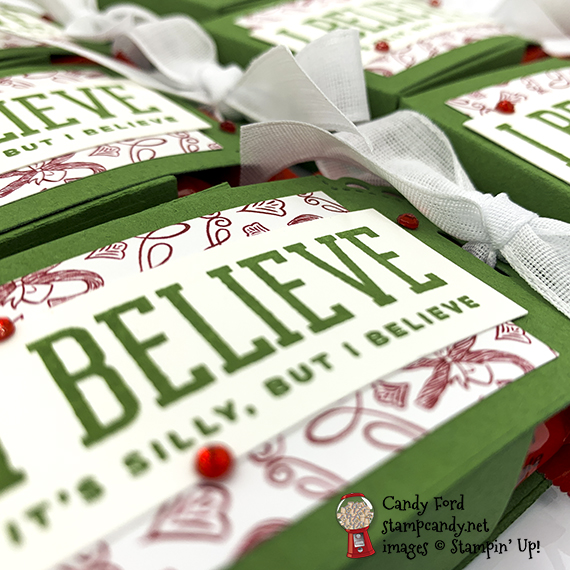
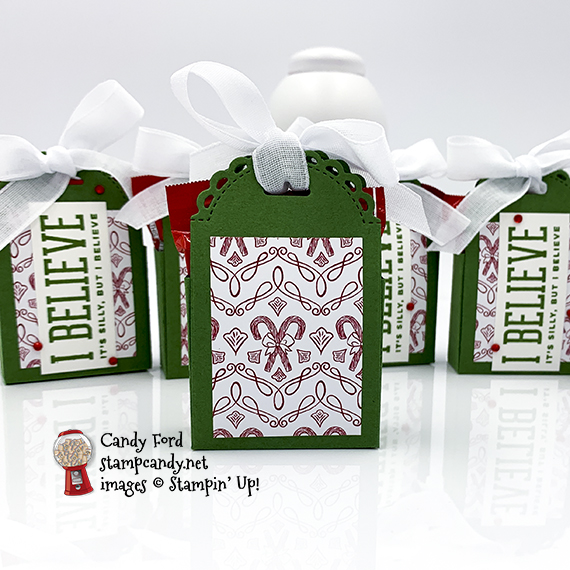
Oct 5, 2020 | Boxes, Christmas, Gallery, Gifts, Holiday, Treat Holders |
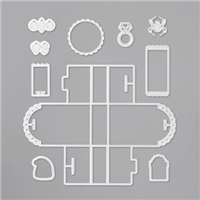
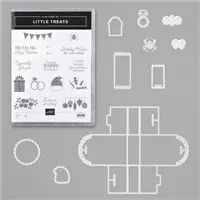
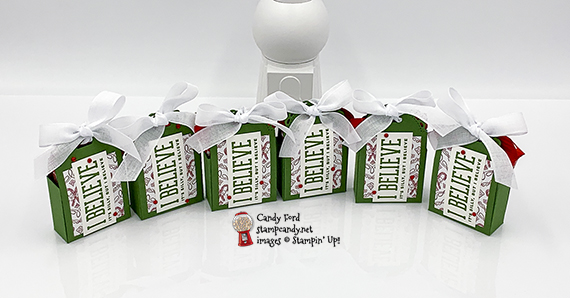
Today I’m sharing some little treat holders I made using the Little Treat Box Dies, Christmas Means More stamp set, and Tis the Season Designer Series Paper. They hold 2 miniature KitKat bars perfectly. I tied the tops with the Whisper White 1/2″ Faux Linen Ribbon from the Flowers for Every Season Ribbon Combo Pack It’s one of my favorite ribbons. It’s pretty and you can quickly color it with your Stampin’ Blends markers. I included one of these treat holders in the BINGO Boxes that I sent to the participants of my World Card Making Day BINGO Party. We had a great time, playing BINGO and making cards.
If you are reading this in email, some photos may appear blurry, or may not appear at all. Please click here to see the post on my blog.
S Little Treat Little Treat Little Treat Little Treat
Here’s what I made:
S
Here’s what I did:
Cut and scored with my paper trimmer:
- Whisper White Thick Card Stock (CS) cut to 2-1/4″ x 1″
- ‘Tis the Season Designer Series Paper (DSP) layer cut to 1-1/2″ x 2″ (2 pieces)
Stamped with the Christmas Means More stamp set:
- sentiment in Garden Green ink onto the Whisper White Thick CS
Cut using the Little Treat Box Dies:
- box from a piece of Garden Green CS
Assembled the treat holder:
- burnished the folds in the box with a Bone Folder
- DSP layer glued onto the front and back panels of the box
- sentiment glued over the DSP layer on the front
- 3 Red Rhinestones applied onto the front using my Take Your Pick tool
- box sides folded up and glued to form the box
- goodies tucked inside
- ribbon threaded through the holes in the top of the two sides and tied in a bow
S
Here are today’s colors:
You can click on each one to see all the products that come in that color!
S
Here’s what I used:
Click on these images for more details and to purchase. If you are reading this post in email, the product images may not show up. Please click here to see the post on my blog.
Supply List. <— Click for a clickable and printable list of the products!
Designer Series Paper Sale!
Click the image to see the sale:
S
Here are some helpful links:
S
Thanks for stopping by today, and Sweet Stamping!
Sep 22, 2020 | Boxes, Christmas, Food, Gallery, Gift Wrap, Gifts, Holiday |
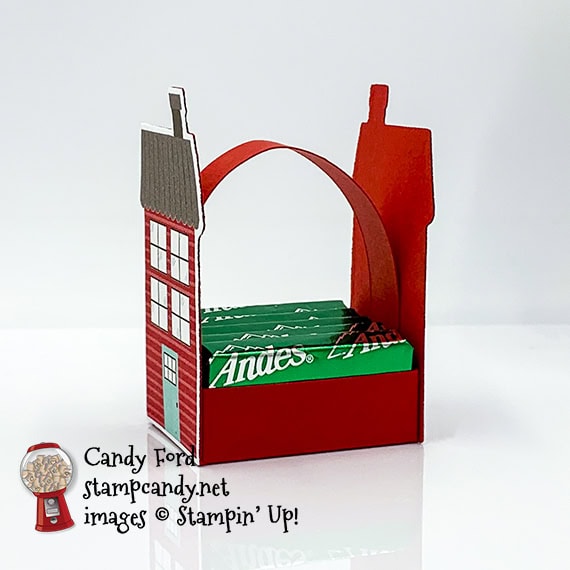
Today I’m sharing a Treat Holder that holds 5 Andes Mints. This is one of the projects we made this weekend at our Candy Hearts team meeting. I was inspired by the little treat holders on page 26 of the August – December 2020 Mini Catalog.
If you are reading this in email, some photos may appear blurry, or may not appear at all. Please click here to see the post on my blog.
S Treat Holder Treat Holder Treat Holder Treat Holder
Here’s what I made:

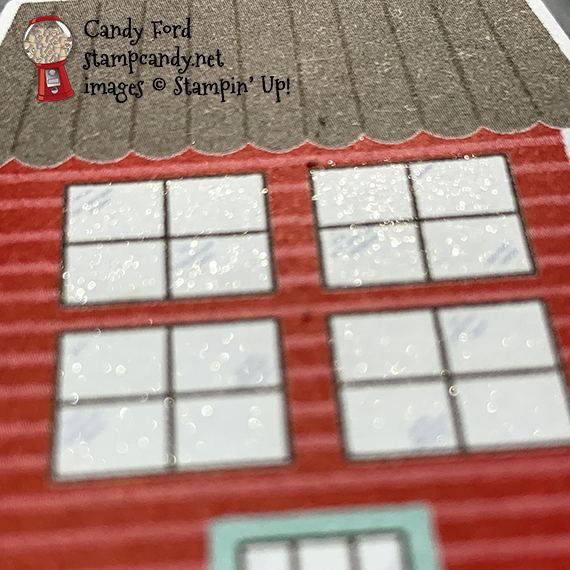
Wink of Stella can add so much to a project, but it seems almost impossible to photograph. Here are a couple of feeble attempts at getting it to show in a photo. It’s much more visible in person, but without being too glitzy.

S
Here’s what I did:
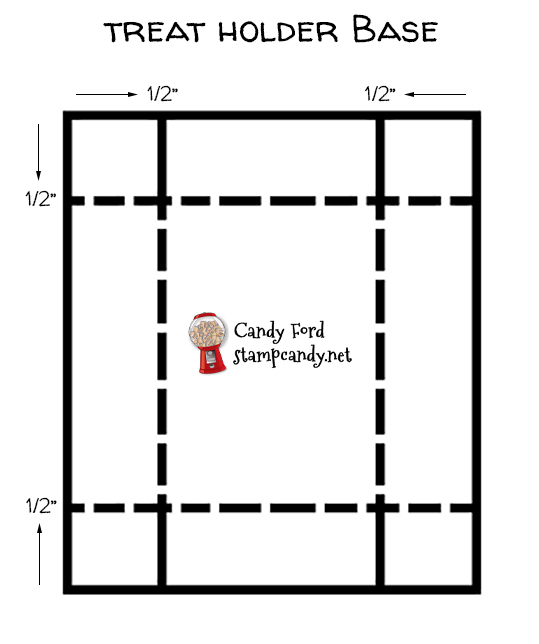
Cut and scored with my paper trimmer:
- Poppy Parade card stock (CS) cut to 2-5/8″ x 2-1/4″, then scored 1/2″ from all four sides
- strip of Poppy Parade CS cut to 1/2″ x 5″ (feel free to make this longer if you wish)
Cut using Paper Snips:
- one score line at each corner, to create a flap at each corner
Cut using the Home Together Dies:
- 2 houses from a scrap of Trimming the Town Designer Series Paper (DSP)
- 2 houses from a scrap of Poppy Parade CS
Colored using Clear Wink of Stella:
- windows of both DSP houses (allow to dry thoroughly before handling)
Assembled the treat holder:
- burnished the folds in the base with a Bone Folder
- corner flaps glued onto the inside of the adjacent sides, to form the open top box
- ran a Bone Folder along the 1/2″ strip, like you would do to curl ribbon, to soften the fibers (This is so it will curve and not bend.)
- one end of the strip glued to the inside of one of the shorter sides of the box
- opposite end of the strip glued to the inside of the opposite short side of the box
- each die cut DSP house glued onto a die cut Poppy Parade CS house
- one house glued onto the outside of each end of the box, only putting along the bottom where it meets the side of the box and a little up the center where it meets the handle
- This will hold 5 Andes Mints perfectly.
S
Here are today’s colors:
You can click on each one to see all the products that come in that color!
S
Here’s what I used:
Click on these images for more details and to purchase. If you are reading this post in email, the product images may not show up. Please click here to see the post on my blog.
Supply List. <— Click for a clickable and printable list of the products!
S
Two ways to save in September!
Buy the Starter Kit and receive even more! It’s already the best deal: $99 for $125 in product of your choice plus Free shipping! In September you will also receive the Queen Anne’s Lace stamp set, the So Much Love stamp set, Rhinestone Basic Jewels, and 16 precut card kits! Wow! This is the perfect time to work on your wish list of Stampin’ Up! products! CLICK HERE for more details.

Buy the new Stampin’ Cut & Emboss Machine (standard size) from me by September 30 and I will give you a Magnetic Cutting Plate FREE! You’ll save almost $30! CLICK HERE for more details and to order.

S
Mystery Stamping Party!

Go ahead and click the image above to join the Facebook group now. A few days before the party I will post what you will need to complete the mystery card. On September 23 at 8:00pm ET, I will begin posting clues you can follow to create the card. We’ll also have games and prizes! And it’s all FREE!
S
World Card Making Day 2020:

- Join me for an afternoon of Bingo, cardmaking, prizes, and fun!
- October 3 at 2:00 pm ET
- See details and register HERE by September 25
- $25 (extra Bingo cards available for $5 each)
- Tell your friends! The more people who register, the bigger the prizes!
S
Here are some helpful links:
S
Thanks for stopping by today, and Sweet Stamping!

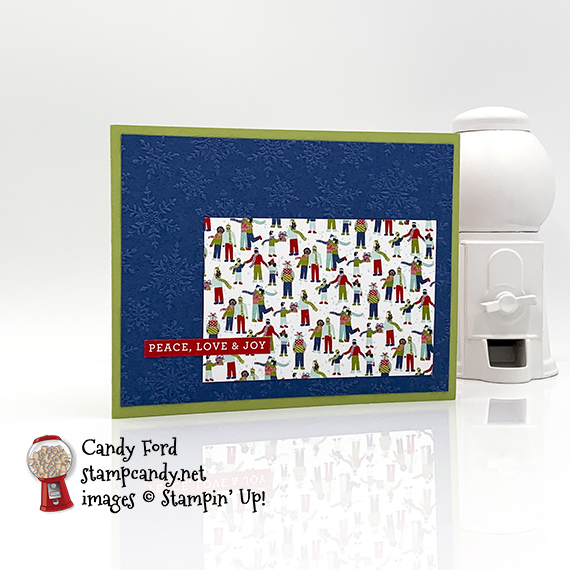
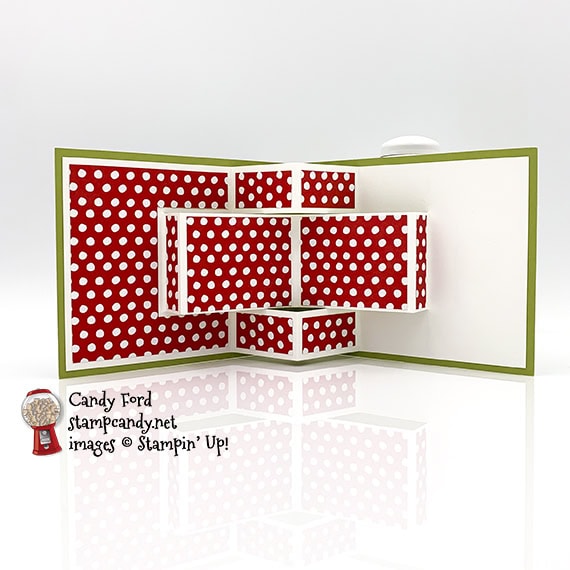
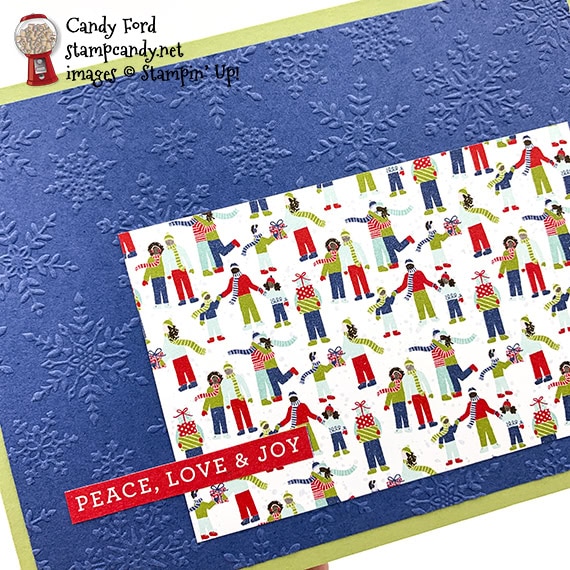
Sep 21, 2020 | Cards, Christmas, Fun Folds, Gallery, Holiday |
Today I’m sharing another 3D Pop Up Card. When my some members of my Candy Hearts team saw the one I posted last week, which you can see here, they requested we make one at our next team meeting, which was yesterday. For today’s card, we used products from the Trimming the Town Suite: Trimming the Town Designer Series Paper and Winter Snow Embossing Folder.
If you are reading this in email, some photos may appear blurry, or may not appear at all. Please click here to see the post on my blog.
S 3D Pop Up Card 3D Pop Up Card 3D Pop Up Card 3D Pop Up Card
Here’s what I made:
Here you can really see the beautiful and dainty embossed snowflakes:
S
Here’s what I did:
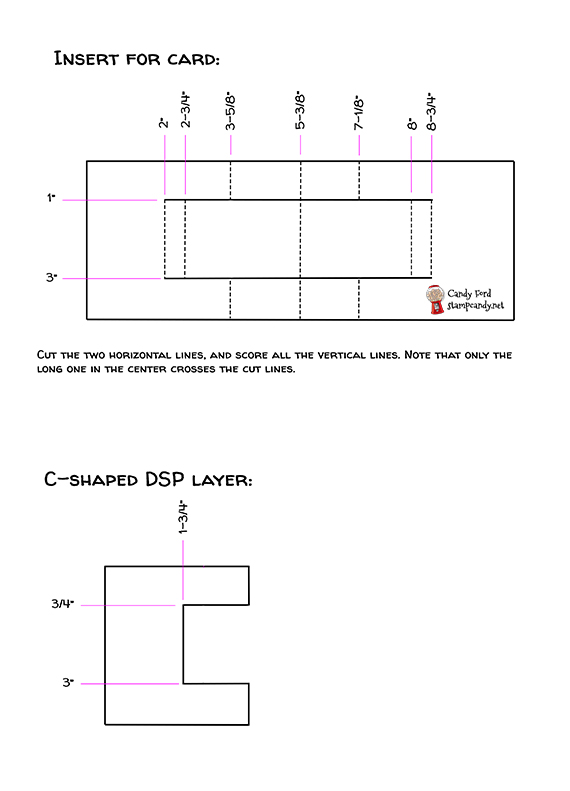
Cut and scored with my paper trimmer:
- Pear Pizzazz card stock (CS) cut to 11″ x 4-1/4″, then scored in half at 5-1/2″
- Misty Moonlight CS layer cut to 5-1/4″ x 4″
- Trimming The Town Designer Series Paper (DSP) layer cut to 3-3/4″ x 2-1/2″ (people)
- Whisper White Thick CS cut to 10-3/4″ x 4″, then cut and scored according to the diagram below
- DSP (polka dots) cut to 2-3/8″ x 1-3/4″ (2 pieces), to 1-1/2″ x 3/4″ (4 pieces), and to 1/2″ x 1-3/4″ (2 pieces)
- DSP (polka dots) cut to 3-3/8″ x 3-3/4″ (1 piece) then cut into a C shape according to the diagram below
Cut using Paper Snips:
- sentiment from a piece of DSP
Embossed using the Winter Snow Embossing Folder:
Assembled the 3D Pop Up Card:
- burnished the fold in the card base with a Bone Folder
- embossed Misty Moonlight CS layer glued onto the front of the card base
- DSP layer (people) glued onto the Misty Moonlight CS layer
- sentiment glued onto the card front
- burnished all the score lines in the Whisper White Thick CS insert with a Bone Folder
- center score line of the Whisper White Thick CS lined up with the score line in the card base, then the C-shaped areas at both ends glued onto the inside of the card base
- polka dot DSP pieces glued onto their corresponding scored areas of the Whisper White Thick CS
S
Here are today’s main colors:
You can click on each one to see all the products that come in that color!
S
Here’s what I used:
Click on these images for more details and to purchase. If you are reading this post in email, the product images may not show up. Please click here to see the post on my blog.
Supply List. <— Click for a clickable and printable list of the products!
S
Two ways to save in September!
Buy the Starter Kit and receive even more! It’s already the best deal: $99 for $125 in product of your choice plus Free shipping! In September you will also receive the Queen Anne’s Lace stamp set, the So Much Love stamp set, Rhinestone Basic Jewels, and 16 precut card kits! Wow! This is the perfect time to work on your wish list of Stampin’ Up! products! CLICK HERE for more details.
Buy the new Stampin’ Cut & Emboss Machine (standard size) from me by September 30 and I will give you a Magnetic Cutting Plate FREE! You’ll save almost $30! CLICK HERE for more details and to order.
S
Mystery Stamping Party!
Go ahead and click the image above to join the Facebook group now. A few days before the party I will post what you will need to complete the mystery card. On September 23 at 8:00pm ET, I will begin posting clues you can follow to create the card. We’ll also have games and prizes! And it’s all FREE!
S
World Card Making Day 2020:
- Join me for an afternoon of Bingo, cardmaking, prizes, and fun!
- October 3 at 2:00 pm ET
- See details and register HERE by September 25
- $25 (extra Bingo cards available for $5 each)
- Tell your friends! The more people who register, the bigger the prizes!
S
Here are some helpful links:
S
Thanks for stopping by today, and Sweet Stamping!
Sep 17, 2020 | Cards, Christmas, Fun Folds, Gallery, Holiday |
Whether it’s a warm cup of coffee or hot cocoa, nothing says Happy Holidays like sharing a warm cuppa with someone special. This is a card for someone extra special in your life. The triple cube card if very popular right now. I decided to change it up a little by having it a full 5-1/2″ tall, instead of the 4″ tall ones I’ve seen. I realize the height doesn’t technically make it a “cube,” but I’m calling it a cube anyway. The base itself is really easy to put together. I used 3 patterns of Designer Series Paper from the Heartwarming Hugs Designer Series Paper. With all the different paper elements, I didn’t feel the need for any embellishments. What do you think?
If you are reading this in email, some photos may appear blurry, or may not appear at all. Please click here to see the post on my blog.
S warm warm warm warm
Here’s what I made:
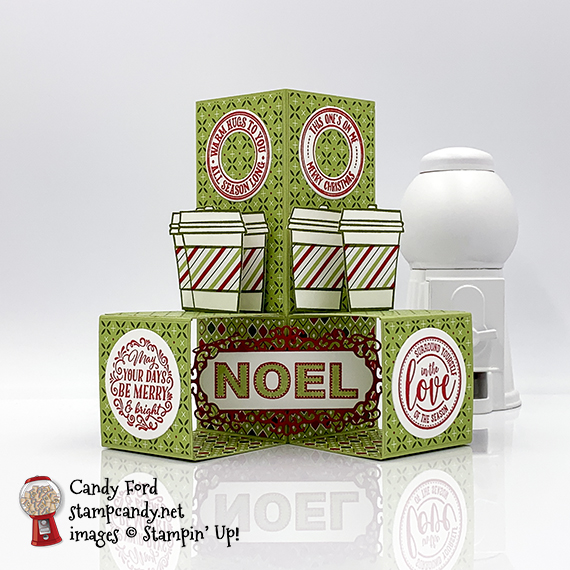


It folds flat to fit into a Whisper White Medium Envelope! When folded flat, the card is 4″ x 51/2″. You can see I have a cup sticking out just a little bit on one side. This is okay because the card is 4″ wide instead of the regular 4-1/4″. But be aware of your placement, so you don’t have any thing sticking out too far.
S
Here’s what I did:
Cut and scored with my Paper Trimmer & Simply Scored Tool:
- Pear Pizzazz card stock (CS) cut to 8-1/4″ x 5-1/2″. then scored at 2″, 4″, 6″, and 8″
- 2 pieces of Pear Pizzazz CS cut to 2″ x 8-1/4″, and scored at 2″, 4″, 6″, and 8″
- 2 Heartwarming Hugs Designer Series Paper pattern 1 (DSP-1) layers cut to 1-7/8″ x 3-3/8″
- 4 DSP-1 layers cut to 1-7/8″ x 1-7/8″
- 6 DSP-2 layers cut to 1-7/8″ x 1-7/8″
- 2 Whisper White CS layers cut to 1-7/8” x 5-3/8”
- 2 Real Red CS strips cut to 1/2″ x 2″, and scored in half at 1″
- 1/4″ strips of Pear Pizzazz CS cut as follows:
- 1 piece cut to 3-1/2″ long, and scored at 1″, 1-1/2”, 2-1/2”, and 3”
- 1 piece cut to 3-1/4″, and scored at 1″, 1-3/8″, 2-3/8″, and 2-3/4″
- 2 pieces cut to 3” long and scored at 1”, 1-1/4”, 2-1/4”, and 2-1/2”
- 1 piece cut to 2-3/4” and scored at 1”, 1-1/8”, 2-1/8”, and 2-1/4”
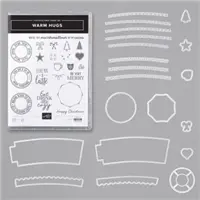
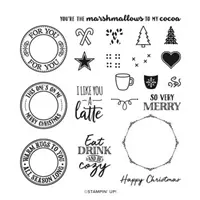
Stamped with the Warm Hugs stamp set:
- the 2 donut-shaped sentiments in Real Red ink onto a scrap of Whisper White Thick CS
Stamped with the Wrapped in Christmas stamp set:
- the two round sentiments in Real Red ink onto a scrap of Whisper White Thick CS
- “NOEL” in Real Red ink onto a scrap of Whisper White Thick CS
Stamped with the Press On stamp set:
- largest cup in Mossy Meadow ink onto a scrap of Whisper White Thick CS (5 of them)
- largest cup in Mossy Meadow ink onto a scrap of DSP-3 (5 of them)
Cut using the Warm Wraps Dies:
- the 2 donut-shaped sentiments
Cut using the Ornate Frames Dies:
- a scrap of Real Red CS to frame “NOEL”
Cut using the Layering Circles Dies:
Cut using Paper Snips:
- the 5 Whisper White Thick CS cups
- only cup wraps from the 5 DSP 3 cups
Colored using the a Stampin’ Write Marker:
Assembled the base:
- burnished all the folds in the three large Pear Pizzazz CS pieces with a Bone Folder
- burnished the folds in the 2 Real Red CS strips with a Bone Folder
- 1/4″ section of the largest piece of Pear Pizzazz CS glued onto the inside of the opposite side, to create a tall, open ended “cube”
- 1/4″ section of both of the smaller Pear Pizzazz CS pieces glued onto the inside of the opposite side, to create 2 smaller, open ended “cubes”
- small cubes glued onto two adjacent sides of the tall cube, at the bottom
- 4 of the DSP-2 layers glued onto the back and bottom inside of the two small cubes
- remaining 2 DSP-2 layers glued onto the inside of the tall cube, on the 2 back sides, so you can see them when looking down from the front
- 2 larger DSP-1 layers glued onto the tall cube above the small cubes
- 4 remaining DSP-1 layers glued onto the top and front of the small cubes
- Whisper White CS layers glued onto the 2 back sides of the tall cube
- NOEL glued onto the Real Red CD die cut
- one half of each Real Red CS strip glued onto the back of the Real Red die cut, with the fold lines meeting in the middle, so the other halves of the strips stuck out in a V-shape
- glued the V-shape onto the corner between the two small cubes, on half of the V on each cube
- round sentiments glued onto the fronts of the 2 small cubes
- donut-shaped sentiments glued onto the 2 front sides of the tall cube, near the top
Attached the cups:
- burnished all the folds in the 5 Pear Pizzazz CS strips with a Bone Folder
- one DSP-3 cup wrap glued onto each Whisper White Thick CS cup
- 1/2″ section at one end of the 1/4″ Pear Pizzazz CS strips glued onto the 1″ section at the other end, to create tiny open rectangles
- a long side of one rectangle glued onto the back of each cup, vertically, making sure the bottom/short side is even with the bottom of the cup
- cup with 1/8″ thick rectangle glued onto the the top of the left small cube, gluing the bottom side to the small cube, and the back side to the tall cube
- 3/8″ thick rectangle cup glued the same way to the left of the first cup, so it sticks out farther
- 1/4″ rectangle cup glued onto the front of the second cup, with its bottom glued onto the top of the small cube
- the other cup with a 1/4″ rectangle glued onto the cube on the right, the same way as the others
- cup with the 1/2″ rectangle glued onto the top of the small cube on the right, with the back glued to the tall cube, so it sticks out farther than the previous cup
- NOTE: It’s best to let the glue dry completely, to make sure the cups stay in position when the card is folded flat, especially the bottoms.
I drew white lines on this photo to highlight one of the Read Red CS strips on the back of the NOEL sentiment. One half of the strip is glued onto the cube and the other half is glued onto the back of the sentiment. The other strip is glued on the same way on the other side. This is how to attach the flat piece onto the corner:
S
Here are today’s colors:
You can click on each one to see all the products that come in that color!
S
Here’s what I used:
Click on these images for more details and to purchase. If you are reading this post in email, the product images may not show up. Please click here to see the post on my blog.
Supply List. <— Click for a clickable and printable list of the products!
Two ways to save in September!
Buy the Starter Kit and receive even more! It’s already the best deal: $99 for $125 in product of your choice plus Free shipping! In September you will also receive the Queen Anne’s Lace stamp set, the So Much Love stamp set, Rhinestone Basic Jewels, and 16 precut card kits! Wow! This is the perfect time to work on your wish list of Stampin’ Up! products! CLICK HERE for more details.
Buy the new Stampin’ Cut & Emboss Machine (standard size) from me by September 30 and I will give you a Magnetic Cutting Plate FREE! You’ll save almost $30! CLICK HERE for more details and to order.
S
Mystery Stamping Party!
Go ahead and click the image above to join the Facebook group now. A few days before the party I will post what you will need to complete the mystery card. On September 23 at 8:00pm ET, I will begin posting clues you can follow to create the card. We’ll also have games and prizes! And it’s all FREE!
S
World Card Making Day 2020:
- Join me for an afternoon of Bingo, cardmaking, prizes, and fun!
- October 3 at 2:00 pm ET
- See details and register HERE by September 25
- $25 (extra Bingo cards available for $5 each)
- Tell your friends! The more people who register, the bigger the prizes!
S
Here are some helpful links:
S
Thanks for stopping by today, and Sweet Stamping!
Aug 25, 2020 | Cards, Christmas, Fun Folds, Gallery, Holiday, Techniques |
Today I’m sharing a card I designed as one of the Make & Takes for our August Candy Hearts team meeting. I used the Poinsettia Place Suite Collection to create this double gate-fold card. At 3″ wide, it’s skinnier than the usual 4-1/4″, but that leaves room for the sprigs to hang off the edge. It will still fit into the standard medium envelope. The poinsettia was die cut from the Poinsettia Place Designer Series Paper, and glued onto a piece of card stock that was cut with the same die. That’s to make it sturdier, since half of it hangs off the layer.
If you are reading this in email, some photos may appear blurry, or may not appear at all. Please click here to see the post on my blog.
S Poinsettia Place Poinsettia Place Poinsettia Place Poinsettia Place
Here’s what I made:


S
Here’s what I did:
Cut and scored with my paper trimmer:
- Old Olive card stock (CS) cut to 5-1/2″ x 9″, then scored at 1-1/2″ 3″, 6″, and 7-1/2″”
- Soft Suede CS layers cut to 1-3/8″ x 5-3/8″ (2 pieces)
- Old Olive card stock layers cut to 1-1/4″ x 5-1/4″ (2 pieces)
- Very Vanilla CS cut to 2-3/4″ x 5-1/4″ for the inside of the card base
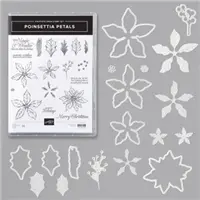
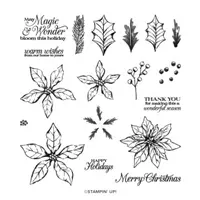
Stamped with the Poinsettia Petals stamp set:
- sentiment in Soft Suede ink onto the Very Vanilla CS
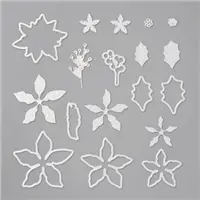
Cut using the Poinsettia Dies:
- flower from a piece of Poinsettia Place Designer Series Paper (DSP)
- scrap of Old Olive CS using the same poinsettia die
- 3 sprigs from a scrap of Soft Suede CS
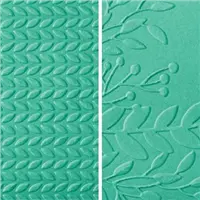
Embossed using the Greenery Embossing Folder:
Assembled the card:
- burnished the folds in the card base with a Bone Folder
- Soft Suede CS layers glued onto the two outer most sections of the card base
- Old Olive CS layers glued onto the Soft Suede CS layers
- Soft Suede CS sprigs glued onto the Old Olive CS layer on the left
- DSP poinsettia glued onto the Old Olive CS die cut in the same shape
- only the left part of the Old Olive poinsettia glued onto the Old Olive CS layer on the left, covering the bases of the sprigs
- Very Vanilla CS glued onto the center section of the card base
S
Here are today’s colors:
You can click on each one to see all the products that come in that color!
S
Here’s what I used:
Click on these images for more details and to purchase. If you are reading this post in email, the product images may not show up. Please click here to see the post on my blog.
Supply List. <— Click for a clickable and printable list of the products!
S
Use your Bonus Days coupons by August 31!
Click the image below to shop now and use your Bonus Days coupons!

S
Here are some helpful links:
S
Thanks for stopping by today, and Sweet Stamping!