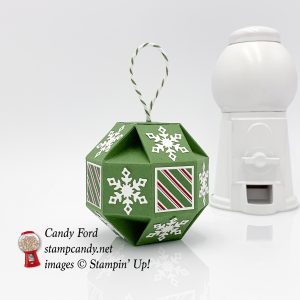
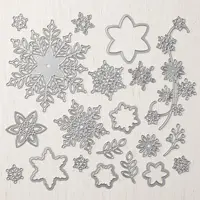
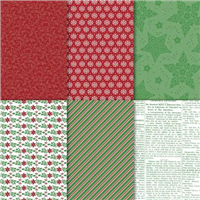
Recently I saw a video for a die that cut out the parts for this ornament, but I thought I could do it myself. So I did! It looks much more complicated than it is. It’s just one piece of paper scored and folded, with a few pieces cut away. Add a piece of twine or ribbon and some glue and you’re done! I used the Dashing Along Designer Series Paper (DSP) and the Snowfall Thinlits Dies to decorate the ornament. By the way, the Dashing Along DSP was a limited time offer that expired, but it’s back while supplies last!!!
Today is the last day to order the Showflake Showcase products! Scroll down to the bottom of this post for details.
Here’s what I made:
Here’s what I did:
Cut and scored with my Stampin’ Trimmer:
Garden Green card stock (CS) cut to 8-1/4″ x 5″
the same Garden Green CS scored every 1″ in both directions
the same Garden Green CS scored diagonally in 8 squares as shown in diagram below
Whisper White CS cut to 3/4″ x 3/4″ (4 pieces)
Dashing Along Designer Series Paper (DSP) cut to 1/2″ x 1/2″ (4 pieces)
Die cut using the Snowfall Thinlits:
12 snowflakes from a scrap of Whisper White CS
Cut using Paper Snips:
remove the green shaded areas shown in the diagram
Cut using a 1/8″ Circle Punch:
a hole in the center of the four flaps that will form the top of the box
Assembled the faceted ornament:
burnished all the folds in the Garden Green CS
glued the tab to the inside of the opposite end
folded in the four tabs that form the bottom, pushing in the diagonally scored areas, and glued the tabs together
NOTE: I think it’s easiest to fold in two opposite flaps and glue together, because it’s easier to keep them square, then to glue the other two opposite flaps.
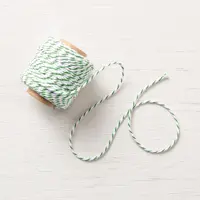
twine looped and tied a knot. then strung through the holes in the four top flaps, leaving the knot on the inside of the ornament, and pushing the flaps down to the knot. The flaps pulling outward against the twine holds them in place.
DSP pieces onto the Whisper White CS pieces
Whisper White CS pieces glued onto four of the panels – every other panel around the middle of the ornament
snowflakes glued onto the remaining 12 square panels of the ornament
You can put treats in the ornament. I recommend gluing the top flaps together, and leaving the bottom flaps open to insert the goodies. Then apply thin velcro pieces to the bottom flaps so the recipient can easily get to the goodies inside. I haven’t actually tried this yet but I have ordered some velcro to try it. I’ll let you know how it works. Theseare the ones I’ve ordered.
Here are today’s colors:
You can click on each one to see all the products that come in that color!
Today I’m sharing one of the projects my stamp club members made at our July gathering, a copper tea tin decorated with the Tea Room Suite of products.
Here’s what we made:
Here’s what I did:
Cut and scored with my Stampin’ Trimmer:
Tea Room Specialty Designer Series Paper (DSP) cut to 12″ x ___
Stamped with the Time For Tea stamp set:
sentiment in Calypso Coral ink onto a scrap of Very Vanilla card stock (CS)
cup in Calypso Coral ink onto a scrap of Calypso Coral CS
Die cut using the Spot of Tea Framelit Dies:
sentiment and cup
Applied Tea Room Copper Vinyl Stickers:
small design on cup
long design onto the front of the tin lid (I cut the sticker to the correct length.)
Decorated the tin:
DSP wrapped around the tin and adhered using Tear & Tape (I put some at each end and a tiny piece in the very middle
cup glued onto the sentiment piece
cup/sentiment adhered to the DSP (covering the seam where the two DSP ends met) using Stampin’ Dimensionals
laced Coastal Cabana ribbon through the hole on the left side of the sentiment, ran both ends around the back, laces one end through the hole on the right side, and tied a bow
Here are today’s colors:
You can click on each one to see all the products that come in that color!
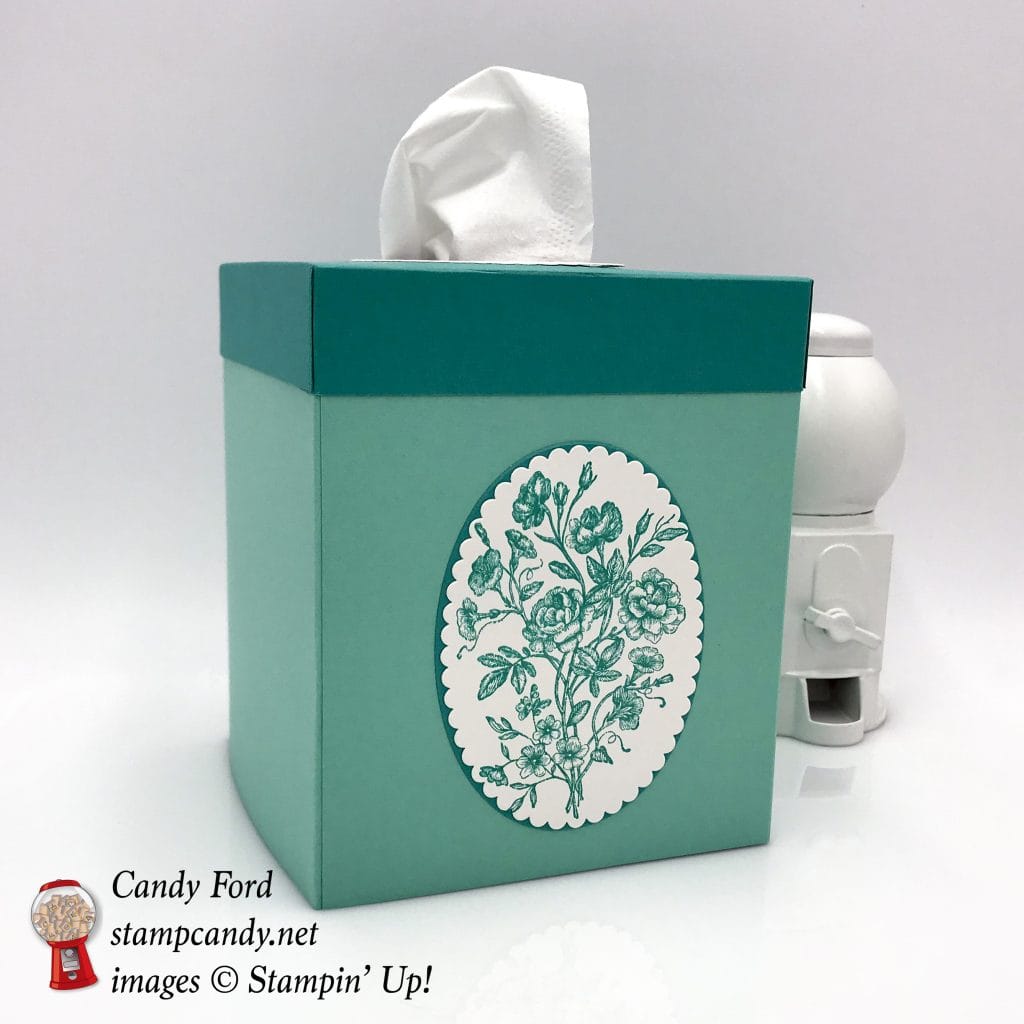
I can’t seem to get enough of the Very Vintage host stamp set. Especially the large floral image I’ve used today…..and the last few days. At least today’s project is a little different in that it isn’t even a card. It’s a tissue box cover. I like to make at least one whenever a new catalog comes out.
A tissue box cover comes in really handy when you want to match the decor of your room, or when you order a case of what you think are solid color boxes of tissues but instead receive a case with cartoon characters on them. Nothing against the cartoon characters, but they aren’t what I had planned on.
Here’s what I made:
Here’s what I did:
Cut and scored with my Stampin’ Trimmer:
Coastal Cabana card stock (CS) cut to 9-1/2″ x 5-1/4″, then scored at 4-1/2″ and 9″ (2 pieces)
Bermuda Bay CS cut to 6-9/16″ x 6-9/16″, and scored 1″ from each of the four edges
Stamped with the Very Vintage stamp set:
floral image into Bermuda Bay ink onto a scrap of Whisper White CS
Die cut using the Layering Ovals Framelits:
stamped image using a scalloped oval die
a scrap of Bermuda Bay CS using a large plain oval die
a scrap of Whisper White CS using a plain oval die and a larger scalloped oval die
a hole in the Bermuda Bay box top using a plain oval die
NOTE: the box top is wider than the Big Shot platform, so I folded in two opposite sides and used them to center the die
Cut using Paper Snips:
one score line at each corner of the Bermuda Bay box top to create tabs
Assembled the cover:
folded and burnished the score lines with a Bone Folder
glued the skinny tab on each Coastal Cabana piece onto the inside of the other one, to create the main box
glued the tabs onto the inside of the adjacent sides of the box top
glued the die cut Whisper White oval frame around the hole in the box top
the stamped image onto the die cut Bermuda Bay CS oval
slipped the box top over the box, gluing the inside of the box top sides to the outside of the box sides
glued the Bermuda Bay CS oval onto the front of the box, centering it between the bottom edge of the box top and bottom edge of the box
Here are today’s colors:
You can click on each one to see all the products that come in that color!
Today I’m sharing a super easy way to decorate a container for a party. I used the Picture Perfect Party Designer Series Paper, Bermuda Bay card stock, and Lemon Lime Twist ribbon. The colors in the paper look great with the multicolor gumballs in the jar.
I’ve had this jar for years, and I decorate it in different ways for different events. This is perfect for a fun birthday party, maybe for a child. I think I bought the jar at Target, or maybe T.J.Maxx or Home Goods.
I recommend using a small plastic scoop, so there aren’t a bunch of sticky little hands all over the gumballs. Don’t ask me how I learned that lesson.
Here’s what I made:
Here’s what I did:
Cut and scored with my Stampin’ Trimmer:
Bermuda Bay card stock (CS) cut to 12″ x 4″ (2 pieces)
Picture Perfect Party Designer Series Paper (DSP) cut to 6″ x 3-1/2″ (4 pieces)
NOTE: I cut the top and bottom off the DSP pieces to have as much of the candles as possible.
Assembled the project:
Bermuda Bay CS pieces wrapped around the jar and adhered with Tear & Tape, to each other and to the jar
DSP pieces glued onto the CS, all the way around the jar
tied a piece of Lemon Lime Twist Finely Woven Ribbon around the lid handle and tied it in a bow
Here are today’s main colors:
You can click on each one to see all the products that come in that color!
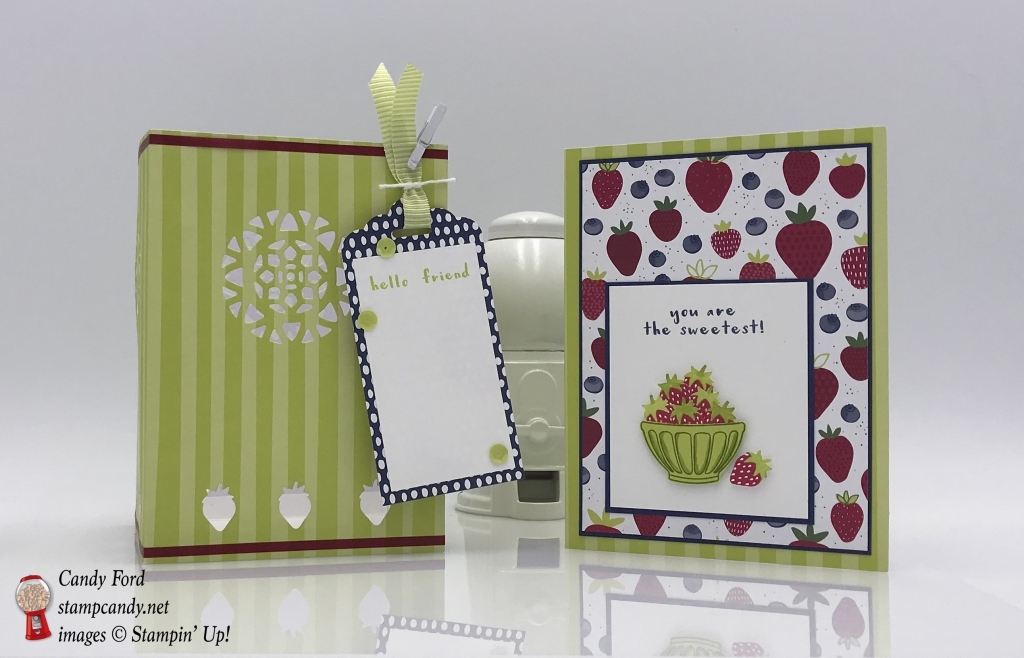
This is my first time participating in the One Stamp at a Time (OSAT) Blog Hop. I’m thrilled to join this talented group of stampers. After you read my post, I hope you’ll click through to the next stop on the hop.
Today we’re highlighting products from the 2018 Occasions and Sale-A-Bration Catalogs. I chose the Tutti-Frutti Suite from the Occasions Catalog (p.28-29) and the coordinating Tutti-Frutti Cards & Envelopes from the Sale-A-Bration Catalog (p.14.) These products are chock full of sweet images, sentiments, and embellishments – even self adhesive sequins! And the colors are what I call Happy Colors. Just look at the the colors in the Tutti-Frutti Designer Series Paper:
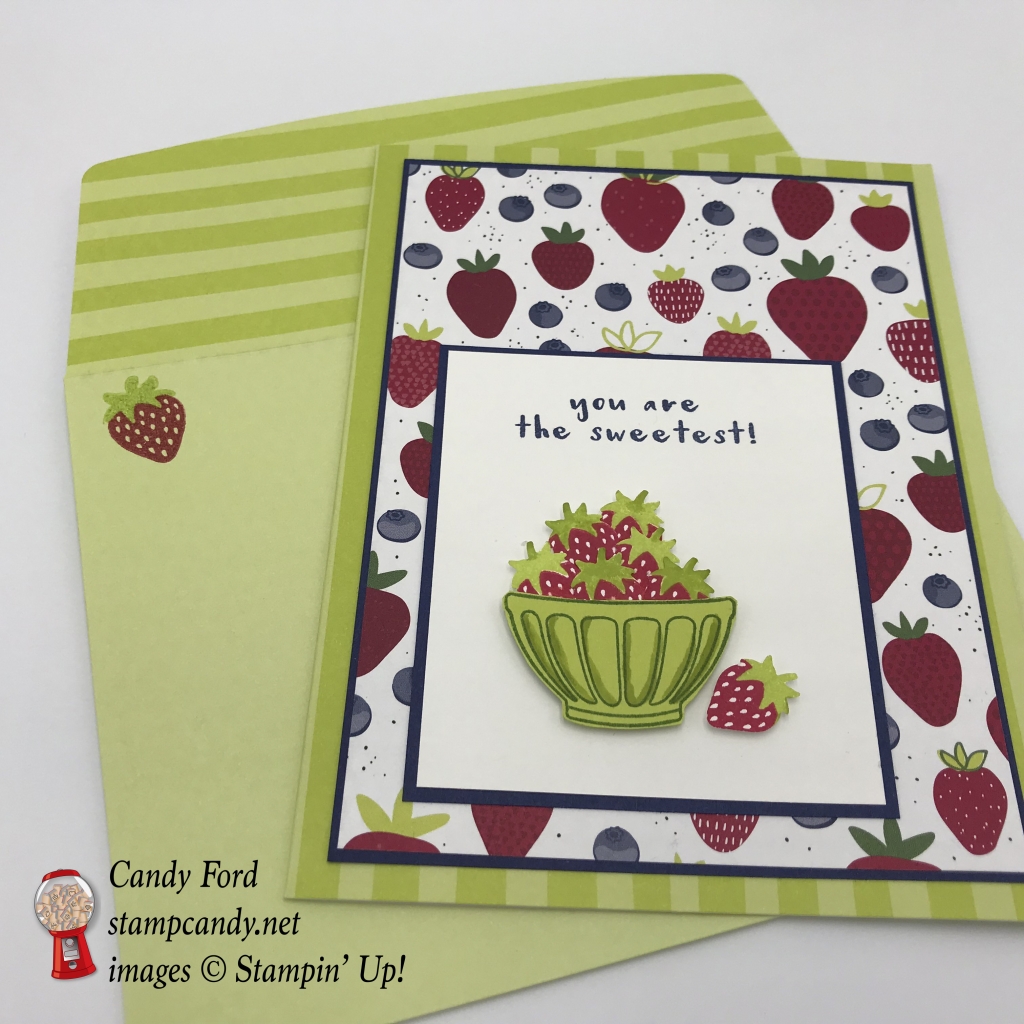
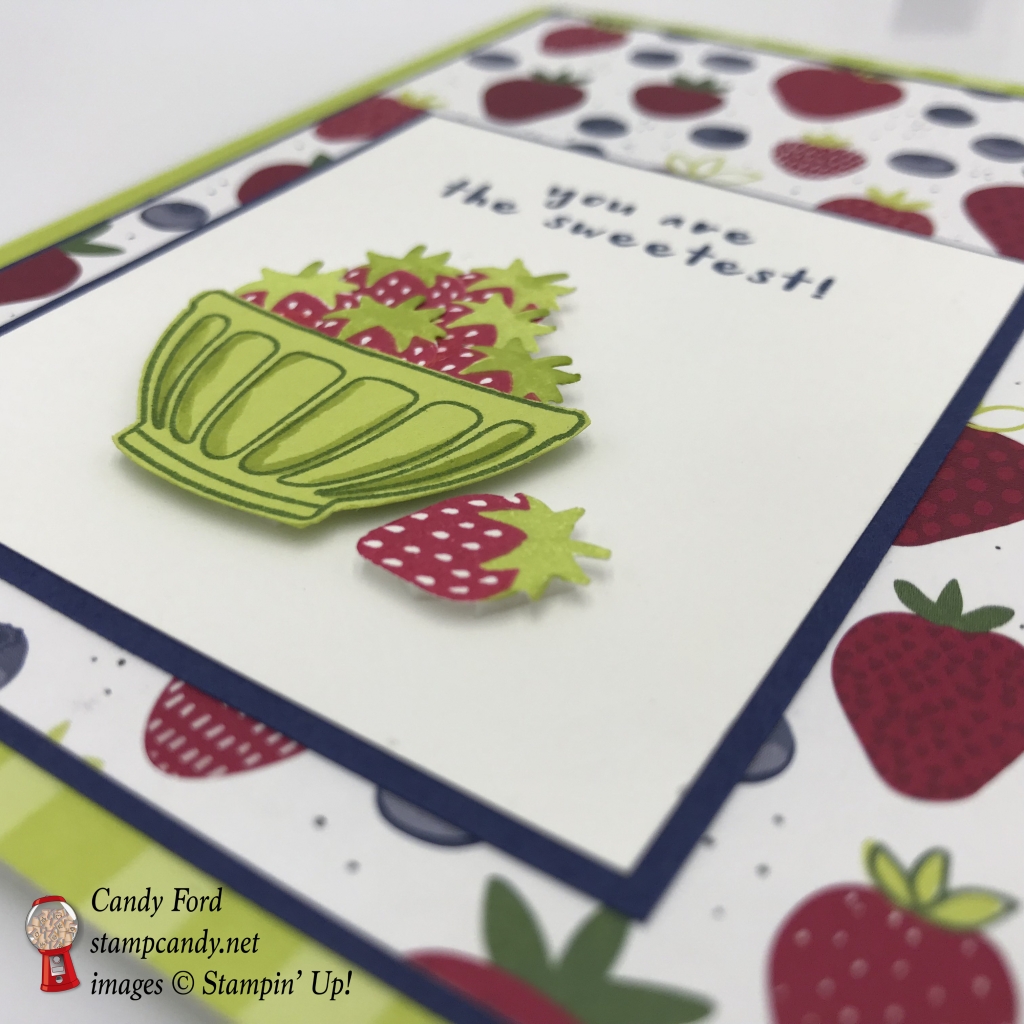
Here’s what I made:
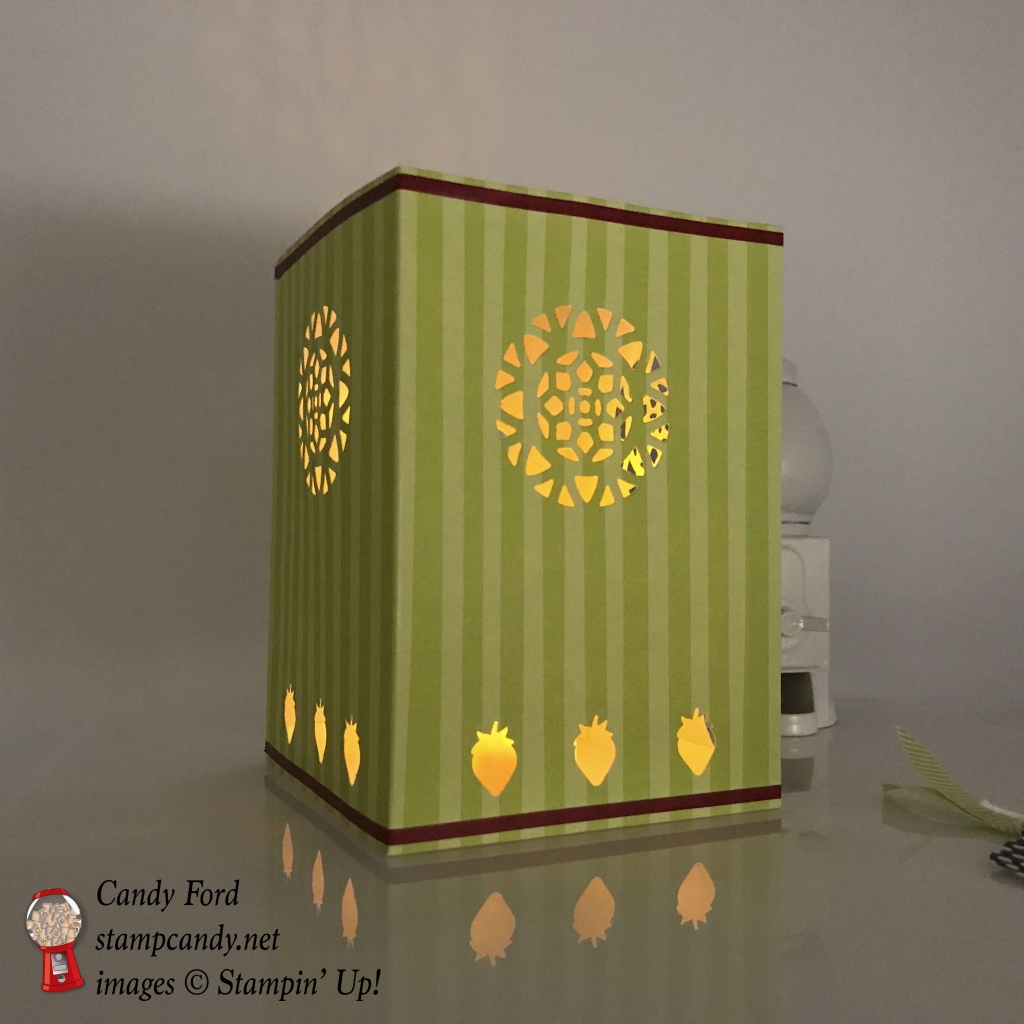
Tea light holder:
Tea light holder with a lit tea light inside: (Only use a battery operated tea light – never real flame.)
Tag front:
Tag back:
Inside of the card:
Here’s what I did:
Cut and scored with my Stampin’ Trimmer:
Night of Navy card stock (CS) cut to 3-7/8″ x 5-1/8″
Tutti-Frutti Designer Series Paper (DSP) cut to 3-3/4″ x 5″
Night of Navy CS cut to 2-3/4″ x 3-1/8″
Whisper White CS cut to 2-5/8″ x 3″
2 Tutti-Frutti card bases – 3/8″ cut off one end, and scored 3/8″ from the other end
Whisper White CS cut to 4-1/8″ x 4-1/8″, then scored 1/4″ from each of the four sides
Tutti-Frutti DSP cut to 2″ x 4″
Whisper White CS cut to 1-3/4″ x 3-1/8″
Stamped with the Fruit Basket stamp set:
bowl in Garden Green ink onto a scrap of Lemon Lime Twist CS
7 strawberries in Real Red and Lemon Lime Twist inks onto a scrap of Whisper White CS
card sentiment in Night of Navy ink onto the 2-5/8″ x 3″ Whisper White CS
tag sentiment in Lemon Lime Twist ink onto the 1-3/4″ x 3-1/8″ Whisper White CS
a strawberry in Real Red and Lemon Lime Twist inks onto the inside of a third card base
a strawberry in Real Red and Lemon Lime Twist inks onto the front of the envelope
Cut using the Itty Bitty Fruit Punch Pack:
7 strawberries from the Whisper White CS scrap
3 strawberries from each side of the 2 trimmed card bases, near the bottom
Cut with the Scalloped Tag Topper Punch:
one end of the 2″ x 4″ DSP, to create the tag
Die cut using the Eastern Medallion Thinlits:
a medallion from each side of the 2 trimmed card bases
Cut using Paper Snips:
bowl
Colored using a Stampin’ Write Marker:
darkened some of the strawberry tops in Lemon Lime Twist
added shadows to the bowl in Lemon Lime Twist
Assembled the card:
6 strawberries glued onto the back of the bowl
bowl of strawberries and the one remaining strawberry adhered to the 2-5/8″ x 3″ Whisper White CS with Mini Stampin’ Dimensionals
2-5/8″ x 3″ Whisper White CS glued onto the 2-3/4″ x 3-1/8″ Night of Navy CS
2-3/4″ x 3-1/8″ Night of Navy CS glued onto the 3-3/4″ x 5″ DSP
3-3/4″ x 5″ DSP DSP glued onto the 3-7/8″ x 5-1/8 Night of Navy CS
3-7/8″ x 5-1/8 Night of Navy CS glued onto the front of the card base (this is the untrimmed card base with a strawberry stamped inside)
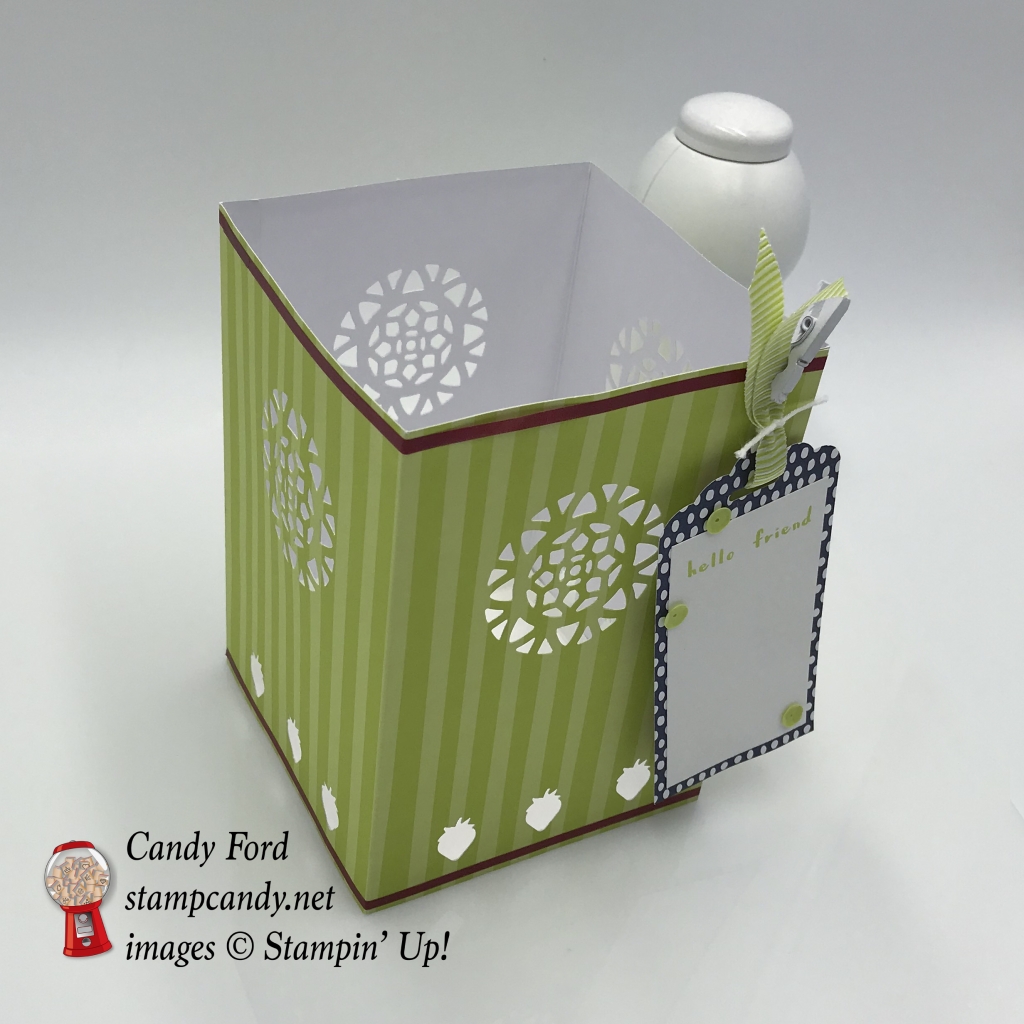
Assembled the tealight holder:
burnished all score lines of the 2 trimmed card bases with a Bone Folder
adhered the 3/8″ section of each card base to the inside of the other card base, to form the four sides of the holder
burnished all score lines of the 4-1/8″ x 4-1/8″ Whisper White CS with a Bone Folder
cut one score line at each corner to create tabs
glued each tab to the inside of the adjacent side to create a tray for the bottom of the holder
put the tray inside the holder and glue on all four sides – I found it easiest to drop the tray down into the holder and press it to the bottom, then flip it over and squeeze a little glue between the two pieces.
applied Tutti-Frutti Washi Tape around the top and bottom of the holder
NOTE: You can just have the four sides. You don’t have to have the bottom tray, but I think it adds stability and shape to the holder.
Assembled the tag:
3/4″ x 3-1/8″ Whisper White CS glued to the blue side of the DSP tag
3 self adhesive sequins applied to the tag
ran 5″ of Lemon Lime Twist 3/8″ Mini Striped Ribbon through the hole
tied a piece of Whisper White Solid Twine around the ribbon
attached tag to the tealight holder with a mini white clothes pin from the Sweet Soiree Embellishment Kit
Here’s the hop:
Click the image to go to the next stop, Pam Staples of Sunny Girl Scraps:
Click on the images for more details and to purchase.
Here’s some stuff you should know:
SAB Stamp Fest – ONLY 2 DAYS LEFT TO REGISTER! It happens January 20. See the details and register HERE by January 13!
Sale-A-Bration is in full swing! Earn lots of free products! Get the details HERE.
This is a fabulous time to join my team! Sale-A-Bration is the biggest event of the Stampin’ Up! year and you can save big on the ultimate bundle, the Starter Kit. CLICK HERE for more information. Contact me with any questions: email candy@stampcandy.net or call/text 404-661-5222
Newsletter: subscribe for exclusive deals, projects, and more! Enter your email address and click SUBSCRIBE at the top right of this page, just under the picture of my smiling face. You can also choose to receive an email every day that I have a blog post.
I like to decorate my whole house for Halloween. I even want the tissue boxes to be Halloweeny. The Spooky Night Designer Series Paper with witch hats on it seemed perfect for a cute and festive, yet spooky tissue box cover. And it’s so easy, you just won’t believe it. It’s almost like wrapping a gift. This is one of the vertical cube-like tissue boxes (about 4-1/2″ on each side and 5″ tall) but you can certainly apply the same method to the long, horizontal boxes.
Here’s what I made:
Here’s what I did:
Cut and scored with my Stampin’ Trimmer:
Spooky Night Designer Series Paper (DSP) cut to 12″ x 4-1/2″
DSP cut to 6-1/2″ x 4-1/2″
DSP cut to 8-1/2″ x 8-1/2″ for the top
Die cut using the Layering Ovals Framelits:
Selected three sized of oval dies, the smallest of which was almost as big at the hole in the top of the box
Pumpkin Pie card stock (CS) cut with the middle sized die, then the center cut out with the smallest die
Basic Black CS cut with the largest die, then the center cut out with the smallest die
cut a hole in the center of the 8-1/2″ x 8-1/2″ piece of DSP with the smallest of the three dies
Assembled the cover:
Be sure not to make the cover too tight, or it will be too difficult to remove it and put it on a new box
the two 4-1/2″ strips of DSP wrapped around the box and glued together at both ends – be careful not to glue the DSP to the box itself, unless you want it to be permanent, instead of a removable box cover
the 8-1/2″ x 8-1/2″ piece of DSP centered on top of the box and folded down the sides, then burnished the creases with a bone folder
cut one crease line at each corner with Paper Snips, then put it back on top of the box with the first DSP pieces wrapped around the sides of the box – be sure the sides pieces go all the way down to the bottom of the box
top piece of tissue box cover, fold dotted lines and cut solid lines
glue the folded over bits of DSP to the sides, tucking the corner pieces under the adjacent side.
adhered ribbon with Tear & Tape, being sure to cover the seam where the two pieces of DSP meet.
Pumpkin Pie CS oval glued onto the Basic Black CS oval, lining up the center holes
Basic Black CS oval glued onto the top of the DSP box cover, lining up the center holes
Here are today’s colors:
You can click on each one to see all the products that come in that color!
Click on the images for more details and to purchase.
Shop and help those affected by
Hurricanes Harvey & Irma
I will donate 20% of my September sales to the American Red Cross for Hurricane Harvey & Irma Relief.
Please help make a difference. CLICK HERE to shop now.
There’s a brand new stamp set that isn’t in any catalog. You can’t buy it, but you can get if for free with a qualifying order! You can host a party, or place your own order, or join under me and get a 20% discount on your demonstrator order.
Here’s a video from Stampin’ Up!:
Here are the details:
Promotion period: September 1–October 31
The Merry Patterns Stamp Set is exclusive to this promotion and will not be available after October 31
In order to qualify, the event merchandise total must reach $300 (before tax and shipping)
There is no limit to the number of times the Merry Patterns Stamp Set may be earned, but only one set can be redeemed per qualifying order
Demonstrator, Customer, Workshop, and online orders qualify
Orders must be closed by:
October 31 at 10:50 PM (PT)
October 31 at 11:50 PM (MT)
November 1 at 12:50 AM (CT)
November 1 at 1:50 AM (ET)
The Merry Patterns Stamp Set is in addition to Stampin’ Rewards
The Merry Patterns Stamp Set may not be exchanged for another stamp set
Here are the samples from the video:
September Host Code
N4ZFHXK9
September’s FREE gift is the brand new Quilt Top Textured Impressions Embossing Folder: Create a beautiful quilt pattern background with this Embossing Folder.It’s easy to make a great impression! Just place flat cardstock in this embossing folder, run it through the Big Shot, and out comes cardstock with a bold textured design.* 1 folder * 6″ x 6″ (15.2 x 15.2 cm) * Use with Big Shot
Watch this video on the Quilted Christmas Suite in the new Holiday Catalog
Use the Host Code on your online orders under $150. You can see how to use a Host Code here.
Orders between $75 and $149.99, using the Host Code, will receive my FREE Gift of the Month. Orders of $150 and above will automatically receive the gift – do no use the Host Code.
I can ship only within the United States. “No contact” orders are not eligible.
You always earn a Gum Ball for every $50 you spend on an order with me. Earn 10 Gum Balls and I’ll send you a free stamp set of your choice! See the Gum Ball Rewards page for details.