Feb 19, 2021 | Cards, Gallery, Love |
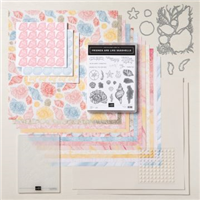
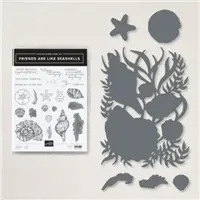
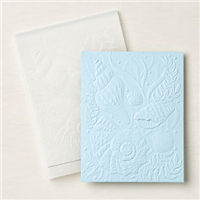
Today’s card is another one from my February Stamp Club gathering on Monday. The Seaside Seashells Dies, Seashells 3D Embossing Folder, and Pearlescent Specialty Paper are the real stars of this card. Just look at the texture on the pearlescent shells. Isn’t it beautiful? I also used the Friends Are Like Seashells stamp set and Sand & Sea Designer Series Paper from the same Sand & Sea Suite Collection.
If you are reading this in email, some photos may appear blurry, or may not appear at all. Please click here to see the post on my blog.
S Seaside Seaside Seaside Seaside
Here’s what I made:


 S
S
Here’s what I did:
Cut and scored with my paper trimmer:
- Sahara Sand card stock (CS) cut to 4-1/4″ x 11″, then scored in half at 5-1/2″
- Sand & Sea Designer Series Paper (DSP) layer cut to 4-1/4″ x 5-1/2″
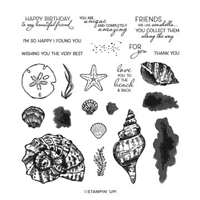
Stamped with the Friends Are Like Seashells stamp set:
- sand dollar in Crumb Cake ink, stamped off once, onto a scrap of Pearlescent Specialty Paper
- sentiment in Soft Suede ink over the sand dollar
- shell in Crumb Cake ink onto the inside of the card base
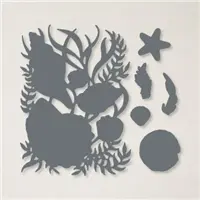
Cut using the Seaside Seashells Dies:
- sand dollar
- a piece of Pearlescent Specialty Paper using the largest die
Embossed using the Seashells 3D Embossing Folder:
- large Pearlescent die cut
Assembled the card:
- burnished the fold in the card base with a Bone Folder
- large pearlescent die cut glued onto the DSP layer
- 3 pieces of linen thread stretched across the layer and adhered on the back using Tear & Tape
- DSP layer adhered onto the front of the card base using Tear & Tape
- sand dollar adhered onto the card front using Stampin’ Dimensionals
S
Here are today’s colors:
You can click on each one to see all the products that come in that color!
S
Here’s what I used:
Click on these images for more details and to purchase. If you are reading this post in email, the product images may not show up. Please click here to see the post on my blog.
Supply List. <— Click for a clickable and printable list of the products!
S
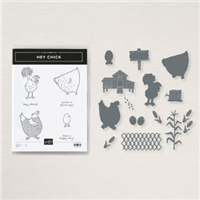
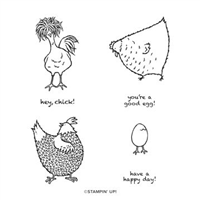
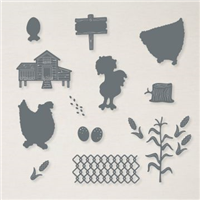
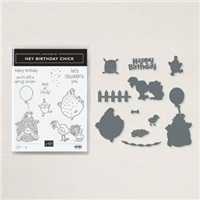
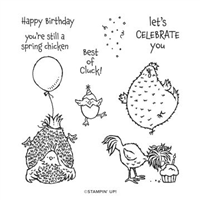
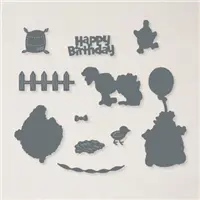
Hey Chick is here!
The Hey Chick stamp set from 2017 Sale-a-bration was so popular, Stampin’ Up! has brought it back. But that’s not all! Now there are coordinating dies. AND there’s a second stamp set, Hey Birthday Chick, that also has coordinating dies. CLICK HERE to see them all. One thing though – they’re available for a limited time, so get them while you can!

S
Basic White is here!
The facility that manufactures Whisper White paper is closed due to COVID-19. But don’t fret. The new Basic White products are here!
S
Here are some helpful links:
S
Thanks for stopping by today, and Sweet Stamping!

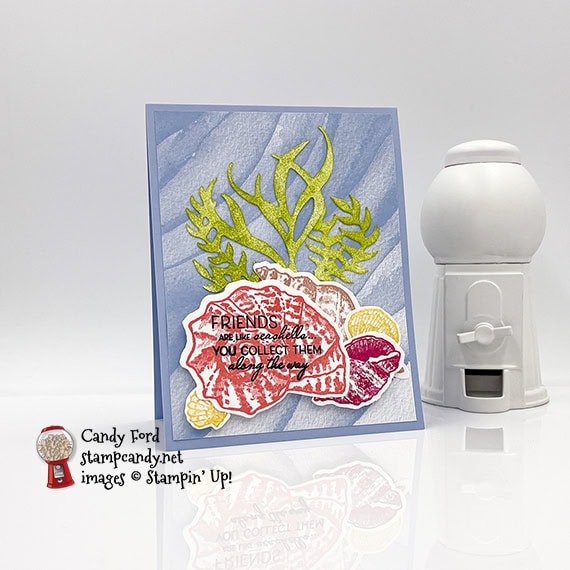
Feb 18, 2021 | Cards, Friend, Gallery |
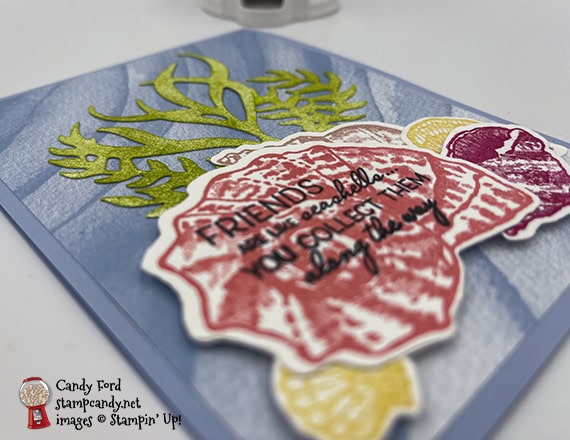
Today’s card is one we made at my February Stamp Club gathering. We made cards featuring products from the Sand & Sea Suite Collection: Friends Are Like Seashells Bundle (Friends Are Like Seashells stamp set & Seaside Seashells Dies – say that three times fast!) and Sand & Sea Designer Series Paper. I’m calling this a pieced card, but I guess it’s more of a rearranged card. The large die I used cuts out the shells and kelp all attached in one piece. I cut them apart and arranged them as you see them below.
If you are reading this in email, some photos may appear blurry, or may not appear at all. Please click here to see the post on my blog.
S Seashells Seashells Seashells Seashells
Here’s what I made:
S
Here’s what I did:
Cut and scored with my paper trimmer:
- Seaside Spray card stock (CS) cut to 4-1/4″ x 11″, then scored in half at 5-1/2″
- Sand & Sea Designer Series Paper (DSP) layer cut to 4″ x 5-1/4″
- DSP (same pattern) cut to 4″ x 3/4″
- Basic White CS cut to 4″ x 5-1/4″ for the inside of the card base
Cut using the Seaside Seashells Dies:
- a piece of Basic White Thick CS using the largest die
Stamped with the Friends are Like Seashells stamp set:
- die cut seashells in Flirty Flamingo, Melon Mambo, Blushing Bride, and So Saffron
- sentiment onto the largest shell in Tuxedo Black Memento ink
Cut using the Paper Snips:
- fussy cut the individual seashells from the die cut
Colored using a wedge of a Stampin’ Sponge:
- remaining bits of die cut (kelp) in Granny Apple Green ink
Assembled the card:
- burnished the fold in the card base with a Bone Folder
- DSP layer glued onto the front of the card base
- arranged shells and kelp on the DSP layer to see where I wanted them, then began gluing on the kelp and a couple shells
- adhered remaining shells using Stampin’ Dimensionals, with the sentiment in front
- DSP strip glued onto the Basic White CS for the inside, along the bottom edge
- Basic White CS glued onto the inside of the card base (Oops, I forgot to photograph the inside.)
S
Here are today’s colors:
You can click on each one to see all the products that come in that color!
S
Here’s what I used:
Click on these images for more details and to purchase. If you are reading this post in email, the product images may not show up. Please click here to see the post on my blog.
Supply List. <— Click for a clickable and printable list of the products!
S
Hey Chick is here!
The Hey Chick stamp set from 2017 Sale-a-bration was so popular, Stampin’ Up! has brought it back. But that’s not all! Now there are coordinating dies. AND there’s a second stamp set, Hey Birthday Chick, that also has coordinating dies. CLICK HERE to see them all. One thing though – they’re available for a limited time, so get them while you can!
S
Basic White is here!
The facility that manufactures Whisper White paper is closed due to COVID-19. But don’t fret. The new Basic White products are here!
S
Here are some helpful links:
S
Thanks for stopping by today, and Sweet Stamping!
Feb 17, 2021 | Baby, Blog Hop, Cards, Gallery |

Welcome to February 2021 IRBH! During this year’s blog hops, we are having fun with our stamping favorites – our favorite themes for seasonal cards and projects. This month’s projects feature balloons, so you are in for a celebratory treat. We are excited to share our creations with you today! After you read my post, I hope you’ll hop over to the next person on the list at the base of this post, Brian King at Stamp with Brian. There’s a lot of inspiration to be found in this group and you don’t want to miss it!
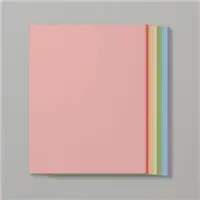
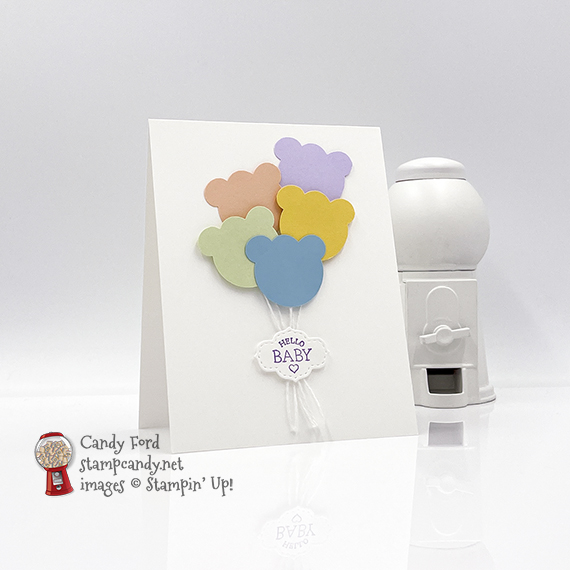
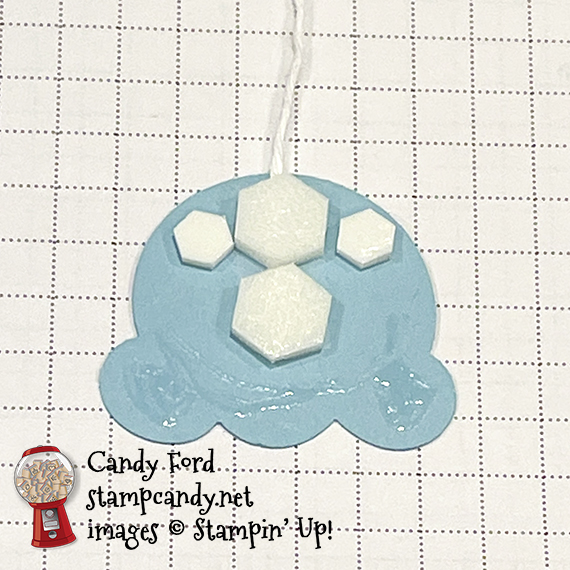
My card is very simple. It’s a card base with some punched and die cut shapes and a small sentiment. The balloons are made with the Ice Cream Cone Builder Punch – the scoop of ice cream flipped upside down looks like a bear or mouse, and I thought it would make adorable balloons. I used several soft colors of card stock for this baby card. You can buy each color separately of course, but most of the colors come in a multi-pack. I’ve listed them all at the bottom of this post.
If you are reading this in email, some photos may appear blurry, or may not appear at all. Please click here to see the post on my blog.
S February 2021 IRBH February 2021 IRBH February 2021 IRBH February 2021 IRBH
Here’s what I made:

S
Here’s what I did:
Cut and scored with my paper trimmer:
- Basic White Thick card stock (CS) cut to 4-1/4″ x 11″, then scored in half at 5-1/2″
Stamped with the So Sentimental stamp set:
- sentiment in Highland Heather ink onto a scrap of Basic White Thick CS
Cut using the Stitched So Sweetly Dies:
Cut using the Ice Cream Cone Builder Punch:
- scoops from scraps of Petal Pink, So Saffron, Soft Sea Foam, Balmy Blue, and Purple Posy CS
Assembled the card:
- burnished the fold in the card base with a Bone Folder
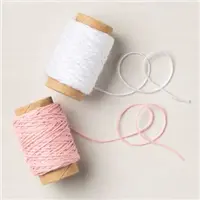
- white twine adhered onto the back of the upside-down-scoop-balloons using Tear & Tape
- 2 of the balloons glued onto the front of the card base, near the top
- a couple of mini Stampin’ Dimensionals applied onto the front of the card base, where the sentiment will go, with a tiny gap between them about 1/8″ wide
- strings of the balloons strung between the mini Stampin’ Dimensionals, and held in place with a piece of Post-It Tape (or you could use a Post-It Note) I left the backings on the dimensionals for this part.
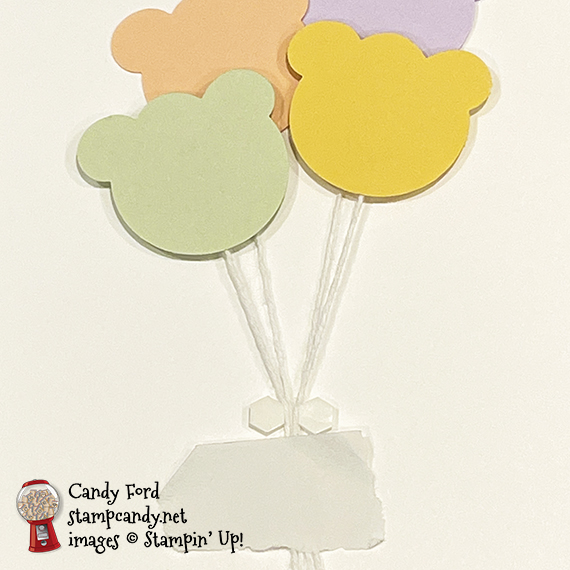
- 2 more balloons adhered beneath the first ones using Stampin’ Dimensionals, and the strings added to the first ones
- the fifth balloon adhered using Stampin’ Dimensionals in the center, and glue along the top where it overlaps the 2 balloons above it, then the string added to the others
- 2 Mini Stampin’ Dimensionals applied onto the back of the sentiment, one at each end, making sure there is space between them for the strings and two dimensionals on the card front

- backs of all four dimensionals removed and sentiment adhered over the strings
- ends of the strings trimmed using Paper Snips (I keep a separate pair just for ribbon.)
S
Here’s the February 2021 IRBH:
Thank you for hopping along with us. If you get stuck during the Blog Hop, please use this line-up as a guide:
- Brian King at Stamp with Brian
- Sue Jackson at Just Peachy Stamping
- Renae Novak at Blessed by Cards
- Lynn Kolcun at Avery’s Owlery
- Robin Myren at Songbird Designs by Robin
- Pam Morris at Tap Tap Stamp
- Linda Krueger at The Stamp Coach
- Sheryl Sharp at Sharp Notes by Sheryl
- Julie DiMatteo at The Paper Pixie
- Joanne Brown at The Inky Dragon
- Rachel Brumley at Artistic Designs by Rachel
- Genevieve Ko at Stampin4Fun
- Shawn de Oliveira at Shawn Stamps
- Jackie Beers at Blue Line Stamping
- Ann Murray at Murray Stamps Ink
- Candy Ford at Stamp Candy <—– YOU ARE HERE!!!
s
Here are today’s colors:
You can click on each one to see all the products that come in that color!
S
Here’s what I used:
Click on these images for more details and to purchase. If you are reading this post in email, the product images may not show up. Please click here to see the post on my blog.
Supply List <— Click for a clickable and printable list of the products!
S
Hey Chick is here!
The Hey Chick stamp set from 2017 Sale-a-bration was so popular, Stampin’ Up! has brought it back. But that’s not all! Now there are coordinating dies. AND there’s a second stamp set, Hey Birthday Chick, that also has coordinating dies. CLICK HERE to see them all. One thing though – they’re available for a limited time, so get them while you can!
S
Basic White is here!
The facility that manufactures Whisper White paper is closed due to COVID-19. But don’t fret. The new Basic White products are here!
S
Here are some helpful links:
S
Thanks for stopping by today, and Sweet Stamping!
Feb 15, 2021 | Birthday, Cards, Gallery, Sale-A-Bration |
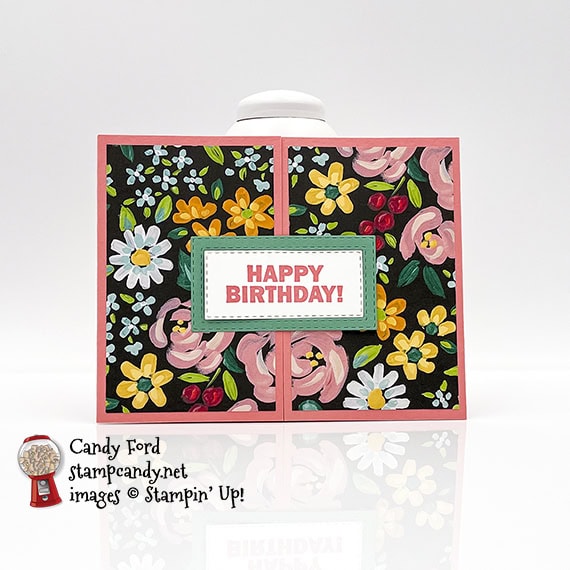
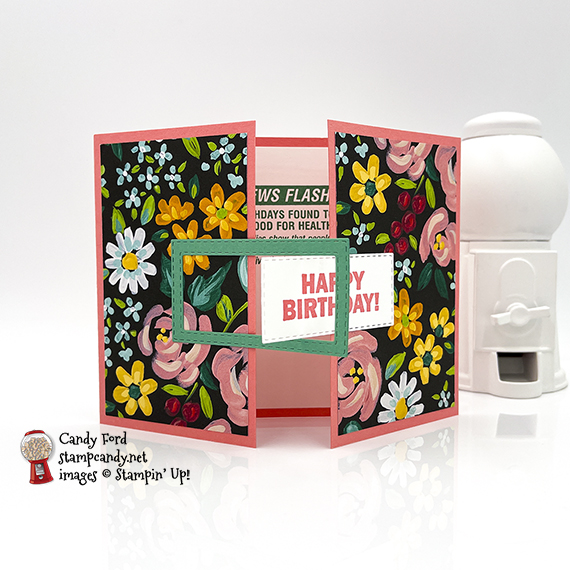
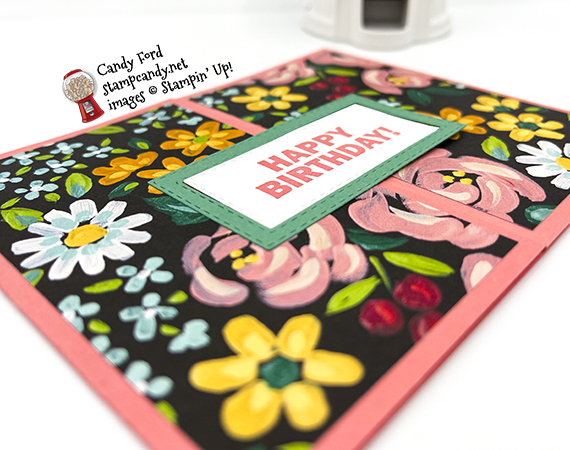
A few days ago, I hosted another Mystery Stamping Party on Facebook. Today I’m sharing the interlocking gate fold card we made. I used the Approaching Perfection stamp set and Flower & Field Designer Series Paper (which are both available for only a couple more weeks – FREE Sale-a-bration items!) along with the Rectangle Stitched Dies.
If you haven’t already, be sure to join the Mystery Stamping Party Facebook group here, so you can join us for the next one on 17 March. 
If you are reading this in email, some photos may appear blurry, or may not appear at all. Please click here to see the post on my blog.
S Rectangle Stitched Dies Rectangle Stitched Dies Rectangle Stitched Dies Rectangle Stitched Dies
Here’s what I made:

S
Here’s what I did:
Cut and scored with my paper trimmer:
- Flirty Flamingo card stock (CS) cut to 11″ x 4-1/4″, then scored at 2-3/4″ and 8-1/4″
- Flower & Field Designer Series Paper (DSP) layers cut to 2-1/2″ x 4″ (2 pieces)
- Basic White CS cut to 5-1/4″ x 4″ for the inside of the card base
Stamped with the Approaching Perfection stamp set:
- outer sentiment in Flirty Flamingo ink onto a scrap of Basic White Thick CS
- inner sentiment in Just Jade ink onto the Basic White CS for the inside
Cut using the Stitched Rectangles Dies:
- outer sentiment
- frame for outer sentiment from a scrap of Just Jade CS, using the same die as for the sentiment and the next size up
Assembled the card:
- burnished the folds in the card base with a Bone Folder
- 2 DSP layers glued onto the two halves of the card front
- outer sentiment glued in the center of the card front, but only onto the right hand side
- Just Jade CS frame glued around the outer sentiment, but only onto the left hand side
- Basic White CS glued onto the inside of the card base
S
Here are today’s main colors:
You can click on each one to see all the products that come in that color!
S
Here’s what I used:
Click on these images for more details and to purchase. If you are reading this post in email, the product images may not show up. Please click here to see the post on my blog.
Supply List. <— Click for a clickable and printable list of the products!
S
Hey Chick is here!
The Hey Chick stamp set from 2017 Sale-a-bration was so popular, Stampin’ Up! has brought it back. But that’s not all! Now there are coordinating dies. AND there’s a second stamp set, Hey Birthday Chick, that also has coordinating dies. CLICK HERE to see them all, or click on the images below to see them one at a time.
One thing though – they’re only available for a limited time, so get them while you can!
S
Basic White is here!
The facility that manufactures Whisper White paper is closed due to COVID-19. But don’t fret. The new Basic White products are here!
S
Here are some helpful links:
S
Thanks for stopping by today, and Sweet Stamping!
Feb 9, 2021 | Blog Hop, Cards, Fun Folds, Gallery, Sale-A-Bration |

Welcome to the February 2021 ICS Blog Hop! This month we are featuring projects made with products from the Sale-a-bration brochure. I used the Oh So Ombre Designer Series Paper, which you can get free with a $50 order, but only through 28 February!
Click the NEXT button farther down this post to hop to the next stop. Be sure to hop all the way around to see all the great projects from this group!
If you are reading this in email, some photos may appear blurry, or may not appear at all. Please click here to see the post on my blog.
S February 2021 ICS Blog Hop February 2021 ICS Blog Hop February 2021 ICS Blog Hop February 2021 ICS Blog Hop
Here’s what I made:


S
Here’s what I did:
Cut and scored with my paper trimmer:
- Misty Moonlight card stock (CS) cut to 5-1/2″ x 8-1/2″, then scored in half at 4-1/4″
- Misty Moonlight CS layer cut to 5″ x 3-3/4″
- Oh So Ombre Designer Series Paper (DSP) layer cut to 1-1/4″ x 3-3/4″ (4 pieces)
- Misty Moonlight CS strip cut to 3″ x 1/2″
- Granny Apple Green strip cut to 2-3/4″ x 1/2″
- Basic White CS cut to 5″ x 3-3/4″ for the inside of the card base
Stamped with the Valentine Keepsake stamp set:
- sentiment in Misty Moonlight ink onto a scrap of Basic White CS
- heart flowers in Granny Apple Green ink onto the Basic White CS for the inside
- tiny hearts in Misty Moonlight ink onto the 4 DSP pieces
Cut using the Layering Circle Dies:
- sentiment
- one size larger circle from a scrap of Blackberry Bliss CS
Cut using Paper Snips:
- one end of each CS strip at an angle
Assembled the card:
- burnished the fold in the card base with a Bone Folder
- DSP pieces glued onto the Misty Moonlight CS layer (you can trim away any ugly edges)
- Misty Moonlight CS layer glued onto the front of the card base
- Misty Moonlight CS strip glued onto the DSP layer
- Granny Apple Green CS strip glued over the Misty Moonlight CS strip
- sentiment glued onto the Blackberry Bliss CS circle
- Blackberry Bliss circle glued over the ends of the CS strips
- Basic White CS glued onto the inside of the card baseS
S
Here’s the February 2021 ICS Blog Hop:
Click the Next button to hop to the next stop, Sharon Hashimoto Burkert of As the Ink Dries:

S
Here are today’s main colors:
You can click on each one to see all the products that come in that color!
S
Here’s what I used:
Click on these images for more details and to purchase. If you are reading this post in email, the product images may not show up. Please click here to see the post on my blog.
Supply List. <— Click for a clickable and printable list of the products!
S
Sale-a-bration ends 28 February
Don’t miss out on all these FREE products! See them all here. You can choose one free Level 1 item for every $50 on an order. You can choose one free Level 2 item for every $100 on an order. The Punch Party host stamp set is included free with any $300 order, in addition to the Level 1 & Level 2 items you earn.
When you join my team during Sale-a-bration, you will pay $99 (plus tax) and you will receive $125 in your choice of product, free shipping, AND 5 packs of Designer Series Paper that no one else can get until May! Get all the details here.
S
Hey Chick is here!
The Hey Chick stamp set from 2017 Sale-a-bration was so popular, Stampin’ Up! has brought it back. But that’s not all! Now there are coordinating dies. AND there’s a second stamp set, Hey Birthday Chick, that also has coordinating dies. CLICK HERE to see them all, or click on the images below to see them one at a time.
One thing though – they’re only available for a limited time, so get them while you can!
S
Basic White is here!
The facility that manufactures Whisper White paper is closed due to COVID-19. But don’t fret. The new Basic White products are here!
S
Here are some helpful links:
S
Thanks for stopping by today, and Sweet Stamping!
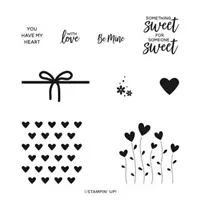
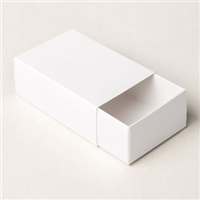
Feb 8, 2021 | Blog Hop, Gallery, Gift Wrap, Gifts, Love, Treat Holders |
Welcome to the February 2021 Candy Hearts Blog Hop! This month’s theme is Love. Be sure to hop around to all the stops on the hop. You don’t want to miss any of the projects the Candy Hearts have made for you today.
If you are reading this in email, some photos may appear blurry, or may not appear at all. Please click here to see the post on my blog.
S February 2021 Candy February 2021 Candy February 2021 Candy February 2021 Candy
Here’s what I made:
 A dozen chocolate kisses fit perfectly in the box, in three neat rows. Of course, you can add many more if you pack them in.


S
Here’s what I did:
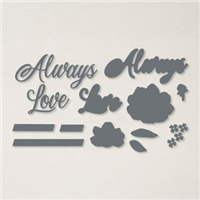
Cut using the Always Dies:
- sentiment from a scrap of Seaside Spray card stock (CS)
- sentiment background from a scrap of Misty Moonlight CS
Cut using the Many Hearts Dies:
- heart from a scrap of Melon Mambo CS
Cut using the Flowering Vine Dies:
- background from a scrap of Blushing Bride CS
Assembled the box:
- burnished the folds in the box and the wrap-around lid with a Bone Folder
- folded the box to assemble it
- Blushing Bride CS die cut glued onto the lid of the box
- Melon Mambo heart die cut glued over the Blushing Bride CS die cut
- Seaside Mist CS sentiment glued onto the Misty Moonlight CS background
- Misty Moonlight CS background glued over the heart
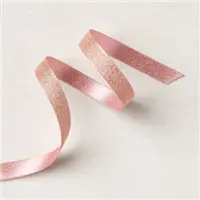
- ribbon adhered onto the bottom of the box using Tear & Tape, so it wraps around the box, and tied it in a bow at one end
- slid the box into the lid
S
Here’s the February 2021 Candy Hearts Blog Hop:
Thank you for hopping with the Hearts today! Be sure to hop around to all the stops. You do not want to miss any of the creativity in this talented group of stampers! If you get lost, use the list below.
Here are today’s colors:
You can click on each one to see all the products that come in that color!
S
Here’s what I used:
Click on these images for more details and to purchase. If you are reading this post in email, the product images may not show up. Please click here to see the post on my blog.
Supply List. <— Click for a clickable and printable list of the products!
S
Hey Chick is here!
The Hey Chick stamp set from 2017 Sale-a-bration was so popular, Stampin’ Up! has brought it back. But that’s not all! Now there are coordinating dies. AND there’s a second stamp set, Hey Birthday Chick, that also has coordinating dies. CLICK HERE to see them all. One thing though – they’re available for a limited time, so get them while you can!
S
Basic White products:
The facility that manufactures Whisper White paper is closed due to COVID-19. But don’t fret. The new Basic White products are here!
S
Here are some helpful links:
S
Thanks for stopping by today, and Sweet Stamping!