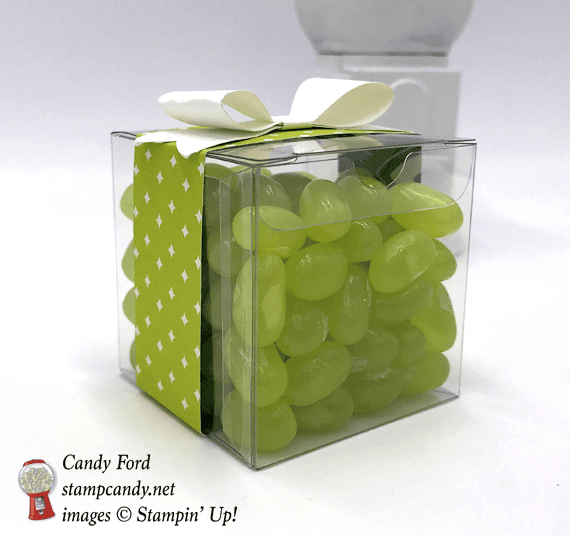
Feb 5, 2018 | Boxes, Food, Gallery, Gift Wrap, Gifts |
Today’s project is so quick and easy it really doesn’t need instructions, but since I know some folks will ask if I don’t explain how it’s done, I will. This little treat is a lemon lime dream. Lemon Lime Twist paper (from the Eastern Palace Designer Series Paper) and actual lemon lime jelly beans match perfectly. And you know how I like stuff to match!
You can whip up a bunch of these little treats, in any color you choose, in no time. The box goes together in seconds. Wouldn’t they be darling on a table, maybe one box on each place setting? Or if you need a bunch of cute little somethings in a hurry for a gathering, your child’s classmates, coworkers, you name it! Just think of all the possibilities!
FYI, a little square Pandora charm box fits inside this treat box perfectly. I’m thinking a ring box would as well.
Here’s what I made:


Here’s what I did:
Cut and scored with my Stampin’ Trimmer:
- Eastern Palace Specialty Designer Series Paper (DSP) cut to 1″ x 9″, then scored at 2″, 4″, 6″, and 8″
Cut using the Bow Builder Punch:
- a scrap of Whisper White card stock
- NOTE: cut twice to have enough pieces for one bow. There will be one small piece left over.
Assembled the project:
- assembled a Clear Tiny Treat Box
- NOTE: when folding in the bottom flaps, you’ll see there’s one flap with 2 sticky-outy pieces, one flap with 1 sticky-outy piece, and the 2 side pieces. Fold them in this order: 1) 2 flap, 2) side flaps, 3) one flap, tucking it’s tongue into the slot created by the other flaps.
- put the jelly beans inside
- wrapped the DSP around the box and glued the ends together on the bottom
- assembled the bow using glue
- NOTE: you may notice the fold lines in the bow. I didn’t burnish, or curl, the paper with a Bone Folder before assembling the pieces. Oops! Burnish them, the way you’d curl ribbon, and you won’t have that problem.
- glued the bow onto the top of the band of DSP
Here are today’s colors:
You can click on each one to see all the products that come in that color!
Here’s what I used:
Click on these images for more details and to purchase.
Here’s some stuff you should know:
- This is a fabulous time to join my team! Sale-A-Bration is the biggest event of the Stampin’ Up! year and you can save big on the ultimate bundle, the Starter Kit. CLICK HERE for more information. Contact me with any questions: email candy@stampcandy.net or call/text 404-661-5222
- Newsletter: subscribe for exclusive deals, projects, and more! Enter your email address and click SUBSCRIBE at the top right of this page, just under the picture of my smiling face. You can also choose to receive an email every day that I have a blog post.
- Check out My Events Calendar HERE
- Host Code for the month of February (2T9AQTKG) Find out more about HOW, WHEN and WHY to use the code HERE.
- My Thank You Gift to You in February: Narrow Note Cards & Envelopes – Find out more HERE.
- Gift Certificates are available in any U.S. dollar amount from me. Contact me – email: candy@stampcandy.net OR call/text: 404-661-5222
- Gumball Rewards for all orders over $50. Find out more HERE.
Thanks for stopping by today, and Sweet Stamping!

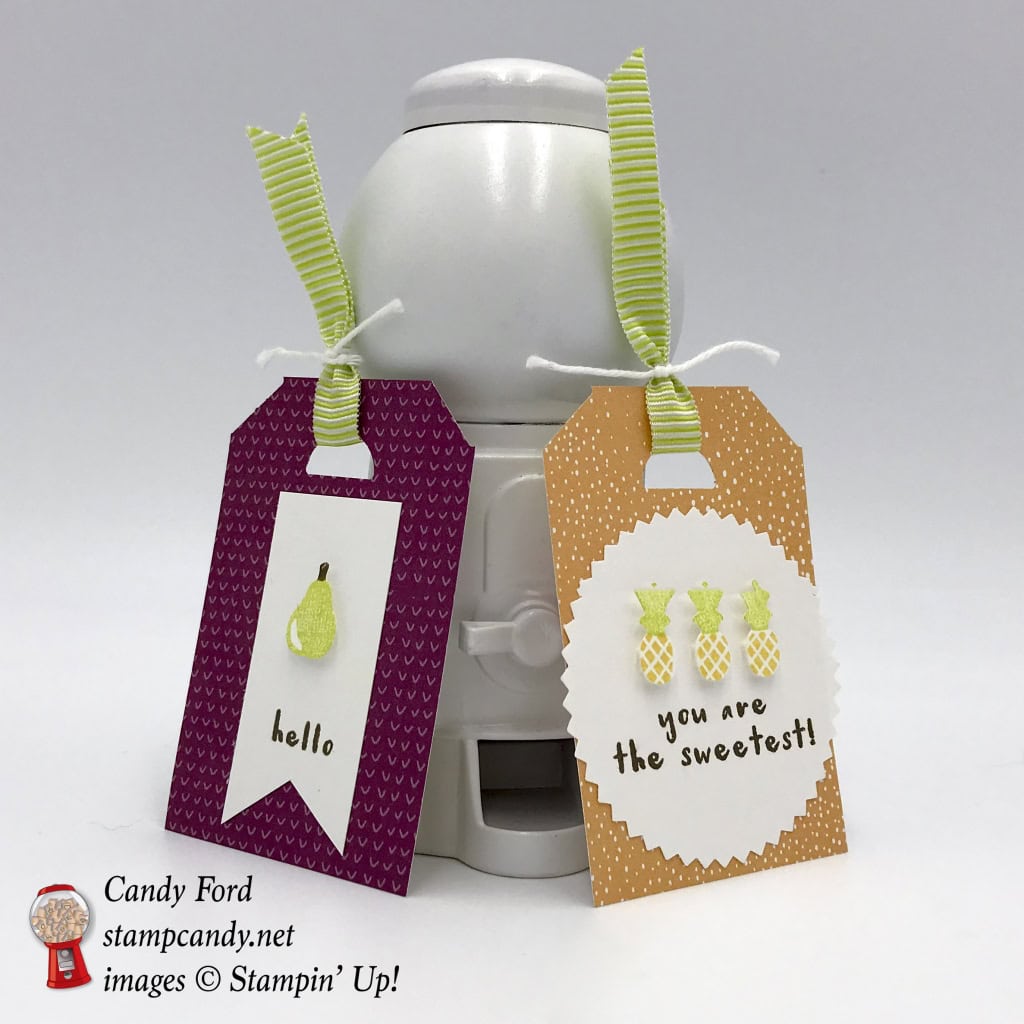
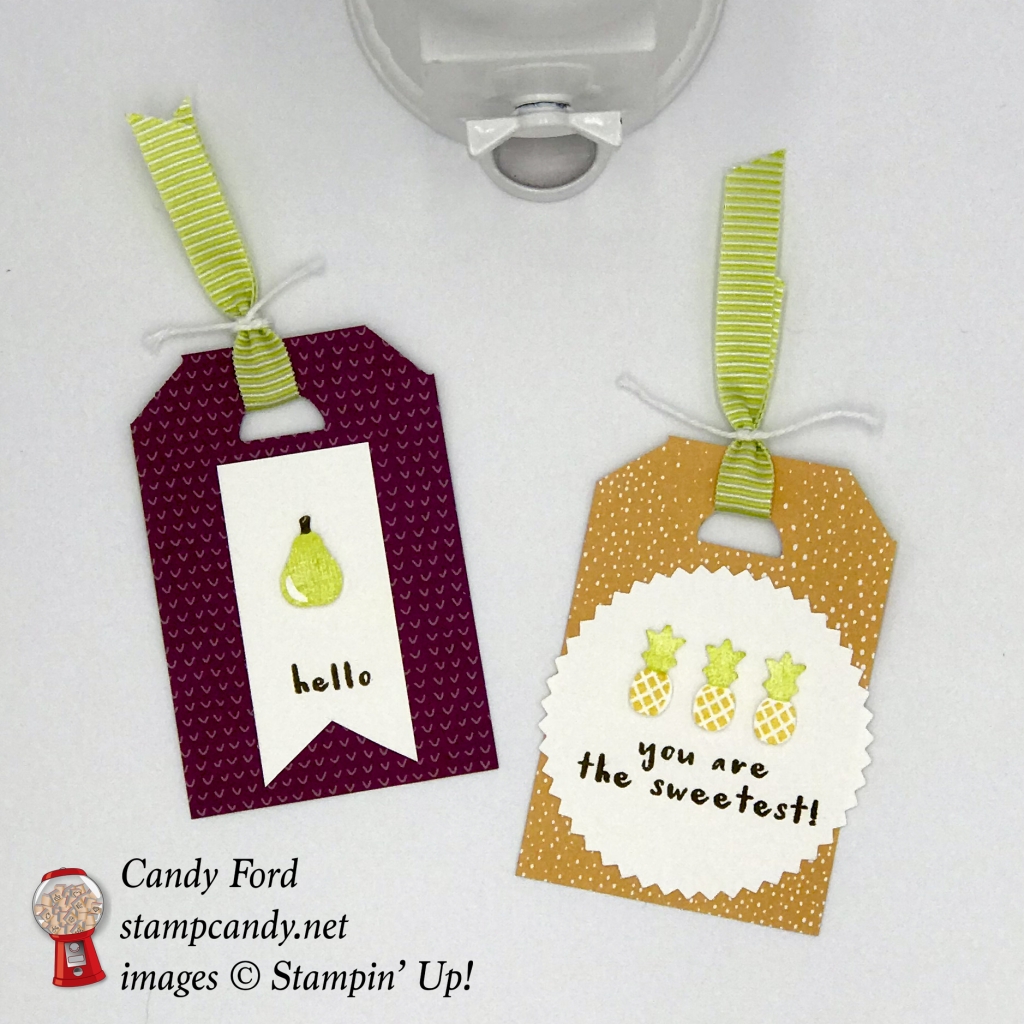
Jan 14, 2018 | Gallery, Gift Wrap, Gifts, New Products, Occasions, Tags |
Today I’m sharing another of the Make & Take projects I got to make at OnStage in November. These two tags are made using the new Tutti-frutti Suite. The Fruit Basket Bundle (Fruit Basket stamp set and Itty Bitty Fruit Punch Pack) and the Tutti-frutti Designer Series Paper are so sweet and fun. I know you’ll enjoy making projects with them. Remember, you save 10% when you buy the bundle.


And during Sale-A-Bration you get to choose a free item for each $50 on your order! So if you purchase the Fruit Basket Bundle $35, the Tutti-frutti DSP $11, and the Lemon Lime Twist 3/8″ Mini Striped Ribbon $8 (all of which were used to make these tags) you can choose any Level 1 Sale-A-Bration item FREE!
CLICK HERE for more details on Sale-A-Bration!
Here’s what I made:
Here’s what I did:
Cut and scored with my Stampin’ Trimmer:
- Whisper White card stock (CS) cut to 1″ x 2-1/2″
- Tutti-frutti Designer Series Paper (DSP) cut to 2″ x 3″ (2 different pieces)
Cut using the Banner Triple Punch:
- one end of the 1″ x 2-1/2″ strip of Whisper White CS
Cut using the Starburst Punch:
- a scrap of Whisper White CS
Stamped with the Fruit Basket stamp set:
- pear in Lemon Lime Twist ink onto a scrap of Whisper White CS
- pear stem in Soft Suede ink
- 3 pineapples in Peekaboo Peach ink onto a scrap of Whisper White CS
- pineapple tops in Lemon Lime Twist ink
- “hello” in Soft Suede ink onto the 1″ x 2-1/2” piece of Whisper White CS
- “you are the sweetest” in Soft Suede ink onto the Starburst circle
Cut using the Itty Bitty Fruit Punch Pack:
- pear with the pear punch
- pineapples with the pineapple punch
- hole in each of the two tags with the “watermelon slice” punch
- top corners of each tag with the “watermelon slice” punch
Assembled the tags:
- pear adhered to “hello” strip with Mini Stampin’ Dimensionals
- “hello” strip glued onto the Rich Razzleberry tag
- 3 pineapples adhered to the starburst with Mini Stampin’ Dimensionals
- starburst glued onto the Peekaboo Peach tag
- Lemon Lime Twist 3/8″ Mini Striped Ribbon through the hole in each tag
- Whisper White Solid Baker’s Twine tied around ribbon
Here are today’s colors:
You can click on each one to see all the products that come in that color!
Here’s what I used:
Click on these images for more details and to purchase.
Here’s some stuff you should know:
- This is a fabulous time to join my team! Sale-A-Bration is the biggest event of the Stampin’ Up! year and you can save big on the ultimate bundle, the Starter Kit. CLICK HERE for more information. Contact me with any questions: email candy@stampcandy.net or call/text 404-661-5222
- Newsletter: subscribe for exclusive deals, projects, and more! Enter your email address and click SUBSCRIBE at the top right of this page, just under the picture of my smiling face. You can also choose to receive an email every day that I have a blog post.
- Check out My Events Calendar HERE
- Host Code for the month of January (XNNMNZSZ) Find out more about HOW, WHEN and WHY to use the code HERE.
- My Thank You Gift to You in January: Silver Embossing Paste – Find out more HERE.
- Gift Certificates are available in any U.S. dollar amount from me. Contact me – email: candy@stampcandy.net OR call/text: 404-661-5222
- Gumball Rewards for all orders over $50. Find out more HERE.
Thanks for stopping by today, and Sweet Stamping!
Jan 13, 2018 | Boxes, Gallery, Gift Wrap, Gifts, New Products |
Today is the last day to register for Sale-A-Bration Stamp Fest! You do not want to miss this fun-filled afternoon of stamping, laughing, learning, demonstrations, and so much more! CLICK HERE for the details and to register now!
And now for today’s project. When I attended OnStage in November, I got to make this very sweet gift box. It’s one of the new Silver Gable Boxes and it is decorated with several products from the Sweet Soiree Suite: Sweet Soiree Designer Series Paper, Cake Soiree stamp set, Berry Burst 3/8″ Metallic-Edged Ribbon, and Silver Baker’s Twine. It all goes together in just a few minutes!
Here’s what I made:


Here’s what I did:
Cut and scored with my Stampin’ Trimmer:
- Sweet Soiree card stock (CS) cut to 2″ x 12″, then scored at 2″, 6″, and 8″
Cut tag with Circle Punches”
- Whisper White CS with the 1-1/2″ punch
- hole in the 1-1/2″ circle with the 1/8″ punch
Stamped with the Cake Soiree stamp set:
- sentiment onto the tag in Old Olive ink
- flowers onto the tag in Berry Burst in
Assembled the project:
- assembled the gable box – The bottom has 4 flaps: a wide one with two tabs, a wide one with one tab, and the two smaller side flaps. Fold in the wide 2 tab flap first, then the two side tabs, then the wide 1 tab flap – stick the one tab through the slot in the center
- DSP strip glued onto the box, all the way around, beginning and ending at the same corner
- NOTE: put the goodies in the box now, before you tie the ribbon around it
- ribbon wrapped around box vertically through handle and tied in a bow
- tag tied onto the ribbon with the twine
Here are today’s main colors:
You can click on each one to see all the products that come in that color!
Here’s what I used:
Click on these images for more details and to purchase.
Here’s some stuff you should know:
- This is a fabulous time to join my team! Sale-A-Bration is the biggest event of the Stampin’ Up! year and you can save big on the ultimate bundle, the Starter Kit. CLICK HERE for more information. Contact me with any questions: email candy@stampcandy.net or call/text 404-661-5222
- SAB Stamp Fest – TODAY IS THE LAST DAY TO REGISTER! It happens January 20. Details and register HERE by January 13!
- Newsletter: subscribe for exclusive deals, projects, and more! Enter your email address and click SUBSCRIBE at the top right of this page, just under the picture of my smiling face. You can also choose to receive an email every day that I have a blog post.
- Check out My Events Calendar HERE
- Host Code for the month of January (XNNMNZSZ) Find out more about HOW, WHEN and WHY to use the code HERE.
- My Thank You Gift to You in January: Silver Embossing Paste – Find out more HERE.
- Gift Certificates are available in any U.S. dollar amount from me. Contact me – email: candy@stampcandy.net OR call/text: 404-661-5222
- Gumball Rewards for all orders over $50. Find out more HERE.
Thanks for stopping by today, and Sweet Stamping!
Dec 30, 2017 | Boxes, Christmas, Food, Gallery, Gift Wrap, Gifts, Holiday |
These mini coffee cups, or espresso cups, are great for tiny gifts. They’re easy to decorate and fill. Today I’m sharing two different batches of these that I made. One batch of Christmas themed cups contains Starbucks Holiday Blend coffee k-cups. The other batch of coffee themed cups contain coffee flavored candies.
Here’s what I made:


Here’s what I did:
Made cup cover and belly band:
- rolled a cup on a large piece of scrap paper, following it with a pencil
- cut out the template with Paper Snips and wrapped it around a cup to make sure it fit
- held the template on the cup with my fingers and drew a belly band onto the template with a pencil
- used that to create a template for the belly band
- covers and cut using Paper Snips from Coffee Break, Be Merry, and Merry Music Specialty Designer Series Papers (DSP)
- belly bands cut using Paper Snips from DSP and from CS in Pool Party, Whisper White, Garden Green, and Cherry Cobbler
Stamped with the Hug in a Mug stamp set:
- sentiment onto Whisper White card stock (CS) in Pear Pizzazz, Early Espresso, Garden Green, and Cherry Cobbler inks
Stamped with the Merry Cafe stamp set:
- sentiment in Memento Tuxedo Black ink onto Whisper White CS
- snowflake in Cherry Cobbler ink above the sentiment
Die cut using the Layering Circles Framelits:
- all sentiments
- larger circles to layer with sentiment, from Pool Party, Early Espresso, Garden Green, and Cherry Cobbler CS
Assembled the cups:
- covers glued onto the cups
- belly bands glued onto the covers
- sentiments layered with coordinating larger circles, then adhered to the cup lids with Stampin’ Dimensionals (The center part of the lid is lower than the rim.)
- adhered a small Rhinestone Basic Jewel to the center of the stamped snowflakes
NOTE: The cups, lids, k-cups, and candies were all ordered from Amazon.com.
Here are today’s colors:
You can click on each one to see all the products that come in that color!
Here’s what I used:
Click on the images for more details and to purchase.
Here’s some stuff you should know:
- Swatch Books and Product Shares from the 2018 Occasions and Sale-A-Bration Catalogs – order yours by January 2 HERE.
- Newsletter: subscribe for exclusive deals, projects, and more! Enter your email address and click SUBSCRIBE at the top right of this page, just under the picture of my smiling face.
- Gift Certificates are available in any U.S. dollar amount from me. Contact me – email: candy@stampcandy.net OR call/text: 404-661-5222
- Year End Sales Event ends January 2, 2018 – CLICK HERE for details. Order soon so you don’t miss your favorite retiring items!
- This is a great time to join my team! With the demonstrator discount of at least 20%, you can get Christmas gifts for all the stampers on your list! Plus you can order from the 2018 Occasions and Sale-A-Bration catalogs now! CLICK HERE for more information. Contact me with any questions: email candy@stampcandy.net or call/text 404-661-5222
- Sale-a-bration Stamp Fest coming January 20. Details and register HERE
- Check out My Events Calendar HERE
- Stampin’ Blends alcohol markers are now available! Click HERE for more info.
- Host Code for the month of December (HS67FXTS) Find out more about HOW, WHEN and WHY to use the code HERE.
- December’s FREE gift: Year of Cheer Specialty Washi Tape – Find out more HERE.
- Gumball Rewards for all orders over $50. Find out more HERE.
Thanks for stopping by today, and Sweet Stamping!
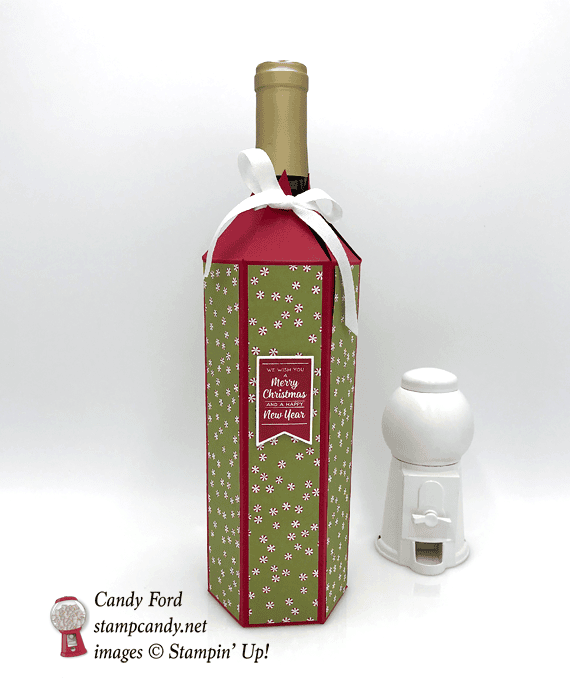
Dec 29, 2017 | Boxes, Christmas, Food, Gallery, Gift Wrap, Gifts, Holiday, New Year, Retiring Products |
I guess I’m a little late posting this one, but you can always change the colors and the sentiment for any occasion, or save it for next year. The Christmas Around the World Designer Series Paper has so many different patterns, even some that can be used for non-Christmas projects. I used the design with lots of tiny mints for today’s project. And the sentiment is made using the Brightly Lit Christmas Bundle. Both the paper and the bundle are retiring. They’ll be available only until January 2, or while supplies last.

Christmas Around the World DSP © Stampin’ Up!

Brightly Lit Christmas Bundle © Stampin’ Up!
Here’s what I made:

Here’s what I did:
Cut and scored with my Stampin’ Trimmer:
- Real Red card stock (CS) cut to 11″ x 12
- CS scored along the 11″ side at 1-3/4″, 3-1/2″, 5-1/4″, 7″, 8-3/4″, 10-1/2″
- CS scored along the 12″ side at 2″ and 10″
- Christmas Around the World Designer Series Paper (DSP) cut to 1-1/2″ x 7-3/4″ (6 pieces)
Cut CS using Paper Snips, according to the diagram:
- removed two smallest rectangles, and angled the leftover tab (in blue)
- cut vertical score lines along the bottom just up to the first horizontal score line
- marked along the top side at 7/8″, 2-5/8″, 4-3/8″, 6-1/8″, 7-7/8″, and 9-5/8″
- cut from marks to the intersections of the vertical score lines and the first horizontal score line – this cuts away the green areas
- used a 1/4″ circle punch to cut a hole in each triangle, about 1/2″ or so from the top – you may want to use a smaller circle punch, like the 1/8″, depending on the size of your ribbon

Stamped with the Brightly Lit Christmas stamp set:
- sentiment in Real Red ink onto a scrap of Whisper White card stock (CS)
Die cut using the Christmas Lamppost Thinlits:
Assembled the bottle cover:
- all score lines burnished with a Bone Folder
- DSP pieces glued onto the panels of the CS cover
- sentiment adhered to one of the DSP pieces with Stampin’ Dimensionals
- skinny tab on one side of the bottle cover adhered to the inside of the other end of the cover with Fast Fuse
- bottle inserted into the cover to make the next step easier:
- folded in one of the bottom tabs, then glued the opposite tab to it, making sure the tabs lined up with each other
- repeated this step for the remaining two pairs of tabs, gluing them all together
- ran a 22″ piece of ribbon through each hole in the top triangles, always front to back, then pulled it tight (not too hard or you’ll tear the paper) and tied a bow
Here are today’s colors:
You can click on each one to see all the products that come in that color!
Here’s what I used:
Click on the images for more details and to purchase.
Here’s some stuff you should know:
- Swatch Books and Product Shares from the 2018 Occasions and Sale-A-Bration Catalogs – order yours by January 2 HERE.
- Newsletter: subscribe for exclusive deals, projects, and more! Enter your email address and click SUBSCRIBE at the top right of this page, just under the picture of my smiling face.
- Gift Certificates are available in any U.S. dollar amount from me. Contact me – email: candy@stampcandy.net OR call/text: 404-661-5222
- Year End Sales Event ends January 2, 2018 – CLICK HERE for details. Order soon so you don’t miss your favorite retiring items!
- This is a great time to join my team! With the demonstrator discount of at least 20%, you can get Christmas gifts for all the stampers on your list! Plus you can order from the 2018 Occasions and Sale-A-Bration catalogs now! CLICK HERE for more information. Contact me with any questions: email candy@stampcandy.net or call/text 404-661-5222
- Sale-a-bration Stamp Fest coming January 20. Details and register HERE
- Check out My Events Calendar HERE
- Stampin’ Blends alcohol markers are now available! Click HERE for more info.
- Host Code for the month of December (HS67FXTS) Find out more about HOW, WHEN and WHY to use the code HERE.
- December’s FREE gift: Year of Cheer Specialty Washi Tape – Find out more HERE.
- Gumball Rewards for all orders over $50. Find out more HERE.
Thanks for stopping by today, and Sweet Stamping!
Dec 28, 2017 | Boxes, Christmas, Food, Gallery, Gift Wrap, Gifts, Holiday, Tags |
It’s winter, and a lot of you have snow. Here in Atlanta we had a nice snow a couple weeks ago, but it only lasted a couple days, and it’s probably the only one we’ll have all year. If you want to give someone a small gift this winter, just fill a Clear Tiny Treat Box with goodies. You can stick on a fast and easy tag made with the Merry Little Labels Bundle (Merry Little Labels stamp set and Everyday Label Punch.)
Here’s what I made:
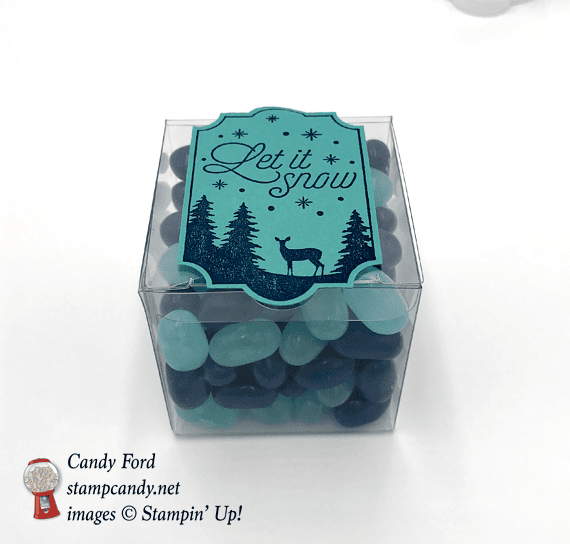
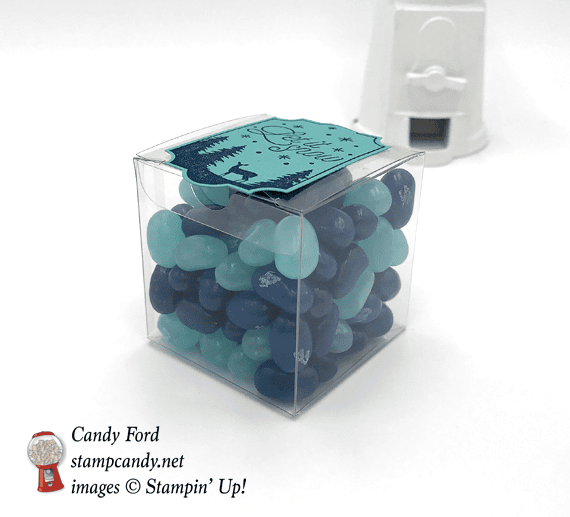

Here’s what I did:
Stamped with the Merry Little Labels stamp set:
- tag in Night of Navy ink onto a scrap of Bermuda Bay card stock (CS)
Cut using the Everyday Label Punch:
Assembled the card:
- filled a Clear Tiny Treat Box with blue jelly beans (These are Jelly Bellies in flavors Blueberry and Berry Blue.)
- adhered the tag to the top of the box with Fast Fuse
Here are today’s colors:
You can click on each one to see all the products that come in that color!
Here’s what I used:
Click on the images for more details and to purchase.
Here’s some stuff you should know:
- Swatch Books and Product Shares from the 2018 Occasions and Sale-A-Bration Catalogs – order yours by January 2 HERE.
- Newsletter: subscribe for exclusive deals, projects, and more! Enter your email address and click SUBSCRIBE at the top right of this page, just under the picture of my smiling face.
- Gift Certificates are available in any U.S. dollar amount from me. Contact me – email: candy@stampcandy.net OR call/text: 404-661-5222
- Year End Sales Event ends January 2, 2018 – CLICK HERE for details. Order soon so you don’t miss your favorite retiring items!
- This is a great time to join my team! With the demonstrator discount of at least 20%, you can get Christmas gifts for all the stampers on your list! Plus you can order from the 2018 Occasions and Sale-A-Bration catalogs now! CLICK HERE for more information. Contact me with any questions: email candy@stampcandy.net or call/text 404-661-5222
- Sale-a-bration Stamp Fest coming January 20. Details and register HERE
- Check out My Events Calendar HERE
- Stampin’ Blends alcohol markers are now available! Click HERE for more info.
- Host Code for the month of December (HS67FXTS) Find out more about HOW, WHEN and WHY to use the code HERE.
- December’s FREE gift: Year of Cheer Specialty Washi Tape – Find out more HERE.
- Gumball Rewards for all orders over $50. Find out more HERE.
Thanks for stopping by today, and Sweet Stamping!
