May 25, 2018 | Bags, Gallery, Gift Wrap, Gifts, Retiring Products, Wedding |
Order your Swatch Books and Product Shares now!
And now for today’s project. This would be perfect for a small gift or favor for a bridal shower or wedding. And it’s SO easy! I used a pre-made bag, doily, ribbon, and clip – I made only the heart with sentiment embossed in gold.
Here’s what I made:


Here’s what I did:
Cut and scored with my Stampin’ Trimmer:
- scored the top of a striped gift bag 1″ from the top
Stamped with the Born to Be Loved stamp set:
- sentiment in Versamark ink onto a scrap of Powder Pink card stock, then heat embossed it in gold
Die cut using the Sweet & Sassy Framelits:
Cut using Paper Snips:
- about 12″ each of three ribbons: Powder Pink Finely Woven Ribbon, Gold Metallic Edge Ribbon, and Gold 1/8″ Ribbon
Assembled the project:
- folded the ribbons in half and adhered the tops to the center of a Gold Metallic Doily using Tear & Tape
- adhered the die cut heart to the doily using Stampin’ Dimensionals
- put goodies in the bag
- folded over the top of the bag and clipped the decoration on with a Gold Binder Clip
Here are today’s colors:
Here’s what I used:
Click here to order your Swatch Books and Product Shares now!
Here’s some information you should check out:
Thanks for stopping by today, and Sweet Stamping!
May 12, 2018 | Baby, Gallery, Gift Wrap, Occasions, Parties |
I recently made my very first diaper cake. I know, I know, they’ve been ubiquitous at baby showers for years now, but somehow I just never got around to making one. Until now. It was surprisingly easy. The hardest part was getting all those diapers bundled together without them going every which way. It helps to have an extra pair of hands for that step. Otherwise it was a piece of cake. <wink> I used the Moon Baby stamp set as well and the Pretty Kitty and Bella & Friends stamp sets, and the Whole Lot of Lovely Designer Series Paper (DSP.) I used Powder Pink and Pool Party to create a gender neutral cake, for times when you don’t know the baby’s gender, or for when you know there are a boy AND a girl.
Kittens and puppies seemed like an appropriate baby theme. I mean, they’re babies, too. So Pretty Kitty and Bella & Friends were the perfect stamp sets to use.
Here’s what I made:


Here’s what I did:
Cut and scored with my Stampin’ Trimmer:
- Whole Lot of Lovely Designer Series Paper (DSP) cut to 3″ x 12″, 4 pieces of one pattern for the bottom tier, and 3 pieces of another pattern for the top tier
Stamped with the Pretty Kitty stamp set:
- 6 cats in Memento black ink onto scraps of Whisper White card stock (CS)
Stamped with the Bella & Friends stamp set:
- 6 dogs in Memento black ink onto scraps of Whisper White CS
Stamped with the Moon Baby stamp set:
- 2 of the baby-on-moon images in Memento black ink onto scraps of Whisper White CS
Die cut using the Layering Circles Framelits:
- cats, dogs, and babies
- slightly larger circles from Powder Pink and Pool Party CS, to mat the stamped cat and dog images
Colored using Stampin’ Blends Markers:
- cats & dogs in Pink Pirouette and Pool Party
- babies in Pink Pirouette, Pool Party, Ivory, and Bronze
- one white doily in Pink Pirouette
- one white doily in Pool Party
- NOTE: I only colored the outer edges of the doilies, since most of the center would be covered up. I also learned – the hard way – to be sure to color the front side of the doily. The back side is too rough and will tear up the brush tip of your marker. Also, you can just use an ink pad to color the doilies.
Assembled the cake:
- rolled individual diapers and held them with rubber bands
- gathered enough diaper rolls together to create the bottom tier of the cake, and tied ribbon around to keep them together
- did the same thing to create the smaller top tier of the cake
- NOTE: I think I used about 50 diapers or so. It will depend on the diapers you use and on the size of your cake platter.
- glued together the lengths of DSP and wrapped around each cake tier
- glue the stamped images onto the larger die cut circles, then glued them onto the DSP strips
- glued the two doilies together, lining up the holes around the edges
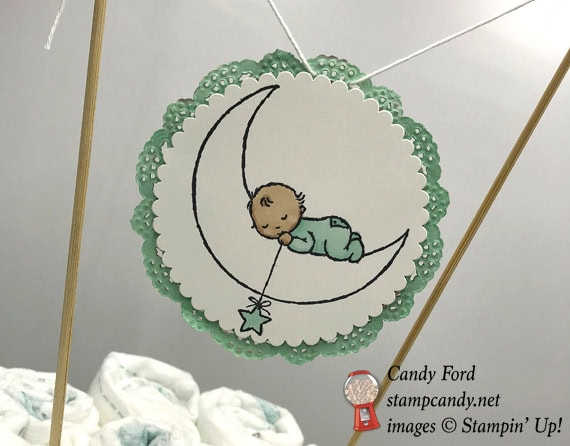
- adhered a baby image to each side of the doilies using Stampin’ Dimensionals
- threaded a length of Solid Whisper White twine through the holes in the doilies at the top, and tied the ends to two wooden skewers
- poked the skewers down into the cake, careful not to puncture the diapers
Here are today’s colors:
You can click on each one to see all the products that come in that color!
Here’s what I used:
Click on these images for more details and to purchase.
Here’s some information you should check out:
Thanks for stopping by today, and Sweet Stamping!
May 3, 2018 | Bags, Blog Hop, Boxes, Cards, Gallery, Gift Wrap, Gifts, Paper Pumpkin |

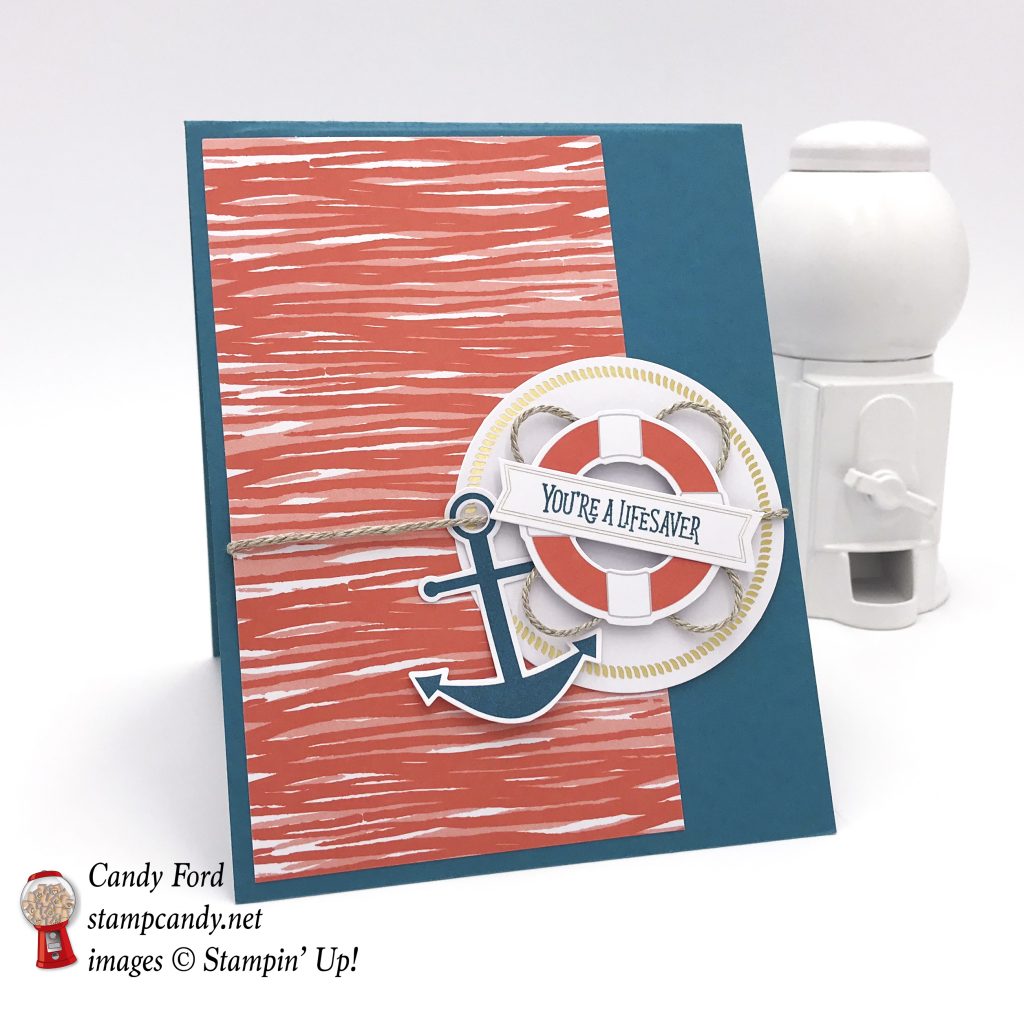
It’s time for the A Paper Pumpkin Thing Blog Hop for the April kit, You Are My Anchor. This is such a fun kit! The colors are great; the images are great; really everything about it is awesome. I’ve had a lot of fun playing with it. I hope you enjoy the alternative projects I’ve made with it. After reading my post, be sure to check out the rest of the stops on the hop. I can’t wait to see what everyone else has made.

Here’s what I made:
Three different items: a bag, a pop up card, and a treat box.

I used one of the matchbox covers from the kit to create this pop-up card.
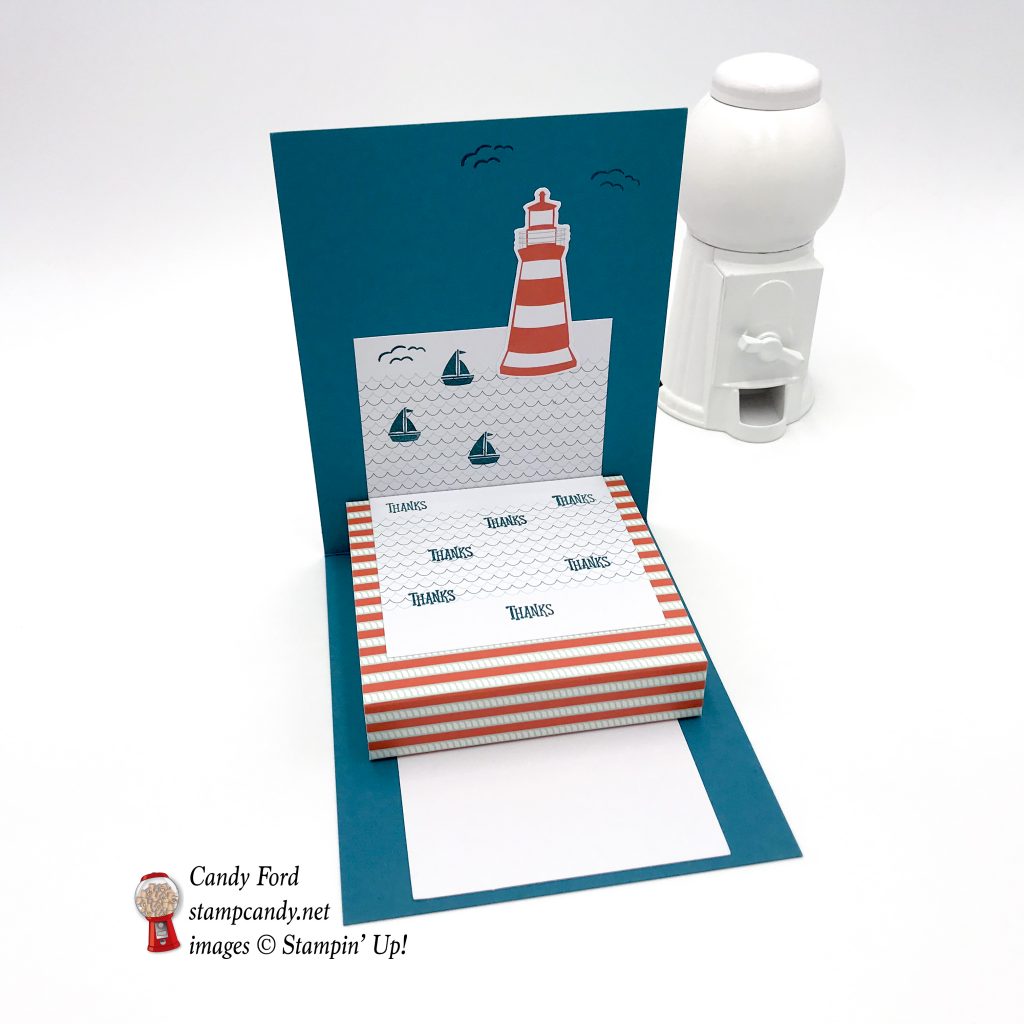


I made this box from some of the note cards in the kit.

Aren’t candies with sea salt appropriate for the theme?
When I saw the gold and white note cards in the kit, I knew I had to pair it with one of Stampin’ Up!’s Striped Treat Bags.


Here’s what I did:
Cut and scored with my Stampin’ Trimmer:
- Island Indigo card stock (CS) cut to 4-1/4″ x 11″, then scored in half at 5-1/2″, for the card base
- 2 Island Indigo striped note cards scored 1/2″ from each end, and 1/4″ from the bottom edge
- 1 Island Indigo striped note card cut to 2-7/8″ x 2-7/8″
- 1 Island Indigo anchor note card cut to 3″ x 3″, then scored 1/4″ from all four edges
- a Calypso Coral note card cut to 3″ x 5-1/4″
- 1 wave note card cut in half
- 1 note card cut in half (doesn’t matter which design because I used the solid white side)
Stamped with the You Are My Anchor stamp set:
- anchor, starfish, and “For You” in Island Indigo ink onto one of the small die cut round tags
- “You’re a lifesaver” in Island Indigo ink onto one of the small die cut banners
- birds in Island Indigo ink onto the inside top of the Island Indigo CS card base
- birds and boats in Island Indigo ink onto one of the wave not card halves
- “Thanks” in Island Indigo ink onto the other wave note card halves
- “Adventure awaits” in Island Indigo ink onto one of the small die cut banners
- anchor, wheel, boat, and starfish in Island Indigo ink onto the white stripes of the treat bag – I lined up the four stamps on one acrylic block and stamped them as one long stamp
Colored using an Island Indigo Stampin’ Write Marker:
- 8″ piece of Whisper White 1/8″ Sheer Ribbon – color on both sides
Assembled the card, front:
- fold in the Island Indigo CS card base burnished with a Bone Folder
- a large round die cut glued onto the side of the 3″ x 5-1/4″ Calypso Coral note card piece
- rope twine run through an Island Indigo anchor die cut, then wrapped around the front of the Calypso Coral note card piece and large round die cut, securing ends on the back using Glue Dots
- NOTE: I covered the score line in the note card piece with the rope twine
- Calypso Coral note card piece and large round die cut glued to the front of the Island Indigo CS card base
- rope twine adhered to the back of a lifesaver die cut using Glue Dots, then the lifesaver adhered to the large round die cut using Stampin’ Dimensionals
- “You’re a lifesaver” sentiment glued onto the front of the lifesaver die cut
Assembled the card, inside:
- wave note card half with boats glued onto the back side of a matchbox cover
- wave note card half with “Thanks” glued onto the top of the matchbox cover
- 3″ x 3″ note card piece glued to the inside of the Island Indigo CS card base, 1/8″ from the bottom edge, with the solid white side showing
- bottom of matchbox cover and back of wave note card half glued onto the inside of the card base, as shown in photos
- lighthouse die cut glued to the inside top of the card base
Assembled the box:
- the two Island Indigo striped note cards glued together at the ends – at both intersections, one flap will be on the outside of the adjacent side, and the other flap will be on the inside of its adjacent side
- using Paper Snips, cut along the score lines up the four corners only up to the horizontal score line
- folded all four flaps toward the inside and glued them to the inside of the 2-7/8″ x 2-7/8″ piece, which will form the bottom of the box
- cut along one score line at each corner of the 3″ x 3″ Island Indigo anchor note card piece
- glued the resulting flaps to the inside of the adjacent sides
- filled the box with goodies and put on the lid
- 2 small die cut banners glued to the back of the small round die cut tag as shown
- tied a piece of the rope twine around the box, through the tag, and tied in a box
Assembled the treat bag:
- “Adventure awaits” banner and an Island Indigo die cut anchor glued to the front of a gold and white note card
- top of treat bag folded over
- note card, Island Indigo colored ribbon, and some rope twine clipped to the top of the treat bag using a Gold Library Clip
Note: I used glue on these projects, but you can certainly use the Glue Dots that come with the kit. I just really like the glue.
Here’s the hop:
Use this list in case you get lost, or click on the Next button to go to Sara Levin of

Here are today’s colors:
You can click on each one to see all the products that come in that color!
Here’s what I used other than what came in the kit:
Click on these images for more details and to purchase.
Here’s some stuff you should know:
Thanks for stopping by today, and Sweet Stamping!

Apr 16, 2018 | Boxes, Gallery, Gift Wrap, Gifts, Parties, Retiring Products |
It’s a party! My presentation at the Spring Stamp-Along last week was all about party favors, food, and decor for five different types of party. One type was a birthday party for an adult. I haven’t seen the Over the Hill birthday theme used in a long time, so I decided to go with that. I used black and silver for all the projects. The Five For All stamp set has funny birthday sentiments perfect for this theme.
Today I’m sharing a box that could hold a small gift or a party favor. Don’t you just love the Mini Pizza Boxes? And they’re carrying over to the new catalog! Unfortunately, the Five For All stamp set is not. It’s one of the products that will be retiring, so it will be available through May 31, or while supplies last. See all the retiring products HERE.
Here’s what I made:


Here’s what I did:
Cut and scored with my Stampin’ Trimmer:
- Silver Foil Sheet cut to 3″ x 3″
- Basic Black card stock (CS) cut to 2-1/2″ x 2-1/2″
Stamped with the Five For All stamp set:
- sentiment in Versamark ink onto the Basic Black CS square, then heat embossed in silver
Painted using Archival Basic Black ink refill:
- the outside of the box – let it dry completely before adhering anything to it
- NOTE: I used an old paintbrush. The ink did stain it, but did not hurt it at all.
- NOTE: I used an alcohol pad to remove any ink from the inside of the box.
Assembled the project:
- folded the box together
- adhered the sentiment onto the Silver Foil Sheet piece using Tear & Tape
- adhered the Silver Foil Sheet to the top of the box using Stampin’ Dimensionals, being sure to leave a “tunnel” for the ribbon
- ran ribbon under the Silver Foil Sheet, wrapped it around the box, and tied it on the side
- applied Metallic Enamel Shapes (silver dots) to the top of the box around the Silver Foil Sheet, to resemble a marquis
Here are today’s colors:
You can click on each one to see all the products that come in that color!
Here’s what I used:
Click on these images for more details and to purchase.
Here’s some stuff you should know:
Thanks for stopping by today, and Sweet Stamping!
Mar 29, 2018 | Bags, Blog Hop, Boxes, Cards, Gallery, Gift Wrap, Gifts, Paper Pumpkin |
Hurray, it’s time for the March 2018 APPT blog hop! This month’s kit is called May Good Things Grow, and it is just lovely. Of course, we can’t leave well enough alone, so we used the kit to create alternate projects, just to give you some ideas. Be sure to check out all the stops on the hop!
The kit makes cards that go is adorable envelopes that look like seed packs. I used the seed packs to make a card and a sour cream container. No, there isn’t sour cream in it, but it’s the shape of the little take out containers that sour cream comes in. It’s one of the easiest containers to make, and it’s even easier with a premade envelope.
The card base is Fresh Fig card stock, but I used one of the kit card bases to cut a piece for the inside of the card. I used Fresh Fig ink, but the Early Espresso ink that comes in the kit would match equally as well.
Brads! There are brads in this kit! I’ve always liked using brads in my paper crafting – there are lots of things you can do with them.
At the bottom of this post, there’s a list of the products I used other than what’s in the kit. There aren’t many. This kit has so much in it, I can think of all sorts of things to make with it. I listed glue and Tear & Tape, because I prefer them, but the kit comes with glue dots – and a whole lot of Stampin’ Dimensionals!
Here’s what I made:


It’s so difficult to get Wink of Stella to show in a photo! The small amount you can see in this one just looks like tiny white specks:


Here’s what I did:
Cut and scored with my Stampin’ Trimmer:
- Fresh Fig card stock (CS) cut to 4-1/4″ x 11″, then scored in half at 5-1/2″
- front of one of the seed packs cut off and trimmed around the design
- the flap off another seed packet cut off
- cut a 3-3/4″ x 5″ piece from a Crumb Cake card base
Stamped with the May Good Things Grow stamp set:
- birthday sentiment in Fresh Fig ink onto one of the precut labels
- friendship sentiment in Fresh Fig ink onto a larger precut label
- scroll design in the four corners of the trimmed Crumb Cake card base
“Colored” using Clear Wink of Stella Pen:
- all the color die cut flowers and leaves (not the monotone ones that are part of the large floral die cut)
Assembled the card:
- seed pack front glued onto the front of the card base
- large floral die cut adhered to the seed pack layer using Stampin’ Dimensionals
- single die cut pink and yellow flowers and one die cut leaf adhered over the large floral die cut using Stampin’ Dimensionals
- 2 brads attached to the larger label, then the label adhered to the large floral die cut using Stampin’ Dimensionals
Assembled the sour cream container:
- pinched the top of the bag perpendicular to the bottom, so the two side score lines touch (I also used snips to cut the edges straight)
- put some goodies inside, then sealed the top shut with Tear & Tape
- punched a hole through the top with the 1/8″ Circle Punch
- put the Fresh Fig ribbon through the hole and tied a bow
- glued a die cut flower and some die cut leaves to the front
- glued on the birthday label

Here’s the hop:
Click the NEXT button to go to the next stop on the hop, Melissa Thomas as Sea to Sea Stampin’. If you get lost, during the hop, use the list below to find your way.
Here are the colors in the kit:
You can click on each one to see all the products that come in that color!
Here’s what I used other than the Paper Pumpkin kit:
Click on these images for more details and to purchase.
Here’s some stuff you should check out:
Thanks for stopping by today, and Sweet Stamping!
Feb 8, 2018 | Blog Hop, Boxes, Cards, Food, Gallery, Gift Wrap, Gifts, Guest Stamper, Occasions, Sale-A-Bration |

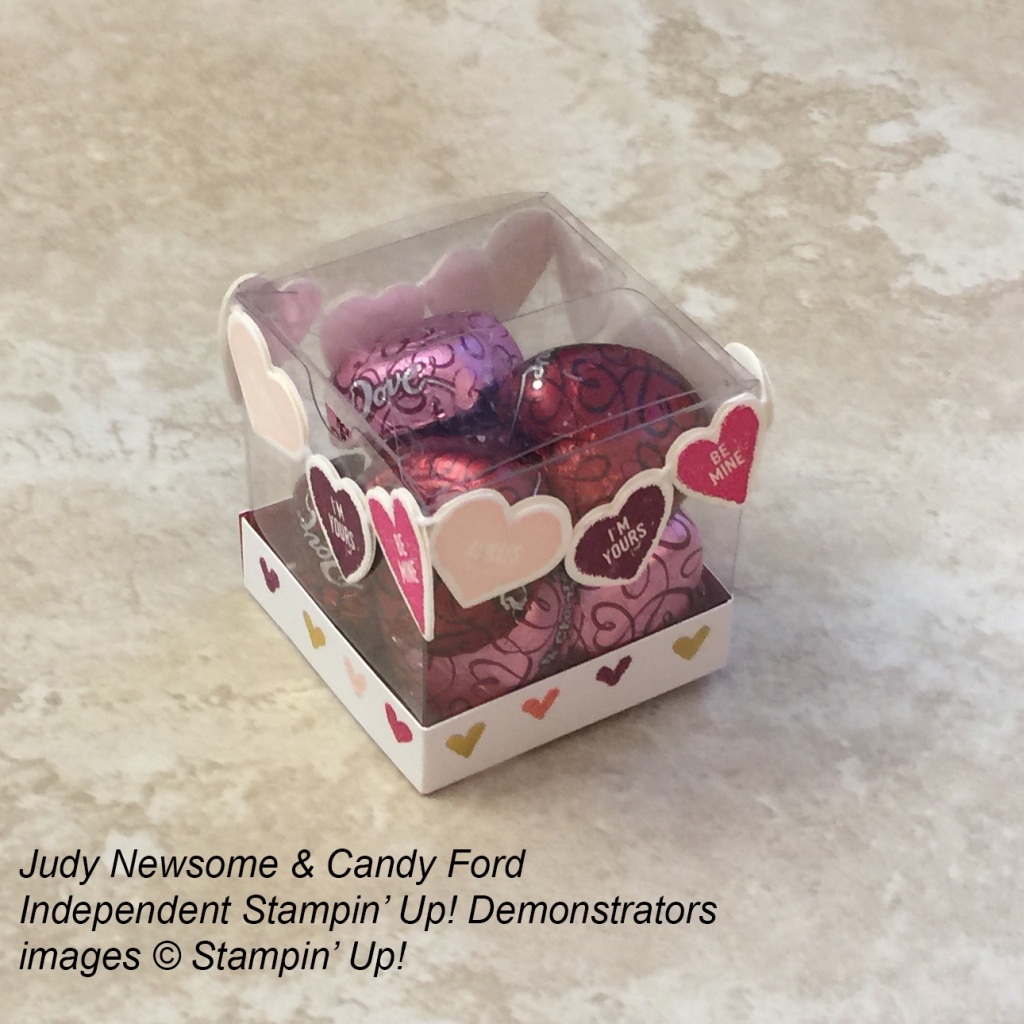
It’s time for the OSAT Blog Hop! This month’s theme is Don’t go breaking my heart in honor of Valentine’s Day. Remember the song by Elton John and Kiki Dee? If not, you can watch the video here. My project has plenty of hearts – a large one from the Painted with Love Designer Series Paper, and small ones from the Sure Do Love You stamp set – and fortunately none of them are broken.
I’m on a ship right now (I’m actually at a live performance by Casey McPherson as I type this, so if there are any typos, that’s why!) My sister, and Candy Hearts team member, Judy Newsome, is house sitting. When I realized I’d forgotten to make the projects for today before I left, I contacted her and begged for help. Of course, she obliged because that’s the kind of gal she is. Between the two of us, we designed the card and treat box, and she actually made and photographed them. So while it was a team effort, she did the lion’s share of the work. Thanks, Judy!
Be sure to hop around to all the blogs listed below. You don’t want to miss any of the great projects by this group!
Here’s what we made:

Here’s what she did:
Cut and scored with my Stampin’ Trimmer:
- Rich Razzleberry card stock (CS) cut to 4-1/4″ x 11″, then scored in half at 5-1/2″
- Melon Mambo CS cut to 4-1/8″ x 5-3/8″
- Powder Pink CS cut to 4″ x 5-1/4″
- Painted With Love Designer Series Paper (DSP) cut to 3-7/” x 5-2/8″ (small hearts design)
- Melon Mambo CS cut to 3-1/2″ x 3/4″
- Powder Pink CS cut to 3-1/2″ x 5/8″
- Painted With Love DSP cut to 1/2″ x 8-1/2″ (one row of small hearts) then scored at 2″, 4″, 6″, and 8″
- Whisper White CS cut to 4″ x 5-1/4″ for the inside of the card
Stamped with the Sure Do Love You stamp set:
- small conversation hearts in Powder Pink,Melon Mambo, and Rich Razzleberry inks onto scraps of of Whisper White CS (4 of each)
Stamped with the Cozy Cottage stamp set:
- card sentiment in Melon Mambo ink onto the Powder Spink CS strip
Die cut using the Lots of Love Box Framelits:
- small converstaion hearts
- large heart from a scrap of the DSP (striped design)
Cut using Paper Snips:
- notched one end of the Melon Mambo and Powder Pink CS strips
- NOTE: you could use the Banner Triple Punch instead
Assembled the card:
- burnished the fold in the card base with a Bone Folder
- Melon Mambo CS layer glued onto the front of the card base
- Powder Pink CS layer glued onto the Melon Mambo CS layer
- DSP layer glued onto the Powder Pink CS layer
- sentiment glued onto the Melon Mambo CS strip
- Melon Mambo CS strip glued onto the DSP layer
- large DSP heart adhered to the DSP layer using Stampin’ Dimensionals
- Whisper White CS glued to the inside of the card base
Assembled the treat box:
- popped the premade box together (just fold in the bottom flaps!)
- glued the conversation hearts to a piece of Whisper White Solid Baker’s Twine to make the garland
- adhered garland around the top of the box with Mini Glue Dots
- adhered strip of DSP around the bottom of the box with Fast Fuse
- filled the box with Dove Milk & Dark Chocolate Hearts
Here’s the hop:
Be sure to hop to all the blogs to see the terrific projects made by this amazing team of stampers. Use the list below if you get lost.
Here are today’s main colors:
You can click on each one to see all the products that come in that color!
Here’s what we used:
Click on these images for more details and to purchase.
Here’s some stuff you should know:
- This is an AMAZING time to join the Candy Hearts! Sale-A-Bration is the biggest event of the Stampin’ Up! year and you can save big on the ultimate bundle, the Starter Kit. CLICK HERE for more information. Contact me with any questions: email candy@stampcandy.net or call/text 404-661-5222
- Newsletter: subscribe for exclusive deals, projects, and more! Enter your email address and click SUBSCRIBE at the top right of this page, just under the picture of my smiling face. You can also choose to receive an email every day that I have a blog post.
- Check out My Events Calendar HERE
- Host Code for the month of February (2T9AQTKG) Find out more about HOW, WHEN and WHY to use the code HERE.
- My Thank You Gift to You in February: Narrow Note Cards & Envelopes – Find out more HERE.
- Gift Certificates are available in any U.S. dollar amount from me. Contact me – email: candy@stampcandy.net OR call/text: 404-661-5222
- Gumball Rewards for all orders over $50. Find out more HERE.
Thanks for stopping by today, and Sweet Stamping!