Dec 22, 2020 | Cards, Christmas, Gallery, Holiday, Techniques |
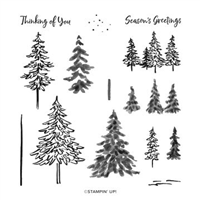
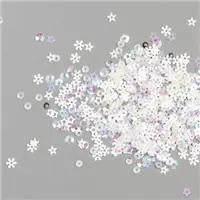
Today I’m sharing another card we made at my Stamp Club’s December virtual gathering. It could be a Christmas holiday card, or just a wintery thinking of you card. We used the In the Pines stamp set, Snow Globe Scenes Dies, Snow Globe Shaker Domes, and Snowflake Sequins to make this lovely shaker dome card.
If you are reading this in email, some photos may appear blurry, or may not appear at all. Please click here to see the post on my blog.
S Snow Globe Snow Globe Snow Globe Snow Globe
Here’s what I made:


S
Here’s what I did:
Cut and scored with my paper trimmer:
- Whisper White Thick card stock (CS) cut to 5-1/2″ x 8-1/2″, then scored in half at 4-1/4″
- Whisper White Thick CS layer cut to 5-1/4″ x 4″
Cut using the Snow Globe Scenes Dies:
- globe shaped hole in the white layer
- globe base from a scrap of a Silver Foil Sheet
Stamped with the In the Pines stamp set:
- First I laid the die cut layer on the card base where it would later be adhered, and used a pencil to lightly trace the shape of the die cut hole, so I would know where to stamp on the front of the card base.
- small tree outlines in Pretty Peacock ink
- small tree fills in Shaded Spruce ink
- sentiment in Shaded Spruce ink onto the white layer
Assembled the card:
- burnished the fold in the card base with a Bone Folder
- adhesive backing removed from the front of the shaker dome, then the white layer places over the dome and pressed to adhere the dome onto the back of the layer
- snowflake sequins (about 1/2 teaspoon or so) placed on the card base, making sore to keep them well within the pencil line
- adhesive backing removed from the back of the dome, and glue applied to the rest of the back of the layer
- white layer pressed in place over the sequins
- dome base glued onto the layer, under the dome
S
Here are today’s colors:
You can click on each one to see all the products that come in that color!
S
Here’s what I used:
Click on these images for more details and to purchase. If you are reading this post in email, the product images may not show up. Please click here to see the post on my blog.
Supply List. <— Click for a clickable and printable list of the products!
S
Here’s some news: Whisper White is going away
The facility that manufactures Whisper White paper is closing due to COVID-19. But don’t fret. The new Basic White products are in the works! No other colors are affected. The following items are now available while supplies last with an order limit of 2 per item per order.
- Cards & Envelopes, Assorted Memories & More (149710)
- Envelopes, Whisper White 3″ x 3″ (145829)
- Cardstock, Whisper White 8-1/2″ x 11″ (100730)
- Envelopes, Whisper White Medium (107301)
- Cardstock, Whisper White 12″ x 12″ (124302) <—SOLD OUT
- Cards & Envelopes, Whisper White Note (131527) <—SOLD OUT
- Cardstock, Whisper White 8-1/2″ x 11″ Thick (140272) <—SOLD OUT
S
Here’s the Year-End Closeout
All retiring items will be available through 4 January 2021, or while supplies last. Click on the image to shop now!

S
Here’s the Curvy Celebrations offering:
Click the image to see it in my online store. The Curvy Christmas stamp set and Classic Christmas Designer Series Paper are available only through January 4, or while supplies last!

S
Here’s the new catalog:
Click the image below to request your January-June 2021 Mini Catalog AND Sale-a-bration Brochure:


S
Here are some helpful links:
S
Thanks for stopping by today, and Sweet Stamping!

Dec 21, 2020 | Cards, Christmas, Gallery, Holiday, Retiring Products, Techniques |
Today I’m sharing one of the cards we made at my Stamp Club’s December virtual gathering. We used the In the Pines stamp set, the Banners Pick a Punch, Watercolor Paper, and a Stampin’ Spritzer to create this simple holiday card.
If you are reading this in email, some photos may appear blurry, or may not appear at all. Please click here to see the post on my blog.
S Pines Pines Pines Pines
Here’s what I made:
S
Here’s what I did:
Cut and scored with my paper trimmer:
- Garden Green card stock (CS) cut to 5-1/2″ x 8-1/2″, then scored in half at 4-1/4″
- Fluid 100 Watercolor Paper layer cut to 4-1/2″ x 3-1/4″
- Garden Green CS strip cut to 4″ x 1″
- Whisper White CS strip cut to 4″ x 3/4″
- Whisper White CS cut to 5-1/4″ x 4″ for the inside of the card base
Stamped with the In the Pines stamp set:
- sentiment in Garden Green ink onto the Whisper White CS strip
- spritzed the watercolor paper layer with water, then stamped the tree in Garden Green ink three times onto the wet layer, then set aside and allowed to dry completely
Cut using the Banners Pick a Punch:
- the left end of the two CS strips
Assembled the card:
- burnished the fold in the card base with a Bone Folder
- fully dry watercolor layer adhered onto the front of the card base using Stampin’ Seal+
- sentiment strip glued onto the Garden Green CS strip
- Garden Green CS strip glued onto the front of the card, then any excess trimmed away using Paper Snips
- 3 Adhesive-Backed Snowflake Sequins applied onto the watercolor layer using my Take Your Pick tool
- Whisper White CS glued onto the inside of the card base
S
Here are today’s colors:
You can click on each one to see all the products that come in that color!
S
Here’s what I used:
Click on these images for more details and to purchase. If you are reading this post in email, the product images may not show up. Please click here to see the post on my blog.
Supply List. <— Click for a clickable and printable list of the products!
S
Here’s some news: Whisper White is going away
The facility that manufactures Whisper White paper is closing due to COVID-19. But don’t fret. The new Basic White products are in the works! No other colors are affected. The following items are now available while supplies last with an order limit of 2 per item per order.
- Cardstock, Whisper White 12″ x 12″ (124302)
- Cards & Envelopes, Assorted Memories & More (149710)
- Cards & Envelopes, Whisper White Note (131527)
- Envelopes, Whisper White 3″ x 3″ (145829)
- Cardstock, Whisper White 8-1/2″ x 11″ (100730)
- Cardstock, Whisper White 8-1/2″ x 11″ Thick (140272)
- Envelopes, Whisper White Medium (107301)
S
Here’s the Year-End Closeout
All retiring items will be available through 4 January 2021, or while supplies last. Click on the image to shop now!
S
Here’s the Curvy Celebrations offering:
Click the image to see it in my online store. The Curvy Christmas stamp set and Classic Christmas Designer Series Paper are available only through January 4, or while supplies last!
S
Here’s the new catalog:
Click the image below to request your January-June 2021 Mini Catalog AND Sale-a-bration Brochure:
S
Here are some helpful links:
S
Thanks for stopping by today, and Sweet Stamping!
Dec 7, 2020 | Cards, Christmas, Events, Gallery, Holiday, Parties |
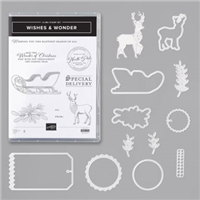
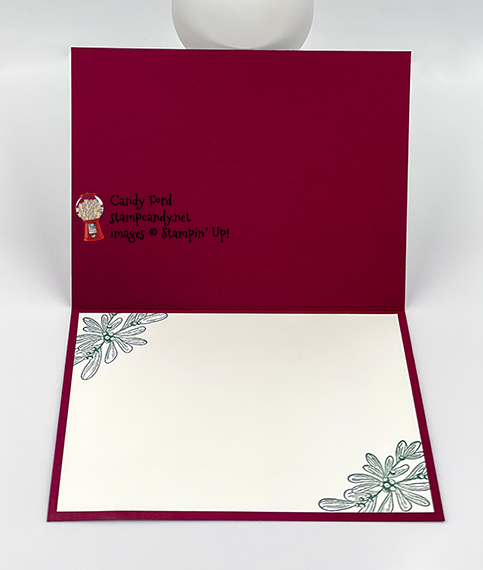
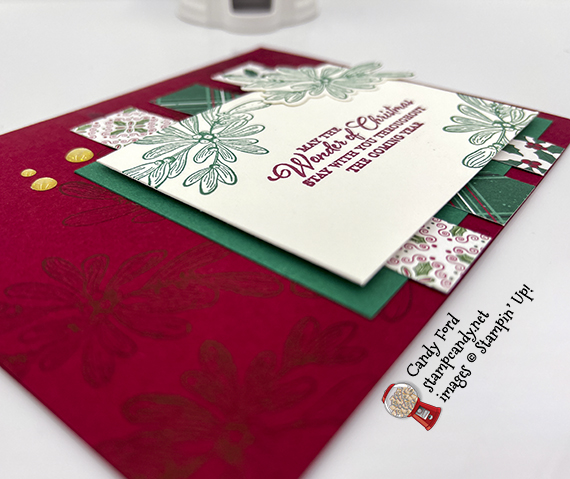
I hosted a Mystery Stamping Party on Facebook, and today I’m sharing my sample card for it. I used the Wishes & Wonder Bundle (Wishes & Wonder stamp set and North Pole Wonder Dies,) ‘Tis the Season Designer Series Paper, and Gold Glitter Enamel Dots.
Mark your calendar and tell your friends! To participate in my next free Mystery Stamping Party, join the Facebook group here. The next one will be Wednesday, 6 January 2021. I will post details in the group.
If you are reading this in email, some photos may appear blurry, or may not appear at all. Please click here to see the post on my blog.
S Wishes & Wonder Wishes & Wonder Wishes & Wonder Wishes & Wonder
Here’s what I made:
S
Here’s what I did:
Cut and scored with my paper trimmer:
- Cherry Cobbler card stock (CS) cut to 5-1/2″ x 8-1/2″, then scored in half at 4-1/4″
- ‘Tis the Season Designer Series Paper (DSP) cut to 3/4″ x 3-3/4″ (3 strips, each a different pattern)
- Shaded Spruce CS layer cut to 3-3/4″ x 2-2/3″
- Whisper White Thick CS layer cut to 3-1/2″ x 2-1/2″
- Whisper White CS cut to 5-1/4″ x 4″ for the inside of the card base
Stamped with the Wishes & Wonder stamp set:
- sentiment in Cherry Cobbler ink onto the Whisper White Thick CS layer
- sprigs in Cherry Cobbler ink in a diagonal swath onto the front of the card base
- two sprigs in Shaded Spruce ink onto the same layer
- one sprig in Shaded Spruce ink onto a scrap of Whisper White Thick CS
- two sprigs in Shaded Spruce ink onto the Whisper White CS for the inside
Cut using the North Pole Wonder Dies:
- the one sprig that was on a scrap of Whisper White Thick CS
Assembled the card:
- burnished the fold in the card base with a Bone Folder
- Shaded Spruce CS layer glued onto the front of the card base, 1/4″ from the bottom and right edges
- 3 DSP strips glued over the Shaded Spruce CS layer, about 1/4″ apart, and the bottom ends even with the edge of the card base
- Whisper White Thick CS layer adhered over the DSP strips, and centered over the Shaded Spruce CS layer, using strips I cut from a Foam Adhesive Sheet
- die cut sprig glued onto the top right corner of the Whisper White Thick CS layer
- 3 Gold Glitter Enamel Dots applied onto the front of the card base using my Take Your Pick tool
- Whisper White CS glued onto the inside of the card base
S
Here are today’s main colors:
You can click on each one to see all the products that come in that color!
S
Here’s what I used:
Click on these images for more details and to purchase. If you are reading this post in email, the product images may not show up. Please click here to see the post on my blog.
Supply List. <— Click for a clickable and printable list of the products!
S
Here’s the new Curvy Celebrations offering:
Click the image to see it in my online store. Some of these products are available only through January 4, or while supplies last!
S
Request a new catalog:
I will be mailing them out in early December. Click the image below to request yours:
S
Here are some helpful links:
S
Thanks for stopping by today, and Sweet Stamping!
Nov 27, 2020 | Cards, Christmas, Gallery, Holiday, Swaps |
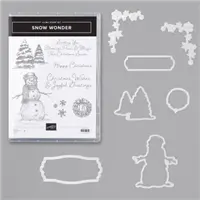
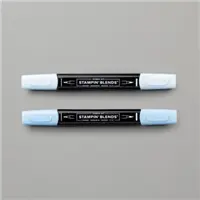
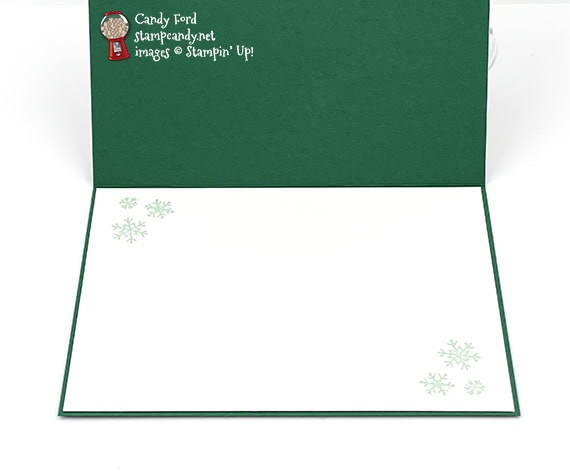
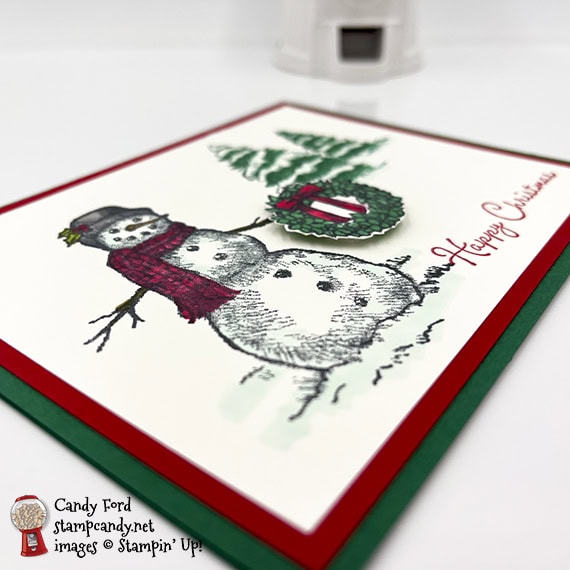
Today I’m sharing my swap card for the November Candy Hearts team meeting. I used the Snow Wonder stamp set and Stampin’ Blends Markers to create this sweet scene.
If you are reading this in email, some photos may appear blurry, or may not appear at all. Please click here to see the post on my blog.
S Snow Wonder Snow Wonder Snow Wonder Snow Wonder
Here’s what I made:

S
Here’s what I did:
Cut and scored with my paper trimmer:
- Shaded Spruce card stock (CS) cut to 5-1/2″ x 8-1/2″, then scored in half at 4-1/4″
- Real Red CS layer cut to 5-1/4″ x 4″
- Whisper White CS layer cut to 5″ x 3-3/4″
- Whisper White CS cut to 5-1/4″ x 4″ for the inside of the card base (I accidentally used a piece cut to 5-3/8″x 4-1/8″)
Stamped with the Snow Wonder stamp set:
- snowman in Tuxedo Black Memento ink onto the Whisper White CS layer
- sentiment in Real Red ink onto the Whisper White CS layer
- trees in Shaded Spruce ink onto the Whisper White CS layer
- wreath in Tuxedo Black Memento ink onto a scrap of Whisper White Thick CS
- snowflakes in Pool Party ink onto the Whisper White CS for the inside
Colored using Stampin’ Blends Markers:
- snowman in Smoky Slate, Real Red, Pumpkin Pie, Granny Apple Green, and Pool Party
- wreath in Shaded Spruce and Real Red
- trees in Shaded Spruce and Pool Party
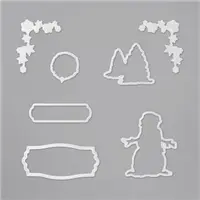
Cut using the Snow Time Dies:
Assembled the card:
- burnished the fold in the card base with a Bone Folder
- Real Red CS layer glued onto the front of the card base
- Whisper White CS layer glued onto the Real Red CS layer
- wreath adhered onto the Whisper White CS layer using Stampin’ Dimensionals
- Whisper White CS glued onto the inside of the card base
S
Here are today’s main colors:
You can click on each one to see all the products that come in that color!
S
Here’s what I used:
Click on these images for more details and to purchase. If you are reading this post in email, the product images may not show up. Please click here to see the post on my blog.
Supply List. <— Click for a clickable and printable list of the products!
S
Here’s the new Curvy Celebrations offering:
Click the image to see it in my online store. Some of these products are available only through January 4, or while supplies last!
S
Request a new catalog:
I will be mailing them out in early December. Click the image below to request yours:
S
Here are some helpful links:
S
Thanks for stopping by today, and Sweet Stamping!
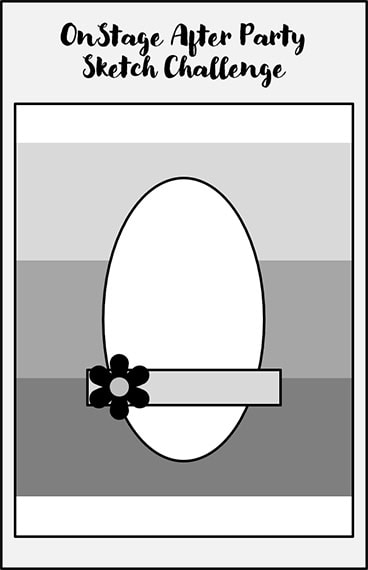
Nov 20, 2020 | Cards, Challenges, Christmas, Gallery, Holiday, Sketches |
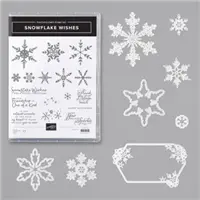
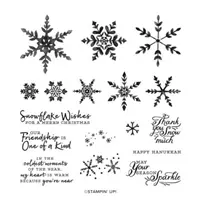
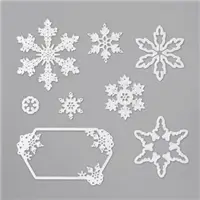
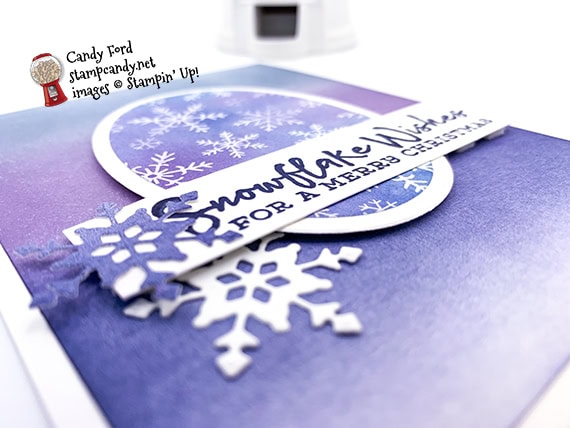
I used the Snowflake Wishes Bundle (Snowflake Wishes stamp set & So Many Snowflakes Dies) along with the Snowflake Splendor Designer Series Paper – all of which are part of the Snowflake Splendor Suite Collection – to create today’s Christmas card. I’m also providing a sneak peek at an upcoming product, that will be available in the January – June 2021 Mini Catalog: Blending Brushes. I am very excited that Stampin’ Up! will be offering this amazing blending tool! I used one in a side to side motion to blend the three stripes of background color onto a layer of Whisper White card stock.
If you are reading this in email, some photos may appear blurry, or may not appear at all. Please click here to see the post on my blog.
S wishes wishes wishes wishes
Here’s the sketch:
I recently attended Stampin’ Up!’s OnStage@Home virtual event for Demonstrators, where we got to see the new catalog and lots of new products. After the last day, my upline, Brian King, hosted a virtual After Party for his team members. He had given us a sketch challenge for the event, and we all got to show off what we made. Today’s card is the one I made for that challenge.
S
Here’s what I made:

S
Here’s what I did:
Cut and scored with my paper trimmer:
- Whisper White Thick card stock (CS) cut to 4-1/4″ x 11″, then scored in half at 5-1/2″
- Whisper White CS layer cut to 4″ x 5-1/4″
- Snowflake Splendor Designer Series Paper strip cut to 4-1/4″ x 1/2″
- Whisper White Thick CS cut to 3-1/2″ x 7/8″ for the sentiment
Stamped with the Snowflake Wishes stamp set:
- sentiment in Night of Navy ink onto the 3-1/2″ x 7/8″ Whisper White Thick CS
Colored using a Blender Brush:
- Whisper White CS layer in Balmy Blue, Highland Heather, and Night of Navy inks (top to bottom)
- a scrap of Whisper White Thick CS in Night of Navy
Cut using the Layering Ovals Dies:
- DSP oval
- Whisper White Thick CS slightly larger than the DSP ovalx
Cut using the So Many Snowflakes Dies:
- one snowflake from the brushed scrap
- one snowflake from a scrap of Whisper White Thick CS
Assembled the card:
- burnished the fold in the card base with a Bone Folder
- blended Whisper White CS layer glued onto the front of the card base
- DSP oval glued onto the Whisper White Thick CS oval
- Whisper White Thick CS oval adhered onto the blended layer using Stampin’ Dimensionals
- sentiment glued across the ovals, and adhered on the ends onto the blended layer using Stampin’ Dimensionals
- blended snowflake glued onto the end of the sentiment
- Whisper White snowflake glued onto the blended layer
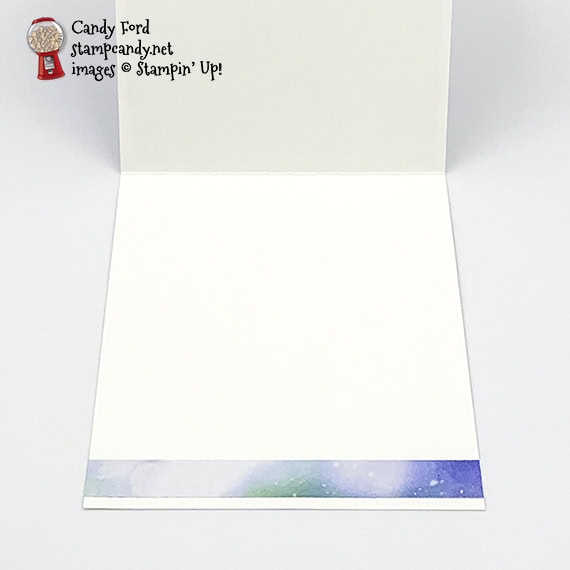
- DSP strip glued onto the inside of the card base
- NOTE: There were some thin strips of DSP from previous projects lying around my craft table. After I had this one glued onto my card, I realized I had used one from the Feels Like Frost DSP instead of the Snowflake Splendor DSP. But, hey, it works!
S
Here are today’s colors:
You can click on each one to see all the products that come in that color!
S
Here’s what I used:
Click on these images for more details and to purchase. If you are reading this post in email, the product images may not show up. Please click here to see the post on my blog.
Supply List. <— Click for a clickable and printable list of the products!
S
Here’s the new Curvy Celebrations offering:
Click the image to see it in my online store.
S
Here are some helpful links:
S
Thanks for stopping by today, and Sweet Stamping!
Nov 19, 2020 | Cards, Christmas, Gallery, Holiday |
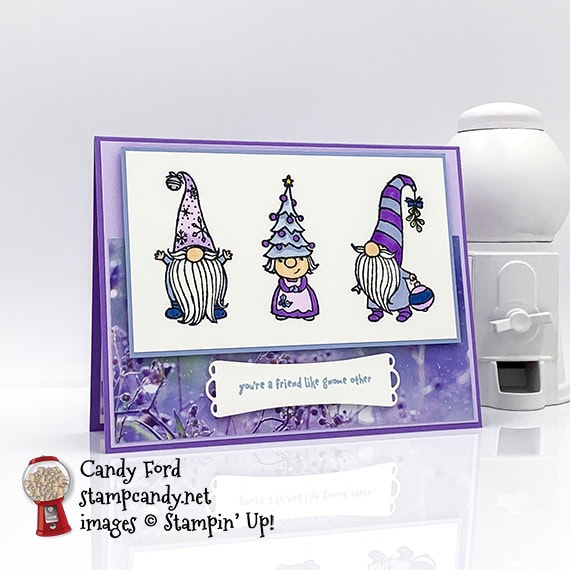
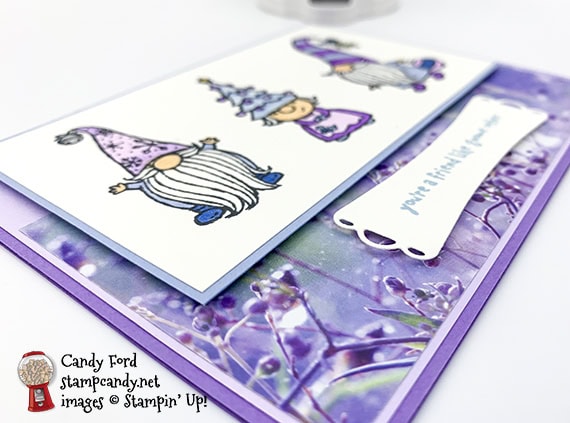
I used the Gnome for the Holidays stamp set, Most Wonderful Time Dies, Feels Like Frost Designer Series Paper, and Stampin’ Blends Markers to make today’s card. I love frosty hues of blue and purple in the paper, and those are the color I used to color the gnomes.
If you are reading this in email, some photos may appear blurry, or may not appear at all. Please click here to see the post on my blog.
S Gnome Gnome Gnome Gnome
Here’s what I made:
S
Here’s what I did:
Cut and scored with my paper trimmer:
- Highland Heather card stock (CS) cut to 5-1/2″ x 8-1/2″, then scored in half at 4-1/4″
- Purple Posy CS layer cut to 5-3/8″ x 4-1/8″
- Feels Like Frost Designer Series Paper (DSP) layer cut to 5-1/4″ x 2-3/4″
- Seaside Spray CS layer cut to 4-7/8” x 2-7/8”
- Whisper White CS layer cut to 4-3/4″ x 2-3/4″
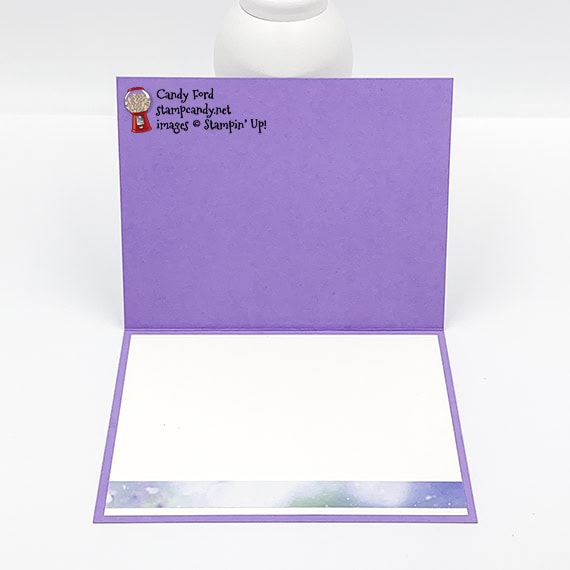
- Whisper White CS cut to 5-1/4″ x 4″ for the inside of the card base
- DSP strip cut to 5-1/4″ x 1/2″
Stamped with the Gnome for the Holidays stamp set:
- three gnomes in Memento Tuxedo Black ink onto the Whisper White CS layer
- sentiment in Seaside Spray ink onto a scrap of Whisper White Thick CS
Cut using the Most Wonderful Time Dies:
Colored using Stampin’ Blends Markers:
- gnomes in Purple Posy, Highland Heather, Night of Navy, Seaside Spray, Ivory, Granny Apple Green (mistletoe,) Smoky Slate (bell,) and Daffodil Delight (star)
Assembled the card:
- burnished the fold in the card base with a Bone Folder
- Purple Posy CS layer glued onto the front of the card base
- DSP layer glued onto the Purple Posy CS layer, lined up at the bottom
- Whisper White CS layer with gnomes glued onto the Seaside Spray CS layer
- Seaside Spray CS layer adhered over the DSP/Purple Posy layers using Stampin’ Dimensionals
- sentiment adhered onto the DSP layer using Stampin’ Dimensionals
- DSP strip glued onto the Whisper White CS for the inside, then the Whisper White CS glued onto the inside of the card base
S
Here are today’s main colors:
You can click on each one to see all the products that come in that color!
S
Here’s what I used:
Click on these images for more details and to purchase. If you are reading this post in email, the product images may not show up. Please click here to see the post on my blog.
Supply List. <— Click for a clickable and printable list of the products!
S
Here’s the new Curvy Celebrations offering:
Click the image to see it in my online store.
S
Here are some helpful links:
S
Thanks for stopping by today, and Sweet Stamping!