Yesterday I shared a sweet thank you card I made using the Very Vintage host stamp set and the Enjoy Life stamp set. You can see it here. Today’s card is the one I was making when I made the mistake that led to yesterday’s card. I had stamped the floral image from the Very Vintage stamp set once, and put another piece of card stock in the Stamparatus to stamp a second one. I forgot to re-ink the stamp so I got the lovely stamped off image on yesterday’s card. Today’s card has the full strength inked image, so the card base is Blueberry Bushel, instead of the soft Petal Pink I felt the stamped off version warranted.
Here’s what I made:
Here’s what I did:
Cut and scored with my Stampin’ Trimmer:
Blueberry Bushel card stock (CS) cut to 4-1/4″ x 11″, then scored in half at 5-1/2″
Whisper White CS cut to 4″ x 5-1/4″ (2 pieces)
Stamped with the Very Vintage stamp set:
floral image in Blueberry Bushel ink onto one of the Whisper White CS pieces
Stamped with the Enjoy Life stamp set:
sentiment in Blueberry Bushel ink above the floral image
Assembled the card:
burnished the fold in the card base with a Bone Folder
stamped layer glued onto the front of the card base
the other Whisper White CS glued onto the inside of the card base
3 pearls applied to the stamped layer in a random pattern
Here are today’s colors:
You can click on each one to see all the products that come in that color!
It’s time for the Remarkably Created Blog Tour for June 2018. We are showcasing new products from the 2018-2019 Annual Catalog. Be sure to check out all the stops on the tour, because you don’t want to miss any of the projects by these talented stampers. I used the Very Vintage host stamp set (yes, again, because it’s fabulous, and I love it, and I have it) and the Enjoy Life stamp set to create this sweet thank you card.
Here’s what I made:
Here’s what I did:
Cut and scored with my Stampin’ Trimmer:
Petal Pink card stock (CS) cut to 4-1/4″ x 11″, then scored in half at 5-1/2″
Whisper White CS cut to 4″ x 5-1/4″ (2 pieces)
Stamped with the Very Vintage stamp set:
floral image in Blueberry Bushel ink, stamped off once, onto one of the Whisper White CS pieces
Stamped with the Enjoy Life stamp set:
sentiment in Blueberry Bushel ink above the floral image
Assembled the card:
burnished the fold in the card base with a Bone Folder
stamped layer glued onto the front of the card base
the other Whisper White CS glued onto the inside of the card base
3 Petal Pink pearls applied to the stamped layer in a random pattern
Here’s the blog tour:
Here are today’s colors:
You can click on each one to see all the products that come in that color!
The Share What You Love suite was available to order before the new annual catalog went live, so I’m sure you’ve seen a lot of it recently. Are you tired of it yet? Me neither. So today I’m sharing another card made with these amazing products, including the Love What You Do stamp set and the Share What You Love Designer Series Paper (DSP.)
I owe a huge apology to my friend and fellow Stampin’ Up! Demonstrator Debbie Mason. She and I did a card swap, and this was one of the cards she sent me. I did make one very, very similar to this, and I got the pictures mixed up. I didn’t remember embossing the cardstock strip across the middle, but my memory isn’t what it used to be, so I just assumed I forgot being so clever. Senility sucks! 🙂
Here’s what I made:
Here’s what I did:
Cut and scored with my Stampin’ Trimmer:
Mint Macaron card stock (CS) cut to 5-1/2″ x 8-1/2″, then scored in half at 4-1/4″
Tranquil Tide CS cut to 5-1/4″ x 4″
Share What You Love Designer Series Paper (DSP) cut to 5″ x 1-1/2″ (2 pieces, each a different pattern)
Tranquil Tide CS cut to 5″ x 1″
Whisper White CS cut to 5-1/4″ x 4″ for the inside of the card base
Stamped with the Love What You Do stamp set:
sentiment in Tranquil Tide ink onto a scrap of Whisper White CS
Die cut using the Stitched Shapes Framelit Dies:
sentiment
Die cut using the Layering Ovals Framelit Dies:
scalloped oval cut from Tranquil Tide CS
Embossed using the Seaside embossing folder:
Tranquil Tide CS strip
Assembled the card:
burnished the fold in the card base with a Bone Folder
Tranquil Tide CS layer glued onto the front of the card base
2 DSP pieces glued onto the Tranquil Tide CS layer, lining up one with the top and one with the bottom
Tranquil Tide CS strip glued over the gap between the 2 DSP pieces
sentiment glued onto the Tranquil Tide CS die cut oval
Tranquil Tide CS die cut oval adhered over the embossed strip using Stampin’ Dimensionals
Whisper White CS glued onto the inside of the card base
3 rhinestones applies to the sentiment oval
Here are today’s main colors:
You can click on each one to see all the products that come in that color!
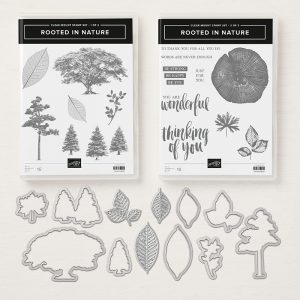
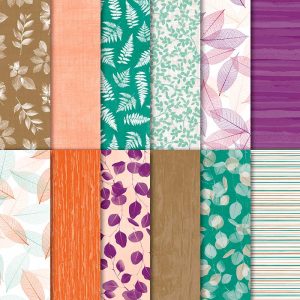
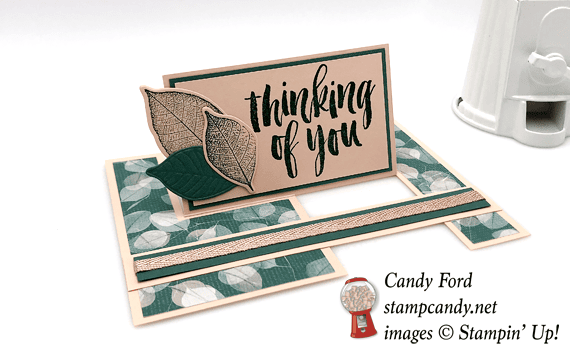
Today’s card in impossible! Well, it’s called an impossible card. But it’s really incredibly easy. For this one I used the new Rooted in Nature stamp set and the coordinating Natures Poem Designer Series Paper. The card base is one piece of 5-1/2″ x 4-1/4″ card stock, so it fits into a standard A2 (medium) envelope. You can write a note on the back/bottom of the card base.
It’s time for the June ICS Blog Hop! This month we are featuring the new 2018-2020 In Colors, I used the new Accented Blooms stamp set and the Tailored Tag Punch.
Here’s what I made:
Here’s what I did:
Cut and scored with my Stampin’ Trimmer:
Basic Black card stock (CS) cut to 5-1/2″ x 8-1/2″, then scored in half at 4-1/4″
Whisper White CS cut to 5-1/4″ x 4″ for the inside of the card
Stamped with the Accented Blooms stamp set:
sentiment in black ink onto a scrap of Whisper White CS, then cut out using Paper Snips
Cut using the Tailored Tag Punch:
2-3 pieces from each of these five colors of card stock: Blueberry Bushel, Call Me Clover, Grapefruit Grove, Lovely Lipstick, Pineapple Punch
Assembled the card:
burnished the fold in the Basic Black card base with a Bone Folder
glued the punched pieces onto the front of the card base about 1/8″ apart, as shown in the photos
sentiment glued onto one of the punched shapes
Whisper White CS glued onto the inside of the card base
Here’s the hop:
Click the arrow to hop to the next blog, Cheryl Hamilton of Create With Cheryl.
Here are today’s colors:
You can click on each one to see all the products that come in that color!
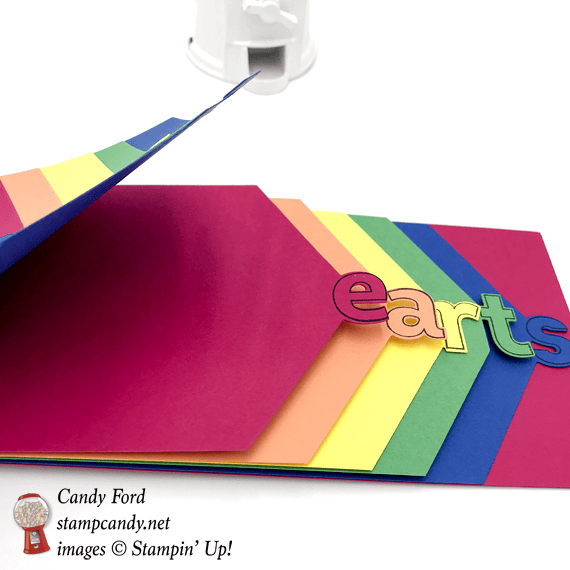
Hi, there! Today’s project is something I made when I was first playing with the new Lined Alphabet bundle (Lined Alphabet stamp set & Layering Alphabet Edgelits Dies.) First I decided to spell out Candy Hearts in the new In Colors. Then I decided to put them all together into a long booklet. Be sure to watch this video that Stampin’ Up! made all about this bundle.
Here’s what I made:
Here’s what I did:
Cut and scored with my Stampin’ Trimmer:
Lovely Lipstick CS cut to 11″ x 4-1/4″, then scored at 7/8″ and 1″ from one end, for the cover
Blueberry Bushel, Lovely Lipstick, Grapefruit Grove, Pineapple Punch, and Call Me Clover card stocks (CS) cut to 11″ x 4-1/4″, a couple pieces of each color
all pieces to length (see below)
Die cut using the Layering Alphabet Framelits:
one letter at the end of each piece of CS
Stamped with the Lined Alphabet stamp set:
letters in Jet Black Memento ink onto die cut pieces
Assembled the card:
folded and burnished the two score lines on the cover with a Bone Folder
laid out all the pieces in order, as you see them in the photo, then cut off the appropriate amount from the left end of each CS piece
stapled the CS layers together at the left end
glued the left end of the cover around the left end of the stapled CS layers
wrapped a piece of ribbon around the end and tied it in a bow
Here are today’s colors:
You can click on each one to see all the products that come in that color!