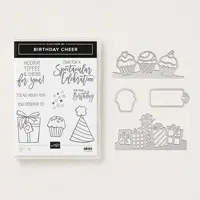
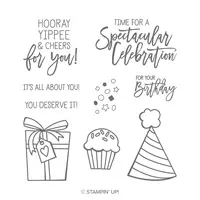
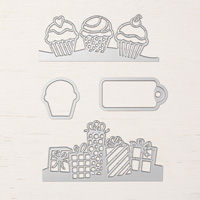
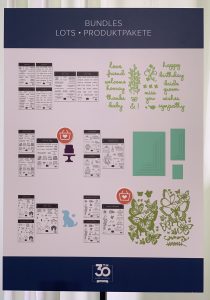
Today I’m sharing a card made with brand new products from the 2019 Occasions Catalog: the Birthday Cheer Bundle! Save 10% when you buy the Birthday Cheer Stamp Set and Detailed Birthday Edgelits Dies together in a bundle! This is such a fun set and you’ll be able to use it all year for any age.
During the Year-End Closeout promotion, you can save on a selection of retiring and surplus items—while supplies last. Definitely place your orders sooner rather than later, because supplies are limited and the Year-End Closeout ends on January 2. After that, some of your favorite retiring items may be gone for good!
CLICK HERE to see all the Year-End Closeout items.
S
Here’s how to get your copy of the new catalogs:
Just click on this button and I’ll send you the new catalogs, along with a list of the bundles, the Designer Series Paper coordinating colors, and a handmade card!
S
Here’s how to shop 2019 Occasions & Sale-a-bration items now!
Become a Candy Heart!
Join my team and you can order the new products right now, instead of having to wait another month!
No selling required! I welcome Hobby Demos! (Hobby Demos join to get the discount for themselves.)
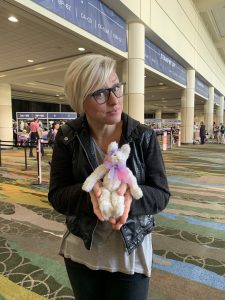
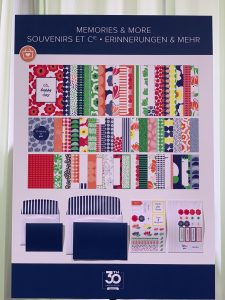
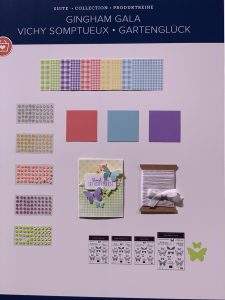
Last week I was in Orlando, Florida, USA with about 6000 other Demonstrators for Stampin’ Up!’s 30th Anniversary Celebration. We received the 2019 Occasions Catalog and Sale-a-bration Brochure (you’re gonna love them!) We also received some of the new products and got to do some great Make & Take projects. Today I’m sharing some sneak peeks with you.
Here are the new catalogs:
I can only show you the covers right now. They go live January 3, 2019.
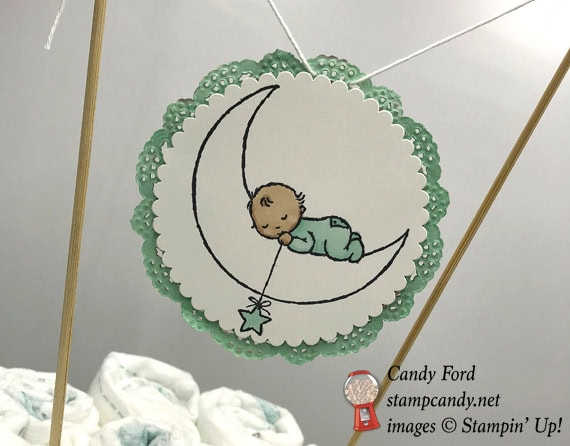
I recently made my very first diaper cake. I know, I know, they’ve been ubiquitous at baby showers for years now, but somehow I just never got around to making one. Until now. It was surprisingly easy. The hardest part was getting all those diapers bundled together without them going every which way. It helps to have an extra pair of hands for that step. Otherwise it was a piece of cake. <wink> I used the Moon Baby stamp set as well and the Pretty Kitty and Bella & Friends stamp sets, and the Whole Lot of Lovely Designer Series Paper (DSP.) I used Powder Pink and Pool Party to create a gender neutral cake, for times when you don’t know the baby’s gender, or for when you know there are a boy AND a girl.
Kittens and puppies seemed like an appropriate baby theme. I mean, they’re babies, too. So Pretty Kitty and Bella & Friends were the perfect stamp sets to use.
Here’s what I made:
Here’s what I did:
Cut and scored with my Stampin’ Trimmer:
Whole Lot of Lovely Designer Series Paper (DSP) cut to 3″ x 12″, 4 pieces of one pattern for the bottom tier, and 3 pieces of another pattern for the top tier
Stamped with the Pretty Kitty stamp set:
6 cats in Memento black ink onto scraps of Whisper White card stock (CS)
Stamped with the Bella & Friends stamp set:
6 dogs in Memento black ink onto scraps of Whisper White CS
Stamped with the Moon Baby stamp set:
2 of the baby-on-moon images in Memento black ink onto scraps of Whisper White CS
Die cut using the Layering Circles Framelits:
cats, dogs, and babies
slightly larger circles from Powder Pink and Pool Party CS, to mat the stamped cat and dog images
Colored using Stampin’ Blends Markers:
cats & dogs in Pink Pirouette and Pool Party
babies in Pink Pirouette, Pool Party, Ivory, and Bronze
one white doily in Pink Pirouette
one white doily in Pool Party
NOTE: I only colored the outer edges of the doilies, since most of the center would be covered up. I also learned – the hard way – to be sure to color the front side of the doily. The back side is too rough and will tear up the brush tip of your marker. Also, you can just use an ink pad to color the doilies.
Assembled the cake:
rolled individual diapers and held them with rubber bands
gathered enough diaper rolls together to create the bottom tier of the cake, and tied ribbon around to keep them together
did the same thing to create the smaller top tier of the cake
NOTE: I think I used about 50 diapers or so. It will depend on the diapers you use and on the size of your cake platter.
glued together the lengths of DSP and wrapped around each cake tier
glue the stamped images onto the larger die cut circles, then glued them onto the DSP strips
glued the two doilies together, lining up the holes around the edges
adhered a baby image to each side of the doilies using Stampin’ Dimensionals
threaded a length of Solid Whisper White twine through the holes in the doilies at the top, and tied the ends to two wooden skewers
poked the skewers down into the cake, careful not to puncture the diapers
Here are today’s colors:
You can click on each one to see all the products that come in that color!
Today I’m sharing a super easy way to decorate a container for a party. I used the Picture Perfect Party Designer Series Paper, Bermuda Bay card stock, and Lemon Lime Twist ribbon. The colors in the paper look great with the multicolor gumballs in the jar.
I’ve had this jar for years, and I decorate it in different ways for different events. This is perfect for a fun birthday party, maybe for a child. I think I bought the jar at Target, or maybe T.J.Maxx or Home Goods.
I recommend using a small plastic scoop, so there aren’t a bunch of sticky little hands all over the gumballs. Don’t ask me how I learned that lesson.
Here’s what I made:
Here’s what I did:
Cut and scored with my Stampin’ Trimmer:
Bermuda Bay card stock (CS) cut to 12″ x 4″ (2 pieces)
Picture Perfect Party Designer Series Paper (DSP) cut to 6″ x 3-1/2″ (4 pieces)
NOTE: I cut the top and bottom off the DSP pieces to have as much of the candles as possible.
Assembled the project:
Bermuda Bay CS pieces wrapped around the jar and adhered with Tear & Tape, to each other and to the jar
DSP pieces glued onto the CS, all the way around the jar
tied a piece of Lemon Lime Twist Finely Woven Ribbon around the lid handle and tied it in a bow
Here are today’s main colors:
You can click on each one to see all the products that come in that color!
Today I’m sharing a card made by Stampin’ Up! Demonstrator Susan Ballentine. Susan is on my Candy Hearts team, and this was her swap card at a recent team gathering. She used the Cake Soiree stamp set and Sweet Soiree Designer Series Paper to create this lovely card. With a sentiment of simply “Celebrate” it’s perfect for any celebratory occasion.
Here’s what she made:
Here’s what she did:
Cut and scored with her Stampin’ Trimmer:
Old Olive card stock (CS) cut to 8-1/2″ x 5-1/2″, then scored in half at 4-1/4″
Sweet Soiree Specialty Designer Series Paper (DSP) layer cut to 4″ x 5″
DSP layer cut to 3″ x 3″ (different pattern)
Whisper White CS layer cut to 1″ x 2″
Whisper White CS cut to 4″ x 5-1/4″ for the inside of the card
Stamped with the Cake Soiree stamp set:
sentiment in Berry Burst ink onto the Whisper White CS layer
Cut using the Envelope Punch Board:
rounded the corners of the sentiment layer
Assembled the card:
burnished the fold in the card base with a Bone Folder
smaller DSP layer glued onto the larger DSP layer
ribbon adhered onto the larger DSP layer, and the ends wrapped around to the back, using Tear & Tape
larger DSP layer glued onto the front of the card base
sentiment layer adhered to the DSP using Stampin’ Dimensionals
3 rhinestones applied to the ribbon
Whisper White CS glued to the inside of the card base
Here are today’s main colors:
You can click on each one to see all the products that come in that color!
Do you recognize the texture on this card? It’s the Basket Weave Dynamic Textured Impressions Embossing Folder. It may not look like basket weave. That’s because I used the other side – the debossed side – of the card stock. I think it makes an interesting pattern that goes well with the lines in the sentiment font. The stamped images are from the Big On Birthdays stamp set. The last little glittery touches are from the Glitter & Clear Epoxy Shapes embellishments.
There’s less than a week left of Sale-A-Bration, which is the only way you can get this embossing folder. It comes in a bundle with the Blossoming Basket stamp set – the bundle is free with a $100 order. Check out the Sale-A-Bration items here.
Here’s what I made:
Here’s what I did:
Cut and scored with my Stampin’ Trimmer:
Bermuda Bay card stock (CS) cut to 5-1/2″ x 8-1/2″, then scored in half at 4-1/4″
Berry Burst CS layer cut to 5-1/4″ x 4″
Whisper White CS layer cut to ___
Whisper White CS cut to 5-1/4″ x 4″ for the inside of the card
Stamped with the Big On Birthdays stamp set:
sentiment in Bermuda Bay ink onto the Whisper White CS layer
bow in Berry Burst ink above the sentiment
Dry embossed using the Basket Weave Dynamic embossing folder:
Berry Burst CS layer
Assembled the card:
burnished the fold in the card base with a Bone Folder
Berry Burst CS layer glued onto the front of the card base
Whisper White CS layer adhered to the Berry Burst CS layer using Stampin’ Dimensionals
applied glitter shapes to the Berry Burst CS layer
glued the remaining Whisper White CS to the inside of the card base
Here are today’s colors:
You can click on each one to see all the products that come in that color!