Mar 4, 2018 | Baby, Cards, Gallery, Holiday, Occasions |
Today I’m sharing a card I made for the Candy Hearts team meeting monthly swap for February. The theme was Spring, including any Spring holiday or anything “Springy.” I used the Sweet Little Something stamp set to create the three stamp photorealistic image of the stuffed bunny. My new Stamparatus made it so so easy to make multiples of this card, all of them lined up perfectly. Just change the sentiment and this card could be used for a baby shower, child birthday, or any occasion calling for a sweet stuffed bunny!
Be on the lookout for swap cards from my Candy Hearts team in the next few days!
Here’s what I made:


Here’s what I did:
Cut and scored with my Stampin’ Trimmer:
- Pool Party card stock (CS) cut to 5-1/2″ x 8-1/2″, then scored in half at 4-1/4″
- Whisper White CS cut to 5-1/4″ x 4″
- Sweet Soiree Designer Series Paper (DSP) cut to 2″ x 4″
- Optional: Whisper White CS cut to 5-1/4″ x 4″ for the inside of the card
Stamped with the Sweet Little Something stamp set:
- first bunny image in Blushing Bride ink onto the Whisper White CS layer
- second bunny image in Flirty Flamingo ink
- third bunny image in Calypso Coral ink
- NOTE: I used the new Stamaparatus to stamp the bunny layers.
- sentiment in Pool Party ink onto a scrap of Whisper White CS
Die cut using the Bunch of Banners Framelits:
Assembled the card:
- folded and burnished the score line in the card base with a Bone Folder
- bunny layer glued onto the front of the card base
- DSP glued onto the Whisper White CS layer
- sentiment adhered to the card front using Stampin’ Dimensionals
- Optional: second Whisper White CS glued to the inside of the card base – The Pool Party CS is light enough to write on without adding the Whisper White CS.
Here are today’s colors:
You can click on each one to see all the products that come in that color!
Here’s what I used:
Click on these images for more details and to purchase.
Here’s some stuff you should know:
- This is a fabulous time to join my team! Sale-A-Bration is the biggest event of the Stampin’ Up! year and you can save big on the ultimate bundle, the Starter Kit. CLICK HERE for more information. Contact me with any questions: email candy@stampcandy.net or call/text 404-661-5222
- Newsletter: subscribe for exclusive deals, projects, and more! Enter your email address and click SUBSCRIBE at the top right of this page, just under the picture of my smiling face. You can also choose to receive an email every day that I have a blog post.
- Check out My Events Calendar HERE
- Host Code for the month of March (34CJGPSJ) Find out more about HOW, WHEN and WHY to use the code HERE.
- My Thank You Gift to You in March: Mini Embroidery Hoops – Find out more HERE.
- Gift Certificates are available in any U.S. dollar amount from me. Contact me – email: candy@stampcandy.net OR call/text: 404-661-5222
- Gumball Rewards for all orders over $50. Find out more HERE.
Thanks for stopping by today, and Sweet Stamping!

Mar 2, 2018 | Cards, Gallery, Occasions |
I’ve really enjoyed playing with the Dad Jokes stamp set. Today I paired it with the True Gentleman Designer Series Paper and Buttons to create this dapper, yet corny, card.
Here’s what I made:


Here’s what I did:
Cut and scored with my Stampin’ Trimmer:
- Early Espresso card stock (CS) cut to 5-1/2″ x8-1/2″, then scored in half at 4-1/4″
- Very Vanilla CS cut to 5 1/4″ x 4″ (2 pieces: one for a layer and one for the inside of the card)
- True Gentleman DSP cut to 5″ x 3.75″, then cut diagonally from corner to corner
- Early Espresso CS cut to
- Very Vanilla CS cut to
Stamped with the Dad Jokes stamp set:
- two sentiments in Early Espresso ink onto the small Very Vanilla CS layer
- scissors in Tranquil Tide ink between the two sentients
Colored using a Blender Pen:
- scissors – smeared the existing ink to fill in the image very lightly
Assembled the card:
- folded and burnished the score line in the card base with a Bone Folder
- Very Vanilla CS layer glued onto the front of the card base
- True Gentleman DSP glued onto Very Vanilla CS layer
- sentiment layer glued onto the Early Espresso CS layer
- Early Espresso CS layer glued onto the DSP and Very Vanilla CS layer
- 3 buttons adhered to the DSP and Very Vanilla CS layer using Mini Glue Dots
- remaining Very Vanilla CS glued to the inside of the card base
Here are today’s colors:
You can click on each one to see all the products that come in that color!
Here’s what I used:
Click on these images for more details and to purchase.
Here’s some stuff you should know:
- This is a fabulous time to join my team! Sale-A-Bration is the biggest event of the Stampin’ Up! year and you can save big on the ultimate bundle, the Starter Kit. CLICK HERE for more information. Contact me with any questions: email candy@stampcandy.net or call/text 404-661-5222
- Newsletter: subscribe for exclusive deals, projects, and more! Enter your email address and click SUBSCRIBE at the top right of this page, just under the picture of my smiling face. You can also choose to receive an email every day that I have a blog post.
- Check out My Events Calendar HERE
- Host Code for the month of March (34CJGPSJ) Find out more about HOW, WHEN and WHY to use the code HERE.
- My Thank You Gift to You in March: Mini Embroidery Hoops – Find out more HERE.
- Gift Certificates are available in any U.S. dollar amount from me. Contact me – email: candy@stampcandy.net OR call/text: 404-661-5222
- Gumball Rewards for all orders over $50. Find out more HERE.
Thanks for stopping by today, and Sweet Stamping!
Feb 27, 2018 | Cards, Gallery, Occasions |
Today I have another dad joke for you. Why do dads love cheesy puns? My dad did. Most of the dads I’ve known did. Me may never know the reason. But it’s a good thing Stampin’ Up! came out with the Dad Jokes stamp set so we can honor these dads. I paired it with a piece of True Gentleman Designer Series Paper that reminds me of a man’s shirt. A piece of vellum helps the sentiments stand out against the background, while still allowing the background to show through.
Here’s what I made:


Here’s what I did:
Cut and scored with my Stampin’ Trimmer:
- Night of Navy card stock (CS) cut to 5-1/2″ x 8-1/2″, then scored in half at 4-1/4″ and scraps
- Tranquil Tide CS cut to 5-1/4″ x 4″
- True Gentlemen Designer Series Paper (DSP) cut to 5″ x 3-3/4″
- Very Vanilla CS cut to 5-1/4″ x 4″ for the inside of the card
Stamped with the Dad Jokes stamp set:
- sentiments in Night of Navy ink onto a scrap of Very Vanilla CS
Die cut using the Lots of Labels Framelit Dies :
- a scrap of Tranquil Tide CS
- a scrap of Vellum CS
Cut using Paper Snips:
- the 3 sentiments
- Night of Navy CS scraps 1/4″ larger than the sentiments
Assembled the card:
- burnished the fold in the Night of Navy card base with a Bone Folder
- Tranquil Tide CS layer glued onto the Night of Navy card base
- DSP layer glued onto the Tranquil Tide CS layer
- Tranquil Tide die cut glued onto the DSP layer
- sentiments glued onto the Night of Navy CS pieces, then adhered to the vellum using Stampin’ Dimensionals
- Vellum die cut adhered onto the Tranquil Tide die cut using Tear & Tape (placed adhesive under the sentiments so it was hidden)
Here are today’s colors:
You can click on each one to see all the products that come in that color!
Here’s what I used:
Click on these images for more details and to purchase.
Here’s some stuff you should know:
- This is a fabulous time to join my team! Sale-A-Bration is the biggest event of the Stampin’ Up! year and you can save big on the ultimate bundle, the Starter Kit. CLICK HERE for more information. Contact me with any questions: email candy@stampcandy.net or call/text 404-661-5222
- Newsletter: subscribe for exclusive deals, projects, and more! Enter your email address and click SUBSCRIBE at the top right of this page, just under the picture of my smiling face. You can also choose to receive an email every day that I have a blog post.
- Check out My Events Calendar HERE
- Host Code for the month of February (2T9AQTKG) Find out more about HOW, WHEN and WHY to use the code HERE.
- My Thank You Gift to You in February: Narrow Note Cards & Envelopes – Find out more HERE.
- Gift Certificates are available in any U.S. dollar amount from me. Contact me – email: candy@stampcandy.net OR call/text: 404-661-5222
- Gumball Rewards for all orders over $50. Find out more HERE.
Thanks for stopping by today, and Sweet Stamping!
Feb 9, 2018 | Cards, Gallery, Guest Stamper, Occasions |
I have another Candy Hearts swap card to share with you today. Today’s card was made by Judy Newsome. She used several products from the new Petal Passion Suite, just one of the incredible new suites in the 2018 Occasions Catalog.
Here’s what she made:
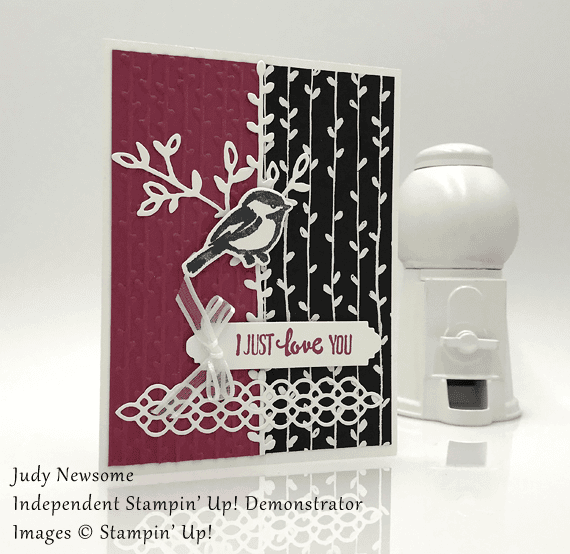
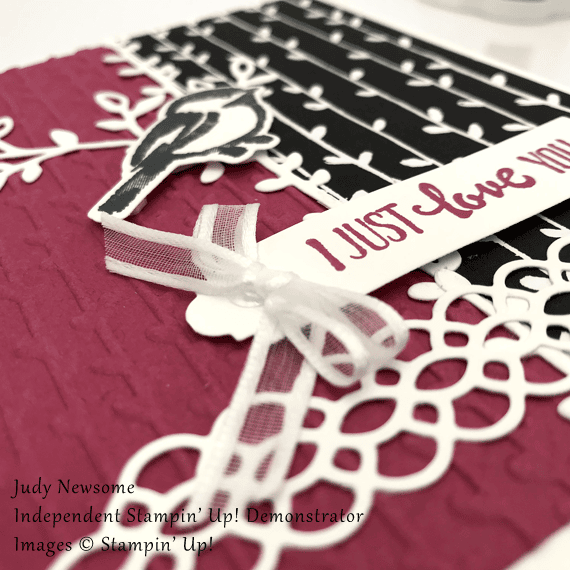
Here’s what she did:
Cut and scored with a Stampin’ Trimmer:
- Whisper White Thick card stock (CS) cut to 8-1/2″ x 5-1/2″, then scored in half at 4-1/4″
- Rose Red CS cut to 2″ x 5-1/4″
- Petal Passion Designer Series Paper (DSP) cut to 2″ x 5-1/4″
Stamped with the Petal Palette stamp set:
- bird in Basic Black ink onto a scrap of Whisper White CS
- sentiment in Rose Red ink onto a scrap of Whisper White CS
Die cut using the Petals & More Thinlits:
- bird, sentiment, branch, lattice, and straight branches that go up the center of the card
Ran through the Big Shot with the Petal Pair Embossing Folders:
- 2″ x 5-1/4″ Rose Red CS layer
Assembled the card:
- burnished the fold in the card base with a Bone Folder
- Rose Red CS and DSP glued onto the front of the card base
- straight branches glued along the seam where the two layers meet
- branch and lattice glued onto the two layers
- bird and sentiment adhered with Stampin’ Dimensionals
- ribbon tied into a bow and adhered to the sentiment with a Mini Glue Dot
Here are today’s colors:
You can click on each one to see all the products that come in that color!
Here’s what she used:
Click on these images for more details and to purchase.
Here’s some stuff you should know:
- This is a fabulous time to join my team! Sale-A-Bration is the biggest event of the Stampin’ Up! year and you can save big on the ultimate bundle, the Starter Kit. CLICK HERE for more information. Contact me with any questions: email candy@stampcandy.net or call/text 404-661-5222
- Newsletter: subscribe for exclusive deals, projects, and more! Enter your email address and click SUBSCRIBE at the top right of this page, just under the picture of my smiling face. You can also choose to receive an email every day that I have a blog post.
- Check out My Events Calendar HERE
- Host Code for the month of February (2T9AQTKG) Find out more about HOW, WHEN and WHY to use the code HERE.
- My Thank You Gift to You in February: Narrow Note Cards & Envelopes – Find out more HERE.
- Gift Certificates are available in any U.S. dollar amount from me. Contact me – email: candy@stampcandy.net OR call/text: 404-661-5222
- Gumball Rewards for all orders over $50. Find out more HERE.
Thanks for stopping by today, and Sweet Stamping!
Feb 8, 2018 | Blog Hop, Boxes, Cards, Food, Gallery, Gift Wrap, Gifts, Guest Stamper, Occasions, Sale-A-Bration |

It’s time for the OSAT Blog Hop! This month’s theme is Don’t go breaking my heart in honor of Valentine’s Day. Remember the song by Elton John and Kiki Dee? If not, you can watch the video here. My project has plenty of hearts – a large one from the Painted with Love Designer Series Paper, and small ones from the Sure Do Love You stamp set – and fortunately none of them are broken.
I’m on a ship right now (I’m actually at a live performance by Casey McPherson as I type this, so if there are any typos, that’s why!) My sister, and Candy Hearts team member, Judy Newsome, is house sitting. When I realized I’d forgotten to make the projects for today before I left, I contacted her and begged for help. Of course, she obliged because that’s the kind of gal she is. Between the two of us, we designed the card and treat box, and she actually made and photographed them. So while it was a team effort, she did the lion’s share of the work. Thanks, Judy!
Be sure to hop around to all the blogs listed below. You don’t want to miss any of the great projects by this group!
Here’s what we made:

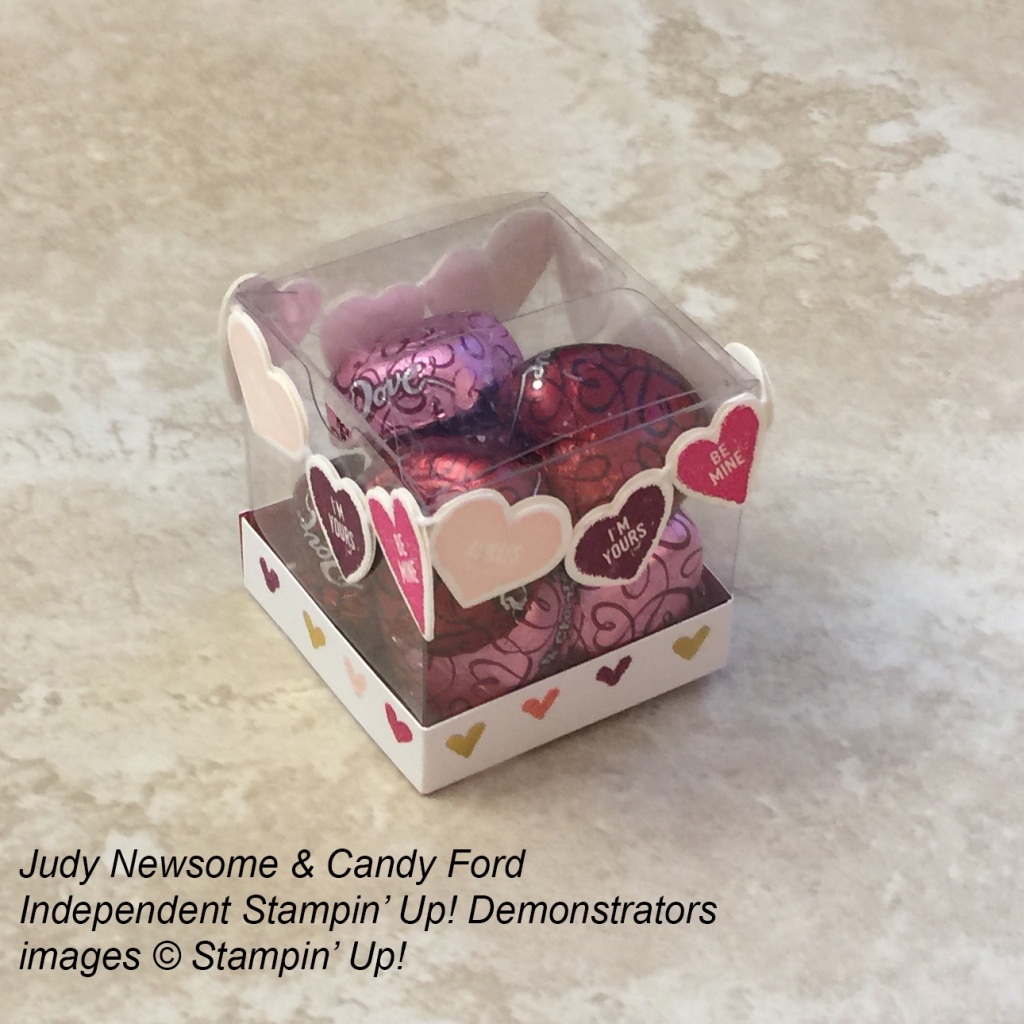
Here’s what she did:
Cut and scored with my Stampin’ Trimmer:
- Rich Razzleberry card stock (CS) cut to 4-1/4″ x 11″, then scored in half at 5-1/2″
- Melon Mambo CS cut to 4-1/8″ x 5-3/8″
- Powder Pink CS cut to 4″ x 5-1/4″
- Painted With Love Designer Series Paper (DSP) cut to 3-7/” x 5-2/8″ (small hearts design)
- Melon Mambo CS cut to 3-1/2″ x 3/4″
- Powder Pink CS cut to 3-1/2″ x 5/8″
- Painted With Love DSP cut to 1/2″ x 8-1/2″ (one row of small hearts) then scored at 2″, 4″, 6″, and 8″
- Whisper White CS cut to 4″ x 5-1/4″ for the inside of the card
Stamped with the Sure Do Love You stamp set:
- small conversation hearts in Powder Pink,Melon Mambo, and Rich Razzleberry inks onto scraps of of Whisper White CS (4 of each)
Stamped with the Cozy Cottage stamp set:
- card sentiment in Melon Mambo ink onto the Powder Spink CS strip
Die cut using the Lots of Love Box Framelits:
- small converstaion hearts
- large heart from a scrap of the DSP (striped design)
Cut using Paper Snips:
- notched one end of the Melon Mambo and Powder Pink CS strips
- NOTE: you could use the Banner Triple Punch instead
Assembled the card:
- burnished the fold in the card base with a Bone Folder
- Melon Mambo CS layer glued onto the front of the card base
- Powder Pink CS layer glued onto the Melon Mambo CS layer
- DSP layer glued onto the Powder Pink CS layer
- sentiment glued onto the Melon Mambo CS strip
- Melon Mambo CS strip glued onto the DSP layer
- large DSP heart adhered to the DSP layer using Stampin’ Dimensionals
- Whisper White CS glued to the inside of the card base
Assembled the treat box:
- popped the premade box together (just fold in the bottom flaps!)
- glued the conversation hearts to a piece of Whisper White Solid Baker’s Twine to make the garland
- adhered garland around the top of the box with Mini Glue Dots
- adhered strip of DSP around the bottom of the box with Fast Fuse
- filled the box with Dove Milk & Dark Chocolate Hearts
Here’s the hop:
Be sure to hop to all the blogs to see the terrific projects made by this amazing team of stampers. Use the list below if you get lost.
Here are today’s main colors:
You can click on each one to see all the products that come in that color!
Here’s what we used:
Click on these images for more details and to purchase.
Here’s some stuff you should know:
- This is an AMAZING time to join the Candy Hearts! Sale-A-Bration is the biggest event of the Stampin’ Up! year and you can save big on the ultimate bundle, the Starter Kit. CLICK HERE for more information. Contact me with any questions: email candy@stampcandy.net or call/text 404-661-5222
- Newsletter: subscribe for exclusive deals, projects, and more! Enter your email address and click SUBSCRIBE at the top right of this page, just under the picture of my smiling face. You can also choose to receive an email every day that I have a blog post.
- Check out My Events Calendar HERE
- Host Code for the month of February (2T9AQTKG) Find out more about HOW, WHEN and WHY to use the code HERE.
- My Thank You Gift to You in February: Narrow Note Cards & Envelopes – Find out more HERE.
- Gift Certificates are available in any U.S. dollar amount from me. Contact me – email: candy@stampcandy.net OR call/text: 404-661-5222
- Gumball Rewards for all orders over $50. Find out more HERE.
Thanks for stopping by today, and Sweet Stamping!
Feb 4, 2018 | Cards, Gallery, Occasions, Swaps |
Today I’m sharing another swap card I received from the amazing Penny Nelson of Designs by Penny She used the Petal Palette Bundle to create this beautiful thank you card. The sentiment is from the Teeny Tiny Wishes stamp set and was die cut using the Stitched Shapes Framelits Dies – two things that should definitely be in every stamper’s arsenal.
Here’s what I made:
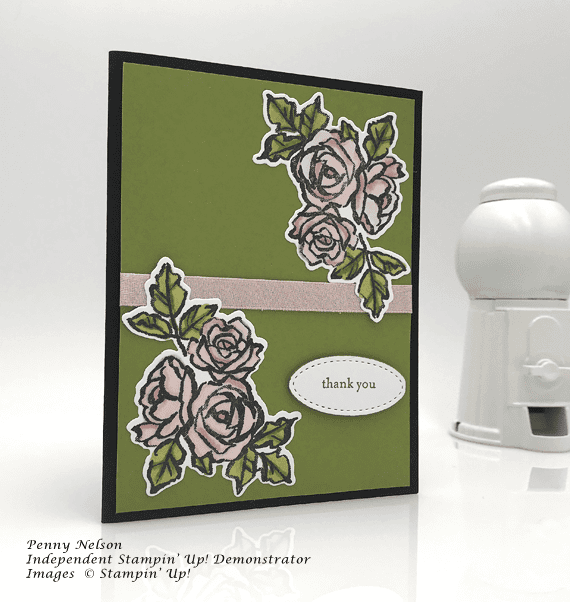

Here’s what (I think) she did:
Cut and scored with a Stampin’ Trimmer:
- Basic Black card stock (CS) cut to 8-1/2″ x 5-1/2″, then scored in half at 4-1/4″
- Old Olive CS cut to 4″ x 5-1/4″
- Whisper White CS cut to 4″ x 5-1/4″ for the inside
Stamped with the Petal Palette stamp set:
- flower cluster x 2 in Basic Black ink onto a scrap of Whisper White CS
Stamped with the Teeny Tiny Wishes stamp set:
- sentiment in Old Olive ink onto a scrap of Whisper White CS
Colored using Blender Pens:
- flowers in Powder Pink ink
- leaves in Old Olive ink
Die cut using the Petals & More Thinlits:
- both colored flower clusters
Die cut using the Stitches Shapes Framelits:
Assembled the card:
- Burnished the fold in the card base with a Bone Folder
- Powder Pink 3/8″ Shimmer Ribbon adhered to the Old Olive CS layer with Tear & Tape, wrapping the ends around to the back
- flower clusters adhered to the Old Olive CS layer with Tear & Tape
- sentiment adhered to the Old Olive CS layer with Stampin’ Dimensionals
- Old Olive CS layer glued to the front of the card base
- Whisper White CS layer glued to the inside of the card base
Here are today’s colors:
You can click on each one to see all the products that come in that color!
Here’s what she used:
Click on these images for more details and to purchase.
Here’s some stuff you should know:
- This is a fabulous time to join my team! Sale-A-Bration is the biggest event of the Stampin’ Up! year and you can save big on the ultimate bundle, the Starter Kit. CLICK HERE for more information. Contact me with any questions: email candy@stampcandy.net or call/text 404-661-5222
- Newsletter: subscribe for exclusive deals, projects, and more! Enter your email address and click SUBSCRIBE at the top right of this page, just under the picture of my smiling face. You can also choose to receive an email every day that I have a blog post.
- Check out My Events Calendar HERE
- Host Code for the month of February (2T9AQTKG) Find out more about HOW, WHEN and WHY to use the code HERE.
- My Thank You Gift to You in February: Narrow Note Cards & Envelopes – Find out more HERE.
- Gift Certificates are available in any U.S. dollar amount from me. Contact me – email: candy@stampcandy.net OR call/text: 404-661-5222
- Gumball Rewards for all orders over $50. Find out more HERE.
Thanks for stopping by today, and Sweet Stamping!
