It’s time for the August 2018 A Paper Pumpkin Thing (APPT) Blog Hop. This month’s kit is called Blissful Blooms, and it is very aptly named. It includes everything you need to make 10 gorgeous floral cards. For the hop, we are using the kit to create alternate projects: one card and one 3D item.
When I was in a hotel room in Seattle, right after the Stampin’ Up! Incentive Trip in July, the toiletries included an unusually shaped box with an asymmetrically shaped bar of soap in it. Of course, I had to bring it home to try to make one. And I thought today’s post was the perfect time to try it. I hope you like what I’ve made.
Here’s a video from Stampin’ Up! about this month’s kit:
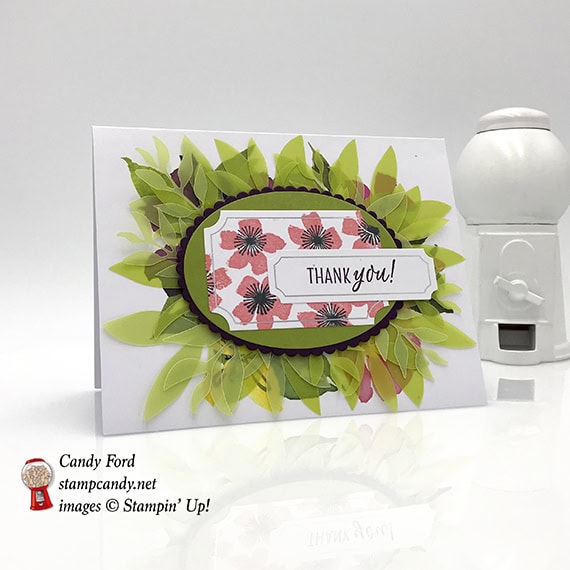
Here’s what I made:
I was afraid I had stamped the sentiment too low on the front of the box, but I think it might look better even lower. What do you think?
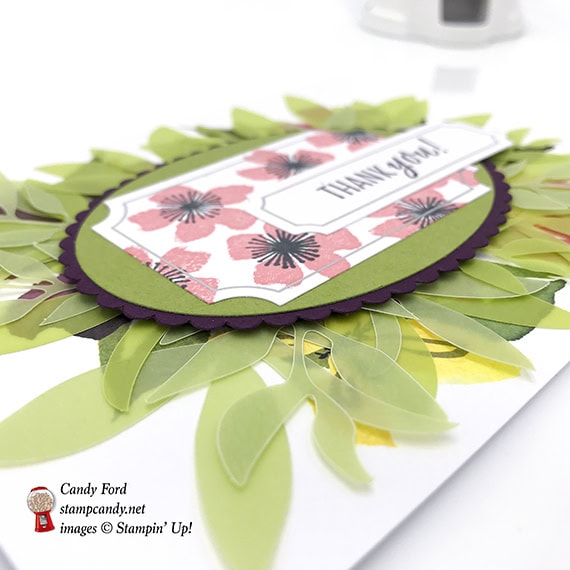
Here’s how I made the card:
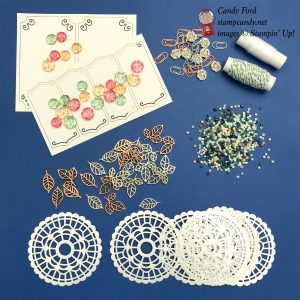
Stamped with the Blissful Blooms stamp set:
flowers in Flirty Flamingo ink onto the larger label
flower centers in Memento black ink
sentiment in Blackberry Bliss ink onto the smaller label
Die cut using the Layering Ovals Framelits:
a plain oval from a scrap from of Old Olive CS
a scalloped oval from a scrap of Blackberry Bliss CS
Assembled the card:
burnished the fold in the card base (with printed flowers in the center of the front) with a Bone Folder
all but about 5 of the green vellum leaves adhered onto the card front, with stems toward the center, larger ones first, then smaller ones over those
Old Olive CS oval adhered to the Blackberry Bliss CS oval
flower stamped label adhered to the Old Olive CS oval
sentiment label adhered to the flower label and ovals
ovals/labels grouping adhered over the leaves using Stampin’ Dimensionals
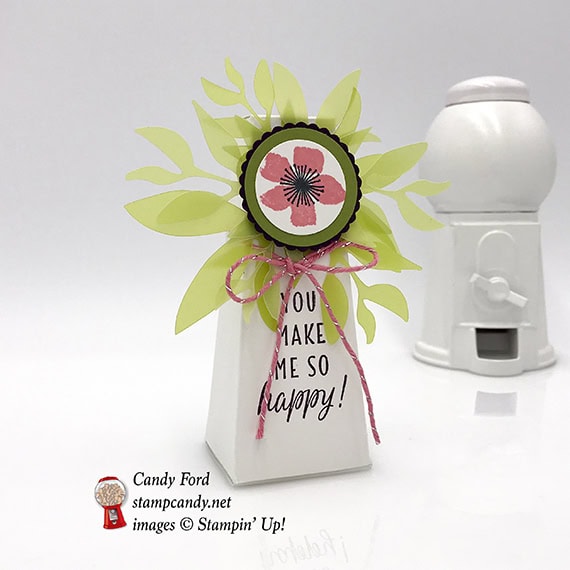
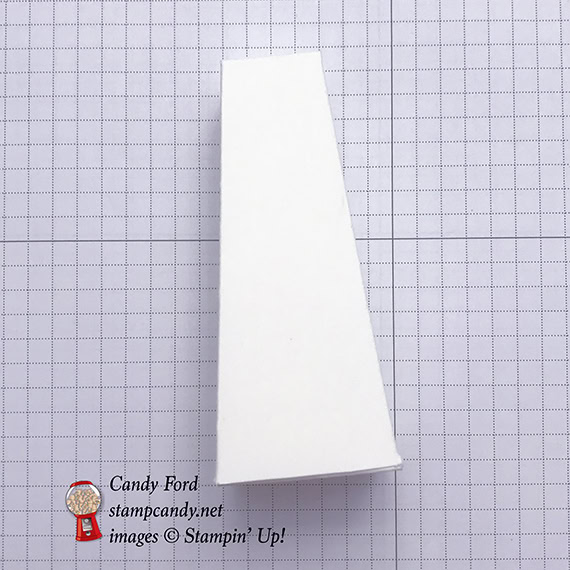
Here’s how I made the box:
Stamped with the Blissful Blooms stamp set:
flower in Flirty Flamingo ink onto a scrap of Whisper White CS
flower center in Memento black ink
sentiment in Blackberry Bliss ink onto the front of the box**
Cut using Circle Punches:
flower with a 1″ circle punch
a scrap of Old Olive CS with a 1-1/4″ circle punch
a scrap of Blackberry Bliss CS with a 1-3/8″ scallop circle punch
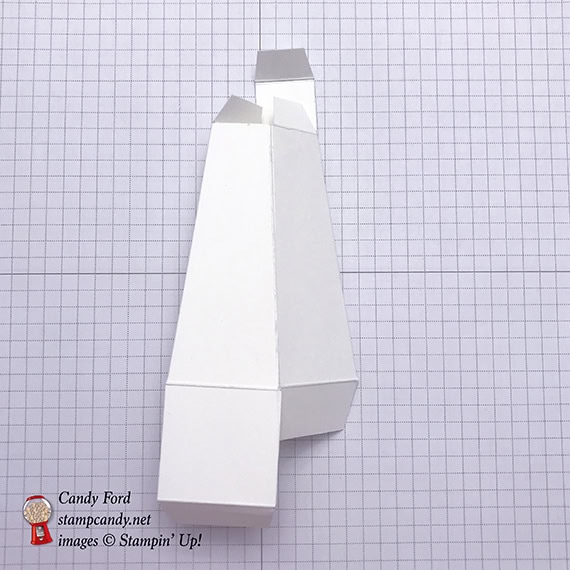
Assembled the box:
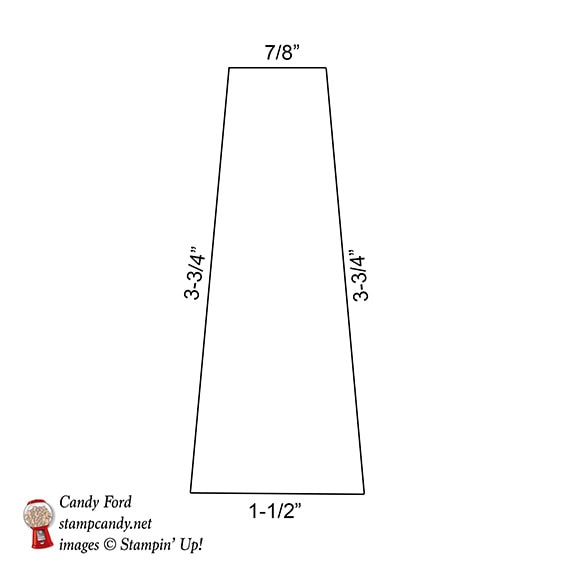
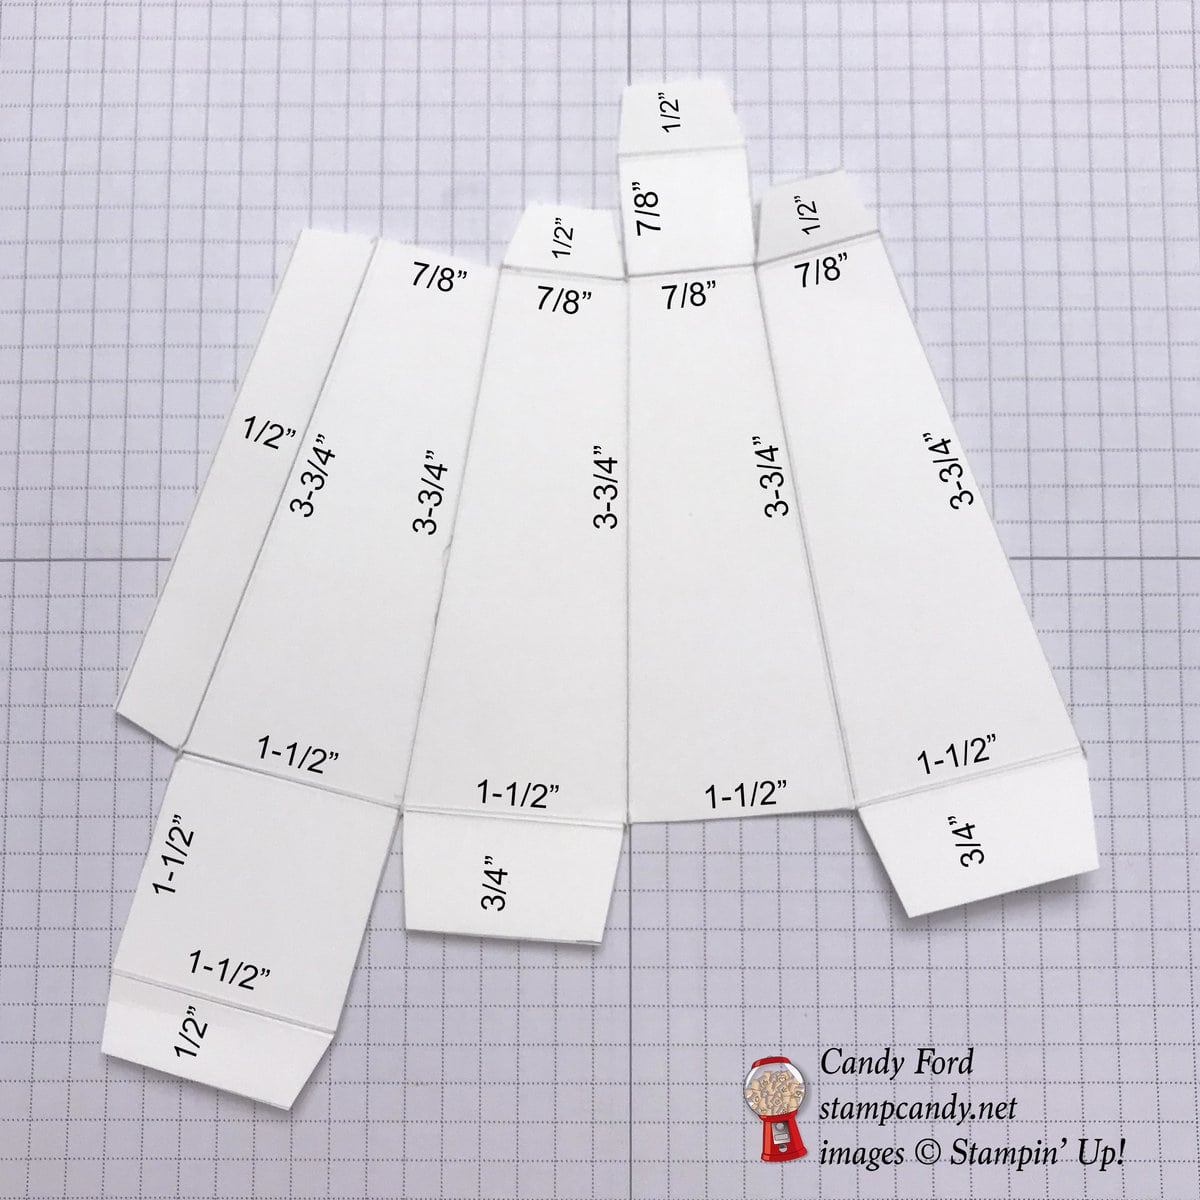
made a template: 7/8″ across the top, 1-1/2″ across the bottom, and 3-3/4″ sides
drew around the template four times, side by side, onto a piece of Whisper White Thick CS
added tabs, according to the template below
scored all inner lines using my Stampin’ Trimmer
cut out the box using Paper Snips
burnished all score lines with a Bone Folder
**stamped sentiment onto the front panel of the box
added adhesive to the long flap along one side of the box, and adhered the flap to the inside of the opposite end
folded in all flaps (adding in your small gift, of course)
about 5 of the green vellum leaves adhered around the top of the front panel of the box
punched flower adhered onto the Old Olive CS circle
Old Olive CS circle adhered onto the Blackberry Bliss CS circle
Blackberry Bliss circle adhered over the leaves using Stampin’ Dimensionals
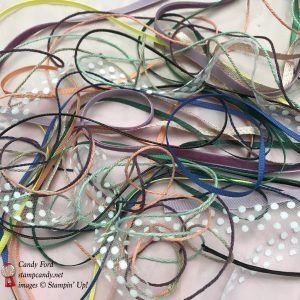
tied a piece of the Flirty Flamingo twine from the kit around the box and tied in a bow
Here’s the APPT Blog Hop:
Click on Next to go to the next stop, or use the list below to navigate the hop.
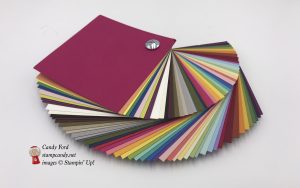
Here are today’s colors:
You can click on each one to see all the products that come in that color!
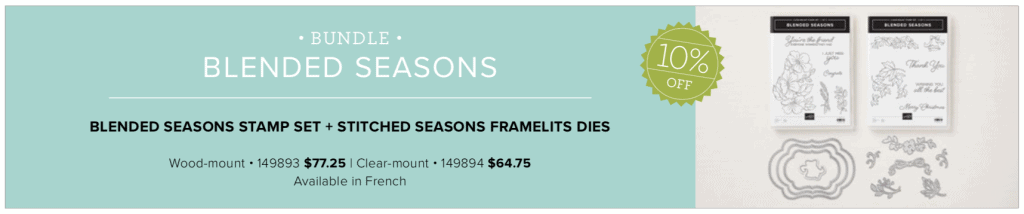
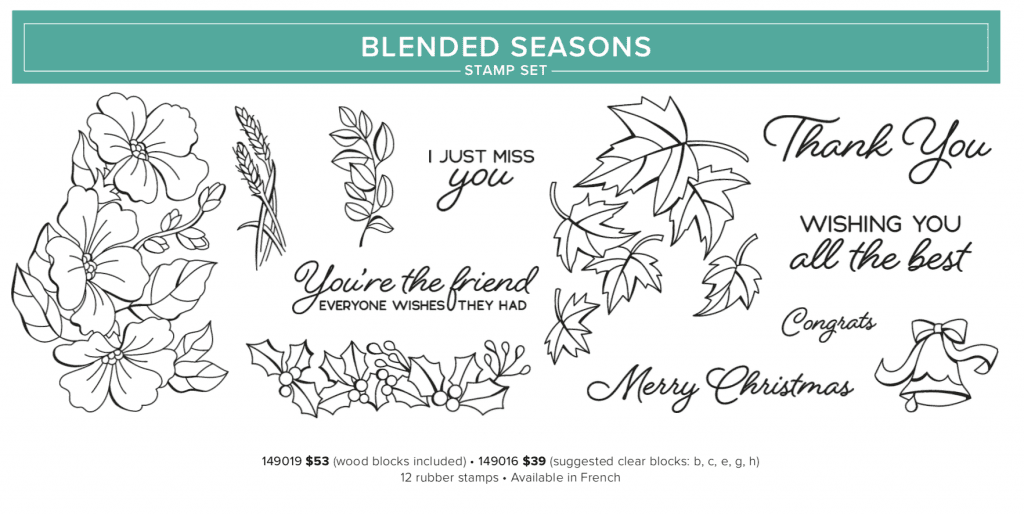
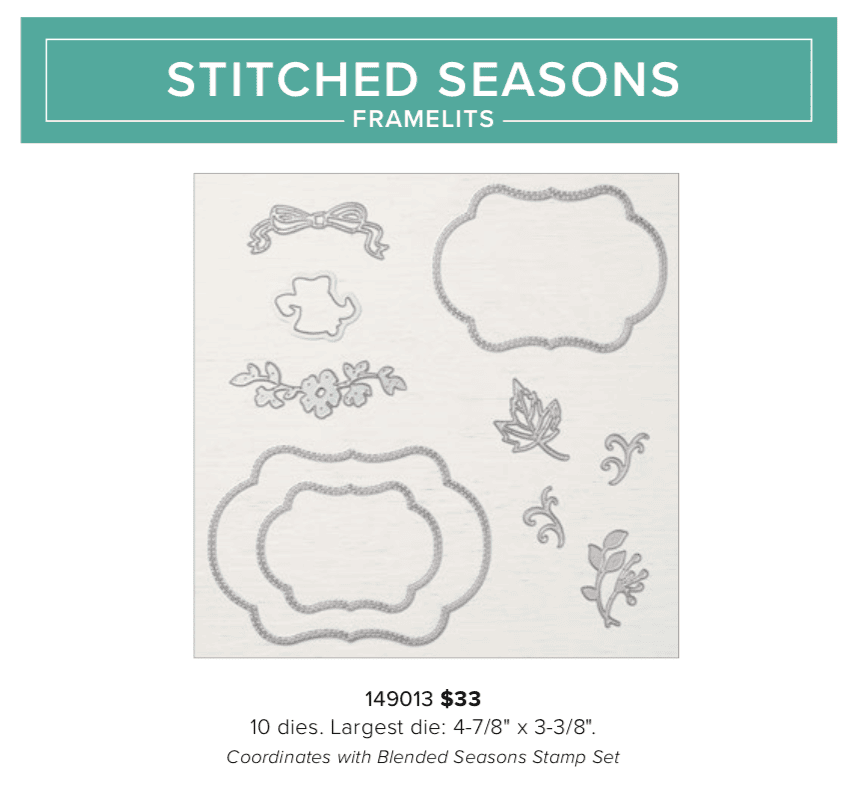
Stampin’ Up!’s® Blended Seasons Stamp Set, coordinating Framelits™ Dies, and Watercolor Pencils are perfect for every season of creating! Plus, save 10% when you buy the stamp set and Framelits in a bundle! But don’t wait—these exclusive products are only available until August 31 while supplies last. So get in the mood to create something full of colors and seasons!
Introducing the all-new, limited-time Color Your Season products:
Blended Seasons Stamp Set, an exclusive 12-piece wood- or clear-mount stamp set with images for every season – #149019 @ $53 (wood blocks included); #149016 @ $39 (suggested clear blocks: b, c, e, g, h)
Stitched Season Framelits Dies, a coordinating stitched die that includes stitching on both the positive and negative images! #149013 @ $33. Has10 dies. Largest die: 4-7/8″ x 3-3/8″.
Save 10%! Blended Seasons BUNDLE – BLENDED SEASONS STAMP SET + STITCHED SEASONS FRAMELITS DIES – Wood-mount #149893 @ $77.25, Clear-mount #149894 @ $64.75
Watercolor Pencils in 10 new colors! #149014 @ $12.50. Acid free, lignin free.10 pencils in Stampin’ Up! colors: Balmy Blue, Cajun Craze, Cherry Cobbler, Coastal Cabana, Crushed Curry, Flirty Flamingo, Garden Green, Gorgeous Grape, Granny Apple Green, Night of Navy
Products available while supplies last until August 31, 2018 – while supplies last
Items may be included as part of a new demonstrator’s Starter Kit.
2) Bonus Days!
For every $50 you spend on an order in August, you will receive a $5 coupon to use in September!
There is no limit to the number of coupons you may earn.
An email address is required to participate; Bonus Days coupon codes can be delivered only via email.
Bonus Days coupon codes may be redeemed for any product (excluding Starter Kits, demonstrator supply items, and Paper Pumpkin subscriptions.) Although new prepaid Paper Pumpkin codes may be discounted with Bonus Days coupon codes.
3) Buy any 10 Classic Stampin’ Ink pads and get one FREE!!
Buy any 10 ink pads from me in August, I will give you another one FREE!
Contact me to place your order, so I can add your FREE ink pad!
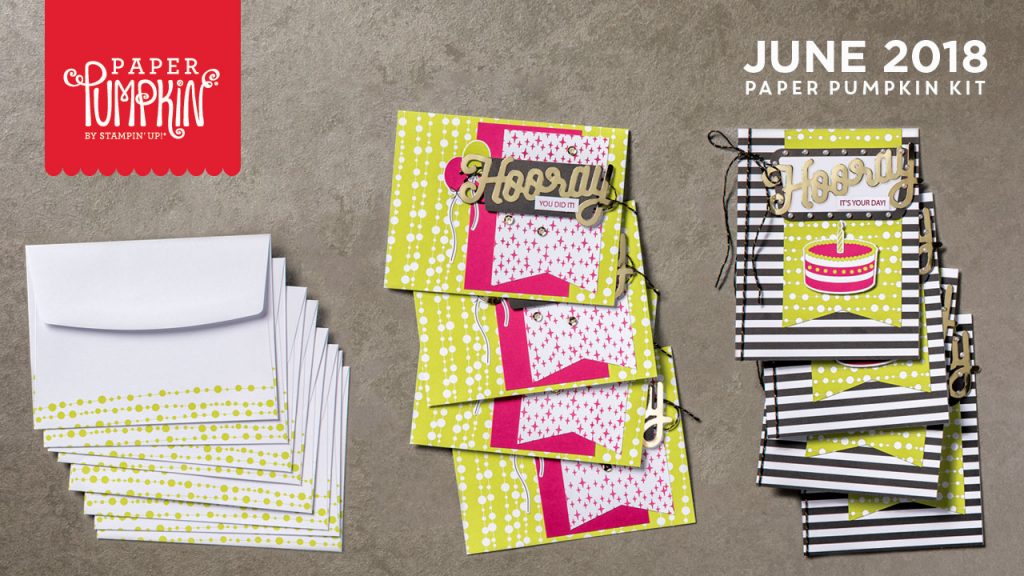
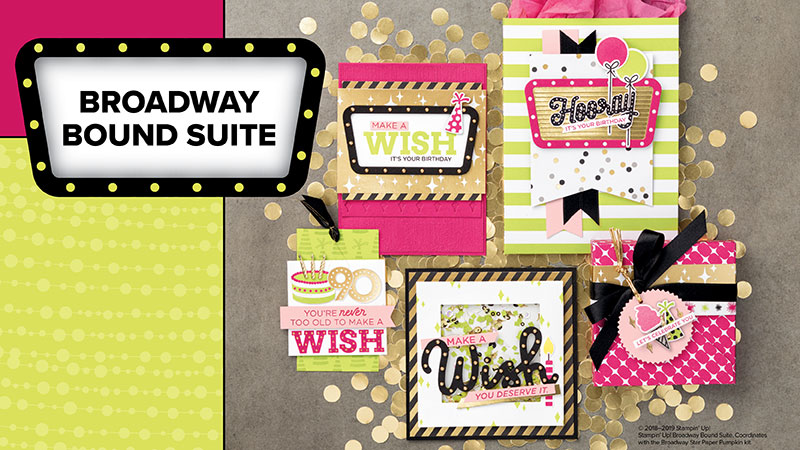
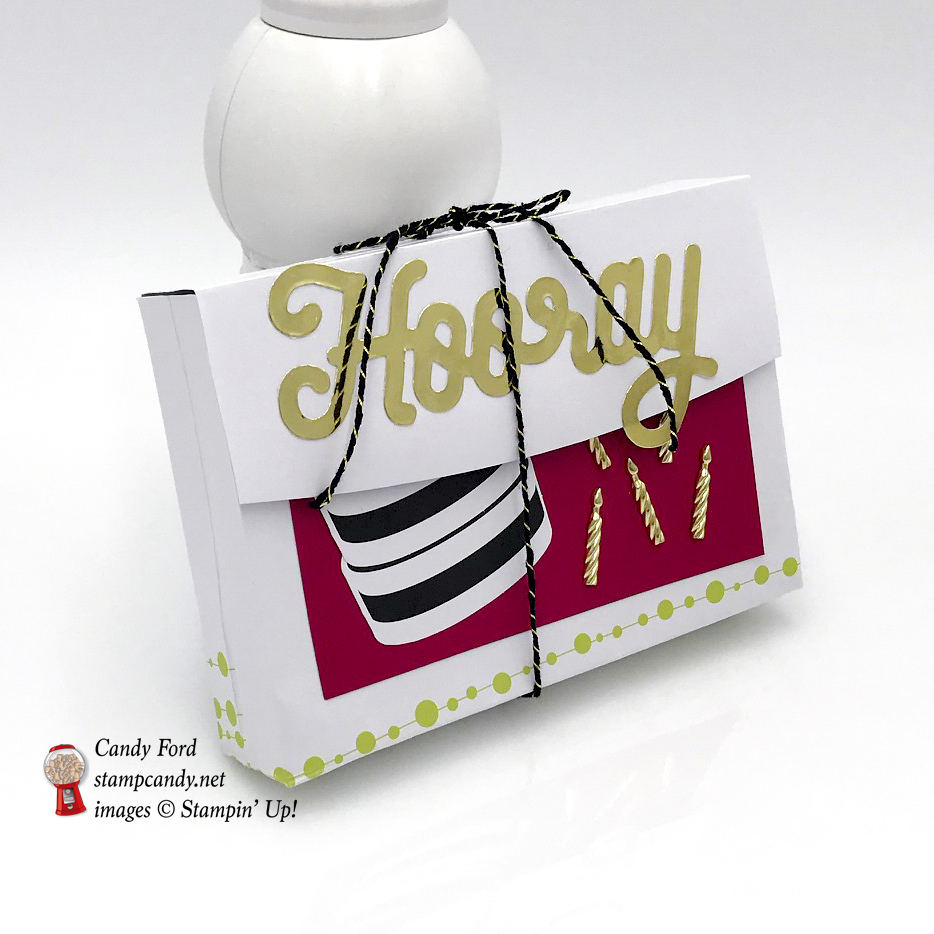
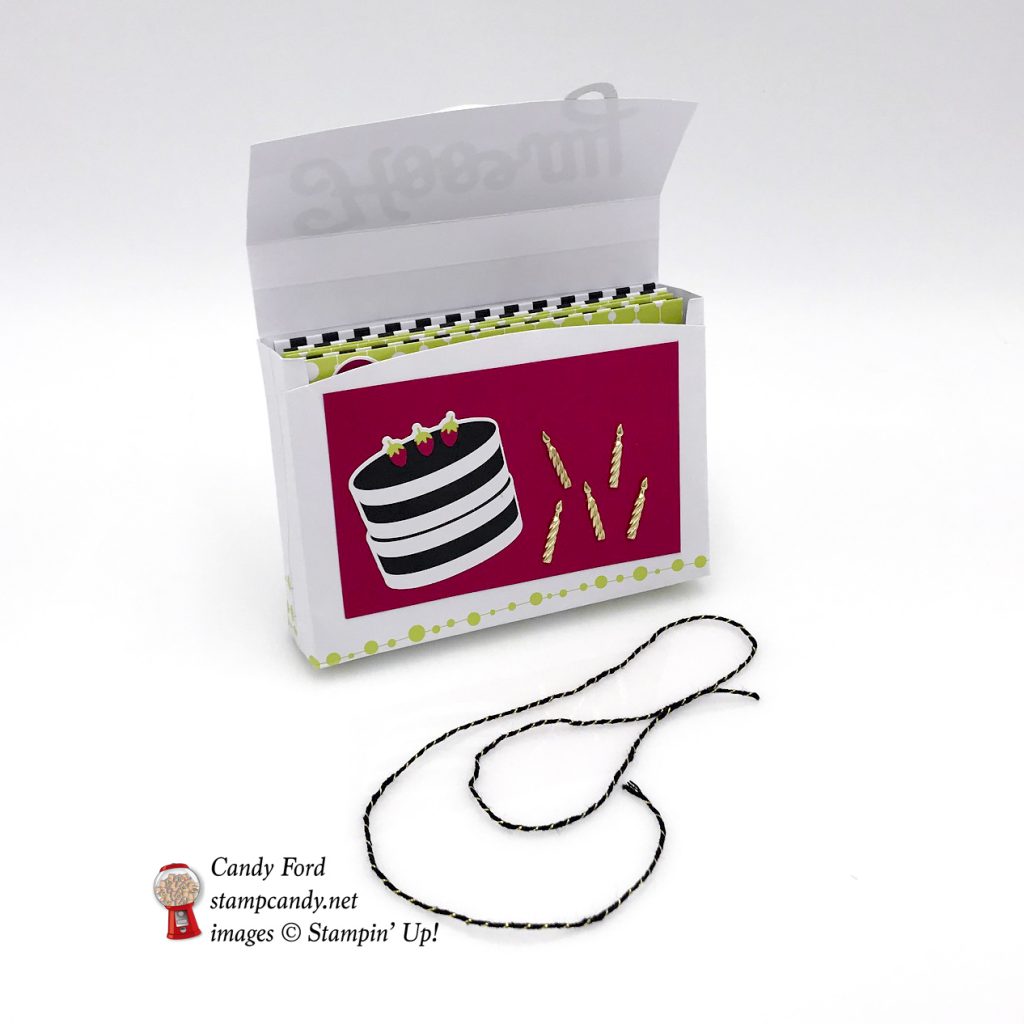
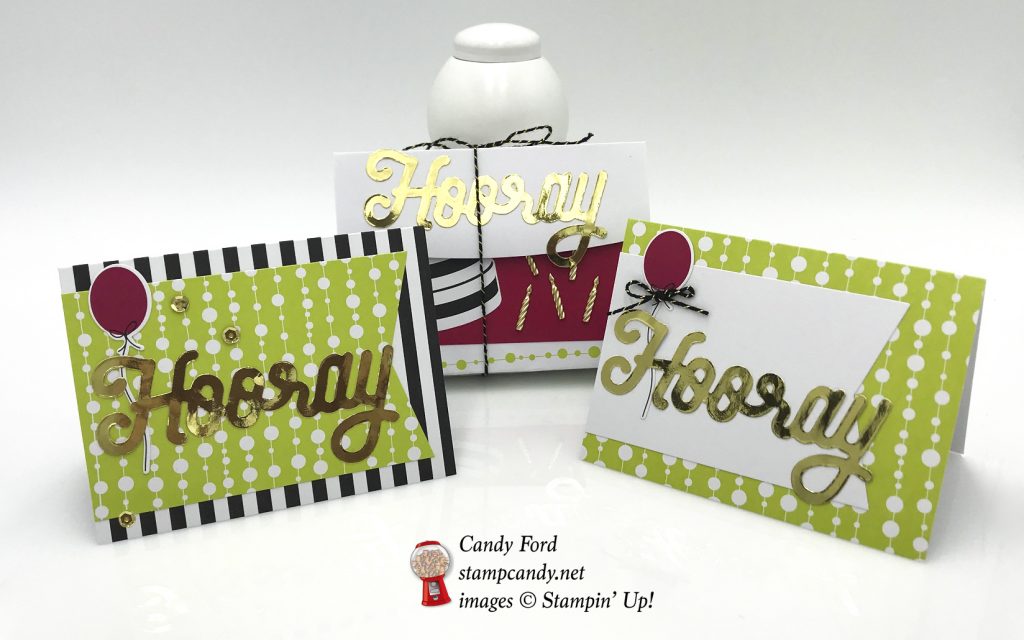
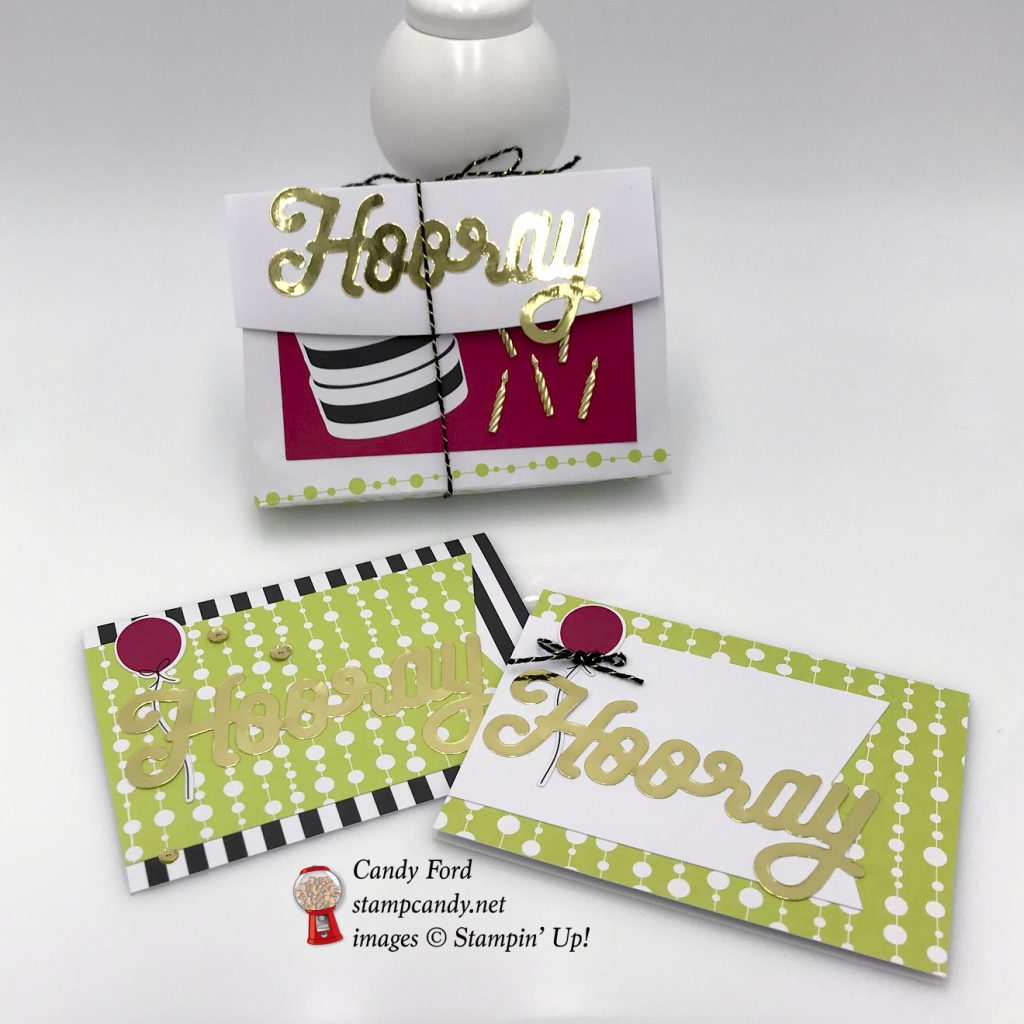
It’s time for the APPT (A Paper Pumpkin Thing) Blog Hop for June. This month’s PP kit, called Broadway Star, coordinates with the new Broadway Bound suite in the annual catalog, and it is a winner winner chicken dinner! It’s all so fun and bright and cheery. You can’t help but smile. For today’s hop I made some small note cards and a holder to store them in.
There are so many different things you can make using this kit, especially when you combine it with the products in the suite. I decided to keep it rather simple. The Candle Embellishments are the only thing from the suite I used on my projects. I didn’t even use a stamp, even though the ones in the PP kit and the ones in the suite are terrific.
This is the Paper Pumpkin kit…
…and this is the suite from the catalog.
Here’s what I made:
Here’s what I did:
Cut and scored with my Stampin’ Trimmer:
cut 3 black striped and 3 green cards down to 4-1/2″ x 6-3/4″, making sure to keep the score line centered, so once the cards are folded they measure 4-1/2″ x 3-3/8″ – in other words, cut 1″ x 8-1/2″ strip off the long side, and cut 7/8″ off each end
scored one of the envelopes 1/2″ in from either side and 1/2″ in from the bottom, then burnished the folds with a bone folder
Cut using Paper Snips:
cut away the outer edges of the envelope flap, that fall outside the score lines
Assembled the cards:
burnished the fold in the card bases with a Bone Folder
banners applied onto the front of the card bases (green onto the black card, and white onto the green card)
balloon applied to the left side of the card front
gold Hooray applied to the banner
tied bows with the black & gold twine from the kit and adhered them to the balloons on the green cards using a rolled up glue dot
applied self stick sequins to the front of the black & white cards
Assembled the holder:
applied a self stick red layer onto the front of the envelope
glued two cakes together to make a taller cake, then glued them onto the red layer
applied 5 gold candles onto the red layer
applied a self stick gold Hooray onto the front of the flap
used an Embossing Buddy to powder the bits of the Hooray that stick out from the flap, so they wouldn’t be sticky
with one hand inside the envelope and one hand outside, flattened the sides and bottom until they were square
tucked under the points at the bottom corners and glued them to the bottom of the holder
put the cards in the holder and tied it closed with a piece of the black & gold twine
Here’s the APPT hop:
You can follow the list, or just click on Next to go to the next stop on the hop!
Here are today’s colors:
You can click on each one to see all the products that come in that color!
Click on these images for more details and to purchase.
Here’s how to get Paper Pumpkin:
The easiest, and least expensive, way to subscribe to Paper Pumpkin is with a 12 month prepaid subscription. There are also 6-month, 3-month, and 1-month prepaid subscriptions. Click on the images below to purchase. Or you can CLICK HEREto subscribe on a month-to-month basis.
It’s finally here! Today is the day we’ve all been waiting for! The 2018-2019 Stampin’ Up! Annual Catalog goes live today! You can begin placing online orders here at:
11am Pacific Time
noon Mountain Time
1pm Central Time
2pm Eastern Time
If you don’t have your new catalog yet:
check out the Catalog page here for the pdf of the full catalog, a list of the new bundles, and a list of the colors in the new Designer Series Papers
That’s isn’t all that’s new today! Stampin’ Up! has announced that the June Paper Pumpkin kit will coordinate with the Broadway Bound Suite from the new catalog! Be sure to subscribe by June 10 to get the June kit! Please be sure I’m listed as your demonstrator when you subscribe. Thanks!
It’s time for the A Paper Pumpkin Thing Blog Hop for May! I aways love this time, because I get to take something predesigned and put my spin on it. This month’s kit is called Manly Moments and includes the makings for cards with manly hues of greens and browns. I’ve made a birthday card and small gift holder, perfect for a manly man. Be sure to check out all the stops on the hop, because you don’t want to miss any of the great alternate projects made by this group.
Here’s what I made:
I tucked a little extra “green” into the gift holder:
Here’s what I did:
Cut and scored with my Stampin’ Trimmer:
a 4-1/8″ x 1/2″ strip of plaid paper from the inside of an envelope
a 1″ x 1-1/2″ piece of the same plaid paper
a 1″ x 7″ strip of wood paper from the inside of a different envelope, then scored down the length 1/4″ from each side, and across the strip at 3-1/2″
four piece of Mossy Meadow card stock (CS) to 2″ x 4-1/4″
Stamped with the Manly Moments stamp set:
stamped “happy” and “birthday” in Mossy Meadow ink onto a shield
stamped the lines in Shaded Spruce ink onto the same shield
stamped “for all you do” in Mossy Meadow ink onto a white banner
Cut using Paper Snips
notched the ends of the Plaid strip (or you could use the Banner Triple Punch)
snipped lots of little cuts along each long side the wood paper strip, only to the score line on each side
used a shield as a guide to cut the ends of the 4 Mossy Meadow CS pieces to fit inside the holder
cut other end of the 4 Mossy Meadow CS pieces about 2″ down to “shred” it (or you could use your paper trimmer to cut every 1/8″, or you could use fringe scissors if you have them)
Created the forest on the front of the Soft Sea Foam card base:
used the negative space of a tree die cut and sponge daubers to color each “layer”
used Mossy Meadow, Shaded Spruce, Pear Pizzazz, Old Olive, Granny Apple Green, Garden Green, and Tranquil Tide inks
started at the top and worked my way down
Assembled the card:
adhered a mountain die cut to the bottom of the front of the card base
glued the notched plaid strip to the card base
adhered the stamped shield over the plaid strip using Stampin’ Dimensionals
Assembled the holder:
glued one snipped side of the wood paper strip to the back edges of a shield, starting with the crosswise score line at the bottom tip of the shield.
glued the other snipped side to another shield, the same way
snip off any extra wood paper at the top, or fold it inside and glue it in place
glued the 1″ x 1-1\2″ plaid paper to the front shield
glued the stamped banner over the plaid paper piece. I should have adhered it with Stampin’ Dimensionals, but I wasn’t thinking and glued it down flat.
crinkled the shredded parts of the Mossy Meadow CS, then stuffed them into the box
inserted some folded money in between the Mossy Meadow CS pieces in the holder
It’s time for the A Paper Pumpkin Thing Blog Hop for the April kit, You Are My Anchor. This is such a fun kit! The colors are great; the images are great; really everything about it is awesome. I’ve had a lot of fun playing with it. I hope you enjoy the alternative projects I’ve made with it. After reading my post, be sure to check out the rest of the stops on the hop. I can’t wait to see what everyone else has made.
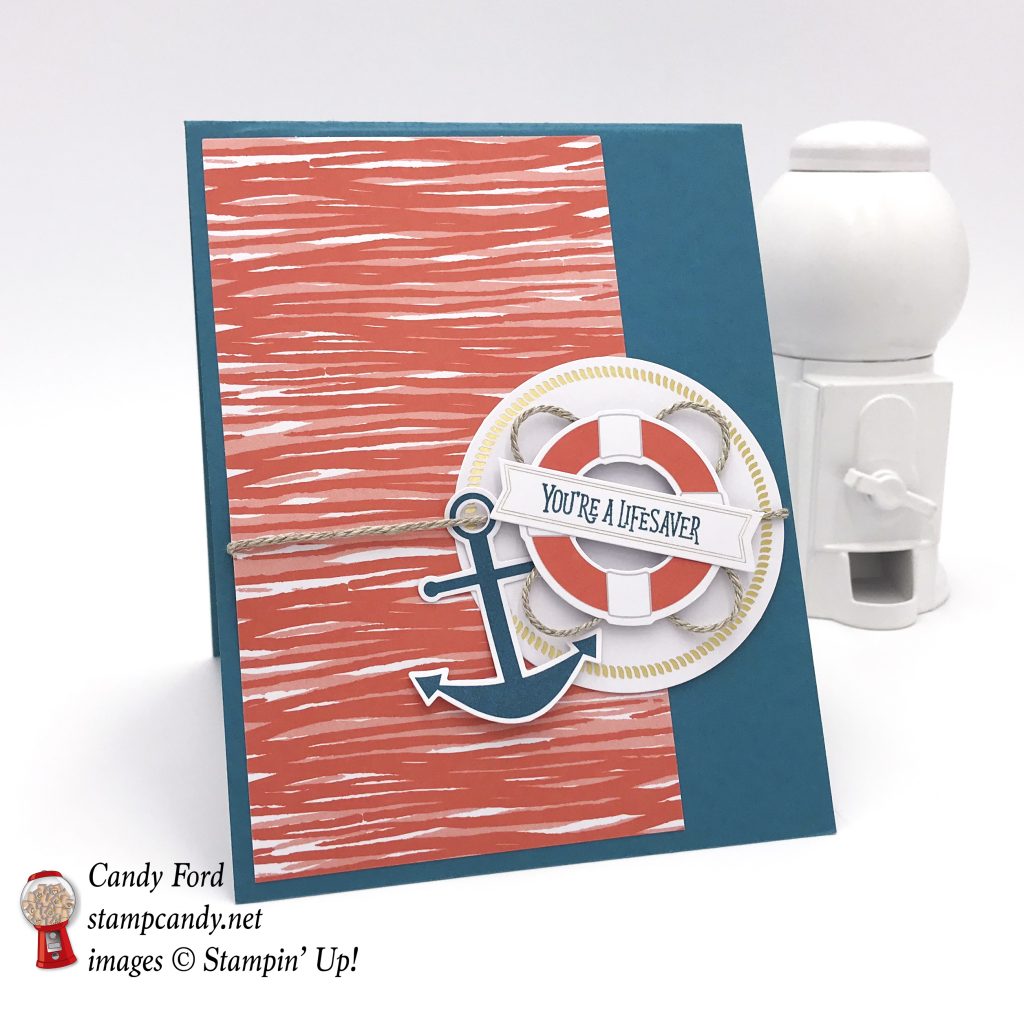
Here’s what I made:
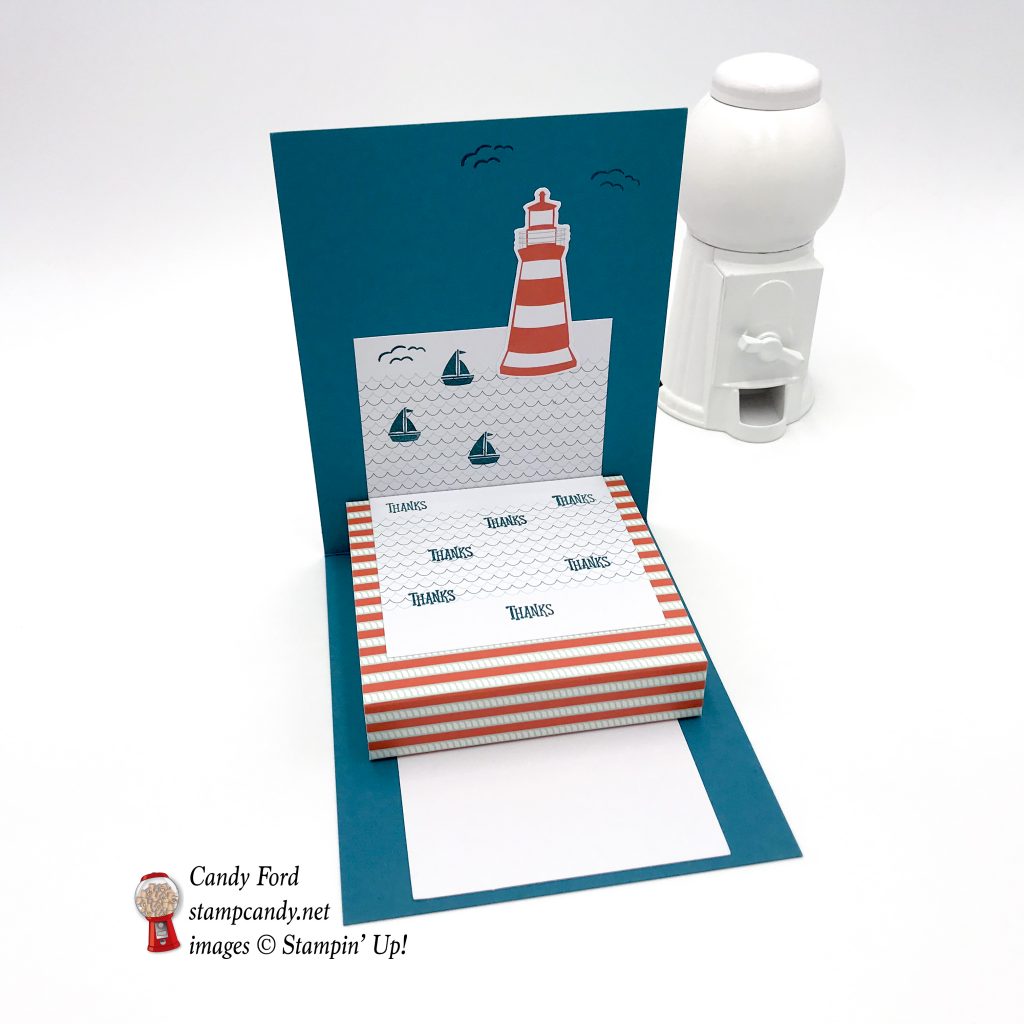
Three different items: a bag, a pop up card, and a treat box.
I used one of the matchbox covers from the kit to create this pop-up card.
I made this box from some of the note cards in the kit.
Aren’t candies with sea salt appropriate for the theme?
When I saw the gold and white note cards in the kit, I knew I had to pair it with one of Stampin’ Up!’s Striped Treat Bags.
Here’s what I did:
Cut and scored with my Stampin’ Trimmer:
Island Indigo card stock (CS) cut to 4-1/4″ x 11″, then scored in half at 5-1/2″, for the card base
2 Island Indigo striped note cards scored 1/2″ from each end, and 1/4″ from the bottom edge
1 Island Indigo striped note card cut to 2-7/8″ x 2-7/8″
1 Island Indigo anchor note card cut to 3″ x 3″, then scored 1/4″ from all four edges
a Calypso Coral note card cut to 3″ x 5-1/4″
1 wave note card cut in half
1 note card cut in half (doesn’t matter which design because I used the solid white side)
Stamped with the You Are My Anchor stamp set:
anchor, starfish, and “For You” in Island Indigo ink onto one of the small die cut round tags
“You’re a lifesaver” in Island Indigo ink onto one of the small die cut banners
birds in Island Indigo ink onto the inside top of the Island Indigo CS card base
birds and boats in Island Indigo ink onto one of the wave not card halves
“Thanks” in Island Indigo ink onto the other wave note card halves
“Adventure awaits” in Island Indigo ink onto one of the small die cut banners
anchor, wheel, boat, and starfish in Island Indigo ink onto the white stripes of the treat bag – I lined up the four stamps on one acrylic block and stamped them as one long stamp
Colored using an Island Indigo Stampin’ Write Marker:
8″ piece of Whisper White 1/8″ Sheer Ribbon – color on both sides
Assembled the card, front:
fold in the Island Indigo CS card base burnished with a Bone Folder
a large round die cut glued onto the side of the 3″ x 5-1/4″ Calypso Coral note card piece
rope twine run through an Island Indigo anchor die cut, then wrapped around the front of the Calypso Coral note card piece and large round die cut, securing ends on the back using Glue Dots
NOTE: I covered the score line in the note card piece with the rope twine
Calypso Coral note card piece and large round die cut glued to the front of the Island Indigo CS card base
rope twine adhered to the back of a lifesaver die cut using Glue Dots, then the lifesaver adhered to the large round die cut using Stampin’ Dimensionals
“You’re a lifesaver” sentiment glued onto the front of the lifesaver die cut
Assembled the card, inside:
wave note card half with boats glued onto the back side of a matchbox cover
wave note card half with “Thanks” glued onto the top of the matchbox cover
3″ x 3″ note card piece glued to the inside of the Island Indigo CS card base, 1/8″ from the bottom edge, with the solid white side showing
bottom of matchbox cover and back of wave note card half glued onto the inside of the card base, as shown in photos
lighthouse die cut glued to the inside top of the card base
Assembled the box:
the two Island Indigo striped note cards glued together at the ends – at both intersections, one flap will be on the outside of the adjacent side, and the other flap will be on the inside of its adjacent side
using Paper Snips, cut along the score lines up the four corners only up to the horizontal score line
folded all four flaps toward the inside and glued them to the inside of the 2-7/8″ x 2-7/8″ piece, which will form the bottom of the box
cut along one score line at each corner of the 3″ x 3″ Island Indigo anchor note card piece
glued the resulting flaps to the inside of the adjacent sides
filled the box with goodies and put on the lid
2 small die cut banners glued to the back of the small round die cut tag as shown
tied a piece of the rope twine around the box, through the tag, and tied in a box
Assembled the treat bag:
“Adventure awaits” banner and an Island Indigo die cut anchor glued to the front of a gold and white note card
top of treat bag folded over
note card, Island Indigo colored ribbon, and some rope twine clipped to the top of the treat bag using a Gold Library Clip
Note: I used glue on these projects, but you can certainly use the Glue Dots that come with the kit. I just really like the glue.
Here’s the hop:
Use this list in case you get lost, or click on the Next button to go to Sara Levin of
Here are today’s colors:
You can click on each one to see all the products that come in that color!
Hurray, it’s time for the March 2018 APPT blog hop! This month’s kit is called May Good Things Grow, and it is just lovely. Of course, we can’t leave well enough alone, so we used the kit to create alternate projects, just to give you some ideas. Be sure to check out all the stops on the hop!
The kit makes cards that go is adorable envelopes that look like seed packs. I used the seed packs to make a card and a sour cream container. No, there isn’t sour cream in it, but it’s the shape of the little take out containers that sour cream comes in. It’s one of the easiest containers to make, and it’s even easier with a premade envelope.
The card base is Fresh Fig card stock, but I used one of the kit card bases to cut a piece for the inside of the card. I used Fresh Fig ink, but the Early Espresso ink that comes in the kit would match equally as well.
Brads! There are brads in this kit! I’ve always liked using brads in my paper crafting – there are lots of things you can do with them.
At the bottom of this post, there’s a list of the products I used other than what’s in the kit. There aren’t many. This kit has so much in it, I can think of all sorts of things to make with it. I listed glue and Tear & Tape, because I prefer them, but the kit comes with glue dots – and a whole lot of Stampin’ Dimensionals!
Here’s what I made:
It’s so difficult to get Wink of Stella to show in a photo! The small amount you can see in this one just looks like tiny white specks:
Here’s what I did:
Cut and scored with my Stampin’ Trimmer:
Fresh Fig card stock (CS) cut to 4-1/4″ x 11″, then scored in half at 5-1/2″
front of one of the seed packs cut off and trimmed around the design
the flap off another seed packet cut off
cut a 3-3/4″ x 5″ piece from a Crumb Cake card base
Stamped with the May Good Things Grow stamp set:
birthday sentiment in Fresh Fig ink onto one of the precut labels
friendship sentiment in Fresh Fig ink onto a larger precut label
scroll design in the four corners of the trimmed Crumb Cake card base
“Colored” using Clear Wink of Stella Pen:
all the color die cut flowers and leaves (not the monotone ones that are part of the large floral die cut)
Assembled the card:
seed pack front glued onto the front of the card base
large floral die cut adhered to the seed pack layer using Stampin’ Dimensionals
single die cut pink and yellow flowers and one die cut leaf adhered over the large floral die cut using Stampin’ Dimensionals
2 brads attached to the larger label, then the label adhered to the large floral die cut using Stampin’ Dimensionals
Assembled the sour cream container:
pinched the top of the bag perpendicular to the bottom, so the two side score lines touch (I also used snips to cut the edges straight)
put some goodies inside, then sealed the top shut with Tear & Tape
punched a hole through the top with the 1/8″ Circle Punch
put the Fresh Fig ribbon through the hole and tied a bow
glued a die cut flower and some die cut leaves to the front
glued on the birthday label
Here’s the hop:
Click the NEXT button to go to the next stop on the hop, Melissa Thomas as Sea to Sea Stampin’. If you get lost, during the hop, use the list below to find your way.
Here are the colors in the kit:
You can click on each one to see all the products that come in that color!
Stamp Candy VIPs– All my customers may join my Stamp Candy VIPs Facebook group to receive free project ideas, tutorials, giveaways, and more! If you’ve ordered through me in the past year, you can join. Just click the link to find the group, request to join and I’ll add you!
Gift Certificates are available in any U.S. dollar amount from me. Contact me for details: candy@stampcandy.net