Feb 10, 2018 | Cards, Gallery, Guest Stamper, Swaps |
This is the third day I’ve shared cards made by by Candy Hearts team members. Today’s card is made by Lonita Barron using the Heartfelt Blooms stamp set from the 2018 Sale-A-Bration catalog. You know what that means! Yes, you can get this stamp set FREE with a $50 order during Sale-A-Bration! That’s only through March 31, so get it now if you haven’t already!
With just 3 pieces of paper, 2 stamps, and 1 ink pad, Lonita created this gorgeous thank you card!
Here’s what she made:


Here’s what she did:
Cut and scored with my Stampin’ Trimmer:
- Whisper White Thick card stock (CS) cut to 5-1/2″x 8-1/2, then scored in half at 4-1/4″
- Wild Wasabi CS cut to 5-1/4″ 4″
- Whisper White CS cut to 5″ x 3-3/4″
Stamped with the Heartfelt Blooms stamp set:
- flower images and sentiment in Rose Red ink onto the Whisper White CS layer
Assembled the card:
- burnished the fold in the card base with a Bone Folder
- Whisper White CS layer glued onto the Wild Wasabi CS layer
- Wild Wasabi CS layer glued onto the front of the card base.
Here are today’s colors:
You can click on each one to see all the products that come in that color!
Here’s what she used:
Click on these images for more details and to purchase.
Here’s some stuff you should know:
- This is a fabulous time to join my team! Sale-A-Bration is the biggest event of the Stampin’ Up! year and you can save big on the ultimate bundle, the Starter Kit. CLICK HERE for more information. Contact me with any questions: email candy@stampcandy.net or call/text 404-661-5222
- Newsletter: subscribe for exclusive deals, projects, and more! Enter your email address and click SUBSCRIBE at the top right of this page, just under the picture of my smiling face. You can also choose to receive an email every day that I have a blog post.
- Check out My Events Calendar HERE
- Host Code for the month of February (2T9AQTKG) Find out more about HOW, WHEN and WHY to use the code HERE.
- My Thank You Gift to You in February: Narrow Note Cards & Envelopes – Find out more HERE.
- Gift Certificates are available in any U.S. dollar amount from me. Contact me – email: candy@stampcandy.net OR call/text: 404-661-5222
- Gumball Rewards for all orders over $50. Find out more HERE.
Thanks for stopping by today, and Sweet Stamping!

Feb 7, 2018 | Cards, Gallery, Guest Stamper, Sale-A-Bration, Swaps |
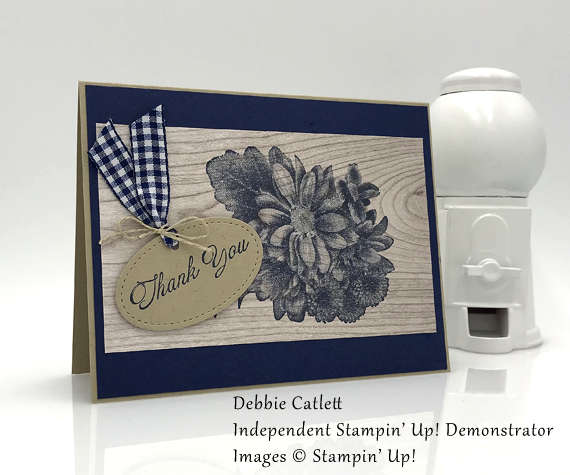
Today I’m excited to share a card made by one of my Candy Hearts team members, Debbie Catlett. Everything she makes is amazing. Her attention to detail and eye for pretty cards make her projects some of the best I’ve seen. She continues to amaze each month at our Hearts gathering with her swap cards. For today’s project, Debbie used the new Heartfelt Blooms stamp set from the 2018 Sale-A-Bration catalog along with the Wood Textures Designer Series Paper and Stitched Shapes Framelits Dies to create a beautifully rustic thank you card.
The Heartfelt Blooms stamp set is made using a new process to create a photorealistic image with only one stamp. Similar images typically use 2 – 3 stamps applied in layers, such as the Sweet Little Something stamp set.
AND the Heartfelt Blooms stamp set is FREE with a $50 order, but only through March 31, 2018. Be sure to take advantage of this amazing Sale-A-Bration opportunity.
Here’s what she made:

Here’s what she did:
Cut and scored with my Stampin’ Trimmer:
- Crumb Cake card stock (CS) cut to 5-1/2″ x 8-1/2″, then scored in half at 4-1/4″
- Night of Navy CS cut to 5-3/8″ x 4-1/8″
- Wood Textures Designer Series Paper (DSP) cut to 5-1/8″ x 3″
- Optional: Whisper White CS cut to 5-1/4″ x 4″ for the inside of the card
Stamped with the Heartfelt Blooms stamp set:
- flower image in Night of Navy ink onto the DSP
- sentiment in Night of Navy ink onto a scrap of Crumb Cake CS
Die cut using the Stitched Shapes Framelits:
Cut using the 1/8″ Circle Punch:
- hole in the top of the sentiment tag
Assembled the card:
- burnished the fold in the card base with a Bone Folder
- Night of Navy CS layer glued onto the front of the card base
- DSP glued onto the Night of Navy CS layer
- piece of Night of Navy Gingham Ribbon through the hole in the tag
- piece of Linen Thread tied in a bow around the Night of Navy ribbon
- tag adhered to the DSP with Stampin’ Dimensionals
- Optional: Whisper White CS glued to the inside of the card base
Here are today’s main colors:
You can click on each one to see all the products that come in that color!
Here’s what she used:
Click on these images for more details and to purchase.
Here’s some stuff you should know:
- This is a fabulous time to join my team! Sale-A-Bration is the biggest event of the Stampin’ Up! year and you can save big on the ultimate bundle, the Starter Kit. CLICK HERE for more information. Contact me with any questions: email candy@stampcandy.net or call/text 404-661-5222
- Newsletter: subscribe for exclusive deals, projects, and more! Enter your email address and click SUBSCRIBE at the top right of this page, just under the picture of my smiling face. You can also choose to receive an email every day that I have a blog post.
- Check out My Events Calendar HERE
- Host Code for the month of February (2T9AQTKG) Find out more about HOW, WHEN and WHY to use the code HERE.
- My Thank You Gift to You in February: Narrow Note Cards & Envelopes – Find out more HERE.
- Gift Certificates are available in any U.S. dollar amount from me. Contact me – email: candy@stampcandy.net OR call/text: 404-661-5222
- Gumball Rewards for all orders over $50. Find out more HERE.
Thanks for stopping by today, and Sweet Stamping!
Feb 4, 2018 | Cards, Gallery, Occasions, Swaps |
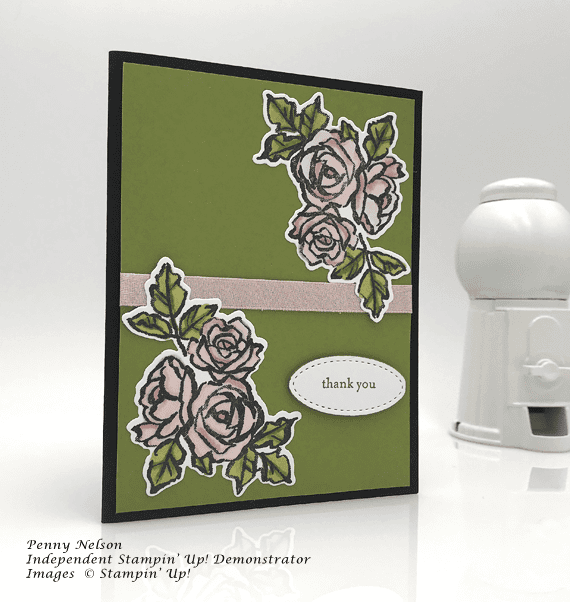
Today I’m sharing another swap card I received from the amazing Penny Nelson of Designs by Penny She used the Petal Palette Bundle to create this beautiful thank you card. The sentiment is from the Teeny Tiny Wishes stamp set and was die cut using the Stitched Shapes Framelits Dies – two things that should definitely be in every stamper’s arsenal.
Here’s what I made:

Here’s what (I think) she did:
Cut and scored with a Stampin’ Trimmer:
- Basic Black card stock (CS) cut to 8-1/2″ x 5-1/2″, then scored in half at 4-1/4″
- Old Olive CS cut to 4″ x 5-1/4″
- Whisper White CS cut to 4″ x 5-1/4″ for the inside
Stamped with the Petal Palette stamp set:
- flower cluster x 2 in Basic Black ink onto a scrap of Whisper White CS
Stamped with the Teeny Tiny Wishes stamp set:
- sentiment in Old Olive ink onto a scrap of Whisper White CS
Colored using Blender Pens:
- flowers in Powder Pink ink
- leaves in Old Olive ink
Die cut using the Petals & More Thinlits:
- both colored flower clusters
Die cut using the Stitches Shapes Framelits:
Assembled the card:
- Burnished the fold in the card base with a Bone Folder
- Powder Pink 3/8″ Shimmer Ribbon adhered to the Old Olive CS layer with Tear & Tape, wrapping the ends around to the back
- flower clusters adhered to the Old Olive CS layer with Tear & Tape
- sentiment adhered to the Old Olive CS layer with Stampin’ Dimensionals
- Old Olive CS layer glued to the front of the card base
- Whisper White CS layer glued to the inside of the card base
Here are today’s colors:
You can click on each one to see all the products that come in that color!
Here’s what she used:
Click on these images for more details and to purchase.
Here’s some stuff you should know:
- This is a fabulous time to join my team! Sale-A-Bration is the biggest event of the Stampin’ Up! year and you can save big on the ultimate bundle, the Starter Kit. CLICK HERE for more information. Contact me with any questions: email candy@stampcandy.net or call/text 404-661-5222
- Newsletter: subscribe for exclusive deals, projects, and more! Enter your email address and click SUBSCRIBE at the top right of this page, just under the picture of my smiling face. You can also choose to receive an email every day that I have a blog post.
- Check out My Events Calendar HERE
- Host Code for the month of February (2T9AQTKG) Find out more about HOW, WHEN and WHY to use the code HERE.
- My Thank You Gift to You in February: Narrow Note Cards & Envelopes – Find out more HERE.
- Gift Certificates are available in any U.S. dollar amount from me. Contact me – email: candy@stampcandy.net OR call/text: 404-661-5222
- Gumball Rewards for all orders over $50. Find out more HERE.
Thanks for stopping by today, and Sweet Stamping!
Feb 3, 2018 | Cards, Gallery, Sale-A-Bration, Swaps |
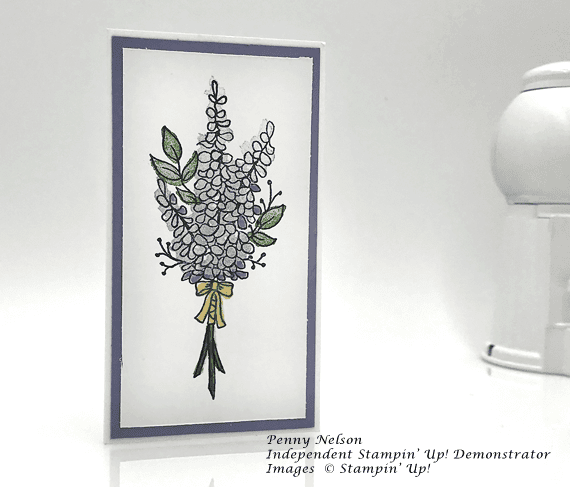
Today I’m excited to share one of the swap cards I received recently from Penny Nelson of designsbypenny.wordpress.com. Penny is a Stampin’ Up! Demonstrator who lives in Katy, TX. We met when we, along with 4 other Demos, earned the Rising Star award our first year with Stampin’ Up!
Penny used the new Sale-A-Bration stamp set, Lots of Lavender, and the new Whisper White Narrow Cards & Envelopes for today’s card.
Be sure to check back as I’ll be posting more swap cards I’ve received from the Rising Stars!
Here’s what she made:

Here’s what she did:
Cut and scored with her Stampin’ Trimmer:
- Wisteria Wonder card stock (CS) cut to 2-1/4″ x 4-1/4″
- Whisper White CS cut to 2″ x 4″
Stamped with the Lots of Lavender stamp set:
- outline image in Basic Black ink onto the Whisper White CS layer
- leaves and stems in Garden Green ink, filling in the outline
- flowers in Wisteria Wonder ink, filling in the outline
- bow in So Saffron ink, filling in the outline
Assembled the card:
- burnished the fold in the pre-made card base with a Bone Folder
- stamped CS glued onto the Wisteria Wonder CS layer
- Wisteria Wonder CS layer glued to the front of the card base
- NOTE: These cards fits perfectly into the accompanying envelopes
Here are today’s colors:
You can click on each one to see all the products that come in that color!
Here’s what she used:
Click on these images for more details and to purchase.
Here’s some stuff you should know:
- This is a fabulous time to join my team! Sale-A-Bration is the biggest event of the Stampin’ Up! year and you can save big on the ultimate bundle, the Starter Kit. CLICK HERE for more information. Contact me with any questions: email candy@stampcandy.net or call/text 404-661-5222
- Newsletter: subscribe for exclusive deals, projects, and more! Enter your email address and click SUBSCRIBE at the top right of this page, just under the picture of my smiling face. You can also choose to receive an email every day that I have a blog post.
- Check out My Events Calendar HERE
- Host Code for the month of February (2T9AQTKG) Find out more about HOW, WHEN and WHY to use the code HERE.
- My Thank You Gift to You in February: Narrow Note Cards & Envelopes – Find out more HERE.
- Gift Certificates are available in any U.S. dollar amount from me. Contact me – email: candy@stampcandy.net OR call/text: 404-661-5222
- Gumball Rewards for all orders over $50. Find out more HERE.
Thanks for stopping by today, and Sweet Stamping!
Jan 30, 2018 | Cards, Gallery, Occasions, Swaps |
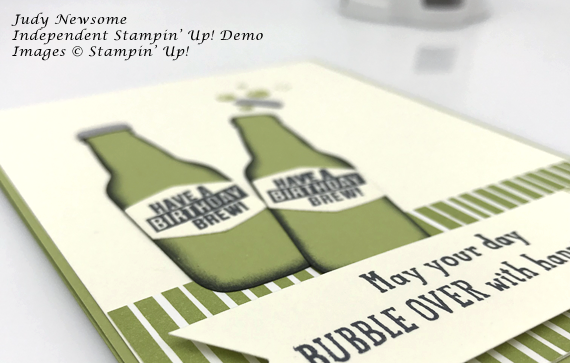
Recently I told you I participated in a card swap with some of my Rising Star friends. We each made 8 different cards. As I was leaving for a trip, I realized I had only 7 done. Enter my sister, team member, cat sitter, and amazing card maker, Judy Newsome. She was house sitting for us while we were gone. After I left, she made the 8th card for each pack and sent them all out. She CASEd a card by Nicole Schlack of www.schlack.de.
Thank you, Judy!
Here’s what she made:


Here’s what she did:
Cut and scored with a Stampin’ Trimmer:
- Pear Pizzazz card stock (CS) cut to 4-1/4″ x 11″, then scored in half at 5-1/2″
- Very Vanilla CS cut to 4-1/8″ x 5-3/8″
- Coffee Break Designer Series Paper (DSP) cut to 4-1/8″ x 1-3/4″
- Very Vanilla CS cut to 4-1/4″ x 1″
- Optional: Very Vanilla CS cut to 4″ x 5-1/4″ for the inside
Cut using the Banner Triple Punch:
- one end of the 4-1/4″ x 1″ Very Vanilla CS strip
Stamped with the Bubble Over stamp set:
- larger sentiment in Basic Black ink onto the Very Vanilla CS strip
- 2 smaller sentiments onto a scrap of Very Vanilla CS
- bubbles in Pear Pizzazz ink onto the Very Vanilla CS layer, to appear to be coming out of the bottle
Die cut using the Bottles & Bubbles Framelits:
- smaller sentiments
- 2 bottles from a scrap of Pear Pizzazz CS
- 2 bottle caps from a scrap of Smoky Slate CS
Colored using a Sponge Dauber:
- around the edges of the 2 bottles in Basic Black ink
Assembled the card:
- burnished the fold in the card base with a Bone Folder
- Very Vanilla CS layer glued onto the front of the card base
- Coffee Break DSP glued onto the bottom of the Very Vanilla CS layer
- small sentiment labels glued onto the bottles
- bottles glued onto the Very Vanilla CS layer
- one bottle cap glued onto a bottle
- the other bottle cap glued onto the Very Vanilla CS layer, among the stamped bubbles, as if it had just popped off the bottle
- wrapped the end of the Very Vanilla CS strip with a piece of Pear Pizzazz Washi Tape and a piece of Basic Black Washi Tape
- Very Vanilla CS strip adhered to the Coffee Break DSP with Stampin’ Dimentionals
- Optional:4″ x 5-1/4″ Very Vanilla CS glued to the inside of the card base
Here are today’s colors:
You can click on each one to see all the products that come in that color!
Here’s what she used:
Click on these images for more details and to purchase.
Here’s some stuff you should know:
- This is a fabulous time to join my team! Sale-A-Bration is the biggest event of the Stampin’ Up! year and you can save big on the ultimate bundle, the Starter Kit. CLICK HERE for more information. Contact me with any questions: email candy@stampcandy.net or call/text 404-661-5222
- Newsletter: subscribe for exclusive deals, projects, and more! Enter your email address and click SUBSCRIBE at the top right of this page, just under the picture of my smiling face. You can also choose to receive an email every day that I have a blog post.
- Check out My Events Calendar HERE
- Host Code for the month of January (XNNMNZSZ) Find out more about HOW, WHEN and WHY to use the code HERE.
- My Thank You Gift to You in January: Silver Embossing Paste – Find out more HERE.
- Gift Certificates are available in any U.S. dollar amount from me. Contact me – email: candy@stampcandy.net OR call/text: 404-661-5222
- Gumball Rewards for all orders over $50. Find out more HERE.
Thanks for stopping by today, and Sweet Stamping!
Oct 7, 2017 | Cards, Christmas, Gallery, Holiday, Swaps |
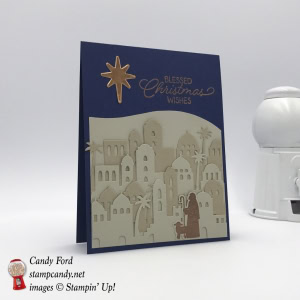
Today I’m sharing the last of four cards I made for the Rising Star card swap, using the Night in Bethlehem bundle. I wanted to give the feeling of a desert city at night, so I used Night of Navy for the night sky, and Sahara Sand and Crumb Cake for the dunes and the buildings. I used copper to add a little shine to the card, both with embossing powder and Copper Foil Sheets.
Here’s the bundle:

Night of Bethlehem Bundle © Stampin’ Up!
Here’s what I made:
Here’s what I did:
Cut and scored with my Stampin’ Trimmer:
- Night of Navy card stock (CS) cut to 4-1/4″ x 11″, then scored in half at 5-1/2″
- Sahara Sand CS cut to 4″ x 4″
- Sahara Sand CS cut to 4″ x 5-1/4″ for the inside
Stamped with the Night in Bethlehem stamp set:
- sentiment in Versamark ink onto the front of the card base, near the top right, then heat embossed in copper
- shepherd in Versamark ink onto a scrap of Sahara Sand CS, then heat embossed in copper
- NOTE: To heat emboss:
- 1) rub the CS with the Embossing Buddy to cut down on static
- 2) stamp in Versamark ink
- 3) cover the stamped area with Copper Stampin’ Emboss Powder
- 4) melt powder with a Heat Tool until it’s shiny
Die cut using the Bethlehem Edgelits:
- shepherd
- star from a Copper Foil Sheet
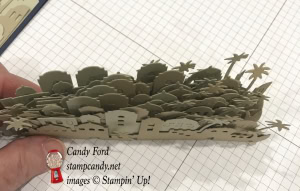
- each of the two Edgelit designs from both Sahara Sand CS and Crumb Cake CS (4 pieces total)
- This is a photo of all the Edgelits I cut out for all the swap cards. 4 pieces x 5 cards = 20 pieces:
Cut using Paper Snips:
- curve along the top of the 4″ x 4″ piece of Sahara Sand CS, to resemble dunes behind the city
Assembled the card:
- Sahara Sand “dune” layer glued onto the front of the card base
- city layers glued onto the Sahara Sand layer, starting at the top and working down
- shepherd glued onto the last city layer
- star glued onto the front of the card base
- 4″ x 5-1/4″ Sahara Sand CS glued to the inside of the card base
Here are today’s colors:
You can click on each one to see all the products that come in that color!
Here’s what I used:
Click on the images for more details and to purchase.
Here are some key points to remember:
- Hostess Code for the month of October (HGB2HGXK)
Find out more about HOW, WHEN and WHY to use that HERE. - October’s FREE gift
Mini Pizza Boxes
Find out more HERE. - New Merry Patterns Hostess Stamp Set – added to your Host Rewards
There’s a brand new stamp set that isn’t in any catalog. You can’t buy it, but you can get if for free with a qualifying order! You can host a party, or place your own order, or join under me and get a 20% discount on your demonstrator order. Find out more HERE. - Gumball Rewards for all orders over $50
Find out more HERE.
Thanks for stopping by today, and Sweet Stamping!
