Sep 8, 2020 | Blog Hop, Cards, Fun Folds, Gallery, Techniques |

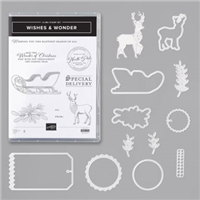
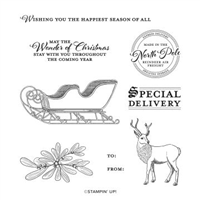
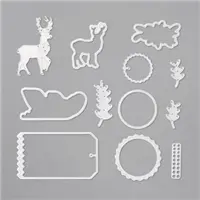
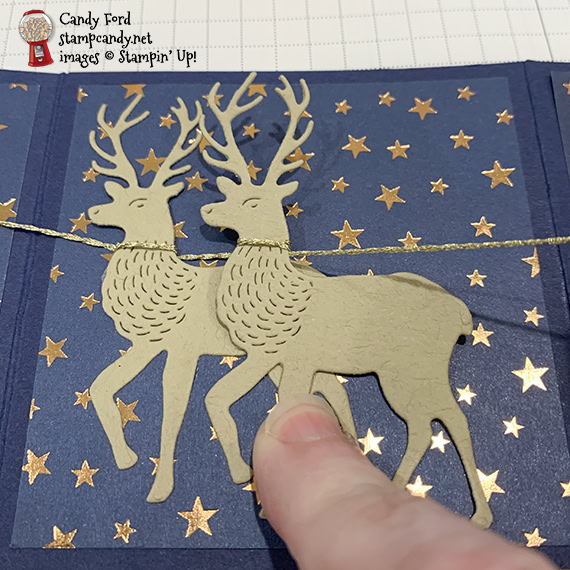
Welcome to the September 2020 ICS Blog Hop! This month’s theme is Mini Catalog Fun Folds. I made an accordion fold card that fits into a Mini Pizza Box. I used the Wishes & Wonder Bundle (Wishes & Wonder stamp set and North Pole Wonder Dies,) along with the Stitched Rectangle Dies, Stitched Shapes Dies, Brightly Gleaming Designer Series Paper, and Forever Gold Laser-Cut Specialty Paper, to create a long skinny card with Santa’s sleigh and eight tiny reindeer, plus Rudolph who has a Red Rhinestone for his nose.
Be sure to hop all the way around to all the stops because you don’t want to miss any of the great fun fold projects this group has for you today.
If you are reading this in email, some photos may appear blurry, or may not appear at all. Please click here to see the post on my blog.
S September 2020 ICS September 2020 ICS September 2020 ICS September 2020 ICS https://bit.ly/34ibSpX. https://stampcandy.net/blog-hop/september-2020-ics-blog-hop-fun-folds/
Here’s what I made:
The box:
The card front: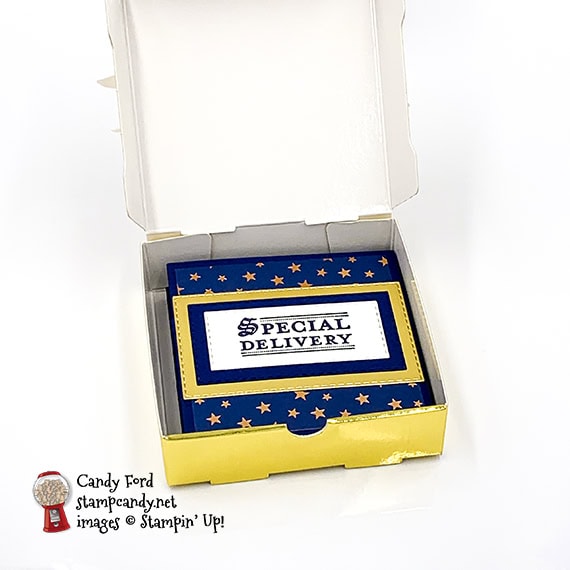
Pulling the card out of the box:
Inside the card: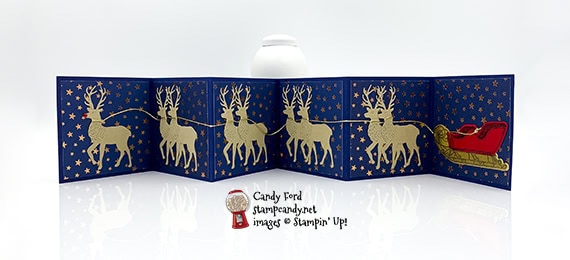
Rudolph leads the way: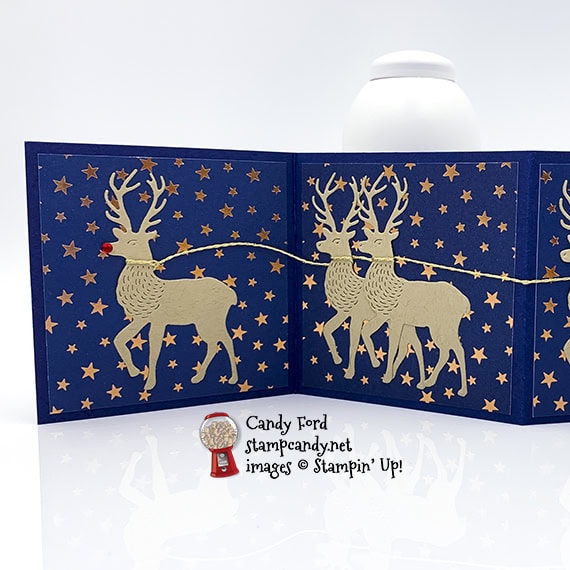
Sleigh ready for Santa and his toy sack:
Back of card: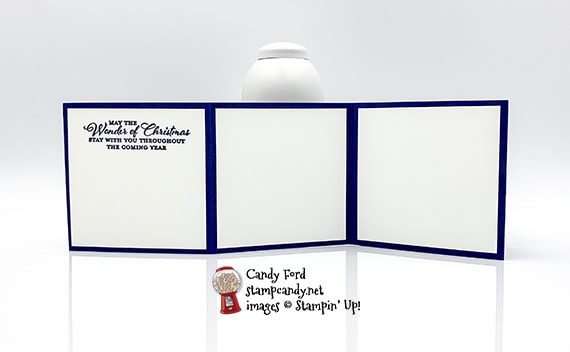 S
S
Here’s what I did:
Cut and scored with my paper trimmer:
- Night of Navy card stock (CS) cut to 11″ x 3-1/4″, then scored at 3-1/4″, 6-1/2″, and 9-3/4″
- Night of Navy card stock (CS) cut to 9-3/4″ x 3-1/4″, then scored at 3-1/4″ and 6-1/2″
- Brightly Gleaming Designer Series Paper (DSP) layers cut to 3″ x 3″ (7 pieces)
- Whisper White CS layers cut to 3″ x 3″ (3 pieces)
- Night of Navy CS cut to 3-1/4″ x 3-1/4″ for the top of the box
Stamped with the Wishes & Wonder stamp set:
- card front sentiment in Night of Navy ink onto a scrap of Whisper White Thick CS
- card back sentiment in Night of Navy ink onto one of the Whisper White CS layers
- box top sentiment in Night of Navy ink onto a scrap of Whisper White Thick CS
- sleigh in Jet Black Stazon ink onto a scrap of Gold Foil Sheet
- sleigh in Jet Black Stazon ink onto a scrap of Real Red CS
Cut using the North Pole Wonder Dies:
- the two stamped sleighs
- 9 reindeer from scraps of Crumb Cake CS
Cut using the Stitched Rectangle Dies:
- sentiment for the card front
- scrap of Night of Navy CS larger than the sentiment
- scrap of Gold Foil Sheet larger than the Night of Navy piece
Cut using the Stitched Shapes Dies:
- sentiment for the box top
Cut using the 2″ Circle Punch:
- scrap of Night of Navy CS
Cut using Paper Snips:
- cut away the rails from the Real Red CS sleigh
Assembled the card:
- burnished the folds in the two long Night of Navy CS pieces with a Bone Folder
- smallest section of the 11″ piece glued onto one end of the 9-3/4″ piece, to create a 19-1/2″ x 3-1/4″ accordion card base, with 6 3-1/4″ square sections
- 6 DSP layers glued onto the 6 sections on one side of the card base
- remaining DSP layer glued onto the front of the card base
- 3 Whisper White CS layers glued onto the back of the card base
- Stampin Seal+ applied onto the back of the first reindeer’s neck
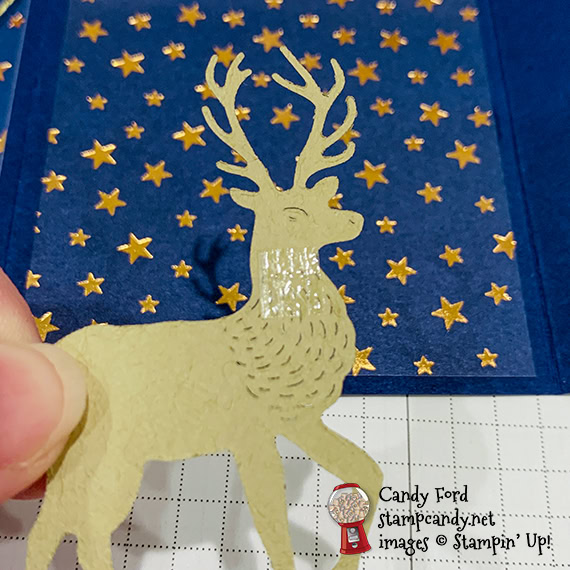
- Gold Twine tied around the reindeer’s neck, then the reindeer glued onto the first DSP layer
- Stampin Seal+ applied onto the back of the next reindeer’s neck, the twine looped around the neck, then the reindeer glued onto the second DSP layer
- continued adding reindeer, looping the twine around each neck and gluing them onto the DSP layers
- NOTE: Don’t pull the twine too tight between the reindeer. Lay the reindeer where it needs to go, then loop the twine around its neck and stick it to the Stampin’ Seal+ on the back (see photo below.) Then carefully turn over the reindeer to apply glue onto the back. Make sure to glue down all the points of the antlers so they don’t get tangled with the others when the card is closed.
- red sleigh pieces adhered onto the gold sleigh using Stampin’ Seal+
- sleigh adhered onto the last DSP layer using Stampn’ Seal+, with the twine under the front rail
- knot tied in the end of the twine to keep it from raveling
- twine adhered onto the sleigh using one tiny strip of Stampn’ Seal+ (I used my Take Your Pick tool to remove just one strip from the adhesive and place it on the sleigh.)
- Red Rhinestone applied onto the first reindeer’s nose
- sentiment for card front glued onto the Night of Navy CS die cut rectangle
- Night of Navy CS die cut rectangle adhered onto the gold foil die cut rectangle using Stampin’ Seal+
- gold rectangle adhered onto the DSP layer on the card front using Stampin’ Seal+
Assembled the box:
- burnished the folds in the box and folded it to assemble
- adhered the 2 back tabs to the back of the box using Stampin’ Seal+
- 3-1/4″ Night of Navy CS square layer adhered onto the top of the box using Stampin’ Seal+
- gold accent adhered onto the Night of Navy CS layer using Stampin’ Seal+
- box sentiment glued onto the punched Night of Navy CS circle
- Night of Navy CS circle adhered onto the center of the gold accent using Black Stampin’ Dimensionals
- 3 Red Rhinestones applied randomly onto the box top
S
Here’s the September 2020 ICS Blog Hop:
Click on the next button below to hop to the next stop, Charmane Hopkins of Renee’s Paper Treasures:
.

S
Here are today’s colors:
You can click on each one to see all the products that come in that color!
S
Here’s what I used:
Click on these images for more details and to purchase. If you are reading this post in email, the product images may not show up. Please click here to see the post on my blog.
Supply List. <— Click for a clickable and printable list of the products!
S
Here are some helpful links:
S
Thanks for stopping by today, and Sweet Stamping!
Sep 3, 2020 | Cards, Gallery, Techniques |
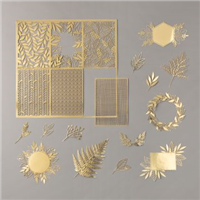
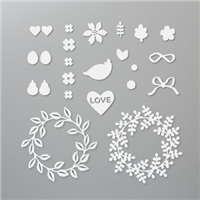
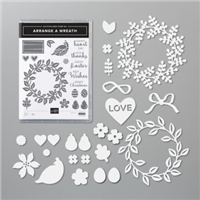
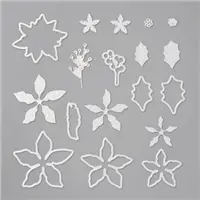
Wreaths aren’t just for the holidays. Today’s wreath card gives encouragement to a dear friend. I used the Wreath Builder Dies, Layering Circle Dies, Ornate Frames Dies, Forever Fern stamp set, and 1-1/2″ Circle Punch. And of course, several colors of card stock. The front of the card base is in two separate pieces that are held together by the wreath and the sentiment.
If you are reading this in email, some photos may appear blurry, or may not appear at all. Please click here to see the post on my blog.
S wreath builder wreath builder wreath builder wreath builder
Here’s what I made:


S
Here’s what I did:
Cut and scored with my paper trimmer:
- Whisper White Thick card stock (CS) cut to 5-1/4″ x 5-1/2″, then scored along the shorter side at 4-1/4″
- Whisper White Thick CS cut to 1″ x 5-1/2″
- Just Jade CS cut to 4″ x 1-1/8″
Stamped with the Forever Fern stamp set:
- inner sentiment in Pretty Peacock ink onto the inside of the card base
- outer sentiment in Pretty Peacock ink onto a scrap of Whisper White Thick CS
Cut using the Wreath Builder Dies:
- leaf wreaths from scraps of Pear Pizzazz, Just Jade, Garden Green, Shaded Spruce, and Pretty Peacock CS
- berry wreath from a scrap of Soft Sea Foam CS
Cut using the Ornate Frames Dies:
Cut using the Layering Circles Dies:
- a scrap of Whisper White Thick CS into a ring, using a larger and a smaller die, for the back of the wreath
- Be sure the ring doesn’t show inside the center of the wreath or outside the perimeter of the wreath.
Cut using the 1-1/2″ Circle Punch:
- both ends of the Just Jade CS piece
Assembled the card:
- burnished the fold in the card base with a Bone Folder
- wreaths stacked and glued onto each other
- 1″ strip of Whisper White Thick CS lined up along the right side of the card base
- Just Jade CS glued only at the ends onto the left side of the card base front and onto the 1″ strip
- flipped over the card base and glued the Whisper White Thick CS ring only on the sides onto the two sides of the card front, making sure the inner sentiment would show through the center
- flipped back over and glued the wreath onto the ring and the two sides of the card front, again making sure the inner sentiment would show through the center
- outer sentiment adhered into the Just Jade CS using Stampin’ Dimensionals
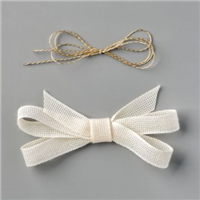
- Magenta Madness ribbon tied in a bow and adhered onto the wreath using a Mini Glue Dot
S
Here are today’s colors:
You can click on each one to see all the products that come in that color!
S
Here’s what I used:
Click on these images for more details and to purchase. If you are reading this post in email, the product images may not show up. Please click here to see the post on my blog.
Supply List. <— Click for a clickable and printable list of the products!
S
Here are some helpful links:
S
Thanks for stopping by today, and Sweet Stamping!
Aug 28, 2020 | Cards, Gallery, Techniques |
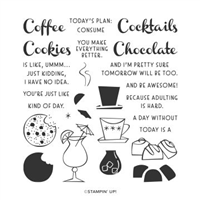
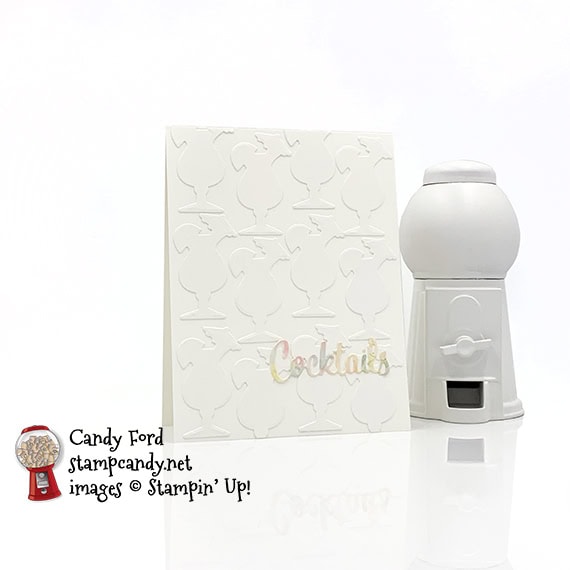
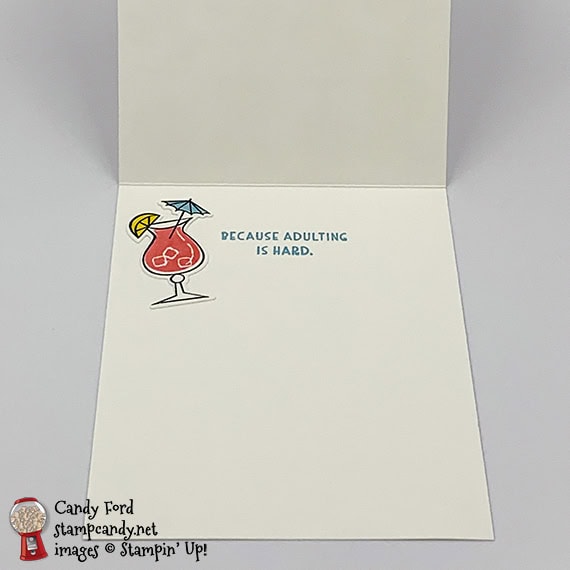
Have you seen the Nothing’s Better Than Bundle yet? It’s the Nothing’s Better Than stamp set and Love You More Than Dies, and you save 10% if you buy them together in a bundle. And of course, you want both anyway, right? I admit I’m not a coffee or cocktail drinker, but I can consume massive amounts of chocolate and cookies!
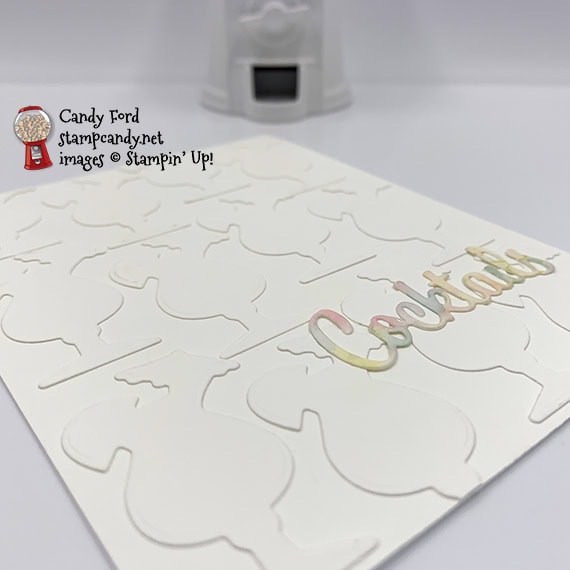
Today’s card looks like it has been embossed with an embossing folder, but it’s faux embossing. I actually die cut the pieces from the same color card stock as the base, and glued them on. Pretty cool, eh? I did stamp one of the cocktails and intended to glue it onto the front in place of one of the white ones, but it came out much bolder than the colors on the die cut sentiment, so I glued in onto the inside of the card.
If you are reading this in email, some photos may appear blurry, or may not appear at all. Please click here to see the post on my blog.
S nothing’s better nothing’s better nothing’s better nothing’s better
Here’s the bundle:

S
Here’s what I made:
S
Here’s what I did:
Cut and scored with my paper trimmer:
- Whisper White Thick card stock (CS) cut to 4-1/4″ x 11″, then scored in half at 5-1/2″
Stamped with the Nothing Better Than stamp set:
- sentiment in Balmy Blue ink onto the inside of the card base
- cocktail in Tuxedo Black Memento ink onto a scrap of Whisper White CS
- drink in Flirty Flamingo ink
- lemon in Daffodil Delight ink
- umbrella in Balmy Blue ink
Colored using a Water Painter filled with water:
- a scrap of Shimmery White CS using Flirty Flamingo, Balmy Blue, and Daffodil Delights inks
- allow to dry completely before die cutting
Cut using the Love You More Than Dies:
- about a dozen cocktails from a scrap of Whisper White Thick CS
- the stamped cocktail
- front sentiment from the watercolored piece
Assembled the card:
- burnished the fold in the card base with a Bone Folder
- Whisper White Thick CS cocktails glued onto the front of the card base
- die cut sentiment glued over the Whisper White Thick CS cocktails
- stamped cocktail glued onto the inside of the card base
S
Here are today’s colors:
You can click on each one to see all the products that come in that color!
S
Here’s what I used:
Click on these images for more details and to purchase. If you are reading this post in email, the product images may not show up. Please click here to see the post on my blog.
Supply List. <— Click for a clickable and printable list of the products!
S
Use your Bonus Days coupons by August 31!
Click the image below to shop now and use your Bonus Days coupons!

S
Here are some helpful links:
S
Thanks for stopping by today, and Sweet Stamping!
Aug 25, 2020 | Cards, Christmas, Fun Folds, Gallery, Holiday, Techniques |
Today I’m sharing a card I designed as one of the Make & Takes for our August Candy Hearts team meeting. I used the Poinsettia Place Suite Collection to create this double gate-fold card. At 3″ wide, it’s skinnier than the usual 4-1/4″, but that leaves room for the sprigs to hang off the edge. It will still fit into the standard medium envelope. The poinsettia was die cut from the Poinsettia Place Designer Series Paper, and glued onto a piece of card stock that was cut with the same die. That’s to make it sturdier, since half of it hangs off the layer.
If you are reading this in email, some photos may appear blurry, or may not appear at all. Please click here to see the post on my blog.
S Poinsettia Place Poinsettia Place Poinsettia Place Poinsettia Place
Here’s what I made:


S
Here’s what I did:
Cut and scored with my paper trimmer:
- Old Olive card stock (CS) cut to 5-1/2″ x 9″, then scored at 1-1/2″ 3″, 6″, and 7-1/2″”
- Soft Suede CS layers cut to 1-3/8″ x 5-3/8″ (2 pieces)
- Old Olive card stock layers cut to 1-1/4″ x 5-1/4″ (2 pieces)
- Very Vanilla CS cut to 2-3/4″ x 5-1/4″ for the inside of the card base
Stamped with the Poinsettia Petals stamp set:
- sentiment in Soft Suede ink onto the Very Vanilla CS
Cut using the Poinsettia Dies:
- flower from a piece of Poinsettia Place Designer Series Paper (DSP)
- scrap of Old Olive CS using the same poinsettia die
- 3 sprigs from a scrap of Soft Suede CS
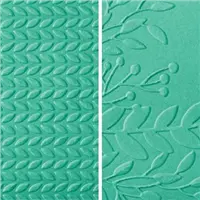
Embossed using the Greenery Embossing Folder:
Assembled the card:
- burnished the folds in the card base with a Bone Folder
- Soft Suede CS layers glued onto the two outer most sections of the card base
- Old Olive CS layers glued onto the Soft Suede CS layers
- Soft Suede CS sprigs glued onto the Old Olive CS layer on the left
- DSP poinsettia glued onto the Old Olive CS die cut in the same shape
- only the left part of the Old Olive poinsettia glued onto the Old Olive CS layer on the left, covering the bases of the sprigs
- Very Vanilla CS glued onto the center section of the card base
S
Here are today’s colors:
You can click on each one to see all the products that come in that color!
S
Here’s what I used:
Click on these images for more details and to purchase. If you are reading this post in email, the product images may not show up. Please click here to see the post on my blog.
Supply List. <— Click for a clickable and printable list of the products!
S
Use your Bonus Days coupons by August 31!
Click the image below to shop now and use your Bonus Days coupons!
S
Here are some helpful links:
S
Thanks for stopping by today, and Sweet Stamping!
Aug 4, 2020 | Cards, Gallery, Halloween, Holiday, Techniques |
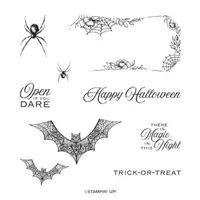
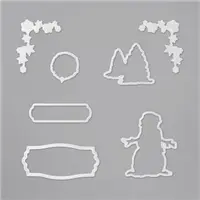
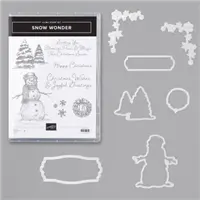
Today the brand new August – December 2020 Mini Catalog goes live! To celebrate, I used two brand new products. I used the stamp set from the Hallows Night Magic Bundle, and the dies from the Snow Wonder Bundle to create today’s Happy Halloween card. The background was created using the Smooshing Technique. Basically you smear some ink around a slick surface, like a Window Sheet, and spritz it with water, then “smoosh” paper into it. Every piece is unique.
If you are reading this in email, some photos may appear blurry, or may not appear at all. Please click here to see the post on my blog.
S hallows hallows hallows hallows
Here are the new products I used:
I used the stamp set from this bundle.
I used the dies from this bundle, specifically the one at the bottom left. The die is taller than the 7/8″ strip for the sentiment, but I centered it over the sentiment, and used it to cut only the ends.
S
Here’s what I made:

I heat embossed the sentiment in white, then colored it with a Dark Highland Heather Stampin’ Blends Marker.
S
Here’s what I did:
Cut and scored with my paper trimmer:
- Basic Black card stock (CS) cut to 5-1/2″ x 8-1/2″, then scored in half at 4-1/4″
- Shimmery White CS layer cut to 5-3/8″ x 4-1/8″
- Basic Black CS cut to 4″ x 7/8″
- Smoky Slate CS cut to 5-3/8″ x 4-1/8″ for the inside of the card base (Purple Posy or Highland Heather CS would work well also.)
Smooshing Technique:
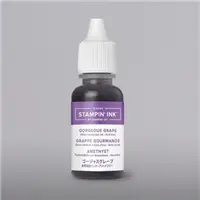
- Gorgeous Grape and Tuxedo Black Memento ink refills dripped onto a Window Sheet, then swirled around
- water spritzed onto the ink
- Shimmery White CS layer laid on the Window Sheet to transfer the ink to it, then lifted it and laid it down in a different area of the Window Sheet
- continued “smooshing” the CS in the ink until I liked the look
- set the CS aside to dry completely
- Just a few drops of ink are more than enough for one card, so I smooshed 4 pieces of the Shimmery White CS. I’ll hold on to the other three for future projects. You can see in this photo that there was still some ink left on the Window Sheet.The piece at the bottom left is the one I used for today’s card, because I thought it looked the most like a spooky sky.

Stamped with the Hallows Night Magic stamp set:
- the bats in Tuxedo Black ink onto the smooshed CS layer
- sentiment in Versamark ink onto the strip of Basic Black CS, then heat embossed it in white
Cut using the Snow Time Dies:
- sentiment
- I centered the strip in the die to cut only the ends.
Colored using a Stampin’ Blends Marker:
- embossed sentiment in Dark Highland Heather
Assembled the card:
- burnished the fold in the card base with a Bone Folder
- smooshed layer glued onto the front of the card base
- sentiment adhered onto the smooshed layer using Black Stampin’ Dimensionals
- 2 Red Rhinestones applied onto the larger bat as eyes
- Smoky Slate CS glued onto the inside of the card base (I think I’ll try using Purple Posy or Highland Heather CS on the inside of the cards I make using the other smooshed pieces.)
S
Use the Bonus Days coupons you earned in the last month!
Click the image below to shop now and use your Bonus Days coupons!
S
Here are today’s main colors:
You can click on each one to see all the products that come in that color!
S
Here’s what I used:
Click on these images for more details and to purchase. If you are reading this post in email, the product images may not show up. Please click here to see the post on my blog.
Supply List. <— Click for a clickable and printable list of the products!
S
Here are some helpful links:
S
Thanks for stopping by today, and Sweet Stamping!
Jul 28, 2020 | Cards, Gallery, Techniques |
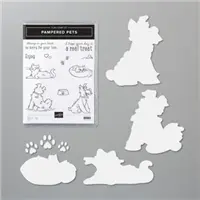
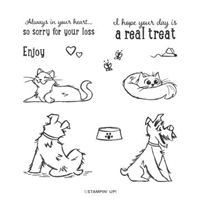
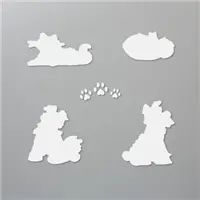
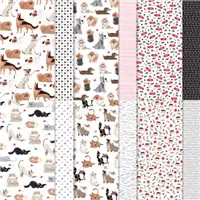
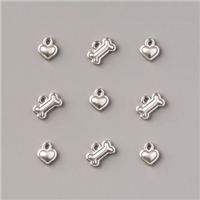
Today I’m sharing a fun wiper card I made using products from the Playful Pets Suite: Pampered Pets Bundle (Pampered Pets stamp set and Pets Dies,) Playful Pets Designer Series paper, and Playful Pets Trinkets. I used two oval dies from the Stitched Shapes Dies for the sentiment.
If you are reading this in email, some photos may appear blurry, or may not appear at all. Please click here to see the post on my blog.
S pets pets pets pets
Here’s what I made:
The card has several cute pups having a good time…

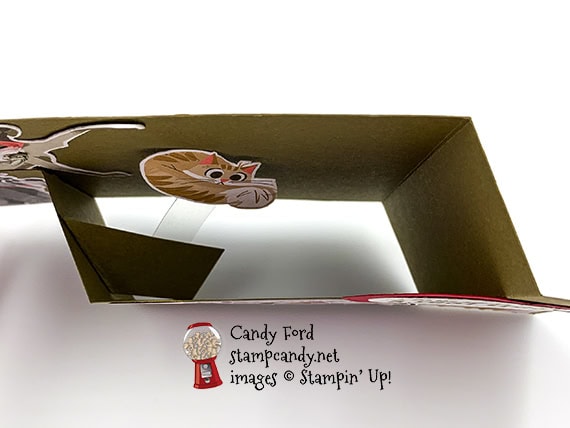
…but when you open it, a very surprised cat has found itself in the middle of a puppy party.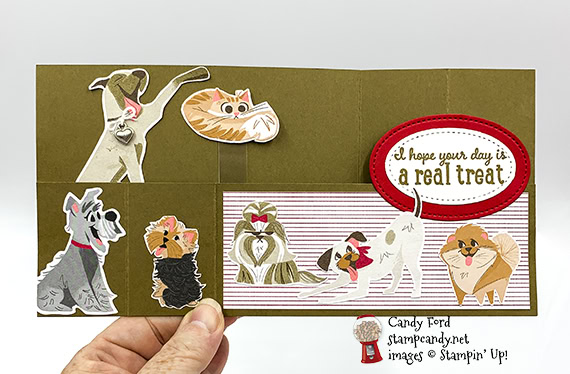

S
Here’s what I did:
Cut and scored with my paper trimmer:
- Soft Suede card stock (CS) cut to 8-1/2″ x 4-1/4″, then scored at 5-1/2″ and 7″
- Soft Suede CS cut to 8-1/2” x 2-1/4″, then scored at 1-1/2″ and 3″
- Playful Pets Designer Series Paper (DSP) layer cut to 5-1/4″ x 2″ (stripes)
- Window Sheet cut to 1/2″ x 2-1/2″
- Soft Suede CS cut to 1″ x 2″
Stamped with the Pampered Pets stamp set:
- sentiment in Soft Suede ink onto a scrap of Whisper White CS
Cut using the Stitched Shapes Dies:
- sentiment with the 2nd smallest oval die
- scrap Real Red CS with the 2nd largest oval die
Cut using the Pets Dies:
- cat from DSP
- grey dog with red collar (at bottom left when the card is open) from DSP. I had to trim his tail a bit to fit on the card.
Cut using Paper Snips:
- the 5 other dogs, from DSP
Assembled the card:
- burnished the folds in both card base pieces with a Bone Folder
- one corner of 1″ x 2″ Soft Suede CS folded over at 45 degrees and burnished with a Bone Folder
- DSP layer glued onto the longest part of the shorter Soft Suede card base
- smaller triangular bit of the 1″ x 2″ Soft Suede CS glued onto the back of the shorter Soft Suede card base as shown below, so that it’s next to the left hand score line when folded down, and doesn’t show above the card base piece when it’s folded up
- Window Sheet adhered onto the 1″ x 2″ Soft Suede CS using Stampin’ Seal+
- cat adhered onto the Window Sheet using Stampin’ Seal+, so it’s hidden behind the shorter card base when the card is closed
- largest dog (Great Dane) glued onto the left end of the taller Soft Suede card base, near the top so it’s paw is just over the cat when the card is open
- shorter card base glued onto the taller card base at each end
- sentiment glued onto the Real Red oval
- Real Red oval glued onto the right side of the card base, careful not to put glue behind the top left corner, where there’s no card base to glue it onto
- remaining dogs glued onto the shorter card base as shown
- white threads pulled from the twine in the Flowers for Every Season Ribbon Combo Pack (pull the silver thread out first, then the blue and white are easy to separate)
- white threads tied in a bow around the loop of a heart charm
- heart charm adhered onto the Great Dane, like it’s hanging from the collar, using a Mini Glue Dot

S
Monday is the last day to earn Bonus Days coupons!
For each $50 you spend on an order now through Monday, August 3, 2020, you will receive a $5 coupon code to use in August! Click the image below to shop now!

S
Here are today’s main colors:
You can click on each one to see all the products that come in that color!
S
Here’s what I used:
Click on these images for more details and to purchase. If you are reading this post in email, the product images may not show up. Please click here to see the post on my blog.
Supply List. <— Click for a clickable and printable list of the products!
S
Here are some helpful links:
S
Thanks for stopping by today, and Sweet Stamping!