Aug 5, 2018 | Cards, Gallery, Techniques |
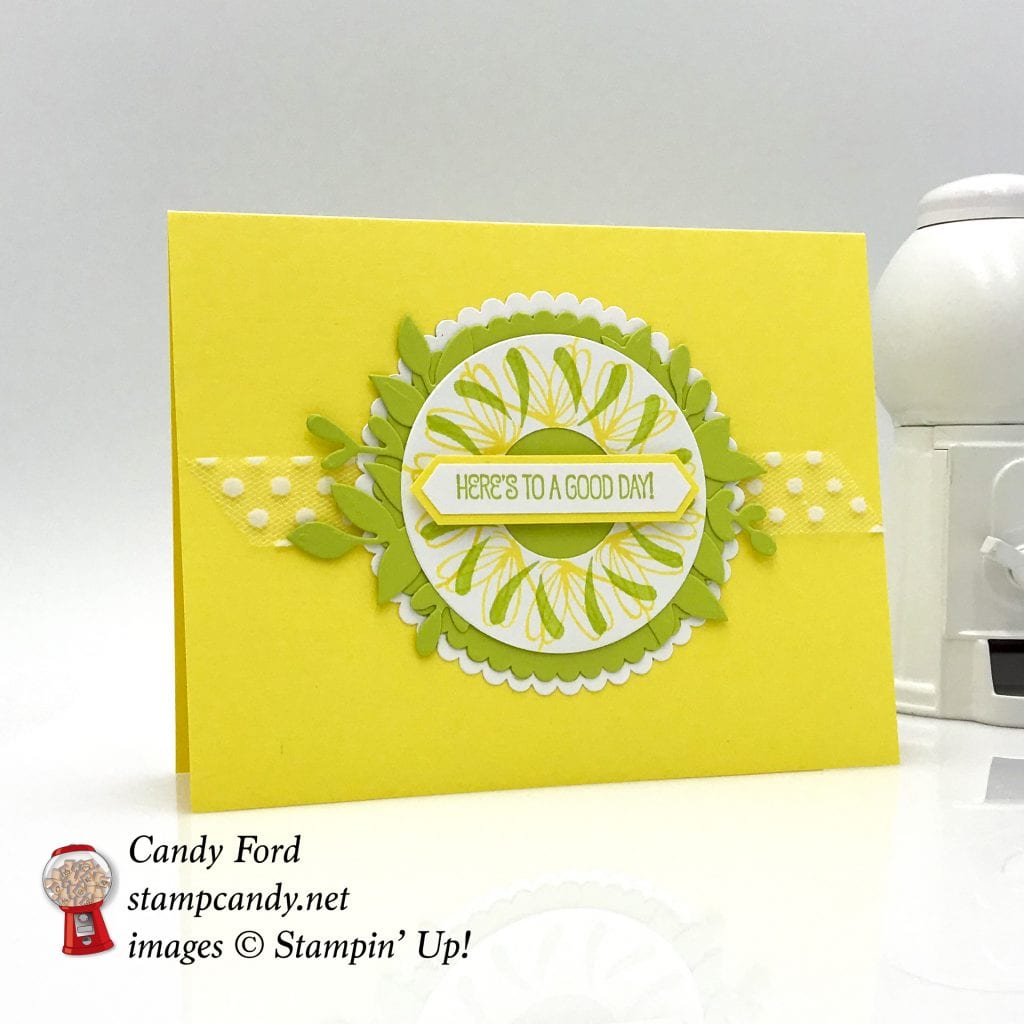
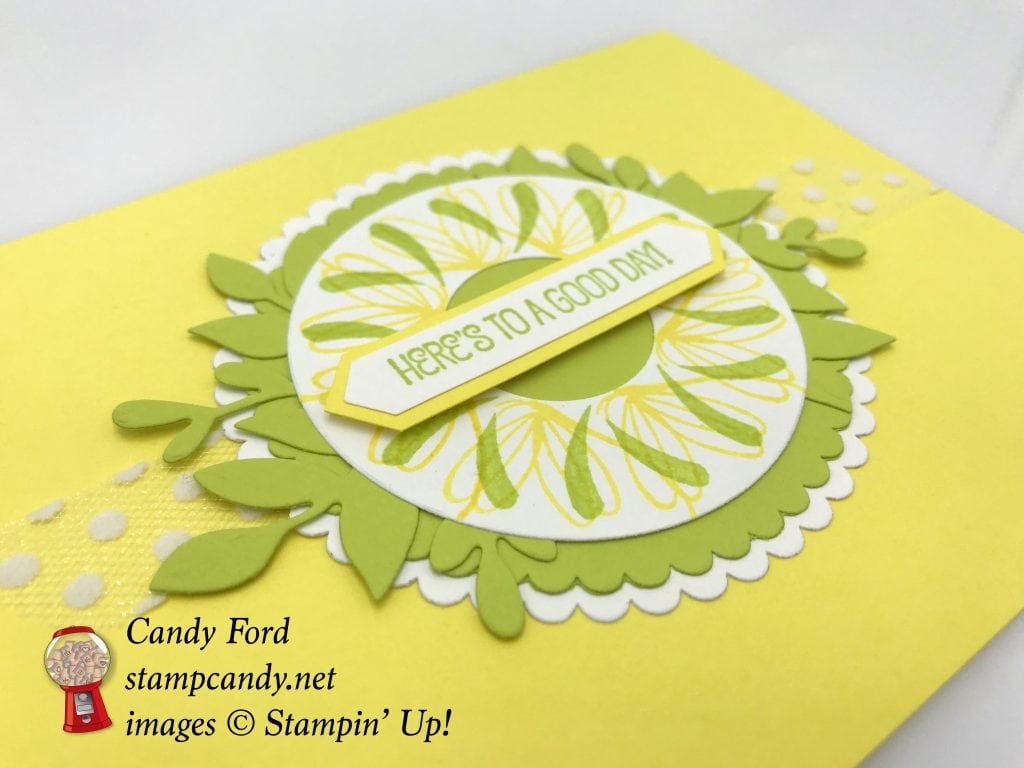
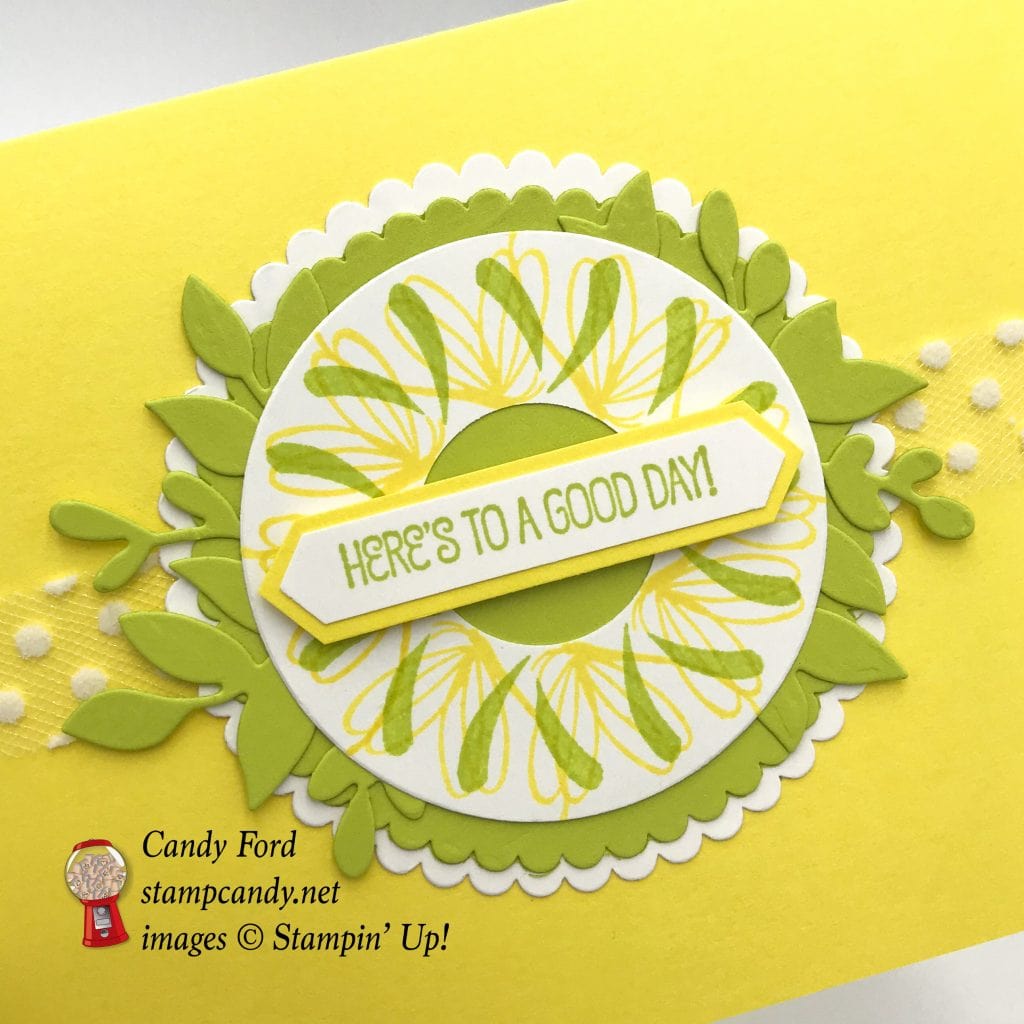
Today I’m finally getting around to posting a card with a Stamparatus wreath. I used two images from the Peaceful Reflections stamp set. The one I used as a flower is actually a butterfly, but when you stamp it around in a circle like this, you can make a wreath out of just about any image.
Here’s what I made:
Here’s what I did:
Cut and scored with my Stampin’ Trimmer:
- Pineapple Punch card stock (CS) cut to 5-1/2″ x 8-1/2″, then scored in half at 4-1/4″
- Optional: Whisper White CS cut to 5-1/4″ x 4″ for the inside of the card. Not needed because the Pineapple Punch card base is light enough to write on.
Die cut using the Layering Squares Framelits:
- a piece of Whisper White CS using the largest plain square die
- the same piece a second time, cutting it diagonally across the first cut
- This created the template for the wreath.
Die cut using the Foliage Frame Framelits:
- leafy frame from a scrap of Granny Apple Green CS
Stamped with the Peaceful Reflections stamp set:
- sentiment in Granny Apple Green ink onto a scrap of Whisper White CS
- butterfly/flower in Pineapple Punch ink onto the Whisper White CS die cut square, in a circle on the Stamparatus
- leaf in Granny Apple Green ink onto the Whisper White CS die cut square, in a circle on the Stamparatus
- NOTE: See the Stamparatus wreath technique below.
Die cut using the Layering Circles Framelits:
- one scalloped circle from a scrap of Granny Apple Green CS
- one slightly larger scalloped circle from a scrap of Whisper White CS
- stamped wreath using a plain circle die
Cut using the Classic Label Punch:
Cut using the 1″ Circle Punch:
- center cut from the stamped circle
Assembled the card:
- burnished the fold in the card base with a Bone Folder
- stamped wreath glued onto the leafy frame
- leafy frame glued onto the Granny Apple Green scalloped circle
- Granny Apple Green scalloped circle glued onto the Whisper White scalloped circle
- sentiment glued onto a scrap of Pineapple Punch CS, then trimmed around the edges with Paper Snips to create the mat
- sentiment adhered over the stamped wreath using Stampin’ Dimensionals
- Whisper White Tulle Ribbon adhered to the front of the card base using Tear & Tape, or Snail, just in the center
- Whisper White scalloped circle glued over the ribbon, onto the front of the card base
Here’s the Stamparatus Wreath Technique:
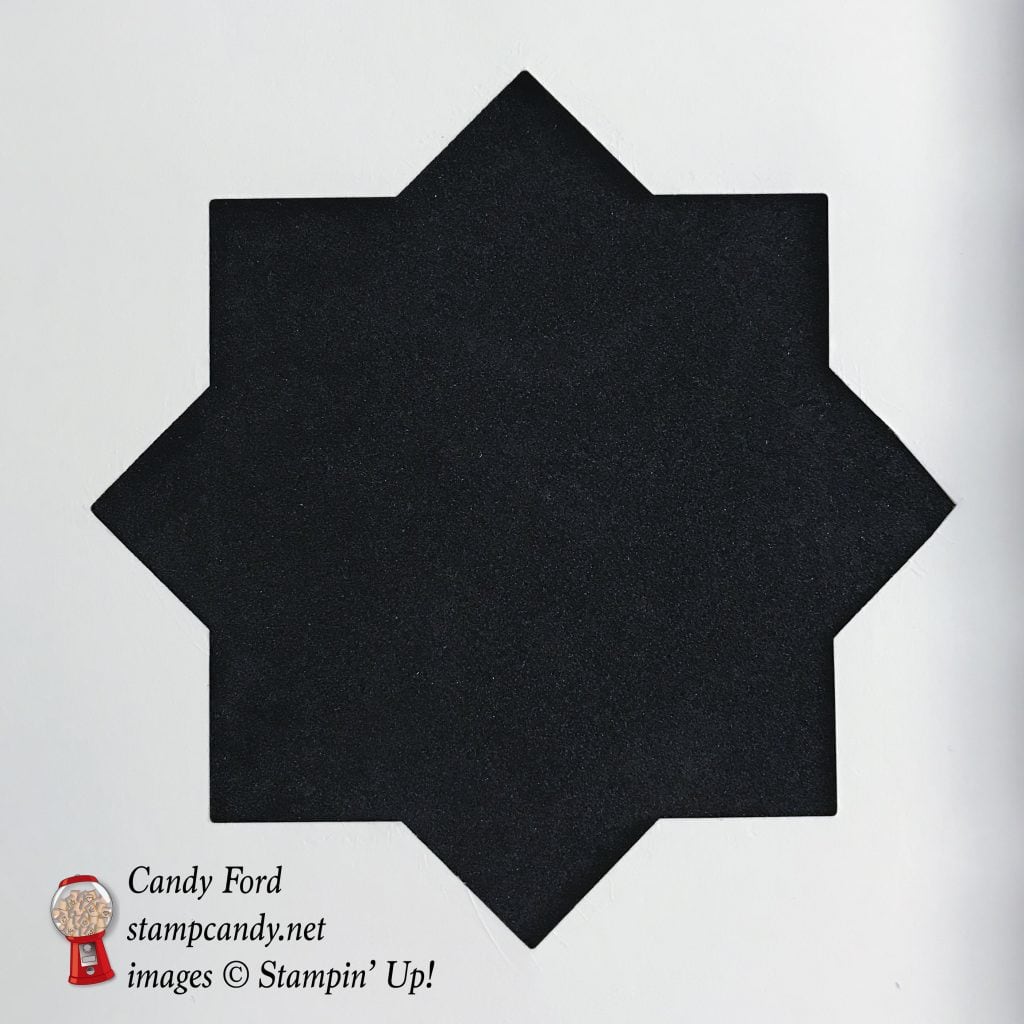
Create the template:
- Die cut a square from a piece of card stock.
- Turn the die 45 degrees and cut again, to make an 8 pointed star.
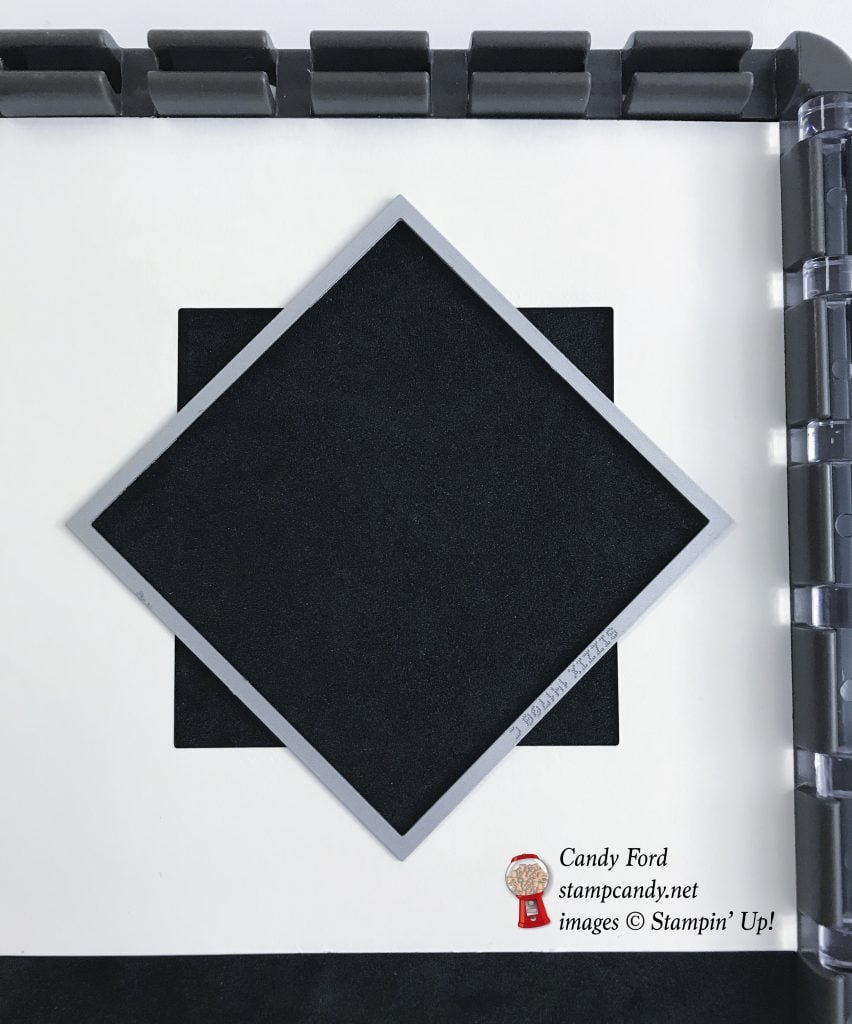
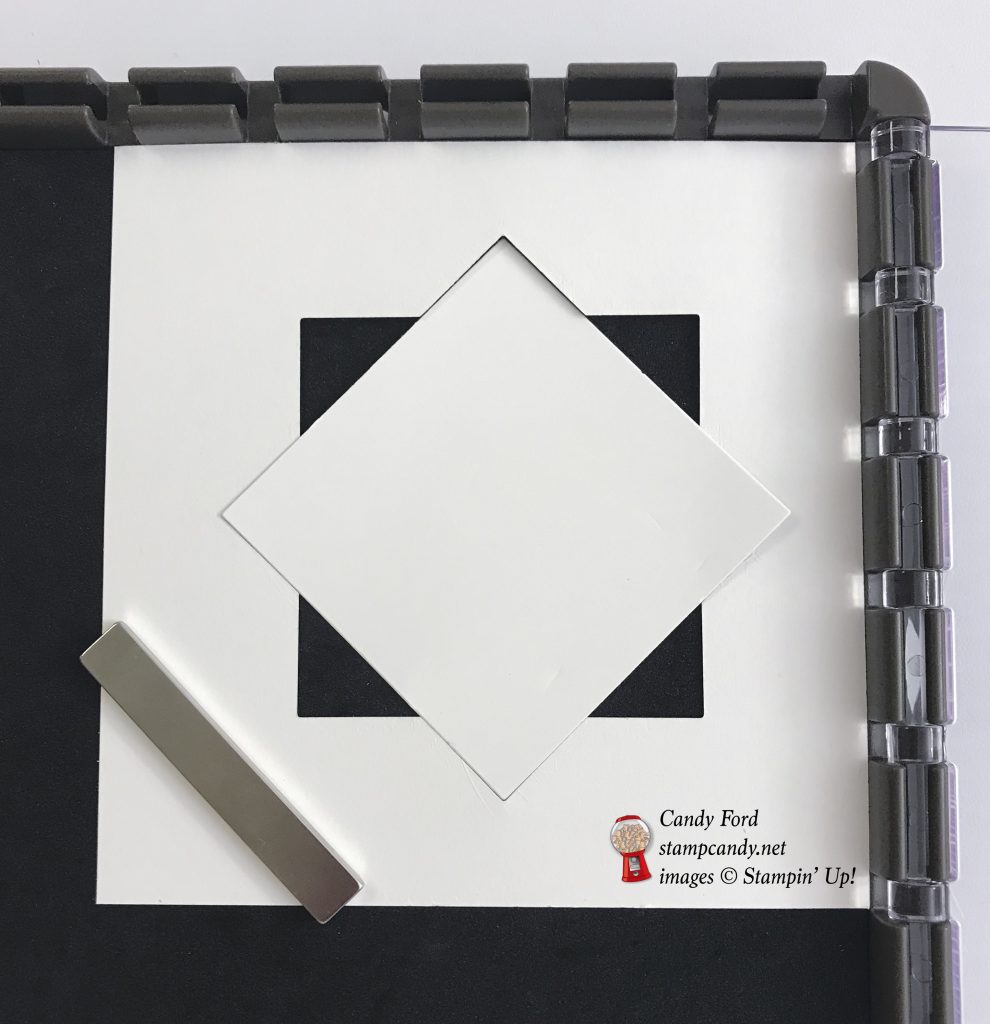
Stamp the wreath:
- Place the template in the Stamparatus and hold in place with a magnet.
- Lay the die cut square in the template.
- Line up one of the stamps with the square, then stamp.
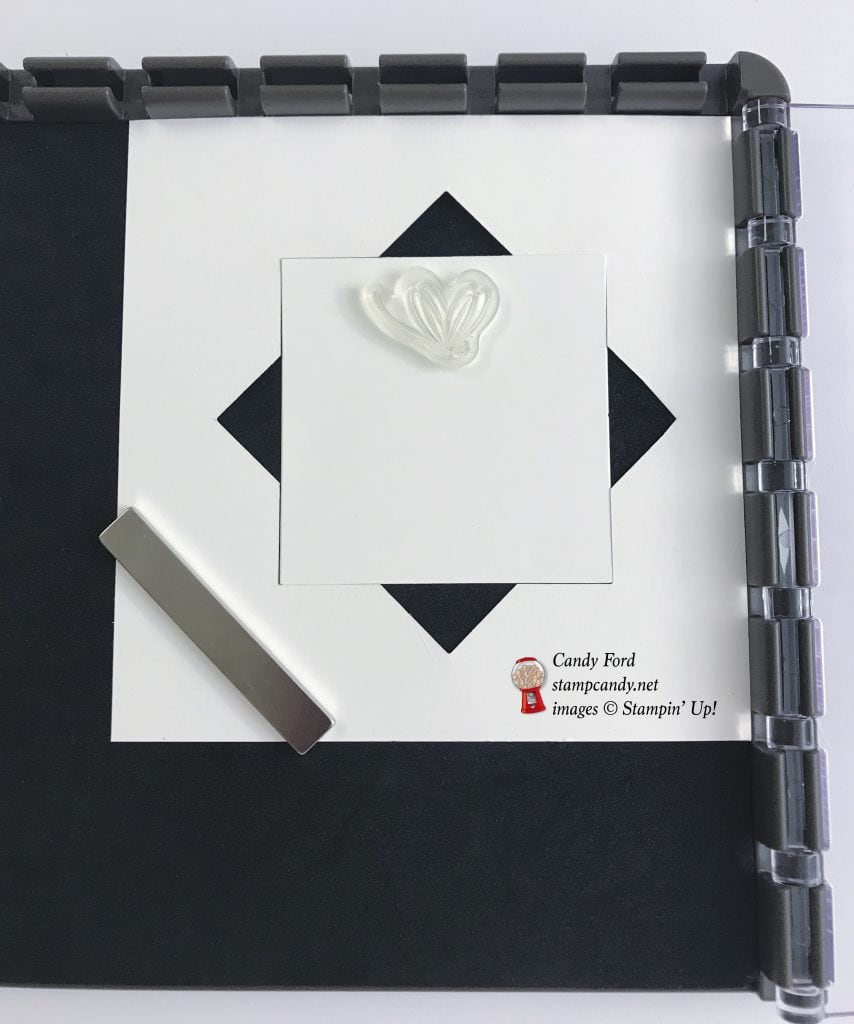
- Move the square around to the next point, and stamp again. (I used darker ink in this example so you could see it better.)
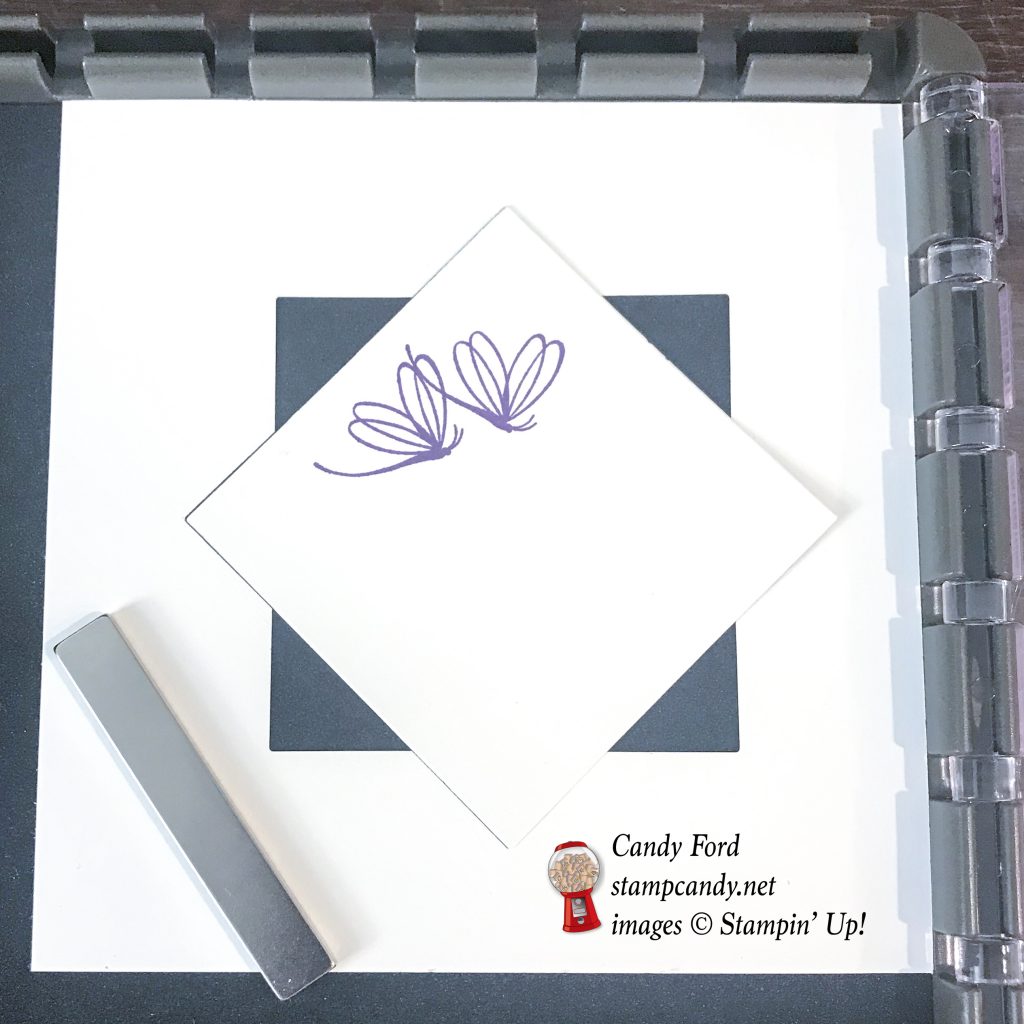
- Continue all around until you’ve stamped it 8 times, once at each point.
- At this point you can line up another stamp, or move the stamp you were using to another spot on the square. Then stamp another 8 times. You can keep adding layers like this as long as you want.
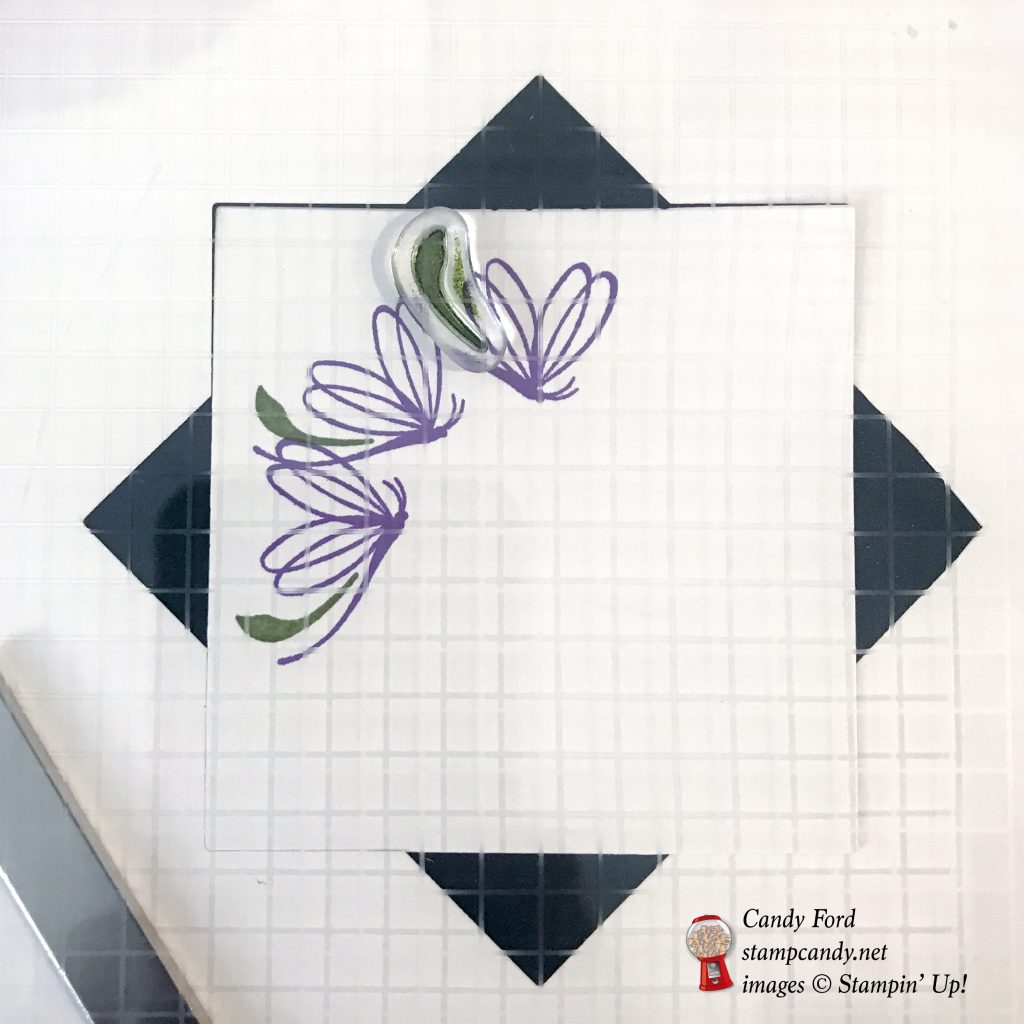
- Be sure to keep the template for future use.
Here are today’s colors:
You can click on each one to see all the products that come in that color!
Here’s what I used:
Click on these images for more details and to purchase.
Here are 2 amazing limited time offers from Stampin’ Up!:
1) Paper Pumpkin Sale, through August 10, 2018
- Subscribe between now and August 10
- Use promo code BLOOM0818
- Get 50% off your first kit
- CLICK HERE to subscribe

2) Color Your Seasons Special, August 1-31, 2018, While Supplies Last!
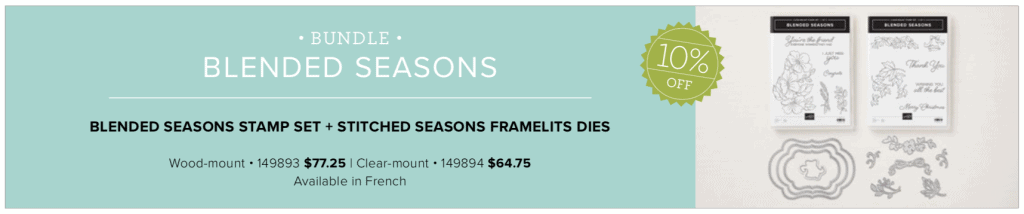
Stampin’ Up!’s® Blended Seasons Stamp Set, coordinating Framelits™ Dies, and Watercolor Pencils are perfect for every season of creating! Plus, save 10% when you buy the stamp set and Framelits in a bundle! But don’t wait—these exclusive products are only available until August 31 while supplies last. So get in the mood to create something full of colors and seasons!
Introducing the all-new, limited-time Color Your Season products:
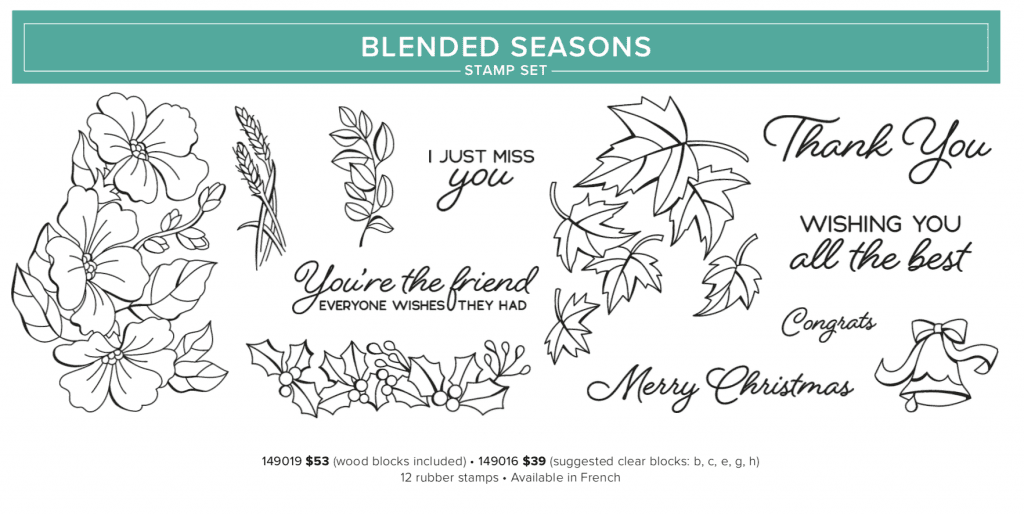
- Blended Seasons Stamp Set, an exclusive 12-piece wood- or clear-mount stamp set with images for every season – #149019 @ $53 (wood blocks included); #149016 @ $39 (suggested clear blocks: b, c, e, g, h)
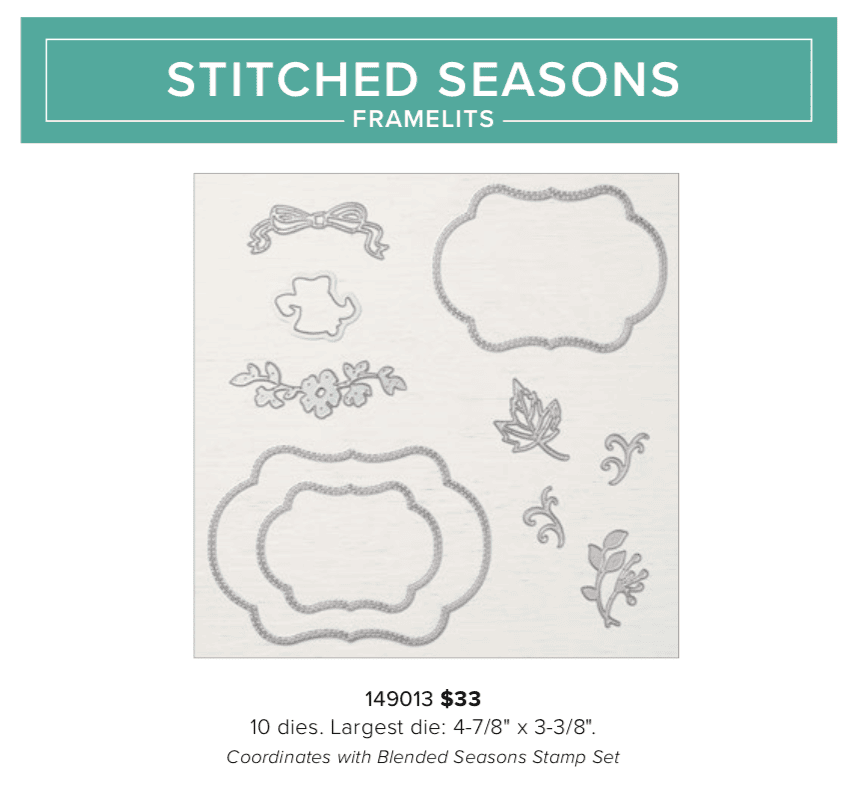
- Stitched Season Framelits Dies, a coordinating stitched die that includes stitching on both the positive and negative images! #149013 @ $33. Has10 dies. Largest die: 4-7/8″ x 3-3/8″.
- Save 10%! Blended Seasons BUNDLE – BLENDED SEASONS STAMP SET + STITCHED SEASONS FRAMELITS DIES – Wood-mount #149893 @ $77.25, Clear-mount #149894 @ $64.75
- Watercolor Pencils in 10 new colors! #149014 @ $12.50. Acid free, lignin free.10 pencils in Stampin’ Up! colors: Balmy Blue, Cajun Craze, Cherry Cobbler, Coastal Cabana, Crushed Curry, Flirty Flamingo, Garden Green, Gorgeous Grape, Granny Apple Green, Night of Navy
- Products available while supplies last until August 31, 2018 – while supplies last
- Items may be included as part of a new demonstrator’s Starter Kit.

Here’s some more cool stuff you should check out:
Thanks for stopping by today, and Sweet Stamping!
Jul 12, 2018 | Blog Hop, Boxes, Cards, Gallery, Gift Wrap, Gifts, Techniques |

It’s time for the July OSAT Blog Hop. This month’s theme is Creature Comforts. and we’re featuring animal themed projects. For my projects today, I used the Kindness & Compassion stamp set with the Graceful Glass Designer Vellum to create a thank you card and a box for the bird lover in your life.
There is an accidental technique used on these projects. I colored the vellum on the back with Stampin’ Write Markers and let them dry. Then I used a sponge to spread glue all over the back, and the ink smeared and created a marbled effect. I liked it so much that I repeated it on the second one.
Here’s what I made:


Here’s what I did:
Cut and scored with my Stampin’ Trimmer:
- Petal Pink card stock (CS) cut to 5-1/2″ x 8-1/2″, then scored in half at 4-1/4″
- Petal Pink CS cut to 2-1/2″ x 7/8″
- Basic Black CS cut to 2-5/8″ x 1″
- Graceful Glass Designer Vellum cut to 5-1/4″ x 2″ (birds)
- Graceful Glass Designer Vellum cut to 5-1/4″ x 1″ (grid, 2 pieces)
- Basic Black CS cut to 4″ x 2″
- Petal Pink CS cut to 3-7/8″ x 1-7/8″
- Graceful Glass Vellum cut to 3-7/8″ x 1-7/8″ (birds)
Stamped with the Kindness & Compassion stamp set:
- sentiment in Memento black ink onto the 2-1/2″ x 7/8″ Petal Pink CS
Colored using Stampin’ Write Markers:
- birds in Real Red, Soft Sea Foam, Calypso Coral, Blueberry Bushel, and Pineapple Punch
- NOTE: color on the back of the vellum and let dry (can use Heat Tool to speed drying)
Assembled the card:
- burnished the fold in the card base with a Bone Folder
- vellum birds glued onto the front of the card base
- two vellum grids glued onto the front of the card base, above and below the birds
- sentiment glued onto the 2-5/8″ x 1″ Basic Black CS
- 2-5/8″ x 1″ Basic Black CS adhered to the card front using Stampin’ Dimensionals
Assembled the box:
- 3-7/8″ x 1-7/8″ vellum birds glued onto the 3-7/8″ x 1-7/8″ Petal Pink CS
- 3-7/8″ x 1-7/8″ Petal Pink CS glued onto the 4″ x 2″ Basic Black CS
- 4″ x 2″ Basic Black CS glued onto the gable box side
- black satin ribbon tied in a bow around the top of the box
Here’s the hop:
Click on the Next button to hop to the next stop, Jo Anne Hewins of Luv 2 Create:

Use this list if you get lost along the hop:
Here are today’s colors:
You can click on each one to see all the products that come in that color!
Here’s what I used:
Click on these images for more details and to purchase.
Here are two amazing July offers:
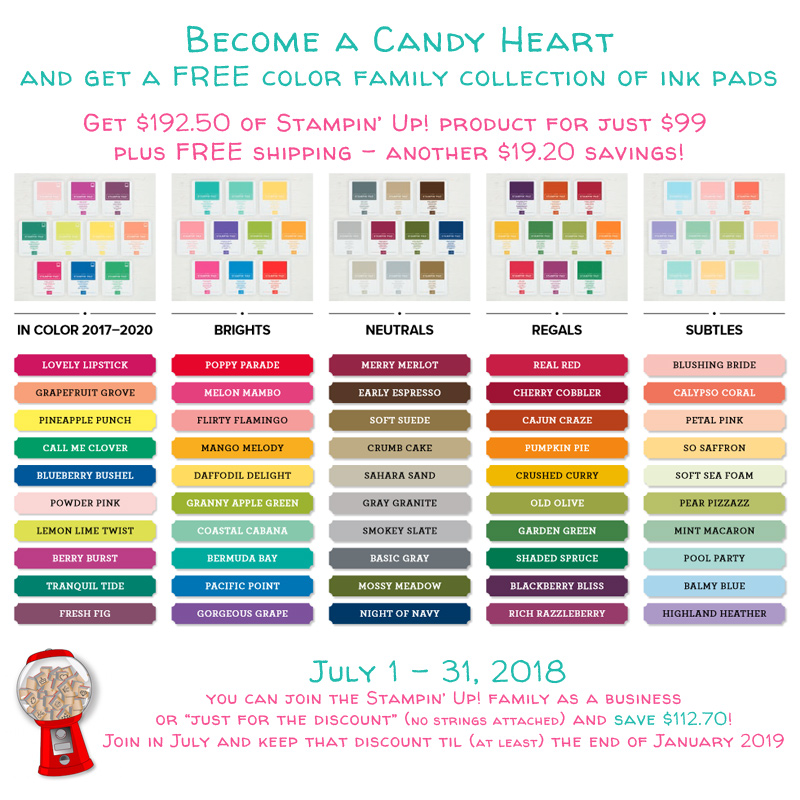
1) Free ink pads:
- Join my team by July 31 and receive a family of 10 ink pads for free!
- In addition to everything you already get with the Starter Kit!
- Click the image for more information
2) Designer Series Paper Sale:
- Buy 3 packs of select DSP and receive 1 pack free
- Mix and match
- Stock up on all your favorites
- Click the image for details and to purchase

Here’s some more stuff you should check out:
Thanks for stopping by today, and Sweet Stamping!
Jun 21, 2018 | Cards, Gallery, Guest Stamper, New Products, Techniques |
Today I’m sharing another swap card I received at our May Candy Hearts team meeting. It was made by Judy Newsome from Lafayette, GA. She used the new Varied Vases Bundle and Share What You Love Designer Series Paper to make this super duper diagonal gate fold card.
Here’s what she made:


Here’s what she did:
Cut and scored with my Stampin’ Trimmer:
- Mint Macaron card stock (CS) cut to 8-1/4″ x 5-1/2″, then scored at 2-3/4″ and 5-1/2″, then scored diagonally on both end sections

- 2 different patterns Share What You Love Designer Series Paper (DSP) cut to 2-1/2″ x 5-1/4″ then cut in half diagonally
- Whisper White CS cut to 2-1/2″ x 5-1/4″
Stamped with the Varied Vases stamp set:
- inside sentiment and flowers in Rich Razzleberry ink onto the Whisper White CS
- stems in Mint Macaron ink onto the Whisper White CS
- Birthday sentiment and flowers in Rich Razzleberry ink onto a scrap of Whisper White CS
- stems in Mint Macaron ink onto the scrap of Whisper White CS
Cut using the Vases Builder Punch:
- one vase from a scrap of Rich Razzleberry CS
Cut using the Stitched Shapes Framelits:
Cut using the Layering Squares Framelits:
- a scalloped square from Rich Razzleberry CS
- a scalloped square from Mint Macaron CS
Assembled the gate fold card:
- burnished the folds in the card base with a Bone Folder – The two vertical lines will fold toward the inside of the card, and the two diagonal lines will fold toward the outside of the card.
- larger Whisper White CS glued onto the inside center of the card base
- two halves of one DSP pattern glued onto the outer most diagonal sections of the card base
- flip over the card base and glued the two halves of the other DSP pattern onto the inner diagonal sections of the card base
- sentiment glued onto the Rich Razzleberry die cut square
- Rich Razzleberry die cut square glued onto the Mint Macaron die cut square
- half of the Mint Macaron square glued onto the left most diagonal DSP, with the center sentiment facing up
- a Faceted Dot applied to the sentiment square
Here are today’s main colors:
You can click on each one to see all the products that come in that color!
Here’s what she used:
Click on these images for more details and to purchase.
Here’s some information you should check out:
Thanks for stopping by today, and Sweet Stamping!
May 10, 2018 | Blog Hop, Cards, Gallery, Techniques |
Hurray, it’s time for the One Stamp At A Time (OSAT) Blog Hop! This month’s theme is On the Red Carpet. This month we’re sharing glamorous projects (think the red carpet at the Oscars) and/or projects made using new products (as in rolling out the red carpet for the new stuff.) I decided to go a bit literal with the theme and create a project with a glamorous lady on the red carpet. The fancy lady is from the You’ve Got Style stamp set.
I created the texture for the red carpet background and for her fur coat using the suede card stock technique. It’s really simple – just burnish the paper with a Bone Folder on both sides and in all directions until the two paper layers separate. It just just take a minute or so. Each of the resulting two pieces will have a regular smooth side and a fuzzy suede-like side.
Here’s what I made:
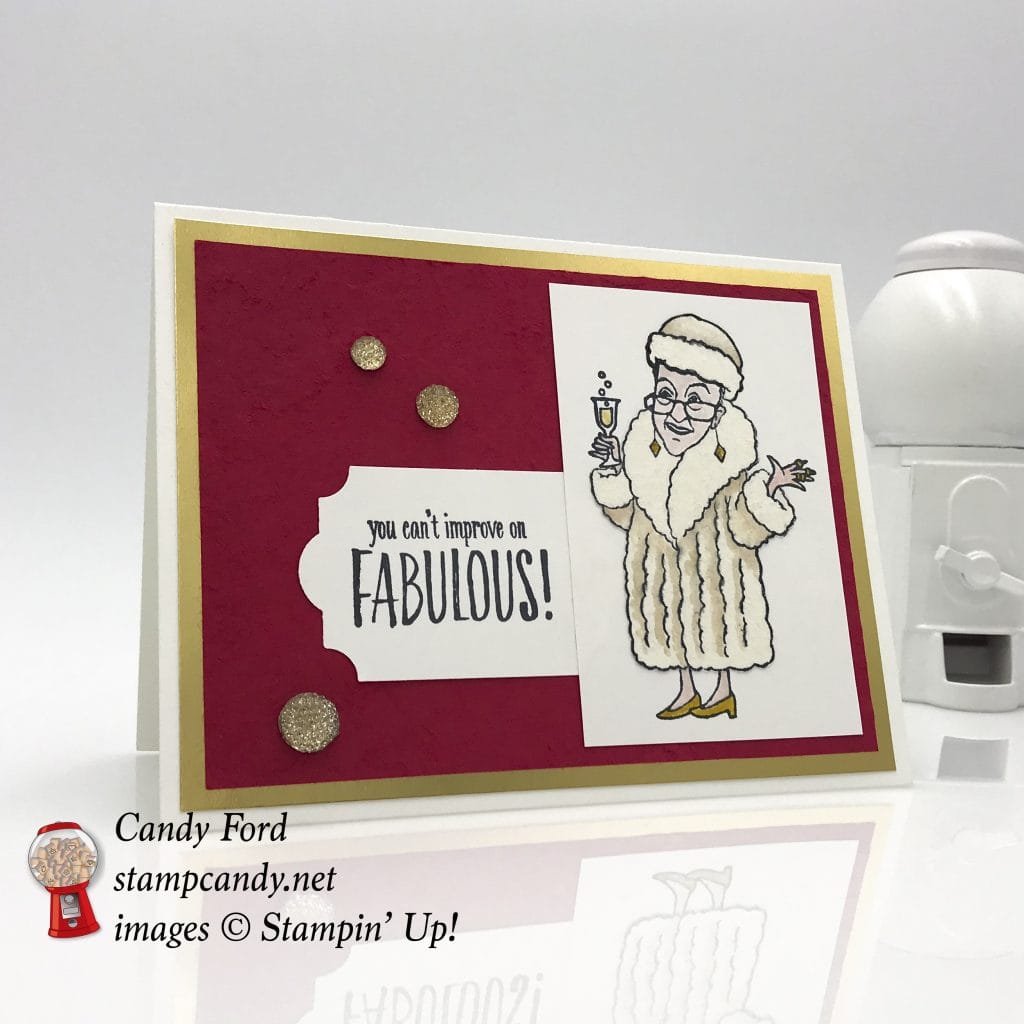
Here you can see the suede-like texture of the Real Red background and the Very Vanilla coat and hat. I just wish I could get the Wink of Stella on her jewelry and champagne to show up in a photo!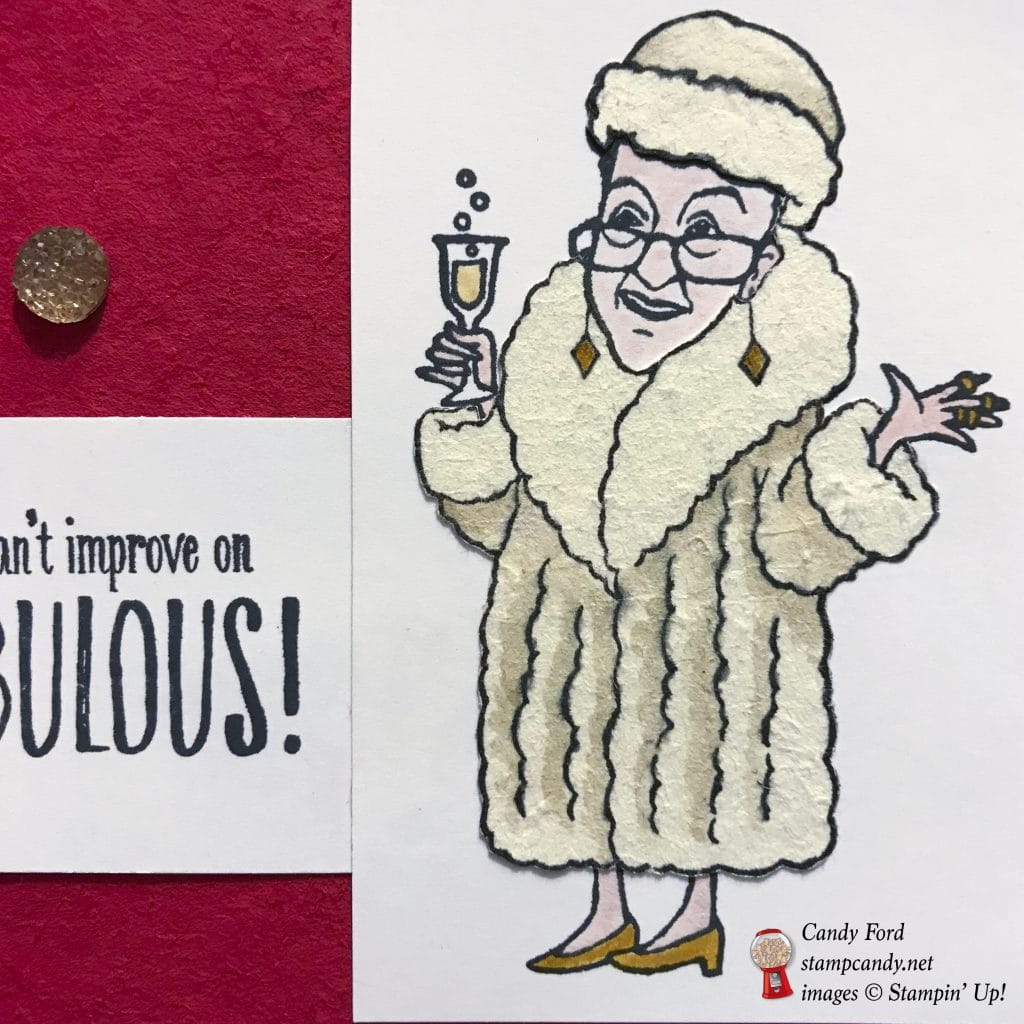
Here’s what I did:
Cut and scored with my Stampin’ Trimmer:
- Whisper White Thick card stock (CS) cut to 5-1/2″ x 8-1/2″ , then scored in half at 4-1/4″
- Gold Foil Sheet layer cut to 5-1/4″ x 4″
- Real Red card stock (CS) layer cut to 5″ x 3-3/4″
- Whisper White CS layer cut to 2-1/4″ x 3-1/2″
- Very Vanilla Thick CS cut to 2-1/4″ x 3-1/2″
Created “suede” card stock pieces:
- burnished the Real Red CS layer and the Very Vanilla CS piece with a Bone Folder until the layers separated
Stamped with the You’ve Got Style stamp set:
- lady in black ink onto the Whisper White CS layer
- lady in black ink onto the “suede” Very Vanilla CS
- sentiment in black ink onto a scrap of Whisper White CS
Cut using the Everyday Label Punch:
- sentiment
- NOTE: The Everyday Label Punch is my free gift to you when you use the Host Code SWA494ST and place an order of at least $75 by May 31!
Colored using a Blender Pen:
- lady’s face, hands, and legs in Powder Pink ink
- lady’s Very Vanilla coat and hat in Crumb Cake ink
Colored using Stampin’ Write Markers:
- shoes, rings, and earrings in Crushed Curry
- champagne in So Saffron
Colored using a Clear Wink of Stella Pen:
- champagne, rings, and earrings (Wink of Stella doesn’t show well in photos)
Cut using Paper Snips:
- very vanilla coat and hat
Assembled the card:
- Very Vanilla coat & hat glued over the coat & hat on the Whisper White CS layer
- one end of the sentiment glued to the back of the Whisper White CS layer
- Both Whisper White CS pieces adhered to the Real Red suede CS layer using Tear & Tape
- Real Red suede CS layer adhered to the Gold Foil layer using Tear & Tape
- Gold Foil layer adhered onto the front of the card base using Tear & Tape
- 3 Gold Faceted Gems applied to the Real Red suede CS layer
Here’s the hop:
Be sure to follow it around to all the stops on the hop!
Here are all of today’s colors:
You can click on each one to see all the products that come in that color!
Here’s what I used:
Click on these images for more details and to purchase.
Here’s some stuff you should check out:
Thanks for stopping by today, and Sweet Stamping!

Feb 28, 2018 | Cards, Gallery, New Products, Sale-A-Bration, Techniques |
Want to tell a music fan they’re awesome? The Epic Celebrations stamp set is just what you need. This terrific set is FREE with a $50 order, but only until March 31, 2018! Brusho Crystal Colour provided the psychedelic tie-dyed effect in the background. Guitars are made of wood, right? Well, most of them anyway. So this guitar was stamped onto a piece of Wood Textures Designer Series Paper, then fussy cut with Paper Snips. I hope you think it’s groovy, man.

Epic Celebrations Stamp Set © Stampin’ Up!
Here’s what I made:


Here’s what I did:
Cut and scored with my Stampin’ Trimmer:
- Whisper White thick card stock (CS) cut to 5-1/2″ x 8-1/2″, then scored in half at 4-1/4″
- Basic Black CS cut to 5-1/4″ x 4″
- Crushed Curry CS cut to 5″ x 3-3/4″
Colored using the Brusho Crystal Colour:
- Crushed Curry CS layer in Prussian Blue and Brilliant Red
- NOTE: I lightly spritzed the paper first, then sprinkled on the Brusho
Stamped with the Epic Celebrations stamp set:
- guitar in Basic Black ink onto a piece of Wood Textures Designer Series Paper (DSP)
- sentiment in Basic Black ink onto the Crushed Curry layer, after the Brusho has dried completely
Fussy Cut using the Paper Snips:
Colored using a Stampin’ Write Marker:
- parts of the guitar in Crumb Cake
Assembled the card:
- burnished the fold in the thick Whisper White card base with a Bone Folder
- Basic Black CS layer glued onto the front of the Whisper White card base
- Crushed Curry CS layer glued onto the Basic Black CS layer
- guitar adhered to the Crushed Curry layer using Stampin’ Dimensionals
Here are today’s colors:
You can click on each one to see all the products that come in that color!
Here’s what I used:
Click on these images for more details and to purchase.
Here’s some stuff you should know:
- This is a fabulous time to join my team! Sale-A-Bration is the biggest event of the Stampin’ Up! year and you can save big on the ultimate bundle, the Starter Kit. CLICK HERE for more information. Contact me with any questions: email candy@stampcandy.net or call/text 404-661-5222
- Newsletter: subscribe for exclusive deals, projects, and more! Enter your email address and click SUBSCRIBE at the top right of this page, just under the picture of my smiling face. You can also choose to receive an email every day that I have a blog post.
- Check out My Events Calendar HERE
- Host Code for the month of February (2T9AQTKG) Find out more about HOW, WHEN and WHY to use the code HERE.
- My Thank You Gift to You in February: Narrow Note Cards & Envelopes – Find out more HERE.
- Gift Certificates are available in any U.S. dollar amount from me. Contact me – email: candy@stampcandy.net OR call/text: 404-661-5222
- Gumball Rewards for all orders over $50. Find out more HERE.
Thanks for stopping by today, and Sweet Stamping!
Feb 7, 2018 | Blog Hop, Cards, Challenges, Gallery, Sale-A-Bration, Techniques |

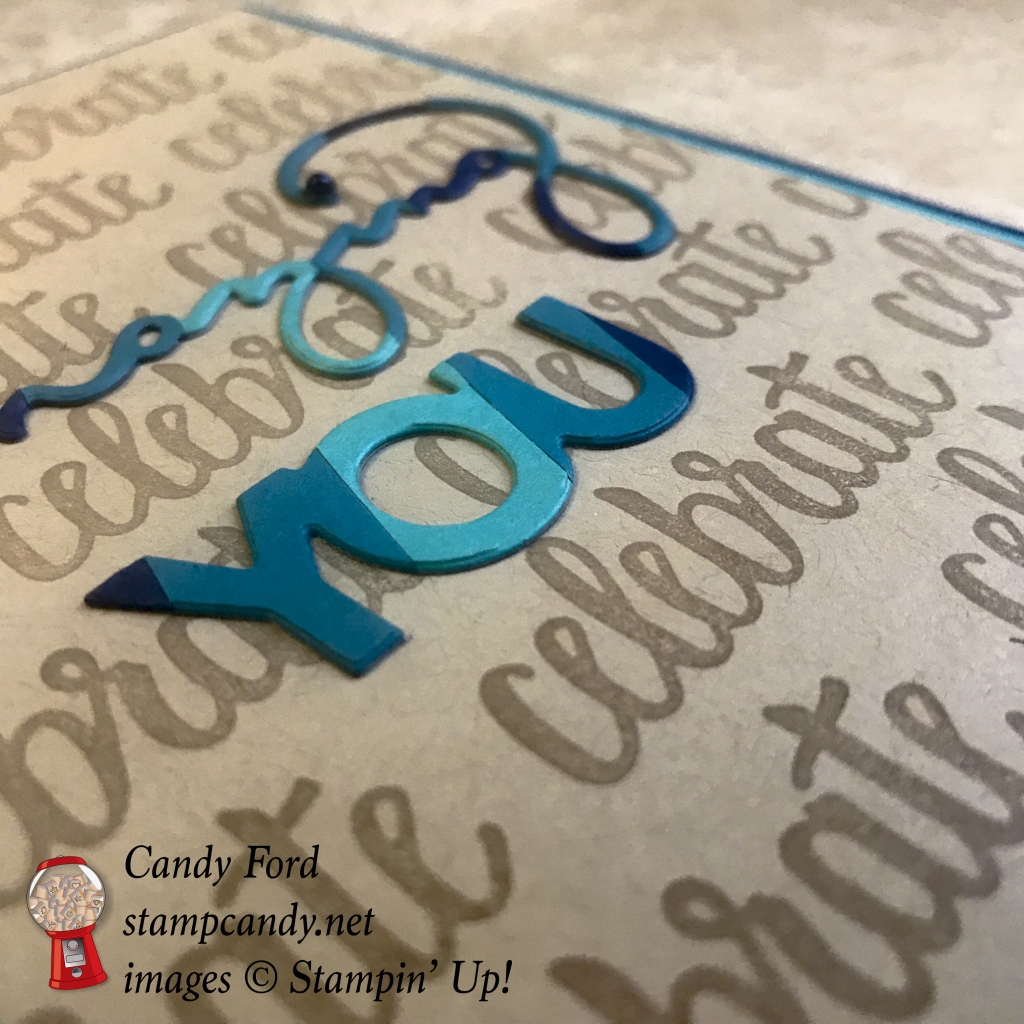
The Sale-A-Bration continues…with a color challenge! This month’s ICS Blog Hop is all about Sale-A-Bration, plus we’re using specific colors. We could use any of these five colors: Crumb Cake, Bermuda Bay, Dapper Denim, Night of Navy, and Island Indigo for our projects. I used all but one (Dapper Denim.) I used the Amazing You stamp set and the coordinating Celebrate You Thinlits Dies – both are available for FREE with a qualifying order during Sale-A-Bration (only through March 31!)

I used a technique whose name I can’t remember to save my life. I glued different colored strips of card stock to a larger piece of CS, then die cut from that, so the die cut words are multicolor. Tell me what you think!
Here’s what I made:
Here’s what I did:
Cut and scored with my Stampin’ Trimmer:
- Crumb Cake card stock (CS) cut to 4-1/4″ x 11″, then scored in half at 5-1/2″
- Night of Navy CS cut to 4-1/8″ x 5-3/8″
- Island Indigo CS cut to 4″ x 5-1/4″
- Bermuda Bay CS cut to 3-7/8″ x 5-1/8″
- Crumb Cake CS cut to 3-3/4″ x 5″
- Crumb Cake CS cut to 3-3/4″ x 3″
- Bermuda Bay, Island Indigo, and Night of Navy CS cut into 1/2″ x 3″ strips, a few of each color
- Optional: Whisper White CS cut to 4″ x 5-1/4″ for the inside
Stamped with the Amazing You stamp set:
- “celebrate” in Crumb Cake ink onto the Crumb Cake CS layer
Die cut using the Celebrate You Thinlits:
- two words from the strips of CS (see below)
- NOTE: I used the Precision Base Plate on the Big Shot to cut through the layers with the Thinlits Dies.
Assembled the card:
- burnished the fold in the card base with a Bone Folder
- Night of Navy CS layer glued onto the front of the card base
- Island Indigo CS layer glued onto the Night of Navy CS layer
- Bermuda Bay CS layer glued onto the Island Indigo CS layer
- stamped Crumb Cake CS layer glued onto the Bermuda Bay CS layer
- 1/2″ strips of CS glued onto the 3-3/4″ x 3″ Crumb Cake CS piece (this is what I die cut the words from above)
- die cut words glued onto the stamped Crumb Cake CS layer
- Optional: Whisper White CS glued onto the inside of the card base
Here’s the hop:
Click the arrow to hop on over to visit Cynthia McQueen of Beautiful Peacock:

Here are today’s colors:
You can click on each one to see all the products that come in that color!
Here’s what I used:
Click on these images for more details and to purchase.
Here’s some stuff you should know:
- This is an amazing time to join the Candy Hearts! Sale-A-Bration is the biggest event of the Stampin’ Up! year and you can save big on the ultimate bundle, the Starter Kit. CLICK HERE for more information.
- Newsletter: subscribe for exclusive deals, projects, and more! Enter your email address and click SUBSCRIBE at the top right of this page, just under the picture of my smiling face. You can also choose to receive an email every day that I have a blog post.
- Check out My Events Calendar HERE
- Host Code for the month of February (2T9AQTKG) Find out more about HOW, WHEN and WHY to use the code HERE.
- My Thank You Gift to You in February: Narrow Note Cards & Envelopes – Find out more HERE.
- Gift Certificates are available in any U.S. dollar amount from me. Contact me – email: candy@stampcandy.net OR call/text: 404-661-5222
- Gumball Rewards for all orders over $50. Find out more HERE.
Contact me with any questions – email: candy@stampcandy.net or call/text: 404-661-5222
Thanks for stopping by today, and Sweet Stamping!
