Aug 20, 2018 | Cards, Gallery, Wedding |
The Blended Seasons bundle (Blended Seasons stamp set and Stitched Seasons Framelits Dies) really does work all year, and for multiple occasions. I used it to make today’s card, meant for a wedding, but it could also be used to wish someone well when they’re moving away, retiring, or beginning any new adventure. The background paper is from the Under the Mistletoe Designer Series Paper, which is meant for Christmas, but can obviously be used for other things.
Scroll down to the bottom of this post for details on the Blended Seasons bundle, and the second assortment of Watercolor Pencils, available only until August 31, or while supplies last.
Here’s what I made:


Here’s what I did:
Cut and scored with my Stampin’ Trimmer:
- Crumb Cake card stock (CS) cut to 5-1/2″ x 8-1/2″, then scored in half at 4-1/4″
- Whisper White CS cut to 5-1/4″ x 4″ (2 pieces)
- Under the Mistletoe Designer Series Paper (DSP) layer cut to 5-1/8″ x 3-7/8″
Stamped with the Blended Seasons stamp set:
- sentiment in Crumb Cake ink onto a scrap of Whisper White CS
- bell in Memento black ink onto a scrap of Whisper White CS
Die cut using the Stitched Seasons Framelits:
- sentiment with the smallest stitched label die
- bell with the bell die
- a scrap of Crumb Cake CS cut with the largest and middle sized stitched label dies
Colored using Stampin’ Blends Markers:
- bell in Smoky Slate and Cherry Cobbler
Assembled the card:
- burnished the fold in the card base with a Bone Folder
- one of the Whisper White CS layers glued onto the front of the card base
- DSP layer glued onto the Whisper White CS layer
- sentiment and Crumb Cake die cut glued onto the DSP layer
- bell adhered using Stampin’ Dimensionals
- the other Whisper White CS piece glued onto the inside of the card base
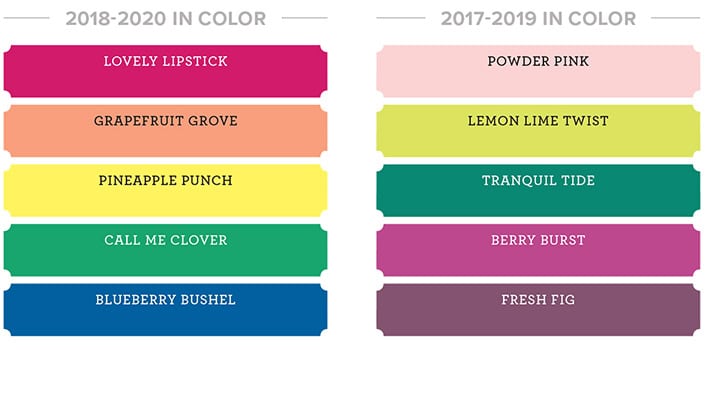
Here are today’s colors:
You can click on each one to see all the products that come in that color!
Here’s what I used:
Click on these images for more details and to purchase.
Here are 3 amazing offers that expire soon!
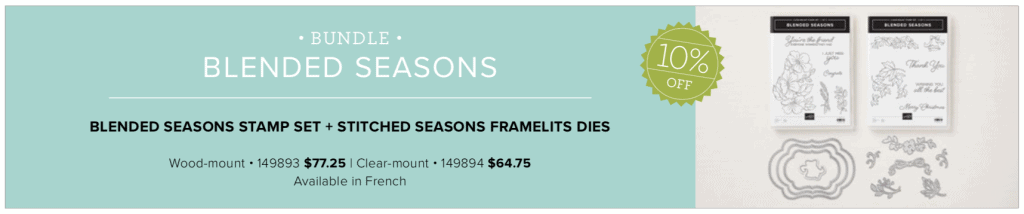
1) Color Your Seasons Special, August 1-31, 2018, While Supplies Last!
Stampin’ Up!’s® Blended Seasons Stamp Set, coordinating Framelits™ Dies, and Watercolor Pencils are perfect for every season of creating! Plus, save 10% when you buy the stamp set and Framelits in a bundle! But don’t wait—these exclusive products are only available until August 31 while supplies last. So get in the mood to create something full of colors and seasons!
Introducing the all-new, limited-time Color Your Season products:
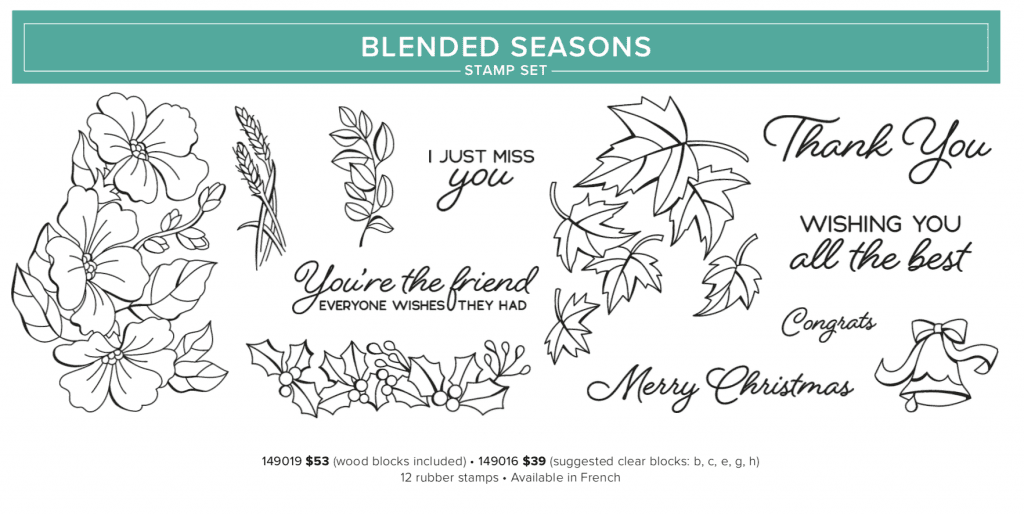
- Blended Seasons Stamp Set, an exclusive 12-piece wood- or clear-mount stamp set with images for every season – #149019 @ $53 (wood blocks included); #149016 @ $39 (suggested clear blocks: b, c, e, g, h)
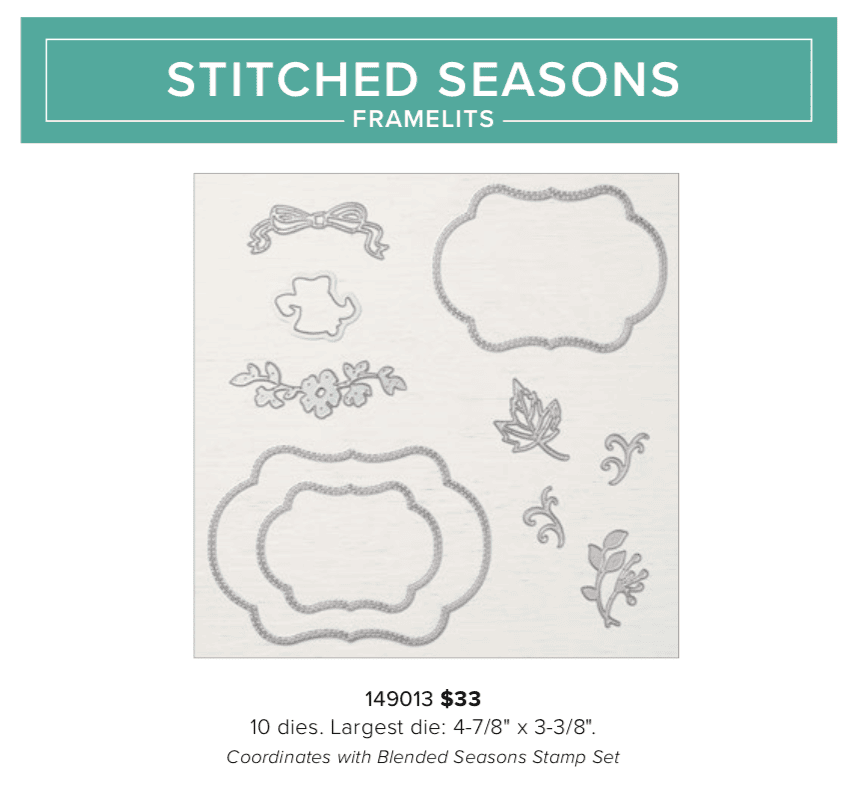
- Stitched Season Framelits Dies, a coordinating stitched die that includes stitching on both the positive and negative images! #149013 @ $33. Has10 dies. Largest die: 4-7/8″ x 3-3/8″.
- Save 10%! Blended Seasons BUNDLE – BLENDED SEASONS STAMP SET + STITCHED SEASONS FRAMELITS DIES – Wood-mount #149893 @ $77.25, Clear-mount #149894 @ $64.75
- Watercolor Pencils in 10 new colors! #149014 @ $12.50. Acid free, lignin free.10 pencils in Stampin’ Up! colors: Balmy Blue, Cajun Craze, Cherry Cobbler, Coastal Cabana, Crushed Curry, Flirty Flamingo, Garden Green, Gorgeous Grape, Granny Apple Green, Night of Navy
- Products available while supplies last until August 31, 2018 – while supplies last
- Items may be included as part of a new demonstrator’s Starter Kit.

2) Bonus Days are back!
- For every $50 you spend on an order in August, you will receive a $5 coupon to use in September!
- There is no limit to the number of coupons you may earn.
- An email address is required to participate; Bonus Days coupon codes can be delivered only via email.
- Bonus Days coupon codes may be redeemed for any product (excluding Starter Kits, demonstrator supply items, and Paper Pumpkin subscriptions.) Although new prepaid Paper Pumpkin codes may be discounted with Bonus Days coupon codes.

3) Buy 10 Stampin’ Ink pads in August and get one FREE!!
- Buy any 10 ink pads from me in August, I will give you another one FREE!
- Contact me to place your order, so I can add your FREE ink pad!
Here’s some more cool stuff you should check out:
Thanks for stopping by today, and Sweet Stamping!
May 27, 2018 | Boxes, Gallery, Gift Wrap, Gifts, Retiring Products, Wedding |
The Silver Gable Boxes are so pretty and so versatile. Don’t you just love products like that? Today I’ve decorated one for a bridesmaid’s gift. One stamp, an embossing folder, and some ribbon turned the simple box into a frilly gift, full of nail polish, lip glass, etc. – all pink of course.
Here’s what I made:
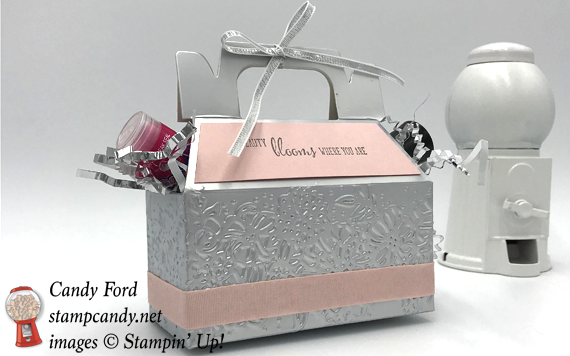

Here’s what I did:
Cut with my Stampin’ Trimmer:
- Powder Pink card stock (CS) cut to fit the top panel of the box, as shown
Stamped with the Friendship’s Sweetest Thoughts stamp set:
- sentiment in Smoky Slate ink onto the Powder Pink CS piece
Embossed using one of the Petal Pair Embossing Folders (TIEF):
- sides of the box (see below for details)
Assembled the project:
- burnished all the folds in the box with a Bone Folder to give it nice crisp edges
- used a Heat Tool to warm the adhered seam of the box and pulled it apart
- ran the box through the Big Shot twice, once on each side, with the TIEF
- glued the box back together at the seam
- assembled box, tucking the two end flaps down into the box
- put gifts inside the box with some shreddie, then tied the top closed with a piece of 1/8″ Silver Ribbon
- adhered Powder Pink all the way ribbon around the sides of the box using Tear & Tape
- adhered the sentiment onto the box panel using Tear & Tape
Here are today’s colors:
You can click on each one to see all the products that come in that color!
Here’s what I used:
Click on these images for more details and to purchase.
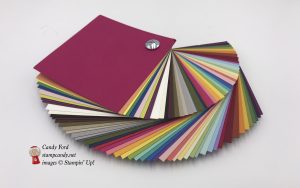
Swatch Books & Product Shares
Order by May 31 to receive them early- to mid-June. Click here for details and to order!
Here’s some information you should check out:
Thanks for stopping by today, and Sweet Stamping!
May 25, 2018 | Bags, Gallery, Gift Wrap, Gifts, Retiring Products, Wedding |
Order your Swatch Books and Product Shares now!
And now for today’s project. This would be perfect for a small gift or favor for a bridal shower or wedding. And it’s SO easy! I used a pre-made bag, doily, ribbon, and clip – I made only the heart with sentiment embossed in gold.
Here’s what I made:


Here’s what I did:
Cut and scored with my Stampin’ Trimmer:
- scored the top of a striped gift bag 1″ from the top
Stamped with the Born to Be Loved stamp set:
- sentiment in Versamark ink onto a scrap of Powder Pink card stock, then heat embossed it in gold
Die cut using the Sweet & Sassy Framelits:
Cut using Paper Snips:
- about 12″ each of three ribbons: Powder Pink Finely Woven Ribbon, Gold Metallic Edge Ribbon, and Gold 1/8″ Ribbon
Assembled the project:
- folded the ribbons in half and adhered the tops to the center of a Gold Metallic Doily using Tear & Tape
- adhered the die cut heart to the doily using Stampin’ Dimensionals
- put goodies in the bag
- folded over the top of the bag and clipped the decoration on with a Gold Binder Clip
Here are today’s colors:
Here’s what I used:
Click here to order your Swatch Books and Product Shares now!
Here’s some information you should check out:
Thanks for stopping by today, and Sweet Stamping!
Mar 8, 2018 | Blog Hop, Cards, Gallery, Wedding |

It’s time for the One Stamp at a Time Blog Hop! This month’s theme is Happily Ever After. I used the Better Together stamp set, some doilies, and a few other goodies to create a wedding card and gift box. I can’t wait to see all the projects the other hoppers have created! Be sure to hop around to see them.
Here’s what I made:
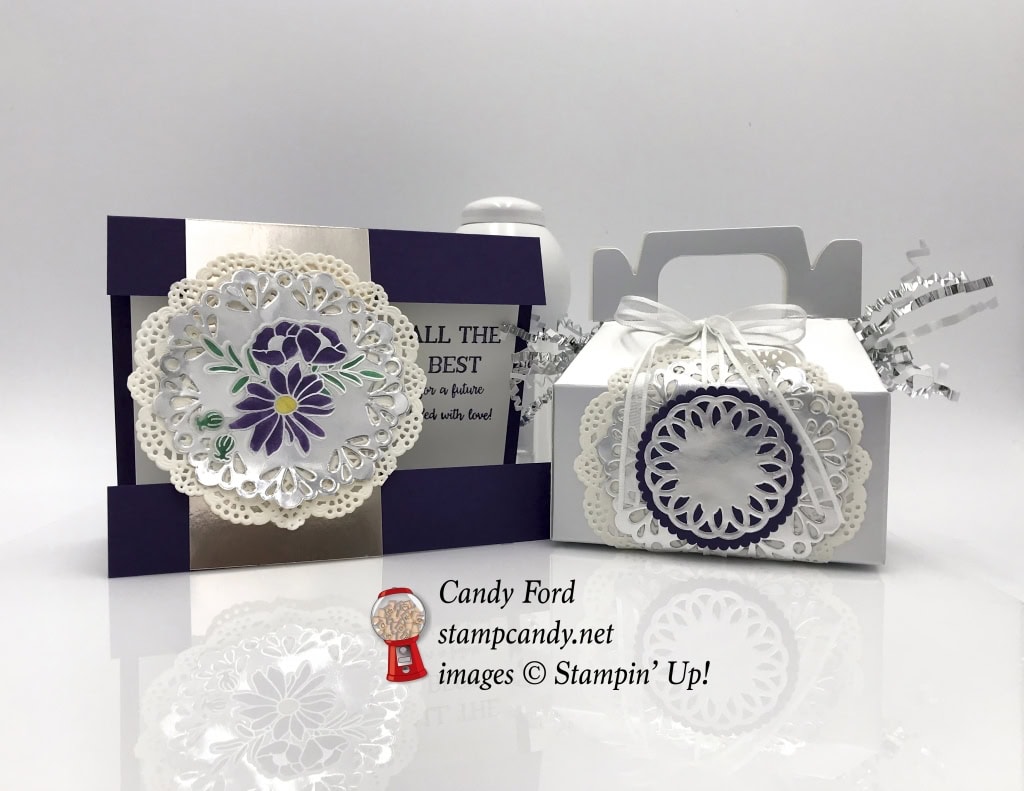
The card…
…and the gift box.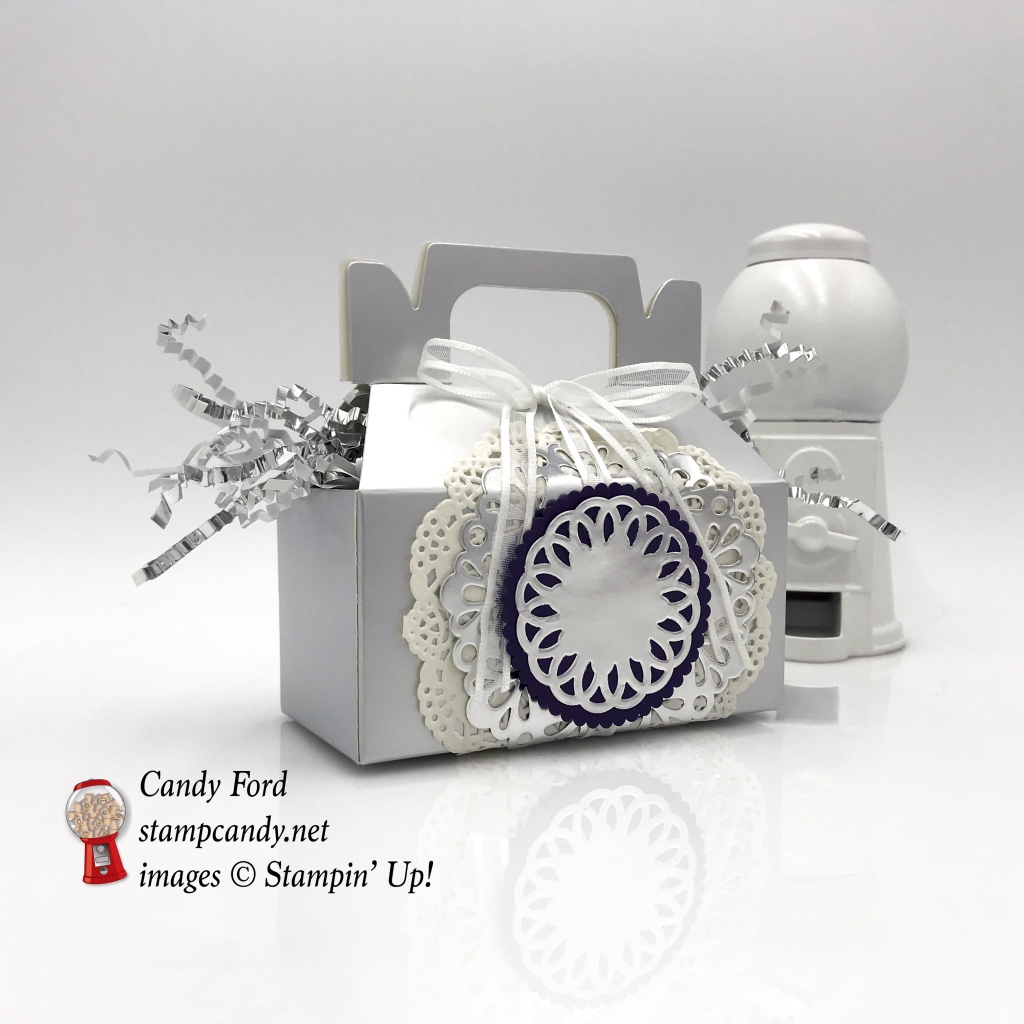
Here’s what I did:
Cut and scored with my Stampin’ Trimmer:
- Elegant Eggplant card stock (CS) cut to 5-1/2″ x 8-1/2″, scored in half at 4-1/4″, then 1″ strip cut off the bottom of the front, then another 2-1/4″ strip cut from the front – there should be a 1″ strip still attached across the top of the front
- Silver Foil Sheet cut to 2″ x 4-1/4″
- Whisper White CS cut to 5″ x 3-3/4″ for the inside of the card
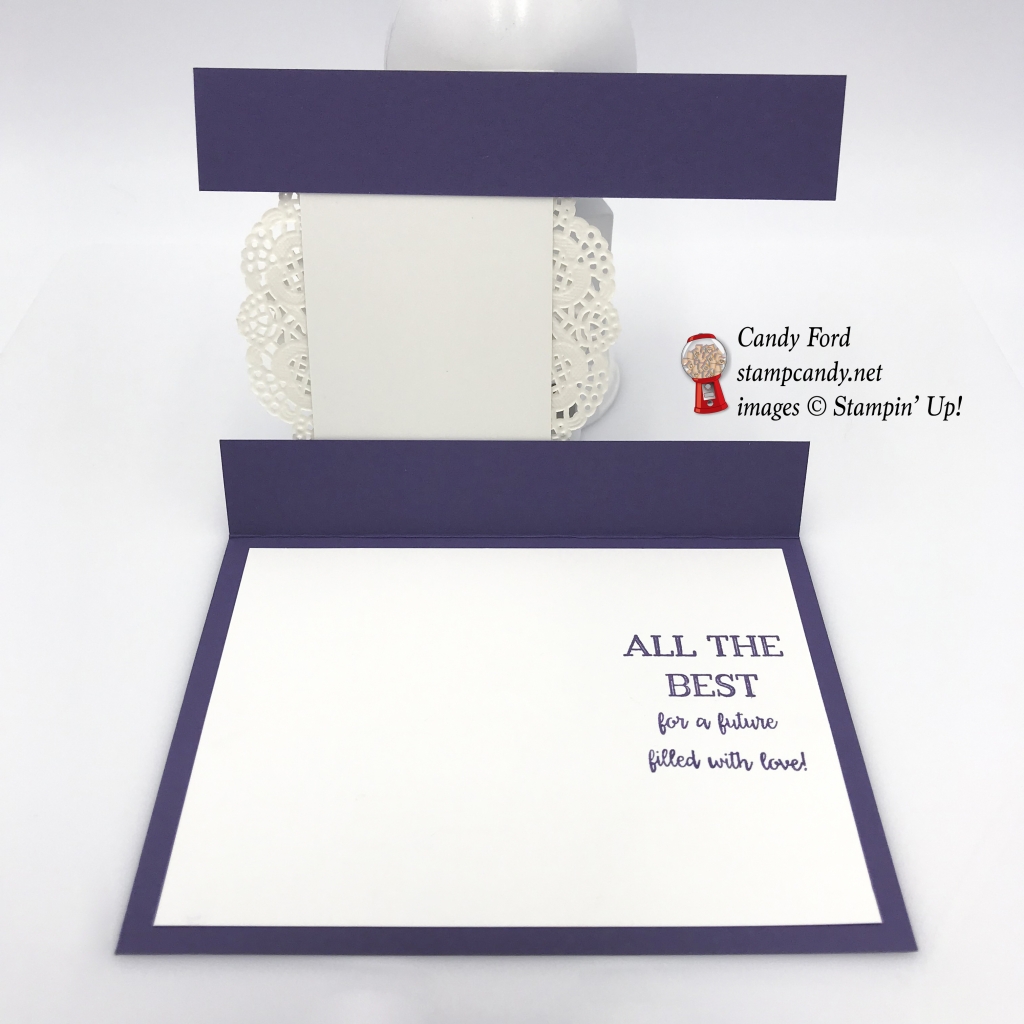
Stamped with the Better Together stamp set:
- sentiment in Elegant Eggplant ink onto the Whisper White CS
- NOTE: I used an Elegant Eggplant Stampin’ Write Marker to ink up each part of the stamp, and used a Stampamajig to line up the words
Die cut using the Layering Circles Framelits:
- scrap of Elegant Eggplant CS with a scalloped circle die
Colored using Stampin’ Write Markers:
- vellum embellishment from the Sweet Soiree Embellishment Kit in Elegant Eggplant, Emerald Envy, and Daffodil Delight
- NOTE: I colored the vellum on the back, not on the side with the silver
Assembled the card:
- folded the card base along the score line, and burnished it with a Bone Folder
- Silver Foil strip adhered to the front of the card base at the top, and to the 5-1/2″ x 1″ Elegant Eggplant CS strip at the bottom
- Delicate White Doily adhered to the Silver Foil strip using Tear & Tape
- Silver Metallic Foil Doily adhered to the white doily using Tear & Tape
- colored vellum embellishment adhered to the silver doily using Tear & tape
- stamped Whisper White CS glued to the inside of the card base
Assembled the box:
- burnished the fold lines in the Mini Silver Gable Box, and assembled it – On the bottom, fold in the long flap with two tabs, then the two short side flaps, then the long flap with one tab.
- two top end flaps tucked inside the box, instead of inserting the top tabs into them
- silver Sweet Soiree Ready Shreddie tucked inside the box with some hanging out the sides
- Delicate White Doily adhered to the side of the box using Tear & Tape
- silver Metallic Foil Doily adhered to the white doily using Tear & Tape
- Whisper White 1/4″ Organza Ribbon wrapped around box and tied in a bow, tying the box closed at the top
- die cut Elegant Eggplant CS scalloped circle adhered to the silver doily using Stampin’ Dimensionals, careful to leave a “tunnel” for the ribbon to slide through freely
- smaller silver Metallic Foil Doily adhered to the die cut circle using Tear & Tape
Here’s the hop:
You don’t want to miss any of these great projects!

Here are today’s colors:
You can click on each one to see all the products that come in that color!
Here’s what I used:
Click on these images for more details and to purchase.
Here’s some stuff you should know:
- This is a fabulous time to join my team! Sale-A-Bration is the biggest event of the Stampin’ Up! year and you can save big on the ultimate bundle, the Starter Kit. CLICK HERE for more information. Contact me with any questions: email candy@stampcandy.net or call/text 404-661-5222
- Newsletter: subscribe for exclusive deals, projects, and more! Enter your email address and click SUBSCRIBE at the top right of this page, just under the picture of my smiling face. You can also choose to receive an email every day that I have a blog post.
- Check out My Events Calendar HERE
- Host Code for the month of March (34CJGPSJ) Find out more about HOW, WHEN and WHY to use the code HERE.
- My Thank You Gift to You in March: Mini Embroidery Hoops – Find out more HERE.
- Gift Certificates are available in any U.S. dollar amount from me. Contact me – email: candy@stampcandy.net OR call/text: 404-661-5222
- Gumball Rewards for all orders over $50. Find out more HERE.
Thanks for stopping by today, and Sweet Stamping!

Feb 18, 2018 | Cards, Gallery, Wedding |
The beautiful blue bouquet on today’s card was made using the Beautiful Bouquet Bundle (Beautiful Bouquet stamp set and Bouquet Bunch Framelits Dies.) Using Stampin’ Dimensionals and Pearl Basic Jewels, and wrapping the flower stems with ribbon can give some thickness to the card. To mail it, simply lay a 4-1/4″ x 5-1/2″ piece of card stock over the front of the card before inserting it into the envelope. You can also pay more to have the envelope hand cancelled, instead of run through the automated postal machines.
Here’s what I made:

Here’s what I did:
Cut and scored with my Stampin’ Trimmer:
- Island Indigo card stock (CS) cut to 4-1/4″ x 11″, then scored in half at 5-1/2″
- Old Olive CS cut to 4-1/8″ x 5-3/8″
- Very Vanilla CS 4″ x 5-1/4″ (2 pieces: one layer for the front and one piece for the inside of the card)
Stamped with the Beautiful Bouquet stamp set:
- sentiments in Island Indigo ink onto the Very Vanilla CS layer
- flowers in Pool Party ink onto a scrap of Very Vanilla CS
Die cut using the Bouquet Bunch Framelits Dies:
- stamped flowers
- small flowers from a scrap of Island Indigo CS
- stems from a scrap of Old Olive CS
Assembled the card:
- burnished the fold in the card base with a Bone Folder
- wrapped Pool Party 3/8″ Shimmer Ribbon around the die cut stems and adhered to the Very Vanilla CS layer with Fast Fuse
- Pearls applied to the centers of the Pool Party flowers
- Pool Party and Island Indigo flowers arranged and adhered to the Very Vanilla CS layer with Mini Dimensionals and glue, working from the outside edges of the bouquet to the stems, and being sure to cover the top of the stems
- Very Vanilla CS layer glued onto the Old Olive CS layer
- Old Olive CS layer glued onto the front of the card base
- remaining Very Vanilla CS piece glued onto the inside of the card base
Here are today’s colors:
You can click on each one to see all the products that come in that color!
Here’s what I used:
Click on these images for more details and to purchase.
Here’s some stuff you should know:
- This is a fabulous time to join my team! Sale-A-Bration is the biggest event of the Stampin’ Up! year and you can save big on the ultimate bundle, the Starter Kit. CLICK HERE for more information. Contact me with any questions: email candy@stampcandy.net or call/text 404-661-5222
- Newsletter: subscribe for exclusive deals, projects, and more! Enter your email address and click SUBSCRIBE at the top right of this page, just under the picture of my smiling face. You can also choose to receive an email every day that I have a blog post.
- Check out My Events Calendar HERE
- Host Code for the month of February (2T9AQTKG) Find out more about HOW, WHEN and WHY to use the code HERE.
- My Thank You Gift to You in February: Narrow Note Cards & Envelopes – Find out more HERE.
- Gift Certificates are available in any U.S. dollar amount from me. Contact me – email: candy@stampcandy.net OR call/text: 404-661-5222
- Gumball Rewards for all orders over $50. Find out more HERE.
Thanks for stopping by today, and Sweet Stamping!
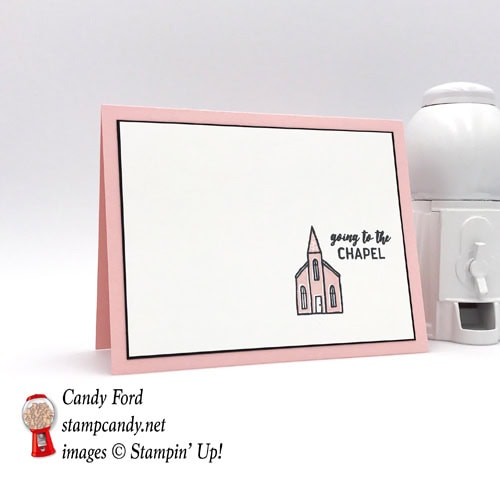
Oct 2, 2017 | Cards, Gallery, Wedding |
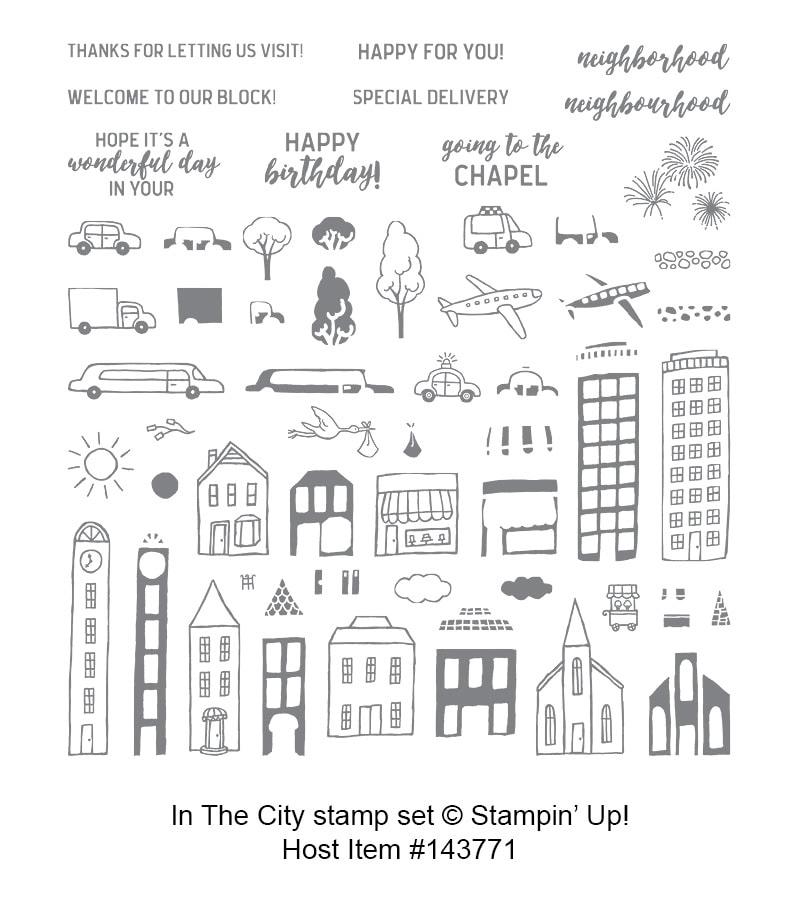
I love simple cards. Not just easy to make, but simple designs. Sometimes they’re the hardest to do though. The In the City stamp set makes simple designs easy. There are 60 stamps in the set – 60!!! – the outlined images have stamps to fill them in, like the chapel on today’s card. And you can only get this set with Host Rewards, so it’s FREE!
Here’s what I made:
Here’s what I did:
Cut and scored with my Stampin’ Trimmer:
- Powder Pink card stock (CS) cut to 5-1/2″ x 8-1/2″, then scored in half at 4-1/4″
- Basic Black card stock (CS) cut to 5″ x 3-3/4″
- Whisper White CS cut to 4-7/8″ x 3-5/8″
- Whisper White CS cut to 4″ x 5-1/4″ for the inside
Stamped using the In the City stamp set:
- chapel outline in Basic Black ink onto the Whisper White CS card layer
- chapel fill in Powder Pink ink
- sentiment in Basic Black ink
Assembled the card:
- Whisper White CS layer glued onto the Basic Black CS layer
- Basic Black CS layer glued onto the front of the card base
- larger piece of Whisper White CS glued onto the inside of the card base
Here are today’s colors:
You can click on each one to see all the products that come in that color!
Here’s what I used:
Click on the images for more details and to purchase.
Key Points to Remember:
- World Card Making Day Sale October 1-10, 15% off select card making essentials. See details HERE.
- Designer Series Paper Sale October 1-31, Buy 3 Get 1 FREE! See details HERE.
- Gumball Reward for all orders over $50.
Find out more HERE. - Hostess Code for the month of October (HGB2HGXK)
Find out more about HOW, WHEN and WHY to use that HERE. - October’s FREE gift – Mini Pizza Boxes. Find out more HERE.
- New Merry Patterns Hostess Stamp Set – added to your Host Rewards.
There’s a brand new stamp set that isn’t in any catalog. You can’t buy it, but you can get if for free with a qualifying order! You can host a party, or place your own order, or join under me and get a 20% discount on your demonstrator order. Find out more HERE.
Thanks for stopping by today, and Sweet Stamping!
