Oct 5, 2020 | Boxes, Christmas, Gallery, Gifts, Holiday, Treat Holders |
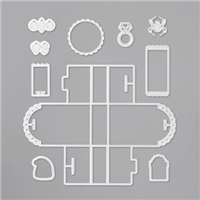
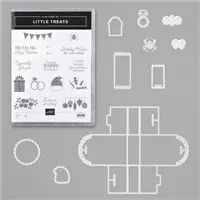
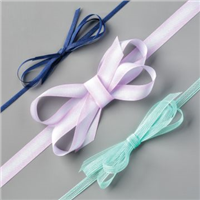
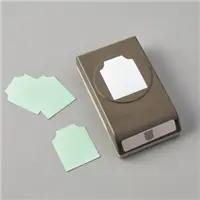
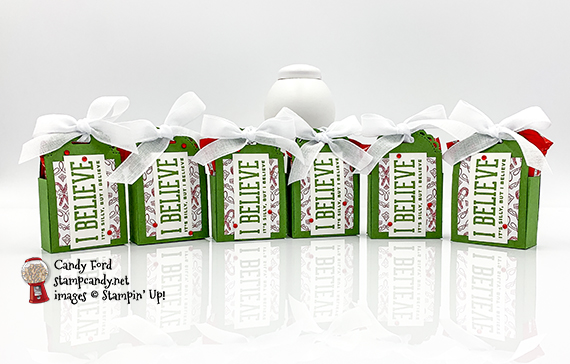
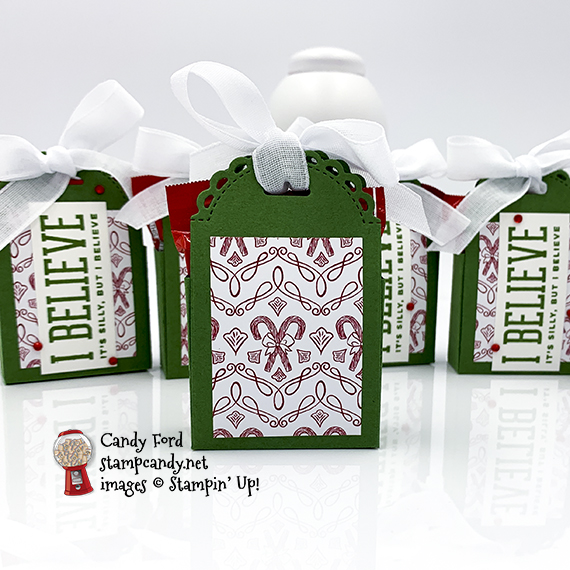
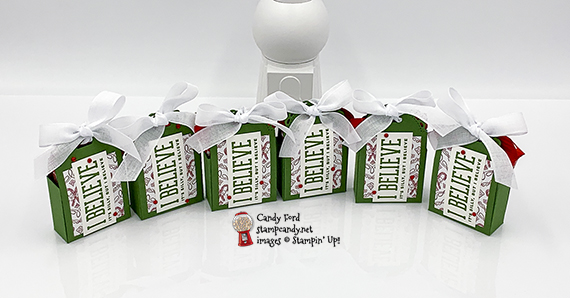
Today I’m sharing some little treat holders I made using the Little Treat Box Dies, Christmas Means More stamp set, and Tis the Season Designer Series Paper. They hold 2 miniature KitKat bars perfectly. I tied the tops with the Whisper White 1/2″ Faux Linen Ribbon from the Flowers for Every Season Ribbon Combo Pack It’s one of my favorite ribbons. It’s pretty and you can quickly color it with your Stampin’ Blends markers. I included one of these treat holders in the BINGO Boxes that I sent to the participants of my World Card Making Day BINGO Party. We had a great time, playing BINGO and making cards.
If you are reading this in email, some photos may appear blurry, or may not appear at all. Please click here to see the post on my blog.
S Little Treat Little Treat Little Treat Little Treat
Here’s what I made:
S
Here’s what I did:
Cut and scored with my paper trimmer:
- Whisper White Thick Card Stock (CS) cut to 2-1/4″ x 1″
- ‘Tis the Season Designer Series Paper (DSP) layer cut to 1-1/2″ x 2″ (2 pieces)
Stamped with the Christmas Means More stamp set:
- sentiment in Garden Green ink onto the Whisper White Thick CS
Cut using the Little Treat Box Dies:
- box from a piece of Garden Green CS
Assembled the treat holder:
- burnished the folds in the box with a Bone Folder
- DSP layer glued onto the front and back panels of the box
- sentiment glued over the DSP layer on the front
- 3 Red Rhinestones applied onto the front using my Take Your Pick tool
- box sides folded up and glued to form the box
- goodies tucked inside
- ribbon threaded through the holes in the top of the two sides and tied in a bow
S
Here are today’s colors:
You can click on each one to see all the products that come in that color!
S
Here’s what I used:
Click on these images for more details and to purchase. If you are reading this post in email, the product images may not show up. Please click here to see the post on my blog.
Supply List. <— Click for a clickable and printable list of the products!
Designer Series Paper Sale!
Click the image to see the sale:
S
Here are some helpful links:
S
Thanks for stopping by today, and Sweet Stamping!
Oct 2, 2020 | Cards, Fun Folds, Gallery |
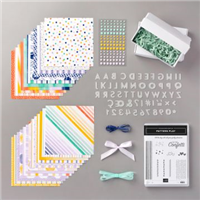
I used some products from the Playing With Patterns Suite Collection along with the Happiest of Birthdays stamp set and the Stitched So Sweetly Dies to create today’s fun pop up birthday card.
If you are reading this in email, some photos may appear blurry, or may not appear at all. Please click here to see the post on my blog.
S playing with patterns playing with patterns playing with patterns playing with patterns
Here’s what I made:
The Night of Navy card stock and ink look almost black in these photos, but they’re much bluer in person.

S
Here’s what I did:
Cut and scored with my paper trimmer:
- Night of Navy card stock (CS) cut to 5-1/2″ x 8-1/2″, then scored in half at 4-1/4″
- Purple Posy CS layer cut to 3-3/4″ x 5″
- Playing With Patterns Designer Series Paper (DSP) layer cut to 3-1/2″ x 4-3/4″
- Whisper White Thick CS cut to 8-1/4″ x 5-1/4″ for the insert, then cut and scored according to the diagram below
- first DSP pattern for the inside cut to 3″ x 1-1/2″, and scored in half at 1-1/2″
- second DSP pattern for the inside cut to 2-1/2″ x 1-1/4″, and scored in half at 1-1/4″
- third DSP pattern for the inside cut to 2″ x 1″, and scored in half at 1″
- Click on the diagram to see it larger:

Stamped with the Happiest of Birthdays stamp set:
- outer sentiment in Night of Navy ink onto a scrap of Whisper White Thick CS
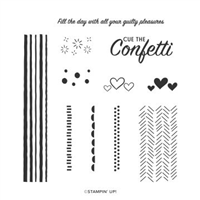
Stamped with the Pattern Play stamp set:
- inner sentiment in Night of Navy ink onto the Whisper White Thick insert
- stars in Coastal Cabana and Highland Heather inks onto the Whisper White Thick insert (I stamped off the Highland Heather to make it lighter.)
Cut using the Stitched So Sweetly Dies:
Assembled the card:
- burnished the fold in the card base with a Bone Folder
- burnished all the folds in the insert with a Bone Folder
- die cut sentiment glued onto the DSP layer
- DSP layer glued onto the Purple Posy CS layer
- Purple Posy CS layer glued onto the front of the card base
- remaining DSP pieces glued onto their corresponding “boxes” on the insert
- ribbon adhered onto each side of each box as shown, using Stampin’ Seal +, and wrapped around to the back
- ribbon tied into a small bow and adhered above the top box using a Mini Glue Dot
- insert glued onto the inside of the card base, applying glue everywhere except to the boxes that will fold out
S
Here are today’s main colors:
You can click on each one to see all the products that come in that color!
S
Here’s what I used:
Click on these images for more details and to purchase. If you are reading this post in email, the product images may not show up. Please click here to see the post on my blog.
Supply List. <— Click for a clickable and printable list of the products!
S
Designer Series Paper Sale!
S
Here are some helpful links:
S
Thanks for stopping by today, and Sweet Stamping!
Sep 18, 2020 | Autumn, Boxes, Gallery, Gifts |
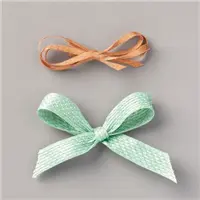
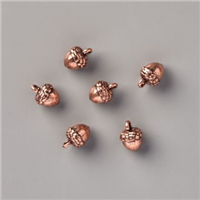
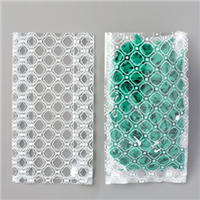
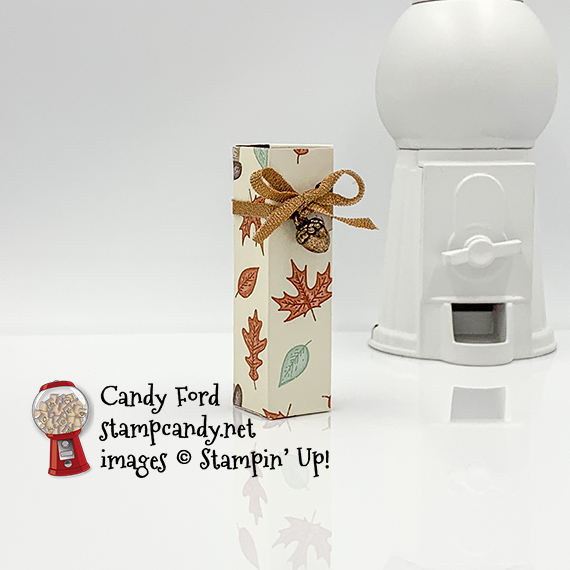
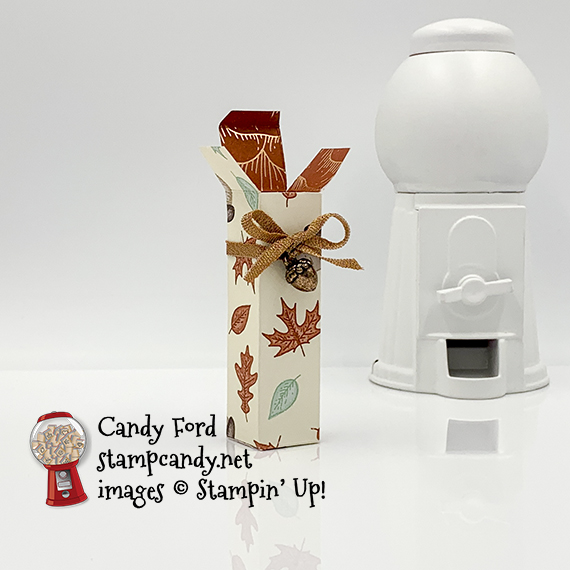
Today I’m sharing a lip balm holder I made with Gilded Autumn Designer Series Paper. I also used the Copper Trim and Acorn Trinkets from the Gilded Autumn Suite Collection. This holder fits any standard size lip balm, like Burt’s Bees, ChapStick, etc. The finished dimensions of the closed holder are 3/4″ x 3/4″ x 2-3/4″. I gave you a sneak peek of it a few days ago, in the post about the coordinating card. You can see that post here.
If you are reading this in email, some photos may appear blurry, or may not appear at all. Please click here to see the post on my blog.
S Gilded Gilded Gilded Gilded
Here’s what I made:

S
Here’s what I did:
Cut and scored with my paper trimmer:
- Gilded Autumn Designer Series Paper (DSP) layer cut to 3-1/4″ x 4-1/2″, and scored and cut according to the diagram
- cut solid lines, score dotted lines, and remove green areas
-
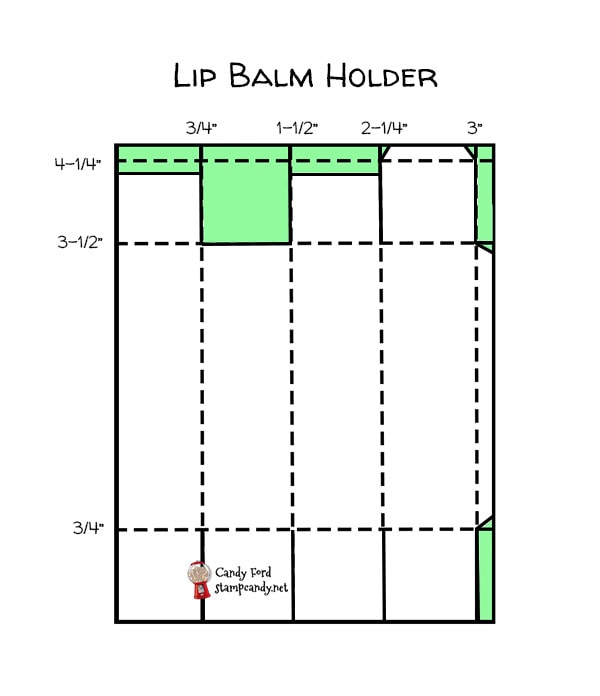 click the diagram to view larger
Assembled the holder:
- burnished all the folds in the DSP with a Bone Folder
- long 1/4″ tab on the side glued onto the inside of the the opposite side to form the box
- bottom flaps folded in and glued together to form the bottom
- lip balm dropped into the box
- side flaps closed and lid closed and tab tucked in
- 2″ length of Tear & Tape folded in half, so it’s only 1/8″ wide x 2″ long, then applied onto the back and two sides of the box
- NOTE: I used the pointy end of my Take Your Pick tool to open the Tear & Tape back up after folding it over onto itself.
- center of ribbon adhered on the back of the box and wrapped around the two sides, covering the Tear & Tape
- acorn trinket threaded onto the ribbon, then the ribbon tied in a bow
- glue dot applied behind the bow, using a Take Your Pick tool, to hold it in place
S
Here are today’s colors:
You can click on each one to see all the products that come in that color!
S
Here’s what I used:
Click on these images for more details and to purchase. If you are reading this post in email, the product images may not show up. Please click here to see the post on my blog.
Supply List. <— Click for a clickable and printable list of the products!
Two ways to save in September!
Buy the Starter Kit and receive even more! It’s already the best deal: $99 for $125 in product of your choice plus Free shipping! In September you will also receive the Queen Anne’s Lace stamp set, the So Much Love stamp set, Rhinestone Basic Jewels, and 16 precut card kits! Wow! This is the perfect time to work on your wish list of Stampin’ Up! products! CLICK HERE for more details.

Buy the new Stampin’ Cut & Emboss Machine (standard size) from me by September 30 and I will give you a Magnetic Cutting Plate FREE! You’ll save almost $30! CLICK HERE for more details and to order.

S
Mystery Stamping Party!

Go ahead and click the image above to join the Facebook group now. A few days before the party I will post what you will need to complete the mystery card. On September 23 at 8:00pm ET, I will begin posting clues you can follow to create the card. We’ll also have games and prizes! And it’s all FREE!
S
World Card Making Day 2020:

- Join me for an afternoon of Bingo, cardmaking, prizes, and fun!
- October 3 at 2:00 pm ET
- See details and register HERE by September 25
- $25 (extra Bingo cards available for $5 each)
- Tell your friends! The more people who register, the bigger the prizes!
S
Here are some helpful links:
S
Thanks for stopping by today, and Sweet Stamping!

Sep 16, 2020 | Autumn, Bags, Blog Hop, Food, Gallery, Gift Wrap, Gifts, Halloween, Holiday, Tags |

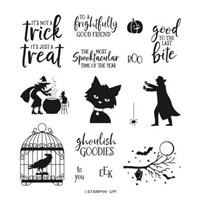
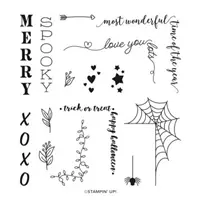
Welcome to the September 2020 Inking Royalty Blog Hop! During this year’s blog hops, we are enjoying a year of celebrations. This month’s projects are all about Halloween. I used the Ghoulish Goodies stamp set, Essential Tag Punch, and Fancy Label Punch to create tags for this cute and scary little treat bag. The candies inside are Bloody Bones Sweet Tarts Candy. Ooooooo spooky! You can buy them here.
Prepare yourself for a wonderful mix of spooky, scary and sweet. We are excited to share our creations with you today! After you read my post, I hope you’ll hop over to the next person, Ann Murray at Murray Stamps Ink, on the list you can see when you scroll down. Be sure to hop around to ALL the stops, because you definitely want to see all the projects this group has created for you!
If you are reading this in email, some photos may appear blurry, or may not appear at all. Please click here to see the post on my blog.
S september 2020 inking royalty september 2020 inking royalty september 2020 inking royalty september 2020 inking royalty
Here’s what I made:

S
Here’s what I did:
Stamped with the Ghoulish Goodies stamp set:
- raven in cage in Memento Tuxedo Black ink onto a scrap of Whisper White Thick CS
- sentiment in Memento Tuxedo Black ink onto a scrap of Real Red CS
Cut using the Essential Tag Punch:
- stamped image and sentiment
Cut using the Label Me Fancy Punch:
- a hole in the top of each tag
- NOTE: I found it a little difficult to line up the punch exactly where I wanted it, so I drew a tiny dot on the tags where I wanted to punch, then positioned each tag so I could see the dot through the hole in the punch. Easy Peasy!

Put it all together:
- put candies in a Mpsaic Gusseted Cellophane Bag and tied the top with a piece of Black Glittered Organdy Ribbon
- black and white twine run through the 2 tags and tied around the top of the bag, tying a small bow in the back
- For the photo, I glued the tags together so you could see both at the same time. You can leave them loose if you prefer.

S
Here’s the September 2020 Inking Royalty Blog Hop:
Thank you for hopping along with us. If you get stuck during the Blog Hop, please use this line-up as a guide:
- Brian King at Stamp with Brian
- Candy Ford at Stamp Candy <— YOU ARE HERE!
- Ann Murray at Murray Stamps Ink
- Sue Jackson at Just Peachy Stamping
- Jackie Beers at Blue Line Stamping
- Rachel Brumley at Artistic Designs by Rachel
- Sheryl Sharp at Sharp Notes by Sheryl
- Shawn de Oliveira at Shawn Stamps
- Julie DiMatteo at The Paper Pixie
- Pam Morris at Tap Tap Stamp
- Lynn Kolcun at Avery’s Owlery
- Sheryl Abernathy at Elegant Sentiments
- Linda Krueger at The Stamp Coach
- Joanne Brown at The Inky Dragon
S
Here are today’s colors:
You can click on each one to see all the products that come in that color!
My husband and I have a Halloween party every year, and this year’s theme was going to be “What’s black and white and red all over?” Unfortunately we had to cancel it this year. But I just realized as I was typing this post that those are the colors of my project today. I’m sure that fact was floating around in the back of my brain somewhere as I made the tags.
S
Here’s what I used:
Click on these images for more details and to purchase. If you are reading this post in email, the product images may not show up. Please click here to see the post on my blog.
Supply List. <— Click for a clickable and printable list of the products!
S
Two ways to save in September!
Buy the Starter Kit and receive even more! It’s already the best deal: $99 for $125 in product of your choice plus Free shipping! In September you will also receive the Queen Anne’s Lace stamp set, the So Much Love stamp set, Rhinestone Basic Jewels, and 16 precut card kits! Wow! This is the perfect time to work on your wish list of Stampin’ Up! products! CLICK HERE for more details.
Buy the new Stampin’ Cut & Emboss Machine (standard size) from me by September 30 and I will give you a Magnetic Cutting Plate FREE! You’ll save almost $30! CLICK HERE for more details and to order.
S
Mystery Stamping Party!
Go ahead and click the image above to join the Facebook group now. A few days before the party I will post what you will need to complete the mystery card. On September 23 at 8:00pm ET, I will begin posting clues you can follow to create the card. We’ll also have games and prizes! And it’s all FREE!
S
World Card Making Day 2020:
- Join me for an afternoon of Bingo, cardmaking, prizes, and fun!
- October 3 at 2:00 pm ET
- See details and register HERE by September 25
- $25 (extra Bingo cards available for $5 each)
- Tell your friends! The more people who register, the bigger the prizes!
S
Here are some helpful links:
S
Thanks for stopping by today, and Sweet Stamping!
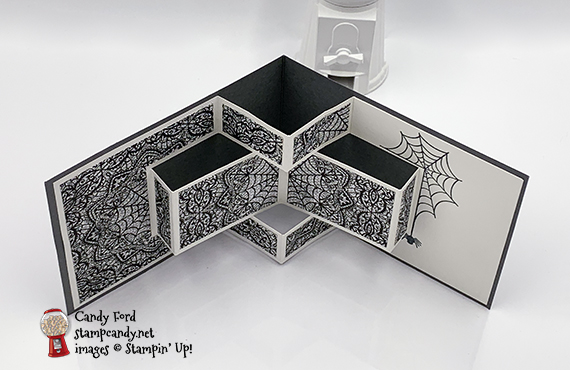
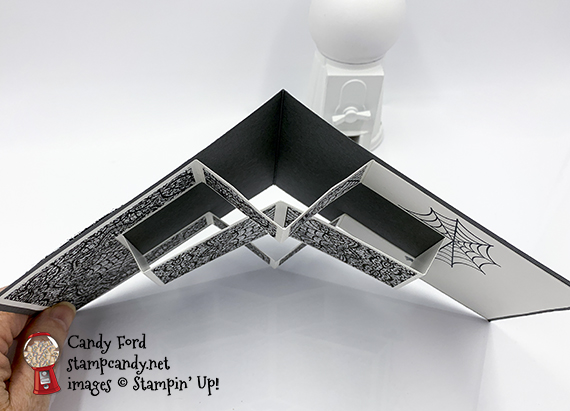
Sep 14, 2020 | Blog Hop, Cards, Fun Folds, Gallery, Halloween, Holiday |

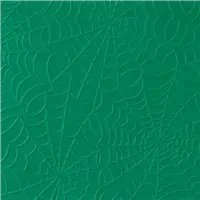
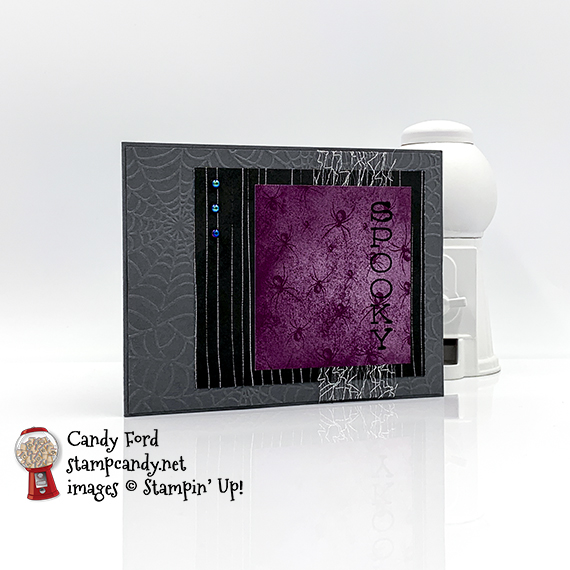
Welcome to the September 2020 Candy Hearts Blog Hop! This month’s theme is Halloween. I used the Festive Corners stamp set, Cobwebs 3D Embossing Folder, and Magic in this Night Designer Series Paper to create a spooky fun 3D Pop Up card.
We have two special guests hopping with us today. One is the amazing and talented Mikaela Titheridge of The Crafty Oink Pen, and I can’t wait to see what she has in store for us. Mikaela has been a member of the prestigious Stampin’ Up! Artisan Design Team, and her projects are always spectacular. She’s also cute as a button! Next, Pam Morris of Tap Tap Stamp, is joining us on a regular basis, and I know she’ll have a super fun project for us. She is one of my Stampin’ Up! uplines, and she’s an absolute hoot and a half!
Be sure to hop around to all the stops, be cause you definitely don’t want to miss any of the projects from this group of terrific stampers!
If you are reading this in email, some photos may appear blurry, or may not appear at all. Please click here to see the post on my blog.
S September 2020 Candy Hearts September 2020 Candy Hearts September 2020 Candy Hearts September 2020 Candy Hearts
Here’s what I made:

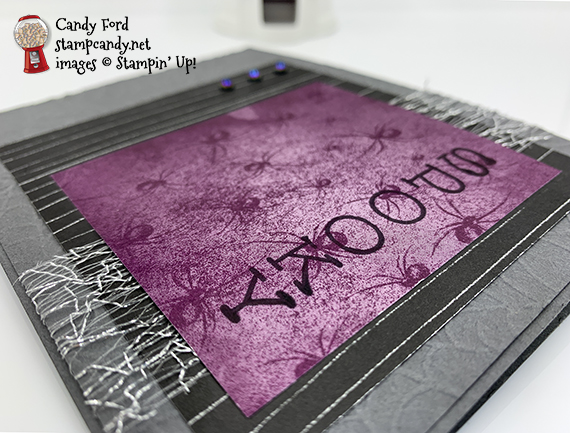
S
Here’s what I did:
Cut and scored with my paper trimmer:
- Basic Gray card stock (CS) cut to 11″ x 4-1/4″, then scored in half at 5-1/2″
- Basic Gray CS layer cut to 5-3/8″ x 4-1/8″
- Magic in this Night Designer Series Paper (DSP) layer cut to 4″ x 3-1/2″ (stripes)
- DSP layer cut to 2-3/4″ x 3″ (spiders)
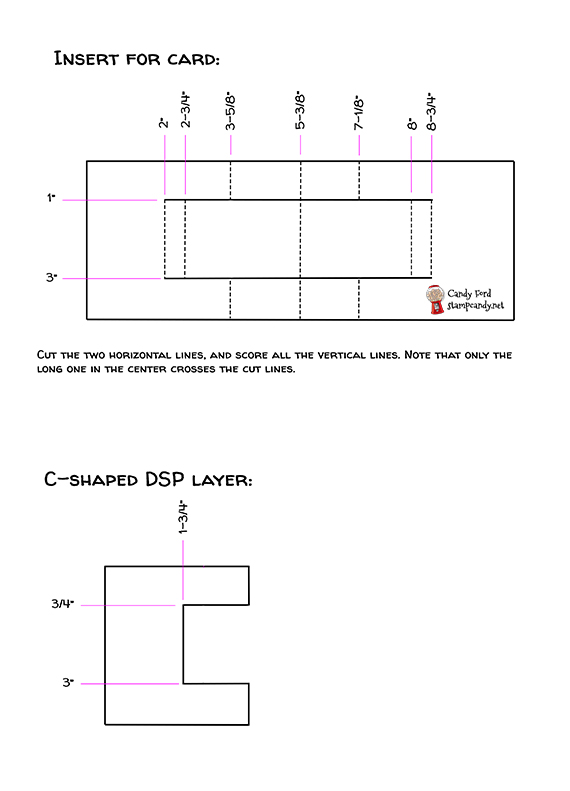
- Whisper White Thick CS cut to 5-1/2″ x 8-1/2″, then cut and scored according to the diagram below
- DSP (cobwebs) cut to 2-3/8″ x 1-3/4″ (2 pieces), to 1-1/2″ x 3/4″ (4 pieces), and to 1/2″ x 1-3/4″ (2 pieces)
- DSP (cobwebs) cut to 3-3/8″ x 3-3/4″ (1 piece) then cut into a C shape according to the diagram below
Stamped with the Festive Corners stamp set:
- sentiment in Memento Tuxedo Black ink onto the spider DSP layer (I used my Stamparatus to stamp it a couple of times so it would be nice and dark.)
- cobweb in Memento Tuxedo Black ink onto the Whisper White Thick CS around the farthest right cut/score line
- spider in Memento Tuxedo Black ink hanging from the cobweb
Embossed using the Cobwebs 3D Embossing Folder:
Assembled the card:
- burnished the fold in the card base, and all the folds in the Whisper White Thick CS, with a Bone Folder
- striped DSP layer glued onto the embossed Basic Gray CS layer
- Metallic Mesh ribbon wrapped around both layers and adhered onto the back using Stampin’ Seal +
- Basic Gray CS layer glued onto the front of the card base
- spider DSP layer glued onto the striped DSP layer over the ribbon
- 3 Iridescent pearls applied onto the striped DSP layer (I like to use the pointy end of the Take Your Pick tool.)
- center score line of the Whisper White Thick CS lined up with the score line in the card base, then the C-shaped areas at both ends glued onto the inside of the card base
- cobwebs DSP pieces glued onto their corresponding scored areas of the Whisper White Thick CS
S
Here’s the September 2020 Candy Hearts Blog Hop:
Thank you for hopping with the Hearts today! Be sure to hop around to all the stops. You do not want to miss any of the creativity in this talented group of stampers!
S
Here are today’s colors:
You can click on each one to see all the products that come in that color!
S
Here’s what I used:
Click on these images for more details and to purchase. If you are reading this post in email, the product images may not show up. Please click here to see the post on my blog.
Supply List. <— Click for a clickable and printable list of the products!
S
Two ways to save in September!
Buy the Starter Kit and receive even more! It’s already the best deal: $99 for $125 in product of your choice plus Free shipping! In September you will also receive the Queen Anne’s Lace stamp set, the So Much Love stamp set, Rhinestone Basic Jewels, and 16 precut card kits! Wow! This is the perfect time to work on your wish list of Stampin’ Up! products! CLICK HERE for more details.
Buy the new Stampin’ Cut & Emboss Machine (standard size) from me by September 30 and I will give you a Magnetic Cutting Plate FREE! You’ll save almost $30! CLICK HERE for more details and to order.
S
Here are some helpful links:
S
Thanks for stopping by today, and Sweet Stamping!