Jan 31, 2020 | Cards, Gallery, New Products |
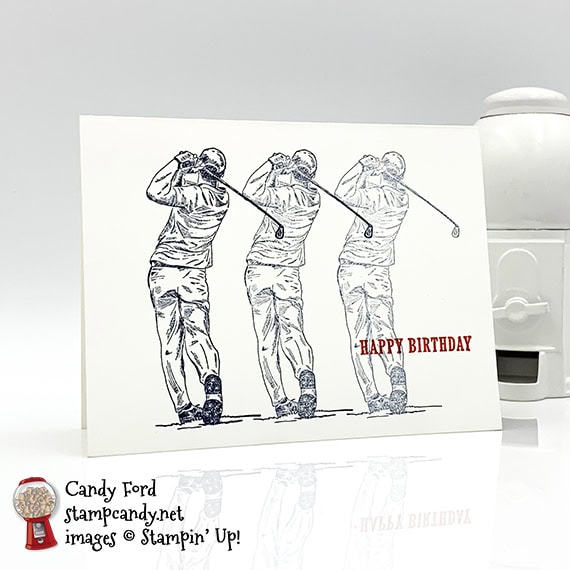
Today’s card takes no time at all. You can put the stamps on your Stamparatus and stamp away, and make a whole bunch of these in just a few minutes. With the premade Note Cards & Envelopes, there’s no cutting or scoring. So fast and simple and easy!
note card note card
Here’s what I made:
 S
S
Here’s what I did:
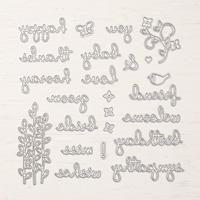
Stamped with the Clubhouse stamp set:
- image and sentiment in Garden Green ink onto the front of the Note Card Base
- NOTE: line up the stamps on the Stamparatus and you can stamp both at the same time!
Assembled the note card:
- burnished the fold in the card base with a Bone Folder
- That’s it!!!
S
Here are today’s colors:
You can click on each one to see all the products that come in that color!
S
Here’s what I used:
Click on these images for more details and to purchase.
Click “Supply List” for a clickable and printable list!
S
S
Here are some helpful links:
S
Thanks for stopping by today, and Sweet Stamping!
Jan 10, 2020 | Cards, Gallery, New Products |
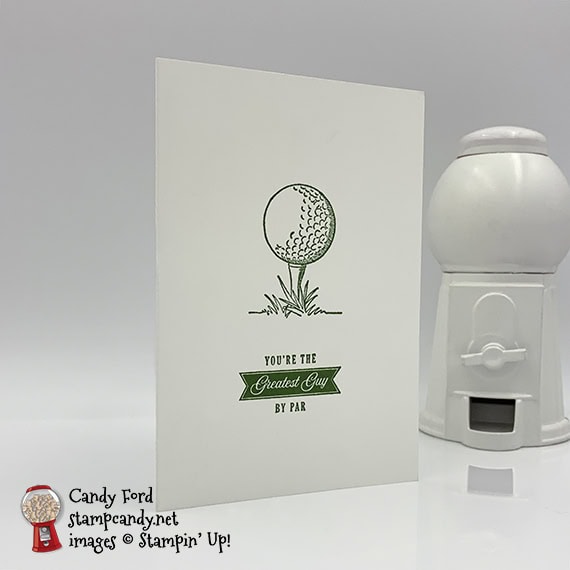
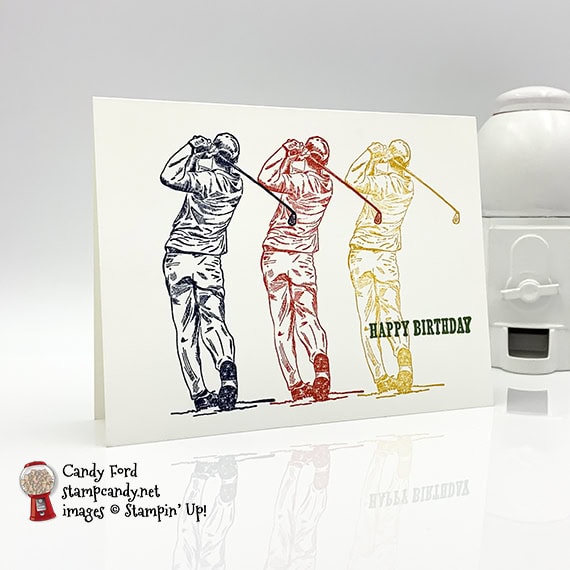
Today’s project is a card I made for my recent demonstration at OnStage. I used the Clubhouse stamp set from the Country Club Suite. It’s so easy, especially if you have a Stamparatus! It’s just stamps, ink, and paper. That’s it! You can stamp the 3 golfers in the same color, or clean the stamp after each one and apply a different color of ink. Super simple! #simplestamping
clubhouse clubhouse clubhouse clubhouse
Here’s what I made:
I stamped the golfer three times without reinking each time, so they got lighter as I went:
I used different colors of ink on this card:
 S
S
Here’s what I did:
Cut and scored with my paper trimmer:
- Whisper White Thick card stock (CS) cut to 5-1/2″ x 8-1/2″, then scored in half at 4-1/4″
Stamped with the Clubhouse stamp set:
- golfer in Night of Navy ink, stamped three times without reinking between stamps
- NOTE: on the Stamparatus, I moved the paper 1-1/4″ between stamps
- sentiment in Poppy Parade ink
- For the other card, I stamped the golfer in Night of Navy, Poppy Parade, and Crushed Curry, and the sentiment in Garden Green
Assembled the card:
- burnished the fold in the card base with a Bone Folder
- That’s it!
S
Here are today’s colors:
You can click on each one to see all the products that come in that color!
S
Here’s what I used:
Click on these images for more details and to purchase.
Click “Supply List” to download a clickable and printable list!
S
Here are some helpful links:
S
Thanks for stopping by today, and Sweet Stamping!
Jun 25, 2019 | Bags, Blog Hop, Cards, Gallery, Gift Wrap, Gifts, Kits, Paper Pumpkin, Tags |
 S
S
It’s time for the June 2019 Paper Pumpkin Possibilities Blog Hop! This month’s kit is called A Little Smile, and it everything you need for 16 gift cards & envelopes and a box to keep them in. I’ve used the kit components to create a full size card and a tag for a treat bag.
Be sure to hop around to all the stops to see all the great alternate projects this group has made using this month’s A Little Smile kit!
S
Here’s what I made:
I’m out of town at a craft retreat and don’t have my lightbox, so my photos look different than usual.
The card: I tried to create a reflection of mountains and sky. It isn’t a perfect mirrored image, but I think you get the idea.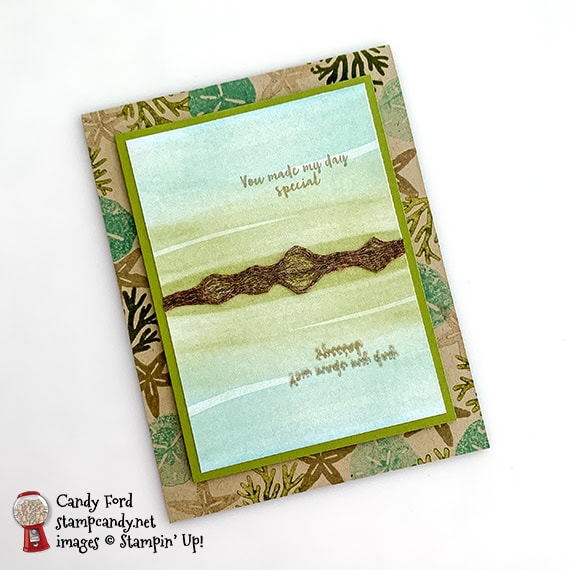
The treat bag: I made a simple tag that matched the card, and attached it using a copper library clip from the Tags & More Accessory Kit. 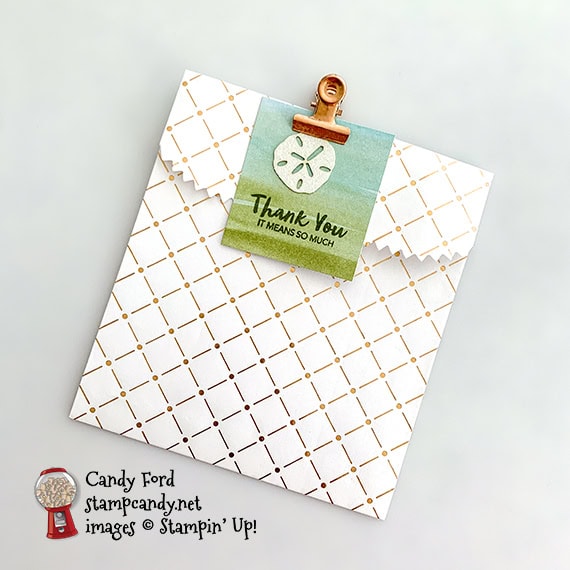
S
Here’s what I did:
Cut and scored with my paper trimmer:
- Crumb Cake card stock (CS) cut to 4-1/4″ x 11″, then scored in half at 5-1/2″
- Old Olive CS cut to 3-1/2″ x 4-3/4″
- two cards fronts from the kit cut to 3-1/4″ x 2-1/4″
- one card front from the kit cut to 2″ x 2-1/4″
- Whisper White CS cut to 4″ x 5-1/4″ for the inside of the card base
Stamped with the A Little Smile stamp set:
- sand dollars in Coastal Cabana ink onto the front of the card base, around the edges
- starfish in Crumb Cake ink onto the front of the card base, around the edges
- coral in Old Olive ink onto the front of the card base, around the edges
- sentiment in Crumb Cake ink onto one of the trimmed card fronts
- mirrored sentiment in Crumb Cake ink onto the other trimmed card front
- sentiment in Old Olive ink onto the smallest trimmed card front
Assembled the card:
- burnished the fold in the card base with a Bone Folder
- two larger trimmed card fronts glued onto the Old Olive CS layer
- Copper Trim pulled apart in a few places, then glued along the seam where the two trimmed card fronts meet
- Old Olive CS layer adhered onto the front of the card base using Stampin’ Dimensionals
- Whisper White CS glued onto the inside of the card base
Assembled the bag:
- sentiment glitter sand dollar die cut glued onto the smallest trimmed card front, above the sentiment
- top of a Copper Dotted Treat Bag folded over and burnished with a Bone Folder
- smallest trimmed card front clipped onto the top of the treat bag using a Copper Library Clip
S
Here’s the A Little Smile blog hop:
Click on the pumpkin to hop to the next blog, Debbie Green of Creative Chaos Crafting.

Here are today’s colors:
You can click on each one to see all the products that come in that color!
S
Here’s what I used, other than what came in the kit:
Click on these images for more details and to purchase.
Supply List <– Click here for a clickable and printable list!
S
Preorder the Sailing Home Online Class by June 26:
- Make 6 cards at home in your PJs!
- 2 each of 3 designs
- Features the Come Sail Away Suite on pages 144-146 of the 2019-2020 Annual Catalog
- I’ve done the trimming and scoring for you!
- You’ll receive all you need to make the cards, including the stamp set, dies, pre-cut/pre-scored/pre-embossed card kits, and 6 Whisper White envelopes.
- Full detailed instructions
- Limited spots available
Click on the image below for details and class options, or copy and paste this link into your browser:
S
Here are some helpful links:
S
Thanks for stopping by today, and Sweet Stamping!

Mar 29, 2019 | Cards, Gallery, Occasions, Techniques |
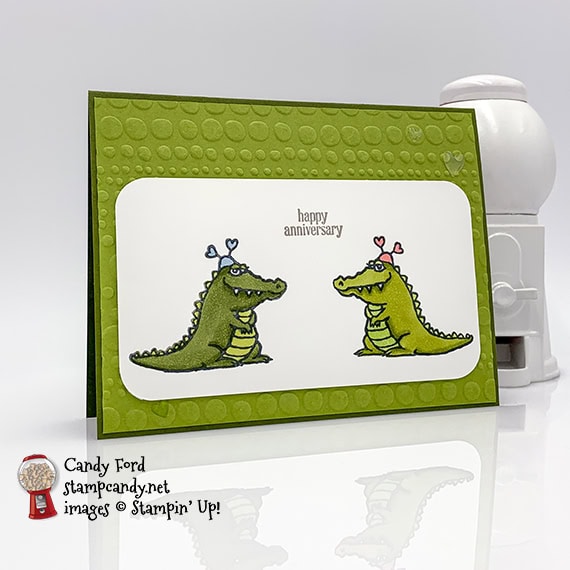
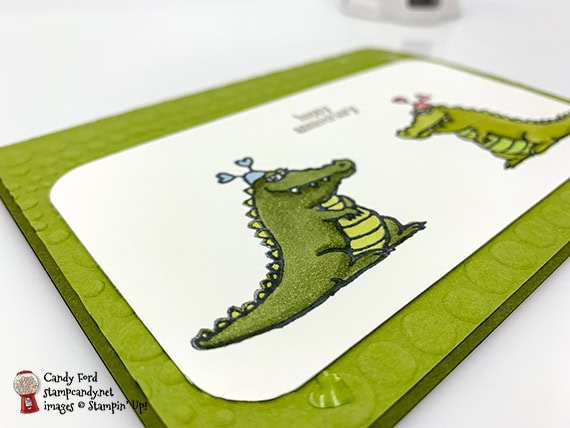
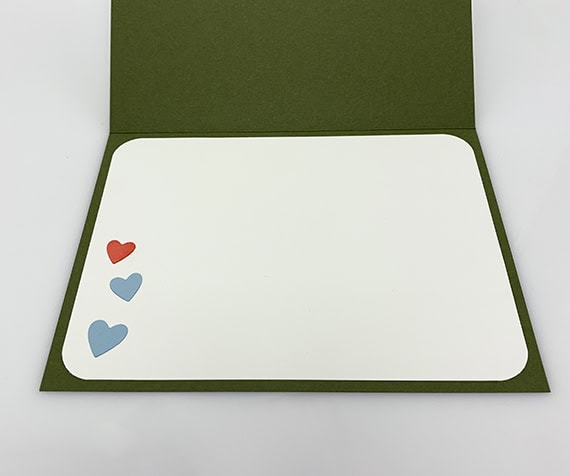
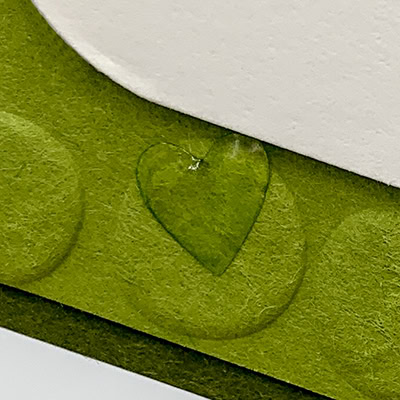
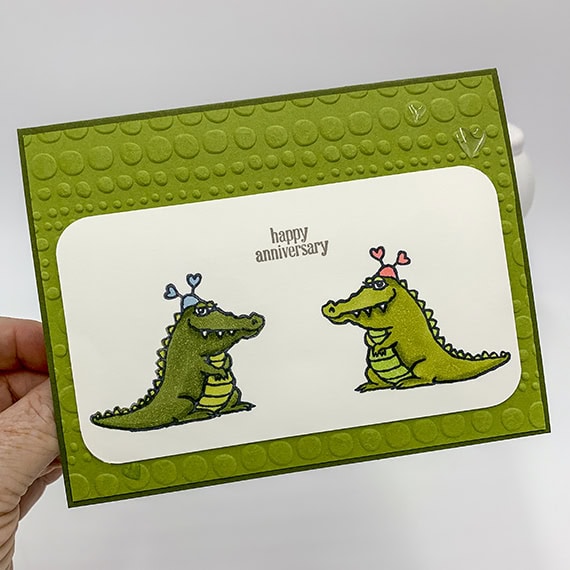
There are lots of ways to stamp an mirror image, but by far the easiest I’ve found is with the Stampatarus and a Silicone Craft Sheet. I used this technique on today’s Happy Anniversary card I made with the Hey Love stamp set, Dot to Dot embossing folder, and Detailed Trio Punch. the hearts on the inside of the card were cut using the multi-heart die in the Be Mine Stitched Framelits Dies, but I had them left over from previous projects – I actually have a little container full of them.
I’ve used the Dot to Dot embossing folder a lot lately. It’s so cute and whimsical and can represent so many things, like bubbles, stones, etc. I thought it lent a reptilian air to this card, appropriate for the cute little lovey-dovey crocodiles.
S
Here’s what I made:
S
Here’s what I did:
Cut and scored with my Stampin’ Trimmer:
- Mossy Meadow card stock (CS) cut to 5-1/2″ x 8-1/2″, then scored in half at 4-1/4″
- Old Olive CS layer cut to 5-3/8″ x 4-1/8″
- Whisper White CS layer cut to 5″ x 2-3/4″
- Whisper White CS cut to 5-1/4″ x 4″ for the inside of the card base
Stamped with the Hey Love stamp set and the Stamparatus:
- crocodile in Memento black ink onto the Whisper White CS layer on the right side
- crocodile in Memento black ink onto the Silicone Craft Sheet ( I stamped it a couple times to make sure there was plenty of ink on the craft sheet.)
- flipped over the layer horizontally, laid it very carefully over the craft sheet, then stamped again. You don’t need to ink up the stamp for this one. This is to press the CS onto the image on the craft sheet and transfer the ink onto the underside of the paper.
- NOTE: When you line up the stamp for the first stamp, be sure it doesn’t cross the center of the layer, or the images may overlap.
- sentiment in Gray Granite ink between the two crocs
Cut using the Detailed Trio Punch:
- rounded all four corners of the Whisper White CS layer and of the Whisper White CS for the inside of the card
Colored using Stampin’ Blends Markers:
- left crocodile in Mossy Meadow, Old Olive , and Balmy Blue
- right crocodile in Old Olive, Granny Apple Green, and Flirty Flamingo
Die cut using the Be Mine Stitched Framelits:
- tiny hearts, using the multi-heart die, from scraps of Flirty Flamingo and Balmy Blue CS
- NOTE: I had the hears left over from previous projects. The pink one was actually Petal Pink, so I colored it with the light Flirty Flamingo marker.
Ran through the Big Shot in the Dot to Dot embossing folder:
Assembled the card:
- burnished the fold in the card base with a Bone Folder
- Old Olive CS layer glued onto the front of the card base
- croc layer glued onto the Old Olive CS layer
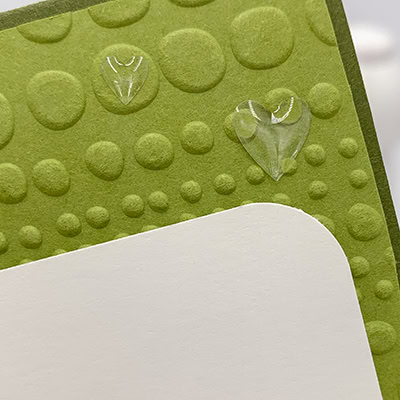
- 3 Heart Epoxy Droplets applied onto the Old Olive CS layer
- 3 hearts glued onto the Whisper White CS for the inside
- Whisper White CS glued onto the inside of the card base
S
Here are today’s colors:
You can click on each one to see all the products that come in that color!
S
Here’s what I used:
Click on these images for more details and to purchase.
S
Preorder the Wonderful Moments Wedding Card Online Class by April 3!
Need some cards for all those weddings and showers that inevitably come up this time of year? This class is for you.
- Make 6 gorgeous cards at home in your PJs!
- 2 each of 3 designs
- perfect for weddings and showers
- I do all the cutting and embossing. You just stamp, color, and assemble!
- Limited spots available
Click on the image below for details and color options (Lovely Lipstick was used in the sneak peeks below, though it looks darker in the photos.)

S
Here are some helpful links:
S
Thanks for stopping by today, and Sweet Stamping!
Feb 21, 2019 | Blog Hop, Gallery, Scrapbooking |

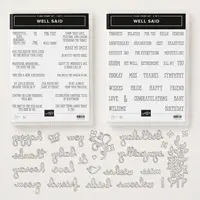
This month the Scrapbooking Global Blog Hop has a theme challenge: Love & Marriage. My page definitely has a love theme, but not necessarily marriage, unless you count the note I made above the photo of how long hubby and I have been together. I used the Nature’s Poem Designer Series Paper because I thought the colors went well with the photo (I must say it looks better in person than in my pics below.) The Well Said Bundle, plus a couple more die sets, Rectangle Stitched Framelits and Swirly Scribbles Thinlits, added the accents. I always try to add some handwriting to my scrapbook pages, and I used a Tranquil Tide Stampin’ Write Marker for this one.

Here’s what I made:
The photo is of the two of us on a sailboat in Cabo this past January. I thought the colors of the paper and the wavy die cuts were perfect for the background. And the stitched edges of the sentiment reminded me of the sails. This was a great outing. We saw some humpback whales and they kept jumping out of the water and crashing back down, like they were putting on a show for us, for almost an hour. They made me completely forget that my back was killing me, although it was already much better at this point, after relaxing by the pool for several days prior. Pain shmain. Life is good.
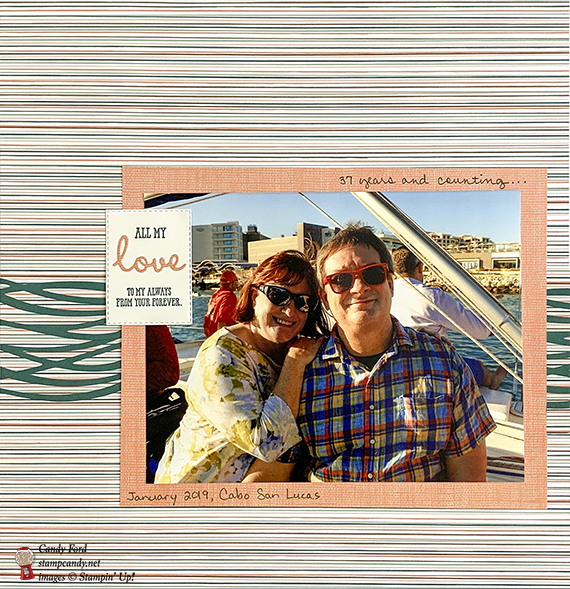
See what’s missing? I took this shot before I added the other Tranquil Tide die cut on the right side of the photo: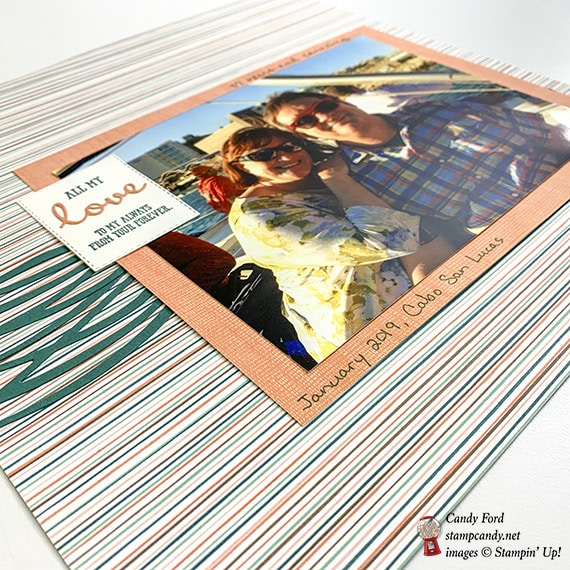
Here’s what I did:
Stamped with the Well Said stamp set:
- sentiment in Tranquid Tide ink onto a scrap of Whisper White card stock (CS)
- the Stamparatus made it easy to line up the two stamps
Die cut using the Rectangle Stitched Framelits:
- sentiment – The die was longer than I needed so I cut the sentiment close to the top, then again close to the bottom.
Die cut using the Well Written dies:
- “love” from a scrap of the DSP
Die cut using the Swirly Scribbles Thinlits:
- a scrap of Tranquil Tide card stock using the long wavy die, two pieces
Cut with my Stampin’ Trimmer:
- Nature’s Poem Designer Series Paper (DSP) full 12″ x 12″ for the background
- DSP cut to 9″ x 7″, to mat the 8″ x 6″ photo
- one of the wavy die cuts vertically in half (2 pieces about 3″ wide each)
- the other wavy die cut vertically to two pieces about 3/4″ wide each
Assembled the page:
- photo adhered onto DSP mat using Snail adhesive
- Tranquil Tide wavy die cuts glued onto the DSP background page, the 3″ pieces on the left and the 3/4″ pieces on the right.
- DSP mat adhered onto the DSP background using Snail, covering the ends of the wavy die cuts
- die cut word glued onto the die cut sentiment
- sentiment adhered over other layers using Snail
- notes handwritten onto the DSP mat using a Tranquil Tide marker

Here’s the hop:
You can click on the next button to hop to the next stop, or you can use the list below to navigate the hop.

Here are today’s colors:
You can click on each one to see all the products that come in that color!
Here’s what I used:
Click on these images for more details and to purchase.
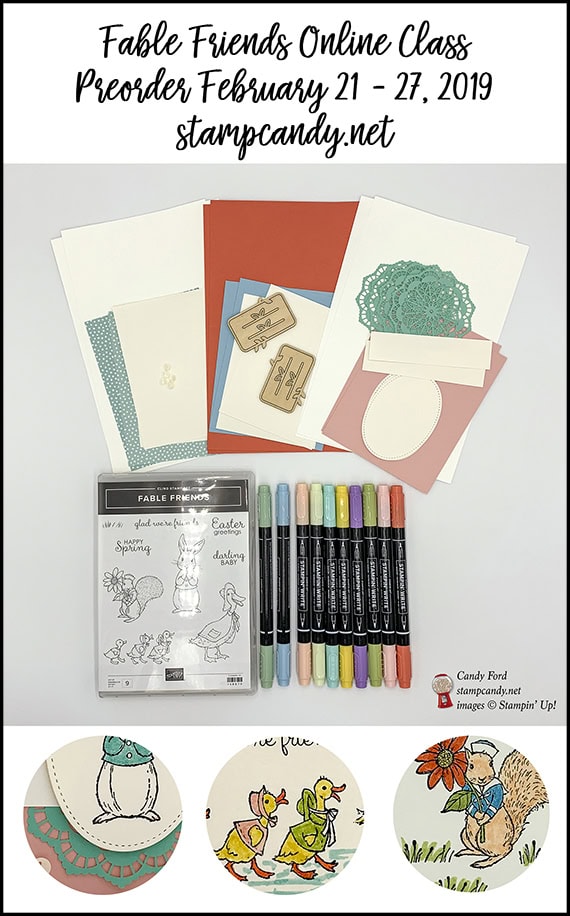
Preorder the Fable Friends Online Class by February 27!
Click on the image for details:
Here’s more cool stuff to check out:
Thanks for stopping by today, and Sweet Stamping!