Oct 7, 2020 | Cards, Christmas, Gallery, Holiday |
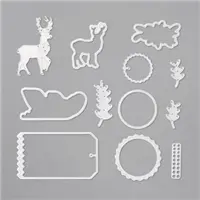
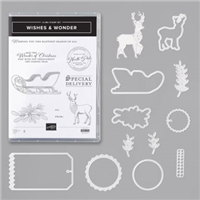
Today’s card has a sentiment that is from the animated short film “How the Grinch Stole Christmas!” It was one of my favorite holiday shows growing up. For today’s card, I’ve paired this sentiment with reindeer instead of a Grinch. I cut the gold deer using the North Pole Wonder Dies, which is available in a bundle (save 10%) with the Wishes & Wonder stamp set. The deer in the background are on the ‘Tis the Season Designer Series Paper, which is one of the papers on sale this month at 15% off!
If you are reading this in email, some photos may appear blurry, or may not appear at all. Please click here to see the post on my blog.
S Christmas Means Christmas Means Christmas Means Christmas Means
Here are the missing measurements from yesterday’s post:
Oops! I accidentally posted yesterday’s project missing the paper measurements. So sorry. The post has been fixed. But here are the missing measurements:
- Whisper White Thick CS cut to 2-1/4″ x 1″
- ‘Tis the Season Designer Series Paper cut to 1-1/2″ x 2″ (2 pieces)
S
Here’s what I made:


S
Here’s what I did:
Cut and scored with my paper trimmer:
- Garden Green card stock (CS) cut to 5-1/2″ x 8-1/2″, then scored in half at 4-1/4″
- Real Red CS layer cut to 5-1/4″ x 4″
- ‘Tis the Season Designer Series Paper (DSP) layer cut to 5″ x 3″
- Whisper White CS cut to 5-1/4″ x 4″ for the inside of the card base
Stamped with the Christmas Means More stamp set:
- sentiment in Garden Green ink onto a scrap of Whisper White CS
- holly in Garden Green and Real Red ink onto the Whisper White CS for the inside (I colored the stamp using Stampin’ Write Markers, then stamped the image)
Cut using the Layering Circles Dies:
- sentiment using the largest plain circle die
- a scrap of a Gold Foil Sheet using the largest scalloped circle die
Cut using the North Pole Wonder Dies:
- reindeer from a scrap of a Gold Foil Sheet
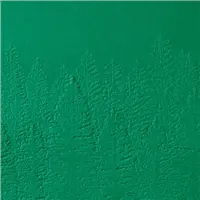
Embossed using the Evergreen Forest 3D Embossing Folder:
Colored using a Stampin’ Write Marker:
- filled in the holly berries for the inside in Real Red
Assembled the card:
- burnished the fold in the card base with a Bone Folder
- embossed Real Red CS layer glued onto the front of the card base
- DSP layer glued onto the Real Red CS layer
- sentiment adhered onto the gold scalloped circle using Stampin’ Seal +
- gold scalloped circle adhered onto the card front using Stampin’ Dimensionals
- reindeer adhered onto the DSP layer using Stampin’ Dimensionals (I cut skinny strips for the legs.)
- reindeer antlers and head glued where it overlapped the sentiment
- 3 Red Rhinestones applied onto the card front using my Take Your Pick tool: 2 on the holly berries on the sentiment and 1 onto the gold reindeer’s nose
- Whisper White CS glued onto the inside of the card base
S
Here are today’s colors:
You can click on each one to see all the products that come in that color!
S
Here’s what I used:
Click on these images for more details and to purchase. If you are reading this post in email, the product images may not show up. Please click here to see the post on my blog.
Supply List. <— Click for a clickable and printable list of the products!
Designer Series Paper Sale!
Click the image to see the sale:
S
Here are some helpful links:
S
Thanks for stopping by today, and Sweet Stamping!
Oct 6, 2020 | Cards, Christmas, Gallery, Holiday |
I used the Christmas Means More stamp set, Sounds of the Season Dies, and ‘Tis the Season Designer Series Paper to make today’s Christmas card. I love this sentiment, which is a line from the movie “It’s a Wonderful Life.” But it’s a line that comes before that one that always makes me cry. It goes something like this, “A toast to my big brother George, the richest man in town.” I love to it watch every year around the holidays.
What is your favorite holiday movie?
If you are reading this in email, some photos may appear blurry, or may not appear at all. Please click here to see the post on my blog.
S means more means more means more means more
Here’s what I made:


S
Here’s what I did:
Cut and scored with my paper trimmer:
- Real Red card stock (CS) cut to 4-1/4″ x 11″, then scored in half at 5-1/2″
- ‘Tis the Season Designer Series Paper (DSP) layer cut to 4-1/8″ x 5-3/8″
- Garden Green CS layer cut to 4-1/8″ x 2-1/2″
- Whisper White CS cut to 4″ x 5-1/4″ for the inside of the card base
- DSP strip cut to 4″ x 5/8″
Stamped with the Christmas Means More stamp set:
- sentiment in Tuxedo Black memento ink onto the Garden Green CS layer
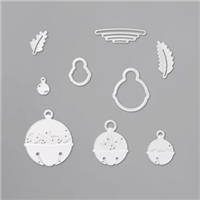
Cut using the Sound of the Seasons Dies:
- largest bell from a scrap of a Silver Foil Sheet
Assembled the card:
- burnished the fold in the card base with a Bone Folder
- DSP layer glued onto the front of the card base
- Garden Green CS layer glued onto the DSP layer
- twine tied in a bow around the top loop of the bell and secured in place with a Mini Glue Dot
- bell adhered onto the Garden Green CS layer using Mini Stampin’ Dimensionals
- DSP strip glued onto the Whisper White CS, near the bottom
- Whisper White CS glued onto the inside of the card base
S
Here are today’s colors:
You can click on each one to see all the products that come in that color!
S
Here’s what I used:
Click on these images for more details and to purchase. If you are reading this post in email, the product images may not show up. Please click here to see the post on my blog.
Supply List. <— Click for a clickable and printable list of the products!
Designer Series Paper Sale!
Click the image to see the sale:
S
Here are some helpful links:
S
Thanks for stopping by today, and Sweet Stamping!
Oct 2, 2020 | Cards, Fun Folds, Gallery |
I used some products from the Playing With Patterns Suite Collection along with the Happiest of Birthdays stamp set and the Stitched So Sweetly Dies to create today’s fun pop up birthday card.
If you are reading this in email, some photos may appear blurry, or may not appear at all. Please click here to see the post on my blog.
S playing with patterns playing with patterns playing with patterns playing with patterns
Here’s what I made:
The Night of Navy card stock and ink look almost black in these photos, but they’re much bluer in person.

S
Here’s what I did:
Cut and scored with my paper trimmer:
- Night of Navy card stock (CS) cut to 5-1/2″ x 8-1/2″, then scored in half at 4-1/4″
- Purple Posy CS layer cut to 3-3/4″ x 5″
- Playing With Patterns Designer Series Paper (DSP) layer cut to 3-1/2″ x 4-3/4″
- Whisper White Thick CS cut to 8-1/4″ x 5-1/4″ for the insert, then cut and scored according to the diagram below
- first DSP pattern for the inside cut to 3″ x 1-1/2″, and scored in half at 1-1/2″
- second DSP pattern for the inside cut to 2-1/2″ x 1-1/4″, and scored in half at 1-1/4″
- third DSP pattern for the inside cut to 2″ x 1″, and scored in half at 1″
- Click on the diagram to see it larger:

Stamped with the Happiest of Birthdays stamp set:
- outer sentiment in Night of Navy ink onto a scrap of Whisper White Thick CS
Stamped with the Pattern Play stamp set:
- inner sentiment in Night of Navy ink onto the Whisper White Thick insert
- stars in Coastal Cabana and Highland Heather inks onto the Whisper White Thick insert (I stamped off the Highland Heather to make it lighter.)
Cut using the Stitched So Sweetly Dies:
Assembled the card:
- burnished the fold in the card base with a Bone Folder
- burnished all the folds in the insert with a Bone Folder
- die cut sentiment glued onto the DSP layer
- DSP layer glued onto the Purple Posy CS layer
- Purple Posy CS layer glued onto the front of the card base
- remaining DSP pieces glued onto their corresponding “boxes” on the insert
- ribbon adhered onto each side of each box as shown, using Stampin’ Seal +, and wrapped around to the back
- ribbon tied into a small bow and adhered above the top box using a Mini Glue Dot
- insert glued onto the inside of the card base, applying glue everywhere except to the boxes that will fold out
S
Here are today’s main colors:
You can click on each one to see all the products that come in that color!
S
Here’s what I used:
Click on these images for more details and to purchase. If you are reading this post in email, the product images may not show up. Please click here to see the post on my blog.
Supply List. <— Click for a clickable and printable list of the products!
S
Designer Series Paper Sale!
S
Here are some helpful links:
S
Thanks for stopping by today, and Sweet Stamping!
Sep 29, 2020 | Blog Hop, Cards, Gallery, Paper Pumpkin |

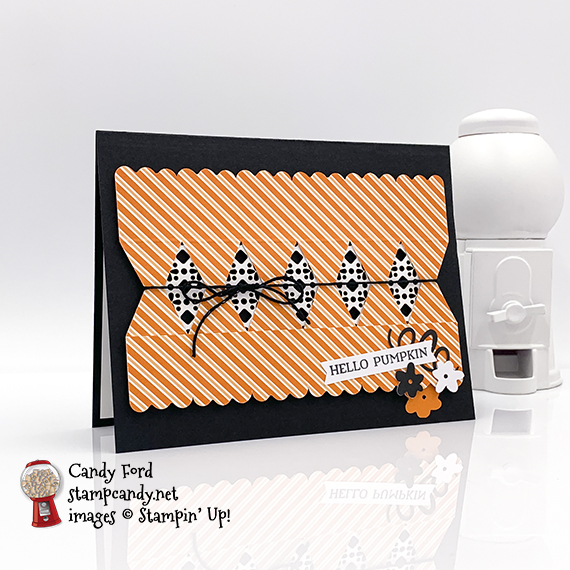
Welcome to the September 2020 PPP Blog Hop! This month’s kit is called Hello Pumpkin and it makes really cute treat holders that look like miniature versions of the crackers we have at Christmas, you know, the ones with the paper crown and little toys in them. I used the pieces to make a card and a candle wrap. https://stampcandy.net/paper-pumpkin/september-2020-ppp-blog-hop-hello-pumpkin https://bit.ly/3cyFfXj
If you are reading this in email, some photos may appear blurry, or may not appear at all. Please click here to see the post on my blog.
S Hello Pumpkin Hello Pumpkin Hello Pumpkin Hello Pumpkin
Here’s what I made:

 S
S
Here’s what I did:
Cut and scored with my paper trimmer:
- Basic Black card stock (CS) cut to 5-1/2″ x 8-1/2″, then scored in half at 4-1/4″
- Whisper White CS cut to 5-1/4″ x 4″ for the inside of the card base
- 2 treat holders from the kit cut in half, to create 4 pieces
- 1 hourglass shape cut from the end of 3 of the treat holder halves

- 1/2″ cut from the straight (non-scalloped) side of the fourth treat holder half (Do not fold this smaller one on any of the score lines. Leave it flat.)

- the scalloped edge of a third treat holder cut away, cutting along the first score line

Stamped with the Hello Pumpkin stamp set:
- sentiment in Tuxedo Black Memento ink onto the white side of a banner from the kit
- small flowers in Pumpkin Pie ink onto the Whisper White CS for the inside
Assembled the card:
- burnished the fold in the card base with a Bone Folder
- the strip glued onto the bottom of the fourth treat holder half, lining it up with the score line as shown:

- 5 of the lacy die cuts from the kit (doesn’t matter which color because I used the white side) adhered onto the back of the treat holder half (with scallops at the top and bottom) so they show through the diamond shaped holes
- black twine tied around the whole piece and tied in a bow, then the whole piece adhered onto the front of the card base using Black Stampin’ Dimensionals
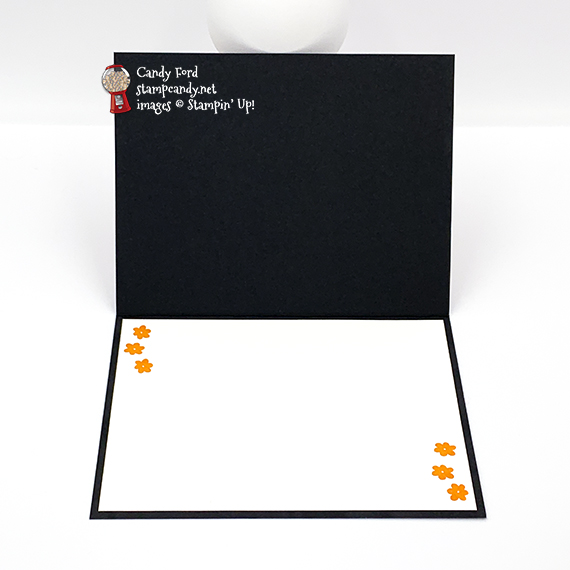
- sentiment, 3 flowers, and a curly piece glued onto the bottom right of the card front
- Whisper White CS glued onto the inside of the card base

Assembled the candle wrap:
- all score lines of the 3 remaining treat holder halves burnished with a Bone Folder
- the three pieces glued together, gluing the small tabs at one end onto the inside of the opposite end of the next one, until you have a ring
- As luck would have it, three of these fit perfectly around the Bath & Body Works candle I had. You may need to adjust for your candle.

- slipped the wrap over the candle, with the scalloped edge at the top, and pushed it down to make the cut out areas stick out
- black twine tied around the wrap and tied in a bow

he dS
Here’s the September 2020 PPP Blog Hop:
Click the pumpkin to hop to the next stop, Deb Naylor of The Flying Stamper:

S
Here are today’s colors:
You can click on each one to see all the products that come in that color!
S
Here’s what I used:
Click on these images for more details and to purchase. If you are reading this post in email, the product images may not show up. Please click here to see the post on my blog.
Supply List. <— Click for a clickable and printable list of the products!
S
Two ways to save in September!
Buy the new Stampin’ Cut & Emboss Machine (standard size) from me by September 30 and I will give you a Magnetic Cutting Plate FREE! You’ll save almost $30! CLICK HERE for more details and to order.

S
Buy the Starter Kit and receive even more! It’s already the best deal: $99 for $125 in product of your choice plus Free shipping! In September you will also receive the Queen Anne’s Lace stamp set, the So Much Love stamp set, Rhinestone Basic Jewels, and 16 precut card kits! Wow! This is the perfect time to work on your wish list of Stampin’ Up! products! CLICK HERE for more details.

S
Here are some helpful links:
S
Thanks for stopping by today, and Sweet Stamping!

Sep 29, 2020 | Cards, Gallery |
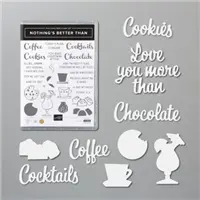
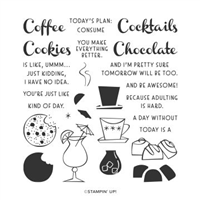
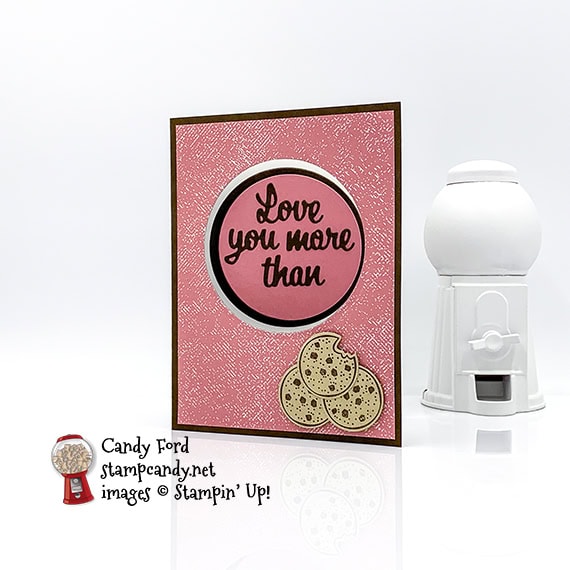
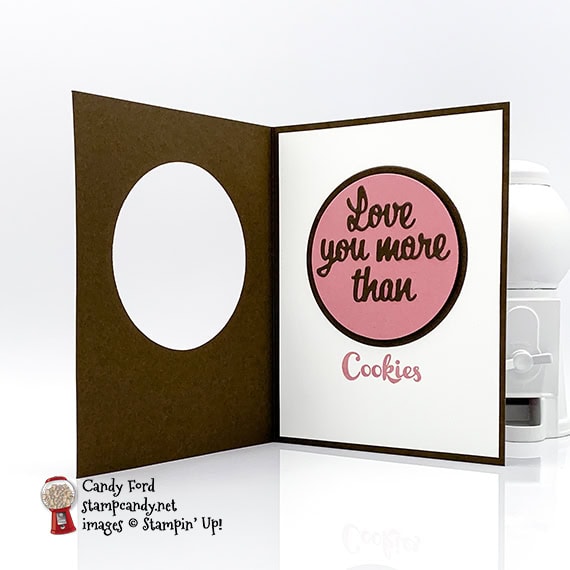
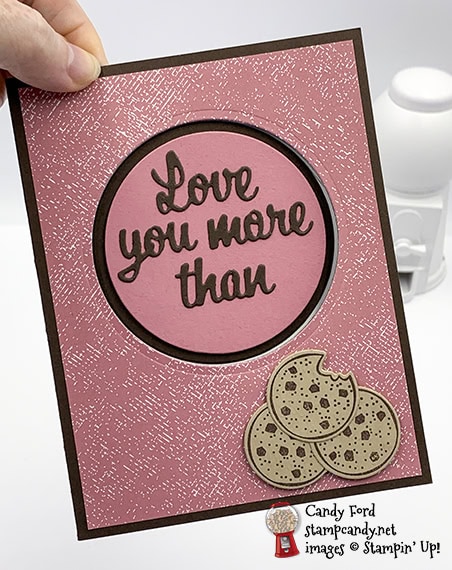
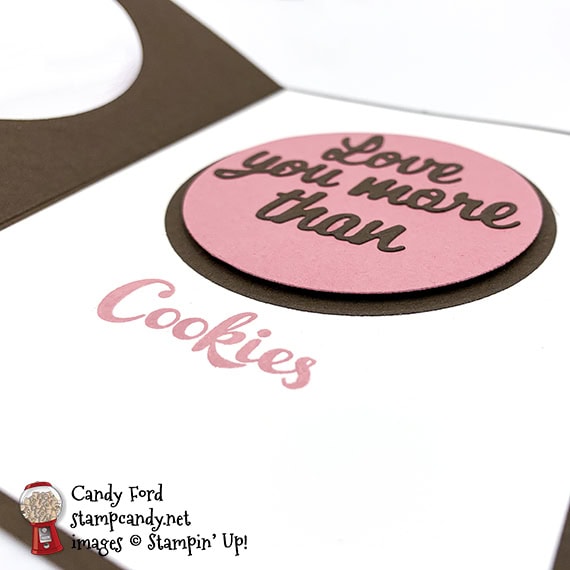
Love you more than cookies! And that’s a lot! Today I’m sharing a card I made with the Nothing’s Better Than Bundle (Nothing’s Better Than stamp set & Love You More Than Dies.) It has a window in the front and the inner sentiment pokes up through it when the card is closed.
If you are reading this in email, some photos may appear blurry, or may not appear at all. Please click here to see the post on my blog.
S more than more than more than more than
Here’s what I made:
S
Here’s what I did:
Cut and scored with my paper trimmer:
- Early Espresso card stock (CS) cut to 4-1/4″ x 11″, then scored in half at 5-1/2″
- Rococo Rose Designer Series Paper (DSP) layer cut to 4″ x 5-1/4″
- Whisper White CS cut to 4″ x 5-1/4″ for the inside of the card base
Stamped with the Nothing’s Better Than stamp set:
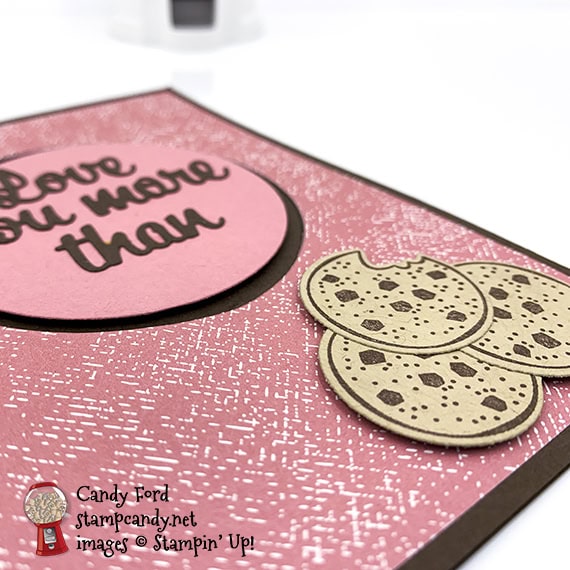
- 3 cookies in Early Espresso ink onto a scrap of Crumb Cake CS
- the word “Cookies” in Rococo Rose ink onto the Whisper White CS for the inside (I did this after the die cut circles were adhered to the inside.)
Cut using the Love You More Than Dies:
- the 3 stamped cookies
- words “Love you more than” from a scrap of Early Espresso CS
Cut using the Layering Circle Dies:
- lined up the DSP layer on the front of the card base, without adhering, and cut a large circle from both layers
- slightly smaller circle cut from a scrap of Rococo Rose CS
Assembled the card:
- burnished the fold in the card base with a Bone Folder
- DSP layer glued onto the front of the card base, lining up the die cut holes
- 3 cookies glued together then adhered onto the DSP layer using Stampin’ Dimensionals
- Whisper White CS glued onto the inside of the card base
- Early Espresso CS circle that was cut from the card base glued onto the Whisper White CS, lined up with the hole in the card front when it’s closed
- die cut words glued onto the Rococo Rose die cut circle
- Rococo Rose die cut circle adhered onto the Early Espresso circle using Stampin’ Dimensionalsx
S
Here are today’s colors:
You can click on each one to see all the products that come in that color!
S
Here’s what I used:
Click on these images for more details and to purchase. If you are reading this post in email, the product images may not show up. Please click here to see the post on my blog.
Supply List. <— Click for a clickable and printable list of the products!
Two ways to save in September! Ends tomorrow!!!
Buy the Starter Kit and receive even more! It’s already the best deal: $99 for $125 in product of your choice plus Free shipping! In September you will also receive the Queen Anne’s Lace stamp set, the So Much Love stamp set, Rhinestone Basic Jewels, and 16 precut card kits! Wow! This is the perfect time to work on your wish list of Stampin’ Up! products! CLICK HERE for more details.
Buy the new Stampin’ Cut & Emboss Machine (standard size) from me by September 30 and I will give you a Magnetic Cutting Plate FREE! You’ll save almost $30! CLICK HERE for more details and to order.
S
Here are some helpful links:
S
Thanks for stopping by today, and Sweet Stamping!
Sep 25, 2020 | Autumn, Cards, Fun Folds, Gallery, Halloween |
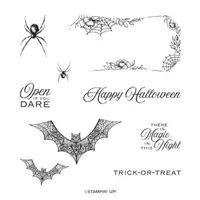
A couple days ago I hosted a Mystery Stamping Party on Facebook. Today I’m sharing the card that we made. I used products from the Magic in This Night Suite Collection to make this spooky by elegant fancy gate fold card.
If you’re interested in participating in my Mystery Stamping Parties, you can join the Facebook group HERE. I usually host one per month. They are FREE!
If you are reading this in email, some photos may appear blurry, or may not appear at all. Please click here to see the post on my blog.
S mystery mystery mystery mystery
Today is the Deadline to sign up for my World Card Making Day Bingo Party!

- Join me for an afternoon of Bingo, cardmaking, prizes, and fun!
- October 3 at 2:00 pm ET
- See details and register HERE by September 25
- $25 (extra Bingo cards available for $5 each)
- Tell your friends! The more people who register, the bigger the prizes!
S
Here’s my Mystery card:


S
Here’s what I did:
Cut and scored with my paper trimmer:
- Basic Gray card stock (CS) cut to 11″ x 4-1/4″, then scored at 2-3/4″ and 8-1/4″
- Basic Black CS layers cut to 5-1/4″ x 1-7/8″ (2 pieces)
- Magic in This Night Designer Series Paper (DSP) layers cut to 5″ x 1-5/8″ (2 pieces)
- Basic Black CS cut to 3-1/8″ x 3/4″ for the sentiment
- Smoky Slate cut to 5-1/4″ x 4″ for the inside of the card base
Stamped with the Hallows Night Magic stamp set:
- sentiment in Versamark ink onto the small piece of Basic Black CS, then heat embossed in white
- bat in Tuxedo Black Memento ink onto the Smoky Slate CS
Assembled the card:
- burnished the folds in the card base with a Bone Folder
- DSP layer glued onto the Basic Black CS layers
- Basic Black CS layers glued onto the front of the card base: left half of the bottom one glued onto the left side of the card base, and the right half of the top one glued onto the right side of the card base
- sentiment glued onto the bottom DSP layer
- 3 Rhinestone Basic Jewels applied around the sentiment using the pointy end of my Take Your Pick tool
- Smoky Slate CS glued onto the inside of the card base
S
Here are today’s colors:
You can click on each one to see all the products that come in that color!
S
Here’s what I used:
Click on these images for more details and to purchase. If you are reading this post in email, the product images may not show up. Please click here to see the post on my blog.
Supply List. <— Click for a clickable and printable list of the products!
S
Two ways to save in September!
Buy the Starter Kit and receive even more! It’s already the best deal: $99 for $125 in product of your choice plus Free shipping! In September you will also receive the Queen Anne’s Lace stamp set, the So Much Love stamp set, Rhinestone Basic Jewels, and 16 precut card kits! Wow! This is the perfect time to work on your wish list of Stampin’ Up! products! CLICK HERE for more details.
Buy the new Stampin’ Cut & Emboss Machine (standard size) from me by September 30 and I will give you a Magnetic Cutting Plate FREE! You’ll save almost $30! CLICK HERE for more details and to order.
S
Here are some helpful links:
S
Thanks for stopping by today, and Sweet Stamping!