Nov 17, 2021 | Bags, Blog Hop, Cards, Christmas, Gallery, Holiday |
 s
s
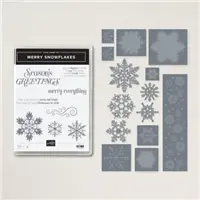
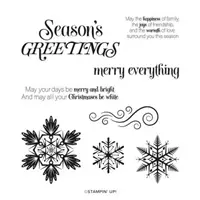
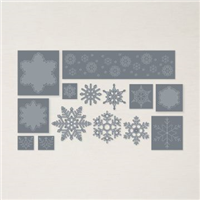
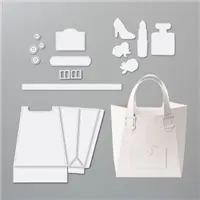
Welcome to the November 2021 IRBH! This month’s theme is Pretty Packages & Tags, and we’re featuring Christmas gift packaging. I used the All Dressed Up Dies with the Merry Snowflakes Bundle (Merry Snowflakes stamp set and Stitched Snowflakes Dies) and the Whimsy & Wonder designer Series paper to create a cute little bag that can hold any number of small gifts.
If you are reading this in email, some photos may appear blurry, or may not appear at all. Please click here to see the post on my blog.
S November 2021 IRBH November 2021 IRBH November 2021 IRBH November 2021 IRBH
Here’s what I made:
You can tuck in the sides for a slim look…
… or you can pull out the sides for a wider look.
The back:
Close up of the front:
S
Here’s what I did:
Stamped with the Merry Snowflakes stamp set:
- snowflake in Polished Pink ink onto the front of the purse
Cut using the All Dressed Up Dies:
- 2 pieces of Whimsy & Wonder Designer Series Paper (DSP) for the body of the purse (green)
- 1 piece of Whimsy & Wonder DSP using the same die (pink)
- 2 straps cut from the pink DSP
- latch cut from a scrap of Mint Macaron card stock (CS)
- 4 buckle pieces cut from a scrap of Silver Foil paper
Cut and scored with my paper trimmer:
- trimmed down the pink DSP purse half to about 1/4″ smaller on each side than the green purse
Cut using the Stitched Snowflakes Dies:
- snowflake out of the center of the pink DSP front piece
Assembled the bag:
- burnished the folds in the bag with a Bone Folder
- glued the tabs of each half of the purse onto the inside of the other half
- bottom tabs glued together to form the bottom of the purse
- pink straps threaded through silver buckles and glued onto the purse, one strap on the front and one on the back
- pink DSP glued onto the front of the purse so that stamped snowflake shows through the die cut hole
- Polished Pink gem applied onto the center of the snowflake using my Take Your Pick tool
- tiny magnets adhered onto the latch and the inside of the purse using Mini Glue Dots…

S
Here’s the November 2021 IRBH:
Thank you for hopping along with us. If you get stuck during the Blog Hop, please use this line-up as a guide:
- Brian King at Stamp with Brian
- Marilyn Jones at Stamp with MJ
- Ann Murray at Murray Stamps Ink
- Pam Morris at Tap Tap Stamp
- Jackie Beers at Blue Line Stamping
- Renae Novak at Blessed by Cards
- Candy Ford at Stamp Candy <——- YOU ARE HERE!
- Jan Dufour at Stamp Me Silly
- Sue Jackson at Just Peachy Stamping
- Robin Myren at Songbird Designs by Robin
- Lynn Kolcun at Avery’s Owlery
- Sheryl Sharp at Sharp Notes by Sheryl
- Lisa Graham at Lisa’s Little Ink Spots
s
Here are today’s colors:
You can click on each one to see all the products that come in that color!
S
Here’s what I used:
Click on these images for more details and to purchase. If you are reading this post in email, the product images may not show up. Please click here to see the post on my blog.
Sale: $28.00
Price: $35.00
Supply List. <— Click for a clickable and printable list of the products!
Here are some helpful links:
S
Thanks for stopping by today, and Sweet Stamping!
Nov 8, 2021 | Blog Hop, Cards, Christmas, Gallery, Holiday |

Welcome to the Candy Hearts Blog Hop for November! Today we are sharing Holiday projects. I used the Stockings Dies to make a hobby horse. I remember having one of these when I was very little. It had jingle bells on it. I usually played with it outside, because inside I had my rocking horse. It was on a metal stand with springs, so it didn’t rock so much as it bounced. I would get going so fast that it would scoot across the room. After reading my post, I hope you will hop to the next person on the list below. Be sure to hop around to see ALL the great projects the Candy Hearts have created for you!
If you are reading this in email, some photos may appear blurry, or may not appear at all. Please click here to see the post on my blog.
S November 2021 Candy Hearts Blog Hop November 2021 Candy Hearts Blog Hop November 2021 Candy Hearts Blog Hop November 2021 Candy Hearts Blog Hop
Here’s what I made:
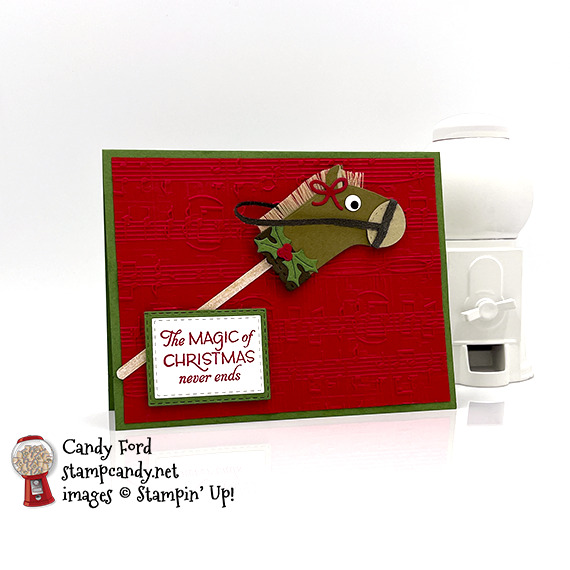
You can see the embossing better in this photo:

S
Here’s what I did:
Cut and scored with my paper trimmer:
- Garden Green card stock (CS) cut to 5-1/2″ x 8-1/2″, then scored in half at 4-1/4″
- Real Red CS layer cut to 5-1/4″ x 4″
- In Good Taste Designer Series Paper (DSP) cut to 1/8″ x 5″
- Basic White CS cut to 5-1/4″ x 4″ for the inside of the card base
- Note: All the other pieces of CS I used were left over scraps.
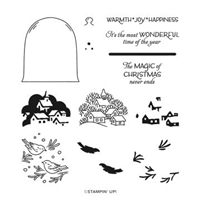
Stamped with the Classic Cloche stamp set:
- sentiment in Real Red ink onto Basic White Thick CS
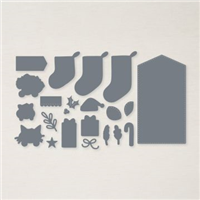
Cut using the Stockings Dies:
- stocking from Soft Suede CS
- toe from Crumb Cake CS
- topper from Early Espresso CS
- holly from Garden Green CS
- bow and berries from Real Red CSx
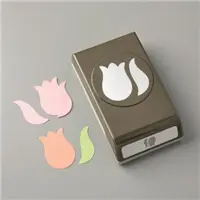
Cut using the Tulip Builder Punch:
- leaf cut from Soft Suede CS (2 pieces) and from Crumb Cake CS (1 piece)
Cut using the Stitched Rectangle Dies:
- sentiment
- Garden Green CS for the mat
Cut using circle punches:
- 1/4″ circle from a scrap of Basic White Thick CS
- 1/8″ circle from a scrap of Basic Black CS
- Note: The punches I used by Stampin’ Up! are retired, but you can find punches like them almost anywhere.
Embossed using the Merry Melody 3D Embossing Folder:
- the 5-1/4″ x 4″ Real Red CS layer
Mane:
- trimmed one edge from a piece of Gold 3/8″ Shimmer Ribbon using Paper Snips (I keep one pair just for ribbon)
- pulled out the long gold threads, leaving a fringe
Assembled the card:
- burnished the fold in the card base with a Bone Folder
- Real Red CS layer glued onto the front of the card base
- Basic White CS glued onto the inside of the card base
- topper glued onto the stocking
- fringe adhered onto the back of the stocking using Tear & Tape
- Crumb Cake leaf glued offset onto the front of a Soft Suede leaf, then trimmed using Paper Snips to create the ear shape
- second Soft Suede leaf trimmed using Paper Snips to create the ear shape
- 2-color ear glued onto the front of the horse head
- second ear glued onto the back of the head
- Basic Black circle glued onto the Basic White circle
- Basic White circle glued onto the head as the eye
- Early Espresso Faux Suede ribbon cut in half lengthwise using Paper Snips
- Faux Suede ribbon strip glued onto the stocking toe piece
- toe piece glued onto the head as the nose
- one end of another Faux Suede ribbon strip glued under the first strip
- the other end of the ribbon strip adhered onto the back of the head
- holly and berries glued onto the stocking topper
- bow glued onto the head in front of the ear
- DSP strip glued onto the Real Red CS layer
- head adhered over the DSP strip using Black Stampin’ Dimensionals
- sentiment glued onto the Garden Green CS mat
- Garden Green CS mat adhered onto the Real Red CS layer using Black Stampin’ Dimensionals
S
Here’s the November 2021 Candy Hearts Blog Hop:
Thank you for hopping with the Candy Hearts today! Be sure to hop around to all the stops. You do not want to miss any of the creativity in this talented group of stampers!
s
Here are today’s colors:
You can click on each one to see all the products that come in that color!
S
Here’s what I used:
Click on these images for more details and to purchase. If you are reading this post in email, the product images may not show up. Please click here to see the post on my blog.
Supply List. <— Click for a clickable and printable list of the products!
Here are some helpful links:
S
Thanks for stopping by today, and Sweet Stamping!
Aug 18, 2021 | Autumn, Blog Hop, Cards, Christmas, Gallery, Holiday, Sale-A-Bration |

Welcome to the August 2021 IRBH! This month’s projects feature leaves and trees, so you are likely to find lots of inspiration for Autumn. We are excited to share our creations with you today! After you read my post, I hope you’ll hop over to the next person on the list further down this post.
If you are reading this in email, some photos may appear blurry, or may not appear at all. Please click here to see the post on my blog.
S August 2021 IRBH August 2021 IRBH August 2021 IRBH August 2021 IRBH
Here’s what I made:
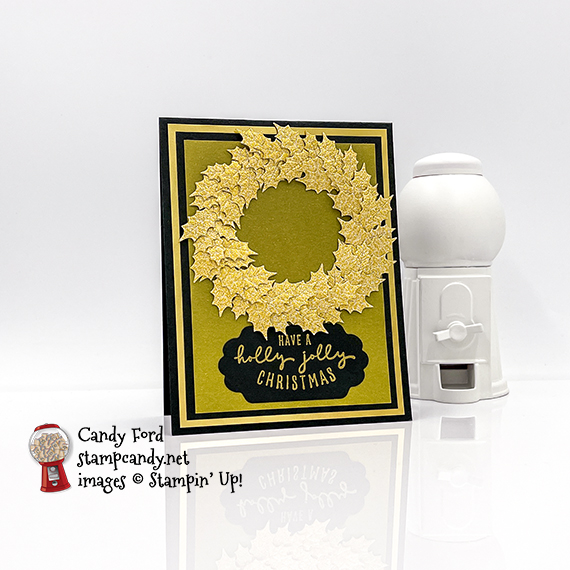
The color is a little off in this photo, but you can see some of the sparkle and shine of the Gold Shimmer Vellum and the heat embossed sentiment:

S
Here’s what I did:
Cut and scored with my paper trimmer:
- Basic Black card stock (CS) cut to 4-1/4″ x 11″, then scored in half at 5-1/2″
- Gold Foil Sheet layer cut to 4″ x 5-1/4″
- Basic Black CS layer cut to 3-3/4″ x 5″
- Gold Shimmer Vellum layer cut to 3-1/2″ x 4-3/4″
- Very Vanilla CS cut to 4″ x 5-1/4″ for the inside of the card base
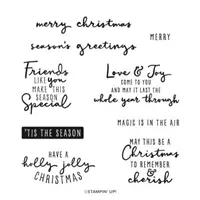
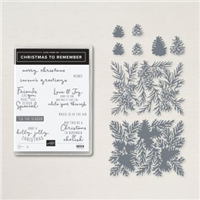
Stamped with the Christmas to Remember stamp set:
- sentiment in Versamark ink onto a scrap of Basic Black CS, then heat embossed in gold
Cut using the Seasonal Labels Dies:
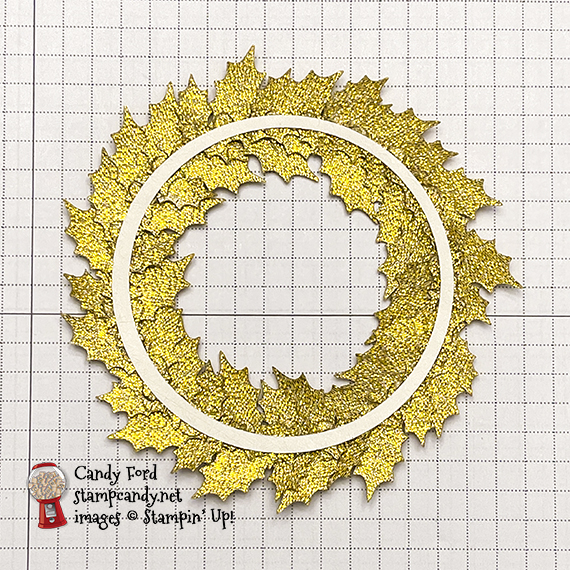
Cut using the Layering Circles Dies:
- a ring from a scrap of Gold Foil Sheet using the two largest plain circle dies
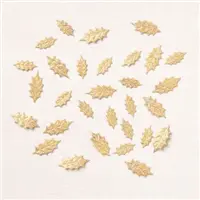
Made the Wreath:
- adhered Gold Holly Leaves, one by one, around the gold foil die cut circle, using Mini Glue Dots
- I used a little over 2 packs of the leaves. You could use fewer by making the circle base smaller and making the wreath thinner.
- The silicone craft sheet is the perfect surface to create the wreath. I happened to have the backing sheet from some labels on my table, and I would’ve had to stand up to get the craft sheet, so of course I used the label backing. But the craft sheet would’ve been better.

- back of the wreath
Assembled the card:
- burnished the fold in the card base with a Bone Folder
- Gold Foil layer adhered onto the front of the card base using Stampin’ Seal+
- Basic Black CS layer adhered onto the Gold Foil layer using Stampin’ Seal+
- sentiment adhered onto the Gold Shimmer Vellum layer using Stampin’ Seal+
- wreath adhered onto the Gold Shimmer Vellum layer using Mini Glue Dots
- Gold Shimmer Vellum layer adhered onto the Basic Black CS layer using Stampin’ Seal+ under the wreath and sentiment, so it wouldn’t show through
- Very Vanilla CS glued onto the inside of the card base
S
Here’s the August 2021 IRBH:
Thank you for hopping along with us. If you get stuck during the Blog Hop, please use this line-up as a guide:
- Brian King at Stamp with Brian
- Lynn Kolcun at Avery’s Owlery
- Renae Novak at Blessed by Cards
- Jackie Beers at Blue Line Stamping
- Sue Jackson at Just Peachy Stamping
- Robin Myren at Songbird Designs by Robin
- Sheryl Abernathy at Elegant Sentiments
- Lisa Graham at Lisa’s Little Ink Spots
- Sheryl Sharp at Sharp Notes by Sheryl
- Joanne Brown at The Inky Dragon
- Candy Ford at Stamp Candy <— YOU ARE HERE!
s
Here are today’s colors:
You can click on each one to see all the products that come in that color!
S
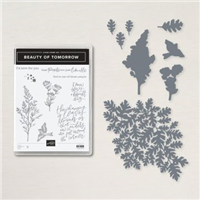
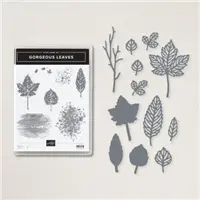
Here’s what I used:
Click on these images for more details and to purchase. If you are reading this post in email, the product images may not show up. Please click here to see the post on my blog.
Supply List. <— Click for a clickable and printable list of the products!
S
It’s Sale-a-bration time…AGAIN!

Stampin’ Up! is having the second Sale-a-bration of this year! Now through 30 September 2021, you can choose a free Level 1 Sale-a-bration item for every $50 on an order, and a free Level 2 item for every $100 on an order (before tax & shipping.)
When you join my Candy Hearts team of stampers during Sale-a-bration, you get to choose $125 in product and FREE shipping and pay only $99 (plus tax) PLUS you get to choose one of a dozen new bundles! for free! You can click on each bundle below to see the details of each in my online store.
S
Here are some helpful links:
S
Thanks for stopping by today, and Sweet Stamping!

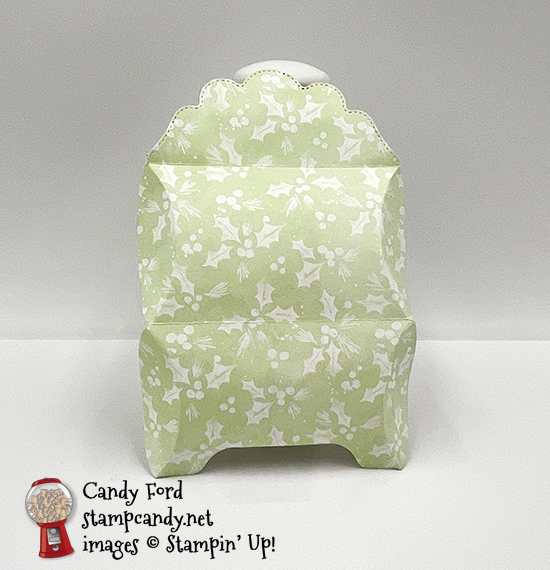
Aug 16, 2021 | Blog Hop, Boxes, Christmas, Gallery, Gift Wrap, Gifts, Holiday, Tags, Treat Holders |

Welcome to the August 2021 CHBH! This month we are featuring 3D projects. I’m sharing a treat box I made using some new holiday products from the July-December 2021 Mini Catalog: the Pretty Pillowbox Dies and Painted Christmas Designer Series Paper.
After reading my post, be sure to hop around to all the stops to see the wonderful 3D projects this creative group has in store for you.
If you are reading this in email, some photos may appear blurry, or may not appear at all. Please click here to see the post on my blog.
S August 2021 CHBH August 2021 CHBH August 2021 CHBH August 2021 CHBH
Here’s what I made:
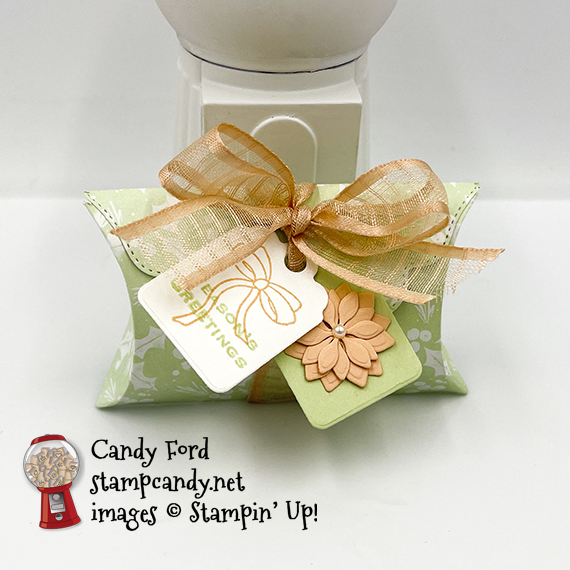
You can fold in the ends as I’ve done here, or you can glue the ends shut, since it opens at the flap.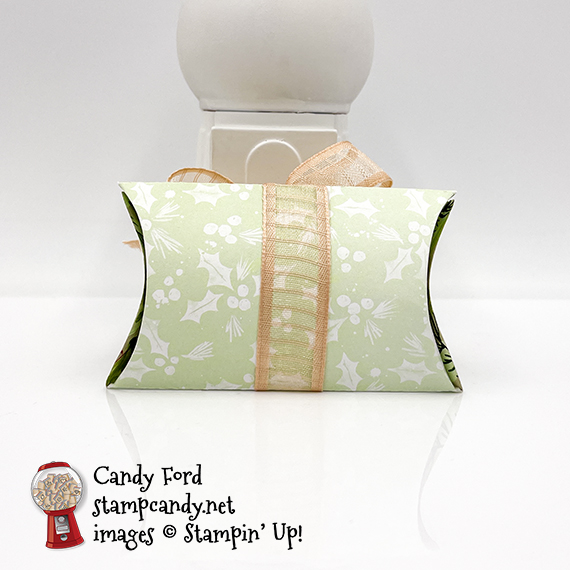
A couple of Burt’s Bees lip balms fit inside for a small and functional gift.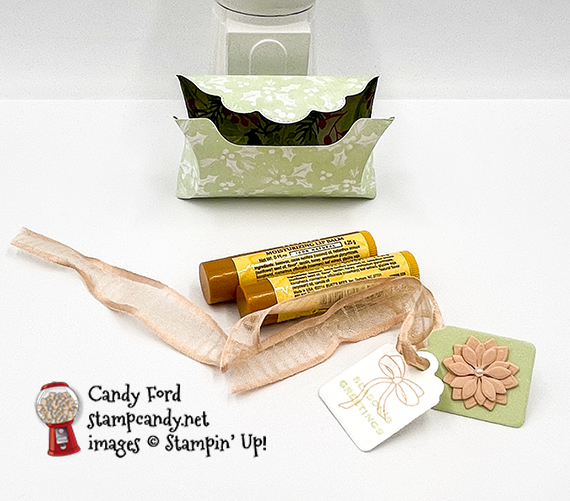


S
Here’s what I did:
Cut using the Pretty Pillowbox Dies:
- box from a 4-1/2″ x 6″ piece of Painted Christmas DSP
- 2 large and 2 small flower pieces from a scrap of Petal Pink CS
- tags from scraps of Soft Sea Foam and Basic White Thick CS
Stamped with the Tidings & Trimmings stamp set:
- bow in Petal Pink ink onto the Basic White Thick CS tag
- sentiment in Soft Sea Foam ink over the bow
Assembled the box:
- burnished the folds in the box with a Bone Folder
- 4 flower pieces stacked and glued together, then glued onto the Soft Sea Foam CS tag
- pearl applied onto the center of the flower using a Take Your Pick tool
- box folded closed, and 2 lip balms put inside
- tags strung onto ribbon, then the ribbon tied around the box and tied in a bow
S
Here’s the August 2021 CHBH:
Thank you for hopping with the Hearts today! Be sure to hop around to all the stops. You do not want to miss any of the creativity in this talented group of stampers! If you get lost, use the list below.
s
Here are today’s colors:
You can click on each one to see all the products that come in that color!
S
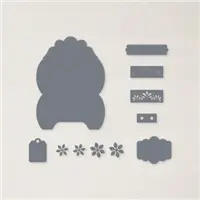
Here’s what I used:
Click on these images for more details and to purchase. If you are reading this post in email, the product images may not show up. Please click here to see the post on my blog.
Supply List. <— Click for a clickable and printable list of the products!
S
It’s Sale-a-bration time…AGAIN!
Stampin’ Up! is having the second Sale-a-bration of this year! Through 30 September 2021, you can choose a free Level 1 Sale-a-bration item for every $50 on an order, and a free Level 2 item for every $100 on an order (before tax & shipping.)
When you join my Candy Hearts team of stampers during Sale-a-bration, you get to choose $125 in product and FREE shipping and pay only $99 (plus tax) PLUS you get to choose one of a dozen new bundles! for free! You can click on each bundle below to see all the details in my online store.
S
Here are some helpful links:
S
Thanks for stopping by today, and Sweet Stamping!
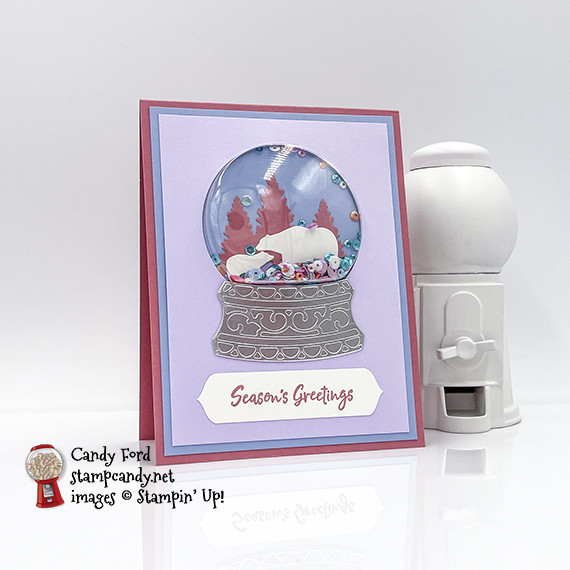
Dec 25, 2020 | Cards, Christmas, Gallery, Holiday |
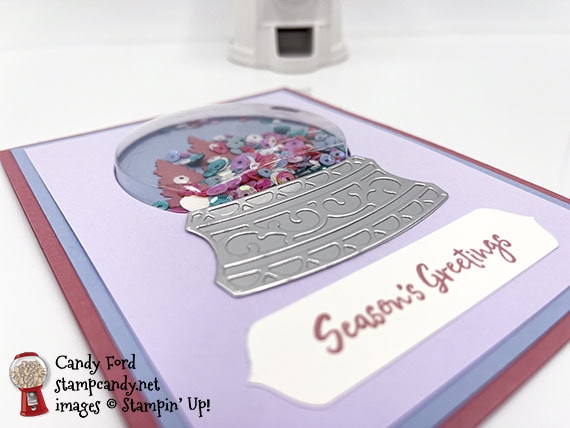
Happy Christmas Day! I hope you have a wonderful day full of cheer and love. Today I’m sharing the fourth and last card we made during my December Stamp Club. We used the In the Pines stamp set, the Snow Globe Scenes Dies, and the new Treasured Tags Pick a Punch to create this sweet pastel card. The Snow Globe Shaker Domes make shaker cards nice and easy. They do add thickness, so this card should be delivered by hand or mailed in a sturdy box.
If you are reading this in email, some photos may appear blurry, or may not appear at all. Please click here to see the post on my blog.
S Snow Globe Snow Globe Snow Globe Snow Globe
Here’s what I made:
S
Here’s what I did:
Cut and scored with my paper trimmer:
- Rococo Rose card stock (CS) cut to 4-1/4″ x 11″, then scored in half at 5-1/2″
- Seaside Spray CS layer cut to 4″ x 5-1/4″
- Purple Posy CS layer cut to 3-3/4″ x 5″
- Whisper White CS cut to 3/4″ x 3-1/2″
- Whisper White CS cut to 4″ x 5-1/4″ for the inside of the card base
Stamped with the In the Pines stamp set:
- sentiment in Rococo Rose ink onto the Whisper White CS strip
Cut using the Treasured Tags Pick a Punch:
- both ends of the sentiment strip
Cut using the Snow Globe Scenes Dies:
- snowglobe shape from the Purple Posy CS layer
- trees from a scrap of Rococo Rose CS
- bears from a scrap of Whisper White CS
- solid base and decorative base from a scrap of a Silver Foil Sheet
Assembled the card:
- burnished the fold in the card base with a Bone Folder
- Purple Posy CS layer lined up on the Seaside Spray CS layer (do not adhere yet) and used a pencil to trace around the hole onto the Seaside Spray CS layer
- set aside the Purple Posy CS layer
- trees glued onto the Seaside Spray CS layer at the bottom of the penciled area
- bears glued over the trees
- adhesive backing removed from the front of the snow globe shaker dome, laid the Purple Posy CS layer over the dome, lining up the dome with the hole, and press to adhered the layer to the front side of the dome
- sequins put in the center of the penciled area
- adhesive backing removed from the back of the snow globe shaker dome, and liquid glue applied to the back of the Purple Posy CS layer, then the layer adhered onto the Seaside Spray CS layer, being careful to keep the sequins under the dome
- pressed around the dome to make sure it adheres well to the layer underneath (I didn’t do this well enough and you can see how some sequins are stuck around the perimeter.)
- ornate foil base glued onto the solid base
- solid base glued onto the Purple Posy CS layer, up against the bottom of the dome
- sentiment strip glued onto the Purple Posy CS layer
- Seaside Spray CS layer glued onto the front of the card base
- Whisper White CS glued onto the inside of the card base
S
Here are today’s colors:
You can click on each one to see all the products that come in that color!
S
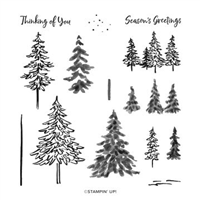
Here’s what I used:
Click on these images for more details and to purchase. If you are reading this post in email, the product images may not show up. Please click here to see the post on my blog.
Supply List. <— Click for a clickable and printable list of the products!
S
Here’s some news: Whisper White is going away
The facility that manufactures Whisper White paper is closing due to COVID-19. But don’t fret. The new Basic White products are in the works! No other colors are affected. The following items are now available while supplies last with an order limit of 2 per item per order.
- Cardstock, Whisper White 12″ x 12″ (124302)
- Cards & Envelopes, Assorted Memories & More (149710)
- Cards & Envelopes, Whisper White Note (131527)
- Envelopes, Whisper White 3″ x 3″ (145829)
- Cardstock, Whisper White 8-1/2″ x 11″ (100730)
- Cardstock, Whisper White 8-1/2″ x 11″ Thick (140272)
- Envelopes, Whisper White Medium (107301)
S
Here’s the Year-End Closeout
All retiring items will be available through 4 January 2021, or while supplies last. Click on the image to shop now!

S
Here’s the Curvy Celebrations offering:
Click the image to see it in my online store. The Curvy Christmas stamp set and Classic Christmas Designer Series Paper are available only through January 4, or while supplies last!

S
Here’s the new catalog:
Click the image below to request your January-June 2021 Mini Catalog AND Sale-a-bration Brochure:


S
Here are some helpful links:
S
Thanks for stopping by today, and Sweet Stamping!
Dec 24, 2020 | Christmas, Food, Gallery, Holiday |
It’s Christmas Eve! It’s also National Eggnog Day, so today I’m sharing my favorite eggnog recipe. I’ve pieced it together from several different recipes I’ve come across over the years, until it’s just how I like it. This makes about a quart. I usually double everything to make about a half gallon. If more eggnog lovers are going to be around, I’ll make several double batches. Of course, it doesn’t matter how much there is, I’ll always find a way to finish it off!
Many people like to add liquor to their eggnog, whether it’s bourbon, rum, brandy, or something else. Feel free to add whatever you want. I prefer to leave it out, to get the full taste of the eggs and cream and vanilla. It’s almost like drinking egg custard, which is one of my favorite desserts.
This is not a low calorie recipe. It isn’t supposed to be. I believe in enjoying all the yummy things in moderation, instead of changing them to something less yummy just so I can have more. Eggnog is only a once a year thing for me, so I fully enjoy it at Christmas, then don’t have it again until the next year.
I hope you enjoy this yummy beverage whether you’re trimming the tree, lighting the Kinara, reciting Gita verses, reminiscing about this year’s Menorah, or doing something else to celebrate this time of year.
If you are reading this in email, some photos may appear blurry, or may not appear at all. Please click here to see the post on my blog.
S Eggnog Eggnog Eggnog Eggnog
Candy’s Eggnog Recipe:
Eggnog Ingredients:
- 6 egg yolks (*See note below about the egg whites.)
- 1/2 cup sugar (you can use up to 3/4 cup if you want it sweeter)
- 2 cups whole milk
- 2 whole cloves
- 1 cup heavy cream
- 1-1/2 teaspoon vanilla extract
- whole nutmeg
You’ll also need:
- mixer – a stand mixer makes this super easy because you have both hands free, but any mixer will do. Or a whisk if you’re into that sort of thing.
- heavy saucepan
- whisk
- wooden spoon
- wire mesh strainer – not too fine or the thick eggnog will take forever to go through
- nutmeg grater, or any fine grater
- food thermometer, optional
Eggnog Directions:
- Beat the egg yolks until they are lighter in color.
- Slowly beat in the sugar.
- Heat milk and cloves on medium heat until steamy hot, but not quite boiling.
- Temper the eggs: Slowly whisk about half of the warm milk into the eggs, to warm them up without curdling them.
- Add the egg mixture back to the pan with the rest of the milk, and add the cream.
- Heat on medium heat, stirring constantly with a wooden spoon, until it reaches 160 degrees F or until it coats the back of the spoon.
- Strain and let cool about an hour.
- Stir in the vanilla and chill thoroughly.
- Grate fresh nutmeg onto each serving.
* Some people like to whip the unused egg whites into a meringue, then fold it into the cold eggnog. This is not my preference, for multiple reasons. One reason is that I just prefer it without. Another reason is that I don’t want raw egg in my nog. The yolks in this recipe are cooked just enough so there’s nothing to upset my tummy. (I can’t drink eggnog from a store for that reason.)
Tip: To serve this in a punch bowl, pour some eggnog into a mold/molds and freeze it. That will keep it cold without watering it down with ice. Last year I set up an eggnog bar, with a big punchbowl of nog, a nutmeg grater, and an assortment of liquors. Bailey’s Irish Cream, Godiva Chocolate Liqueur, Amaretto, and Kahlua were popular add-ins, along with the regulars listed above.
S
And now back to stamping news:
Reserve your Designer Series Paper Swatch Books and Product Shares
I’ll be selling Swatch Books of all the new papers in the Jan-Jun 2021 Mini Catalog, paper shares, ribbon shares, and embellishment shares. You’ll save $25 when you get it all! Click on the image to get all the details and reserve yours today:

S
Whisper White is going away
The facility that manufactures Whisper White paper is closing due to COVID-19. But don’t fret. The new Basic White products are in the works! No other colors are affected. The following items are available only while supplies last, with an order limit of 2 per item per order.
- Cardstock, Whisper White 12″ x 12″ (124302)
- Cards & Envelopes, Assorted Memories & More (149710)
- Cards & Envelopes, Whisper White Note (131527)
- Envelopes, Whisper White 3″ x 3″ (145829)
- Cardstock, Whisper White 8-1/2″ x 11″ (100730)
- Cardstock, Whisper White 8-1/2″ x 11″ Thick (140272)
- Envelopes, Whisper White Medium (107301)
S
Here’s the Year-End Closeout
All retiring items will be available through 4 January 2021, or while supplies last. Click on the image to shop now!
S
Here’s the Curvy Celebrations offering:
Click the image to see it in my online store. The Curvy Christmas stamp set and Classic Christmas Designer Series Paper are available only through January 4, or while supplies last! The Quite Curvy stamp set and Curvy Dies will be in the Jan-Jun 2021 Mini Catalog.
S
Here’s the new catalog:
Click the image below to request your January-June 2021 Mini Catalog AND Sale-a-bration Brochure:
S
Here are some helpful links:
S
Thanks for stopping by today, and Sweet Stamping!