Jul 15, 2020 | Blog Hop, Cards, Christmas, Gallery, Holiday |

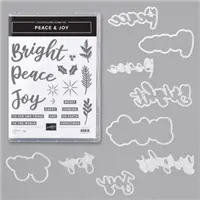
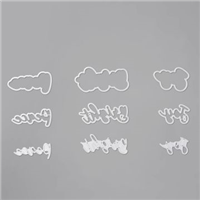
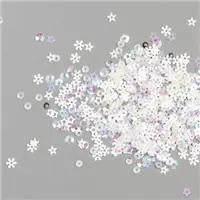
Welcome to the July 2020 Inking Royalty Blog Hop! This month’s theme is Christmas in July! This is the perfect time to start planning your holiday cards and invitations, especially since so many folks are staying home and have more time. My card for today can be used for Christmas or really any winter occasion. I used the Peace & Joy Bundle (Peace & Joy stamp set and Joy Dies,) Trimming the Town Designer Series Paper, and Snowflake Sequins from the upcoming August – December 2020 Mini Catalog, which goes live August 4. If you’d like to order from the new Mini Catalog now instead of having to wait, click here to join.
After reading my post today, I hope you’ll hop around to all the stops. There’s so much talent in this group and you don’t want to miss any of it!
If you are reading this in email, some photos may appear blurry, or may not appear at all. Please click here to see the post on my blog.
S July 2020 Inking Royalty Blog Hop July 2020 Inking Royalty Blog Hop
Here are the Sneak Peek products I used:


S
Here’s what I made:


S
Here’s what I did:
Cut and scored with my paper trimmer:
- Misty Moonlight card stock (CS) cut to 5-1/2″ x 8-1/2″, then scored in half at 4-1/4″
- Whisper White CS layer cut to 5-3/8″ x 4-1/8″
- Trimming the Town Designer Series Paper (DSP) layer cut to 5-1/4″ x 4″ (stripes)
- Whisper White CS layer cut to 4-1/8″ x 2-7/8″
- DSP layer cut to 4″ x 2-3/4″ (snow)
- Whisper White CS cut to 5-1/4″ x 4″ for the inside of the card base
Stamped with the Peace & Joy stamp set:
- HAPPY and AND in Misty Moonlight ink onto a scrap of Whisper White Thick CS
- BRIGHT in Misty Moonlight ink, stamped off three times, onto the 5-1/4″ x 4″ Whisper White CS (I wanted it to be very light, like a watermark, so I could write over it.)
Cut using the Joy Dies:
- BRIGHT using all three dies, the middle one from a scrap of Misty Moonlight CS, and the other two from a scrap of Whisper White Thick CS
Cut using Paper Snips:
Assembled the card:
- burnished the fold in the card base with a Bone Folder
- the 3 BRIGHT die cuts glued together
- BRIGHT die cut stack, HAPPY, and AND adhered onto the smaller DSP layer using Stampin’ Dimensionals
- smaller DSP layer glued onto the smaller Whisper White CS layer
- smaller Whisper White CS layer glued onto the larger DSP layer
- larger DSP layer glued onto the larger Whisper White CS layer
- larger Whisper White CS layer glued onto the front of the card base
- 3 Snowflake Sequins glued onto the larger DSP layer
- 5-1/4″ x 4″ Whisper White CS glued onto the inside of the card base
What I would do differently:
I’m not yet used to having the new adhesives, so I forget to use them. For today’s card, I would have put the card stock for the top two BRIGHT die cuts on an Adhesive Sheet before die cutting. Then I could have just peeled off the backing to adhere the pieces, instead of gluing them. I would have put the card stock for the bottom (largest) BRIGHT die cut on a Foam Adhesive Sheet before die cutting. I also would have put the stamped sentiments on a Foam Adhesive Sheet before cutting them with Paper Snips.
S
Here’s the July 2020 Inking Royalty Blog Hop:
Thank you for hopping along with us. Please hop to the next stop, Linda Krueger at The Stamp Coach. If you get stuck during the Blog Hop, please use this line-up as a guide:
- Brian King at Stamp with Brian
- Ann Murray at Murray Stamps Ink
- Janneke Dijkstra-de Jong at Happy Stampin
- Candy Ford at Stamp Candy <—————YOU ARE HERE!
- Linda Krueger at The Stamp Coach
- Shawn de Oliveira at Shawn Stamps
- Pam Morris at Tap Tap Stamp
- Julie DiMatteo at The Paper Pixie
- Joanne Brown at Stamping with JoJo
- Lynn Kolcun at Avery’s Owlery
- Jennifer Spiller at Westside Paper Creations
- Jackie Beers at Blue Line Stamping
- Sheryl Sharp at Sharp Notes by Sheryl
- Sue Jackson at Just Peachy Stamping
S
Bonus Days are here!
Click the image below to shop now and earn Bonus Days coupons to use next month!

Here are today’s colors:
You can click on each one to see all the products that come in that color!
I S
Here’s what I used:
Click on the images for more details and to purchase. If you are reading this post in email, the product images may not show up. Please click here to see the post on my blog.
These products will be available to purchase 4 August 2020:
- Peace & Joy Bundle (155167) $45.00
- Peace & Joy stamp set (153430) $18.00
- Joy Dies (153530) $32.00
- Trimming the Town Designer Series Paper (153491) $11.50
- Snowflake Sequins (150443) $6.00
Supply List. <— Click for a clickable and printable list of the products!
S
S
Here are some helpful links:
S
Thanks for stopping by today, and Sweet Stamping!

Jan 8, 2020 | Cards, Christmas, Gallery, New Products |
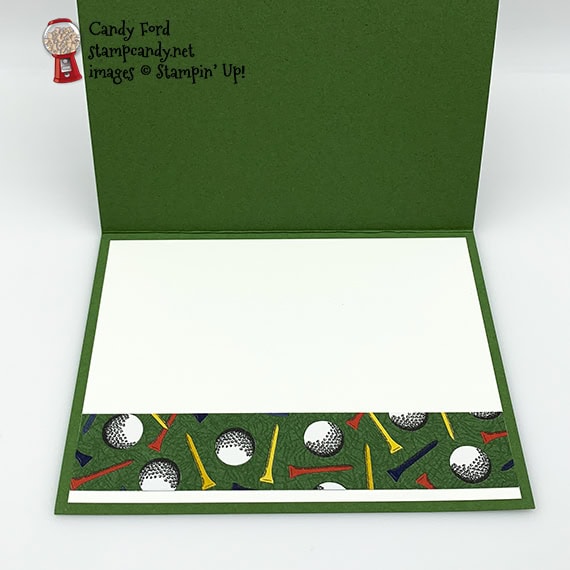
I realize Christmas is over, but it’s never too soon to plan for the next one. And what would be more perfect for a golfer than ornaments made from golf balls? Today I’m sharing a Christmas card I made using the Golf Club Dies, Winter Woods stamp set, and In the Woods Dies. Of course, in the woods is where you want your golf ball never to go. (Sorry, I couldn’t resist the pun.)
Here’s what I made:

 S
S
Here’s what I did:
Cut and scored with my paper trimmer:
- Garden Green card stock (CS) cut to 5-1/2″ x 8-1/2″, then scored in half at 4-1/4″
- Country Club Designer Series Paper (DSP) layer cut to 5″ x 3-3/4″
- Whisper White CS 5-1/4″ x 4″ for the inside of the card base
- DSP strip cut to 5-1/4″ x 1″
Stamped with the Winter Woods stamp set:
- sentiment in Garden Green ink onto a scrap of Whisper White CS
Cut using the Golf Club Dies:
- large golf balls from a scrap of Whisper White Thick CS
- mini golf balls from a scrap of Poppy Parade CS
- golf tees from a scrap of Golf Foil Sheet
Cut using In the Woods Dies:
- small trees from a scrap of Garden Green CS that I used as pine sprigs
Cut using the Layering Ovals Dies:
Assembled the card:
- burnished the fold in the card base with a Bone Folder
- DSP layer glued onto the front of the card base
- sentiment glued onto the DSP layer
- Whisper White golf balls glued onto the DSP layer, then the gold tees glued at the tops of the balls
- Garden Green sprigs glued along the top of the card front, left to right
- Poppy Parade mini balls glued onto the sprigs
- DSP strip glued onto the Whisper White CS
- Whisper White CS glued onto the inside of the card base
S
Here are today’s main colors:
You can click on each one to see all the products that come in that color!
S
Here’s what I used:
Click on these images for more details and to purchase.
Click “Supply List” for a clickable and printable list!
S
Here are some helpful links:
S
Thanks for stopping by today, and Sweet Stamping!
Dec 18, 2019 | Blog Hop, Boxes, Christmas, Gallery, Gift Wrap, Gifts, Holiday |

Welcome to the Inking Royalty Christmas 2020 Blog Hop! Today I’m sharing a faceted treat box. I love this little box, and I realized I hadn’t made one in a long time. I used the Perfectly Plaid stamp set and Wrapped in Plaid Specialty Designer Series Paper. The pearls were colored with Stampin’ Blends Markers in Dark Cherry Cobbler, Dark Night of Navy, and Dark Shaded Spruce.
Here’s what I made:

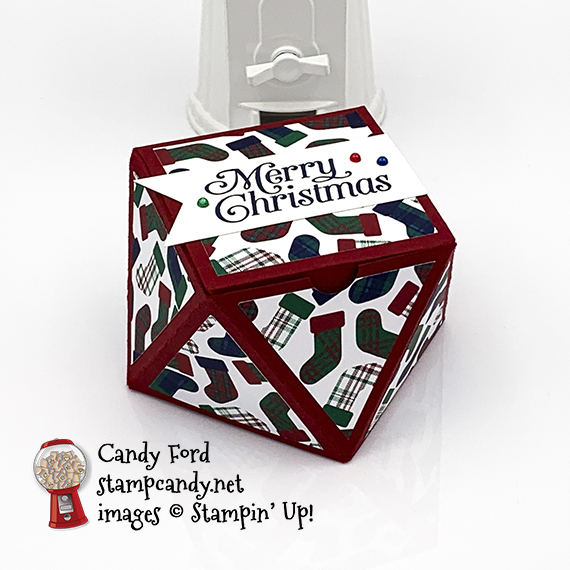 S
S
Here’s what I did:
Cut and scored with my paper trimmer and Simply Scored Tool:
- Cherry Cobbler card stock (CS) cut to 7-7/8″ x 11-1/4″
- scored the Cherry Cobbler CS along the short side at 2-1/2″, 4-5/8″, and 7-1/8″
- rotated the Cherry Cobbler CS 90 degrees so the skinny section is at the top, then scored only down to the second score line (cross one score line and stop at the second) at 2-1/2″, 5″, 7-1/2″, and 10″
- rotated the Cherry Cobbler CS 180 degrees, then scored only down to the first score line at 2-1/2″, 5″, 7-1/2″, and 10″
- used a ruler and stylus to score the diagonal lines as shown in the diagram
- Wrapped in Plaid Specialty Designer Series Paper (DSP) cut to 2-1/4″ x 2-1/4″
- Wrapped in Plaid Specialty Designer Series Paper (DSP) cut into 1-3/4″ strips, then cut into triangles 2″ wide (see diagram below)
- Whisper White Thick CS cut to 1-1/8″ x 3″
 Click on the template for a larger version.
S
Stamped with the Perfectly Plaid stamp set:
- sentiment in Night of Navy ink onto the 1-1/8″ strip of Whisper White CS stamp set
Cut using the Banner Triple Punch:
- left end of the sentiment strip
Cut using the 1/2″ Circle Punch:
- finger notch in the front panel of the box
Colored using Stampin’ Write Markers:
- 1 Pearl Basic Jewel in Dark Cherry Cobbler
- 1 Pearl Basic Jewel in Dark Night of Navy
- 1 Pearl Basic Jewel in Dark Shaded Spruce
Assembled the box:
- made all cuts in the Cherry Cobbler base using Paper Snips (refer to diagram)
- burnished all the folds in the Cherry Cobbler CS base with a Bone Folder (This is much more easily done after making the cuts.)
- 8 DSP triangles glued onto the 8 triangular sides of the box (This is easier while it’s still flat, before assembling the box.)
- DSP square glued onto the lid of the box
- sentiment strip glued onto the lid of the box
- pearls applied onto the sentiment strip
- small triangular section at one end glued onto the inside of the large triangle at the opposite end (A & B on diagram)
- folded all 4 bottom flaps in, one by one, gluing them together
- put goodies in the box and closed up the top
S
Here’s the Inking Royalty Christmas 2020 Blog Hop:
Thank you for hopping along with us. If you get stuck during the Blog Hop, please use this line-up as a guide:
- Brian King at Stamp with Brian
- Jackie Beers at Blue Line Stamping
- Sheryl Sharp at Sharp Notes by Sheryl
- Shawn de Oliveira at Shawn Stamps
- Lynn Kolcun at Avery’s Owlery
- Sue Jackson at Just Peachy Stamping
- Linda Krueger at The Stamp Coach
- Candy Ford at Stamp Candy <———– YOU ARE HERE!
- Julie DiMatteo at The Paper Pixie
- Robbye Hamilton at Miss Hammie’s Crafts
Here are today’s colors:
You can click on each one to see all the products that come in that color!
S
Here’s what I used:
Click on these images for more details and to purchase.
<– Click here for a clickable and printable list!
S
S
Here are some helpful links:
S
Thanks for stopping by today, and Sweet Stamping!
Nov 19, 2019 | Cards, Christmas, Gallery, Holiday |
For today’s project I used the A Big Thank You stamp set along with the Ornate Frames Dies and Most Wonderful Time Specialty Designer Series Paper to create a Christmas thank you card. I crossed the ribbon and added a bow and tag so it looks like a gift.
S
Here’s what I made:


S
Here’s what I did:
Cut and scored with my paper trimmer:
- Real Red card stock (CS) cut to 4-1/4″ x 11″, then scored in half at 5-1/2″
- Old Olive CS layer cut to 3-5/8″ x 4-7/8″
- Basic Black CS layer cut to 3-3/8″ x 4-5/8″
- Gold Foil Sheet layer cut to 3-1/4″ x 4-1/2″
- Most Wonderful Time Designer Series Paper (DSP) layer cut to 3″ x 4-1/4″
- Whisper White CS cut to 4″ x 5-1/4″ for the inside of the card base
Stamped with the A Big Thank You stamp set:
- sentiment in Old Olive ink onto a scrap of Whisper White Thick CS
Cut using the Ornate Frames Dies:
Assembled the card:
- burnished the fold in the card base with a Bone Folder
- Old Olive CS layer glued onto the front of the card base
- Basic Black CS layer glued onto the Old Olive CS layer
- Gold Foil Sheet layer glued onto the Basic Black CS layer
- 2 pieces Real Red Ribbon adhered onto the DSP layer using Tear & Tape, and the ends wrapped around to the back
- DSP layer adhered onto the Gold Foil Sheet layer using Tear & Tape
- Real Red Ribbon tied in a bow and adhered onto the intersection of the first two pieces of ribbon using Mini Glue Dots
- hole poked in the top of the sentiment tag using a Take Your Pick Tool or Paper Piercing Tool (or a 1/16″ Circle Punch)
- Whisper White Solid Baker’s Twine split into individual strands
- one strand of twine run through the hole in the tag, and the tag tied onto the ribbon
- Whisper White CS glued onto the inside of the card base
S
Here are today’s colors:
You can click on each one to see all the products that come in that color!
S
Here’s what I used:
Click on these images for more details and to purchase.
<– Click here for a clickable and printable list!
S
Here are some helpful links:
S
Thanks for stopping by today, and Sweet Stamping!
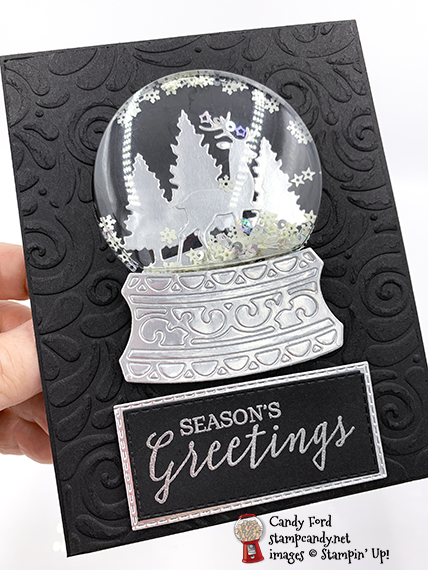
Sep 12, 2019 | Blog Hop, Cards, Christmas, Gallery, Holiday, New Products |
 It’s time for the OSAT Blog Hop for September! This month we’re featuring products from the brand new 2019 Holiday Catalog. I used the Still Scenes Bundle (Still Scenes stamp set and Snow Globe Scenes Dies) on page 43 to make a shaker card. The Snow Globe Shaker Domes make it easy – there is adhesive on both sides of the rims.
S
Here’s what I made:


S
Here’s what I did:
Cut and scored with my paper trimmer:
- Basic Black card stock (CS) cut to 4-1/4″ x 11″, then scored in half at 5-1/2″
- Basic Black CS layer cut to 4-1/8″ x 5-3/8″
- Whisper White CS cut to 3-3/4″ x 5″ for the inside of the card base
Stamped with the Still Scenes stamp set:
- outer sentiment in Versamark ink onto a scrap of Basic Black CS, then heat embossed in silver
- inner sentiment in black ink onto the Whisper White CS for the inside of the card base
Cut using the Snow Globe Scenes Dies:
- trees and 2 deer from a scrap of Silver Foil Sheet
- hole for shaker dome from the Basic Black CS layer
- snow globe base from a scrap of Silver Foil Sheet (one detailed and solid)
Cut using the Stitched Rectangle Dies:
- heat embossed sentiment
- slightly larger piece from a scrap of Silver Foil Sheet
- NOTE: There isn’t a die in the set to cut the sentiment as I wanted to, so I used a larger die and cut it twice as shown below. I cut the Silver Foil piece the same way.


Embossed using the Swirls & Curls Embossing Folder:
- Basic Black CS layer (be sure to emboss it after die cutting)
Assembled the card:
- burnished the fold in the card base with a Bone Folder
- trees and one deer adhered onto the front of the card base using Snail, so they will show through the hole in the Basic Black CS layer
- adhesive backing pulled off the top edge of the shaker dome, the dome put through the hole in the Basic Black CS layer, and adhered onto the back side,
- Snowflake Sequins laid over the trees and deer
- adhesive backing pulled off the bottom edge of the shaker dome, and Basic Black CS layer glued onto the front of the card base, so the sequins are trapped under the shaker dome
- NOTE: Be sure you press well to seal around the shaker dome. I left it a bit loose and the sequins stick to the edges.
- detailed base adhered onto the solid base using Snail, then adhered onto the Basic Black CS layer using Black Stampin’ Dimensionals
- front sentiment adhered onto the die cut Silver Foil, then the foil adhered onto the Basic Black CS layer using Black Stampin’ Dimensionals
- second deer adhered onto the Whisper White CS for the inside of the card base using Snail, and any excess trimmed away using Paper Snips
- Whisper White CS glued onto the inside of the card base
S
Here’s the hop:
S
Here are today’s colors:
You can click on each one to see all the products that come in that color!
S
Here’s what I used:
Click on these images for more details and to purchase.
<– Click here for a clickable and printable list!
S
Preorder the Monster Bash Online Treat Holder Class by September 18:
- Make 6 adorable treat holders in the comfort of your own home!
- 2 each of 3 designs
- Features the Monster Bash Suite on pages 52-54 of the 2019 Holiday Catalog
- I’ve done the trimming and scoring for you!
- You’ll receive the stamp set, dies, pre-cut kits, and Black Stampin’ Dimensionals.
- Full detailed instructions
- Limited spots available
Click on the image below for details and class options, or copy and paste this link into your browser: https://stampcandy.net/online-classes/monster-bash-treat-holder-class-preorder/
S
Here are some helpful links:
S
Thanks for stopping by today, and Sweet Stamping!
Sep 7, 2019 | Cards, Christmas, Gallery, Holiday, New Products |
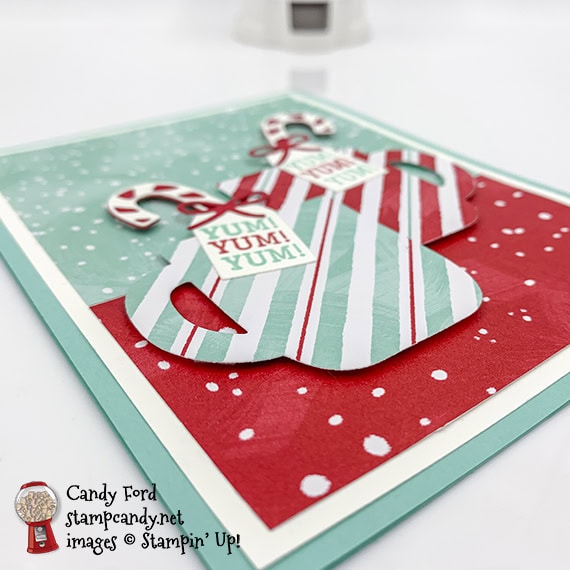
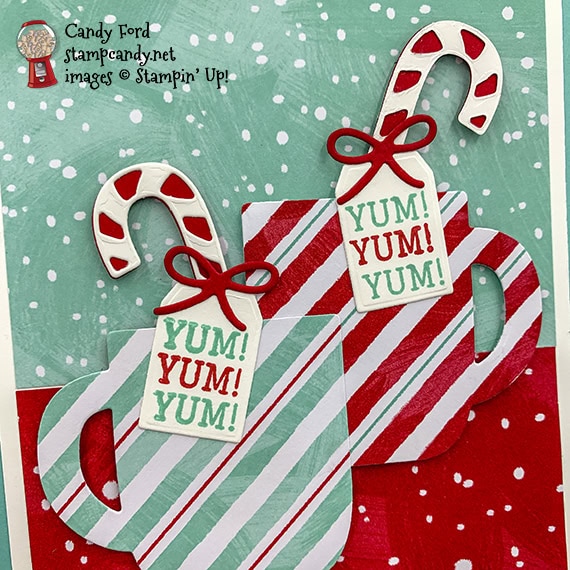
What’s better in winter than a cup of hot cocoa? Today I’m sharing a card I made using the new Cup of Christmas Bundle (Cup of Christmas stamp set and Cup of Cheer Dies) and Let It Snow Specialty Designer Series Paper. You can use it as a Christmas card, but it’s really an all occasion winter themed card.
S
Here’s what I made:
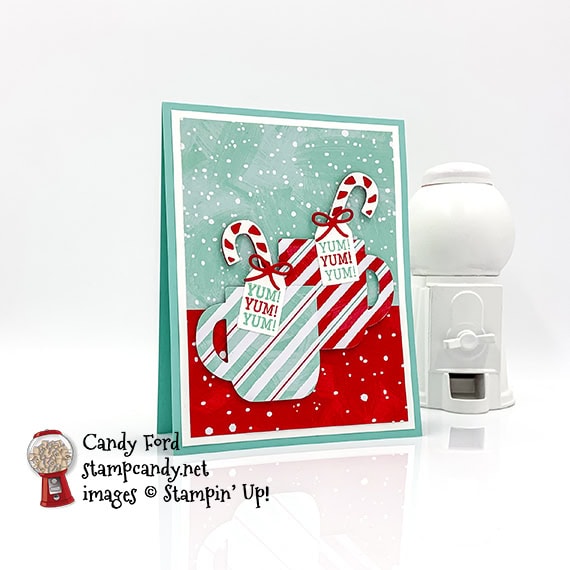
S
Here’s what I did:
Cut and scored with my paper trimmer:
- Coastal Cabana card stock (CS) cut to 4-1/4″ x 11″, then scored in half at 5-1/2″
- Whisper White card stock (CS) layer cut to 4″ x 5-1/4″
- Let It Snow Specialty Designer Series Paper (DSP) layer (blue) cut to 3-3/4″ x 3-1/2″
- Let It Snow Specialty Designer Series Paper (DSP) layer (red) cut to 3-3/4″ x 2-1/2″
- optional: Whisper White CS cut to 4″ x 5-1/4″ for the inside of the card base
Stamped with the Cup of Christmas stamp set:
- YUM in Real Red and Coastal Cabana inks onto a scrap of Whisper White Thick CS – stacked close together – stamped this for 2 tags
Cut using the Cup of Cheer Dies:
- stamped tags (2)
- cups from scraps of DSP (2 different stripe patterns)
- solid candy canes from a scrap of Real Red CS (2)
- striped candy canes from a scrap of Whisper White CS (2)
- bows from a scrap of Real Red CS (2)
Assembled the card:
- burnished the fold in the card base with a Bone Folder
- Whisper White CS layer glued onto the front of the card base
- 2 DSP layers glued onto the Whisper White CS layer
- Whisper White candy canes glued onto the Real Red candy canes
- candy canes glued onto the back of the cups
- tags glued onto the candy canes and cups
- bows glued onto the tags
- top right part of blue cup glued onto the bottom left part of the red cup
- cup assembly adhered onto the DSP layers using Stampin’ Dimensionals
- Whisper White CS glued onto the inside of the card base
S
Here are today’s colors:
You can click on each one to see all the products that come in that color!
S
Here’s what I used:
Click on these images for more details and to purchase.
<– Click here for a clickable and printable list!
S
Preorder the Monster Bash Online Treat Holder Class by September 18:
- Make 6 adorable treat holders in the comfort of your own home!
- 2 each of 3 designs
- Features the Monster Bash Suite on pages 52-54 of the 2019 Holiday Catalog
- I’ve done the trimming and scoring for you!
- You’ll receive the stamp set, dies, pre-cut kits, and Black Stampin’ Dimensionals.
- Full detailed instructions
- Limited spots available
Click on the image below for details and class options, or copy and paste this link into your browser: https://stampcandy.net/online-classes/monster-bash-treat-holder-class-preorder/
S
Here are some helpful links:
S
Thanks for stopping by today, and Sweet Stamping!