Apr 15, 2018 | Baby, Food, Gallery, Gifts, Parties, Promotions, Retiring Products |
Today’s project is made with several retiring products: World’s Best Trophy stamp set, Archival Basic Black ink pad, and card stock in Chocolate Chip, Pink Pirouette, and Soft Sky. Chocolate Chip is the perfect reddish brown color for a cigar. I wrapped it around large rolls of Sweetarts candies. The cigar bands are strips of card stock with 1″ punched circles. I didn’t have a stamp set that included “boy,” although there are a few that have the word “girl.” So I used the “son” and “daughter” from the World’s Best Trophy stamp set. These make great party favors for a baby shower. You can change the band color and sentiment for any occasion.
You can see everything that is retiring HERE. Everything is available through May 31, or while supplies last.
Here’s what I made:


Here’s what I did:
Cut and scored with my Stampin’ Trimmer:
- Chocolate Chip card stock (CS) cut to 3″ x 7-1/4″ (one for each cigar)
- Pink Pirouette CS cut to 3″ x 3/4″
- Soft Sky CS cut to 3″ x 3/4″
Stamped with the World’s Best Trophy stamp set:
- son in Basic Black ink onto a scrap of Soft Sky CS
- daughter in Basic Black ink onto a scrap of Pink Pirouette CS
Cut using the 1″ Circle Punch:
Assembled the cigars:
- burnished the Chocolate Chip CS pieces, and both of the CS strips, with a Bone Folder to soften and curl them
- wrapped the Chocolate Chip CS pieces around rolls of SweetTarts candy and secured using Tear & Tape
- wrapped the CS strips around the cigars and secured using Tear & Tape
- adhered the punched sentiments onto the cigar bands using Tear & Tape
Here are today’s colors:
You can click on each one to see all the products that come in that color!
Here’s what I used:
Click on these images for more details and to purchase.
Here’s some stuff you should know:
Thanks for stopping by today, and Sweet Stamping!
Apr 14, 2018 | Food, Gallery, Gifts, Parties |
Today I’m sharing another project I made for my presentation at last weekend’s Spring Stamp-Along hosted by Brian King of stampwithbrian.com. It’s an oh so quick and easy project (you know how I like those!) that I made for a kid’s birthday party theme. I used a little plastic champagne bottle filled with Mini M&Ms. The bottom comes off the tiny bottle so it’s easy to fill. I know it looks as big as my gumball machine prop in the pictures, but it’s only about 3″ tall. The sentiment is from the Teeny Tiny Wishes stamp set. I’ve been saying for years that everyone should own this stamp set. It has a sentiment for all the major occasions in life. If you don’t already have it, I strongly encourage you to get it before it disappears!
Here’s what I made:


Here’s what I did:
Stamped with the Teeny Tiny Wishes stamp set:
- sentiment in Pacific Point ink onto a scrap of Whisper White cardstock (CS)
Cut using the Classic Label Punch:
Assembled the project:
- adhered the sentiment to the bottle using Tear & Tape
- tied a piece of ribbon around the bottle neck and into a bow
Here are today’s colors:
You can click on each one to see all the products that come in that color!
Here’s what I used:
Click on these images for more details and to purchase.
The little champagne bottles came from orientaltrading.com. The Mini M&Ms came from the grocery store.
Here’s some stuff you should know:
Thanks for stopping by today, and Sweet Stamping!
Apr 11, 2018 | Baby, Food, Gallery, Gifts, Parties |
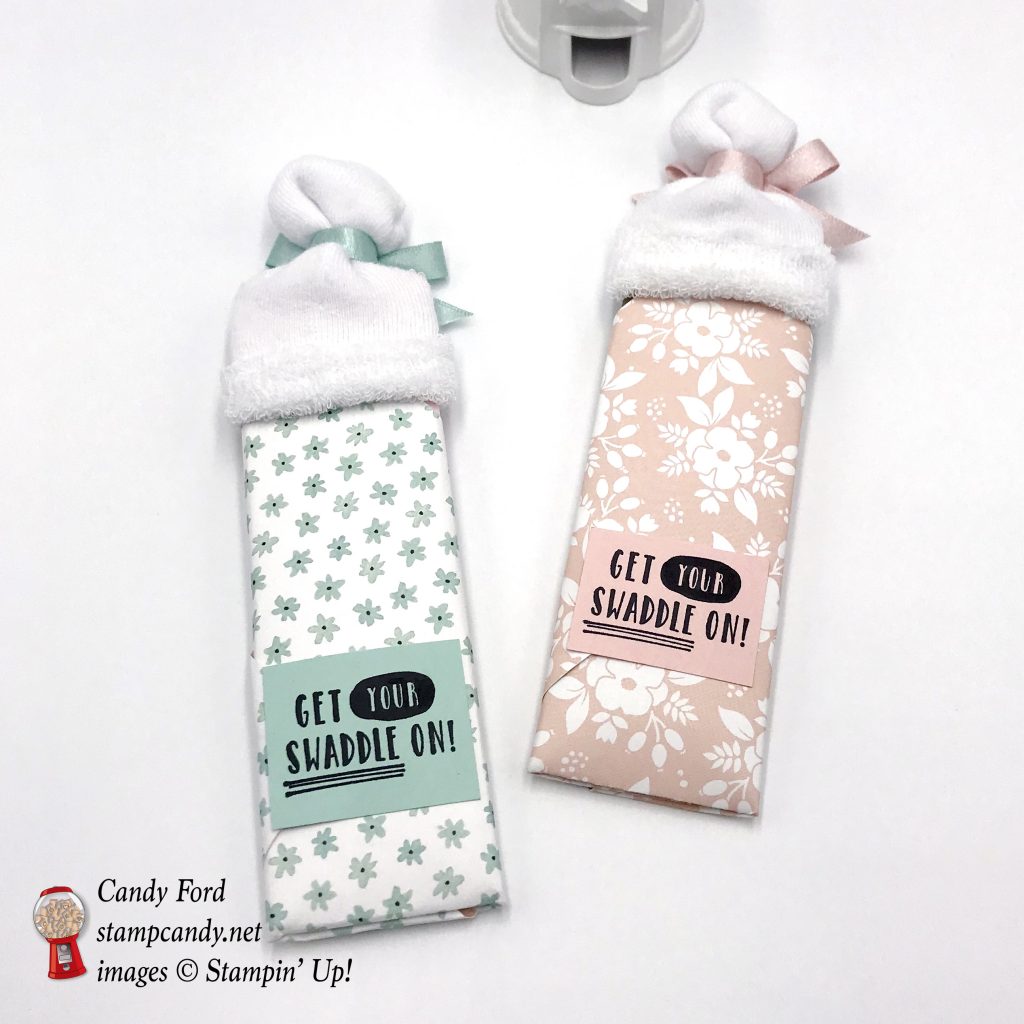
I am back from a fun, amazing, full, exhausting weekend full of stamping events: two official Stampin’ Up! events and two events hosted by Stampin’ Up! Demonstrators. I gave a presentation at the first event, Brian’s Spring Stamp-Along on April 6 hosted by Brian King. Today I’m sharing one of the projects from my presentation; chocolate bars decorated with A Whole Lot of Lovely Designer Series Paper for a baby shower. It’s a very quick and easy project. I mean very quick and easy. For the basic design, you need a chocolate bar, a couple pieces of paper, and a baby sock. Then you can froufrou it up however you want.
Here’s what I made:

Here’s what I did:
Cut and scored with my Stampin’ Trimmer:
- A Whole Lot of Lovely Designer Series Paper (DSP) cut to 6″ x 6″ (2 pieces)
- Pink Pirouette card stock (CS) cut to 5″ x 6-1/4″ (the chocolate bar is 6-1/4″ long and just over 4″ around)
- Soft Suede CS cut to 5″ x 6-1/4″
- Pool Party CS cut to 1-3/4″ x 1-1/4″
- Powder Pink CS cut to 1-3/4″ x 1-1/4″
Stamped with the Little One stamp set:
- sentiment in Basic Black ink onto each 1-3/4″ x 1-1/4″ CS piece
Stamped with the Better Together stamp set:
- diaper pin in Basic Black ink onto the front of the DSP “blankets”
Drew using Journaling Markers:
- faces on the front of the CS wrapped chocolate bar “babies”
Assembled the project:
- wrapped each chocolate bar with a 5″ x 6-1/4″ piece of CS and adhered together on the back with Tear & Tape
- DSP wrapped around chocolate bar like a blanket, and adhered with Tear & Tape
- sentiment adhered to the back using Tear & Tape
- baby sock put on top like a hat
- ribbon tied around the top of the hat and tied in a bow
Here are today’s colors:
You can click on each one to see all the products that come in that color!
Here’s what I used:
Click on these images for more details and to purchase.
Here’s some stuff you should know:
Thanks for stopping by today, and Sweet Stamping!
Apr 4, 2018 | Food, Gallery, Gifts, Tags |
I got to go on the 2016 Stampin’ Up! Incentive Trip, a Mediterranean Cruise. While touring Positano, Italy, famous for their lemons and limoncello, I bought a bag of lemon drops. Wow! They were the best I’ve ever had! They didn’t last long after I got home, so I did an internet search. I found them – you can order them through Amazon.com! They aren’t cheap, and they doesn’t have fast shipping, but oh my, are they worth it! When I decided to give up one of my precious bags of lemon drops for a birthday gift, I knew the Lemon Zest bundle (Lemon Zest stamp set & Lemon Builder Punch) would be perfect. I couldn’t remove the label without destroying the bag, so I opted to cover it. Let me know what you think!
Here’s what I made:


Here’s what I did:
Cut and scored with my Stampin’ Trimmer:
- Lemon Lime Twist card stock (CS) cut to 3″ x 6″, then scored in half at 3″
Stamped with the Lemon Zest stamp set:
- 2 lemons in Daffodil Delight ink onto a scrap of Daffodil Delight CS, then immediately heat embossed them with clear embossing powder, to give them some texture
- leaves in Lemon Lime Twist ink onto a scrap of Lemon Lime Twist CS
- two sentiments – one of the front and one on the back – in Basic Black ink
- NOTE: I used a Black Sharpie marker to add the dots at the ends of the lemons.
Cut using the Lemon Builder Punch:
- lemons and leaves
- stem from a scrap of Lemon Lime Twist CS, which I pressed onto the Lemon Lime Twist ink pad to darken it
Cut using the Envelope Punch Board:
- rounded all four corners of the tag
Assembled the project:
- burnished the fold in the tag with a Bone Folder
- lemons and one leaf glued together, then adhered to the tag front using Stampin’ Dimensionals
- remaining two leaves adhered to the lemons using Stampin’ Dimensionals
- stem glued to tag front, sticking out from under the lemons
- lined up the tag over the original one, and adhered it using Tear & Tape
- Lemon Lime Twist clip added on top for the finishing touch
Here are today’s colors:
You can click on each one to see all the products that come in that color!
Here’s what I used:
Click on these images for more details and to purchase.
Here’s some stuff you should know:
Thanks for stopping by today, and Sweet Stamping!
Mar 29, 2018 | Bags, Blog Hop, Boxes, Cards, Gallery, Gift Wrap, Gifts, Paper Pumpkin |

Hurray, it’s time for the March 2018 APPT blog hop! This month’s kit is called May Good Things Grow, and it is just lovely. Of course, we can’t leave well enough alone, so we used the kit to create alternate projects, just to give you some ideas. Be sure to check out all the stops on the hop!
The kit makes cards that go is adorable envelopes that look like seed packs. I used the seed packs to make a card and a sour cream container. No, there isn’t sour cream in it, but it’s the shape of the little take out containers that sour cream comes in. It’s one of the easiest containers to make, and it’s even easier with a premade envelope.
The card base is Fresh Fig card stock, but I used one of the kit card bases to cut a piece for the inside of the card. I used Fresh Fig ink, but the Early Espresso ink that comes in the kit would match equally as well.
Brads! There are brads in this kit! I’ve always liked using brads in my paper crafting – there are lots of things you can do with them.
At the bottom of this post, there’s a list of the products I used other than what’s in the kit. There aren’t many. This kit has so much in it, I can think of all sorts of things to make with it. I listed glue and Tear & Tape, because I prefer them, but the kit comes with glue dots – and a whole lot of Stampin’ Dimensionals!
Here’s what I made:


It’s so difficult to get Wink of Stella to show in a photo! The small amount you can see in this one just looks like tiny white specks:


Here’s what I did:
Cut and scored with my Stampin’ Trimmer:
- Fresh Fig card stock (CS) cut to 4-1/4″ x 11″, then scored in half at 5-1/2″
- front of one of the seed packs cut off and trimmed around the design
- the flap off another seed packet cut off
- cut a 3-3/4″ x 5″ piece from a Crumb Cake card base
Stamped with the May Good Things Grow stamp set:
- birthday sentiment in Fresh Fig ink onto one of the precut labels
- friendship sentiment in Fresh Fig ink onto a larger precut label
- scroll design in the four corners of the trimmed Crumb Cake card base
“Colored” using Clear Wink of Stella Pen:
- all the color die cut flowers and leaves (not the monotone ones that are part of the large floral die cut)
Assembled the card:
- seed pack front glued onto the front of the card base
- large floral die cut adhered to the seed pack layer using Stampin’ Dimensionals
- single die cut pink and yellow flowers and one die cut leaf adhered over the large floral die cut using Stampin’ Dimensionals
- 2 brads attached to the larger label, then the label adhered to the large floral die cut using Stampin’ Dimensionals
Assembled the sour cream container:
- pinched the top of the bag perpendicular to the bottom, so the two side score lines touch (I also used snips to cut the edges straight)
- put some goodies inside, then sealed the top shut with Tear & Tape
- punched a hole through the top with the 1/8″ Circle Punch
- put the Fresh Fig ribbon through the hole and tied a bow
- glued a die cut flower and some die cut leaves to the front
- glued on the birthday label

Here’s the hop:
Click the NEXT button to go to the next stop on the hop, Melissa Thomas as Sea to Sea Stampin’. If you get lost, during the hop, use the list below to find your way.

Here are the colors in the kit:
You can click on each one to see all the products that come in that color!
Here’s what I used other than the Paper Pumpkin kit:
Click on these images for more details and to purchase.
Here’s some stuff you should check out:
Thanks for stopping by today, and Sweet Stamping!

Feb 8, 2018 | Blog Hop, Boxes, Cards, Food, Gallery, Gift Wrap, Gifts, Guest Stamper, Occasions, Sale-A-Bration |

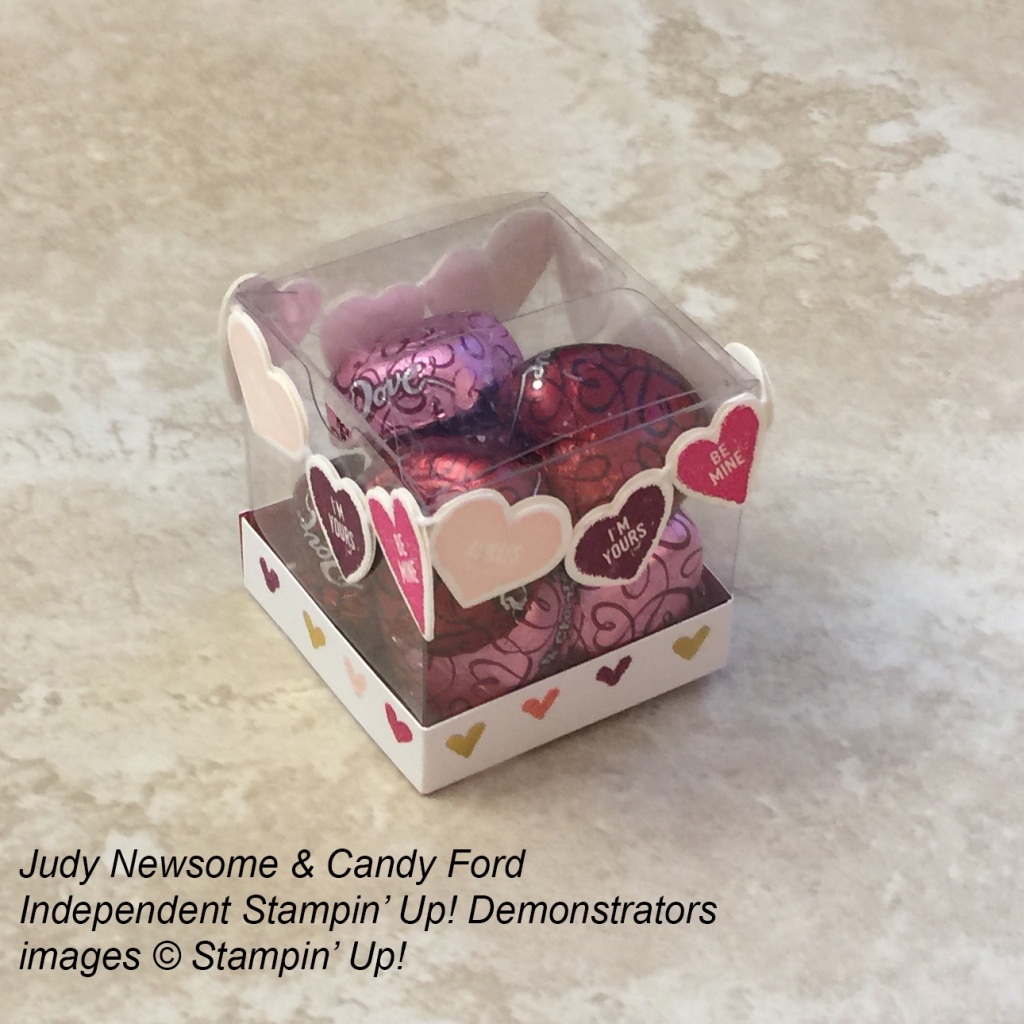
It’s time for the OSAT Blog Hop! This month’s theme is Don’t go breaking my heart in honor of Valentine’s Day. Remember the song by Elton John and Kiki Dee? If not, you can watch the video here. My project has plenty of hearts – a large one from the Painted with Love Designer Series Paper, and small ones from the Sure Do Love You stamp set – and fortunately none of them are broken.
I’m on a ship right now (I’m actually at a live performance by Casey McPherson as I type this, so if there are any typos, that’s why!) My sister, and Candy Hearts team member, Judy Newsome, is house sitting. When I realized I’d forgotten to make the projects for today before I left, I contacted her and begged for help. Of course, she obliged because that’s the kind of gal she is. Between the two of us, we designed the card and treat box, and she actually made and photographed them. So while it was a team effort, she did the lion’s share of the work. Thanks, Judy!
Be sure to hop around to all the blogs listed below. You don’t want to miss any of the great projects by this group!
Here’s what we made:

Here’s what she did:
Cut and scored with my Stampin’ Trimmer:
- Rich Razzleberry card stock (CS) cut to 4-1/4″ x 11″, then scored in half at 5-1/2″
- Melon Mambo CS cut to 4-1/8″ x 5-3/8″
- Powder Pink CS cut to 4″ x 5-1/4″
- Painted With Love Designer Series Paper (DSP) cut to 3-7/” x 5-2/8″ (small hearts design)
- Melon Mambo CS cut to 3-1/2″ x 3/4″
- Powder Pink CS cut to 3-1/2″ x 5/8″
- Painted With Love DSP cut to 1/2″ x 8-1/2″ (one row of small hearts) then scored at 2″, 4″, 6″, and 8″
- Whisper White CS cut to 4″ x 5-1/4″ for the inside of the card
Stamped with the Sure Do Love You stamp set:
- small conversation hearts in Powder Pink,Melon Mambo, and Rich Razzleberry inks onto scraps of of Whisper White CS (4 of each)
Stamped with the Cozy Cottage stamp set:
- card sentiment in Melon Mambo ink onto the Powder Spink CS strip
Die cut using the Lots of Love Box Framelits:
- small converstaion hearts
- large heart from a scrap of the DSP (striped design)
Cut using Paper Snips:
- notched one end of the Melon Mambo and Powder Pink CS strips
- NOTE: you could use the Banner Triple Punch instead
Assembled the card:
- burnished the fold in the card base with a Bone Folder
- Melon Mambo CS layer glued onto the front of the card base
- Powder Pink CS layer glued onto the Melon Mambo CS layer
- DSP layer glued onto the Powder Pink CS layer
- sentiment glued onto the Melon Mambo CS strip
- Melon Mambo CS strip glued onto the DSP layer
- large DSP heart adhered to the DSP layer using Stampin’ Dimensionals
- Whisper White CS glued to the inside of the card base
Assembled the treat box:
- popped the premade box together (just fold in the bottom flaps!)
- glued the conversation hearts to a piece of Whisper White Solid Baker’s Twine to make the garland
- adhered garland around the top of the box with Mini Glue Dots
- adhered strip of DSP around the bottom of the box with Fast Fuse
- filled the box with Dove Milk & Dark Chocolate Hearts
Here’s the hop:
Be sure to hop to all the blogs to see the terrific projects made by this amazing team of stampers. Use the list below if you get lost.
Here are today’s main colors:
You can click on each one to see all the products that come in that color!
Here’s what we used:
Click on these images for more details and to purchase.
Here’s some stuff you should know:
- This is an AMAZING time to join the Candy Hearts! Sale-A-Bration is the biggest event of the Stampin’ Up! year and you can save big on the ultimate bundle, the Starter Kit. CLICK HERE for more information. Contact me with any questions: email candy@stampcandy.net or call/text 404-661-5222
- Newsletter: subscribe for exclusive deals, projects, and more! Enter your email address and click SUBSCRIBE at the top right of this page, just under the picture of my smiling face. You can also choose to receive an email every day that I have a blog post.
- Check out My Events Calendar HERE
- Host Code for the month of February (2T9AQTKG) Find out more about HOW, WHEN and WHY to use the code HERE.
- My Thank You Gift to You in February: Narrow Note Cards & Envelopes – Find out more HERE.
- Gift Certificates are available in any U.S. dollar amount from me. Contact me – email: candy@stampcandy.net OR call/text: 404-661-5222
- Gumball Rewards for all orders over $50. Find out more HERE.
Thanks for stopping by today, and Sweet Stamping!