Feb 1, 2018 | Cards, Gallery, Occasions, Sale-A-Bration |
Today’s project is Made With Love. It’s a feminine card made with the Apron of Love bundle (Apron of Love stamp set and Apron Builder Framelits Dies.) You save 10% when you buy both products together in a bundle! Click here to see the masculine apron card I shared a few days ago.
Just like the other card, I used my Stylus that came with my Simply Scored scoring tool to draw lines on the oven mitt, to give it a quilted look. I used a piece of Tutti-frutti Designer Series Paper (DSP) for the fabric of the apron. Doesn’t it look like an apron from the 1940s or 1950s? I think my aunt Mildred had one just like it!
Here’s what I made:


Here’s what I did:
Cut with my Stampin’ Trimmer:
- Whisper White card stock (CS) cut to 3-3/4″ x 5″
Die cut using the Apron Builder Framelits:
- apron from a scrap of Tutti-frutti Designer Series Paper (DSP)
- pocket, mitt, neck strap, and 2 apron strings from Real Red CS
- utensils from a scrap of Silver Foil Sheet
- rolling pin from a scrap of Wood Textures DSP
Stamped with the Apron of Love stamp set:
- sentiment in Real Red ink onto the Whisper White CS layer, near the bottom
- small sentiment in Basic Black ink onto the die cut apron pocket
Embossed with a Stylus:
- drew lines on the oven mitt, to make it look quilted (I found it impossible to make the lines show well in a photo.)
Assembled the card:
- burnished the fold in the card base (from the Tutti-frutti Cards & Envelopes, which are free with a $50 order, through March 31!) with a Bone Folder
- Whisper White CS layer glued onto the front of the card base
- neck strap and apron strings glued to the back of the apron
- utensils (spoon, rolling pin, whisk, spatula, and tongs) glued onto the back of the pocket
- pocket and utensils glued to the front of the apron
- NOTE: the white spatula is cut from the Silver Foil Sheet, then turned around to the white side
- apron glued onto the Whisper White CS layer
- mitt glued onto the Whisper White CS layer
Here are today’s colors:
You can click on each one to see all the products that come in, or with, that color!
Here’s what I used:
Click on these images for more details and to purchase.
Here’s some stuff you should know:
- This is a fabulous time to join my team! Sale-A-Bration is the biggest event of the Stampin’ Up! year and you can save big on the ultimate bundle, the Starter Kit. CLICK HERE for more information. Contact me with any questions: email candy@stampcandy.net or call/text 404-661-5222
- Newsletter: subscribe for exclusive deals, projects, and more! Enter your email address and click SUBSCRIBE at the top right of this page, just under the picture of my smiling face. You can also choose to receive an email every day that I have a blog post.
- Check out My Events Calendar HERE
- Host Code for the month of February (2T9AQTKG) Find out more about HOW, WHEN and WHY to use the code HERE.
- My Thank You Gift to You in February: Narrow Note Cards & Envelopes – Find out more HERE.
- Gift Certificates are available in any U.S. dollar amount from me. Contact me – email: candy@stampcandy.net OR call/text: 404-661-5222
- Gumball Rewards for all orders over $50. Find out more HERE.
Thanks for stopping by today, and Sweet Stamping!

Jan 30, 2018 | Cards, Gallery, Occasions, Swaps |
Recently I told you I participated in a card swap with some of my Rising Star friends. We each made 8 different cards. As I was leaving for a trip, I realized I had only 7 done. Enter my sister, team member, cat sitter, and amazing card maker, Judy Newsome. She was house sitting for us while we were gone. After I left, she made the 8th card for each pack and sent them all out. She CASEd a card by Nicole Schlack of www.schlack.de.
Thank you, Judy!
Here’s what she made:

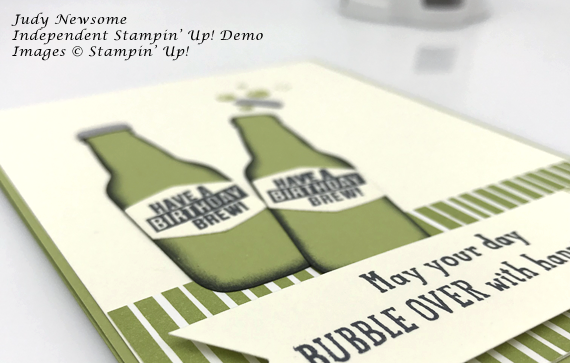

Here’s what she did:
Cut and scored with a Stampin’ Trimmer:
- Pear Pizzazz card stock (CS) cut to 4-1/4″ x 11″, then scored in half at 5-1/2″
- Very Vanilla CS cut to 4-1/8″ x 5-3/8″
- Coffee Break Designer Series Paper (DSP) cut to 4-1/8″ x 1-3/4″
- Very Vanilla CS cut to 4-1/4″ x 1″
- Optional: Very Vanilla CS cut to 4″ x 5-1/4″ for the inside
Cut using the Banner Triple Punch:
- one end of the 4-1/4″ x 1″ Very Vanilla CS strip
Stamped with the Bubble Over stamp set:
- larger sentiment in Basic Black ink onto the Very Vanilla CS strip
- 2 smaller sentiments onto a scrap of Very Vanilla CS
- bubbles in Pear Pizzazz ink onto the Very Vanilla CS layer, to appear to be coming out of the bottle
Die cut using the Bottles & Bubbles Framelits:
- smaller sentiments
- 2 bottles from a scrap of Pear Pizzazz CS
- 2 bottle caps from a scrap of Smoky Slate CS
Colored using a Sponge Dauber:
- around the edges of the 2 bottles in Basic Black ink
Assembled the card:
- burnished the fold in the card base with a Bone Folder
- Very Vanilla CS layer glued onto the front of the card base
- Coffee Break DSP glued onto the bottom of the Very Vanilla CS layer
- small sentiment labels glued onto the bottles
- bottles glued onto the Very Vanilla CS layer
- one bottle cap glued onto a bottle
- the other bottle cap glued onto the Very Vanilla CS layer, among the stamped bubbles, as if it had just popped off the bottle
- wrapped the end of the Very Vanilla CS strip with a piece of Pear Pizzazz Washi Tape and a piece of Basic Black Washi Tape
- Very Vanilla CS strip adhered to the Coffee Break DSP with Stampin’ Dimentionals
- Optional:4″ x 5-1/4″ Very Vanilla CS glued to the inside of the card base
Here are today’s colors:
You can click on each one to see all the products that come in that color!
Here’s what she used:
Click on these images for more details and to purchase.
Here’s some stuff you should know:
- This is a fabulous time to join my team! Sale-A-Bration is the biggest event of the Stampin’ Up! year and you can save big on the ultimate bundle, the Starter Kit. CLICK HERE for more information. Contact me with any questions: email candy@stampcandy.net or call/text 404-661-5222
- Newsletter: subscribe for exclusive deals, projects, and more! Enter your email address and click SUBSCRIBE at the top right of this page, just under the picture of my smiling face. You can also choose to receive an email every day that I have a blog post.
- Check out My Events Calendar HERE
- Host Code for the month of January (XNNMNZSZ) Find out more about HOW, WHEN and WHY to use the code HERE.
- My Thank You Gift to You in January: Silver Embossing Paste – Find out more HERE.
- Gift Certificates are available in any U.S. dollar amount from me. Contact me – email: candy@stampcandy.net OR call/text: 404-661-5222
- Gumball Rewards for all orders over $50. Find out more HERE.
Thanks for stopping by today, and Sweet Stamping!
Jan 29, 2018 | Cards, Gallery, Occasions |
When I first saw the Apron of Love Bundle, I immediately thought of making some cute feminine projects. Then I realized there are male elements in the bundle as well. So I was inspired to make today’s card for a Dad who loves to BBQ. We all know at least one of those, don’t we?
The bundle is $45, so all you have to do is add an ink pad, a pack of paper, or something else that is at least $5, and you get to choose a free Sale-A-Bration item!

Apron of Love Bundle © Stampin’ Up!
Here’s what I made:


Here’s what I did:
Cut and scored with my Stampin’ Trimmer:
- Crushed Curry card stock (CS) cut to 4-1/4″ x 11″, then scored in half at 5-1/2″
- Night of Navy CS cut to 4-1/8″ x 5-3/8″
- Wood Textures Designer Series Paper (DSP) cut to 4″ x 5-1/4″
- Wood Textures Designer Series Paper (DSP) cut to 4″ x 1″
- Tranquil Tide CS cut to 1-3/8″ x 1″
- Optional: Whisper White CS cut to 4″ x 5-1/4″ for the inside
Stamped with the Apron of Love stamp set:
- larger sentiment in Basic Black ink onto the 4″ x 1″ Wood Textures DSP strip
- smaller sentiment in Basic Black ink onto the Tranquil Tide CS piece
Die cut using the Apron Builder Framelits:
- apron from a scrap of True Gentleman DSP
- 2 apron strings and 1 neck string from a scrap of Tranquil Tide CS
- tools and mitt from a scrap of Silver Foil Sheet
Embossed using a Stylus:
- drew lines on the mitt to make it look quilted
Colored using Stampin’ Write Markers:
- on the white side of the brush, the bristle area in So Saffron
- handle and bristle lines in Soft Suede
Assembled the card:
- burnished the fold in the card base with a Bone Folder
- Night of Navy CS layer glued onto the front of the card base
- Wood Textures DSP layer glued onto the Night of Navy CS layer
- Wood Textures DSP strip glued onto theWood Textures DSP layer
- apron strings glued to the
Here are today’s main colors:
Click on each one to see all the products that come in, or with, that color.
Here’s what I used:
Click on these images for more details and to purchase.
Here’s some stuff you should know:
- This is a fabulous time to join my team! Sale-A-Bration is the biggest event of the Stampin’ Up! year and you can save up to 60% on the ultimate bundle, the Starter Kit. CLICK HERE for more information. Contact me with any questions: email candy@stampcandy.net or call/text 404-661-5222
- Newsletter: subscribe for exclusive deals, projects, and more! Enter your email address and click SUBSCRIBE at the top right of this page, just under the picture of my smiling face. You can also choose to receive an email every day that I have a blog post.
- Check out My Events Calendar HERE.
- Host Code for the month of January (XNNMNZSZ) Find out more about HOW, WHEN and WHY to use the code HERE.
- My Thank You Gift to You in January: Silver Embossing Paste – CLICK HERE to find out how to get your free gift.
- Gift Certificates are available in any U.S. dollar amount from me. Contact me – email: candy@stampcandy.net OR call/text: 404-661-5222
- Gumball Rewards for all orders over $50. CLICK HERE to find out how to get your free stamp set from me.
Thanks for stopping by today, and Sweet Stamping!
Jan 27, 2018 | Cards, Gallery, Occasions, Sale-A-Bration |
The Bubble Over Bundle (Bubble Over stamp set and Bottles & Bubbles Framelits Dies) allows you to create super cute, super fun projects, like today’s card. The bright colors of this fun thank you card are inspired by the Bubbles & Fizz Designer Series Paper (which you can get FREE with a $50 order!!!) My sister inspired the design, with the awesome idea of putting the bottles in a wooden crate, made with the Wood Crate Framelits Dies and Wood Textures Designer Series Paper.
Here’s what I made:
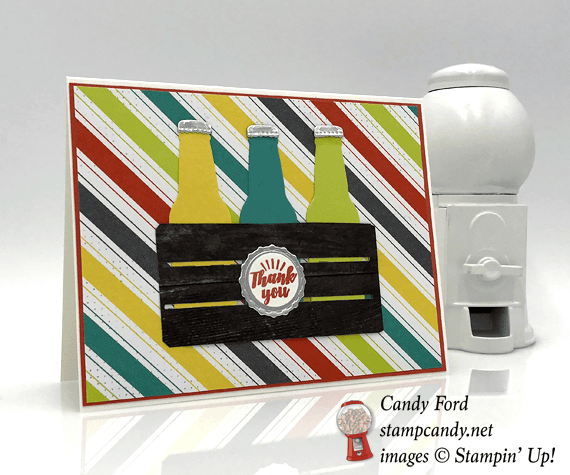
Here’s what I did:
Cut and scored with my Stampin’ Trimmer:
- Whisper White Thick card stock (CS) cut to 5-1/2″ x 8-1/2″, then scored in half at 4-1/4″
- Calypso Coral CS cut to 5-3/8″ x 4-1/8″
- Bubbles & Fizz Designer Series Paper (DSP) cut to 5-1/4″ x 4″
Stamped with the Bubble Over stamp set:
- sentiment in Calypso Coral ink onto a scrap of Whisper White CS
Die cut using the Bottles & Bubbles Framelits:
- 3 bottles from scraps of Daffodil Delight, Bermuda Bay, and Lemon Lime Twist CS
- 3 bottle caps (for the tops of the bottles) from a scrap of Silver Foil Sheet
- 1 bottle cap (round for the sentiment) from a scrap of Silver Foil Sheet
Die cut using the Wood Crate Framelits:
- one side of the crate from Wood Textures DSP, then trimmed away the excess bits with Paper Snips
Cut using the 3/4″ Circle Punch:
Assembled the card:
- burnished the fold in the card base with a Bone Folder
- Calypso Coral CS layer glued onto the front of the card base
- Bubbles & Fizz DSP layer glued onto the Calypso Coral CS layer
- 3 bottles glued to the back of the crate
- bottles and crate glued onto the DSP layer
- 3 small bottle caps glued onto the bottles
- sentiment adhered to the round bottle cap with Fast Fuse
- round bottle cap glued onto the crate
Here are today’s main colors:
You can click on each one to see all the products that come in, or with, that color!
Here’s what I used:
Click on these images for more details and to purchase.
Here’s some stuff you should know:
- This is a fabulous time to join my team! Sale-A-Bration is the biggest event of the Stampin’ Up! year and you can save big on the ultimate bundle, the Starter Kit. CLICK HERE for more information. Contact me with any questions: email candy@stampcandy.net or call/text 404-661-5222
- Newsletter: subscribe for exclusive deals, projects, and more! Enter your email address and click SUBSCRIBE at the top right of this page, just under the picture of my smiling face. You can also choose to receive an email every day that I have a blog post.
- Check out My Events Calendar HERE
- Host Code for the month of January (XNNMNZSZ) Find out more about HOW, WHEN and WHY to use the code HERE.
- My Thank You Gift to You in January: Silver Embossing Paste – Find out more HERE.
- Gift Certificates are available in any U.S. dollar amount from me. Contact me – email: candy@stampcandy.net OR call/text: 404-661-5222
- Gumball Rewards for all orders over $50. Find out more HERE.
Thanks for stopping by today, and Sweet Stamping!
Jan 20, 2018 | Cards, Gallery, New Products, Occasions |


Here’s what I made:

Here you can see the shine on the gold bits:
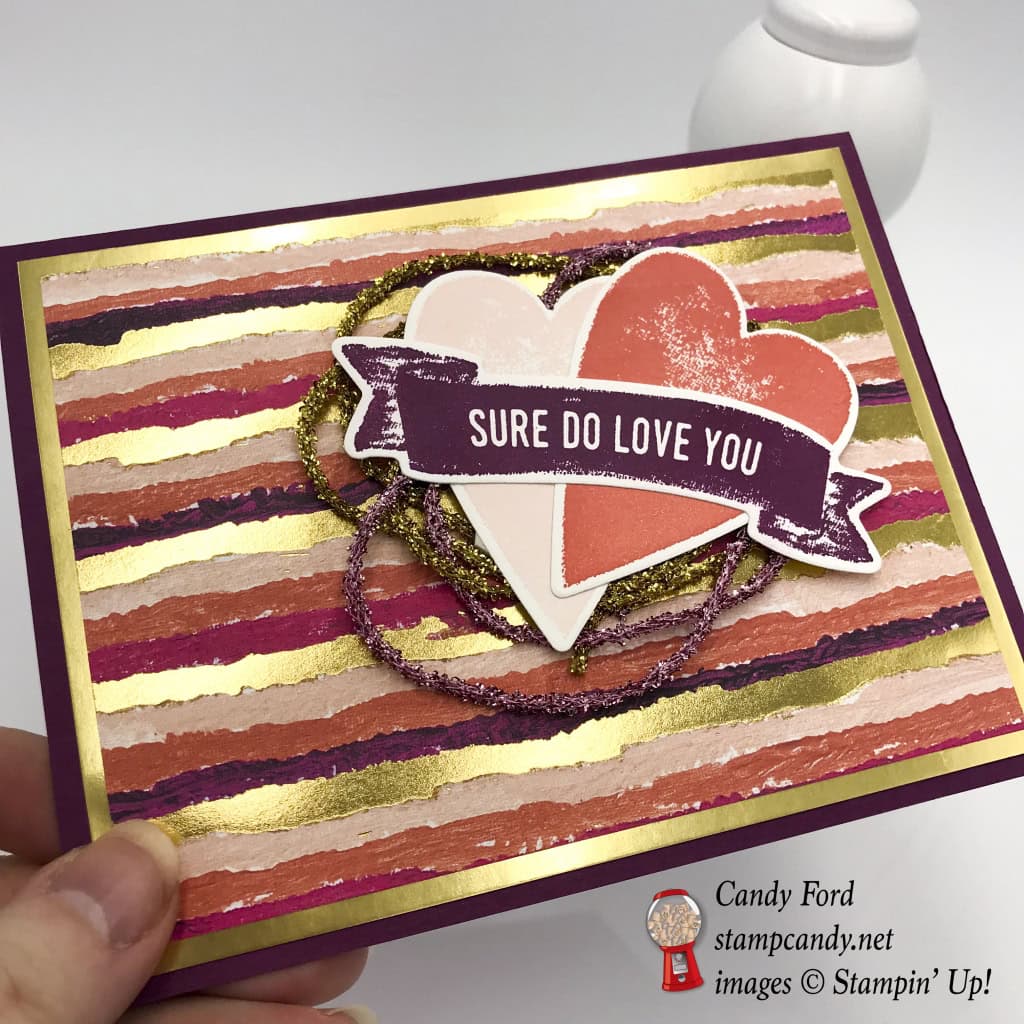
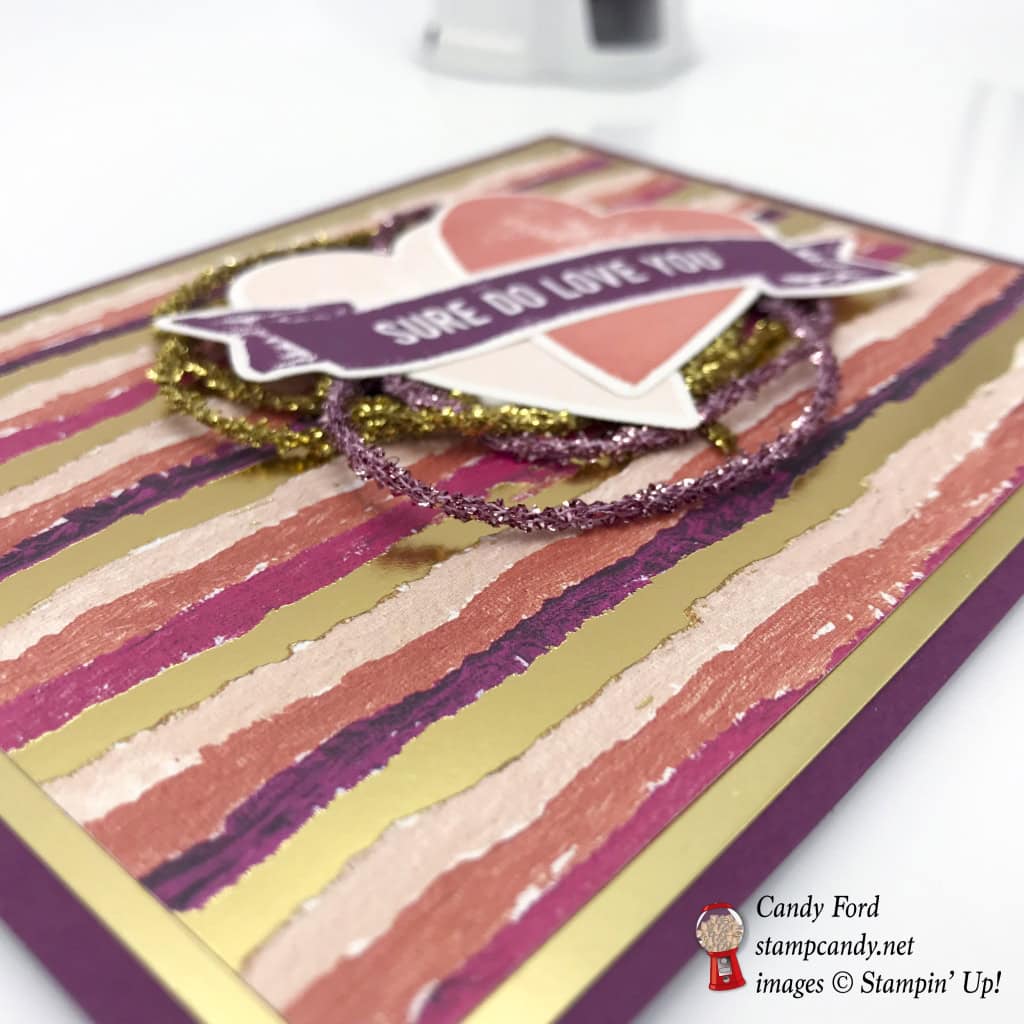
Here’s what I did:
Cut and scored with my Stampin’ Trimmer:
- Rich Razzleberry card stock (CS) cut to 5-1/2″ x 8-1/2″, then scored in half at 4-1/4″
- Gold Foil Sheet cut to 5-1/4″ x 4″
- Painted Love Designer Series Paper (DSP) cut to 5″ x 3-3/4″
- Whisper White CS cut to 5-1/4″ x 4″ for the inside
Stamped with the Sure Do Love You stamp set:
- heart in Powder Pink ink onto a scrap of Whisper White CS
- heart in Calypso Coral ink onto a scrap of Whisper White CS
- sentiment banner in Rich Razzleberry ink onto a scrap of Whisper White CS
Die cut using the Lots to Love Box Framelits:
- the 2 stamped hearts and the sentiment
Assembled the card:
- card base fold burnished with a Bone Folder
- gold foil layer glued onto the front of the card base
- DSP layer glued onto the gold foil layer
- Love Mini Tinsel Trim wrapped around my hand a couple times, then adhered to the DSP with Fast Fust
- heart and sentiment glued together, then adhered over the tinsel trim with Stampin’ Dimensionals
- Whisper White CS glued to the inside of the card base
Here are today’s colors:
You can click on each one to see all the products that come in that color!
Here’s what I used:
Click on these images for more details and to purchase.
Here’s some stuff you should know:
- This is a fabulous time to join my team! Sale-A-Bration is the biggest event of the Stampin’ Up! year and you can save big on the ultimate bundle, the Starter Kit. CLICK HERE for more information. Contact me with any questions: email candy@stampcandy.net or call/text 404-661-5222
- Newsletter: subscribe for exclusive deals, projects, and more! Enter your email address and click SUBSCRIBE at the top right of this page, just under the picture of my smiling face. You can also choose to receive an email every day that I have a blog post.
- Check out My Events Calendar HERE
- Host Code for the month of January (XNNMNZSZ) Find out more about HOW, WHEN and WHY to use the code HERE.
- My Thank You Gift to You in January: Silver Embossing Paste – Find out more HERE.
- Gift Certificates are available in any U.S. dollar amount from me. Contact me – email: candy@stampcandy.net OR call/text: 404-661-5222
- Gumball Rewards for all orders over $50. Find out more HERE.
Thanks for stopping by today, and Sweet Stamping!
Jan 19, 2018 | Cards, Gallery, New Products, Occasions |
Once again, my Rising Star friends decided to do a card swap for the new catalog. We each made 2 cards from 4 stamp sets, so 8 different cards total. Today I’m sharing one of the cards I made for the swap. I used the Cake Soiree stamp set (which comes in a bundle with the Sweet Cake Thinlits Dies to save you 10%!) and the coordinating Sweet Soiree Specialty Designer Series Paper. This paper has a design with metallic silver on one side and a beautiful non-metallic designs on the other – all the designs are just lovely. I used one of the designs with silver on today’s card.

The Sweet Soiree paper has 12 different gorgeous patterns, 6 of them with silver!

Here’s what I made:


Here’s what I did:
Cut and scored with my Stampin’ Trimmer:
- Calypso Coral card stock (CS) cut to 5-1/2″ x 8-1/2″, then scored in half at 4-1/4″
- Silver Foil Sheet cut to 5-1/4″ x 4″
- Sweet Soiree Designer Series Paper (DSP) cut to 5″ x 3-3/4″
- Calypso Coral CS cut to 2-1/2″ x 1-1/8″
- Whisper White CS cut to 2-3/8″ x 1″
- Whisper White CS cut to 5-1/4″ x 4″ for the inside
Stamped with the Cake Soiree stamp set:
- sentiment in Old Olive and Berry Burst inks onto the smaller piece of Whisper White CS
- NOTE: I held the stamp and the ink pad at eye level so I could see where they met. I inked the lower part of the sentiment with the Berry Burst ink pad, then turned the stamp around and inked the upper part of the sentiment with the Old Olive ink pad.
Assembled the card:
- burnished the fold in the card base with a Bone Folder
- Silver Foil layer glued onto the front of the card base
- DSP layer glued onto the Silver Foil layer
- sentiment glued onto the Calypso Coral CS piece
- Calypso Coral CS piece adhered to DSP with Stampin’ Dimensionals
- Silver Baker’s Twine tied into a bow and adhered to the sentiment with a Mini Glue Dot
- larger piece of Whisper White CS glued to the inside of the card base
Here are today’s colors:
You can click on each one to see all the products that come in that color!
Here’s what I used:
Click on these images for more details and to purchase.
Here’s some stuff you should know:
- This is a fabulous time to join my team! Sale-A-Bration is the biggest event of the Stampin’ Up! year and you can save big on the ultimate bundle, the Starter Kit. CLICK HERE for more information. Contact me with any questions: email candy@stampcandy.net or call/text 404-661-5222
- Newsletter: subscribe for exclusive deals, projects, and more! Enter your email address and click SUBSCRIBE at the top right of this page, just under the picture of my smiling face. You can also choose to receive an email every day that I have a blog post.
- Check out My Events Calendar HERE
- Host Code for the month of January (XNNMNZSZ) Find out more about HOW, WHEN and WHY to use the code HERE.
- My Thank You Gift to You in January: Silver Embossing Paste – Find out more HERE.
- Gift Certificates are available in any U.S. dollar amount from me. Contact me – email: candy@stampcandy.net OR call/text: 404-661-5222
- Gumball Rewards for all orders over $50. Find out more HERE.
Thanks for stopping by today, and Sweet Stamping!
